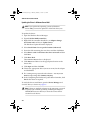
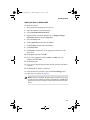
1
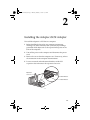
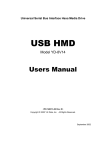
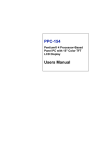
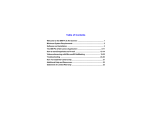
ASA-7211 IG.book Page 1 Monday, February 2, 2004 10:33 AM
INSTALLATION GUIDE
ASA-7211C/F iSCSI ADAPTER
FOR INITIATOR APPLICATIONS
ASA-7211 IG.book Page ii Monday, February 2, 2004 10:33 AM
Copyright
©2002 – 2004 Adaptec, Inc. All rights reserved. No part of this publication may be
reproduced, stored in a retrieval system, or transmitted in any form or by any
means, electronic, mechanical, photocopying, recording or otherwise, without the
prior written consent of Adaptec, Inc., 691 South Milpitas Blvd., Milpitas, CA 95035.
Trademarks
Adaptec, the Adaptec logo, and ASA are trademarks of Adaptec, Inc., which may be
registered in some jurisdictions.
Windows NT and Windows 2000 are trademarks of Microsoft Corporation in the US
and other countries, used under license.
All other trademarks are the property of their respective owners.
Changes
The material in this document is for information only and is subject to change
without notice. While reasonable efforts have been made in the preparation of this
document to assure its accuracy, Adaptec, Inc. assumes no liability resulting from
errors or omissions in this document, or from the use of the information contained
herein.
Adaptec reserves the right to make changes in the product design without
reservation and without notification to its users.
Disclaimer
IF THIS PRODUCT DIRECTS YOU TO COPY MATERIALS, YOU MUST HAVE
PERMISSION FROM THE COPYRIGHT OWNER OF THE MATERIALS TO AVOID
VIOLATING THE LAW WHICH COULD RESULT IN DAMAGES OR OTHER
REMEDIES.
ii
ASA-7211 IG.book Page iii Monday, February 2, 2004 10:33 AM
Regulatory Compliance Statements
Federal Communications Commission Radio Frequency Interference Statement
WARNING: Changes or modifications to this unit not expressly approved by the party
responsible for compliance could void the user’s authority to operate the equipment.
This equipment has been tested and found to comply with the limits for a Class B digital device,
pursuant to Part 15 of the FCC rules. These limits are designed to provide reasonable protection
against harmful interference in a residential installation. This equipment generates, uses, and
can radiate radio frequency energy, and if not installed and used in accordance with the
instruction manual, may cause harmful interference to radio communications. However, there is
no guarantee that interference will not occur in a particular installation. However, if this
equipment does cause interference to radio or television equipment reception, which can be
determined by turning the equipment off and on, the user is encouraged to try to correct the
interference by one or more of the following measures:
■ Reorient or relocate the receiving antenna.
■ Increase the separation between equipment and receiver.
■ Connect the equipment to an outlet on a circuit different from that to which the receiver is
connected.
■ Consult the dealer or an experienced radio/television technician for help.
■ Use a shielded and properly grounded I/O cable and power cable to ensure compliance of
this unit to the specified limits of the rules.
This device complies with part 15 of the FCC rules. Operation is subject to the following two
conditions: (1) this device may not cause harmful interference and (2) this device must accept
any interference received, including interference that may cause undesired operation.
Adaptec, Inc.
ASA-7211C
ASA-7211F
Tested to Comply
With FCC Standards
FOR HOME OR OFFICE USE
European Union Compliance Statement
This Information Technology Equipment has been tested and found to comply with
EMC Directive 89/336/EEC, as amended by 92/31/EEC and 93/68/EEC, in
accordance with:
■ EN55022 (1998) Emissions
■ EN55024 (1998) Immunity:
–
–
–
–
–
–
EN61000-4-2 (1998) Electrostatic discharge: ±4 kV contact, ±8 kV air
EN61000-4-3 (1998) Radiated immunity
EN61000-4-4 (1995) Electrical fast transients/burst: ±1 kV AC, ±0.5 kV I/O
EN61000-4-5 (1995) Surges ±1 kV differential mode, ±2 kV common mode
EN61000-4-6 (1996) Conducted immunity: 3 V
EN61000-4-11 (1994) Supply dips and variation: 30% and 100%
In addition, all equipment requiring U.L. listing has been found to comply with EMC
Directive 73/23/EEC as amended by 93/68/EEC in accordance with EN60950 with
amendments A1, A2, A3, A4, A11.
Australian/New Zealand Compliance Statement
This device has been tested and found to comply with the limits for a Class B digital
device, pursuant to the Australian/New Zealand standard AS/NZS 3548 set out by
the Spectrum Management Agency.
iii
ASA-7211 IG.book Page iv Monday, February 2, 2004 10:33 AM
Canadian Compliance Statement
This Class B digital apparatus meets all requirements of the Canadian InterferenceCausing Equipment Regulations.
Cet appareil numérique de la classe B respecte toutes les exigences du Règlement sur
le matériel brouilleur du Canada.
Japanese Compliance (Voluntary Control Council Initiative)
This equipment complies to class B Information Technology equipment based on
VCCI (Voluntary Control Council for Interface). This equipment is designed for home
use but it may causes radio frequency interference problem if used too near to a
television or radio. Please handle it correctly per this documentation.
iv
ASA-7211 IG.book Page v Monday, February 2, 2004 10:33 AM
Contents
1
Introduction
Kit Contents 1-2
Adaptec iSCSI Adapter Features 1-2
Adapter Illustrations 1-3
Installation Overview 1-4
System Requirements 1-5
Hardware Requirements 1-5
Supported iSCSI targets 1-5
Operating System Requirements 1-5
Using the Adaptec iSCSI Installation CD 1-6
Configuration Management Utilities Overview
About the Documentation 1-7
1-6
2
Installing the Adaptec iSCSI Adapter
3
Installing the Driver in Existing Systems
Installing the Windows Driver 3-2
Installing the Driver in Windows Server 2003 3-2
Installing the Driver in Windows 2000 3-4
Installing the Driver in Windows NT 4.0 3-6
Installing the Linux Module 3-7
Installing the Module Using the RPM Package 3-7
Installing to the Module Using the .tar.gz Package 3-9
v
ASA-7211 IG.book Page vi Monday, February 2, 2004 10:33 AM
ASA-7211C/F Installation Guide
4
Creating an iSCSI-Bootable System
Configuring the iSCSI Adapter BIOS 4-2
Overview 4-2
Using the iSCSISelect Utility 4-2
Installing the Driver with Windows 4-4
Creating a Driver Floppy Disk 4-4
Installing the OS and Driver 4-4
Installing the Module with Linux 4-5
Creating a Module Floppy Disk 4-5
Installing the OS and Module 4-6
5
Configuring the iSCSI System
Using the iSCSI Configuration Manager – Windows only 5-1
Using the Express Setup Wizard 5-2
Using the iConfig Utility – Linux only 5-5
Installing and Running the iConfig Utility 5-5
Using Express Setup to Configure the iSCSI Adapter 5-6
Changing the iConfig Password 5-7
Configuration Tasks 5-7
A
Updating the Driver
Updating the Windows Driver A-1
Updating the Driver in Windows Server 2003 A-2
Updating the Driver in Windows 2000 A-3
Updating the Driver in Windows NT 4.0 A-4
Updating the Linux Module A-5
B
vi
LEDs
ASA-7211 IG.book Page 1 Monday, February 2, 2004 10:33 AM
1
Introduction
In this Chapter...
Kit Contents
1-2
Adaptec iSCSI Adapter Features
1-2
Adapter Illustrations
1-3
Installation Overview
1-4
System Requirements
1-5
Using the Adaptec iSCSI Installation CD
1-6
Configuration Management Utilities Overview
1-6
About the Documentation
1-7
The Adaptec® Storage Accelerator (ASA) 7211 iSCSI storage adapter is
a PCI Host Bus Adapter (HBA) that enables servers and storage
systems to be used in iSCSI SANs using an Ethernet interconnect. The
adapter provides efficient, high-performance TCP/IP and iSCSI
protocol offload, with throughput up to 2 Gigabits/sec at full duplex.
1-1
ASA-7211 IG.book Page 2 Monday, February 2, 2004 10:33 AM
ASA-7211C/F Installation Guide
Kit Contents
The Adaptec iSCSI kit includes:
■
ASA-7211 adapter card, shown on page 1-3.
■
Adaptec iSCSI installation CD containing:
■
■
Operating system drivers
■
Configuration management utilities
■
SNMP extension agents
■
Readme files
■
The iConfig Utility for Linux User’s Guide in PDF format
■
This Installation Guide in PDF format
This Installation Guide as a printed document.
Note: You need a copper (CAT 5 or CAT 6), or fiber, Ethernet
cable. The cable is not included in the kit.
Adaptec iSCSI Adapter Features
The Adaptec iSCSI adapter features are summarized below:
■
PCI compatible:
■
compatible with 3.3/5-V, 32/64-bit, 33/66-MHz slots
Available in two connector configurations:
■ ASA-7211C—Copper connector
■ ASA-7211F—Fiber connector
Full iSCSI and TCP/IP protocol processing
Supports flashable firmware upgrades
■
■
■
■
1-2
PCI 2.2 compliant
ASA-7211 IG.book Page 3 Monday, February 2, 2004 10:33 AM
Introduction
Adapter Illustrations
The Adaptec iSCSI adapters are illustrated below. Note the
difference in external connectors. One adapter has a copper
connector; the other, a fiber connector.
For LED
details, see
Appendix B,
LEDs
J4
Copper
connector
J5
ASA-7211C Adapter Card
For LED
details, see
Appendix B,
LEDs
J4
J5
Fiber
connector
ASA-7211F Adapter Card
Note: Some ASA-7211 adapters are manufactured with
jumpers “hanging,” but not installed, on jumper connectors J4
and J5. Do not install these jumpers.
1-3
ASA-7211 IG.book Page 4 Monday, February 2, 2004 10:33 AM
ASA-7211C/F Installation Guide
Installation Overview
The following steps provide an overview of the process of
installing and configuring the ASA-7211 adapter:
Note: If you already have an iSCSI adapter installed in the
computer and you wish to update the driver, proceed directly
to Appendix A.
1 Verify that the computer meets the requirements described in
System Requirements on page 1-5.
2 Gain familiarity with the contents of the Adaptec iSCSI
installation CD. Read the Readme files for installation and
compatibilities issues.
3 Install the Adaptec iSCSI adapter as described in Chapter 2.
4 Connect Ethernet cables with the appropriate connector type
(either copper or fiber) between the adapter, switches (if any),
and targets.
Note: You need a copper (CAT 5 or CAT 6), or fiber,
Ethernet cable. The cable is not included in the kit.
5 Installing the driver for nonbootable adapters—If your
operating system is already installed and you are adding the
iSCSI adapter for additional storage capabilities, install the
appropriate driver for the operating system as described in
Chapter 3.
Creating an iSCSI bootable system—If you are building a new
system and wish to boot from an iSCSI target, skip Chapter 3
and proceed to Chapter 4.
6 Run the configuration management utility to configure the
network, as described in Chapter 5, Configuring the iSCSI System.
1-4
ASA-7211 IG.book Page 5 Monday, February 2, 2004 10:33 AM
Introduction
System Requirements
The following system requirements are discussed:
■
Hardware requirements
■
Supported iSCSI targets
■
Operating system requirements
Hardware Requirements
The computer must meet the following requirements:
■
Intel Pentium or equivalent processor
■
An available PCI slot
■
At least 128 MB of RAM
■
CD-ROM drive
■
Copper (CAT 5 or CAT 6), or fiber, Ethernet cable. (Not
included. Visit www.adaptec.com for cables.)
Supported iSCSI targets
For the latest support information, refer to www.adaptec.com.
Operating System Requirements
The computer must have one of the following compatible
operating systems:
Windows
■
Windows Server 2003:
■
Standard Edition
■
Enterprise Edition
■
Web Edition
Note: Windows Server 2003 only—The adapter currently does
not support the Datacenter Edition. For updated OS support
information, visit www.adaptec.com.
■
Windows 2000 Server and Advanced Server with Service Pack 4
■
Windows NT 4.0 Server and Enterprise Edition with Service Pack 6a
1-5
ASA-7211 IG.book Page 6 Monday, February 2, 2004 10:33 AM
ASA-7211C/F Installation Guide
Linux
The following Linux versions are supported:
■
Red Hat Version 9.0
■
Red Hat Advanced Server 2.1
■
SuSE Version 8.2 Professional
■
SuSE Enterprise Server 8.0
Using the Adaptec iSCSI Installation CD
The Adaptec iSCSI installation CD contains the device drivers,
configuration management software, user documentation, and
SNMP extensions for the Adaptec iSCSI adapter.
You can directly access directories and files on the Adaptec iSCSI
installation CD. These include:
■
Documentation—Contains the Readme text files and PDF files.
See About the Documentation on page 1-7 for details.
■
Drivers—Provided for each supported operating system.
■
Configuration Management Software—See Configuration
Management Utilities Overview.
■
Adaptec SNMP Extension Agents—Provides Windows and
Linux SNMP extension agents for simple network management.
For details, see the Readme text file in the folder or directory for
the operating system.
Configuration Management Utilities Overview
The configuration management software is used to monitor
connections, display statistics and event logs, and add and delete
targets. The user interface for the utility and the method of
installation depends on the operating system:
■
Windows iSCSI Configuration Manager—Features a
Graphical User Interface (GUI) with online Help. You install
this utility automatically when you install the driver. See
Chapter 3, Installing the Driver in Existing Systems.
■
Linux iConfig Utility—Text-based user interface. See the
iConfig Utility User’s Guide for instructions. You install this
utility by copying the executable from the Adaptec iSCSI
1-6
ASA-7211 IG.book Page 7 Monday, February 2, 2004 10:33 AM
Introduction
installation CD to the hard drive. See Installing and Running the
iConfig Utility on page 5-5.
About the Documentation
The Adaptec iSCSI installation CD provides the following
documentation files:
■
Readme.txt—The generic Readme text file in the top-level of the
CD file structure summarizes the contents of the installation CD.
■
Windows—Located in the Windows folder.
■
Linux—Located in the Linux folder.
These files contain the latest information about the Adaptec
iSCSI adapter, important technical information about device
compatibility, operating system support, and drivers.
Visit www.adaptec.com for the latest updates.
Visit ask.adaptec.com for the latest troubleshooting tips for the
adapter, driver, or configuration management utility.
■
ASA-7211 iSCSI Adapter Installation Guide (This book)—
Describes how to install the Adaptec iSCSI adapter, install the driver,
and get started using the configuration management software.
Browse to the Documentation folder on the CD.
■
iSCSI Configuration Manager for Windows Online Help—
iSCSI Configuration Manager for Windows contains a complete
online Help system.
■
iConfig Utility for Linux User’s Guide—Describes how to monitor
the connections, display MIB statistics and event logs, and add and
delete targets. Also contains customer support and warranty
information. Browse to the Documentation folder on the CD.
To view and print the PDF files, you will need Adobe’s Acrobat
Reader or Viewer software installed on the system. Acrobat is
available from Adobe as a free download. For details, visit
www.adobe.com.
1-7
ASA-7211 IG.book Page 1 Monday, February 2, 2004 10:33 AM
2
Installing the Adaptec iSCSI Adapter
To install the adapter in a PCI slot in a computer:
1 Before handling the board or any computer components,
discharge any static electricity from your body by touching a
grounded metal object such as the exposed metal parts on the
back of the computer.
2 Turn off the power to the computer and disconnect the power
cord.
3 Remove the cover from the computer case. If necessary, refer to
the instructions in the computer documentation.
4 Locate an unused and unobstructed 64-bit or 32-bit PCI
expansion slot and remove the expansion slot cover.
Expansion
slot cover
32-bit PCI slot
64-bit PCI slot
2-1
ASA-7211 IG.book Page 2 Monday, February 2, 2004 10:33 AM
ASA-7211C/F Installation Guide
5 Insert the adapter in the PCI expansion slot. Press the board
firmly into the slot until it clicks into place.
Note: Some ASA-7211 adapters are manufactured with
jumpers “hanging,” but not installed, on jumper
connectors J4 and J5. Do not install these jumpers.
6 Close the computer cabinet and reattach the power cord.
7 Connect Ethernet cables with the appropriate connector type
(either copper or fiber) between the adapter, switches (if any),
and targets.
Note: You need a copper (CAT 5 or CAT 6), or fiber,
Ethernet cable. The cable is not included in the kit.
Next, proceed to Chapter 3 to install the driver in an existing
system or Chapter 4 to create an iSCSI bootable system.
2-2
ASA-7211 IG.book Page 1 Monday, February 2, 2004 10:33 AM
3
Installing the Driver in
Existing Systems
In this Chapter...
Installing the Windows Driver
3-2
Installing the Linux Module
3-7
Now that you have installed the adapter in the computer and
connected the Ethernet cables, you are ready to install the driver.
When you are finished installing the driver, proceed to Chapter 5,
Configuring the iSCSI System.
Note: If you already have an iSCSI adapter installed in the
computer and you wish to update the driver, see Appendix A.
3-1
ASA-7211 IG.book Page 2 Monday, February 2, 2004 10:33 AM
ASA-7211C/F Installation Guide
Installing the Windows Driver
This section contains the following procedures:
■
Installing the Driver in Windows Server 2003
■
Installing the Driver in Windows 2000
■
Installing the Driver in Windows NT 4.0
Installing the Driver in Windows Server 2003
To install the driver:
1
Install the Adaptec iSCSI adapter according to the instructions
in Chapter 2.
2
Start Windows and log in with administrative privileges.
The Windows Found New Hardware Wizard automatically
detects the new hardware.
The adapter is identified as a Mass Storage Controller. Later, it
will be listed under the SCSI and RAID Controllers device group
in the Device Manager.
3
Select Install from a list or specific location (Advanced).
4
Insert the Adaptec installation CD and then click Next.
5
Select Search for the best driver in these locations and select
Include this location in the search. Deselect Search removable
media.
6
Click Browse and locate the Win2003 driver folder on the CD.
7
Click Open and then click OK.
8
If a warning message states that the software ...has not passed
Windows Logo testing, click Continue Anyway.
9
On the Completing the Found New Hardware Wizard window,
click Finish.
When the driver installation is finished, the Found New
Hardware Wizard window is displayed a second time,
requesting that you install the Adaptec ASAMGMT Processor
Device.
10 Select Install from a list or specific location (Advanced) and
click Next.
3-2
ASA-7211 IG.book Page 3 Monday, February 2, 2004 10:33 AM
Installing the Driver in Existing Systems
11 Select Search for the best driver in these locations and select
Include this location in the search. Deselect Search removable
media.
12 Click Browse and locate the Win2003 driver folder on the
installation CD and then click Next.
13 If a warning message states that the software ...has not passed
Windows Logo testing, click Continue Anyway.
14 On the Completing the Found New Hardware Wizard window,
click Finish.
The driver has been installed. The system does not require
rebooting. To verify the driver installation, open the Device
Manager and view the driver, as shown below.
ASA-7211 adapter
When you are finished installing the driver, proceed to Chapter 5,
Configuring the iSCSI System.
3-3
ASA-7211 IG.book Page 4 Monday, February 2, 2004 10:33 AM
ASA-7211C/F Installation Guide
Installing the Driver in Windows 2000
To install the driver:
1
Install the Adaptec iSCSI adapter according to the instructions
in Chapter 2.
2
Start Windows and log in with administrative privileges.
The Windows Found New Hardware Wizard automatically
detects the new hardware.
The adapter is identified as a Mass Storage Controller. Later, it
will be listed under the SCSI and RAID Controllers device group
in the Device Manager.
3
Click Next.
4
Select Search for a suitable driver for my device (recommended)
and then click Next.
5
In the Locate Driver Files window, select Specify a location.
6
Insert the Adaptec installation CD and then click Next.
7
Click Browse and locate the Win2000 driver folder on the CD.
8
Click Open and then click OK.
9
In the Driver Files Search Results window, select Next and
follow the on-screen instructions to install the driver.
10 If the Digital Signature Not Found window is displayed, click
Yes to continue.
11 In the Completing the Found New Hardware Wizard window,
click Finish.
12 After the driver installation is finished, the Found New
Hardware Wizard window displays a second time, requesting
that you install the Adaptec ASAMGMT Processor Device.
Click Yes.
3-4
ASA-7211 IG.book Page 5 Monday, February 2, 2004 10:33 AM
Installing the Driver in Existing Systems
The driver has been installed. The system does not require
rebooting. To verify the driver installation, open the Device
Manager and view the driver, as shown below.
ASA-7211 adapter
When you are finished installing the driver, proceed to Chapter 5,
Configuring the iSCSI System.
3-5
ASA-7211 IG.book Page 6 Monday, February 2, 2004 10:33 AM
ASA-7211C/F Installation Guide
Installing the Driver in Windows NT 4.0
To install the driver:
1
Install the Adaptec iSCSI adapter according to the instructions
in Chapter 2.
2
Start Windows and log in with administrative privileges.
3
Insert the Adaptec installation CD.
4
Open the Windows Control Panel.
5
Double-click SCSI Adapters.
6
Click the Drivers tab.
7
Click Add, and then click Have Disk.
8
Click Browse and then browse to WinNT40 driver folder on the
installation CD.
9
Click Open, and then click OK.
10 Click Adaptec Storage Accelerator 7211 (NT 4.0).
11 Click OK and follow all Windows instructions. Windows will
prompt you to reboot the computer.
When you are finished installing the module, proceed to Chapter 5,
Configuring the iSCSI System.
3-6
ASA-7211 IG.book Page 7 Monday, February 2, 2004 10:33 AM
Installing the Driver in Existing Systems
Installing the Linux Module
This section contains the following procedures:
■
Installing the Module Using the RPM Package
■
Installing to the Module Using the .tar.gz Package
For additional Linux functionality, such as enabling multiLUN
support in Red Hat or dynamically adding and removing devices,
refer to the Linux Readme file located on the CD inside the RPM
file.
Installing the Module Using the RPM Package
To install the module:
1
Mount the Adaptec installation CD:
for Red Hat mount /dev/cdrom /mnt/cdrom
for SuSE
2
mount /dev/cdrom /media/cdrom
Change to the cdrom directory:
for Red Hat cd /mnt/cdrom/Linux
for SuSE
3
cd /media/cdrom/Linux
Extract the RPM package and install it:
rpm -Uhv asa72xx.rpm
4
Change to the following directory:
cd /usr/src/asa72xx
5
Unmount the Adaptec installation CD:
for Red Hat umount /mnt/cdrom
for SuSE
6
umount /media/cdrom
SuSE only—
a Update the configuration file:
cp /boot/vmlinuz.config /usr/src/linux/.config
cd /usr/src/linux
make menuconfig
b Exit and save changes.
c Change directory:
cd /usr/src/asa72xx
3-7
ASA-7211 IG.book Page 8 Monday, February 2, 2004 10:33 AM
ASA-7211C/F Installation Guide
7
Run the configure script:
./configure
If the kernel source is not in /usr/src/linux-2.4, run the
configure script using the tree option:
./configure --tree=<path to source tree>
For example, the following commands work:
Red Hat
./configure --tree=/usr/src/linux-2.4
SuSE Enterprise Server 8.0 ./configure --tree=/usr/src/linux-2.4.19.SuSE
SuSE 8.2 Professional
./configure --tree=/usr/src/linux-2.4.20.SuSE
8
Build the ASA72XX module:
make
9
You can load the ASA72XX module automatically or manually.
■
To load the ASA72XX module automatically:
make install
/etc/init.d/asa72xx start
The ASA72XX module is copied to /lib/modules/
kernel_version. Linux loads the module when booting.
■
To load the ASA72XX module manually:
insmod asa72xx.o
10 Optional—Verify that the module is loaded:
lsmod
If the module is loaded, the module table list displays asa72xx.
11 Check the build version of the module:
rpm -qi asa72xx
When you are finished installing the module, proceed to Chapter 5,
Configuring the iSCSI System.
3-8
ASA-7211 IG.book Page 9 Monday, February 2, 2004 10:33 AM
Installing the Driver in Existing Systems
Installing to the Module Using the .tar.gz Package
To install the module:
1
Mount the Adaptec installation CD:
for Red Hat mount /dev/cdrom /mnt/cdrom
for SuSE
2
mount /dev/cdrom /media/cdrom
Change to the cdrom directory:
for Red Hat cd /mnt/cdrom/Linux
for SuSE
3
cd /media/cdrom/Linux
Create the ASA72XX directory under /usr/src:
mkdir -p /usr/src/asa72xx
4
Copy the .tar.gz package to /usr/src/asa72xx:
cp -v asa72xx.tar.gz /usr/src/asa72xx
5
Change to the /usr/src/asa72xx directory:
cd /usr/src/asa72xx
6
Unmount the Adaptec installation CD:
for Red Hat umount /mnt/cdrom
for SuSE
7
umount /media/cdrom
Extract the .tar.gz package:
tar -zxvf asa72xx.tar.gz
8
SuSE only—
a Update the configuration file:
cp /boot/vmlinuz.config /usr/src/linux/.config
cd /usr/src/linux
make menuconfig
b Exit and save changes.
c Change directory:
cd /usr/src/asa72xx
3-9
ASA-7211 IG.book Page 10 Monday, February 2, 2004 10:33 AM
ASA-7211C/F Installation Guide
9
Run the configure script:
./configure
If the kernel source is not in /usr/src/linux-2.4, run the
configure script using the tree option:
./configure --tree=<path to source tree>
For example, the following commands work:
Red Hat
./configure --tree=/usr/src/linux-2.4
SuSE Enterprise Server 8.0 ./configure --tree=/usr/src/linux-2.4.19.SuSE
SuSE 8.2 Professional
./configure --tree=/usr/src/linux-2.4.20.SuSE
10 Build the ASA72XX module:
make
11 You can load the ASA72XX module automatically or manually.
■
To load the ASA72XX module automatically:
make install
/etc/init.d/asa72xx start
The ASA72XX module is copied to /lib/modules/
kernel_version. Linux loads the module when booting.
■
To load the module manually:
insmod asa72xx.o
12 Verify that the ASA72XX module is loaded:
lsmod
If the module is loaded, the module table list displays asa72xx.
When you are finished installing the module, proceed to Chapter 5,
Configuring the iSCSI System.
3-10
ASA-7211 IG.book Page 1 Monday, February 2, 2004 10:33 AM
4
Creating an iSCSI-Bootable
System
In this Chapter...
Configuring the iSCSI Adapter BIOS
4-2
Installing the Driver with Windows
4-4
Installing the Module with Linux
4-5
Now that you have installed the adapter in the computer and
connected the Ethernet cables, you are ready to install your
operating system and iSCSI driver so that the system boots from an
iSCSI target.
Before you begin, you need to know the following facts about your
network:
■
Target IP address (for at least the bootable target)
■
Initiator iSCSI name (if different from the default), IP address,
and subnet mask
In addition, you need to verify that the targets are configured to
recognize the initiator iSCSI name.
4-1
ASA-7211 IG.book Page 2 Monday, February 2, 2004 10:33 AM
ASA-7211C/F Installation Guide
Configuring the iSCSI Adapter BIOS
Overview
Configuring the BIOS involves the following tasks:
1 Optional—Configure the initiator by entering the iSCSI initiator
name (iqn name), initiator IP address, and initiator subnet
mask.
2 Configure a single bootable target by entering the iSCSI portal
name (iSCSI) and target IP address and making the target bootable.
3 Rescan to make the target visible.
4 Rescan again to the establish connectivity between the initiator
and the target.
5 Set target login and availability parameters.
This section discusses only how to configure a bootable target. If
you need to configure any nonbootable targets, proceed with the
driver and operating system installation, then use:
■
iSCSI Configuration Manager (for Windows). Refer to the
online Help.
■
iConfig utility (for Linux). Refer to the iConfig Utility for Linux
User’s Guide.
Using the iSCSISelect Utility
To use the iSCSISelect utility to configure the iSCSI adapter BIOS
and add a single bootable target:
1 Start the system, then press Ctrl-A when prompted to start the
iSCSISelect utility.
2 Select Adapter Configuration > Controller Configuration and
press Enter. Then, accept the default (recommended) or type a
different iSCSI initiator name.
Note: Verify that the initiator iSCSI name (iqn name)
chosen is listed in the target’s ACL (Access Control List).
3
4
5
4-2
Save settings.
Select Adapter Configuration > Network Configuration. Type
the initiator IP address and the subnet mask.
Save settings and press Esc to return to the main menu.
ASA-7211 IG.book Page 3 Monday, February 2, 2004 10:33 AM
Creating an iSCSI-Bootable System
6
To create a single boot target entry, select Target Configuration >
Add Targets and press Enter.
a For the target name, choose one of the following:
■ Type iSCSI as the target portal name. (recommended)
■ Leave blank, and the utility automatically uses iSCSI.
■ Enter the full iqn name.
b Specify an IP address for the target.
c Use the default for the port number, 3260, and verify that
Available after reboot is Yes.
7
Save settings.
8
Select Target Configuration > Rescan Targets and press Enter
to make the target you added in Step 6 visible in Step 9.
9
Select Target Configuration > Manage Targets > Available
Targets and press Enter.
10 Press Enter again to display target properties.
11 Select Yes for Available After Reboot and Target Login.
12 Save settings.
13 Press Esc twice to return to the Target Menu.
14 Select Target Configuration > Boot Targets and press Enter.
15 Select the target you want to make bootable, and press F4.
List of Boot LUNs is displayed.
16 Verify that the LUN you want to make bootable is listed first in
the boot order. If not, change the boot order accordingly.
Note: If the bootable target has multiple LUNs, only ONE
of the LUNs is actually bootable. The adapter
automatically uses the LUN listed first in the boot order.
17 Press Esc, then Y to save the boot order.
18 Press Esc three times, then Y when prompted to exit
iSCSISelect.
The computer will automatically restart.
4-3
ASA-7211 IG.book Page 4 Monday, February 2, 2004 10:33 AM
ASA-7211C/F Installation Guide
Installing the Driver with Windows
To install the driver during a fresh install of the operating system,
you need to perform the following procedures:
■
Creating a Driver Floppy Disk
■
Installing the OS and Driver
Creating a Driver Floppy Disk
Note: To create a driver floppy disk, you need a separate
computer with a functioning Windows operating system.
To create the driver disk:
1
Insert a formatted, blank floppy disk.
2
Browse to the appropriate directory for the operating system
you intend to install, one of the following:
3
■
\Windows\Win2003\disk
■
\Windows\Win2000\disk
■
\Windows\WinNT40\disk
Click the self-extracting Winxxxx.exe file and extract the files to
the floppy disk.
Installing the OS and Driver
1
Insert the Windows setup CD and restart the system to begin
the Windows installation.
2
When prompted to install a third-party driver, press F6.
3
Insert the driver floppy disk you created in Creating a Driver
Floppy Disk and wait until prompted to install a driver. Press S
to specify that the driver is on the installation floppy disk, and
then press Enter. The computer reads the disk.
The Adaptec driver for your operating system, one of the
following, is listed:
■
■
■
4
4-4
Adaptec Windows Server 2003 1Gb iSCSI Miniport Driver
Adaptec Windows 2000 1Gb iSCSI Miniport Driver
Adaptec Windows NT 4.0 1Gb iSCSI Miniport Driver
Press Enter.
ASA-7211 IG.book Page 5 Monday, February 2, 2004 10:33 AM
Creating an iSCSI-Bootable System
5
Proceed with the Windows installation, responding to prompts
and instructions as needed.
Installing the Module with Linux
To install the driver while installing a fresh operating system, you
need to perform the following procedures:
■
Creating a Module Floppy Disk
■
Installing the OS and Module
For additional Linux functionality, such as enabling multiLUN
support in Red Hat or dynamically adding and removing devices,
refer to the Linux Readme file located on the CD.
Creating a Module Floppy Disk
Note: To create a module floppy disk, you need a separate
computer with a functioning Linux operating system.
To create the driver disk:
1
Insert a blank, formatted floppy disk.
2
Mount the Adaptec installation CD:
for Red Hat mount /dev/cdrom /mnt/cdrom
for SuSE
3
mount /dev/cdrom /media/cdrom
Change to the cdrom directory:
for Red Hat cd /mnt/cdrom/Linux/RedHat9_AS21/disk
for SuSE
cd /media/cdrom/Linux/SuSE82_Enterprise/disk
Then type:
for Red Hat dd if=RedHat9_AS21.img of=/dev/fd0
for SuSE
dd if=SuSE82_Ent.img of=/dev/fd0
4-5
ASA-7211 IG.book Page 6 Monday, February 2, 2004 10:33 AM
ASA-7211C/F Installation Guide
Installing the OS and Module
1
Restart the computer and boot from the Linux installation CD.
2
For Red Hat—Insert the driver floppy disk you created in
Creating a Module Floppy Disk, type expert, then press Enter.
For SuSE Version 8.2 Professional—Press F3, then press Enter.
Then, insert the driver floppy disk you created in Creating a
Module Floppy Disk when prompted.
For SuSE Enterprise Server 8.0—Press Ctrl + Alt, and then press
Enter. Then, insert the driver floppy disk you created in
Creating a Module Floppy Disk when prompted.
3
Complete the Linux installation.
4
Log in and verify that ASA72XX module is loaded:
lsmod
If the module is loaded, the module table list displays asa72xx.
4-6
ASA-7211 IG.book Page 1 Monday, February 2, 2004 10:33 AM
5
Configuring the iSCSI
System
In this Chapter
Using the iSCSI Configuration Manager – Windows only
5-1
Using the iConfig Utility – Linux only
5-5
Now that you have installed the Adaptec iSCSI adapter, Ethernet
cables, and driver, you need to run the configuration management
software to configure the iSCSI system.
Using the iSCSI Configuration Manager – Windows only
To start the Adaptec iSCSI Configuration Manager, open the
Control Panel and select Adaptec iSCSI Configuration Manager.
If you are starting the iSCSI Configuration Manager for the first
time, the Express Setup wizard starts automatically, and assists you
in configuring your initiator and discovering targets, as described
in Using the Express Setup Wizard on page 5-2.
For additional instructions on using the iSCSI Configuration
Manager, click Help.
5-1
ASA-7211 IG.book Page 2 Monday, February 2, 2004 10:33 AM
ASA-7211C/F Installation Guide
Using the Express Setup Wizard
This section describes the Express Setup wizard, which starts
automatically when you start the iSCSI Configuration Manager for
the first time. Express Setup assists you in configuring your
initiator and discovering targets.
Before you begin, you need to know the following facts about your
network:
■
Target IP address (for at least the bootable target)
■
Initiator iSCSI name (if different from the default), IP address,
and subnet mask
In addition, you need to verify that the targets are configured to
recognize the initiator iSCSI name.
The procedure for using the Express Setup wizard is as follows:
1
Open the Control Panel and select Adaptec iSCSI
Configuration Manager.
You are prompted to enter a configuration file name or proceed
with Express Setup. If you choose to proceed with Express
Setup, you are prompted to choose an initiator iSCSI name, as
shown below.
5-2
ASA-7211 IG.book Page 3 Monday, February 2, 2004 10:33 AM
Configuring the iSCSI System
2 Choose an initiator iSCSI name. Adaptec recommends that you
apply the default name. However, you can assign your own
iSCSI name to the adapter if you uncheck Apply Default iSCSI
Name and enter your own unique iSCSI name. Click Next to
continue.
3 Select Enable DHCP if your network supports it, or manually
assign a static IP address, subnet mask, and gateway IP address.
Click Next to continue.
4 Enter the IP address of your DNS (Domain Name Server). If
you do not have one, leave the field blank and click Next to
continue.
5-3
ASA-7211 IG.book Page 4 Monday, February 2, 2004 10:33 AM
ASA-7211C/F Installation Guide
5 Select the method for target discovery, then click Next.
6 If you are satisfied with your configuration settings, click
Finish. Otherwise, click Back to edit the appropriate
configuration settings.
5-4
ASA-7211 IG.book Page 5 Monday, February 2, 2004 10:33 AM
Configuring the iSCSI System
Using the iConfig Utility – Linux only
iConfig has an easy-to-use Express Setup that prompts you for the
information the system needs to be configured the first time.
Once the system is setup, you can use iConfig to view, change, or
upgrade the configuration. For example, you can monitor the
connections, display MIB statistics and event logs, and add and
delete targets.
The following instructions are provided:
■
Installing and Running the iConfig Utility on page 5-5
■
Using Express Setup to Configure the iSCSI Adapter on page 5-6
■
Changing the iConfig Password on page 5-7
■
Configuration Tasks on page 5-7
Installing and Running the iConfig Utility
To install and run iConfig on Red Hat:
1 Login as root.
2 To mount the Adaptec installation CD, type:
for Red Hat mount /dev/cdrom /mnt/cdrom
for SuSE
mount /dev/cdrom /media/cdrom
3 To change to the Linux directory on the CD, type:
for Red Hat cd /mnt/cdrom/Linux/RedHat9_AS21/config_utility
for SuSE
cd /media/cdrom/Linux/SuSE82_Enterprise/config_utility
4 To copy the utility to the local hard drive, type:
cp -v iconfig /sbin
5 Enter iconfig
6 At the login prompt, type the default user ID, admin
7 At the password prompt, type the default password, adaptec
The iConfig Express Setup instructions are displayed.
Now that you have started iConfig, proceed to Using Express Setup
to Configure the iSCSI Adapter on page 5-6.
5-5
ASA-7211 IG.book Page 6 Monday, February 2, 2004 10:33 AM
ASA-7211C/F Installation Guide
Using Express Setup to Configure the iSCSI Adapter
Now that you have started iConfig, you are ready to run iConfig
Express Setup to configure the adapter (initiator).
Note: In any menu, press Esc to get back to the previous menu.
When you run iConfig for the first time, Express Setup starts
automatically, and you are prompted to type the following
information for the initiator:
■
IP address
■
Subnet mask
■
Gateway address
■
iSCSI initiator name
Now that the initiator is configured, you can choose from these
options:
■
Allow iConfig to discover targets automatically—iConfig
locates and configures targets and displays target information.
■
Enter target information manually—You are prompted to type
the following information for each target:
■
Target DNS name or IP address
■
Port number
■
iSCSI target name
After you enter this information, save the settings. The Main Menu
is displayed as shown below.
5-6
ASA-7211 IG.book Page 7 Monday, February 2, 2004 10:33 AM
Configuring the iSCSI System
Changing the iConfig Password
The default user ID is admin. The default password is adaptec. To
change the default password:
1 From the Main Menu, select User Logout and Login Password.
For details, see the Main Menu illustration on page 5-6.
2 Select Changing the Password.
3 To complete the change, follow the iConfig instructions.
Configuration Tasks
The following table summarizes the configuration tasks you can
perform using iConfig. The menu options all appear in the Main
Menu illustration on page 5-6.
To perform this task...
Use this Menu Option...
➣
View controller and target info
➣
1. Display Properties
➣
View and set controller, Ethernet,
SLP, and ISNS properties.
View and set login parameters.
➣
2. Setup Properties
➣
View, add, edit, delete, log in, log
out, and rescan targets.
➣
3. Device and Targets
➣
View, add, and delete routing,
DNS, ARP, and Host table entries.
➣
4. Routing, DNS, and ARP
➣
View port transmission statistics,
event messages, initiator login,
iSCSI session statistics and iSCSI
node portal info.
➣
5. Statistics, MIB, and Event Log
➣
Erase or save ROM settings.
Upgrade firmware.
➣
6. Firmware and ROM
Log out.
Change your password.
➣
➣
7. User Logout and Login
Password
➣
Save settings.
➣
8. Immediate Save Settings
➣
➣
➣
For additional information, refer to the iConfig Utility User’s Guide.
5-7
ASA-7211 IG.book Page 1 Monday, February 2, 2004 10:33 AM
A
Updating the Driver
In this Chapter...
Updating the Windows Driver
A-1
Updating the Linux Module
A-5
This Appendix describes how to update the driver if you already
have an iSCSI adapter installed in the computer.
Updating the Windows Driver
This section contains the following procedures:
■
Updating the Driver in Windows Server 2003
■
Updating the Driver in Windows 2000
■
Installing the Driver in Windows NT 4.0
A-1
ASA-7211 IG.book Page 2 Monday, February 2, 2004 10:33 AM
ASA-7211C/F Installation Guide
Updating the Driver in Windows Server 2003
Note: If you update the operating system to Windows
Server 2003, you need to update the ASA-7211 driver, too.
To update the driver:
1
Open the Windows Device Manager.
2
Expand SCSI & RAID controllers.
3
Right-click the controller identified as an Adaptec Storage
Accelerator 7211 and choose Update Driver.
The Hardware Update Wizard is displayed.
4
Select Install from a list or specific location (Advanced).
5
Insert the disk containing the new driver and then click Next.
6
Select Don’t search. I will choose the driver to install and then
click Next.
7
Click Have Disk.
The Install From Disk text box is displayed.
8
Click Browse and browse to the appropriate location on the
driver disk.
9
Click Open and then click OK.
10 Choose the appropriate driver (7211C or 7211F) for the adapter
and click Next.
11 If a warning message states that the software ...has not passed
Windows Logo testing, click Continue Anyway.
12 In the Completing the Hardware Update Wizard window, click
Finish. No reboot is required.
To verify the driver installation, open the Device Manager and
view the driver, as shown on page 3-3.
Note: If there are multiple adapters in the computer, you need
to update each of them separately (including the Adaptec
ASAMGMT Processor Device) to show the correct driver
version for each device.
A-2
ASA-7211 IG.book Page 3 Monday, February 2, 2004 10:33 AM
Updating the Driver
Updating the Driver in Windows 2000
To update the driver:
1
Insert the disk containing the new driver.
2
Open the Windows Device Manager.
3
Expand SCSI & RAID controllers.
4
Right-click the controller identified as an Adaptec Storage
Accelerator 7211 and choose Properties.
5
Select the Driver tab.
6
Click Update Driver and then click Next.
7
Click Display a list and then click Next.
8
Click Have Disk.
9
Click Browse and browse to the appropriate location on the
driver disk.
10 Click Open and then click OK.
11 Choose the appropriate driver (7211C or 7211F) for your
adapter and click Next.
12 Click Next again.
13 If you see the Digital Signature Not Found window, click Yes to
continue.
14 Click Finish. No reboot is required.
To verify the driver installation, open the Device Manager and
view the driver, as shown on page 3-5.
Note: If there are multiple adapters in the computer, you need
to update each of them separately (including the ASAMGMT
Processor Device) to show the correct driver version for each
device.
A-3
ASA-7211 IG.book Page 4 Monday, February 2, 2004 10:33 AM
ASA-7211C/F Installation Guide
Updating the Driver in Windows NT 4.0
This section describes the following procedures:
■
Removing the Old Driver
■
Adding the New Driver
Removing the Old Driver
To update the driver, you must first remove the driver. To remove
the driver:
1
Open the Windows Control Panel.
2
Double-click SCSI Adapters.
3
Click the Drivers tab.
4
Choose the appropriate driver from the list box.
5
Click the controller identified as an Adaptec Storage Accelerator 7211.
6
Click Remove and follow all Windows instructions. Windows
will prompt you to reboot the computer.
Adding the New Driver
To add the new driver:
1
Insert the disk containing the new driver.
2
Open the Windows Control Panel.
3
Double-click SCSI Adapters.
4
Click the Drivers tab.
5
Click Add, and then click Have Disk.
6
Click Browse and browse to the appropriate location on the
driver disk.
7
Click Open, and then click OK.
8
Click Adaptec Storage Accelerator 7211 (NT 4.0).
9
Click OK and follow all Windows instructions. Windows will
prompt you to reboot the computer.
A-4
ASA-7211 IG.book Page 5 Monday, February 2, 2004 10:33 AM
Updating the Driver
Updating the Linux Module
In order to update the Linux asa72xx module, you need to first
remove the old module prior to installing the new module. To
remove the old module:
1 Verify that no devices are being used by the adapter.
2 Unmount all volumes from the adapter.
3
If the asa72xx module is loaded, use rmmod or modprobe to
unload the module. Enter:
rmmod asa72xx
or enter:
modprobe -r asa72xx
4 To change to the /usr/src/asa72xx directory, enter:
cd /usr/src/asa72xx
5 To run the remove script, enter:
sh asa72xx_remove
6 To remove the RPM, enter:
cd ..
and then enter:
rpm -e asa72xx
7 To remove the asa72xx directory, enter:
rm -rfv asa72xx
The module is now removed from the system.
8
Install the new module according to the instructions in
Installing the Linux Module on page 3-7.
A-5
ASA-7211 IG.book Page 1 Monday, February 2, 2004 10:33 AM
B
LEDs
You can use the adapter LEDs to diagnose problems during system
startup and as speed indicators during normal system operation.
The following tables describe the LED functions.
LED Diagnostics Definitions
D0
D1
Definition
Off
Off
Power-on Self Test (POST) failed.
Flashing
Off
POST is in progress.
On
Off
POST is complete.
On
On
Initialization is complete.
LED Functions for ASA-7211C
Label on
Bracket1
Reference
Designator2
100
Function
LED Description
Color
DS2
Rate
indicator
When lit, indicates a valid
100-Megabit/sec connection.
Green
1000
DS3
Rate
indicator
When lit, indicates a valid GbE
(1000 Megabit/sec) connection.
Green
ACT
DS4
Activity
status
When flashing, indicates an
incoming or outgoing traffic.
Yellow
1 See
the appropriate figure on page 1-3.
DS3 are off and DS4 is on, a 10-Megabit/sec connection is indicated.
2 When both DS2 and
LED Functions for ASA-7211F
Label on
Bracket1
Reference
Designator
Function
LED Description
Color
1000
DS3
Rate
indictor
When lit, indicates a valid GbE
(1000 Megabit/sec) connection.
Green
ACT
DS4
Activity
status
When lit, indicates an incoming
signal or outgoing traffic.
Yellow
1 See
the appropriate figure on page 1-3.
B-1
ASA-7211 IG.book Page 2 Monday, February 2, 2004 10:33 AM
R
Adaptec, Inc.
691 South Milpitas Boulevard
Milpitas, CA 95035 USA
©2002 – 2004 Adaptec, Inc.
All rights reserved. Adaptec and the Adaptec logo
are trademarks of Adaptec, Inc. which may be
registered in some jurisdictions.
Part Number: 513193-06, Ver. AC 01/04 MKL