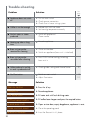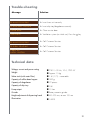
1
V-ZUG Ltd Coffee-Center Supremo SL/XSL Operating instructions Dear V-ZUG Customer Thank you for choosing to buy one of our products. Your appliance is made to high standards and is easy to use. Nevertheless, please take the time to read these operating instructions in order to familiarize yourself with the appliance and get the best use out of it. Please follow the safety precautions. Modifications Text, diagrams and data correspond to the technical standard of the appliance at the time these operating instructions went to press. The right to make technical modifications for the purpose of the further development of the appliance is reserved. Symbols used Denotes important safety precautions. Failure to observe said precautions can result in injury or damage to the appliance or fittings! n Indicates step-by-step instructions. Indicates a list. Denotes useful tips for the user. Validity The model number corresponds to the first three numbers on the identification plate. These operating instructions apply to the model: Type Model no. CCS-SL 301 Variations depending on the model are noted in the text. © V-ZUG Ltd, CH-6301 Zug, 2008 2 Contents Safety precautions . . . . . . . . . . . . . . . . . . . . . . . . . . . . . . . . . . . . . . . . . . . . . . 4 Appliance description Using for the first time Operating and display elements . . . . . . . . . . . . . . . Operating panel. . . . . . . . . . . . . . . . . . . . . . . . . . Behind the operating panel. . . . . . . . . . . . . . . . . . . Behind the service door. . . . . . . . . . . . . . . . . . . . . Accessories. . . . . . . . . . . . . . . . . . . . . . . . . . . . . 6 6 6 7 7 7 Water hardness. . . . . . . . . . . . . . . . . . . . . . . . . . Filling the water tank. . . . . . . . . . . . . . . . . . . . . . . Filling with coffee beans. . . . . . . . . . . . . . . . . . . . . Switching on the appliance. . . . . . . . . . . . . . . . . . . Venting the system. . . . . . . . . . . . . . . . . . . . . . . . . 8 8 8 8 9 9 User Settings/Programming Preparing coffee 10 12 AromaControl . . . . . . . . . . . . . . . . . . . . . . . . . . . 12 Espresso. . . . . . . . . . . . . . . . . . . . . . . . . . . . . . . 12 Cappuccino . . . . . . . . . . . . . . . . . . . . . . . . . . . . 13 Drawing hot water/steam Care and maintenance 14 Water tank/Coffee bean hopper. . . . . . . . . . . . . . . Drip tray/Dregdrawer . . . . . . . . . . . . . . . . . . . . . . Dispensing head. . . . . . . . . . . . . . . . . . . . . . . . . . Nozzle. . . . . . . . . . . . . . . . . . . . . . . . . . . . . . . . Brew unit. . . . . . . . . . . . . . . . . . . . . . . . . . . . . . . 15 15 15 16 16 16 Descaling 17 Rinsing cycle 19 Trouble-shooting 20 Technical data 21 Disposal 22 Repair service 23 3 Safety precautions The appliance corresponds to recognised technology standards and the relevant safety regulations. Proper use of the appliance is however essential to avoid damage and accidents. Please therefore follow the precautions given in these operating instructions. These operating instructions must be retained and passed onto future owners. Emergency n Immediately remove plug from the mains or switch off the mains fuse. Appliance n Indoors. may be used n For preparing coffee and hot water as well as for frothing milk and exclusively steaming drinks. nFor household purposes. n For other purposes other than those described above, otherwise danger Never use the appliance may result. Installation n Use the appliance only after it has been installed. nThe appliance must be installed and connected up to the electricity supply according to the separate installation instructions. The necessary work should be carried out by a qualified fitter/electrician. nPlease read the section «Using for the first time» before using the appliance for the first time. Mains connection n The appliance must be connected to a suitable mains socket. nMains voltage must correspond to the specifications on the identification plate on the appliance nRecommendation: connect the appliance via a residual current device (RCD). 4 Safety precautions Dangers nThe appliance must not be used by children or persons not instructed in nThe appliance is dangerous to children. Keep children away from the n Keep packaging material out of the reach of children. nD o not point the steam-/hot water nozzle at yourself or others (dan- the use of the appliance. appliance. Switch off the appliance when unattended. ger of scalding). n Do not insert any objects into the openings of the appliance (Danger! High voltage!). nIf accessible, do not touch the plug with wet hands or pull it out of the mains socket by the cable. nCaution: you may scald yourself if you come into contact with hot water, steam or the nozzle. nDo not remove the drip tray during preparation, otherwise you may scald yourself with hot drinks. Defects n Do not use the appliance if it is faulty or faults are suspected, e.g. if the appliance has been dropped. nAny repairs should only be carried out by Customer Services or autho rised and qualified persons. nDo not use the appliance if the mains cable is defective. Have the mains cable replaced only by Customer Services (Danger! High voltage!). nSwitch off the appliance before opening the service door. Danger of scalding! Cleaning/ n If possible, disconnect the plug from the mains and allow the appliDescaling ance to cool down before cleaning. n Do not spray the appliance down with water. nDo not dry any part of the appliance in the oven or microwave. Before prolonged n Empty the water tank and coffee bean hopper. periods of non-use n Empty and clean the drip tray and dregdrawer. n Switch off the appliance. Spare parts n In the interests of safety, use only original spares and accessories. Fire n In the event of fire, use only carbon dioxide (CO2) to extinguish flames. 5 Appliance description Operating and display elements To open panel, press strip handle Select product Ready for use Strip handle Operating panel (can be folded out) AromaControl Nozzle Dispensing head Service door Drip tray Dregdrawer Drip grill Display «Drip tray» Operating panel (can be folded out) 6 y td isp la tex Pla in Ste am tw ate r Ho so Es pr es De sc ale Pro g Us ram er mi Se ng ttin , S gs tan La db rg y, e co ffe e Co ffe e Select product Ready for use Appliance description Behind the operating panel Coffee bean hopper Water tank Main switch Behind the service door Grinder setting Brew unit Accessories Key Brush Drip guard Water filter Water-hardness Detergent tablets test strip «Aqua Prima» Available from specialist retailers 7 Using for the first time Water hardness Hardness 1 Hardness 2 Hardness 3 Hardness 4 Corresponds to German degree of hardness [˚dH] 0–7 7–14 14–21 above 21 Corresponds to French degree of hardness [˚fH] 0–12.5 12.5–25 25–37.5 above 37.5 Range/User settings Water-hardness test strip To test for water hardness: hold strip under water for one second. Take a reading after one minute. To set water hardness, see «User Settings/Programming». Filling the water tank 1 2 Open operating panel by Insert water filter pressing on strip handle Remove water tank 4 3 Fill with fresh water according to instructions in package (max. 1.7 l) The appliance can also be used without a water filter, though this requires more frequent descaling. Using the water filter improves the quality of the coffee, and places less strain on the parts of the appliance. To programme water filter, see «User Settings/Programming». Insert water tank Filling the hopper with coffee beans 1 Remove coffee bean hopper 8 2 3 Fill with coffee beans Insert coffee bean (max. 300 g) hopper Using for the first time Switching on the appliance 1 Switch on appliance at main switch 2 Close operating panel. «Ventilate» appears in plain text display For language settings, see «User Settings/Programming». Ventilating the system 1 2 Press the Place a tall vessel key and draw hot water until a steady jet of water is produced under nozzle Select product Ready for use Hot water Dispensing... 3 Press the key again to interrupt the flow of hot water. «Select product» and «Ready for use» appear in the plain text display 9 User Settings/Programming The flashing selected. 1 Start P * symbol in the plain text display denotes the user setting 2 Function 3 Settings or Cancel by pressing «esc» Standby Select Confirm Select Confirm Cancel Energy saving Appliance switches over to energy-saving mode. Rinsing Rinsing On - Off Circuit is automatically rinsed when appliance is switched on. Coffee is prepared using fresh water. Language Language Deutsch - Français - … Select language for the plain text display. The following languages can be select: German, French, English, Spanish, Dutch, Italian, Russian and Turkish. Contrast Contrast 10 20 30 40 50 60 70 80 90 100 Adjust contrast for the plain text display. Illumination Illumination On - Off Switch the illumination on/off. Water hardness Water hardness Hardness 1 - … 2 - … 3 - … 4 The appliance should be adjusted to the degree of water hardness (see «Descaling»). Waterfilter On - Off - Reset Water filter Use only when inserting water filter for the first time. Important: reset after each change of filter! Temperature low - medium - high Temperature Select temperature for preparing coffee. 10 User Settings/Programming 1 Start P 2 Function 3 Settings or Cancel by pressing «esc» Aroma of espresso Select Confirm Aroma espresso Select Confirm Cancel Mild - Normal - Strong Select amount of ground coffee for espresso. Aroma of coffee Aroma coffee Mild - Normal - Strong Select amount of ground coffee for coffee. Aroma of large coffee Aroma large coffee Mild - Normal - Strong Select amount of ground coffee for large coffee. Prebrewing Prebrewing Off - On - long The coffee is moisturized first of all. This is the best way of bringing out the taste. If setting is «large», the coffee is pre-brewed for 4 seconds. Total coffees Total coffees The total number of coffee portions served is displayed. Timer Timer Standby after X:XX Select duration according to which the appliance is set to «Standby» (can be preset 3 hours). Clock Clock Automatic On/Off - Clock time On/Off time - Show clock time Automatic On/Off Yes - No Set whether or not switch on/off times are activated. Clock time XX:XX Set clock time. On/Off time On time XX:XX Off time XX:XX Set switch on/off times Show clock time Off - On Set whether to show clock time. Rinsing cycle Rinsing cycle Yes - No The rinsing cycle is for degreasing the brew unit. Factory settings Factory settings Yes - No Restores all settings to the factory default settings. Exit Exit Exit from program mode 11 Preparing coffee Espresso Hot water and steam can scald! Point nozzle at drip tray! Place 1 or 2 cups under dispensing head Energy saving Can be cancelled by pressing the key Espresso Preheat cups For large cups: push dispensing head up A Select pro Ready for AromaControl Strength of coffee is fully adjustable. B Mild coffee Start Druckvorlage Strong coffee preparation 1 espresso Dispensing... Press the required key: 1 cup = 1× ■ 2 cups = 2× ■ C Settings Amount to be filled Place cup below dispenser head key until the Hold down the ■ 12 required quantity is reached. The quantity remains stored in the memory Grinder setting No coffee beans should be in the grinder when changing the grinder setting Fine Coarse Cappuccino After starting the steam function, some condensed water will be produced at first. Put the milk into a suitable vessel. ■ Cold milk froths better ■ Fill vessel no more than 1⁄ 3 full Cappuccino A Steam Dispensing... oduct r use Start steam Caution: steam spray! Point nozzle at drip grill B Frothing the milk Rotate vessel when frothing the milk C As soon as there is enough froth D Stop the steam by pressing the key Remove vessel Prepare coffee For cappuccino, pour coffee directly into the milk froth. Amount for grinding This can be selected before preparation, see «User Settings/Programming». ■ Aroma of espresso ■ Aroma of coffee ■ Aroma of large coffee Cleaning the nozzle Caution: hot part. There is a danger of burning yourself! Clean nozzle immediately after use with a damp cloth 13 Drawing hot water/steam Danger: hot water and steam can scald! Point nozzle at drip tray. Place cup under nozzle 1 Hot water Dispensing... Hot water Start hot water Press the key Stop hot water 2a Press the Hot water Programm. water key Adjusting the filling amount Press and hold the key After about 5 seconds the second line switches to programming mode 2b As soon as the desired amount is reached Press the key Place cup under nozzle After steam function has started, some condensed water is produced at first 1 Steam Dispensing... Steam Starting steam Press the key Warm the drink by rotating 2a vessel Stop steam Press the Steam Programm. steam key Adjusting the steam duration Press and hold the 2b 14 key After about 5 seconds the second line switches to programming mode As soon as the desired amount is reached key Press the Care and maintenance If required, wipe the appliance with a damp cloth. Clean the brewing group and accessories on a weekly basis under flowing water, without detergent. Never wash appliance parts in the dishwasher, and never dry them in the oven or microwave. Water tank/Coffee bean hopper 1 Switch off appliance 3 Clean tank (including strainers) 2 Remove tank/coffee bean hopper 4 Empty/Clean the coffee bean hopper Drip tray/Dregdrawer 1 2 Remove dregdrawer Remove drip tray 3 Clean dregdrawer 15 Care and maintenance Dispensing head 1 Push back dispensing head, push drip guard to AromaControl position. Remove drip tray 2 Open service door (push button is behind cover). Nozzle 2 1 Pull lower part of nozzle downwards 3 Push top button and pull dispensing head forwards. Clean without detergent under the tap. Push dispensing head onto holder until it rests in. Clean under the tap without detergent Brew unit Proceed with care when using the key. Push drip guard to AromaControl position Remove drip tray Open service door (pushbutton behind cover) Press PUSH and pull brew unit forwards Insert key, turn anti-clockwise and remove the top strainer Clean/dry everything 16 Do not press PUSH when reassembling Reassemble strainer and brew unit in reverse sequence. Close service door of brew unit. Descaling Whenever plain text display shows Decalcify or as required. Under no circumstances use vinegar, as appliance will otherwise be damaged. Use commercially available descaling agents that are suitable for this appliance. If the appliance is switched off during descaling, then descaling will continue after the appliance is switched on again. Descaling lasts approx. 30 minutes. Preparation 1 Remove water filter 2 Use descaler according to manufacturer‘s instructions and fill with at least 1 litre of water. Re-insert water tank. 3 Place large vessel 4 Press key below nozzle Starting descaling 5 Descaling Yes 6 Machine is descaling Rinsing occurs at 1-minute intervals until the message Rinse machine Fill watertank Press the select Yes key, key, this starts the descaling Press the is displayed. For further information, see «Rinsing». 17 Descaling Rinsing 8 7 Rinse machine Press water key Press the button to cancel and to continue the procedure The cleaning process is completed as soon as the water tank is empty and Rinsing finished Press water key Press the key, Rinsing begins Rinse water tank thoroughly is displayed in the text indicator. Fill with fresh water Press the Finishing descaling 10 9 Rinse water tank Put back water filter thoroughly 12 11 Fill with fresh water Press the Insert water tank Draw hot water until a steady key. Ventilating begins jet of water is produced Press the 18 key to finish key Rinsing cycle Every 14 days or after 250 cups Before starting the rinsing cycle, empty drip tray and have a spare vessel handy. Large amounts of water will be produced (approx. 8.5 dl), therefore watch vessel closely. Switch the appliance on prior to the cleaning cycle. Once started, a rinsing cycle cannot be interrupted. 2 1 Add detergent tablet Fill water tank Insert water tank to the brew unit Insert brew unit Place vessel below dispensing head 5 4 Energy saving Rinsing Press key 3 6 Rinsing cycle Factory settings Select Rinsing cycle by pressing key Confirm by pressing key Yes Select Yes by pressing key Confirm by pressing key Approx. 8.5 dl water is pumped off in approx. 7 minutes. For optimum cleaning, we recommend the detergent tablets manufactured by Saeco. These can be obtained from our Customer Services or through specialist dealers. If other products are used, damage may result, for which no responsibility can be accepted. 19 Trouble-shooting Problem See page Solution ■ Appliance does not switch on Turn on main switch Check power connection Check fuse in house wiring system 9 ■ Coffee is not hot enough Preheat cups with hot water Set brewing temperature correctly 14 10 ■ No hot water or steam produced Switch off appliance! 16 ■ Heating up takes a long time Descale appliance ■ Brew unit cannot be removed for cleaning Close service door Switch on appliance (brew unit is initialised) ■ Brew unit cannot be reinstalled after cleaning Press PUSH so that locking/unlocking ■ Coffee produced is too little, or none is produced at all Check grinder setting and AromaControl 12 ■ No illumination Switch on main switch Adjust illumination 9 10 Message Clean nozzle 17 lever rests in Solution Energy saving Press the Decalcify Descale appliance Fill watertank Fill water tank with fresh drinking water Coffee beans empty Fill coffee bean hopper and press the required button. Dregdrawer full Open service door, empty dregdrawer, appliance is reset. Close control panel Close the operating panel Brewunit missing Insert the Brewunit in it‘s place. 20 key Trouble-shooting Message Solution Brewunit blocked Insert brew unit correctly Dregdrawer missing Insert drip tray/dregdrawer correctly Close door Close service door Ventilate Ventilation system (on initial use). Press the Brewunit blocked Call Customer Services Grinder blocked Call Customer Services Fault on water system Call Customer Services key Technical data Voltage, current and power rating Weight Water tank (with water filter) Capacity of coffee bean hopper Capacity of dregdrawer Capacity of drip tray Pump output Grinder Height adjustment of dispensing head Illumination n230 V ~50 Hz, 10 A, 1250 W nApprox. 13 kg n1.8 l (1.7 l) – removable n300 g n12 pieces n0.8 l n15 bar nRotary ceramic grinder n80–105 mm, at rear 155 mm n3 LEDS 21 Disposal Packaging n All packaging materials (cardboard, plastic film (PE) and polystyrene (EPS)) are marked and should, if possible, be collected for recycling and disposed of in an environmentally friendly way. Disconnection n Disconnect the appliance from the mains. With a fixed appliance, this is to be carried out by a qualified electrician! Safety n Disable the appliance to prevent accidents caused by improper use, especially through children playing. n Pull the plug out of the mains socket or have the appliance disconnected from the mains by a qualified electrician. Then cut off the mains cable. Disposal n The old appliance should not be discarded as worthless rubbish. If disposed of correctly, the raw materials can be recovered for recycling. n The symbol on the identification plate warns that the appliance may not be disposed of in normal household waste. n The appliance must be disposed of in accordance with local regulations on waste disposal. For more information on the handling, disposal and recycling of the roduct, please contact the local authorities, the local recycling facilities for household waste or the retailer from whom you purchased the appliance. 22 Repair service The «Trouble-shooting» section will help you to carry out small repairs yourself, saving you the time and trouble of calling out a service engineer and the cost that goes along with it. Whether you contact us for repairs or orders, please always state the serial number (FN) and the name of the appliance. Enter these details below and also on the service sticker which comes with the appliance. Stick it in a conspicuous place or in your telephone or address book. FN Appliance You will also find the same details on the certificate of guarantee, the original sales invoice and the identification plate of the appliance. Open the operating panel. The identification plate is situated on the right-hand side, next to the coffee bean hopper 23 V-ZUG Ltd Industriestrasse 66, CH-6301 Zug [email protected], www.vzug.com J300.352-2