1
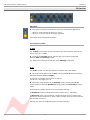
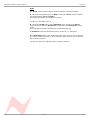
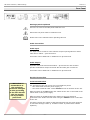
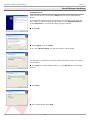
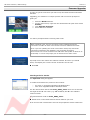
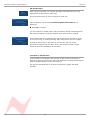
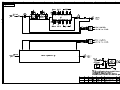
Neve 8803
Dual EQ
User Manual
527 - 370
Issue 3.4
The 8803 is a Dual Equaliser with both of the two independent audio paths,
featuring four bands of EQ plus high & low pass filters.
88 Series Outboard / 8803 Dual EQ
Issue 3.4
Health & Safety Notice
For your own safety and for the protection of others,
please observe the following safety instructions
•
Read these instructions.
•
Heed all safety warnings.
•
Do not use near water.
•
Clean only with a dry cloth.
•
Do not install near heat sources.
•
Do not block ventilation openings.
•
Protect the power cord.
•
Only use accessories specified by the manufacturer.
•
Unplug when unused for long periods of time.
•
Refer all servicing to qualified personnel only.
•
This equipment can only be used with the power supply provided:
XP Model Number PCM80PS36 or SWITCHBOX Model Number SPU-110/36.
AMS NEVE
Billington Road
Burnley
Lancs
BB11 5UB
England
Phone +44 (0)1282 457011
Fax: +44 (0)1282 417282
Email: [email protected]
Web: www.ams-neve.com
Support: www.ams-neve.info/crm/fault_report.html
© 2007-2010 AMS Neve Ltd own the copyright of all information and drawings contained in this manual which are not to
be copied or reproduced by any means or disclosed in part or whole to any third party without written permission.
As part of our policy of continual product improvement, we reserve the right to alter specifications without notice but with
due regard to all current legislation.
Disclaimer: The information in this manual has been carefully checked and is believed to be accurate at the time of
publication. However, no responsibility is taken by us for inaccuracies, errors or omissions nor any liability assumed for any
loss or damage resulting either directly or indirectly from use of the information contained within it.
Trademarks: All trademarks are the property of their respective owners and are hereby acknowledged.
-2-
88 Series Outboard / 8803 Dual EQ
Issue 3.4
Table of Contents
Health & Safety Notice...................................................2
Hi Mid Q...................................................8
Customer Service...........................................3
High Frequency Band..........................................8
HF Gain....................................................8
HF Hz.......................................................9
Introduction.....................................................................5
System Requirements.........................................5
Rear Panel.....................................................................10
Front Panel Controls......................................................6
On/Off......................................................6
Warning Symbols Explained...............................10
Input Section.....................................................6
Input trim.................................................6
Signal led..................................................6
Clip led.....................................................6
Audio Connections............................................10
Audio Inputs............................................10
Audio Outputs..........................................10
Filter Section......................................................6
High Pass Filter..........................................6
Low Pass Filter..........................................6
Electrical Connections........................................10
Technical Earth Switch..............................10
Fuse.......................................................11
Power DIN socket.....................................11
USB........................................................11
EQ Section.......................................................................7
Unit Specifications............................................11
EQ Switch..........................................................7
Recall Software Installation.........................................12
Low Frequency Band...........................................7
LF Gain.....................................................7
LF Hz........................................................7
Installation for PC.............................................12
Installation for Mac...........................................14
Low Mid Frequency Band.....................................8
Lo Mid Gain...............................................8
LMF Hz.....................................................8
Lo Mid Q...................................................8
New Versions of Recall Software for Mac..............14
Firmware Upgrades......................................................15
Selecting a File for Transfer................................15
High Mid Frequency Band....................................8
Hi Mid Gain...............................................8
HMF Hz.....................................................8
File Downloading...............................................16
Corrupted or Old Firmware.................................16
-----+----Appendix: Block Diagrams
8803
Customer Service
In the unlikely event that this unit should malfunction or develop a fault,
then please register the fault details on our website, by clicking the link
below.
You will also need to enter the unit's serial number when you do this, so
please have this to hand.
http://www.ams-neve.info/crm/fault_report.html
Once the fault details have been registered, one of our technical support
team will be in touch via email.
This link should also be used for further operational or technical help, or
any general enquiry about the unit.
-3-
88 Series Outboard / 8803 Dual EQ
Issue 3.4
Introduction
The 8803 is a Dual Equaliser in a 1U rack mounting box.
The operation of the left side and the right side of the unit is identical.
Each of the two independent audio paths features high and low pass filters
and four bands of EQ.
8803 settings may be stored and recalled via USB using the Recall software.
Up to sixteen 88 series units may be connected to a Recall system
simultaneously in any combination.
When connecting to a PC (or a Mac), it should either be connected directly via
USB or via a powered USB hub, not a passive hub.
System Requirements
The 8803 may be used as a standalone unit.
If you wish to use the units Recall facility, it should be connected directly to
the computer or via a powered USB hub but not via a passive USB hub.
If you wish to use the Neve Recall software to store and reload user
configurations you must have one of the following supported operating
systems:
PC:
•
•
•
Mac:
•
Windows 2000, Service Pack 4 or later
Windows XP, Service Pack 3 or later
Vista, Service Pack 1 or later
Mac OS 10.3.9 or later
-4-
88 Series Outboard / 8803 Dual EQ
Issue 3.4
Front Panel Controls
On/Off
The Neve Logo Switch on the right hand side of the unit switches the unit on
and off.
Input Section
Input trim
Sets the level of the input signal.
The trim range is from –20dB to +20dB and can encompass signals from
sources referenced to +4dBu or to –10dBV.
Signal led
The yellow led will light to indicate that a signal is present at the unit input.
The trigger level is –30dBu.
Clip led
Will light red to indicate that the signal is >25dBu and there is danger of
clipping occurring.
The signal level is monitored at three stages:
• Input pre-trim;
• Input post-trim;
• Output.
The Led is triggered by any one of these levels reaching >25dBu.
Filter Section
High Pass Filter
The high pass filter has a 12dB per octave (20dB per decade) slope and a
frequency range from 30Hz to 300Hz.
It is switched into circuit by pressing the Hi Pass frequency control.
The Hi Pass led will light.
Low Pass Filter
The low pass filter has a 12dB per octave (20dB per decade) slope and a
frequency range from 1.5kHz to 18kHz.
It is switched into circuit by pressing the Lo Pass frequency control.
The Lo Pass led will light.
-5-
88 Series Outboard / 8803 Dual EQ
Issue 3.4
EQ Section
EQ Switch
The square EQ switch beneath the input leds activates the EQ section.
• When lit, all four bands of EQ are in circuit.
• When un-lit all four bands of EQ are bypassed.
This switch does not bypass the filters.
Low Frequency Band
LF Gain
The LF Gain control sets the cut or boost for the low frequency band of EQ
with a range of +/-18dB.
Pressing the LF Gain control switches the Low Frequency EQ band
between Bell and Shelving modes.
The adjacent led will light to indicate when Shelving is selected.
LF Hz
The LF Hz control sets the low frequency between 33Hz and 440Hz.
When the LF EQ band is set to Bell, pressing the LF Hz control switches
the band between Low and High Q.
A led lights to indicate the selection of High Q.
Low Q is 0.7 and High Q is 1.8.
When the LF EQ band is set to Shelving mode, pressing the LF Hz
control switches between Standard shelving mode and Resonant shelving
mode.
A led lights to indicate the selection of Resonant shelving.
In Standard mode the selected frequency will be the +/- 3dB point.
In Resonant mode, when boosting a slight extra lift occurs in frequencies
around the selected frequency, when cutting a slight extra dip occurs around
the selected frequency.
This has the effect of emphasising the selected frequency.
-6-
88 Series Outboard / 8803 Dual EQ
Issue 3.4
Low Mid Frequency Band
Lo Mid Gain
The Lo Mid Gain control sets the cut or boost for the low medium frequency
band of EQ with a range of +/-18dB.
LMF Hz
The LMF Hz control sets the low medium frequency between 120Hz and
2kHz.
Lo Mid Q
The Lo Mid Q control adjusts the Q continuously variable between 0.3 and 7.
High Mid Frequency Band
Hi Mid Gain
The Hi Mid Gain control sets the cut or boost for the high medium frequency
band of EQ with a range of +/-18dB.
HMF Hz
The HMF Hz control sets the high medium frequency between 800Hz and
9kHz.
Hi Mid Q
The Hi Mid Q control adjusts the Q continuously variable between 0.3 and 7.
High Frequency Band
HF Gain
The HF Gain control sets the cut or boost for the low frequency band of EQ
with a range of +/-18dB.
Pressing the HF Gain control switches the High Frequency EQ band between
Bell and Shelving modes.
A led lights to indicate when Shelving is selected.
-7-
88 Series Outboard / 8803 Dual EQ
Issue 3.4
HF Hz
The HF Hz control sets the high frequency between 1.5kHz and 18kHz.
When the HF EQ band is set to Bell, pressing the HF Hz control switches
the band between Low and High Q.
A led lights to indicate the selection of High Q.
Low Q is 0.7 and High Q is 1.8.
When the HF EQ band is set to Shelving mode, pressing the HF Hz
control switches between Standard shelving mode and Resonant shelving
mode.
A led will light to indicate the selection of Resonant shelving.
In Standard mode the selected frequency will be the +/- 3dB point.
In Resonant mode, when boosting a slight extra lift occurs in frequencies
around the selected frequency, when cutting a slight extra dip occurs around
the selected frequency.
This has the effect of emphasising the selected frequency.
-8-
88 Series Outboard / 8803 Dual EQ
Issue 3.4
Rear Panel
Warning Symbols Explained
There are no user serviceable parts inside the unit.
Disconnect the power lead to isolate this unit.
Please refer to the manual before operating this unit
Audio Connections
Audio Inputs
The input combo socket for each channel accepts input signals from either
male XLR or male ¼” jack connectors.
Connection can be balanced or unbalanced on jack and XLR.
Audio Outputs
Separate male XLR socket and female ¼” jack socket for each channel
provide simultaneous output to female XLR and male jack connectors.
Connection can be balanced or unbalanced on jack and XLR.
Electrical Connections
Technical Earth Switch
!!!WARNING!!!!
Connections to
the technical
earth and changes
to the grounding
of the unit should
only be carried
out by qualified
personnel.
The grounding of the unit can be set to two different points:
• The mains earth from the power supply, or
• The studio technical earth via the Chassis screw on the back of the unit.
With the switch in the Off position the chassis of the unit is connected to the
mains earth via the power supply.
With the switch in the On position the chassis of the unit should be
connected to the studio technical earth using the Chassis screw on the back
of the unit.
For safety reasons the chassis is NOT disconnected from the main Earth but
is connected through a filter (a 10 Ohms resistor in parallel with a 680nF
capacitor).
-9-
88 Series Outboard / 8803 Dual EQ
Issue 3.4
Fuse
The removable fuse holder houses a 1.6 AT fuse
Power DIN socket
The 8 pin DIN socket should only be used to connect the power supply
provided with the 8803 unit.
NB: for technical reasons the orientation of the socket is the opposite way up
to normal. The “top” of the DIN connector will therefore be underneath.
It is not possible to connect the plug the wrong way up.
USB
The USB socket is a Type B connector used to connect the 8803 to a PC or
Mac for Recall store and recall of unit settings.
Unit Specifications
Audio Specifications:
Max Output Level
Frequency Response
+26 dBu
+/- 0.3 dB 10Hz - 20kHz
+/- 0.5 dB 10Hz - 35 kHz
Distortion
<0.006
(10Hz to 20kHz using window of 10hZ - 80kHz)
Noise
<80dB 20hz – 20kHz
(Using measurement window of 10hZ - 22kHz)
Input Impedance
Output Impedance
>20kΩ
50Ω
Dimensions:
Width
48.2cm / 19 inches
Height
4.4cm / 1¾ inches
24cm / 9½ inches
(without power socket plugged in)
Depth
Weight
2.5kg / 5½ lbs
- 10 -
88 Series Outboard / 8803 Dual EQ
Issue 3.4
Recall Software Installation
Installation for PC
Insert the CD into the drive and the Setup program should automatically
launch.
If the application fails to launch automatically on inserting the CD, then go to
the CD Drive in Windows Explorer and double-click the NeveRecall.msi file
or the setup.exe file to launch the Setup program manually.
Click Next.
Click I Agree, then click Next.
If you click I Do Not Agree, the install procedure will terminate.
The installation programme will select a default location for files to be copied
and created to.
Click Next to keep the default location, or click Browse to select another
location.
Click Next.
Tick as desired then click Next.
- 11 -
88 Series Outboard / 8803 Dual EQ
Issue 3.4
Click Install.
The install will start and the progress displayed.
If you wish to launch Recall, tick the Launch Neve Recall box.
Click Finish.
The software will now be ready to use, and will be accessible from Start
Menu / Programs / Neve Recall / Neve Recall, or from the Recall icon
on the Windows Desktop.
- 12 -
88 Series Outboard / 8803 Dual EQ
Issue 3.4
Installation for Mac
Insert the CD containing the software into the Mac, and the install
programme will launch automatically.
Click Continue.
Select the location where you wish the software to be installed to.
Click Continue.
Click Upgrade, and the software will start to install.
The progress bar will show the state of the installation.
Once completed, click Close.
The software is now ready to use.
New Versions of Recall Software for Mac
Where you wish to install a new version of the Recall software on a Mac, you
will need to uninstall the previous version first and remove some files:
> From the Applications folder, move the Neve Recall folder to the
Trash;
> From the //System Library/Extensions folder, move Neve8816.kext
to the Trash (move this file, regardless of the actual outboard units you
may have connected via USB)
> From the //Library/Receipts folder, move Neve Recall.pkg to the
Trash.
You will now be able to install the new version
- 13 -
88 Series Outboard / 8803 Dual EQ
Issue 3.4
Firmware Upgrades
In order to get the most from your Neve unit, the latest firmware should be
installed.
Upgrading your software is a simple process with on screens prompts to
guide you.
>
>
>
>
Start the Recall software.
On the main screen, right-click the window title bar (Mac users select
Recalls)
Click Upgrade Firmware.
Select the file to transfer.
You will be prompted about removing other units.
When updating units, only the unit that is being updated should be
connected via USB. All other units should have their USB disconnected.
Even if you are updating two units of the same model, they should be
connected individually and updated in two separate operations.
If more than one unit is connected via USB when the Update is about to be
performed, a screen will prompt you to disconnect the other units.
A prompt screen will confirm the software number & version you should
select, and display the current version of firmware for the unit.
Click OK.
Selecting a File for Transfer
The Open File dialog will appear.
To locate the firmware file, browse to the location:
•
•
PC users: C:\Program Files\Neve Recall\Firmware
Mac users: Applications\Neve Recall\Firmware
The file names follow the format down_88XY_V.hex where XY are the last
two digits of the 88 unit name (e.g. '16' for 8816) and V is the software
version number.
A typical filename could be down_8804_3.hex.
Double click on the latest filename which matches your unit.
If an incorrect file is selected the user will be prompted to select another file.
- 14 -
88 Series Outboard / 8803 Dual EQ
Issue 3.4
File Downloading
Once the file is selected, the transfer will begin and the Recall screen will
display that the download is under way.
This process may take up to two minutes for each unit.
Upon completion, the message Firmware Update Successful will be
displayed.
Click OK to continue.
You can continue to update other units successfully without restarting Recall,
but the Recall software must be restarted once this process is finished.
If the transfer fails (for example if the USB is removed by accident or power
is lost to the unit), a warning message will prompt to the user to try again.
If Recall is started with a unit that has no firmware, the user will be
prompted to upgrade the firmware, as the unit cannot be used in Recall
unless the firmware installation is successful.
Corrupted or Old Firmware
If the firmware is corrupted or the unit has an old version of firmware, a
prompt will appear upon starting the Recall software to indicate that firmware
must be updated before the user can proceed.
The process described above can then be followed to update the latest
firmware.
- 15 -