1
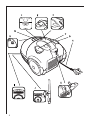
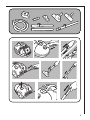
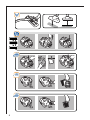
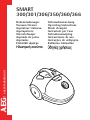
SMART
300/301/306/350/360/366
AUS ERFAHRUNG GUT
Bodenstaubsauger
Vacuum Cleaner
Aspirateur traîneau
Aspirapolvere
Vloerstofzuiger
Aspirado de polvo
Aspirador
Elektrikli süpürge
Gebrauchsanweisung
Operating Instructions
Mode d'emploi
Instruzioni per l’uso
Gebruiksaanwijzing
Instrucciones de uso
Instruc¸ o˜es de utiliyac¸ a˜o
Kullanma talimatları
Ausstattung .........................................7
Zubehör ................................................7
Sicherheitshinweise............................7
Inbetriebnahme ...................................8
Die besten Ergebnisse erzielen .........8
Wechsel des Staubbeutels.................8
Staubbeutelwechselanzeige .................8
Wechsel des Staubbeutels....................8
Staubbeutel-Sicherheitsvorrichtung ......8
Wechsel/Reinigen der Filter ...............9
Reinigen des Motorschutzfilters ............9
Wechsel des Mikrofilters .......................9
Fehlersuche und -behebung ..............9
Dear Customer ..................................10
Features .............................................10
Accessories .......................................10
Safety instructions ............................10
Getting Started ..................................10
Getting the best results ....................11
Dust bag indicator and changing
the dustbag.....................................11
To change the dustbag .......................11
We recommend the dustbag
is changed........................................11
Changing the filters ..........................11
To clean Motor Protection filter ...........11
To change Micro filter..........................12
Troubleshooting ................................12
Votre Smart posséde les
caractéristiques suivantes ............13
Les accessoires de votre Smart ......13
Assurer votre sécurité ......................13
Mise en marche .................................13
Comment obtenir les meilleurs
résultats .........................................14
Indicateur de remplissage de sac
et changement du sac
á poussiére .....................................14
Pour changer le sac á poussiére.........14
Nous recommandons de
changer le sac á poussiére ..............14
Changer les filtres.............................15
Pour nettoyer le filtre
de protection du moteur ...................15
Pour changer le microfiltre ..................15
Gestion des pannes ..........................15
2
Le caratteristiche del Smart .................16
Accessori dell'aspirapolvere Smart ....16
Per la vostra sicurezza .........................16
Per cominciare ......................................16
Per ottenere i migliori risultati .............17
Indicatore di sacchetto pieno
e come cambiare il sacchetto ...........17
Per cambiare il sacchetto........................17
Raccomandiamo di cambiare
il sacchetto della polvere......................17
Cambio dei filtri .....................................18
Diagnosi dei guasti ..............................18
Kenmerken van uw Smart ....................19
Hulpstukken voor uw Smart.................19
Veiligheid voorop ..................................19
Voordat u begint....................................19
Optimale resultaten...............................20
De stofzakindicator en
het verwisselen van de stofzak.........20
Als u de stofzak wilt verwisselen.............20
Wij raden u aan om de stofzak
vervangen ............................................20
De filters vervangen ................................21
Het motorbeschermfilter
schoonmaken.......................................21
Het Microfilter vervangen ........................21
Problemen oplossen ...............................21
Estimado cliente ...................................22
Las caracter sticas de su Smart ..........22
Accesorios para su Smart................... 22
Para garantizar su seguridad ..............22
Listo para comenzar .............................22
C mo obtener los mejores
resultados ............................................23
Indicador de llenado de bolsa
y cambio de esta ...............................23
Para cambiar la bolsa de recogida
de polvo ...............................................23
Recomendamos que se cambie
la bolsa de recogida de polvo ..............23
Cambio de los filtros ............................24
Modo de limpiar el filtro de protecci
n de motor ...........................................24
Para cambiar el Micro Filtro ....................24
Reparaci n de aver as ...........................24
4
5
6
Dear Customer
Thank you for choosing an AEG
SMART cleaner. To ensure total satisfaction, read this Instruction book
carefully.
Features (see page 3)
A
B
C
D
E
F
Mains cable
Cable rewind button
On/off button
Suction control (306;350;360;366)
Multifunction handle
Cover release catch for dustbag
compartment
G Dustbag indicator
H Hose connection
I Carrying Handle
J Storage slot for floor nozzle and
extention tubes when not in use
K Storage slot for floor nozzle and
extention tubes when in use
Accessories (see page 4)
Getting Started
(see page 4)
Dust bags
Extension tubes (x2) (300;301)
Telescopic tube (306;350;360;366)
Swivel hose and handle with manual
suction control
Combination carpet/hard floor nozzle
(301;306;350;360;366)
Floor nozzle (300)
Narrow crevice nozzle (301;306;350;
360; 366)
Upholstery nozzle (301;306;350;360;
366)
Check the dustbag is in place.
Insert the hose until the catches
click to engage. (Press catches
inwards to release).
Attach tubes or telescopic tube to
the hose handle and floor nozzle by
pushing and twisting together.
(Twist and pull apart to dismantle).
Extend the cable and connect to
mains. The cleaner is fitted with
cable rewind, ensure cable is not
twisted before use. (Press foot pedal
to rewind. Note: Please hold the
plug to prevent it striking you or
the machine).
Press the On/Off button to activate
the cleaner.
To decrease/increase suction, turn
the rolling wheel on the multifunction handle (306;350;360;366).
Suction can also be regulated on
the hose handle by opening/closing
the aperture.
Safety instructions
The cleaner is for domestic use only
and has been designed to ensure
maximum safety and performance.
Please follow these simple precautions:
The cleaner is double-insulated so it
must not be earthed.
10
The cleaner is only to be used by
adults. Young children or infirm
persons should be supervised to
ensure that they do not play with the
appliance.
Always store in a dry place.
Do not use to pick up liquids.
Avoid sharp objects.
Do not pick up hot cinder or lighted
cigarette ends.
Do not use near flammable gases.
Avoid tugging on the mains cable
and check cable regularly for damage.
Note: Do not use your cleaner with
a damaged cable. If damaged the
cable should be replaced at an
AEG Service Centre.
The Plug must be removed from the
socket-outlet before cleaning or
maintaining the appliance.
All service and repairs must be carried
out by authorised AEG service staff.
Getting the best results
(see page 5)
Carpets: Use the floor nozzle with
the lever in horizontal position.
Hard floors: Use the floor nozzle
with the lever in vertical position.
Loose rugs/curtains/lightweight fabrics:
Reduce the suction power. Use the floor
nozzle for loose rugs and the upholstery
nozzle for curtains, cushions etc.
Confined areas: Use the crevice nozzle
for crevices, corners and radiators.
Dustbag indicator and
changing the dustbag
(see page 5)
For peak performance the dustbag
must be changed when full. If the
dustbag should accidentally get
broken in the cleaner, take cleaner to
an AEG Service Centre for cleaning.
Check the dustbag regularly and
replace when necessary. The dustbag
indicator window will gradually turn
red when filling and completely red
when full.
To check the dustbag, the cleaner
must be switched on, with all attachments connected and off the floor.
The dustbag full indicator may
signify that the bag is blocked
(occasionally caused by very fine
dust) which will cause loss of suction
and may result in overheating. If this
occurs change the dustbag even if it
is not full.
To change the dustbag
Release catch and swing back lid
before removing the dustbag.
Remove the dustbag.
Insert new dustbag by fitting the bag
slots over holders.
We recommend the dustbag is changed
after using a carpet cleaning powder
if there is a bad smell from the
cleaner, then you should also
change the filter
Note: Use only AEG original dustbags
and filters (ref GR50).
Dust bag safety device:
To avoid damaging the cleaner do
not use it without a dustbag. A
safety device is fitted which
prevents the cover closing without
a dustbag. Do not attempt to force
cover shut.
Changing the filters
(see page 5)
There are two filters inside your
cleaner. Never use the cleaner
without the filters in place.
To clean Motor Protection filter
The Motor Protection filter should
be cleaned when dirty.
Release catch, remove the lid and
the filter.
Wash the filter in warm water.
Allow to dry and re-insert the clear
filter. Close the lid.
To change Micro filter
The Micro filter should be changed
with every fifth dustbag.
Release catch, open the filter cover
and remove filter with grill.
Take the filter out of the grill.
Insert new filter into the grill, put it
back into the cleaner. Close the cover.
To change HEPA filter (366)
Release catch, open the filter cover.
Take the filter with grill out of the
cleaner.
Insert new filter with grill, and close
the cover.
11
Troubleshooting
Power: If the electric power does not
come on, disconnect from mains
and check plugs, cable and fuses
where appropriate.
Blockages/dirty filters: The cleaner
may switch itself off in the event of
a severe blockage or excessively dirty
filter(s). In such cases, disconnect
from mains and allow to cool for
20-30 minutes.
Clear blockage and/or replace
filter(s) and restart.
The clearing of blocked hoses is not
covered by the guarantee.
Please also see AEG additional
information towards the back of this
booklet.
Water: If water is sucked into the
cleaner the motor must be changed
at an AEG Service Centre.
12
AEG Hausgeräte GmbH
Postfach 1036
D-90327 Nürnberg
http://www.aeg-hausgeraete.de
© Copyright by AEG
3302 02 06 04