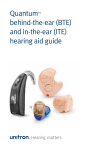
1
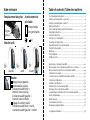
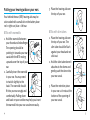
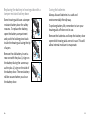
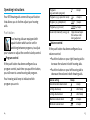
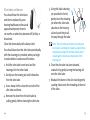
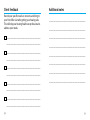
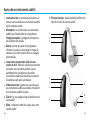
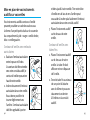
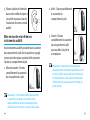
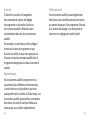
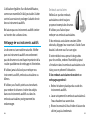
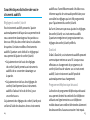
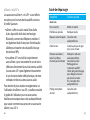
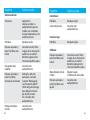
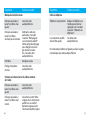
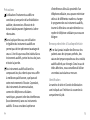
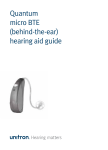
Quantum micro BTE
(behind-the-ear)
hearing aid guide
™
Guide pour les instruments
auditifs mini-contours
d’oreille Quantum
MC
Thank you
Thank you for choosing Unitron hearing aids.
At Unitron, we care deeply about people with
hearing loss. We work closely with hearing
healthcare professionals to make advanced,
purpose-driven solutions available to everyone.
Because hearing matters.
Your hearing aids
Hearing healthcare professional:______________
____________________________________
Telephone:_ __________________________________
Model:_______________________________________
Remerciements
Serial number:________________________________
Merci d’avoir choisi les instruments auditifs
contours d’oreille d’Unitron.
Replacement batteries:
Chez Unitron, nous nous dévouons entièrement
aux personnes souffrant de perte auditive.
Nous travaillons en étroite collaboration avec
des audioprothésistes afin de proposer des
solutions de pointe, adaptées aux besoins de
tous. Parce qu’entendre est important.
Size 312
Warranty:_ ___________________________________
Program 1 is for: _______________________________
Program 2 is for: _ _____________________________
Program 3 is for: _ _____________________________
Program 4 is for: _ _____________________________
Date of purchase:______________________________
Quick reference
Changing batteries
Vos instruments auditifs
Low battery warning
2 beeps every
30 minutes
Plus
(+) signs
Audioprothésiste :________________________
____________________________________
Téléphone :___________________________________
312
On/Off
Modèle :_____________________________________
Numéro de série :______________________________
Piles de remplacement :
Taille 312
Garantie :_ ___________________________________
on
off
open
Push button
switching programs
volume control; right aid=louder,
left aid=softer
comfort-clarity control; right aid=clarity,
left aid=comfort
Le programme 1 correspond à : _ _________________
Le programme 2 correspond à : __________________
Le programme 3 correspond à : __________________
Le programme 4 correspond à : __________________
Date de l’achat :_______________________________
Aide-mémoire
Table of contents/Table des matières
Remplacement des pilesAvertissement de
pile faible
Your hearing aids at a glance...................................................................2
Putting your hearing aids on your ears....................................................4
Turning your hearing aids on and off ......................................................6
Battery information..................................................................................8
Tips for wearing hearing aids for the first time...................................... 12
Operating instructions........................................................................... 14
Using the telephone..............................................................................20
Caring for your hearing aids................................................................... 21
Cleaning your hearing aids....................................................................22
Signature features of your hearing aids................................................26
Troubleshooting guide...........................................................................29
Warnings................................................................................................34
Client feedback......................................................................................38
Additional notes.....................................................................................39
2 bips toutes
les 30 minutes
Signes
plus(+)
312
Marche/arrêt
marche
arrêt
ouvert
Bouton
changer de programme
commande de volume;
instrument auditif droit = intensité sonore accrue,
instrument auditif gauche = intensité sonore réduite
réglage du confort/clarté;
instrument auditif droit = clarté,
instrument auditif gauche = confort
Aperçu de vos instruments auditifs.......................................................40
Mise en place de vos instruments auditifs sur vos oreilles...................42
Mise en marche et arrêt de vos instruments auditifs ...........................44
Informations sur la pile..........................................................................46
Conseils pour le port initial d’instruments auditifs...............................50
Instructions d’utilisation........................................................................52
Utilisation du téléphone........................................................................58
Entretien de vos instruments auditifs....................................................59
Nettoyage de vos instruments auditifs..................................................60
Caractéristiques distinctives de vos instruments auditifs.....................64
Guide de dépannage..............................................................................67
Avertissements......................................................................................72
Commentaires du client.........................................................................76
Remarques supplémentaires.................................................................77
Compliance information........................................................................78
Your hearing aids at a glance
1 E
arhook - your custom made earmold attaches to
your hearing aids using the earhook
2 Microphone - sound enters your hearing aids via
the microphones. Microphone shield - protects
microphones from dirt & debris
3 Push button - switches between listening
programs or changes the volume level or comfortclarity, depending on your customized fitting
4 Battery door/on & off - close the door to turn on
your hearing aids, partly open the door to turn off
your hearing aids. Opening the door all the way
gives you access to change the battery
5 Earmold - allows the sound to pass from the
hearing aids to the ear and holds the hearing aids
in place
6 Slim tube - sound travels down the slim tube to
the ear canal
7 Dome - holds the slim tube in place in your ear
canal
8 Retention piece - helps prevent the dome and slim
tube from moving out of the ear canal
2
2
3
2
1
4
5
2
3
2
6
4
8
7
3
Putting your hearing aids on your ears
Your behind-the-ear (BTE) hearing aids may be
color-coded with a small dot on the battery door:
red = right ear; blue = left ear.
3.Place the hearing aid over
the top of your ear.
3.
BTEs with earmolds
BTEs with slim tubes
1.Hold the earmold between
1.
your thumb and index finger.
The opening should be
pointing in towards your ear
canal with the BTE resting
upwards over the top of your
ear.
1.Place the hearing aid over
the top of your ear. The
slim tube should lie flush
against your head and not
stick out.
1.
2.Hold the slim tube where it
attaches to the dome and
gently push the dome into
your ear canal.
2.
3.Place the retention piece
in your ear so it rests at the
bottom of the opening of
your ear canal.
3.
2.Carefully insert the earmold 2.
in your ear. You may need
to twist it slightly to the
back. The earmold should
fit into your ear snugly and
comfortably. Pulling down
and back on your earlobe may help you insert
the earmold into your ear canal more easily.
4
5
Turning your hearing aids on and off
Your hearing aids have a three-position battery
door that acts as an on/off switch and that
allows access to the battery compartment.
1.ON: Close the battery door 1.
fully.
Note: It may take 5 seconds
before the hearing aid turns
on. Your hearing healthcare
on
provider can additionally
increase the start up delay if required.
2.OFF: Partially open the
battery door.
3.OPEN: Fully open the
battery door to access
and change the battery.
3.
open
ote: When turning your hearing aid on and off
N
while it is on the ear, grasp the top and bottom
of the device with your index finger and thumb.
Use your thumb to open and close the battery
door.
2.
off
6
7
Battery information
Replacing the battery
To replace the battery, fully open the battery
door for access to the battery compartment.
1.Gently swing out the battery
door with your fingernail.
Low battery warning
Two long beeps indicate the hearing aid battery
is low. After the low battery warning, you may
experience some reduction in sound quality.
This is normal and can be remedied by inserting
fresh batteries into the hearing aids.
If you are not able to hear the low battery
warning, your hearing healthcare professional
can change the pitch or loudness of the low
battery warning. If you prefer, it can be turned
off entirely.
8
our hearing aids are designed to generate a
Y
low battery warning every 30 minutes until you
change the batteries, but depending on the
condition of the batteries, they may die before
another low battery warning occurs. Therefore,
it is recommended that the batteries are
replaced as soon as possible once you hear the
low battery warning.
2.Grasp the battery with your
thumb and index finger and
remove.
1.
2.
3.Insert the new battery into the 3.
battery compartment with the
plus (+) sign on the battery
facing the same way as the
plus (+) sign on the side of the
battery door. This will ensure that the battery
door closes properly.
ote: If the battery is inserted incorrectly, the
N
hearing aid will not turn on.
4. Close the battery door.
4.
9
Replacing the battery in hearing aids with a
tamper-resistant battery door
Some hearing aids have a tamperresistant battery door for safety
reasons. To replace the battery,
open the battery compartment
and push the locking piece back
inside the hearing aid using the tip
of a pen.
Remove the old battery. Insert a
new one with the plus (+) sign on
the battery facing the same way
as the plus (+) sign on the side of
the battery door. The new battery
will be secured when you close
the battery door.
10
1.
Caring for batteries
Always discard batteries in a safe and
environmentally friendly way.
To prolong battery life, remember to turn your
hearing aids off when not in use.
2.
Remove the batteries and keep the battery door
open while hearing aids are not in use. This will
allow internal moisture to evaporate.
3.
11
Tips for wearing hearing aids for the first
time
1.Start in a quiet room at home first to get
used to the new sound quality. Sounds like
the ticking of a clock, the humming of the
computer, the beep of the microwave or the
rustling of clothes or paper may seem loud
to you at first, because you have not been
hearing them properly for a long time.
2.Read aloud to yourself and learn to correct
the volume of your own voice when you are
wearing the hearing aids.
3.Talk to different people and learn how to
distinguish between different sound patterns
again.
4.It will take some time before you are
completely used to your hearing aids and can
fully enjoy the benefits.
5.Wear your hearing aids for as many hours a
day as you can, and for a little longer each
day.
12
6. Make notes at the back of this booklet,
write down difficult situations and describe
what any unpleasant noises were like. This
information will help your hearing healthcare
professional to fine-tune the devices better
for you.
7.Involve your family and friends in this
familiarization period. For example,
ask someone to set the television to a
comfortable volume.
8.When you are beginning to get used to
wearing the hearing aids, wear them in more
difficult listening environments such as the
office, at parties or in restaurants. This can
be difficult even for people who can hear
normally. Give yourself time to regain your
ability to hear in these difficult situations.
9.Make your hearing aids part of your everyday
life and be patient with yourself until you
have retrained yourself to interpret the
sounds correctly.
13
Operating instructions
Your BTE hearing aids come with a push button
that allows you to further adjust your hearing
aids.
Push button
Your hearing aids are equipped with
a push button which can be set for
switching between programs, to adjust
your volume or adjust the comfort-clarity control.
Program control
If the push button has been configured as a
program control, each time you push the button,
you will move to a new hearing aid program.
Your hearing aids beep to indicate which
program you are in.
14
Program 1
(e.g. automatic program)
Program 2 (e.g. speech in noise)
1 beep
Program 3 (e.g. telephone)
3 beeps
2 beeps
4 beeps
Program 4 (e.g. music)
DuoLink (if enabled) (see pg 20)
Opposite ear beeps
the same as side
being adjusted
Volume control
If the push button has been configured as a
volume control:
• Push the button on your right hearing aid to
increase the volume in both hearing aids.
• Push the button on your left hearing aid to
decrease the volume in both hearing aids.
Volume setting
Recommended volume level
Beeps
1 beep
Turning volume up
short beep
Turning volume down
short beep
Maximum volume level
2 beeps
Minimum volume level
2 beeps
15
Comfort-clarity control
If the push button has been configured as a
comfort-clarity control:
• Push the button on your right hearing aid to
increase clarity of speech.
• Push the button on your left hearing aid to
decrease overall noise or improve listening
comfort.
Comfort-clarity control setting
Ideal comfort and clarity level
Increase sound clarity level
Beeps
1 beep
short beep
Increase listening comfort
short beep
Maximum sound clarity level
2 beeps
Maximum listening comfort level
2 beeps
Each step will change the hearing aid
performance. Sometimes multiple steps are
required to achieve the desired listening results.
After each press wait for about 4-5 seconds
to allow the hearing aid to adjust to the new
setting.
As you change the comfort-clarity level, your
hearing aids will beep.
16
17
DuoLink
Remote control
If DuoLink is enabled, then changing the volume,
program or comfort-clarity setting on one
hearing aid, will automatically make the change
to both hearing aids at the same time.
Your hearing aids may also come with an
optional remote control which allows you to
switch between different listening programs,
and change your volume or comfort-clarity
settings.
For example, if your push button is configured
as a program control and DuoLink is enabled,
when you push the button on your right hearing
aid, the program will change in both hearing
aids.
Learning
Your hearing aids will learn your adjustments
in different environments, if this feature is
available and has been enabled by your hearing
healthcare professional. Over time, the hearing
aids will adjust the default volume and comfortclarity settings to the levels that you typically
use.
18
19
Using the telephone
Caring for your hearing aids
As telephones do not all work the same, you
may experience different results from different
phones. You can use many phones by simply
holding the receiver to your ear, without the
need to change to a dedicated telephone
program on your hearing aids. Remember to
move the handset slightly up or back to find the
position that sounds best to you.
Open the battery door when not in use.
Depending on the phone type you use, your
hearing healthcare professional might have
selected a dedicated phone program on your
hearing aids.
If your hearing aids are configured to work with
the wireless uDirect 2 neck worn accessory,
you might benefit from a Bluetooth hands free
option. Refer to the uDirect 2 user guide for
more information.
™
®
® Bluetooth is a registered trademark of Bluetooth SIG Inc.
20
Always remove your hearing aids when using
hair care products. The hearing aids can become
clogged and cease to function properly.
Do not wear your hearing aids in the bath or
shower or immerse them in water.
If your hearing aids do become wet, do not
attempt to dry them in an oven or microwave.
Do not adjust any controls. Open the battery
doors immediately, and allow your hearing aids
to dry naturally for 24 hours.
Protect your hearing aids from excessive heat
(hair dryer, vehicle glove box or dashboard).
Regular use of a dehumidifier, such as a Dri-Aid
kit, can help prevent corrosion and prolong the
life of your hearing aids.
Do not drop your hearing aids or knock them
against hard surfaces.
21
Cleaning your hearing aids
Ear wax is natural and common. Ensuring your
hearing aids are free of ear wax is an important
step in your daily cleaning and maintenance
routine.
Never use alcohol to clean your hearing aids,
earmolds or domes.
Do not use sharp tools to dislodge ear wax.
Sticking household items into your hearing aids
or earmolds can seriously damage them.
Earmolds
If the earmolds require further cleaning:
1.Disconnect the plastic tube from the hook of
the hearing aids.
2.Wash only the earmolds in warm water with a
mild soap.
3.Rinse them with cool water and dry overnight.
4.Make sure the earmold tubes are dry before
reconnecting them to each hook on your
hearing aids. Use of a hearing aid blower
can assist with removing moisture/debris
from tube. See your hearing healthcare
professional for more information.
Always ensure earmolds are
clean and free of earwax.
Do not use alcohol to clean
your earmolds.
If the earmolds become plugged, clear the
opening with a wax loop or pipe cleaner.
If your physician prescribes eardrops, clean
any moisture that may get into the earmolds or
tubing to prevent plugging.
22
23
Slim tubes and domes
You should have the slim tubes
and domes replaced by your
hearing healthcare professional
approximately every three to
six months or when they become stiff, brittle, or
discolored.
Clean the domes daily with a damp cloth.
You should also clean the slim tubes periodically,
with the cleaning pin provided, when you begin
to notice debris in and around the tubes.
1. Hold the slim tube in one hand and the
hearing aid in the other hand.
2. Gently turn the hearing aid until it detaches
from the slim tube.
3. Use a damp cloth to clean the outside of the
slim tube and dome.
5. Using the black cleaning
pin provided in the kit,
gently insert the cleaning
pin where the slim tube
attaches to the hearing
aid and push the pin all
the way through the tube.
ote: The slim tubes and domes should never
N
be rinsed or submerged in water as water drops
may become lodged in the tube, block sound
or damage the electrical components of the
hearing aid.
6. Once the slim tube has been cleaned,
reattach it by gently turning the hearing aid
onto the slim tube.
7.Reattach the dome to the slim tube by gently
pushing it back onto the threading at the end
of the tube.
4. Remove the dome from the slim tube by
pulling gently, before cleaning the slim tube.
24
25
Signature features of your hearing aids
Comfort-clarity control
Your hearing aids automatically adjust to focus
on hearing speech more clearly or providing
comfort in noisy situations. Some Quantum BTE
hearing aid models provide a control to adjust
your comfort-clarity settings.
• Adjusting the comfort-clarity control up
causes your hearing aids to focus more on
speech clarity.
• Adjusting the comfort-clarity control
down causes your hearing aids to soften
background noise, providing more comfort.
Comfort-clarity control adjustments can be
made using the controls on your hearing aids
or a remote control. Please talk with your
hearing healthcare professional to find out
which controls have been programmed for the
comfort-clarity control.
26
As you adjust the comfort-clarity control, your
hearing aids will gradually learn your preferred
comfort-clarity settings.
DuoLink
With DuoLink, your hearing aids wirelessly
communicate with each other. As you make
a program, comfort-clarity or volume change
on one hearing aid, the other hearing aid
automatically changes as well.
Binaural Phone
The Binaural Phone feature enables you to hold
a landline or mobile phone to one ear and hear
the sound clearly in both ears. No accessories
are required.
27
Troubleshooting guide
uDirect 2 and uTV 2
The uDirect 2 and uTV 2 are optional
accessories for Quantum micro BTE hearing aids.
™
™
• uDirect 2 provides easy, hands-free access to
Bluetooth enabled devices, such as mobile
phones. It also has a wired audio jack to plug
in devices like MP3 players.
• uTV 2 is used with the uDirect 2 to transmit
sound from your TV directly to your hearing
aids. The uTV 2 can also transmit sound from
stereo systems, computers and other audio
sources.
For more information on using the uDirect 2
or uTV 2, please see the user guide for that
accessory. For information on how to get a
uDirect 2 or uTV 2 accessory, please contact
your hearing healthcare professional.
28
Cause
Possible remedy
No sound
Not turned on
Turn on
Low/dead battery
Replace battery
Poor battery contact
Consult your hearing
healthcare professional
Battery upside down
Insert battery plus (+) side
up
Earmolds/slim tubes/
domes blocked with ear
wax
Clean earmolds/ domes.
See “Cleaning your hearing
aids”. Use cleaning pin to
dislodge ear wax in slim
tubes. Consult your hearing
healthcare professional.
Plugged microphone shield Consult your hearing
healthcare professional
29
Cause
Possible remedy
Not loud enough
Low volume
Cause
Turn up volume; see
hearing healthcare
professional for models
without a manual volume
control or if problem
persists.
Two long beeps
Low battery
Replace battery
Low battery
Earmolds/slim tubes/
domes not inserted
properly
See “Putting your hearing
aids on your ears”. Reinsert
carefully.
Whistling
Change in hearing
Consult your hearing
healthcare professional
Earmolds/slim tubes/
domes blocked with
ear wax
Clean earmolds.
See “Cleaning your hearing
aids”. Use cleaning pin to
dislodge ear wax in slim
tubes. Consult your hearing
healthcare professional.
Plugged microphone
shield
Consult your hearing
healthcare professional
30
Possible remedy
Intermittent
Low battery
Replace battery
Dirty battery contact
Consult your hearing
healthcare professional
Replace battery
Earmolds/slim tubes/
domes not inserted
properly
See “Putting your hearing
aids on your ears”. Reinsert
carefully.
Hand/clothing
near ear
Move hand/clothing away
from your ear
Poorly fitting
earmolds/slim tubes/
domes
Consult your hearing
healthcare professional
31
Cause
Possible remedy
Earmolds/slim tubes/
domes blocked with ear
wax
Possible remedy
Weak on the telephone
Not clear, distorted
Poorly fitting earmolds/
slim tubes/domes
Cause
Consult your hearing
healthcare professional
Clean earmolds. See
“Cleaning your hearing
aids”. Use cleaning pin to
dislodge ear wax in slim
tubes. Consult your hearing
healthcare professional.
Low battery
Replace battery
Plugged microphone
shield
Consult your hearing
healthcare professional
Telephone not
positioned properly
Move telephone receiver
around ear for clearer
signal. See “Using the
telephone”.
Hearing aid requires
adjustment
Consult your hearing
healthcare professional
For any problems not listed in the guide, contact your
hearing healthcare professional.
Earmolds/slim tubes/domes falling out of ear
Poorly fitting earmolds/
slim tubes/domes
Consult your hearing
healthcare professional
Earmolds/slim tubes/
domes not inserted
properly
See “Putting your
hearing aids on your ears”.
Reinsert carefully.
32
33
Warnings
Hearing aids should only be used as directed
by your physician or hearing healthcare
professional.
Hearing aids will not restore normal hearing
and will not prevent or improve a hearing
impairment resulting from organic conditions.
Do not use your hearing aids in explosion
hazard areas.
Allergic reactions to hearing aids are
unlikely. However, if you experience itching,
redness, soreness, inflammation or a burning
sensation in or around your ears, inform your
hearing healthcare professional and contact
your physician.
In the unlikely case that any parts remain in
the ear canal after the removal of the hearing
aid, contact a physician immediately.
34
Remove your hearing aids for CT and
MRI scans or for other electromagnetic
procedures.
Special care should be exercised in wearing
hearing aids when maximum sound
pressure levels exceed 132 decibels. There
may be a risk of impairing your remaining
hearing. Speak with your hearing healthcare
professional to ensure the maximum output
of your hearing aids is suitable for your
particular hearing loss.
Battery warnings
Never leave hearing aids or batteries where
small children and pets can reach them.
Never put hearing aids or batteries in
your mouth. If a hearing aid or battery is
swallowed, call a physician immediately.
35
Precautions
The use of hearing aids is only part of hearing
rehabilitation; auditory training and lip
reading instruction may be required as well.
In most cases, infrequent use of hearing aids
does not provide full benefit. Once you have
become accustomed to your hearing aids,
wear your hearing aids everyday all day.
Your hearing aids use the most modern
components to provide the best possible
sound quality in every listening situation.
However, communication devices such as
digital cell phones can create interference
(a buzzing sound) in hearing aids. If you
experience interference from a cell phone
being used close by, you can minimize this
interference in a number of ways. Switch your
hearing aids to another program, turn your
head in a different direction or locate the cell
phone and move away from it.
36
Note to hearing healthcare professional
Domes should never be fitted on patients
with perforated eardrums, exposed middle
ear cavities, or surgically altered ear
canals. In the case of such a condition, we
recommend to use a customized ear mold.
Labeling
The serial number and year of manufacture are
located inside the battery door.
37
Client feedback
Record your specific needs or concerns and bring to
your first office visit after getting your hearing aids.
This will help your hearing healthcare professional to
address your needs.
__________________________________________
__________________________________________
__________________________________________
Additional notes
____________________________________________
____________________________________________
____________________________________________
____________________________________________
____________________________________________
__________________________________________
____________________________________________
__________________________________________
__________________________________________
__________________________________________
____________________________________________
____________________________________________
__________________________________________
__________________________________________
__________________________________________
38
39
Aperçu de vos instruments auditifs
1 Coude auriculaire : vos embouts auriculaires sur
mesure sont raccordés à vos instruments auditifs
par le coude auriculaire
2 Microphone : le son entre dans vos instruments
auditifs par l’intermédiaire des microphones.
Protège-microphone : protège les microphones
de la saleté et des résidus
3 Bouton : permet de passer d’un programme
d’écoute à un autre ou de changer le niveau de
volume ou de confort/clarté, selon vos réglages
personnalisés.
4 Couvercle du compartiment à pile/mise en
marche et arrêt : fermez le couvercle pour mettre
en marche vos instruments auditifs, ouvrez
partiellement le couvercle pour les arrêter.
L’ouverture complète du couvercle vous permet
d’accéder à la pile pour la remplacer
5Embout auriculaire : permet aux sons de passer
des instruments auditifs aux oreilles et maintient
les instruments auditifs en place
6 Tube fin : le son voyage le long du tube fin vers le
canal auditif
7 Dôme : maintient le tube fin en place dans votre
conduit auditif
40
8 Pièce de rétention : aide à empêcher le dôme et le
tube fin de sortir du conduit auditif
2
3
2
1
4
5
2
3
2
6
4
8
7
41
Mise en place de vos instruments
auditifs sur vos oreilles
Vos instruments auditifs contours d’oreille
peuvent posséder un code de couleur sous
la forme d’un petit point situé sur le couvercle
du compartiment à pile : rouge = oreille droite;
bleu = oreille gauche.
et bien ajusté à votre oreille. Tirer votre lobe
d’oreille vers le bas et vers l’arrière peut
vous aider à insérer plus facilement l’embout
auriculaire dans votre conduit auditif.
3.
3.Placez l’instrument auditif
sur le dessus de votre
oreille.
Contours d’oreille avec embouts
auriculaires
Contours d’oreille avec
tubes fins
1.Saisissez l’embout auriculaire 1.
entre le pouce et l’index.
L’ouverture doit être orientée
vers votre conduit auditif, le
contour d’oreille reposant en
haut de votre oreille.
2.Insérez doucement l’embout 2.
auriculaire dans votre oreille.
Vous devrez peut-être le
tourner légèrement vers
l’arrière. L’embout auriculaire
doit être agréable à porter
42
1.Placez l’instrument auditif
sur le dessus de votre
oreille. Le tube fin doit
affleurer et non dépasser
de l’oreille.
2.Tenez le tube fin au niveau
de son point d’attache
avec le dôme et poussez
doucement ce dernier
à l’intérieur du conduit
auditif.
1.
2.
43
3.Placez la pièce de rétention 3.
dans votre oreille de façon à
ce qu’elle repose au bas de
l’ouverture de votre conduit
auditif.
2.Arrêt : Ouvrez partiellement 2.
le couvercle du
compartiment à pile.
Mise en marche et arrêt de vos
instruments auditifs
3.Ouvert : Ouvrez
complètement le couvercle
du compartiment à pile
pour accéder à la pile et
la remplacer.
Vos instruments auditifs possèdent un couvercle
de compartiment à pile à trois positions qui agit
comme un interrupteur marche/arrêt et permet
l’accès au compartiment à pile.
1.
1.Mise en marche : Fermez
complètement le couvercle
du compartiment à pile.
marche
arrêt
3.
ouvert
emarque: Lorsque que vous activez ou
R
désactivez votre instrument auditif alors qu’il
est sur l’oreille, saisissez le haut et le bas de
l’instrument avec votre index et votre pouce.
Utilisez votre pouce pour ouvrir et fermer la
porte de pile.
Remarque : L’instrument auditif peut prendre
5 secondes à se mettre en marche. Votre
audioprothésiste peut encore augmenter le
délai de mise en marche si cela est nécessaire.
44
45
Informations sur la pile
Pour remplacer la pile, ouvrez complètement le
couvercle de façon à accéder au compartiment
à pile.
piles, celles-ci peuvent s’épuiser avant qu’un
autre avertissement se produise. Il est donc
recommandé de remplacer les piles dès que
possible lorsque vous entendez l’avertissement
de pile faible.
Avertissement de pile faible
Remplacement de la pile
Deux longs bips sonores indiquent que
la pile de l’instrument auditif est presque
épuisée. Après le premier avertissement, vous
constaterez peut-être une certaine diminution
de la qualité sonore. Ceci est normal et peut être
corrigé en remplaçant la pile par une nouvelle.
1.Ouvrez doucement le couvercle
du compartiment à pile avec
votre ongle.
1.
2.Attrapez la pile à l’aide de votre
pouce et de votre index puis
retirez-la.
2.
Si vous ne parvenez pas à entendre
l’avertissement de pile faible, votre
audioprothésiste peut en modifier la tonalité et
l’intensité. Si vous préférez, cette fonction peut
être désactivée.
os instruments auditifs sont conçus pour
V
émettre un avertissement de pile faible
toutes les 30 minutes jusqu’à ce que vous
changiez les piles; toutefois, selon l’état des
46
3.Insérez la nouvelle pile dans
3.
le compartiment à pile en
alignant les signes (+) de la
pile et du bord du couvercle
du compartiment à pile. Cela
permettra au couvercle du compartiment à
pile de se fermer correctement.
47
La pile neuve demeurera en place lorsque vous
refermerez le couvercle du compartiment à pile.
Remarque : Si la pile est mal
4.
insérée, l’instrument auditif ne se
mettra pas en marche.
Entretien des piles
4.Fermez le couvercle du
compartiment à pile.
Débarrassez-vous toujours des piles de manière
sûre et écologique.
Remplacement de la pile d’instruments
auditifs munis d’un couvercle de
compartiment à pile inviolable
Pour prolonger la durée de vie de la pile, pensez
à arrêter vos instruments auditifs lorsque vous
ne les utilisez pas.
Certains instruments auditifs
possèdent un couvercle de
compartiment à pile inviolable
à des fins de sécurité. Pour
remplacer la pile, ouvrez le
compartiment à pile et repoussez
le verrou vers l’intérieur de
l’instrument auditif à l’aide du
bout d’un stylo.
1.
Retirez la pile usagée. Insérez
une pile neuve en alignant les
signes (+) de la pile et du bord du
couvercle du compartiment à pile.
3.
48
2.
Retirez la pile et laissez le couvercle du
compartiment à pile ouvert lorsque vous
n’utilisez pas les instruments auditifs. Cela
permettra à l’humidité située à l’intérieur de
s’évaporer.
49
Conseils pour le port initial
d’instruments auditifs
1.Commencez par les utiliser chez vous, dans
une pièce au calme, pour vous habituer à
la nouvelle qualité de son. Certains sons,
comme le mécanisme d’une horloge, le
bourdonnement d’un ordinateur, la sonnerie
du four à micro-ondes ou le bruissement des
vêtements ou du papier peuvent vous sembler
forts au début, car cela fait un certain temps
que vous ne les entendez pas correctement.
2.Lisez à haute voix et apprenez à ajuster le
volume de votre propre voix lorsque vous
portez un instrument auditif.
3.Parlez à différentes personnes et réapprenez à
distinguer les différents types de sons.
4.Il vous faudra un peu de temps pour vous
habituer complètement à vos instruments
auditifs et pour profiter pleinement de leurs
avantages.
5.Portez vos instruments auditifs aussi
50
longtemps que vous le pouvez au cours d’une
journée et de plus en plus longtemps chaque
jour.
6. À l’endos de ce livret, notez les situations
difficiles et décrivez tout bruit désagréable.
Ces renseignements aideront votre
audioprothésiste à effectuer les derniers
réglages sur votre dispositif.
7.Demandez à votre famille et à vos amis de
participer à cette période de familiarisation.
Par exemple, demandez à quelqu’un d’ajuster
le son de la télévision à un volume confortable.
8.Lorsque vous commencez à vous habituer à
porter un instrument auditif, portez-le dans
des environnements où il est plus difficile
d’entendre, comme au bureau, lors de fêtes
ou au restaurant. Cela peut être difficile
même pour des personnes qui entendent
normalement. Donnez-vous le temps de
retrouver votre capacité à entendre lors de ces
situations difficiles.
51
9.Intégrez vos instruments auditifs à vos
activités quotidiennes et soyez patient
avec vous-même pendant cette période de
réapprentissage des sons.
Instructions d’utilisation
Vos instruments auditifs de type contour
possèdent un bouton poussoir vous permettant
des ajustements manuels au besoin.
Votre instrument auditif émet des bips sonores
pour indiquer le programme que vous utilisez.
Programme 1
(ex. : programme automatique)
Programme 2 (ex. : parole dans
un environnement bruyant)
Programme 3 (ex. : téléphone)
3 bips
Programme 4 (ex. : musique)
4 bips
DuoLink (si activé)
(voir page 20)
Bouton
Vos instruments auditifs sont équipés
d’un bouton qui peut être configuré
pour passer d’un programme à l’autre,
régler le volume ou le confort/clarté.
Commande de programme
Si le bouton a été configuré comme un bouton
de programme, vous passerez à un nouveau
programme d’instrument auditif chaque fois
que vous appuierez sur le bouton.
52
1 bip
2 bips
L’instrument auditif
opposé émet des bips
de la même manière que
le côté que l’on ajuste
Commande de volume
Si le bouton a été configuré comme commande
de volume :
• Appuyez sur le bouton de votre instrument
auditif droit pour augmenter le volume des
deux côtés.
• Appuyez sur le bouton de votre instrument
auditif gauche pour baisser le volume des
deux côtés.
53
Commande de volume
Volume recommandé
Bips
Augmentation du volume
1 bip
bip court
Diminution du volume
bip court
Volume maximal
2 bips
Volume minimal
2 bips
Réglage du confort/clarté
Si le bouton a été configuré comme un réglage
du confort/clarté :
• Appuyez sur le bouton de votre instrument
auditif droit pour augmenter la clarté de la
parole.
• Appuyez sur le bouton de votre instrument
auditif gauche pour adoucir le bruit de fond
global ou améliorer le confort d’écoute.
54
Chaque palier modifiera la performance de
l’instrument auditif. Parfois, plusieurs paliers
sont nécessaires pour obtenir les résultats
d’écoute désirés. Après chaque palier, attendez
4 à 5 secondes pour permettre à l’instrument
auditif de s’adapter au nouveau réglage.
Lorsque vous changerez le niveau de confort/
clarté, vos instruments auditifs émettront des
bips.
Réglage du confort/clarté
Confort/clarté idéaux
Bips
1 bip
Augmenter le niveau de clarté
sonore
Augmenter le confort d’écoute
bip court
Clarté sonore maximale
2 bips
Confort d’écoute maximal
2 bips
bip court
55
DuoLink
Télécommande
Si DuoLink est activé, le changement
de commande de volume, de réglage
de programme ou de confort/clarté sur
un instrument auditif s’effectuera alors
simultanément dans les deux instruments
auditifs.
Vos instruments auditifs peuvent également
être fournis avec une télécommande en option,
qui permet de passer d’un programme d’écoute
à un autre et de changer vos commandes de
volume et vos réglages de confort/clarté.
Par exemple, si votre bouton a été configuré
comme un bouton de programme et que
DuoLink est activé, lorsque vous appuyez sur
le bouton de votre instrument auditif droit, le
programme change dans les deux instruments
auditifs.
Apprentissage
Vos instruments auditifs enregistreront vos
ajustements dans différents environnements,
si cette fonction est disponible et que votre
audioprothésiste l’a activée. Au fil du temps, vos
instruments auditifs ajusteront les commandes
de volume, de confort/clarté par défaut aux
niveaux que vous utilisez habituellement.
56
57
Utilisation du téléphone
Entretien de vos instruments auditifs
Les téléphones ne fonctionnant pas tous de
la même manière, vous constaterez différents
résultats selon le type de téléphone. Vous
pouvez utiliser de nombreux téléphones
en tenant simplement le récepteur près de
votre oreille, sans avoir à faire passer votre
instrument auditif à un programme consacré
au téléphone. Pensez à déplacer légèrement le
combiné vers le haut ou à le reculer pour trouver
la position qui vous offre la meilleure écoute.
Ouvrez le couvercle du compartiment à pile
lorsque l’instrument auditif n’est pas utilisé.
Selon le type de téléphone que vous utilisez,
votre audioprothésiste peut avoir sélectionné
un programme dédié au téléphone sur votre
instrument auditif.
Si vos instruments auditifs venaient à être
mouillés, n’essayez pas de les faire sécher dans
un four traditionnel ou à micro-ondes. N’ajustez
pas les commandes. Ouvrez immédiatement le
compartiment à pile et laissez vos instruments
auditifs sécher à l’air libre pendant 24 heures.
Si vos instruments auditifs sont configurés pour
fonctionner avec l’accessoire sans fil uDirect 2
vous pouvez profiter d’une option mains libres
Bluetooth. Consultez le guide de l’utilisateur
uDirect 2 pour obtenir plus de renseignements.
MC
®
Retirez toujours vos instruments auditifs
lorsque vous utilisez des produits de soin pour
les cheveux. Les instruments auditifs pourraient
s’obstruer et ne plus fonctionner correctement.
Ne portez pas vos instruments auditifs dans le
bain ou sous la douche et ne les immergez pas
dans l’eau.
Protégez vos instruments auditifs contre la
chaleur excessive (sèche-cheveux, boîte à gants
ou tableau de bord).
® Bluetooth est une marque de commerce déposée de Bluetooth SIG Inc.
58
59
Embouts auriculaires
L’utilisation régulière d’un déshumidificateur,
comme un ensemble Dri-Aid, peut aider à lutter
contre la corrosion et prolonger la durée de vie
de vos instruments auditifs.
Veillez à ce que les embouts
auriculaires soient toujours
propres et exempts de cérumen.
Ne laissez pas vos instruments auditifs tomber
ou heurter des surfaces dures.
N’utilisez pas d’alcool pour
nettoyer vos embouts auriculaires.
Nettoyage de vos instruments auditifs
Le cérumen est une matière naturelle. Vérifier
que vos instruments auditifs ne contiennent
pas de cérumen est une étape importante de la
routine quotidienne de nettoyage et d’entretien.
N’utilisez jamais d’alcool pour nettoyer vos
instruments auditifs, embouts auriculaires ou
dômes.
N’utilisez pas d’outils pointus ou tranchants
pour enlever le cérumen. Insérer des objets
dans vos instruments auditifs ou dans les
embouts auriculaires peut gravement les
endommager.
60
Si les embouts auriculaires venaient à être
obstrués, dégagez leur ouverture à l’aide d’une
boucle à cérumen ou d’un cure-pipe.
Si votre médecin vous prescrit des gouttes
pour les oreilles, enlevez l’humidité qui peut
s’introduire dans les embouts auriculaires ou le
tube, pour en prévenir l’obturation.
Si les embouts auriculaires nécessitent un
nettoyage approfondi :
1.Retirez le tube en plastique du coude des
instruments auditifs.
2.Lavez uniquement les embouts auriculaires à
l’eau chaude et au savon doux.
3.Rincez-les ensuite à l’eau froide et laissez-les
sécher jusqu’au lendemain.
61
Tubes fins et dômes
Faites remplacer les tubes
fins et les dômes par votre
audioprothésiste tous les trois
à six mois environ ou lorsqu’ils
durcissent ou deviennent
friables ou décolorés.
Nettoyez les dômes quotidiennement avec un
chiffon humide.
Vous devez aussi nettoyer régulièrement les
tubes fins à l’aide de la tige de nettoyage
fournie lorsque vous constatez que des résidus
commencent à s’accumuler à l’intérieur et
autour des tubes.
1. Tenez le tube fin dans une main et
l’instrument auditif dans l’autre.
2. Tournez doucement l’instrument auditif
jusqu’à ce qu’il se détache du tube fin.
3. Utilisez un chiffon humide pour nettoyer
l’extérieur du tube fin et du dôme.
62
4. Retirez le dôme du tube fin en tirant
doucement, avant de nettoyer le tube fin.
5. Insérez doucement la
tige de nettoyage noire
fournie avec l’ensemble
dans l’extrémité du tube
qui se fixe à l’instrument
auditif et poussez la tige jusqu’au bout
du tube.
emarque : Les tubes fins et les dômes ne
R
doivent jamais être rincés ou immergés, car
des gouttes d’eau pourraient s’y introduire et
bloquer le passage du son ou endommager les
composants électriques de l’instrument auditif.
6. Une fois le tube fin nettoyé, rattachez-le
en tournant doucement l’instrument auditif
dessus.
7.Rattachez le dôme au tube fin en poussant
doucement pour l’enfiler à l’extrémité
du tube.
63
Caractéristiques distinctives de vos instruments auditifs
Réglage du confort/clarté
Vos instruments auditifs peuvent s’ajuster
automatiquement de façon à vous permettre de
vous concentrer davantage sur les paroles ou
de vous offrir plus de confort dans les situations
bruyantes. Certains modèles d’instruments
auditifs Quantum sont dotés d’un réglage qui
vous permet d’ajuster le confort/clarté.
• L’ajustement vers le haut des réglages
de confort/clarté permet aux instruments
auditifs de se concentrer davantage sur
la parole.
• L’ajustement vers le bas des réglages de
confort/clarté permet à vos instruments
auditifs d’adoucir le bruit de fond, pour
un confort accru.
L’ajustement des réglages de confort/clarté peut
se faire à l’aide des boutons de vos instruments
64
auditifs ou d’une télécommande. Veuillez vous
informer auprès de votre audioprothésiste pour
connaître les réglages qui ont été programmés
pour l’ajustement du confort/clarté.
Au fur et à mesure que vous ajustez les réglages
de confort/clarté, vos instruments auditifs
Quantum enregistreront progressivement vos
réglages de confort/clarté préférés.
DuoLink
Grâce à DuoLink, vos instruments auditifs peuvent
communiquer entre eux sans fil. Lorsque vous
effectuez un changement de programme, de
confort/clarté ou de volume sur un instrument
auditif, l’autre instrument auditif procède
automatiquement au changement.
Programme téléphonique binaural
La fonction de programme téléphonique binaural
vous permet de tenir le combiné d’un téléphone
utilisant une ligne terrestre ou un téléphone
mobile devant une oreille et d’entendre clairement
des deux oreilles. Aucun accessoire n’est requis.
65
Guide de dépannage
uDirect 2 et uTV 2
Les accessoires uDirect 2 et uTV 2 sont offerts
en option pour les instruments auditifs contours
d’oreille Quantum.
MC
MC
• uDirect 2 offre un accès mains libres facile
à des dispositifs dotés de la technologie
Bluetooth, comme des téléphones mobiles. Il
est également doté d’une prise d’entrée audio
câblée pour brancher des dispositifs tels que
des lecteurs MP3.
• L e système uTV 2 est utilisé conjointement
avec uDirect 2 pour transmettre le son de votre
télévision directement à vos instruments auditifs.
L’accessoire uTV 2 peut également transmettre
le son de votre chaîne stéréophonique, de votre
ordinateur et de vos autres sources audio.
Pour obtenir de plus amples renseignements sur
l’utilisation de uDirect 2 ou uTV 2, veuillez consulter
le guide de l’utilisateur pour ces accessoires.
Veuillez communiquer avec votre audioprothésiste
pour savoir comment vous procurer un accessoire
uDirect 2 ou uTV 2.
66
Symptôme
Solution possible
Aucun son
Pas en marche
Mettre en marche
Pile faible ou épuisée
Remplacer la pile
Mauvais contact de la pile
Consulter votre
audioprothésiste
Pile à l’envers
Insérer la pile avec le signe
plus (+) vers le haut
Embouts auriculaires/
tubes fins/dômes
obstrués par du cérumen
Protège-microphone
obstrué
Nettoyer les embouts
auriculaires/dômes.
Consulter la section
“Nettoyage de vos
instruments auditifs”.
Utiliser la tige de nettoyage
pour déloger le cérumen
qui obstrue les tubes
fins. Consulter votre
audioprothésiste.
Consulter votre
audioprothésiste
67
Symptôme
Solution possible
Volume insuffisant
Volume bas
Solution possible
Intermittence
Augmenter le
volume; consulter un
audioprothésiste pour les
modèles sans commande
de volume manuelle, ou si le
problème persiste.
Pile faible
Remplacer la pile
Embouts auriculaires/
tubes fins/dômes mal
insérés
Consulter la section “Mise
en place de vos instruments
auditifs sur vos oreilles”.
Remettre soigneusement
l’instrument auditif en place.
Changement dans
l’audition
Consulter votre
audioprothésiste
Embouts auriculaires/
tubes fins/dômes
obstrués par du cérumen
Nettoyer les embouts
auriculaires. Consulter
la section “Nettoyage de
vos instruments auditifs”.
Utiliser la tige de nettoyage
pour déloger le cérumen
qui obstrue les tubes
fins. Consulter votre
audioprothésiste.
Protège-microphone
obstrué
Consulter votre
audioprothésiste
68
Symptôme
Pile faible
Remplacer la pile
Contact de pile sale
Consulter votre
audioprothésiste
Deux bips longs
Pile faible
Remplacer la pile
Sifflement
Embouts auriculaires/
tubes fins/dômes mal
insérés
Consulter la section “Mise
en place de vos instruments
auditifs sur vos oreilles”.
Remettre soigneusement
l’instrument auditif en place.
Main/vêtement près de
l’oreille
Éloigner la main/
le vêtement de votre oreille
Embouts auriculaires/
tubes fins/dômes mal
ajustés
Consulter votre
audioprothésiste
69
Symptôme
Solution possible
Symptôme
Solution possible
Manque de clarté, distorsion
Faible au téléphone
Embouts auriculaires/
tubes fins/dômes mal
ajustés
Consulter votre
audioprothésiste
Téléphone mal positionné
Embouts auriculaires/
tubes fins/dômes
obstrués par du cérumen
Nettoyer les embouts
auriculaires. Consulter
la section “Nettoyage de
vos instruments auditifs”.
Utiliser la tige de nettoyage
pour déloger le cérumen
qui obstrue les tubes
fins. Consulter votre
audioprothésiste.
Déplacer le téléphone sur
l’oreille pour obtenir un
signal plus net. Consulter
la section “Utilisation du
téléphone”.
Les instruments auditifs
doivent être ajustés
Consulter votre
audioprothésiste
Pile faible
Remplacer la pile
Protège-microphone
obstrué
Consulter votre
audioprothésiste
Pour tout autre problème ne figurant pas dans ce guide,
communiquez avec votre audioprothésiste.
Embouts auriculaires/tubes fins/dômes tombant
de l’oreille
Embouts auriculaires/
tubes fins/dômes mal
ajustés
Consulter votre
audioprothésiste
Embouts auriculaires/
tubes fins/dômes mal
insérés
Consulter la section “Mise
en place de vos instruments
auditifs sur vos oreilles”.
Remettre soigneusement
l’instrument auditif en place.
70
71
Avertissements
Les instruments auditifs doivent être utilisés
conformément aux instructions de votre
audioprothésiste.
Les instruments auditifs ne rétabliront pas
l’audition normale et ne préviendront pas ni
n’amélioreront pas, une perte auditive due à
des conditions organiques.
Les instruments auditifs ne doivent pas être
utilisés dans des zones présentant un danger
d’explosion.
Les réactions allergiques aux instruments
auditifs sont peu probables. Cependant,
en cas de démangeaison, de rougeur, de
douleur, d’inflammation ou de sensation
de brûlure à l’intérieur ou autour des
oreilles, informez votre audioprothésiste et
communiquez avec votre médecin.
Dans l’éventualité improbable où des pièces
resteraient dans votre conduit auditif après
le retrait de l’instrument auditif, contactez
72
immédiatement un médecin.
Retirez vos instruments auditifs pour les
scanographies, examens par IRM ou autres
procédures électromagnétiques.
Faites extrêmement attention lorsque vous
portez vos instruments auditifs dans un
endroit où le niveau de pression sonore
maximal dépasse 132 décibels. Vous pourriez
affecter votre audition. Communiquez avec
votre audioprothésiste pour vérifier que le
niveau de sortie maximal de vos instruments
auditifs convient à votre perte auditive.
Avertissements concernant les piles
Ne laissez jamais les instruments auditifs
ou les piles à la portée de jeunes enfants ou
d’animaux.
Ne mettez jamais les instruments auditifs ou
les piles dans votre bouche. Si un instrument
auditif ou une pile est ingéré, appelez
immédiatement un médecin.
73
Précautions
L’utilisation d’instruments auditifs ne
constitue qu’une partie de la réhabilitation
auditive; des exercices d’écoute et de
lecture labiale peuvent également s’avérer
nécessaires.
Dans la plupart des cas, une utilisation
irrégulière des instruments auditifs ne
permet pas de tirer pleinement avantage de
ceux-ci. Une fois que vous êtes habitué à vos
instruments auditifs, portez-les tous les jours
et toute la journée.
Vos instruments auditifs utilisent les
composants les plus récents pour vous offrir
la meilleure qualité sonore, quel que soit
votre environnement d’écoute. Cependant,
des instruments de communication,
comme les téléphones cellulaires
numériques, peuvent créer des interférences
(bourdonnements) avec vos instruments
auditifs. Si vous constatez la présence
74
d’interférences liées à la proximité d’un
téléphone cellulaire, vous pouvez minimiser
celles-ci de différentes manières: changer
le programme de vos instruments auditifs,
tourner la tête dans une autre direction ou
repérer le téléphone cellulaire pour vous en
éloigner.
Remarque destinée à l’audioprothésiste
Il ne faut jamais installer de dôme sur des
patients avec des tympans perforés, des
caisses de tympan exposées ou des conduits
auditifs altérés par chirurgie. Dans le cas de
telles affections, nous conseillons d’utiliser
un embout auriculaire sur mesure.
Identification
Le numéro de série et l’année de fabrication
sont indiqués sur l’intérieur du couvercle du
compartiment à pile.
75
Commentaires du client
Remarques supplémentaires
Notez vos besoins ou vos préoccupations spécifiques
et apportez-les lors de votre première visite suivant
la réception de vos instruments auditifs. Cela aidera
votre audioprothésiste à répondre à vos besoins.
____________________________________________
__________________________________________
____________________________________________
__________________________________________
__________________________________________
__________________________________________
__________________________________________
____________________________________________
____________________________________________
____________________________________________
____________________________________________
__________________________________________
____________________________________________
__________________________________________
____________________________________________
__________________________________________
__________________________________________
__________________________________________
76
77
Compliance information
Declaration of conformity
Hereby Unitron declares that this Unitron product meets the
requirements of the Medical Devices Directive 93/42/EEC as
well as the Radio and Telecommunications Terminal Equipment
Directive 1999/5/EC. The full text of the Declaration of Conformity
can be obtained from the manufacturer.
The hearing aid described in this user guide is certified under:
Standard hearing system
USA Canada FCC ID: VMY-UWBTE1
IC: 2756A-UWBTE1
Notice 1
This device complies with Part 15 of the FCC Rules and with RSS210 of Industry Canada. Operation is subject to the following two
conditions:
1) this device may not cause harmful interference, and
2) this device must accept any interference received, including
interference that may cause undesired operation.
Notice 3
This device has been tested and found to comply with the limits for
a Class B digital device, pursuant to Part 15 of the FCC Rules and
ICES-003 of Industry Canada. These limits are designed to provide
reasonable protection against harmful interference in a residential
installation. This device generates, uses and can radiate radio
frequency energy and, if not installed and used in accordance
with the instructions, may cause harmful interference to radio
communications. However, there is no guarantee that interference
will not occur in a particular installation. If this device does cause
harmful interference to radio or television reception, which can
be determined by turning the equipment off and on, the user is
encouraged to try to correct the interference by one or more of the
following measures:
• Reorient or relocate the receiving antenna
• Increase the separation between the equipment and receiver
• Connect the device into an outlet on a circuit different from
that to which the receiver is connected
• Consult the dealer or an experienced radio/TV technician for
help
Notice 2
Changes or modifications made to this device not expressly
approved by Unitron may void the FCC authorization to operate
this device.
78
79
Unitron Hearing Ltd.
20 Beasley Drive, P.O. Box 9017,
Kitchener, ON N2G 4X1 Canada
European Representative /
Représentant Européen
Max-Eyth-Straße 20, 70736
Fellbach-Oeffingen, Germany
Distributor/Distributeur
www.unitron.com/ca
A/11-038 029-5897