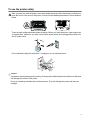
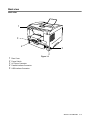
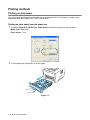
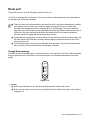
1
Brother Laser Printer
HL-1430
User's Guide
For visually-impaired users
Please see the two HTML files, index_win.html and index_mac.html,
on the supplied CD-ROM. You can read them with Screen Reader
‘text-to-speech’ software.
You must set up the hardware and install the driver before you can use the printer.
Please use the Quick Setup Guide to set up the printer. You can find a printed copy in the box or view
it on the CD-ROM we have supplied.
Please read this User’s Guide thoroughly before you use the printer. Keep the CD-ROM in a
convenient place so you can use it quickly if you need to.
Please visit our web site at http://solutions.brother.com where you can get answers to Frequently
Asked Questions (FAQs), Product Support and Technical Questions, and the latest Driver Updates
and Utilities.
Version 1
Laser printer
HL-1430 series
User's Guide
Definitions of warnings, cautions, and notes
We use the following terms throughout this User’s Guide:
You must follow these warnings to prevent possible personal injury.
You must follow these instructions to make sure you use the printer properly and do not damage it.
Remember these useful tips when you use the printer.
i
To use the printer safely
After you have just used the printer, some parts inside the printer will be extremely hot. When you
open the front or rear cover of the printer, never touch the shaded parts shown in the illustrations
below.
There are high voltage electrodes inside the printer. Before you clean the printer, clear a paper jam
or replace parts, make sure you have turned off the power switch and unplugged the printer from
the AC power outlet.
Do not handle the plug with wet hands - it might give you an electrical shock.
Caution
Use water or neutral detergents for cleaning. Cleaning with volatile liquids such as thinner or benzene
will damage the surface of the printer.
Do not use cleaning materials that contain ammonia. They will damage the printer and the toner
cartridge.
ii
Register your product
By registering your product with Brother, you will be recorded as the original owner of the product. Your
registration with Brother:
■ may serve as a confirmation of the purchase date of your product should you lose your receipt;
■ may support an insurance claim by you in the event of product loss covered by insurance; and,
■ will help us notify you of enhancements to your product and special offers.
Please complete the Brother Warranty Registration or, for you convenience and most efficient way to register
your new product, register on-line at
http://www.brother.com/registration/index.html
Frequently asked questions (FAQs)
The Brother Solutions Center is our one-stop resource for all your Printer needs. You can download the latest
software and utilities, read FAQs and troubleshooting tips, and go to the ‘Solutions’ section to learn how to get
the most from your Brother product.
http://solutions.brother.com
You can check here for the Brother driver updates.
iii
Important information: Regulations
Radio interference (220 to 240 volt model only)
This printer follows EN55022 (CISPR Publication 22)/Class B.
Before you use this product, make sure that you use a double-shielded interface cable with twisted-pair
conductors and that it is marked “IEEE1284 compliant”. The cable must not be more than 2 metres long.
International ENERGY STAR® Compliance Statement
The purpose of the International ENERGY STAR® Program is to promote the development and
popularization of energy-efficient office equipment.
As an ENERGY STAR® Partner, Brother Industries, Ltd. has determined that this product meets the ENERGY
STAR® guidelines for energy efficiency.
Laser Safety (100 to 120 volt model only)
This printer is certified as a Class I laser product under the U.S. Department of Health and Human
Services (DHHS) Radiation Performance Standard according to the Radiation Control for Health and
Safety Act of 1968. This means that the printer does not produce hazardous laser radiation.
Since radiation emitted inside the printer is completely confined within protective housings and external
covers, the laser beam cannot escape from the machine during any phase of user operation.
FDA Regulations (100 to 120 volt model only)
U.S. Food and Drug Administration (FDA) has implemented regulations for laser products manufactured
on and after August 2, 1976. Compliance is mandatory for products marketed in the United States. One
of the following labels on the back of the printer indicates compliance with the FDA regulations and must
be attached to laser products marketed in the United States.
MANUFACTURED:
Brother Industries, Ltd.,
15-1 Naeshiro-cho Mizuho-ku Nagoya, 467-8561 Japan
This product complies with FDA radiation performance standards, 21 CFR subchapter J.
MANUFACTURED:
Brother Corporation (Asia) Ltd. Brother Buji Nan Ling Factory
Gold Garden Ind., Nan Ling Village, Buji, Rong Gang, Shenzhen, CHINA
This product complies with FDA radiation performance standards, 21 CFR Subchapter J
Caution:
Use of controls, adjustments or performance of procedures other than those specified in this manual
may result in hazardous radiation exposure.
iv
IEC 60825 specification (220 to 240 volt model only)
This printer is a Class 1 laser product as defined in IEC 60825 specifications. The label shown below is
attached in countries where it is needed.
CLASS 1LASERP RODUCT
APPAREIL Å LASER DE CLASSE 1
LASER KLASSE 1 PRODUKT
This printer has a Class 3B laser diode which produces invisible laser radiation in the scanner unit. You
should not open the scanner unit under any circumstances.
Caution:
Use of controls or adjustments or performance of procedures other than those specified in this manual
may result in hazardous radiation exposure.
For Finland and Sweden
LUOKAN 1 LASERLAITE
KLASS 1 LASER APPARAT
Varoitus!
Laitteen käyttäminen muulla kuin tässä käyttöohjeessa mainitulla tavalla saattaa altistaa käyttäjän
turvallisuusluokan 1 ylittävälle näkymättömälle lasersäteilylle.
Varning
Om apparaten används på annat sätt än i denna Bruksanvisning specificerats, kan användaren
utsättas för osynlig laserstrålning, som överskrider gränsen för laserklass 1.
Internal laser radiation
Maximum radiation power:
Wave length:
Laser class:
v
5 mW
760 - 810 nm
Class IIIb (Accordance with 21 CFR Part 1040.10)
Class 3B (Accordance with IEC 60825)
IMPORTANT - For Your Safety
To ensure safe operation the supplied three-pin plug must be inserted only into a standard three-pin
power outlet that is properly grounded through the standard electrical wiring.
Extension cords used with this printer must be three-pin plug type and correctly wired to provide proper
grounding. Incorrectly wired extension cords may cause personal injury and equipment damage.
The fact that the equipment operates satisfactorily does not imply that the power is grounded and that
the installation is completely safe. For your safety, if in any doubt about the effective grounding of the
power, call a qualified electrician.
Disconnect device
You must install this printer near a power outlet that is easily accessible. In case of an emergency, you
must disconnect the power cord from the power outlet to shut off the power completely.
Caution for LAN connection
Connect this product to a LAN connection that is not subjected to overvoltages.
IT power system (For Norway only)
This product is also designed for an IT power system with phase-to-phase voltage 230V.
Geräuschemission / Acoustic noise emission (for Germany only)
Lpa < 70 dB (A) DIN 45635-19-01-KL2
vi
Wiring information (for UK)
Important
If the mains plug that is supplied with this printer is not suitable for your plug socket, remove the plug
from the mains lead and fit an appropriate three-pin plug. If the replacement plug needs a fuse, fit the
same fuse as the original.
If a moulded plug comes off the mains lead, you should destroy it because a plug with cut wires is
dangerous if it is put in a live plug socket. Do not leave it where a child might find it!
If you need to replace the plug fuse, fit a fuse that is approved by ASTA to BS1362 with the same rating
as the original fuse.
Always replace the fuse cover. Never use a plug that does not have a cover.
Warning - This printer must be earthed.
The wires in the mains lead are coloured in line with the following code:
Green and Yellow:
Earth
Blue:
Neutral
Brown:
Live
The colours of the wires in the mains lead of this printer may not match the coloured markings identifying
the terminals in your plug.
If you need to fit a different plug, you should do the following.
Remove a bit of the outer cover of the lead, taking care not to damage the coloured insulation of the
wires inside.
Cut each of the three wires to the appropriate length. If you can, leave the green and yellow wire longer
than the others so that, if the lead is pulled out of the plug, the green and yellow wire will be the last to
disconnect.
Remove a short section of the coloured insulation to expose the wires.
The wire which is coloured green and yellow must be connected to the terminal in the plug which is
marked with the letter “E” or the safety earth symbol, or coloured green or green and yellow.
The wire, which is coloured blue, must be connected to the terminal, which is marked with the letter “N”
or coloured black or blue.
The wire, which is coloured brown, must be connected to the terminal, which is marked with the letter “L”
or coloured red or brown.
The outer cover of the lead must be secured inside the plug. The coloured wires should not hang out of
the plug.
vii
Trademarks
The Brother logo is a registered trademark of Brother Industries, Ltd.
Apple, the Apple Logo, and Macintosh are registered trademarks in the United States and other
countries, and TrueType is a trademark of Apple Computer, Inc.
Microsoft, MS-DOS, Windows and Windows NT are registered trademarks of Microsoft Corporation in
the U.S. and other countries.
ENERGY STAR is a U.S. registered mark.
All other terms and brand and product names mentioned in this User’s Guide are registered trademarks
of their respective companies.
Compilation and Publication Notice
Under the supervision of Brother Industries Ltd., this manual has been compiled and published, covering
the latest product’s descriptions and specifications.
The contents of this manual and the specifications of this product are subject to change without notice.
Brother reserves the right to make changes without notice in the specifications and materials contained
herein and shall not be responsible for any damages (including consequential) caused by reliance on
the materials presented, including but not limited to typographical and other errors relating to the
publication.
©2003 Brother Industries Ltd.
viii
“EC” Declaration of Conformity
Manufacturer
Brother Industries Ltd.,
15-1, Naeshiro-cho, Mizuho-ku,
Nagoya 467-8561, Japan
Plant
Brother Corporation (Asia) Ltd.
Brother Buji Nan Ling Factory,
Gold Garden Ind., Nan Ling Village,
Buji, Rong Gang, Shenzhen, China
Herewith declare that:
Products description:
Product Name:
Model Number:
Laser Printer
HL-1430
HL-14
are in conformity with provisions of the Directives applied: Low Voltage Directive 73/23/EEC (as
amended by 93/68/EEC) and the Electromagnetic Compatibility Directive 89/336/EEC (as amended by
91/263/EEC and 92/31/EEC and 93/68/EEC).
Standards applied:
Harmonized:
Safety:
EMC:
EN60950: 1992
A1 : 1993, A2 : 1993, A3 : 1995,
A4 : 1997, All : 1997
EN55022: 1998 Class B
EN61000-3-2: 1995 / A1: 1998 + A2: 1998
EN61000-3-3: 1995
EN55024 : 1998
Year in which CE marking was first affixed: 2003
Issued by
: Brother Industries, Ltd.
Date
: 25 December, 2002
Place
: Nagoya, Japan
Signature
:
Takashi Maeda
Manager
Quality Audit Group
Quality Management Dept.
Information & Document Company
ix
Table of Contents
Definitions of warnings, cautions, and notes ............................................................................. -i
To use the printer safely ............................................................................................................-ii
Register your product ...............................................................................................................-iii
Frequently asked questions (FAQs) ...............................................................................................-iii
Important information: Regulations .................................................................................................-iv
Radio interference (220 to 240 volt model only) .......................................................................-iv
International ENERGY STAR® Compliance Statement ............................................................-iv
Laser Safety (100 to 120 volt model only) ................................................................................-iv
FDA Regulations (100 to 120 volt model only) .........................................................................-iv
IEC 60825 specification (220 to 240 volt model only) .............................................................. -v
IMPORTANT - For Your Safety ................................................................................................-vi
Geräuschemission / Acoustic noise emission (for Germany only) .......................................-vi
Wiring information (for UK) ..................................................................................................-vii
Trademarks .................................................................................................................................. -viii
Compilation and Publication Notice .................................................................................... -viii
Table of Contents ......................................................................................................................... 1-x
x
1
About this printer .................................................................................................................................... 1-1
What is in the box? ....................................................................................................................... 1-1
Interface cable .................................................................................................................... 1-1
Front view ............................................................................................................................... 1-2
Back view ............................................................................................................................... 1-3
Positioning the printer ................................................................................................................... 1-4
Power supply .......................................................................................................................... 1-4
Environment ........................................................................................................................... 1-4
What kind of paper can I use? ...................................................................................................... 1-5
Type and size of paper ........................................................................................................... 1-5
Recommended paper ............................................................................................................. 1-6
Printable area ......................................................................................................................... 1-7
Printing methods ........................................................................................................................... 1-8
Printing on plain paper ............................................................................................................ 1-8
Printing on plain paper from the paper tray ........................................................................ 1-8
Printing on plain paper from the manual feed slot ............................................................ 1-11
Printing on thicker paper and card stock .............................................................................. 1-14
Printing on envelopes ........................................................................................................... 1-17
Types of envelopes to avoid ............................................................................................. 1-17
Printing on envelopes from the manual feed slot ............................................................ 1-18
Printing on transparencies .................................................................................................... 1-21
Printing on transparencies from the paper tray ................................................................ 1-21
Printing on transparencies from the manual feed slot ...................................................... 1-24
Printing on both sides of the paper (Manual duplex printing) ............................................... 1-27
Manual duplex printing from the paper tray ...................................................................... 1-27
Manual Duplex printing from the manual feed slot ........................................................... 1-29
Guidelines for printing on both sides of the paper ............................................................ 1-31
2
Driver and software ................................................................................................................................ 2-1
Printer driver ................................................................................................................................. 2-1
For Windows® 95/98/Me, Windows NT® 4.0 and Windows® 2000/XP ............................... 2-1
For Mac® OS 8.6 to 9.2 and Mac® OS X 10.1 to 10.2 ........................................................ 2-1
For Windows® ................................................................................................................................................................................ 2-2
Features in the Brother printer driver ................................................................................. 2-2
For Macintosh® ............................................................................................................................................................................. 2-9
3
Control panel ........................................................................................................................................... 3-1
Service call indications ........................................................................................................... 3-5
Control panel buttons ................................................................................................................... 3-7
Print a test page ..................................................................................................................... 3-8
Using Control panel button ................................................................................................. 3-8
Using the printer driver ....................................................................................................... 3-8
4
Options .................................................................................................................................................... 4-1
Ir-DA Interface (IR-1000) .............................................................................................................. 4-1
5
Routine maintenance .............................................................................................................................. 5-1
Toner cartridge ............................................................................................................................. 5-2
Toner Low message ............................................................................................................... 5-2
Toner Empty message ........................................................................................................... 5-3
Replacing the toner cartridge ................................................................................................. 5-3
Drum unit ...................................................................................................................................... 5-8
Change Drum message ..................................................................................................... 5-8
Replacing the drum unit .......................................................................................................... 5-9
Cleaning ..................................................................................................................................... 5-12
Replacing maintenance parts ..................................................................................................... 5-13
6
Troubleshooting ...................................................................................................................................... 6-1
Identifying your problem ............................................................................................................... 6-1
Error messages in the status monitor ........................................................................................... 6-2
Error message printouts ............................................................................................................... 6-3
Paper handling ............................................................................................................................. 6-4
Paper jams and how to clear them ............................................................................................... 6-5
Other problems ........................................................................................................................... 6-10
For Macintosh® with USB ..................................................................................................... 6-10
Improving the print quality .................................................................................................... 6-10
Solving print problems ................................................................................................................ 6-15
7
Appendix ..................................................................................................................................................A-1
Printer specifications ....................................................................................................................A-1
Important information for choosing your paper .............................................................................A-3
8
INDEX ........................................................................................................................................................ I-1
xi
1
About this printer
What is in the box?
When you unpack the printer, check to see that you have all of the following parts.
1
2
2
1
3
4
5
3
AC Power Cord
Drum Unit Assembly
(with Toner Cartridge included)
Printer
Quick Setup Guide
CD-ROM
4
5
■ Components may differ from one country to another.
■ The power cord may be slightly different than the one in the figure above, depending on which
country the printer was bought in.
Interface cable
■ An interface cable is not a standard accessory. Please purchase the appropriate cable for the
interface you intend to use.
■ It is recommended to use a Parallel interface cable or USB interface cable that is no longer than 6
feet (2 metres).
■ For Parallel interface cable use a shielded interface cable that is IEEE 1284-compliant.
■ Do not connect the USB cable to the front of your PC or to the iMac’s keyboard.
ABOUT THIS PRINTER 1 - 1
Front view
Front View
2
1
7
3
6
4
5
Figure 1-1
1
2
3
4
5
6
7
Face-down Output Tray Support Flap (Support Flap)
Face-down Output Tray (Top Output Tray)
Front Cover
Paper Tray
Manual Feed Paper Guides
Manual Feed Slot
Control Panel
1 - 2 ABOUT THIS PRINTER
Back view
Back view
1
5
4
2
3
Figure 1-2
1
2
3
4
5
Rear Cover
Power Switch
AC Power Connector
Parallel Interface Connector
USB Interface Connector
ABOUT THIS PRINTER 1 - 3
Positioning the printer
Please read the following before you use the printer.
Power supply
Use the printer within the recommended power range.
Power source: USA and Canada:
AC 110 to 120 V, 50/60 Hz
Europe and Australia: AC 220 to 240 V, 50/60 Hz
The power cord, including extensions, should be no longer than 5 metres (16½ feet).
Do not share the same power circuit with other high-power appliances, such as an air conditioner, copier,
shredder and so on. If you cannot avoid using the printer with these appliances, we recommend that you
use a voltage transformer or a high-frequency noise filter.
Use a voltage regulator if the power source is not stable.
Environment
■ Make sure that the power outlet is near the machine and is easy to get to so that, if there is an
emergency, it can be easily unplugged.
■ Only use the printer within the following ranges of temperature and humidity:
Temperature: 10 °C to 32.5 °C (50 °F to 90.5 °F)
Humidity: 20% to 80% (without condensation)
■
■
■
■
■
■
■
■
■
■
■
To avoid ozone building up, put this machine in a large well-ventilated room.
Put the printer on a flat, horizontal surface.
Keep the printer clean. Do not put the printer in a dusty place.
Do not put the printer where the ventilation hole of the printer is blocked. Keep a gap of approximately
100 mm (4 in.) between the ventilation hole and the wall.
Do not put the printer in direct sunlight. If you have to put it near a window, use a blind or a heavy
curtain to protect the printer from direct sunlight.
Do not put the printer near devices that contain magnets or generate magnetic fields.
Do not subject the printer to strong physical shocks or vibrations.
Do not expose the printer to open flames or salty or corrosive gasses.
Do not put objects on top of the printer.
Do not put the printer near an air conditioner.
Keep the printer horizontal when you carry it.
1 - 4 ABOUT THIS PRINTER
What kind of paper can I use?
Type and size of paper
The printer loads paper from the installed paper tray or manual feed slot.
The names for the paper trays in the printer driver and this Guide are as follows:
Paper tray
Tray 1
Manual feed slot
Manual
While looking at this page on the PDF, you can jump to the page for each printing method by clicking L
in the table.
Media type
Plain paper
Tray 1
Manual
feed slot
L
L
L
L
Select the Media type from the
printer driver
Plain paper
60 g/m2 to 105 g/m2
(16 to 28 lb)
Recycled paper
Bond paper
L
Bond paper
Thick paper
L
Thick paper or Thicker paper
L
L
Transparencies
Up to 10 sheets
A4 or Letter
A4 or Letter
105 g/m2 to 161 g/m2
(28 to 43 lb)
Transparency
L
Labels
Thick paper
A4 or Letter
Envelopes
L
Thicker paper
Card stock
L
Thick paper or Thicker paper
Tray 1
Manual feed slot
Paper size
A4, Letter, Legal (US and
Canada only), B5 (ISO),
Executive, A5, A6, B6(ISO),
Width: 69.8 to 216 mm
(2.75 to 8.5 in.)
Length: 116 to 406.4 mm
(4.57 to 16.0 in.)
Number of sheets
250 sheets
(80 g/m2 or 21 lb)
Single sheet
ABOUT THIS PRINTER 1 - 5
Recommended paper
Europe
USA
2
Plain paper
Xerox Premier 80 g/m
Xerox Business 80 g/m2
Modo DATACOPY 80 g/m2
IGEPA X-Press 80 g/m2
Recycled paper
Xerox RECYCLED SUPREMES
Transparency
3M CG 3300
3M CG 3300
Labels
Avery laser label L7163
Avery laser label #5160
■
■
■
■
■
■
Xerox 4200DP 20 lb
Hammermill Laser Paper 24 lb
Before you buy a lot of paper, please test some to make sure that the paper is suitable.
Use paper that is made for plain-paper copying.
Use paper that is 75 to 90 g/m2 (20 to 24 lb).
Use neutral paper. Do not use acidic or alkaline paper.
Use long-grain paper.
Use paper with a moisture content of approximately 5%.
Caution
Do not use ink jet paper, or it may cause a paper jam and damage your printer.
To help you choose which paper to use with this printer, see Important information for choosing your
paper on page A-3.
1 - 6 ABOUT THIS PRINTER
Printable area
When using Brother GDI printer driver emulation, the edges of the paper that cannot be printed on are
shown below.
Portrait
1
4
2
3
Figure 1-3
A4
Letter
Legal
B5 (ISO)
Executive
A5
A6
B6 (ISO)
1
4.2 mm
(0.17 in.)
4.2 mm
(0.17 in.)
4.2 mm
(0.17 in.)
4.2 mm
(0.17 in.)
4.2 mm
(0.17 in.)
4.2 mm
(0.17 in.)
4.2 mm
(0.17 in.)
4.2 mm
(0.17 in.)
2
6.01 mm
(0.24 in.)
6.35 mm
(0.25 in.)
6.35 mm
(0.25 in.)
6.01 mm
(0.24 in.)
6.35 mm
(0.25 in.)
6.01 mm
(0.24 in.)
6.01 mm
(0.24 in.)
6.01 mm
(0.24 in.)
3
4.2 mm
(0.17 in.)
4.2 mm
(0.17 in.)
4.2 mm
(0.17 in.)
4.2 mm
(0.17 in.)
4.2 mm
(0.17 in.)
4.2 mm
(0.17 in.)
4.2 mm
(0.17 in.)
4.2 mm
(0.17 in.)
4
6.01 mm
(0.24 in.)
6.35 mm
(0.25 in.)
6.35 mm
(0.25 in.)
6.01 mm
(0.24 in.)
6.35 mm
(0.25 in.)
6.01 mm
(0.24 in.)
6.01 mm
(0.24 in.)
6.01 mm
(0.24 in.)
Landscape
1
2
4
3
Figure 1-4
A4
Letter
Legal
B5 (ISO)
Executive
A5
A6
B6 (ISO)
1
4.2 mm
(0.17 in.)
4.2 mm
(0.17 in.)
4.2 mm
(0.17 in.)
4.2 mm
(0.17 in.)
4.2 mm
(0.17 in.)
4.2 mm
(0.17 in.)
4.2 mm
(0.17 in.)
4.2 mm
(0.17 in.)
2
5.0 mm
(0.19 in.)
5.08 mm
(0.2 in.)
5.08 mm
(0.2 in.)
5.0 mm
(0.19 in.)
5.08 mm
(0.2 in.)
5.0 mm
(0.19 in.)
5.0 mm
(0.19 in.)
5.0 mm
(0.19 in.)
3
4.2 mm
(0.17 in.)
4.2 mm
(0.17 in.)
4.2 mm
(0.17 in.)
4.2 mm
(0.17 in.)
4.2 mm
(0.17 in.)
4.2 mm
(0.17 in.)
4.2 mm
(0.17 in.)
4.2 mm
(0.17 in.)
4
5.0 mm
(0.19 in.)
5.08 mm
(0.2 in.)
5.08 mm
(0.2 in.)
5.0 mm
(0.19 in.)
5.08 mm
(0.2 in.)
5.0 mm
(0.19 in.)
5.0 mm
(0.19 in.)
5.0 mm
(0.19 in.)
ABOUT THIS PRINTER 1 - 7
Printing methods
Printing on plain paper
You can print on plain paper from the paper tray or manual feed slot. For the paper you want to use,
please see What kind of paper can I use? in this chapter.
Printing on plain paper from the paper tray
1
2
Select the Paper Size, Media Type, Paper Source, and other settings in the printer driver.
Media Type: Plain Paper
Paper Source: Tray1
Pull the paper tray completely out of the printer.
Figure 1-5
1 - 8 ABOUT THIS PRINTER
3
While pressing the blue paper-guide release lever, slide the paper guides to fit the paper size.
Check that the guides are firmly in the slots.
Figure 1-6
4
Put paper in the tray. Check that the paper is flat in the tray at all four corners.
Figure 1-7
ABOUT THIS PRINTER 1 - 9
Do not put more than 250 sheets of paper (80 g/m2) in the tray, or paper jams may occur. Check
that paper is below the maximum paper mark (▼).
Figure 1-8
For two-sided printing, put the side that is going to be printed on (blank side) face down, with the
top of the paper at the front of the tray.
5
Put the paper tray firmly back in the printer. Check that it is inserted fully into the printer.
Pull up the support flap to prevent paper from sliding off the top output tray.
Figure 1-9
If you choose not to pull out the support flap, we recommend that you remove printed pages
immediately after they come out of the printer.
6
Send the print data to the printer.
1 - 10 ABOUT THIS PRINTER
Printing on plain paper from the manual feed slot
The printer automatically turns on the Manual Feed mode when you put paper into manual feed slot.
1
2
Select the Paper Size, Media Type, Paper Source, and other settings in the printer driver.
Media Type: Plain Paper
Paper Source: Manual
Send the print data to the printer.
A NO PAPER message is shown in the Status Monitor and indicated by the control panel LEDs until
you put a sheet of paper in the manual feed slot.
Drum
Ready
Paper
Alarm
Toner
Data
Figure 1-10
ABOUT THIS PRINTER 1 - 11
3
Using both hands, slide the manual feed slot paper guides to the paper width to be used.
Figure 1-11
Pull up the support flap to prevent paper from sliding off the top output tray.
Figure 1-12
If you choose not to pull out the support flap, we recommend that you remove printed pages
immediately after they come out of the printer.
4
Using both hands, insert into the paper into the manual feed slot until the front edge of the paper
touches the paper feed roller. Hold the paper in this position until the printer automatically feeds the
paper in for a short distance, and then let go of the paper.
Figure 1-13
1 - 12 ABOUT THIS PRINTER
■ Put the paper into the manual feed slot with the side to be printed face up.
■ Make sure that the paper is straight and in the proper position on the manual feed slot. If it is not,
the paper may not be fed properly, resulting in a skewed printout or a paper jam.
■ Do not put more than one piece of paper in the manual feed slot at any one time, or it may cause
a jam.
5
After the printed page comes out of the printer, put in the next sheet of paper as in Step 4 above.
Repeat for each page that you want to print.
ABOUT THIS PRINTER 1 - 13
Printing on thicker paper and card stock
When the rear cover is lifted up, the printer has a straight paper path from the manual feed slot to the
back of the printer. Use this paper feed and output method when you want to print on thicker paper or
card stock.
When you select the paper you want to use, please see What kind of paper can I use? in this chapter.
1
2
Select the Paper Size, Media Type, Paper Source, and other settings in the printer driver.
Media Type: Thick paper or Thicker paper
Paper Source: Manual
Open the rear cover.
Figure 1-14
1 - 14 ABOUT THIS PRINTER
3
Send the print data to the printer.
A NO PAPER status is shown by the control panel LEDs until you put a sheet of paper in the manual
feed slot.
Drum
Ready
Paper
Alarm
Toner
Data
Figure 1-15
4
Using both hands, set the width of the manual feed paper guides to the paper width you want to use.
Figure 1-16
5
Using both hands, insert the paper into the manual feed slot until the front edge of the paper touches
the paper feed roller. Hold the paper in this position until the printer automatically feeds the paper
in for a short distance, and then let go of the paper.
Figure 1-17
ABOUT THIS PRINTER 1 - 15
■ Put the paper into the manual feed slot with the side to be printed face up.
■ Make sure that the paper is straight and in the proper position in the manual feed slot. If it is not,
the paper may not be fed properly, resulting in a skewed printout or a paper jam.
■ Do not put more than one piece of paper in the manual feed slot at any one time, or it may cause
a jam.
6
7
After the printed page comes out of the printer, put in the next sheet of paper as in Step 5 above.
Repeat for each page that you want to print.
Close the rear cover.
Caution
Remove each sheet immediately after printing. Stacking the sheets may cause a paper jam or the
paper to curl.
Figure 1-18
1 - 16 ABOUT THIS PRINTER
Printing on envelopes
Types of envelopes to avoid
Do not use envelopes:
■ that are damaged, curled, wrinkled, or an usual shape
■ that are extremely shiny or textured
■ with clasps, snaps or tie strings
■ with self-adhesive closures
■ that are of a baggy construction
■ that are not sharply creased
■ that are embossed (have raised writing on them)
■ that were previously printed by a laser printer
■ that are pre-printed on the inside
■ that cannot be arranged when put in a pile
■ that are made of paper that weighs more than the paper weight specifications for the printer
■ that have been badly made, with edges that are not straight or consistently square or
■ with windows, holes, cutouts or perforations
Figure 1-19
IF YOU USE ANY OF THE TYPES OF ENVELOPES LISTED ABOVE, THEY MAY DAMAGE YOUR
PRINTER. THIS DAMAGE IS NOT COVERED UNDER ANY BROTHER WARRANTY OR SERVICE
AGREEMENT.
■ Before you print envelopes, you must ‘fan’ the stack to avoid paper jams and misfeeds.
■ Do not put different types of paper in the paper tray at the same time because it may cause paper
jams or misfeeds.
■ Do not print envelopes using manual duplex printing.
■ For proper printing, you must choose the same paper size from your software application as the
paper in the tray.
■ See What kind of paper can I use? in this chapter.
Most envelopes will be suitable for your printer. However, some envelopes will have feed and
print-quality problems because of the way they have been made. A suitable envelope should have edges
with straight, well-creased folds and the leading edge should not be thicker than two pieces of paper.
The envelope should lie flat and not be of baggy or flimsy construction. You should buy quality envelopes
from a supplier who understands that you will be using the envelopes in a laser printer. Before you print
a lot of envelopes, test one to make sure that the print results are what you want.
Brother will not recommend a particular envelope because envelope manufacturers may change
the envelope specifications. You are responsible for the quality and performance of the envelopes
you use.
ABOUT THIS PRINTER 1 - 17
Printing on envelopes from the manual feed slot
When the rear cover is lifted up, the printer has a straight paper path from the manual feed slot to the
back of the printer. Use this paper feed and output method when you want to print envelopes.
The printer automatically turns on the Manual Feed mode when you put paper in the manual feed
slot.
1
2
Select the Paper Size, Media Type, Paper Source, and other settings in the printer driver.
Media Type: Thicker paper
Paper Source: Manual
Open the rear cover.
Figure 1-20
1 - 18 ABOUT THIS PRINTER
3
Send the print data to the printer.
A NO PAPER status is shown by the control panel LEDs until you put a sheet of paper in the manual
feed slot.
Drum
Ready
Paper
Alarm
Toner
Data
Figure 1-21
4
Using both hads, set the width of the manual feed paper guides to the envelope width.
Figure 1-22
5
Using both hands put the envelope in the manual feed slot until the front edge of the envelope
touches the paper feed roller. Hold the envelope in this position until the printer automatically feeds
it in for a short distance, and then let go of the envelope.
Figure 1-23
ABOUT THIS PRINTER 1 - 19
■ Make sure the envelope is straight as you insert it sideways in the manual feed slot. If it is not,
the envelope may not be fed properly, resulting in a skewed printout or a jam.
■ Do not put more than one envelope in the manual feed slot at any one time, or it may cause a
jam.
■ Put the envelope in the manual feed slot with the side to be printed face up.
6
7
After the printed envelope comes out of the printer, the printer will wait until you put in the next
envelope. Repeat Step 5 for each envelope you want to print.
After you finish the print job, close the rear cover.
■ Envelope joints that are sealed by the manufacturer should be secure.
■ All sides should be properly folded without wrinkles or creases.
1 - 20 ABOUT THIS PRINTER
Printing on transparencies
You can print on transparencies from the paper tray, manual feed slot.
Printing on transparencies from the paper tray
■ Do not put more than 10 transparencies in the paper tray.
1
2
Select the Paper Size, Media Type, Paper Source, and other settings in the printer driver.
Media Type: Transparencies
Paper Source: Tray1
Pull the paper tray completely out of the printer.
Figure 1-24
ABOUT THIS PRINTER 1 - 21
3
While pressing the blue paper-guide release levers, slide the paper guides to fit the transparency
size. Check that the guides are firmly in the slots.
Figure 1-25
4
Put transparencies in the tray. Check that the transparencies are flat and below the maximum paper
mark (▼). Do not put more than 10 transparencies in the tray at any one time, or it may cause a jam.
Figure 1-26
1 - 22 ABOUT THIS PRINTER
5
Put the paper tray firmly back in the printer.
Pull out the support flap to prevent transparencies from sliding off the top output tray.
Figure 1-27
6
Send the print data to the printer.
Caution
Remove each transparency immediately.
ABOUT THIS PRINTER 1 - 23
Printing on transparencies from the manual feed slot
When the rear cover is lifted up, the printer has a straight paper path from the manual feed slot to the
back of the printer.
1 Select the Paper Size, Media Type, Paper Source, and other settings in the printer driver.
Media Type: Transparencies
Paper Source: Manual
Figure 1-28
2
Open the rear cover.
Figure 1-29
1 - 24 ABOUT THIS PRINTER
3
Send the print data to the printer
A NO PAPER status is shown by the control panel LEDs until you put a transparency in the manual
feed slot.
Drum
Ready
Paper
Alarm
Toner
Data
Figure 1-30
4
Using both hands, slide the manual feed paper guides to the transparency width.
Figure 1-31
5
Using both hands put the transparency in the manual feed slot until its front edge touches the paper
feed roller. Hold the transparency in this position until the printer automatically feeds it in for a short
distance, and then let go of the transparency.
Figure 1-32
ABOUT THIS PRINTER 1 - 25
■ Put the transparency into the manual feed slot with the side to be printed face up.
■ Make sure that the transparency is straight and in the proper position on the manual feed slot.
If it is not, the transparency may not be fed properly, resulting in a skewed printout or a jam.
■ Do not put more than one transparency in the manual feed slot at any one time, or it may cause
a jam.
6
After the printed transparency comes out of the printer, put in the next transparency as described
in Step 5 above. Repeat for each transparency that you want to print
7
After you finish the print job, close the rear cover.
Caution
Remove each transparency immediately after printing. Stacking the printed transparencies may cause
a paper jam or the transparency to curl.
1 - 26 ABOUT THIS PRINTER
Printing on both sides of the paper (Manual duplex printing)
The supplied printer drivers for Windows® 95/98/Me, Windows NT® 4.0, Windows® 2000/XP, Mac® OS
8.6 to 9.2 and Mac® OS X 10.1 enable manual duplex printing. For more information about how to
choose the settings, see the Help text in the printer driver.
Manual duplex printing from the paper tray
1
Choose the Duplex printing mode from the Advanced tab in the printer driver.
Figure 1-33
2
3
Select the Paper Size, Media Type, Paper Source, and other settings in the printer driver.
The printer will automatically print all the even-numbered pages on one side of the paper first.
Figure 1-34
ABOUT THIS PRINTER 1 - 27
4
Remove the printed even-numbered pages from the output tray and put them back in the paper tray,
placing the paper with the side to be printed on (blank side) face down. Follow the instructions on
the computer screen.
Figure 1-35
5
The printer will now automatically print all the odd-numbered pages on the other side of the paper.
1 - 28 ABOUT THIS PRINTER
Manual Duplex printing from the manual feed slot
■ Before you put the sheets back in the manual feed slot, you will have to straighten them, or you
may get paper jams.
■ You should not use very thin or very thick paper.
■ When you use the manual duplex function, it is possible that there may be paper jams or poor
print quality. If there is a paper jam, see Paper jams and how to clear them on page 6-5.
1
Choose the Duplex printing mode from the Advanced tab in the printer driver.
Figure 1-36
2
3
Select the Paper Size, Media Type, Paper Source, and other settings in the printer driver.
Using both hands put the paper in the manual feed slot with the side to be printed on first facing up.
Follow the instructions on the computer screen. Repeat this step until you have printed all the
even-numbered pages.
Figure 1-37
ABOUT THIS PRINTER 1 - 29
4
Remove the printed even-numbered pages from the output tray and put them in the same order
back into the manual feed slot. Place the paper with the side that is going to be printed on (the blank
side) face up. Follow the instructions on the computer screen.
Figure 1-38
5
Repeat Step 3 until you have printed all the odd-numbered pages on the other side of the paper.
1 - 30 ABOUT THIS PRINTER
Guidelines for printing on both sides of the paper
■
■
■
■
If the paper is thin, it may wrinkle.
If paper is curled, straighten it and then put it back in the paper tray.
You should use regular paper. Do not use bond paper.
When you put paper in the paper tray, first empty the tray then put the printed page in it, with the
printed side face up. (Do not add the printed pages to the top of the stack of unprinted paper.)
■ If the paper is not feeding properly, it may be curled. Remove the paper and straighten it.
Paper orientation for printing on both sides of the paper
The printer prints the second page first.
If you print 10 pages on 5 sheets of paper, it will print page 2 then page 1 on the first sheet of paper.
It will print page 4 then page 3 on the second sheet of paper.
It will print page 6 then page 5 on the third sheet of paper, and so on.
When doing manual duplex printing, the paper must be put in the paper tray in the following way:
■ For the upper paper tray (tray1):
Put the side to be printed on first, face down, with the leading edge (top) of the paper at the front of
the tray.
To print the second side, put the paper face up, with the leading edge (top) of the paper at the front
of the tray.
If letter head paper is used, this would be put in the paper tray with the heading face up, and at the
front of the tray.
To print the second page, put the heading face down and at the front of the tray.
■ For the manual feed slot
Put the side to be printed on first, in face-up, with the leading edge (top) of the paper in first.
To print the second side, put the paper face down, with the leading edge (top) of the paper in first.
If letterhead paper is used, this would be put in with the heading face down, and in first.
To print the second side, put the heading face up and in first.
ABOUT THIS PRINTER 1 - 31
2
Driver and software
Printer driver
A printer driver is software that translates data from the format used by a computer to the format that a
particular printer needs. Typically, this format is a printer command language or page description
language.
The printer drivers for the following operating systems are on the CD-ROM that we have supplied. You
can also download the latest printer driver from the Brother Solutions Center at
http://solutions.brother.com
You can see the operations and detailed information in the Install Software section of the supplied
CD-ROM.
For Windows® 95/98/Me, Windows NT® 4.0 and Windows® 2000/XP
■ Brother GDI Printer driver for Windows®
For Mac® OS 8.6 to 9.2 and Mac® OS X 10.1 to 10.2
■ Brother Laser driver for Macintosh®
2 - 1 DRIVER AND SOFTWARE
For Windows®
Features in the Brother printer driver
You can also change settings by clicking the illustration on the left side of the Basic tab in the Properties
dialog box.
The screens in this section are from Windows® XP. The screens on your PC will vary depending on
your Operating System.
Basic tab
If you are using Windows NT® 4.0, Windows® 2000 or XP, you can access the Basic tab by clicking
Printing Preferences... in the General tab of the Brother HL-1430 series Properties screen.
1
2
1
2
Select the Paper Size, Multiple Page, Orientation and so on.
Select the Paper Source and so on.
DRIVER AND SOFTWARE 2 - 2
Advanced tab
If you are using Windows NT® 4.0, Windows® 2000 or XP, you can access the Advanced tab by
clicking Printing Preferences... in the General tab of the Brother HL-1430 series Properties
screen.
1
2
3
4
5
Change the tab settings by clicking the following icons:
1 Print Quality
2 Duplex
3 Watermark
4 Page Setting
5 Device Options
2 - 3 DRIVER AND SOFTWARE
1
Print Quality
Select the resolution, toner save and print settings or gray printing setting.
Resolution
You can change the resolution as follows:
■ 300 dpi
■ 600 dpi
Toner Save Mode
You can save running costs by turning on the toner save mode, which reduces the print density.
Print Setting (For Windows® 95/98/Me users only)
You can manually change the brightness, contrast and other settings.
2
Duplex
If you select the Duplex button, the dialog box for the manual duplex settings appears. Six types of
manual duplex binding directions are available for each orientation.
3
Watermark
You can place a watermarked logo or text into your documents.
When you use a bitmap file as a watermark, you can change the size of the watermark and place it
anywhere you like on the page.
When you use text as a watermark, you can change the font, darkness and angle settings.
4
Page Setting
You can change the print image scaling and select Mirror / Reverse print options.
DRIVER AND SOFTWARE 2 - 4
5
Device Options
You can set the following Printer Function modes in this tab:
(You can jump to the page for each Printer Function by clicking the function name in the list below.)
■
■
■
■
■
■
Job Spooling
Quick Print Setup
Sleep Time
Status Monitor
Page Protection
Print Date & Time
2 - 5 DRIVER AND SOFTWARE
Job Spooling
The printer saves data that you want reprinted.
You can reprint a document without sending the data again from your PC. To reprint press and hold down
the Control Panel button until all four LED’s are lit and then release the Control Panel button.
If you want to prevent other people from printing your data using the Reprint function, clear the Use
Reprint check box in the job spooling settings.
Quick Print Setup
You can turn the Quick Print Setup function ON or OFF. A small selection window appears on your
computer. This will then let you make changes to the settings of the following functions:
■ Multiple Page
■ Manual Duplex
■ Toner Save Mode
■ Paper Source
■ Media Type
Sleep Time
When the printer does not receive data for a certain period of time (timeout), it enters sleep mode. Sleep
mode acts as though the printer was turned off. The default timeout is 5 minutes. When Intelligent Sleep
Mode is selected, it is automatically adjusted to the most suitable time-out setting depending on the
frequency of your printer use. While the printer is in sleep mode, all the LEDs are off, but the printer can
still receive data from the computer. Receiving a print file or document automatically wakes up the printer
to start printing. Pressing one of the buttons will also wake up the printer.
Status Monitor
This reports the printer status (any errors that may happen with the printer) when printing. The default
setting for the Status Monitor is off. If you would like to turn the status monitor on, go the Advanced tab,
select Device options and then select Status monitor.
Page Protection
‘Page Protection’ refers to a setting that reserves additional memory for the creation of full page images.
Selections are AUTO, OFF, LTR (Letter-size paper), A4 or LGL (legal-size-paper).
The page protection feature allows the printer to create the full page image to be printed in memory
before physically moving the paper through the printer. When the image is very complicated and the
printer has to wait to process the image before printing, use this function.
Print Date & Time
Date: Specifies the format of the date.
Time: Specifies the format of the time.
DRIVER AND SOFTWARE 2 - 6
Accessories tab
When you install some options, you can add it and select its settings in the Accessories tab as follows.
1
2
1
You can manually add and remove the options for any optional unit device that is installed on the
printer. Tray settings will match the installed options.
2
Paper Source Setting
This feature recognizes the paper size in each paper tray.
2 - 7 DRIVER AND SOFTWARE
Support tab
■ You can download the latest driver by accessing the Brother Solutions Center at
http://solutions.brother.com
■ You can see the printer driver version.
■ You can check the current driver settings.
DRIVER AND SOFTWARE 2 - 8
For Macintosh®
This printer supports Mac® OS 8.6 to 9.2 and Mac® OS X 10.1 to 10.2.
You can download the latest driver by accessing the Brother Solutions Center at
http://solutions.brother.com
The screens in this section are from Mac® OS X 10.1
The screens on your Macintosh® will vary depending on your Operating System.
Page setup
You can set the Paper size, Orientation and Scale.
Layout
Set the Layout, Pages per Sheet and other settings.
2 - 9 DRIVER AND SOFTWARE
Specific settings
Set the Media Type, Resolution, Toner Save, and other settings.
DRIVER AND SOFTWARE 2 - 10
3
Control panel
This section refers to the Light Emitting Diodes (LEDs) and Control panel button on the control panel.
Drum
Ready
Paper
Alarm
Toner
Data
Figure 3-1
The LED indications shown in the table below are used in the illustrations in this chapter.
LED is off
or
or
LED is on
or
or
LED is blinking
When the power switch is off or the printer is in Sleep mode, all the LEDs are off.
CONTROL PANEL 3 - 1
LED
Drum
Printer status
Sleep mode
The power switch is off or the printer is in Sleep mode. Pressing the Control
panel button wakes up the printer from Sleep mode to Ready mode.
Ready
Paper
Alarm
Toner
Data
Figure 3-2
Drum
Ready to print
The printer is ready to print. Pressing Control panel button wakes up the printer
to Ready mode.
Ready
Paper
Alarm
Toner
Data
Figure 3-3
Warming up (Blinking at 1 second intervals)
The printer is warming up.
Drum
Ready
Paper
Alarm
Toner
Data
Cooling down or stop printing (Blinking at 2 second intervals)
The printer is cooling down and stops printing until the internal temperature of
the printer lowers.
Figure 3-4
Drum
Ready
Paper
Alarm
Toner
Data
Figure 3-5
3 - 2 CONTROL PANEL
Receiving data
The printer is either receiving data from the computer, processing data in
memory or printing the data.
LED
Drum
Printer status
Data remaining in memory
Print data remains in the printer memory. If the Data LED is on for a long time
and nothing has printed, press the Control panel button to print the remaining
data.
Ready
Paper
Alarm
Toner
Data
Figure 3-6
Drum
Toner low
Indicates that the toner cartridge is nearly empty. Purchase a new toner
cartridge and have it ready for when Toner Empty is indicated.
Ready
Paper
Alarm
Toner
Data
Figure 3-7
Drum
Toner empty
Replace the toner cartridge with a new one. See Replacing the toner cartridge
on page 5-3.
Ready
Paper
Alarm
Toner
Data
Figure 3-8
Drum
Drum unit near end of life
The drum unit is near the end of its life. We recommend that you buy a new drum
unit to replace the current one. See Replacing the drum unit on page 5-9.
Ready
Paper
Alarm
Toner
Data
Figure 3-9
CONTROL PANEL 3 - 3
LED
Drum
Ready
Paper
Alarm
Toner
Data
Figure 3-10
3 - 4 CONTROL PANEL
Printer status
Paper jam
Clear the paper jam. See Paper jams and how to clear them on page 6-5. If the
printer does not start printing, press the Control panel button.
No paper
Put paper in the printer. See Printing on plain paper on page 1-8. Then press
the Control panel button.
Misfeed
Put the paper back in properly, and then press the Control panel button. The
printer will start printing again.
Service call indications
If there is an error that cannot be corrected, the printer will show that a service call is needed by lighting
up all the LEDs and then alternating the following combination as shown in Table 1: LED indications
when the service error occurs on page 3-6.
If you see the service call indication above, turn off the power switch, wait a few seconds, and then turn
it back on and try to print again.
If you cannot clear the error and see the same service call indication after turning the printer back on,
call your dealer or a Brother authorized service center.
For example, the LED indication below shows a Fuser Malfunction.
Drum
Drum
Ready
Paper
Alarm
Toner
Data
Ready
Paper
Alarm
Toner
Data
Figure 3-11
CONTROL PANEL 3 - 5
Table 1: LED indications when the service error occurs
LEDs
Fuser
Malfunction
Laser BD
Malfunction
Scanner
Malfunction
ROM Error
D-RAM Error
Service B
Engine
Interface Error
NV-RAM
Error
Main Motor
Malfunction
CPU Runtime
Error
Service A
Drum
Ready
Alarm
Data
LEDs
Drum
Ready
Alarm
Data
Make a note of the indication and report the error status to your dealer or a Brother authorized service
center by referring to the above table.
Make sure that the front cover is fully closed before you report a service call.
3 - 6 CONTROL PANEL
Control panel buttons
The control panel buttons have the following functions:
Cancel printing
If you press the Control panel button while printing, the printer will immediately stop printing and will
then eject the paper.
Wake-up
If the printer is in Sleep mode, press the Control panel button to wake the printer up and go to the Ready
state. It will take up to 25 seconds for the printer to reach the Ready state.
Form feed
If the orange Data LED is on, press the Control panel button. The printer will print any data that is left
in the printer memory.
Error recovery
If there is an error, the printer will recover automatically from some errors. If an error is not automatically
cleared, press the Control panel button to clear the error, and then continue to use the printer.
Reprint
If you want to reprint a document that has just been printed, you can do this by pressing and holding
down the Control panel button until all four LEDs are lit and then release the Control panel button.
CONTROL PANEL 3 - 7
Print a test page
You can use the Control panel button or the printer driver to print a test page.
Using Control panel button
1
2
3
4
Turn off the printer.
Make sure that the front cover is closed and the power cord is plugged in.
Hold down the Control panel button as you turn on the power switch. All the LEDs light up and then
go off again. Keep the Control panel button pressed down until the Drum LED comes on. When
the Drum LED comes on, release the Control panel button.
Press the Control panel button again. The printer will print a test page.
Using the printer driver
If you are using Brother’s Windows® printer driver, click the Print Test Page button. It is usually in the
General tab of the Windows® printer driver.
3 - 8 CONTROL PANEL
4
Options
Ir-DA Interface (IR-1000)
IR-1000 connects to any printer and prints data without using connecting cables.
■ Supports IrDA1.1 infrared communication standard.
■ Fully compatible with Windows® 95/98/Me, Windows NT® 4.0 and Windows® 2000 infrared printer
device.
■ Transmits and receives data at up to 4 Mbits/sec.
■ Connects to the PC parallel port and connects to the Centronics parallel port on the printer.
■ Allows a printer to communicate with an infrared-equipped portable computer.
■ Transmission range: 1 cm (3.9 inch) up to 100 cm (39 inch), meets the IrDA standard.
■ 30 degree cone angle.
■ Selects between infrared or parallel port.
Figure 4-1
Optional accessories may differ from one country to another.
OPTIONS 4 - 1
5
Routine maintenance
You will need to replace certain parts and clean the printer on a regular basis.
You can see the maintenance video in the Maintenance Tutorial section of the CD-ROM we have
provided with the printer.
1
2
3
4
5
1
2
3
4
5
You can see how to replace the toner cartridge.
You can see how to replace the drum unit.
You can see how to clean the scanner window.
You can see how to clean the corona wire in the drum unit.
You can see how to clean the surface of the OPC in the drum unit.
These instructions are also included in Improving the print quality on page 6-10.
5 - 1 ROUTINE MAINTENANCE
Toner cartridge
A new toner cartridge contains enough toner to print up to 3,000 (TN-standard cartridge) or up to 6,000
(TN-high yield cartridge) A4 or Letter-size single-sided pages at about 5% coverage.
■ The amount of toner used varies according to what is printed on the page and the print density
setting.
■ The more that is printed, the more toner will be used.
■ If you change the print density setting for lighter or darker printing, the amount of toner that is
used will change.
■ Wait to unpack the toner cartridge until immediately before you install it in the printer.
Toner Low message
Drum
Ready
Paper
Alarm
Toner
Data
Blinking every 5 seconds.
Figure 5-1
If the LED shows this message, the toner cartridge has nearly run out of toner. Buy a new toner cartridge
and have it ready before you get a Toner Empty message. To put in the toner cartridge, see Replacing
the toner cartridge on page 5-3
Both Alarm and Data (Toner) LEDs will blink continuously to indicate that the toner cartridge is
nearly empty. This blinking will not stop until you have installed a new toner cartridge.
ROUTINE MAINTENANCE 5 - 2
Toner Empty message
If the LED shows the message below, the printer has run out of toner or the toner is not evenly distributed
inside the cartridge.
Drum
Ready
Paper
Alarm
Toner
Data
Figure 5-2
Replacing the toner cartridge
To make sure you get high quality print, use quality toner cartridges. When you want to buy toner
cartridges, call the dealer you bought the printer from.
We recommend that you clean the printer when you replace the toner cartridge. see Cleaning on
page 5-12.
Follow these steps to replace the toner cartridge. You can also view the toner cartridge replacement
method in the instructional video on the supplied CD-ROM:
1 Open the front cover of the printer.
2
Pull out the drum unit assembly.
Figure 5-3
5 - 3 ROUTINE MAINTENANCE
Caution
■ We recommend that you place the drum unit assembly on a piece of disposable paper or cloth
in case you accidentally spill or scatter toner.
■ To prevent damage to the printer from static electricity, do not touch the electrodes shown in
Figure 5-4.
Figure 5-4
3
Hold down the blue lock lever and take the toner cartridge out of the drum unit assembly.
Figure 5-5
Caution
Handle the toner cartridge carefully. If toner scatters on your hands or clothes, immediately wipe or
wash it off with cold water.
■ Be sure to seal up the toner cartridge tightly so that toner powder does not spill out of the
cartridge.
■ Discard the used toner cartridge according to local regulations, keeping it separate from
domestic waste. If you have questions, call your local waste disposal office.
4
Unpack the new toner cartridge. Hold the cartridge level with both hands and gently rock it from side
to side five or six times to spread the toner evenly inside the cartridge.
Figure 5-6
ROUTINE MAINTENANCE 5 - 4
Caution
■ Wait to unpack the toner cartridge until immediately before you put it in the printer. If toner
cartridges are left unpacked for a long time the toner life will be shortened.
■ If an unpacked drum unit is put in direct sunlight or room light, the unit may be damaged.
■ Brother strongly recommends that you don not refill the toner cartridge provided with your
printer. We also strongly recommend that you continue to use only Genuine Brother Brand
replacement toner cartridges.Using or attempting to use potentially incompatible toner and /or
toner cartridges in your printer may cause damage to the printer itself and/or it may result in
unsatisfactory print quality. Our warranty coverage does not apply to any problem that wa
caused by the use of unauthorized third party toner and toner cartridges. To protect your
investment and guarantee your print quality, please continue to replace consumed toner
cartridges with only Genuine Brother Branded Supplies.
■ Printing with a third-party toner or third-party toner cartridge may reduce not only the print quality
but also the quality and life of the printer itself. It may also cause serious damage to the
performance and life of a drum unit. Warranty coverage does not apply to problems caused by
the use of third-party toner or third-party toner cartridges.
5
Pull off the protective cover.
Figure 5-7
5 - 5 ROUTINE MAINTENANCE
Caution
Put the toner cartridge in the drum unit immediately after you have removed the protective cover. Do
not touch the shaded parts shown in Figure 5-8 and Figure 5-9 to prevent any degradation to the print
quality.
Figure 5-8
6
Figure 5-9
Put the new toner cartridge firmly into the drum unit until you hear it lock into place. If you put it in
properly, the lock lever will lift automatically.
Figure 5-10
Caution
Make sure you fit the toner cartridge properly or it may separate from the drum unit.
ROUTINE MAINTENANCE 5 - 6
7
Clean the primary corona wire inside the drum unit by gently sliding the blue tab from right to left
and left to right several times. Return the tab to the home position (▲) before you put the drum unit
assembly back in the printer. If you do not, printed pages may have a vertical stripe.
Figure 5-11
8
Put the drum unit assembly back in the printer. Close the front cover of the printer.
Figure 5-12
5 - 7 ROUTINE MAINTENANCE
Drum unit
This printer can print up to 20,000 pages* with one drum unit.
*
At 5% print coverage (A4 or Letter size). The actual number of printed pages will vary depending on
the average type of print job and paper.
■ There are many factors that determine the actual drum life, such as the temperature, humidity,
type of paper, type of toner used, number of pages per print job and so on. Under ideal
conditions, the average drum life is estimated at up to 20,000 pages. The actual number of
pages that your drum will print may be significantly less than this estimate. Because we have no
control over the many factors that determine the actual drum life, we cannot guarantee a
minimum number of pages that will be printed by your drum.
■ Printing with a third-party drum unit may reduce not only the print quality but also the quality and
life of the printer itself. Warranty coverage does not apply to problems caused by the use of
third-party drum unit.
■ For best performance, use only genuine Brother drum and toner. The printer should be used
only in a clean, dust-free environment with adequate ventilation.
Change Drum message
If the LED shows the message below, it means the drum unit is near the end of its life. We recommend
that you replace the drum unit with a new one before there is a noticeable deterioration in the print
quality.
Drum
Ready
Paper
Alarm
Toner
Data
Figure 5-13
Caution
■ While removing the drum unit, handle it carefully because it may contain toner.
■ Every time you replace the drum unit, you should clean the inside of the printer. see Cleaning
on page 5-12
ROUTINE MAINTENANCE 5 - 8
Replacing the drum unit
We recommend that you clean the printer when you replace the drum unit. See Cleaning in this
chapter.
Follow these steps to replace the drum unit. You can also view the drum unit replacement method in the
instructional video on the supplied CD-ROM:
1 Open the front cover of the printer.
2 Pull out the drum unit assembly.
Figure 5-14
Caution
■ We recommend that you place the drum unit assembly on a piece of disposable paper or cloth
in case you accidentally spill or scatter toner.
■ To prevent damage to the printer from static electricity, do not touch the electrodes shown in
Figure 5-15.
Figure 5-15
5 - 9 ROUTINE MAINTENANCE
3
Hold down the blue lock lever and take the toner cartridge out of the drum unit assembly.
Figure 5-16
Caution
Handle the toner cartridge carefully. If toner scatters on your hands or clothes, immediately wipe or
wash it off with cold water.
■ Discard the used drum unit according to local regulations, keeping it separate from domestic
waste. If you have questions, call your local waste disposal office.
■ Be sure to seal up the drum unit tightly in a bag so that toner powder does not spill out of the unit.
4
Unpack the new drum unit.
Caution
Wait to unpack a drum unit until immediately before you put it in the printer. Exposure to direct
sunlight or room light may damage the drum unit.
5
Put the toner cartridge in the new drum unit until you hear it lock into place with a click. If you put
the cartridge in properly, the blue lock lever is lifted automatically.
Figure 5-17
Caution
Make sure you fit the toner cartridge properly, or it may separate from the drum unit when you pick
up the drum unit assembly.
ROUTINE MAINTENANCE 5 - 10
6
Put the drum unit assembly in the printer.
Make sure that the printer is turned on, the front cover is open and the Drum and Alarm LED are lit.
Figure 5-18
7
Reset the drum counter. See the instructions supplied with the new drum unit.
Caution
■ The Drum LED indication does not disappear until you reset the drum counter.
■ Do not reset the drum counter when you replace only the toner cartridge.
8
9
Close the front cover.
Make sure that the Drum LED is now off.
5 - 11 ROUTINE MAINTENANCE
Cleaning
Clean the outside and inside of the printer regularly with a dry soft cloth. When you replace the toner
cartridge or the drum unit, make sure you clean the inside of the printer. If printed pages are stained with
toner, clean the inside of the printer with a dry soft cloth.
See the Maintenance Tutorial section in the supplied CD-ROM. You can see instructional videos on
your computer screen, showing you how to perform these tasks.
1
2
1
2
You can see how to clean the scanner window.
You can see how to clean the corona wire in the drum unit.
ROUTINE MAINTENANCE 5 - 12
Replacing maintenance parts
You need to replace the maintenance parts regularly to maintain print quality. You should replace the
units listed below after printing the following number of pages.
Item
Approximate Life
To Purchase Replacement
Fixing unit
50,000 pages *
Call Customer Service
Separator pad holder
assembly
50,000 pages *
Call Customer Service
Pick up roller assembly
50,000 pages *
Call Customer Service
* The actual number of printed pages may vary depending on your average type of print job and paper.
These figures are based on 5% coverage per page.
5 - 13 ROUTINE MAINTENANCE
6
Troubleshooting
Identifying your problem
First, check the following:
■ The power plug is connected properly and the printer is turned on.
■ All of the protective parts have been removed.
■ The toner cartridge and drum unit are installed properly.
■ The front cover is fully closed.
■ Paper is inserted properly in the paper tray.
■ The interface cable is securely connected to the printer and the computer.
■ The correct driver for the printer is installed and selected.
■ The PC is set up to connect to the correct printer port.
Printer does not print:
If you did not solve your problem with the above checks, please find your problem and then go to the
section listed:
Printer LED is blinking
See Control panel buttons on page 3-7.
Status Monitor Error Message appears
See Error messages in the status monitor on page 6-2.
Printer printed an Error Message
See Error message printouts on page 6-3.
Paper handling
See Paper handling on page 6-4 or See Paper jams and how to clear them on page 6-5.
Other problems
See Other problems on page 6-10.
Pages are printed, however there are problems with:
Print quality
See Improving the print quality on page 6-10.
Printout is incorrect
See Solving print problems on page 6-15.
TROUBLESHOOTING 6 - 1
Error messages in the status monitor
The Status Monitor will report problems with the printer. Take the corrective actions listed in the following
table for the error message that the Status Monitor reports.
The default setting for the Status Monitor is off. If you would like to turn the Printer Status on, you can
change the setting of the Status Monitor in the Device Options of the Advanced tab. See Device
Options on page 2-5.
Error message
Action
Cover Open
■ Close the front cover of the printer.
Memory Full
■ Press the Control panel button to print the data remaining in the printer.
■ Reduce the print resolution or reduce the complexity of your document.
No Paper
■ The paper tray may be out of paper or not properly installed. If it is empty, put
a new stack of paper in the paper tray.
Misfeed
■ If there is paper in the paper tray, make sure it is straight. If the paper is curled,
straighten it before printing. Sometimes it is helpful to remove the paper, turn
the stack over and put it back in the paper tray.
■ Reduce the amount of paper in the paper tray, and then try again.
■ Make sure you use paper that meets Brother’s recommended paper
specifications. See What kind of paper can I use? on page 1-5.
Paper Jam
■ Take out the jammed paper from the indicated area.
See Paper jams and how to clear them on page 6-5.
Print Overrun
■ Press the Control panel button to print the data left in the printer.
■ If this does not clear the error, reduce the complexity of your document or
reduce the print resolution.
■ Reduce the complexity of your document before you print to prevent
Resolution Adapted
automatic reduction of the resolution.
(The printer has printed the
document at a reduced
resolution)
Toner Empty
■ See Replacing the toner cartridge on page 5-3.
Toner Low
■ Purchase a new toner cartridge and have it ready for when the Toner Empty
status is indicated.
6 - 2 TROUBLESHOOTING
Error message printouts
The printer will report problems by printing an error message as defined in the following table. Take the
corrective actions for the error message.
Error message
Action
Memory Full
■ Press the Control panel button to print the data left in the printer.
■ Reduce the print resolution or reduce the complexity of your document.
Print Overrun
■ Press the Control panel button to print the data left in the printer.
■ If this does not clear the error, reduce the complexity of your document or
reduce the print resolution.
■ Reduce the complexity of your document before you print to prevent
Resolution Adapted
automatic reduction in the resolution.
(The printer has printed the
document at a reduced
resolution)
TROUBLESHOOTING 6 - 3
Paper handling
First, make sure that you are using paper that meets Brother recommended paper specifications. See
What kind of paper can I use? on page 1-5.
Problem
Recommendation
The printer does not feed
paper from the tray1.
■ The paper tray may be out of paper or not properly installed. If it is empty, put
a new stack of paper in the paper tray.
■ If there is paper in the paper tray, make sure it is straight. If the paper is curled,
you should straighten it before printing. Sometimes it is helpful to remove the
paper, turn the stack over and put it back in the paper tray.
■ Reduce the amount of paper in the paper tray, and then try again.
■ Check that manual feed mode is not selected in the printer driver.
The printer does not feed
paper from the manual feed
slot.
■ Re-insert the paper firmly, one sheet at a time.
■ Make sure that manual feed mode is selected in the printer driver.
The printer will not feed
envelopes.
■ The printer can feed envelopes from the manual feed slot. Your application
software must be set up correctly to print on the envelope size you are using.
This is usually done in the page setup or document setup menu of your
software. Please see your software application manual.
A paper jam has occurred.
■ Clear the jammed paper. Please see Paper jams and how to clear them or the
paper jam instructional video on the CD-ROM.
The printer does not print to
the top output tray.
■ Close the rear cover.
The printer does not print on
the specified paper.
■ Make sure that the cable is connected to the printer.
■ Make sure that the appropriate printer driver is selected.
6 - 4 TROUBLESHOOTING
Paper jams and how to clear them
When a paper jam occurs, the printer indicates it by lighting the control panel LEDs as shown below.
Drum
Ready
Paper
Alarm
Toner
Data
Figure 6-1
After you have just used the printer, some parts inside the printer are extremely hot. When you
open the front cover or rear cover of the printer, never touch the shaded parts shown in Figure 6-2.
HOT!
Figure 6-2
Clear the jammed paper as follows.
If the jammed paper is removed completely by using the information in the following steps, you can install
the paper tray first, and then close the front cover and the printer will resume printing automatically.
If the printer does not start printing automatically, press the Control panel button. If the printer still does
not start printing, please check that all the jammed paper has been removed from the printer. Then try
printing again.
■ Always remove all paper from the paper tray and straighten the stack when you add new paper.
This helps prevent multiple sheets of paper from feeding through the printer at one time and
reduces paper jams.
TROUBLESHOOTING 6 - 5
1
Pull the paper tray completely out of the printer.
Figure 6-3
2
Pull the jammed paper up and out of the printer.
Figure 6-4
3
Open the front cover.
6 - 6 TROUBLESHOOTING
4
Pull out the drum unit assembly. Pull the jammed paper up and out of the printer. If you cannot
remove the drum unit assembly easily at this time, do not use extra force. Instead, pull the edge of
the jammed paper from the paper tray.
Figure 6-5
Caution
To prevent damage to the printer caused by static electricity, do not touch the electrodes shown in
Figure 6-6.
Figure 6-6
TROUBLESHOOTING 6 - 7
5
Open the rear cover. Pull the jammed paper out of the fuser unit.
Figure 6-7
If you have to pull the paper toward the back of the printer, the fuser may get dirty with toner powder
and it may scatter on the next printouts. Print a few copies of the test page until the scattering of
toner stops.
Caution
After you have just used the printer, some internal parts of the printer are extremely hot! Wait for the
printer to cool down before you touch the internal parts of the printer.
HOT!
Figure 6-8
6
Close the rear cover.
6 - 8 TROUBLESHOOTING
7
Push the lock lever down and take the toner cartridge out of the drum unit assembly. Take out the
jammed paper if there is any inside the drum unit.
Figure 6-9
8
Put the drum unit assembly back in the printer.
9
Put the paper tray in the printer.
10
Close the front cover.
TROUBLESHOOTING 6 - 9
Other problems
Problem
Recommendation
The printer cannot print. There ■ Check that the printer cable is not damaged or broken.
was an error writing to
■ If you have an interface-switching device, make sure the correct printer is
LPT1: (or BRUSB) for the
selected.
printer error message occurs
on your PC.
For Macintosh® with USB
Problem
Recommendation
HL-1430 does not appear in
Chooser.
■ Check that the printer is turned on.
■ Check that the USB interface cable is connected correctly.
■ Check the printer driver is installed correctly.
Unable to print from
application software.
■ Make sure that the supplied Macintosh® printer driver is installed in the
System Folder and that it is selected with Chooser.
Improving the print quality
This section provides information on the following topics:
Examples of poor print
quality
ABCDEFGH
CDEF
abcdefghijk
defg
ABCD
abcde
01234
Recommendation
■ Check the printer’s environment. Conditions such as humidity, high
temperatures, and so on may cause this print fault. See Positioning the printer
in Chapter 1.
■ If the whole page is too light, Toner Save mode may be on. Turn off Toner
Save mode in the printer Properties tab of the driver.
■ Try installing a new toner cartridge. See Replacing the toner cartridge on
page 5-3.
■ Try installing a new drum unit. See Replacing the drum unit on page 5-9.
Faint
ABCDEFGH
abcdefghijk
ABCD
abcde
01234
Gray background
6 - 10 TROUBLESHOOTING
■ Make sure that you use paper that meets the recommended specifications.
See What kind of paper can I use? on page 1-5.
■ Check the printer’s environment - high temperatures and high humidity can
increase the amount of background shading. See Positioning the printer on
page 1-4.
■ Use a new toner cartridge. See Replacing the toner cartridge on page 5-3.
■ Use a new drum unit. See Replacing the drum unit on page 5-9.
Examples of poor print
quality
Recommendation
■ Make sure you use paper that meets our specifications. Rough-surfaced
paper or thick print media may cause this problem. See What kind of paper
can I use? on page 1-5.
■ Make sure that you choose the appropriate media type in the printer driver.
See What kind of paper can I use? on page 1-5.
■ Try using a new drum unit. See Replacing the drum unit on page 5-9.
Ghost
ABCDEFGH
abcdefghijk
ABCD
abcde
01234
■ Make sure that you use paper that meets our specifications. Rough-surfaced
paper may cause the problem. See What kind of paper can I use? on page
1-5.
■ The drum unit may be damaged. Put in a new drum unit. See Replacing the
drum unit on page 5-9.
Toner specks
■ Make sure that you use paper that meets our specifications. See What kind
of paper can I use? on page 1-5.
■ Choose Thick paper mode in the printer driver, or use thinner paper than you
are currently using.
■ Check the printer’s environment because conditions such as high humidity
can cause hollow print. See Positioning the printer on page 1-4.
Hollow print
■ You may clear the problem by cleaning the primary corona wire inside the
drum unit by sliding the blue tab. Make sure you return the blue tab to the
home position (▲). See Cleaning on page 5-12.
■ The drum unit may be damaged. Put in a new drum unit. See Replacing the
drum unit on page 5-9.
All black
TROUBLESHOOTING 6 - 11
Examples of poor print
quality
Recommendation
■ If the problem is not solved after printing a few pages, the drum unit may have
glue from label stock on the OPC drum surface.
Clean the drum unit as follows:
94 mm
(3.7 in.)
94 mm
(3.7 in.)
1
Position the print sample in front of the drum unit, and find the exact position
of the poor print.
2
Turn the drum unit gear by hand while looking at the surface of the OPC
drum.
3
When you find the mark on the drum that matches the print sample, wipe the
surface of the OPC drum with a cotton swab until the dust or paper powder
on the surface comes off.
White Spots on black text
and graphics at 94 mm
(3.7 in.) intervals
94 mm
(3.7 in.)
94 mm
(3.7 in.)
Black Spots at 94 mm
(3.7 in.) intervals
Caution
Do not try to clean the surface of the photosensitive drum with a sharp
object, such as a ball-point pen.
■ The drum unit may be damaged. Put in a new drum unit. See Replacing the
drum unit on page 5-9.
6 - 12 TROUBLESHOOTING
Examples of poor print
quality
ABCDEFGH
abcdefghijk
ABCD
abcde
01234
Black toner marks across
the page
ABCDEFGH
abcdefghijk
ABCD
abcde
01234
Recommendation
■ The drum unit may be damaged. Put in a new drum unit. See Replacing the
drum unit on page 5-9.
■ Make sure that you use paper that meets our specifications. See What kind
of paper can I use? on page 1-5.
■If you use label sheets, the glue from the sheets may sometimes stick to
the OPC drum surface. Clean the drum unit. See Cleaning on page 5-12.
■Do not use paper that has clips or staples because they will scratch the
surface of the drum.
■If the unpacked drum unit is in direct sunlight or room light, the unit may be
damaged.
■ Make sure that you use paper that meets our specifications. A rough surfaced
paper or thick print media can cause the problem.
■ Make sure that you select the appropriate media type in the printer driver.
■ The problem may disappear by itself. Try printing multiple pages to clear this
problem, especially if the printer has not been used for a long time.
■ The drum unit may be damaged. Put in a new drum unit. See Replacing the
drum unit on page 5-9.
White lines across the page
ABCDEFGH
abcdefghijk
■ Clean the inside of the printer and the primary corona wire in the drum unit.
See Cleaning on page 5-12.
■ The drum unit may be damaged. Put in a new drum unit. See Replacing the
drum unit on page 5-9.
ABCD
abcde
01234
Lines across the page
ABCDEFGH
abcdefghijk
ABCD
abcde
01234
■ Clean the primary corona wire of the drum unit. See Cleaning on page 5-12.
■ Make sure the primary corona wire cleaner is at the home position (▲).
■ The drum unit may be damaged. Install a new drum unit. See Replacing the
drum unit on page 5-9.
■ The toner cartridge may be damaged. Put in a new toner cartridge. See
Replacing the toner cartridge on page 5-3. Make sure that a torn piece of
paper is not inside the printer covering the scanner window.
■ The fixing unit may be smudged. Call Customer Service.
Black lines down the page
Printed pages have toner
stains down the page.
TROUBLESHOOTING 6 - 13
Examples of poor print
quality
ABCDEFGH
abcdefghijk
Recommendation
■ You may clear the problem by wiping the scanner window with a soft cloth.
See Cleaning on page 5-12.
■ The toner cartridge may be damaged. Put in a new toner cartridge. See
Replacing the toner cartridge on page 5-3.
ABCD
abcde
01234
White lines down the page
FGH
ABCDE ijk
h
fg
e
d
abc
ABCD
abcde
01234
■ Make sure the paper or other print media is loaded properly in the paper tray
and that the guides are not too tight or too loose against the paper stack.
■ Set the paper guides correctly. See Printing on plain paper from the paper tray
on page 1-8.
■ If you are using the manual feed slot, see Printing on plain paper from the
manual feed slot on page 1-11.
■ The paper tray may be too full. See Printing on plain paper from the paper tray
on page 1-8.
■ Check the paper type and quality. See What kind of paper can I use? on page
1-5.
Page skewed
■ Check the paper type and quality. High temperatures and high humidity will
cause paper to curl. See What kind of paper can I use? on page 1-5.
■ If you don’t use the printer very often, the paper may have been in the paper
tray too long. Turn over the stack of paper in the paper tray. Also, try fanning
the paper stack and then rotating the paper 180° in the paper tray.
■ Try printing using the straight-through output path. See Printing on plain paper
from the paper tray on page 1-8, or see Printing on transparencies on page
1-21.
Curl or wave
B DEFGH
abc efghijk
A CD
bcde
1 34
Wrinkles or creases
6 - 14 TROUBLESHOOTING
■ Make sure that paper is loaded properly. See Printing on plain paper from the
paper tray on page 1-8.
■ Check the paper type and quality. See What kind of paper can I use? on page
1-5.
■ Try printing using the straight-through output path. See Printing on plain paper
from the manual feed slot on page 1-11 or see Printing on transparencies on
page 1-21.
■ Turn over the stack of paper in the tray or try rotating the paper 180° in the
input tray.
Solving print problems
Problem
Recommendation
The printer prints
unexpectedly or it prints
garbage data.
■ Make sure the printer cable is not too long. We recommend that you use a
parallel cable of less than 2 metres (6 feet) in length.
■ Make sure that the printer cable is not damaged or broken.
■ If you are using an interface-switching device, remove it. Connect your
computer directly to your printer, and then try again.
■ Check that you have chosen the appropriate printer driver with ‘Set as
Default’.
■ Make sure that the printer is not connected to the same port that is also
connected to a storage device or scanner. Take away all other devices and
connect the port only to the printer.
■ Turn off Printer Status Monitor in the Device Options tab in the printer driver.
The printer cannot print full
■ Press the Control panel button to print the data left in the printer.
pages of a document. An error ■ If this does not clear the error, reduce the complexity of your document or
message PRINT OVERRUN is
reduce the print resolution.
printed.
The printer cannot print full
pages of a document. An error
message MEMORY FULL is
printed.
■ Press the Control panel button to print the data left in the printer.
■ Reduce the print resolution or reduce the complexity of your document.
My headers or footers appear
when I view my document on
the screen but they do not
show up when I print it.
■ Most laser printers have a restricted area that cannot be printed on. This
unprintable area is usually the first two lines and the last two lines of a page
(leaving 62 printable lines). Adjust the top and bottom margins of your
document to allow for this.
TROUBLESHOOTING 6 - 15
A
Appendix
Printer specifications
Engine
Technology
Electrophotographic
Print speed
Up to 15 ppm when printing on Letter size paper
Up to 14 ppm when printing on A4 size paper
First print time*1
Less than 15 sec
Resolution
600 dpi x 600 dpi
300 dpi x 300 dpi
*1 From standard paper tray
Controller
Processor
Memory
Interface
Fujitsu MB86833 66MHz
Standard
4MB
Option
N/A
Standard
USB, Parallel
Option
Optional Ir-DA (IR-1000)*2 *3
Emulation
GDI
*2) Not available on Windows® XP and Mac® OS
*3) Optional accessories may differ from one country to another.
Software
Printer driver
For Windows®
Brother GDI Printer Driver for Windows® 95/98 /Me,
Windows NT® 4.0, Windows® 2000 and Windows®
XP
For Macintosh®
Brother Laser Driver for Mac® OS 8.6 to 9.2 and
Mac® OS X 10.1 to 10.2
Interactive Help*4
Utilities
*4) Instructional movie for the solution when any error message appears on the Status Monitor.
Control panel
LED
4 LEDs
Button
1 button
A - 1 APPENDIX
Paper handling
Paper Input*5
Paper
Output*5
Manual feed slot
1 Sheet
Paper tray
250 Sheets
Face-down
150 Sheets
Face-up
1 Sheet
Manual Duplex*6
Duplex
*5) Calculated with 80 g/m2 paper
*6) Not available on Mac® OS X 10.2
Media specifications
Media types
Media weights
Media sizes
Manual feed slot
Plain paper, Bond paper, Recycled paper,
Envelope, Labels, and Transparency
Paper tray (Standard)
Plain paper, Recycled paper, and Transparencies*7
Manual feed slot
60 to 161 g/m2 (16 to 43 lb)
Paper tray (Standard)
60 to 105 g/m2 (16 to 28 lb)
Manual feed slot
Width: 69.8 to 216 mm
(2.75 to 8.7 in.)
Length: 116 to 356 mm
(4.57 to 14.0 in.)
Paper tray (Standard)
A4, Letter, Legal, B5(ISO), A5, B6(ISO), A6,
Executive
Standard yield cartridge
3,000 pages A4/Letter pages @5% coverage
High yield cartridge
6,000 pages A4/Letter pages @5% coverage
*7) Up to 10 sheets
Supplies
Toner
Drum
20,000 A4/Letter pages (1 page / job)
Dimensions / Weights
Dimensions
(W × D × H)
For USA/Canada/Latin America
360 × 430 × 235 mm
(14.2 × 16.9 × 9.3 in.)
For other countries
360 × 370 × 235 mm
(14.2 × 14.6 × 9.3 in.)
Weights
Approx.9.2 kg (20.3 lb) including
the drum unit and toner cartridge
Other
Power
consumption
Noise level
Ecology
Printing
Less than 340 W at 25 °C (77 °F)
Standby
Less than 70 W at 25 °C (77 °F)
Sleep
Less than 5 W
Printing
Less than 50 dB
Standby
Less than 30 dB
Power save
Yes
Toner save
Yes
APPENDIX A - 2
Important information for choosing your paper
This section provides information to help you choose paper to use with this printer.
Before you purchase a large quantity of paper
Make sure the paper is suitable for the printer.
Paper for plain paper copies
Paper is divided by usage, such as paper for printing and paper for copying. The usage is usually
specified on the paper’s package. Check the package to see whether it is suitable for laser printers. Use
paper that is suitable for laser printers.
Basis weight
The basis weight of the paper in general use varies in different countries. We recommend that you use
paper that weighs 75 g/m2 to 90 g/m2 (20 to 24 lb), although this printer is able to cope with thinner or
thicker paper than these weights.
Unit
Europe
USA
g/m2
80 to 90
75 to 90
lb
20 to 24
Long grain and short grain
The pulp fiber of the paper is aligned during paper manufacture. What we call long grain paper is paper
where the fiber is parallel to the paper carriage direction of the paper.
Paper can be classified into two types, long grain and short grain. Long grain paper’s fiber direction is
parallel to the carriage direction of the paper in the printer. Short grain paper’s fiber direction is vertical
to the carriage direction of the paper in the printer. Though most plain paper for copying is long grain,
some is short grain. We recommend that you use long grain paper for this printer. Short grain paper is
too weak for the paper carriage of the printer.
Acid paper and neutralized paper
Paper can be classified as either acid paper or neutralized paper.
Though modern paper manufacture methods started with acid paper, recently neutralized paper is taking
the place of acid paper because of environment or preservation issues.
However, many forms of acid paper can be found in recycled paper. We recommend that you use
neutralized paper for this printer.
You can use an acid paper check pen to distinguish acid paper from neutral paper.
Print surface
The characteristics may differ a little between the face side and reverse side of a sheet of paper.
Usually, the opening side of the ream of paper package is the print side. Follow any indication of the print
side on the paper package. Typically, the print side is indicated by an arrow.
A - 3 APPENDIX
Moisture content
Moisture content is the amount of water left in the paper after manufacture. It is one of the important
characteristics of the paper. This can change greatly depending on the storage environment, although
usually paper contains about 5% water by weight. Because paper often absorbs water, the amount of
water can sometimes be about 10% in a high humidity environment. When the amount of water
increases, the characteristic of the paper changes greatly. The fixing of the toner may become worse.
For storage of the paper and during use, we recommend that the humidity of the surrounding
environment is between 50% and 60%.
Rough estimate of basis weight
g/m2
lb
Bond
Index
60
16
64
17
75
20
90
24
105
28
120
32
135
36
161
43
90
200
53
110
Paper size
Letter
8.5 × 11 in.
Legal
8.5 × 14 in.
Executive
7.25 × 10.5 in.
A4
210 × 297 mm
A5
148 × 210 mm
A6
105 × 148 mm
B5 (ISO)
201 × 276 mm
Envelope Monarch
3.875 × 7.5 in.
Envelope #9
3.875 × 8.9 in.
Envelope #10
4.12 × 9.5 in.
Envelope #11
4.5 × 10.375 in.
Envelope DL
110 × 220 mm
Envelope C5
162 × 229 mm
Envelope C6
114 × 162 mm
Envelope B5
176 × 250 mm
Envelope B6
176 × 125 mm
Folio
APPENDIX A - 4
INDEX
A
P
Accessories tab .............................................2-7
paper ..................................................... 1-5, A-3
paper handling ...................................... 6-4, A-2
paper jams .............................................3-4, 6-5
Parallel interface cable ..................................1-1
pick up roller ................................................5-13
plain paper ....................................................1-6
power supply .................................................1-4
print media ....................................................1-5
print quality ...........................................2-4, 6-10
print test page ...............................................3-8
printable area ................................................1-7
printer driver .......................................... 2-1, A-1
printer parts ............................................1-2, 1-3
processor ..................................................... A-1
B
Brother numbers (USA/Canada) .................... -iii
Brother Solutions Center ...............................2-1
C
carton contents .............................................1-1
cleaning .......................................................5-12
control panel ......................................... 3-1, A-1
control panel button ......................................3-7
corona wire ...................................................5-7
D
Device Options ..............................................2-5
dimensions ................................................... A-2
drum ........................................ 5-4, 5-8, 5-9, A-2
Drum LED .....................................................5-8
duplex printing .............................................1-27
E
R
Register your printer (USA) ............................ -iii
resolution ..................................................... A-1
S
F
separator pad holder ...................................5-13
service call ....................................................3-5
service centers (USA/Canada) .....................3-5
software ....................................................... A-1
specifications ............................................... A-1
Status Monitor ...............................................2-6
fixing unit .....................................................5-13
Frequently asked questions (FAQs) .............. -iii
T
emulation ..................................................... A-1
envelope ............................................1-17, 1-18
error messages ......................................6-2, 6-3
I
interface ....................................................... A-1
IR-1000 .........................................................4-1
Ir-DA ..............................................................4-1
L
LED ...............................................................3-1
M
Macintosh® ..........................................2-9, 6-10
maintenance (routine) .................................5-13
manual feed tray ...... 1-2, 1-11, 1-18, 1-24, 1-29
media specifications ..................................... A-2
memory ........................................................ A-1
misfeed .........................................................3-4
toner ............................................... 5-2, 5-3, A-2
toner empty ............................................3-3, 5-3
toner low ................................................3-3, 5-2
True Type Mode ............................................2-7
U
utilities .......................................................... A-1
W
watermark .....................................................2-4
weights ......................................................... A-2
N
no paper ........................................................3-4
I-1