1
ESET
SECURE
AUTHENTICATION
Product Manual
ESET SECURE AUTHENTICATION
Copyright 2015 by ESET, spol. s r.o.
ESET Secure Authentication was developed by ESET, spol. s r.o.
For more information visit www.eset.com.
All rights reserved. No part of this documentation may be reproduced, stored in a retrieval
system or transmitted in any form or by any means, electronic, mechanical, photocopying,
recording, scanning, or otherwise without permission in writing from the author.
ESET, spol. s r.o. reserves the right to change any of the described application software
without prior notice.
Customer Care: www.eset.com/support
REV. 06/02/2015
Contents
1.
Overview
..................................................4
2.
Requirements
..................................................4
2.1 Su p p o r ted Op er ati n g Systems
........................................................................4
ons
2.2 Su p p o r ted Web Ap p l i cati
........................................................................5
11.1.4
11.1.5
11.1.6
11.1.7
11.1.8
Hard
.....................................................................................42
Tokens
Migration
.....................................................................................42
f rom SMS-Based OTPs to Mobile Application
Non-2FA
.....................................................................................42
Pass-through
Access
.....................................................................................43
Control Using Group Membership
Hard
.....................................................................................43
Tokens
11.2 OTPs an d Wh i tesp ace........................................................................43
o d s an d PPP Co mp ati b i l i ty
11.3 ESA Au th en ti cati o n Meth
........................................................................43
e Op er ati n g Systems
2.3 Su p p o r ted Mo b i l e Ph o n........................................................................5
ts
2.4 In stal l ati o n Req u i r emen
........................................................................5
12. Auditing and Licensing
..................................................43
r y En vi r o n men ts
12.1 Au d i ti n g
2.5 Su p p o r ted Acti ve Di r ecto
........................................................................7
........................................................................43
12.2 L i cen si n g
........................................................................44
3. Installation
..................................................8
12.2.1
Ov.....................................................................................44
erv iew
co mp o n en ts
12.2.2
Warnings
.....................................................................................44
3.1 In stal l ati o n o f th e Co r e........................................................................9
12.2.3
License
.....................................................................................44
States
Ap p p l u g i n
3.2 In stal l ati o n o f th e Web
........................................................................11
12.2.4
License
.....................................................................................45
Enf orcement
te Deskto p p l u g i n
3.3 In stal l ati o n o f th e Remo
........................................................................12
3.4 B asi c Co n fi g u r ati o n ........................................................................13
4.
..................................................14
User Management
5.
VPN Protection ..................................................15
5.1 Co n fi g u r ati o n
........................................................................15
5.2 Usag e
........................................................................16
6.
Web Application..................................................16
Protection
6.1 Co n fi g u r ati o n
........................................................................17
6.1.1
Allowing
.....................................................................................17
Non-2FA Users
6.2 Usag e
7.
7.1
........................................................................17
Remote Desktop ..................................................18
Protection
Co n fi g u r ati o n
7.1.1
7.2 Usag e
8.
........................................................................18
Allowing
.....................................................................................18
Non-2FA Users
Hard Tokens
........................................................................19
..................................................19
t
8.1 Har d To ken Man ag emen
........................................................................20
8.1.1
Enable
.....................................................................................20
8.1.2
Import
.....................................................................................20
8.1.3
Delete
.....................................................................................22
8.1.4
Resy
.....................................................................................22
nchronize
ag emen t
8.2 Har d To ken User Man........................................................................23
8.2.1
Enable
.....................................................................................23
and Assign
8.2.2
Rev
.....................................................................................25
oke
9.
API
..................................................25
9.1 In teg r ati o n Over vi ew ........................................................................26
9.2 Co n fi g u r ati o n
........................................................................26
ti fi cate
9.3 Rep l aci n g th e SSL Cer
........................................................................26
9.3.1
Prerequisites
.....................................................................................26
9.3.2
Importing
.....................................................................................27
the New Certif icate
9.3.3
Replacing
.....................................................................................27
the ESA Certif icate
10. Advanced User Management
..................................................28
10.1 User States
........................................................................29
Ph o n es
10.2 Pr o vi si o n i n g Mu l ti p l e........................................................................38
er Fi el d
10.3 Over r i d e Mo b i l e Nu mb........................................................................40
ag emen t
10.4 Gr o u p s B ased User Man
........................................................................40
11. Advanced VPN Topics
..................................................41
ti o n s
11.1 VPN Au th en ti cati o n Op
........................................................................41
11.1.1
SMS-based
.....................................................................................41
OTPs
11.1.2
On-demand
.....................................................................................42
SMS-based OTPs
11.1.3
Mobile
.....................................................................................42
Application
13. High Availability..................................................45
View
1. Overview
ESET Secure Authentication (ESA) adds Two Factor Authentication (2FA) to Microsoft Active Directory domains. The ESA product
consists of the following components:
The ESA Web Application plugin, which provides 2FA to various Microsoft Web Applications.
The ESA Remote Desktop plugin, which provides 2FA for the Remote Desktop Protocol.
The ESA RADIUS Server, which adds 2FA to VPN authentication.
The ESA Authentication Service, which includes a REST-based API which can be used to add 2FA to custom applications.
ESA Management Tools:
o ESA User Management plug-in for Active Directory Users and Computers (ADUC), which is used to perform user management.
o ESA Management Console, which is used to configure ESA.
ESA requires Active Directory infrastructure since it stores its data in the Active Directory data store. This means that there is no
need for additional backup policies since the ESA data is automatically included in your Active Directory backups.
2. Requirements
Installing ESET Secure Authentication requires an Active Directory domain. The minimum supported Active Directory domain
functional level is "Windows 2000 Native".
The installer always automatically selects the Authentication Service and Management Tools components. Should the user select
a component that cannot be installed, the installer will inform them of the exact prerequisites that are outstanding.
2.1 Supported Operating Systems
ESET Secure Authentication Services and Management Tools have been tested and are supported on the following operating
systems:
Windows Server 2003 (both 32-bit and 64-bit)
Windows Server 2003 R2 (both 32-bit and 64-bit)
Windows Server 2008 (both 32-bit and 64-bit)
Windows Server 2008 R2
Windows Server 2012
Windows Server 2012 R2
Windows Small Business Server 2008
Windows Small Business Server 2011
Windows Server 2012 Essentials
Windows Server 2012 R2 Essentials
The Management Tools are also supported on client operating systems from Windows XP SP3 and later, in both 32-bit and 64-bit
versions.
NOTE: When you install a RADIUS Server on Windows Small Business Server 2008 or 2011, the default NPS port must be changed
from 1812 to 1645. Verify that there are no processes listening on port 1812 before installing ESA by running the following
command: C:\> netstat -a -p udp | more
4
2.2 Supported Web Applications
ESET Secure Authentication provides 2FA for the following Microsoft products:
Microsoft Exchange 2007
o Outlook Web Access
Microsoft Exchange 2010
o Outlook Web App
o Exchange Control Panel
Microsoft Exchange 2013
o Outlook Web App
o Exchange Admin Center
Microsoft Dynamics CRM 2011
Microsoft Dynamics CRM 2013
Microsoft SharePoint 2010
Microsoft SharePoint 2013
Microsoft Remote Desktop Web Access
Microsoft Terminal Services Web Access
Microsoft Remote Web Access
2.3 Supported Mobile Phone Operating Systems
The ESET Secure Authentication Mobile app is compatible with the following mobile phone operating systems:
iPhone iOS 4.3 and higher
Android™ 2.1 and higher
Windows Phone 7 and higher
Windows Mobile 6
BlackBerry® 4.3 to 7.1
BlackBerry® 10 version 10.0 and higher
Symbian® - all supporting J2ME
All J2ME enabled phones
2.4 Installation Requirements
Installation always requires outbound connectivity to esa.eset.com on TCP port 443 to secure your installation. The installer must
be run as a user of the "Domain Administrators" security group. Another requirement for running the installer is .NET Framework
Version 4 (Full Install). The installer will automatically attempt to install .NET 4 if it is not already installed.
ESA supports the installation of components in a distributed environment, with all components installed on computers that are
joined to the same Windows Domain.
The prerequisites for the installation of each component are:
Authentication Service:
o Windows 2003 Server SP2 or later
o The installer must be run as a user who is a member of the "Schema Admins" security group the first time an Authentication
Service is installed on the domain.
5
Management Tools:
o Windows XP SP3 or later, or Windows 2003 Server SP2 or later
o .NET Framework version 3.5
o Windows Remote Server Administration Tools, Active Directory Domain Services component (RSAT AD DS)
o NOTE: RSAT was previously know as the Remote Administration Pack (adminpak) and is downloadable from Microsoft. In
Windows Server 2008 and later, this component may be installed from the “Add Feature” wizard in the Server Manager. All
Domain Controllers already have these components installed.
RADIUS Server:
o Windows 2003 Server SP2 or later
Web App Plug-in for Microsoft Exchange Server:
o Microsoft Exchange Server 2007 or later (64-bit only), with the Client Access role (Outlook Web App / Outlook Web Access)
installed
o .NET Framework version 3.5
Web App Plug-in for Microsoft SharePoint Server:
o Microsoft SharePoint Server 2010 or 2013 (64-bit only)
o .NET Framework version 3.5
Web App Plug-in for Microsoft Dynamics CRM:
o Microsoft Dynamics CRM 2011
o .NET Framework version 3.5
Web App Plug-in for Microsoft Terminal Services Web Access:
o The Terminal Services role with the Terminal Services role service installed on Windows Server 2008 (32-bit or 64-bit)
o .NET Framework version 3.5
Web App Plug-in for Microsoft Remote Desktop Services Web Access:
o The Remote Desktop Services role with the Remote Desktop Web Access role service installed on Windows Server 2008 R2 and
later
o .NET Framework version 3.5
Web App Plug-in for Microsoft Remote Web Access:
o The Remote Web Access role service installed on Windows Server 2012 Essentials and later
o .NET Framework version 3.5
Remote Desktop Protection:
o Windows Server 2008 R2 or later
o Only 64-bit operating systems are supported
.NET Requirements:
All components: .NET 4 or 4.5 Full Install
Core Server: .NET 4 or 4.5 Full Install
RADIUS Server: .NET 4 or 4.5 Full Install
Management Tools: .NET 3.5 (4 on Windows Server 2012)
Web App Plugin: .NET 3.5
NOTE: The Authentication Service and RADIUS Server components are compatible with Windows XP SP3 and later, but will not be
6
supported on these client operating systems.
2.5 Supported Active Directory Environments
ESET Secure Authentication supports either single domain or multiple domain Active Directory environments. The differences
between these environments and their installation requirements are detailed below.
Single Domain, Single Forest
This is the simplest configuration, and the installer may be run as any Domain Admin. ESET Secure Authentication is available to
all users within the domain.
Multiple Domain, Single Forest
In this deployment, a parent domain such as example.corp has multiple sub-domains such as branch1.example.corp and
branch2.example.corp . ESET Secure Authentication may be deployed on any of the domains in the forest, but there is no crosscommunication between the installations. Each installation will require it's own ESET Secure Authentication license.
In order to install ESET Secure Authentication on a sub-domain, the installer must be launched as a Domain Admin user from the
top level domain.
For example, using the example domains defined previously:
To install ESET Secure Authentication on server01.branch1.example.corp , log on to server01 as the example.corp
\Administrator user (or any other Admin from example.corp ). After installation, ESET Secure Authentication will be available
to any user within the branch1.example.corp domain.
Multiple Domain, Multiple Forest
This is identical to the previous environment, in that ESET Secure Authentication installations on separate forests are not aware of
each other.
7
3. Installation
All of the following components are required for your first ESA installation:
At least one instance of the Authentication Server
At least one instance of the Management Tools
At least one of the authentication endpoints (API, Web Application, Remote Desktop or RADIUS)
All the components may be installed on a single machine, or they may be installed across multiple machines in a distributed
environment. As is the case with distributed systems there are many possible installation scenarios.
Only a single generic installation scenario will be described here, yet the steps described should generalize well to other
deployment scenarios. The example installation consists of two sequences. After completing both, your deployment will
correspond with the figure below.
8
3.1 Installation of the Core components
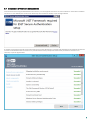
From the machine hosting the ESA Authentication Service, run the supplied .exe file to start the installation. If the .NET Framework
version 4.0 is not detected, the installer will bootstrap the installation thereof, as per the figure below.
A number of prerequisite checks will be performed to ensure that the domain is healthy and that ESA can be installed. Any failures
must be corrected before the installation can proceed. When all the prerequisite checks have passed the installation can
continue, as per the figure below.
9
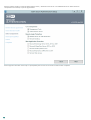
When prompted, make sure that the "Management Tools", "Authentication Server" and "RADIUS Server for VPN Protection"
components are selected, as per the figure below.
Go through the remainder of the steps as prompted by the installer and close the installer when complete.
10
3.2 Installation of the Web App plugin
From the machine running the Web App that is to be protected, run the supplied .exe file to start the installation. The installer will
run a number of prerequisite checks as was done during the Installation of the Core components.
When prompted, make sure that the component for the appropriate Web App is selected. The figure below shows the component
selection for the installation of the SharePoint Server plugin.
Prerequisite checks will be run to ensure that the Web App is running on the server and that the ESA Web App plugin can be
installed. Any failures must be corrected before the installation can proceed.
Go through the remainder of the steps as prompted by the installer and close the installer when complete.
11
3.3 Installation of the Remote Desktop plugin
From the Remote Desktop Access machine that is to be protected, run the supplied .exe file to start the installation. The installer
will run a number of prerequisite checks as was done during the Installation of the Core components.
The figure below shows the component selection for the installation of the Remote Desktop plugin.
Prerequisite checks will be run to ensure that the ESA Remote Desktop plugin can be installed. Any failures must be corrected
before the installation can proceed. Go through the remainder of the steps as prompted by the installer and close the installer
when complete.
12
3.4 Basic Configuration
Once you have installed the required components, some basic configuration is necessary. All configuration of the ESA system is
performed via the ESA Management Console. The ESA Management Console is added as a Snap-In to the standard MMC console.
The ESA Management Console may be accessed under Administrative Tools, as per the figure below.
First, you must activate your ESA system using an ESA license. This license can be obtained from your ESET distributor, or the demo
license (in License.txt) shipped with the installer can be used.
To activate your ESA Server:
1. Launch the ESA Management Console.
2. Navigate to your domain node.
3. Enter the Username and Password for your ESA license.
4. The ESA Server will obtain its license automatically and display the current license information.
Once your license is active, configure your token name under Basic Settings. This is your company's token name that will display
in the Mobile Application on user's phones.
If you wish to configure a Web Application, jump to the Web Application Protection chapter. For configuring 2FA on your VPN, go
to the VPN Protection chapter. To configure 2FA for Remote Desktop, see the Remote Desktop Protection chapter.
13
4. User Management
All user management is done via the Active Directory Users and Computers management interface. All ESA users must have valid
mobile phone numbers in the Mobile field of the Telephones tab.
Provisioning a new Mobile App:
1. Open the normal ADUC user view.
2. Right-click a User and select Properties.
3. Type the user’s mobile phone number into the Mobile field.
NOTE: Mobile numbers must consist entirely of digits (for example, they must be in the format 421987654321, where 4 is the
country code and 21 is the area code).
Click the ESET Secure Authentication tab to manage ESET Secure Authentication settings for a specific user.
14
Enabling soft-token OTPs for a specific user:
1. Make sure that the check box next to Mobile Application is selected.
2. Click Send Application.
3. The user will receive an SMS message containing a link that can be used to install the application.
5. VPN Protection
ESA ships with a standalone RADIUS server that is used to authenticate VPN connections. After installing the ESA RADIUS server
component, the service will start automatically. Ensure that it is running by checking its status in the Windows Services console.
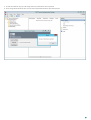
5.1 Configuration
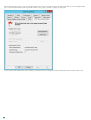
To configure 2FA for your VPN, you first need to add your VPN appliance as a RADIUS client. Follow these steps:
1. From within the ESA Management Console, right click the RADIUS server and select Add Client.
2. Select the new client and choose Properties from the list of available actions. This is displayed in the figure below.
3. Give the RADIUS client a memorable name for easy reference.
4. Configure the IP Address and Shared Secret for the Client so that they correspond to the configuration of your VPN appliance.
The IP address is the internal IP address of your appliance. The shared secret is the RADIUS shared secret for the external
authenticator that you will configure on your appliance.
5. Select "Mobile Application" as an authentication method. The optimal authentication method depends on your VPN appliance
make and model. See the appropriate ESA VPN Integration Guide for details. The VPN integration guides are available on the
ESET Knowledgebase.
15
6. Optionally allow any non-2FA users to use the VPN.
NOTE: Allowing non-2FA users to log in to the VPN without restricting access to a security group will allow all users in the domain
to login via the VPN. Using such a configuration is not recommended.
7. Optionally restrict VPN access to an existing Active Directory security group.
8. Once you are finished making changes, click OK.
9. Re-start the RADIUS Server.
a. Locate the ESA RADIUS Service in the Windows Services (under Control Panel - Administrative Tools - View Local
Services).
b. Right Click on the ESA Radius Service and select Restart.
5.2 Usage
Once you have configured your RADIUS client, it is recommended that you verify RADIUS connectivity using a testing utility such
as NTRadPing before reconfiguring your VPN appliance. After verifying RADIUS connectivity, you may configure your appliance to
use the ESA RADIUS server as an external authenticator for your VPN users.
Since both the optimal authentication method and usage are dependent on your appliance make and model, see the relevant ESET
Secure Authentication VPN integration guide, available on the ESET Knowledgebase.
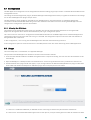
6. Web Application Protection
The ESA Web Application Protection module automatically adds 2FA into the authentication process of all supported Web
Applications. The module will be loaded the next time the protected Web Application is accessed after ESA has been installed.
Users will log in using the normal authentication process of the Web Application. After being authenticated by the Web
Application, the user will be redirected to an ESA web page and prompted for an OTP. The user will only be allowed access to the
Web Application if a valid OTP is entered.
The user's 2FA session will remain active until they log out of the Web Application or close their browser.
16
6.1 Configuration
The Web Application integration can be configured from the Basic Settings page of your domain in the ESET Secure Authentication
management console.
The settings for the Exchange Server plugins, Outlook Web App and Exchange Control Panel, are global to the domain. The settings
for all other Web Application plugins are per server.
The 2FA protection can be enabled or disabled for each Web Application. The 2FA protection is enabled by default after
installation. The World Wide Web Publishing service will need to be restarted on all servers hosting the Web Application for
changes to this configuration option to be reloaded.
6.1.1 Allow ing Non-2FA Users
The module can be configured to either allow or to prohibit users that do not have 2FA enabled from accessing the Web
Application through the "Users without 2FA enabled may still log in" configuration option.
This scenario occurs if the user is configured for neither SMS-based OTPs nor the Mobile Application and the Web Application
configuration option to allow non-2FA users to log in is enabled. The configuration option to allow non-2FA users defaults to
being enabled after installation.
In this configuration, a user can log into the Web Application with their Active Directory password.
If the configuration option to allow non-2FA users is disabled, then the user will not be able to log into the Web Application.
6.2 Usage
The same 2FA process is followed for all supported Web Apps.
The operation of the Web Application Protection module can be verified as follows:
1. A user that has ESA 2FA enabled in the ADUC management tool is required for testing. The user must also be allowed to access
the Web App.
2. Open the Web App in a desktop browser and authenticate as normal using the Active Directory credentials of the test user.
3. The ESA authentication page should now appear, as per the figure below. The Remote Desktop Web Access plugin on Windows
Server 2008 and the Microsoft Dynamics CRM 2011 plugin will not display the "Cancel" button.
a. If the user is enabled for SMS OTPs, an SMS will be sent containing an OTP that may be entered to authenticate.
b. If the user has installed the ESA mobile application on their phone, it may be used to generate an OTP to authenticate. OTPs
17
are displayed in the mobile application with a space between the 3rd and 4th digits in order to improve readability. The Web
Application Protection module strips whitespace, so a user may include or exclude whitespace when entering an OTP
without affecting authentication.
4. If a valid OTP is entered, then the user will be redirected to the page they originally requested. The user will then be able to
interact with the Web App.
5. If an invalid OTP is entered, then an error message will be displayed and the user will not be allowed access to the web
application, as per the figure below.
6.
7. Remote Desktop Protection
The ESA Remote Desktop Protection module adds 2FA into the authentication process of Remote Desktop users. The module will be
loaded the next time a 2FA-enabled user attempts to use Remote Desktop to log in to a remote computer on which the ESA
Credential Provider has been installed.
Users will log in using the normal authentication process of Remote Desktop. After being authenticated by Remote Desktop, the
user will be prompted for an OTP. The user will only be allowed access to his or her computer if a valid OTP is entered.
The user's 2FA session will remain active until they log out or disconnect from the Remote Desktop session.
7.1 Configuration
To configure Remote Desktop 2FA for ADUC users, you must enable 2FA for the desired user(s). They must also be allowed Remote
Desktop users.
7.1.1 Allow ing Non-2FA Users
The module can be configured to either allow or to prohibit users that do not have 2FA enabled from logging in to remote
computers with Remote Desktop Protocol through the "Users without 2FA enabled may still log in" configuration option.
This scenario occurs if the user is configured for neither SMS-based OTPs nor the Mobile Application and the Remote Desktop
configuration option to allow non-2FA users to log in is enabled. The configuration option to allow non-2FA users defaults to
being enabled after installation.
In this configuration, a user can log into the remote computer with their Active Directory password.
If the configuration option to allow non-2FA users is disabled, then the user will not be able to log into remote computers with
Remote Desktop Protocol.
18
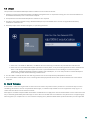
7.2 Usage
The operation of the Remote Desktop Protection module can be verified as follows:
1. A domain user that has ESA 2FA enabled in the ADUC management tool is required for testing. This user must be added as an
allowed Remote Desktop user on the remote computer.
2. A computer that has Remote Desktop Access enabled is also required.
3. Connect to the remote computer using a Remote Desktop client, and authenticate as normal using the Active Directory
credentials of the test user.
4. The OTP prompt screen should now appear, as per the figure below.
a. If the user is enabled for SMS OTPs, an SMS will be sent containing an OTP that may be entered to authenticate.
b. If the user has installed the ESA mobile application on their phone, it may be used to generate an OTP to authenticate.
OTPs are displayed in the mobile application with a space between the 3rd and 4th digits in order to improve
readability. The Remote Desktop Protection module strips whitespace, so a user may include or exclude whitespace
when entering an OTP without affecting authentication.
5. If a valid OTP is entered, then the user will be granted access to the computer they attempted to connect to.
6. If an invalid OTP is entered, then an error message will be displayed and the user will not be allowed access to the remote
computer.
8. Hard Tokens
A hard token is a device that generates an OTP and can be used in conjunction with a password as an electronic key to access
something. Hard tokens come in many different device types, it could be a key fob which can be clipped onto a keyring or in a
credit card form which can be stored in a wallet.
ESA supports all OATH compliant HOTP hard tokens but ESET does not supply them. The hard token HOTPs can be used in the same
way as the OTPs generated by the mobile app or sent to the user via SMS. Scenarios where this may be useful is to support legacy
token migration, for compliance or if it fits with the company policy. Note that OATH TOTPs (time-based OTPs) are not supported.
19
8.1 Hard Token Management
This section describes how to enable hard tokens and manage them using the ESA Management Console.
This mainly consists of three functions:
1. Importing the hard tokens into the system
2. Deleting hard tokens
3. Resynchronizing hard tokens
8.1.1 Enable
Hard tokens are disabled by default and must be enabled before use. Once enabled, hard tokens will need to be imported before
the full functionality is available.
Hard tokens can be enabled as follows:
1. Launch the ESET Secure Authentication Management Console and navigate to the “Advanced Settings” node for your domain.
2. Expand the “Hard Tokens” section and check the “Hard tokens are enabled” check box. Save the changes.
3. If successful a "Hard Tokens" node will appear. Hard token management can be done here.
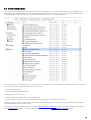
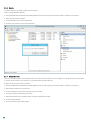
8.1.2 Import
To fully utilize hard token functionality, hard tokens need to be imported. Once done these hard tokens will be available to assign
to users.
Tokens can be imported as follows:
1. Launch the ESET Secure Authentication Management Console and navigate to the "Hard Tokens" node for your domain.
2. Click the "Import Tokens" action.
3. Select the file to import. This should be an XML file in the PSKC format. NOTE: If such a file was not received from the hard token
vendor, please contact ESA support.
4. Click the Import tokens button.
20
5. A result window will pop up indicating how many hard tokens were imported.
6. On clicking OK the windows will close and the imported hard tokens will be displayed.
21
8.1.3 Delete
It may be necessary to delete a token from the system.
Tokens can be deleted as follows:
1. Launch the ESET Secure Authentication Management Console and navigate to the "Hard Tokens" node for your domain.
2. Select the hard token to delete.
3. Click the Delete action for that hard token.
4. Click the "Yes" button on the confirmation box.
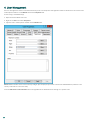
8.1.4 Resynchronize
There is a possibility that a hard token becomes out of sync with the system. This can happen if a user generates many new OTPs
in a short space of time. In this scenario a resynchronization will be required.
A token can be resynchronized as follows:
1. Launch the ESET Secure Authentication Management Console and navigate to the "Hard Tokens" node for your domain.
2. Select the hard token to resynchronize.
3. Click the "Resynchronize Token" action for that hard token.
4. This opens the Hard Token Resync window.
5. Generate and enter two consecutive OTPs using the selected hard token.
6. Click the Resync button.
7. A successful message should display.
22
8.2 Hard Token User Management
This section deals with the user management of hard tokens. For this functionality to work hard tokens need to be enabled on the
system and hard tokens need to have been imported.
User management takes place through the ESET Secure Authentication tab in the ADUC tool.
There are three functions available:
1. Enable hard token authentication for a user and assign a hard token.
2. Revoke a hard token linked to a user.
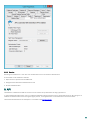
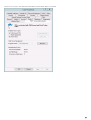
8.2.1 Enable and Assign
When hard tokens are enabled for a user a hard token needs to be assigned before proceeding.
Enable and assign as follows:
1. Open the user's profile from the ADUC.
2. Navigate to the ESET Secure Authentication tab.
3. Enable the Hard Token token type.
4. In the Hard Token Management group select a token to assign.
5. Click the Apply button. The hard token is now assigned to the user.
23
24
8.2.2 Revoke
Revoking a hard token for a user will also disable that user for hard token authentication.
A hard token can be revoked as follows:
1. Open the user's profile from the ADUC tool.
2. Navigate to the ESET Secure Authentication tab.
3. Click the Revoke button.
9. API
The ESA API is a REST-based web service that can be used to easily add 2FA to existing applications.
In most web-based applications users are authenticated before being granted access to protected resources. By asking for an
additional authentication factor during the logon process, such applications can be made more resilient to attack.
The full API documentation for developers is available in the API User Guide.
25
9.1 Integration Overview
The API consists of two endpoints , which are both called by POSTing JSON-formatted text to the relevant API URLs. All responses
are also encoded as JSON-formatted text, containing the method result and any applicable error messages. The first endpoint (the
Authentication API) is for user authentication and the second endpoint (the User Management API) is for user management.
The API is available on all servers where the Authentication Core component is installed and runs over the secure HTTPS protocol
on port 8001.
The Authentication API is available on URLs of the form https://127.0.0.1:8001/auth/v1/ and the User Management API is
available on URLs of the form https://127.0.0.1:8001/manage/users/v1/. Both endpoints are protected from unauthorized access
via standard HTTP Basic Authentication, requiring a valid set of API Credentials before processing any request.
The ESET Secure Authentication installer automatically uses an appropriate SSL security certificate installed on the machine, or
generates a new self-signed certificate if another cannot be found.
9.2 Configuration
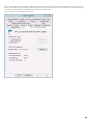
The API is disabled by default and must be enabled before use. Once enabled, API credentials must be created to authorize
requests:
1. Launch the ESET Secure Authentication Management Console and navigate to the “Advanced Settings” node for your domain.
2. Expand the “API” section and check the “API is enabled” check box. Save the changes.
3. Open the standard Windows Services Console and restart the ESET Secure Authentication Core service for the change to take
effect.
4. Navigate to the newly visible “API Credentials” node for your domain.
5. Click the “Add Credentials” action to create a new set of credentials.
6. Double-click on the newly created credentials to get the username and password that are to be used for API authentication.
7. Check the "Enabled for Auth API" check box, the "Enabled for User Management API" check box or both.
Many sets of API credentials may be created. It is recommended to create different sets for each application being protected, as
well as for testing.
If the API is enabled, all servers with the Authentication Core component installed will respond to authorized API requests after
they are restarted. There is no need to restart the Authentication Core service when credentials are created or deleted.
9.3 Replacing the SSL Certificate
The API utilizes an SSL certificate to secure API communications from eavesdropping. The installer automatically selects an
appropriate certificate installed on the machine, or generates a new self-signed certificate if another cannot be found.
This section explains how to replace the certificate with another of your choosing. It will first help you to import your new
certificate into Windows, and then use it for ESA.
9.3.1 Prerequisites
In order to follow this guide you will need:
All operating systems:
o An installation of the ESET Secure Authentication Core component
o Administrator access to the computer where ESET Secure Authentication is installed
o The SSL certificate you wish to use in PKCS12 format (.pfx or .p12)
The certificate file needs to contain a copy of the private key as well as the public key
Windows 2003 only:
o The httpcfg.exe tool from the Windows Support Tools pack (either on the installation CD or downloadable from http://
www.microsoft.com/en-us/download/details.aspx?id=18546)
NOTE: The ESA Authentication API does not have to be enabled in order to replace the certificate.
26
9.3.2 Importing the New Certificate
The new certificate needs to be placed in the Local Machine\Personal store before it can be used.
1. Launch the Microsoft Management Console (MMC):
o Windows Server 2003: Start -> Run -> Type “mmc.exe” and press the “Enter” key
o Windows Server 2008+: Start -> Type “mmc.exe” and press the “Enter” key
2. Add the Certificates snap-in:
o Windows Server 2003:
Click “File” -> “Add/Remove Snap-in” -> “Add” button
Select “Certificates” from the list
Click the “Add” button
Select “Computer account”
Click “Next”
Select “Local computer”
Click “Finish”
Click “Close”
Click “OK”
o Windows Server 2008+:
Click “File” -> “Add/Remove Snap-in”
Select “Certificates” from the left-hand column
Click the “Add >” button
Select “Computer account”
Click “Next”
Select “Local computer”
Click “Finish”
Click “OK”
3. Optionally save the snap-in for future use (“File” -> “Save”)
4. Select the “Certificates (Local Computer)” -> “Personal” node in the tree
5. Right-click -> “All tasks” -> “Import”
6. Follow the Import Wizard, taking care to place the certificate in the “Personal” certificate store location
7. Double-click the certificate and make sure the line “You have a private key that corresponds to this certificate” is displayed
9.3.3 Replacing the ESA Certificate
NOTE: The ESA Core Authentication service will not start up without a certificate configured. If you remove the certificate, you must
add another before the Core service will run correctly.
Determine the correct certificate to use:
1. Open the MMC Certificates Manager using the steps above
2. Find the certificate you wish to use in the “Personal” folder and double-click it
3. Make sure you see “You have a private key that corresponds to this certificate” on the “General” tab
4. On the “Details” tab, select the “Thumbprint” field
5. The certificate thumbprint is displayed in the bottom pane (sets of two hex digits separated by spaces)
27
Windows Server 2003:
1. Click “Start” -> “All Programs” -> “Windows Support Tools” -> “Command Prompt”
2. Type “httpcfg query ssl -i 0.0.0.0:8001” and press the “Enter” key
3. Copy and paste the “Hash” field somewhere safe, in case you want to re-add the existing certificate
4. Type “httpcfg delete ssl –i 0.0.0.0:8001” and press the “Enter” key
5. You should see “HttpDeleteServiceConfiguration completed with 0.”
6. Type “httpcfg set ssl –i 0.0.0.0:8001 –g {BA5393F7-AEB1-4AC6-B759-1D824E61E442} –h <THUMBPRINT>”, replacing
<THUMBPRINT> with the values from the certificate thumbprint without any spaces and press the “Enter” key
7. You should see “HttpSetServiceConfiguration completed with 0”
8. Restart the ESET Secure Authentication Core service for the new certificate to take effect
Windows Server 2008+
Click “Start” -> Type “cmd.exe”
In the list of programs, right-click the “cmd.exe” item and select “Run as administrator”
Type “netsh http show sslcert ipport=0.0.0.0:8001” and press the “Enter” key
Copy and paste the “Certificate Hash” field somewhere safe, in case you want to re-add the existing certificate
Type “netsh http delete sslcert ipport=0.0.0.0:8001” and press the “Enter” key
You should see “SSL Certificate successfully deleted”
Type “netsh http add sslcert ipport=0.0.0.0:8001 appid={BA5393F7-AEB1-4AC6-B759-1D824E61E442}
certhash=<THUMBPRINT>”, replacing <THUMBPRINT> with the values from the certificate thumbprint without any spaces and
press the “Enter” key
You should see “SSL Certificate successfully added”
Restart the ESET Secure Authentication Core service for the new certificate to take effect
10. Advanced User Management
The ESET Secure Authentication tab for a user in the ADUC is divided into four sections:
User State (indicated by a colored flag for quick reference)
Enabled Token Types (check boxes)
Administrator Actions (buttons)
Auditing Data (text data indicating authentication events)
28
10.1 User States
A user may be in various states during regular operation. Before enabling a user for 2FA, they are in an uninitialized state:
29
A user may then be enabled for either SMS-based OTPs, Mobile Application OTPs, or both. If they are enabled for both, they are in
what is known as the transitioning state:
30
In this state, a user will receive SMS OTPs when authentication attempts are initiated, but as soon as a valid mobile OTP is used
for authentication, SMS OTPs will be disabled, and the user will only be able to authenticate using mobile OTPs. When a user has
successfully authenticated using a mobile app OTP, a green flag is displayed:
31
When authenticating OTPs, a user has 10 opportunities to enter an incorrect OTP. On the 11th failed OTP, a user's 2FA gets locked.
This is to prevent brute force guessing of OTPs. When a user's 2FA is locked, a red flag is displayed:
If it has been confirmed that the user's identity is not under attack, clicking on the Unlock 2FA button will unlock the user's 2FA.
32
If Hard Token OTPs have been enabled in the MMC, then the Hard Token check-box will become available. There are then more
states in which the user may potentially find him or herself. The user can be enabled for any combination of the three OTP types,
including a transitioning state. The different possibilities are listed below.
The user may be in a Hard Token OTP only state:
33
Or the user may be in a transitioning state where all three OTP types are enabled. In this state, a user will receive SMS OTPs when
authentication attempts are initiated, but as soon as a valid mobile OTP is used for authentication, SMS OTPs will be disabled,
and the user will only be able to authenticate using mobile or Hard Token OTPs:
34
In the following state the user is enabled for both Hard Token and mobile OTPs:
35
If the Mobile Application has been sent but not yet installed, the user will be in the following state:
36
The user can also be in the state where both SMS and Hard Token OTPs are allowed:
37
10.2 Provisioning Multiple Phones
You can distribute the ESET Secure Authentication mobile app or SMS text messaging service to multiple mobile phones using the
ADUC. For provisioning to multiple phones to be successful, all users must have a valid mobile phone number entered in User
Properties under 'Mobile' (see the section User Management for instructions on how to enter a user's mobile phone number into
User Properties).
1. Open the normal ADUC user view.
2. Hold CTRL and click to select the users you want to provision.
3. Right-click the group of users that you want to provision and select Properties from the context menu.
4. In the Properties for Multiple Items window, click the ESET Secure Authentication Tab.
5. Select the check boxes next to Update Enabled Token Types and Mobile Application (leave the check box next to SMS-based OTPs
deselected).
38
6. Click Send Application. Your client phones will receive a text message containing a link to the ESA mobile app download page.
39
10.3 Override Mobile Number Field
You can specify the Active Directory field from which a user's mobile number is loaded. The "Mobile" field is used by default.
To change the mobile number field:
1. Launch the ESA Management Console.
2. Expand the node for your domain.
3. Navigate to the Advanced Settings node.
4. Expand the Default Mobile Number Field panel.
5. You will be able to select a different field to be used for loading a user's mobile number.
6. After you have selected a different field to use, click on Save.
7. Restart the ESET Secure Authentication Core Authentication Service:
a. Locate the ESET Secure Authentication Core Service in the Windows Services (under Control Panel - Administrative Tools
- View Local Services).
b. Right Click on the ESET Secure Authentication Radius Service and select Restart.
10.4 Groups Based User Management
Keeping track of which users in your domain are activated for two-factor authentication becomes hard in large domains. To solve
this problem, ESET Secure Authentication provides automatic bookkeeping for your 2FA users by means of Active Directory groups
membership.
Concretely, three active directory groups are created at installation time:
ESA Users
The ESA Users group does not contain any users directly, but contains the ESA SMS Users and ESA Mobile App Users group.
Transitive Group Membership may therefore be used to locate all 2FA users in your domain using this group.
ESA SMS Users
40
The ESA SMS Users group contains all users in your domain that have been enabled for SMS OTPs
ESA Mobile App Users
The ESA Mobile App Users group contains all users that have been enabled for mobile application OTPs.
Group membership is updated in real-time when users are configured in the ADUC. Finding all users that have been enabled for
SMS OTPs (for example), is simple:
1. Launch the ADUC
2. Right-click on your domain node, and select Find
3. Type in "ESA SMS" and hit Enter - the group will be displayed in the Search Result section
4. Double click on the group and select the Members tab to view all users in your domain that have been enabled for SMS OTPs.
11. Advanced VPN Topics
This chapter contains the detail of all the options available when configuring two factor authentication for your VPN.
11.1 VPN Authentication Options
This section contains the detail of the options available when configuring a RADIUS client using the ESA Management Console.
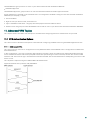
11.1.1 SMS-based OTPs
This scenario occurs if the user is configured to use only SMS-Based OTPs and the RADIUS client is configured to use SMS-based
OTP authentication.
In this configuration, a user logs in with their Active Directory password. The first authentication attempt by the VPN client will
fail to authenticate and the user will be prompted to enter their password again. At the same time, the user will receive an SMS
with their OTP. The user then logs in with the OTP contained in the SMS. The second authentication attempt will grant access if the
OTP is correct.
This sequence is depicted in Figure 1: RADIUS SMS OTP Authentication.
Supported authentication protocols: PAP, MSCHAPv2.
41
11.1.2 On-demand SMS-based OTPs
ESET Secure Authentication supports "On-demand SMS OTPs" for certain systems that support primary authentication against
Active Directory and secondary authentication against a RADIUS server. In this scenario, users that have already been
authenticated against Active Directory may type the letters 'sms' to receive a One Time Password via SMS.
NOTE: This feature should only be used when instructed to do so by an official ESET Secure Authentication Integration Guide, as it
may allow users to authenticate with only an OTP if used incorrectly.
11.1.3 Mobile Application
This scenario occurs if the user is configured to use only the Mobile Application and the RADIUS client is configured to use Mobile
Application-based OTP authentication.
The user logs in with an OTP generated by the Mobile Application. Note that PIN enforcement is strongly recommended in this
configuration to provide a second authentication factor.
Supported PPTP Protocols: PAP, MSCHAPv2.
Compound Authentication Enforced
This scenario occurs if the RADIUS client is configured to use Compound Authentication. This authentication method is restricted
to users who are configured to use the Mobile Application.
In this scenario, a user logs into the VPN by entering their Active Directory (AD) password concatenated with an OTP generated by
the Mobile Application. For example, given an AD password of 'password' and an OTP of '123456', the user enters
'password123456' into the password field of their VPN client.
Supported authentication protocols: PAP.
11.1.4 Hard Tokens
This scenario occurs if both the user and the RADIUS client are configured to use Hard Token OTPs.
In this configuration, a user logs into the VPN by entering their Active Directory (AD) password concatenated with an OTP
generated by their Hard Token. For example, given an AD password of 'password' and an OTP of '123456', the user enters
'password123456' into the password field of their VPN client.
Supported authentication protocols: PAP.
11.1.5 Migration from SMS-Based OTPs to Mobile Application
This scenario occurs if the user is configured to use both SMS-based OTPs and the Mobile Application, and the RADIUS client is
configured to use OTP authentication.
In this configuration, the user may use either the SMS-based OTP or Mobile Application OTP scenarios (as described above) to log
in.
If the user logs in with an OTP generated with their Mobile Application, SMS OTP authentication will automatically be disabled.
On subsequent attempts, SMS based OTPs will not be accepted as log-in credentials.
Supported authentication protocols: PAP, MSCHAPv2.
11.1.6 Non-2FA Pass-through
This scenario occurs if the user is not configured for SMS-, Mobile Application- or Hard Token-based OTPs, and the RADIUS client
configuration option to allow Active Directory passwords without OTPs is selected.
In this configuration the user logs in with their Active Directory password.
Supported authentication protocols: PAP, MSCHAPv2.
NOTE: For Microsoft Routing & Remote Access Server (RRAS) PPTP VPNs, encryption of the VPN connection is not performed when
the PAP authentication protocol is used, and is therefore not recommended. Most other VPN providers encrypt the connection
regardless of the authentication protocol in use.
42
11.1.7 Access Control Using Group Membership
ESA supports the ability to only allow members of a specific AD security group to log in to the VPN using 2FA. This is configured on
a per RADIUS client basis under the Access Control heading.
11.1.8 Hard Tokens
This scenario occurs if both the user and the RADIUS client are configured to use Hard Token OTPs.
In this configuration, a user logs into the VPN by entering their Active Directory (AD) password concatenated with an OTP
generated by their Hard Token. For example, given an AD password of 'password' and an OTP of '123456', the user enters
'password123456' into the password field of their VPN client.
Supported authentication protocols: PAP.
11.2 OTPs and Whitespace
OTPs are displayed in the mobile application with a space between the 3rd and 4th digits in order to improve readability. All
authentication methods except MS-CHAPv2 strip whitespace from the provided credentials, so a user may include or exclude
whitespace without affecting authentication.
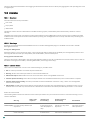
11.3 ESA Authentication Methods and PPP Compatibility
This section explains which PPP authentication methods are compatible with which ESA authentication methods. The VPN server
must be configured to allow all protocols that clients might want to use. End-user VPN clients need only be configured for a single
protocol.
Whenever more than one protocol is supported, VPN clients should be configured to use MS-CHAPv2 with 128-bit MPPE. This
means that PAP is only recommended for Compound Authentication.
Authentication Method
PAP
MS-CHAPv2
MS-CHAPv2 with MPPE
SMS-Based OTPs
Supported
Supported
Supported
On-demand SMS-Based OTPs
Supported
Not supported Not supported
Mobile-Application (OTP Only) Supported
Supported
Supported
Mobile Application (Compound
Supported
Authentication)
Not supported Not supported
Hard Token OTPs
Supported
Not supported Not supported
Active Directory passwords
without OTPs
Supported
Supported
Supported
12. Auditing and Licensing
12.1 Auditing
ESA records audit entries in the Windows event logs - specifically the Application log in the Windows Logs section. The Windows
Event Viewer can be used to view the audit entries.
Audit entries fall into the following categories:
User auditing
o Successful and failed authentication attempts
o Changes to 2FA state, for example, when a user account becomes locked
System auditing
o Changes to ESA settings
o When ESA services are started or stopped
43
The use of the standard Windows event logging architecture facilitates the use of third-party aggregation and reporting tools such
as LogAnalyzer.
12.2 Licensing
12.2.1 Overview
Your ESA license has three parameters:
User Total
Expiry Date
SMS Credits
The details of the license are obtained from the ESET Licensing system, and the ESA system automatically checks for license
validity.
The ESA Provisioning server may perform license enforcement by limiting SMS OTPs and user provisioning. In addition, the ESA
authentication server performs license enforcement by limiting user management actions and (in extreme cases) disabling user
authentication.
12.2.2 Warnings
Warnings are communicated to the ESA Administrator in the User Management plugin in the ADUC console and in the ESA
Management Console.
During User Management
When the license is not in the normal state, a warning message will be displayed in the ADUC (user management) interface. This
warning indicates the severity of the problem, but not the details, due to limited space.
During System Administration
The full license state is displayed in the system management interface. This will include the overall state of the license as well as
the details of usage (user numbers, remaining SMS credits, remaining license days).
12.2.3 License States
The license of an ESA server can be in one of the following six possible states:
1. OK: all license parameters are within the prescribed limits
2. Warning: At least one license parameter is close to the allowed limit
3. SMS Credits Expired: SMS credits have run out and no OTP or Provisioning SMSes will be sent.
4. Violation (full functionality): One of the licensed parameters has exceeded allowed limits, but no enforcement is imposed
5. Violation (limited functionality): A license parameter has been exceeded for more than 7 days, certain user management
functions are disabled
6. ESA Disabled: The ESA license expiry date has passed more than 30 days ago and authentication is disabled. In this case all
authentication calls will fail, will lock out all authentication until ESA is uninstalled, disabled by the admin or re-licensed.
Details of License States
The following table summarizes how each of the license parameters may cause the license to be in one of the warning or error
states listed above.
Warning
SMS Credits
depleted
less than 30 days before
License Expiry
N/A
expiration
User Numbers
44
less than 10% or 10
seats available,
N/A
Violation (full
functionality)
Violation (limited
functionality)
ESA Disabled
0 more than the
license expiry date
more than/equals 7
days
more than 7 days after
expiration
more than 30 days
after expiration
Active users exceed
licensed users
more than 7 days after
Never
active users exceed license
whichever is lowest
SMS Credits
less than 10 SMS credits
0 SMS credits
remaining (Onboarding +
remain
Top-up)
Never
Never
Never
12.2.4 License Enforcement
The following table describes how license enforcement is performed on the ESA authentication server. In all cases, an
administrator will be able to disable ESA authentication for a subset of the users (by disabling 2FA for those users) or for all
users (by means of system configuration or uninstalling the product).
OK
Warning
SMS Credits
depleted
Violation (full
functionality)
Violation (limited
functionality)
ESA Disabled
Enable Users for
2FA
Allowed
Allowed
Allowed
Allowed
Disabled
Disabled
Provision Users
Allowed
Allowed
Disabled
Allowed
Disabled
Disabled
Authenticate with Allowed
SMS OTP
Allowed
Disabled
Allowed
Allowed
Disabled
Authenticate with Allowed
mobile app
Allowed
Allowed
Allowed
Allowed
Disabled
Authenticate with Allowed
hard token
Allowed
Allowed
Allowed
Allowed
Disabled
Manage system
configuration
Allowed
Allowed
Allowed
Allowed
Allowed
Allowed
Disable Users for
2FA
Allowed
Allowed
Allowed
Allowed
Allowed
Allowed
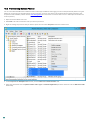
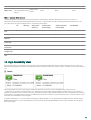
13. High Availability View
All installed servers are displayed in the “servers” panel of the ESA management console. When more than one core service is
detected on the network, all servers are displayed. Online and active servers are shown in green , and offline servers are shown in
red.
Each ESA Authentication Service that gets installed on the domain registers itself in AD DNS using an SRV record (as
_esetsecauth._tcp). When an endpoint (such as a web application or a VPN appliance) begins authentication, it first checks its
internal list of known servers. If the list is empty, it performs an SRV lookup. The SRV lookup will return all Authentication Servers
on the domain. The endpoint then chooses an Authentication Server to connect to. If the connection fails, it selects another server
from the list and attempts to connect again.
If network redundancy is a concern when protecting your VPN with ESA, it is recommended to configure primary and secondary
RADIUS authenticators on your VPN appliance. You should then install two ESA RADIUS servers on your network, and configure
them accordingly.
45