1
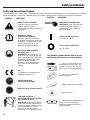
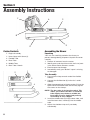
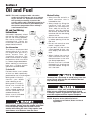
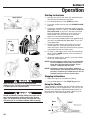
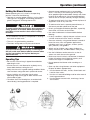
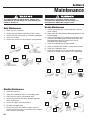
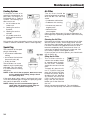
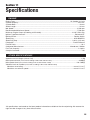
Professional
Landscaping Tools
BB40
BACK PACK
BLOWER
IMPORTANT: READ SAFETY RULES AND
INSTRUCTIONS CAREFULLY
DO NOT THROW AWAY
Table of Contents
Content
Page
Introduction . . . . . . . . . . . . . . . . . . . . . . . . . . . . . . . . . . . . . . . . . . . . . . . . . . . . . . . . . . . . . . . 2
Safety . . . . . . . . . . . . . . . . . . . . . . . . . . . . . . . . . . . . . . . . . . . . . . . . . . . . . . . . . . . . . . . . . . . 3
Know Your Unit . . . . . . . . . . . . . . . . . . . . . . . . . . . . . . . . . . . . . . . . . . . . . . . . . . . . . . . . . . . . 7
Assembly . . . . . . . . . . . . . . . . . . . . . . . . . . . . . . . . . . . . . . . . . . . . . . . . . . . . . . . . . . . . . . . . . 8
Oil & Fuel . . . . . . . . . . . . . . . . . . . . . . . . . . . . . . . . . . . . . . . . . . . . . . . . . . . . . . . . . . . . . . . . . 9
Operation . . . . . . . . . . . . . . . . . . . . . . . . . . . . . . . . . . . . . . . . . . . . . . . . . . . . . . . . . . . . . . . . 10
Maintenance. . . . . . . . . . . . . . . . . . . . . . . . . . . . . . . . . . . . . . . . . . . . . . . . . . . . . . . . . . . . . . 12
Specifications . . . . . . . . . . . . . . . . . . . . . . . . . . . . . . . . . . . . . . . . . . . . . . . . . . . . . . . . . . . . 15
Warranty . . . . . . . . . . . . . . . . . . . . . . . . . . . . . . . . . . . . . . . . . . . . . . . . . . . . . . . . . . . . . . . . . 16
To the Owner
Thank you for buying this quality product. Before starting or operating this equipment, read the whole manual
and follow all the instructions to keep your new outdoor power tool in top operating condition.
All information, illustrations and specifications in this manual are based on the latest product information
available at the time of printing. We reserve the right to make changes at any time without notice. Service on this
unit both within and after the warranty period should be performed only by a Cub Cadet Commercial dealer.
Proof of purchase will be required for warranty service.
Spark Arrestor
NOTE: For users on U.S. Forest Land and in the states of California, Maine, Oregon and Washington. All
U.S. Forest Land and the state of California (Public Resources Codes 4442 and 4443), Oregon and Washington
require, by law that certain internal combustion engines operated on forest brush and/or grass-covered areas be
equipped with a spark arrestor, maintained in effective working order, or the engine be constructed, equipped
and maintained for the prevention of fire. Check with your state or local authorities for regulations pertaining to
these requirements. Failure to follow these requirements could subject you to liability or a fine. This unit is
factory equipped with a spark arrestor. If it requires replacement, Spark Arrestor Screen is available by
contacting the service department.
Emission Control Information
This engine is certified to operate on unleaded regular grade gasoline only. A minimum of 87 octane of the
antiknock index is recommended. The antiknock index is posted on service station pumps in the United State.
To protect the environment, this unit has an exhaust emission control system (EM) in compliance with applicable
regulations of the California Air Resources Board. The exhaust emission control system applied to this engine
consists of a carburetor and an ignition system with optimum ignition timing characteristics. Carburetors have
been calibrated to provide lean air/fuel mixture characteristics and optimum fuel economy with a suitable air
cleaner and exhaust system.
Proper maintenance is required to ensure low emission levels for your engine. This manual contains maintenance
recommendations, outlined by the periodic maintenance chart. Follow items in this chart to ensure compliance
with the applicable standards. The Limited Emission Control System Warranty requires that you return your
engine to an authorized engine dealer for remedy under warranty. Please read the warranty carefully and keep it
valid by complying with the list of owner’s obligations that it contains.
Federal law and California state law prohibits the following acts or the causing thereof:
•The removal or rendering inoperative by any person other than for purposes of maintenance, repair, or
replacement of any device or element of design incorporated into any new engine for the purposes of emission
control prior to its ale or delivery to the ultimate purchaser or while it is in use, or
• The use of the engine after such device or element of design has been removed or rendered inoperative by any
person.
Among those acts presumed to constitute tampering are the acts listed below (do not tamper with the original
emission-related parts): Carburetor and internal parts, Spark plug, Magneto or electronic ignition system, Fuel
filter, Air cleaner element
Calling Customer Support
If you have difficulty assembling this product or have any questions regarding the controls, operation or
maintenance of this unit, please call the Customer Support Department.
Call 1-877-282-8684 to reach a Customer Support representative. Please have your unit’s model number and
serial number ready when you call. See the previous section to locate this information.
Copyright© 2003 Cub Cadet Commercial LLC
All Rights Reserved
For more details about your unit, visit our website at www.cubcadetcommercial.com
2
Section 1
Safety
The purpose of safety symbols is to attract your attention to possible dangers. The safety symbols, and their
explanations, deserve your careful attention and understanding. The safety warnings do not by themselves eliminate
any danger. The instructions or warnings they give are not substitutes for proper accident prevention measures.
SYMBOL
MEANING
SAFETY ALERT SYMBOL: Indicates
danger, warning or caution. Attention is
required in order to avoid serious personal
injury. May be used in conjunction with
other symbols or pictographs.
NOTE: Advises you of information or instructions
vital to the operation or maintenance of
the equipment.
Failure to obey a safety warning will result in
serious injury to yourself or to others. Always
follow the safety precautions to reduce the risk
of fire, electric shock, and personal injury.
Failure to obey a safety warning can result in
injury to yourself and others. Always follow the
safety precautions to reduce the risk of fire,
electric shock, and personal injury.
California Proposition 65 Warning
THE ENGINE EXHAUST FROM THIS PRODUCT
CONTAINS CHEMICALS KNOWN TO THE STATE
OF CALIFORNIA TO CAUSE CANCER, BIRTH
DEFECTS OR OTHER REPRODUCTIVE HARM.
Failure to obey a safety warning may result in
property damage or personal injury to yourself or to
others. Always follow the safety precautions to
reduce the risk of fire, electric shock, and personal
injury.
Important Safety Instructions
READ ALL INSTRUCTIONS
Before Operating
• Clear the area of children, bystanders, and pets. At
a minimum, keep all children, bystanders, and pets
outside a 50 feet (15 m.) radius; there still may be a
risk to bystanders from thrown objects. Bystanders
should be encouraged to wear eye protection. If you
are approached, stop the unit immediately.
When using the unit, you must follow the safety
rules. Please read these instructions before
operating the unit in order to ensure the safety of
the operator and any bystanders. Please keep
these instructions for later use.
Safety Warnings for Gas Units
• Read the instructions carefully. Be familiar with the
controls and proper use of the unit.
Gasoline is highly flammable, and its vapors can
explode if ignited. Take the following precautions.
• Do not operate this unit when tired, ill or under the
influence of alcohol, drugs or medication.
• Children and teens under the age of 15 must not
use the unit, except for teens guided by an adult.
• Store fuel only in containers specifically designed
and approved for the storage of such materials.
They should have an anti-spill valve.
• Inspect the unit before use. Replace damaged parts.
Check for fuel leaks. Make sure all fasteners are in
place and secure. Replace parts that are cracked,
chipped or damaged in any way. Check that the
spark plug and other items are not damaged.
• Always stop the engine and allow it to cool before
filling the fuel tank. Never remove the cap of the fuel
tank, or add fuel, when the engine is hot. Never
operate the unit without the fuel cap securely in
place. Loosen the fuel tank cap slowly to relieve any
pressure in the tank.
• Carefully inspect the area before starting the unit.
Remove all hard or sharp objects such as glass,
wire, etc.
• Avoid creating a source of ignition for spilled fuel.
Do not start the engine until fuel vapors dissipate.
3
Safety (continued)
• Add fuel in a clean, well-ventilated outdoor area
where there are no sparks or flames. Slowly remove
the fuel cap only after stopping engine. Do not
smoke while fueling or mixing fuel. Wipe up any
spilled fuel from the unit immediately.
• Do not operate the engine faster than the speed
needed to do the job. Do not run the engine at high
speed when not in use.
• Move the unit at least 50 feet (15 m) from the fueling
source and site before starting the engine. Do not
smoke. Keep sparks and open flames away from the
area while adding fuel or operating the unit.
• Stop the engine for maintenance or repair. The unit
must be stopped and the impeller no longer turning to
avoid contact with the rotating blades.
• Never fill with fuel while the engine is running.
While Operating
• Never start or run the unit inside a closed room or
building. Breathing exhaust fumes can kill. Operate
this unit only in a well ventilated outdoor area.
• Wear safety glasses or goggles that are marked as
meeting ANSI Z87.1-1989 standards. Also wear
ear/hearing protection when operating this unit.
Wear a face or dust mask if the operation is dusty.
Long sleeve shirts are recommended.
• Wear heavy, long pants, boots or safety footwear
and protective gloves. Do not wear loose clothing,
jewelry, short pants, sandals or go barefoot. Secure
hair above shoulder level.
• To reduce the risk of hearing loss associated with
sound level(s), always wear ear/hearing protection
when operating this unit.
• Use the unit only in daylight or good artificial light.
• Avoid accidental starting. Be in the starting position
whenever pulling the starter rope. The operator and
unit must be in a stable position while starting. See
Starting/Stopping Instructions.
• Do not set unit on any surface except a clean, hard
area while engine is running. Debris such as gravel,
sand, dust, grass, etc. could be picked up by the air
intake and thrown out by the discharge opening,
damaging unit, property, or causing serious injury to
bystanders or operator.
• Use the right tool. Only use this tool for the purpose
intended.
• Do not force unit. It will do the job better and with
less likelihood of injury at a rate for which it was
designed.
• Do not overreach or use from unstable surfaces
such as ladders, trees, steep slopes, rooftops, etc.
Always keep proper footing and balance.
• Always hold the unit with a firm grip when
operating.
• Keep hands, face, and feet at a distance from all moving
parts. Do not touch or try to stop the impeller when it is
rotating. Do not operate without guards in place.
• Do not put any object into openings. Do not use
with any opening blocked; keep free of dirt, debris,
and anything that may reduce the air flow.
• Do not touch the engine or muffler. These parts get
extremely hot from operation. When turned off they
remain hot for a short time.
4
• Always stop the engine when operation is delayed or
when walking from one location to another.
• Use only original equipment manufacturer
replacement parts when servicing this unit. These
parts are available from your authorized service
dealer. Do not use unauthorized parts, accessories,
or attachments for this unit. Doing so could lead to
serious injury to the user, or damage to the unit, and
void your warranty.
• Never use this unit for spreading chemicals, fertilizers or
other substances which may contain toxic materials.
• To reduce fire hazard, replace faulty muffler and
spark arrestor, keep the engine and muffler free from
grass, leaves, excessive grease or carbon build up.
• Never point the blower in the direction of people or
pets, or in the direction of windows. Always direct the
blowing debris away from people, animals, and
windows. Use extra caution when blowing debris near
solid objects such as trees, automobiles, walls, etc.
Other Safety Warnings
• Always disconnect the spark plug before performing
maintenance or accessing movable parts.
• Never store the unit, with fuel in the tank, inside a
building where fumes may reach an open flame (pilot
lights, etc.) or sparks (switches, electrical motors, etc.).
• Allow the engine to cool before storing or transporting.
Be sure to secure the unit while transporting.
• Store the unit in a dry place, either locked up or up
high to prevent unauthorized use or damage. Keep
out of the reach of children.
• Never douse or squirt the unit with water or any other
liquid. Keep handles dry, clean, and free from debris.
Clean after each use, see Cleaning and Storage
instructions.
• Keep these instructions. Refer to them often and use
them to instruct other users. If you loan this unit to
others, also loan these instructions to them.
SPECIAL NOTE: Exposure to vibrations through
prolonged use of gasoline powered hand tools could
cause blood vessel or nerve damage in the fingers,
hands, and joints of people prone to circulation
disorders or abnormal swelling. Prolonged use in cold
weather has been linked to blood vessel damage in
otherwise healthy people. If symptoms occur such as
numbness, pain, loss of strength, change in skin color
or texture, or loss of feeling in the fingers, hands or
joints, discontinue use of this tool and seek medical
attention. An anti-vibration system does not guarantee
avoidance of these problems. Users who operate power
tools on a regular basis must closely monitor their
physical condition and the condition of this tool.
SAVE THESE INSTRUCTIONS
Safety (continued)
PROTECTIVE SAFETY EQUIPMENT
The Unit’s Protective Safety Equipment
Personal Equipment
Stop Switch- Use the stop
switch to stop the engine. To
service and test the stop
switch, start the engine and
make sure that the engine halts
when you move the stop switch
to the off position.
Ear Protection- Wear ear protection that offers a sufficient
dampening effect. Remove your
hearing protection as soon as
you stop the engine, in order to
hear any noises or warning signals.
Eye Protection- Wear safety
glasses or goggles that are
marked as meeting ANSI
Z87.1-1989 standards to protect from blows to the eyes
from branches or flying objects.
Boots- Wear anti-slip and stable boots.
Clothing- Wear clothes made of
strong fabrics. Avoid loose
clothing that could catch on
shrubs and branches. Wear
heavy long pants and do not
wear jewelry, shorts, sandals or
go barefoot. Secure hair above
shoulder length.
First Aid Kit- Always have a first
aid kit present.
Breathing Protection- Wear a
dust mask if you are working in
dusty conditions.
Vibration Damping SystemThis is designed to make usage
as vibration-free and comfortable as possible. The vibration
damping system reduces the
transfer of vibrations. Check the
system often for cracks and
distortion, and make sure it is
securely attached.
Muffler- The muffler reduces
noise levels and directs the
engine’s exhaust fumes away
from the operator. Never use a
unit that has a defective muffler
and check to see that the muffler is secure. Clean the muffler’s spark arrestor screen regularly. Never use a muffler that
has a defective spark arrestor
screen. Refer to the Muffler
section in the Maintenance
chapter for more information.
Safety Harness- A well-adjusted harness considerably simplifies your work. Adjust the harness to provide you with the
most efficient stance. Adjust
the side straps to equally distribute the weight of the unit
across both of your shoulders.
Never use a unit that has defective safety
equipment. Maintain the safety equipment as
described. If the safety equipment and/or the
unit is defective or fails your control tests,
contact your local service workshop.
Never use the unit without the safety harness in
tact. Failure to use the harness will make the
unit less safe and increase the risk of injury to
yourself or others. Never use a harness that has
a faulty quick release.
5
Safety (continued)
Safety and International Symbols
This operator's manual describes safety and international symbols and pictographs that may appear on this product.
Read the operator's manual for complete safety, assembly, operating and maintenance and repair information.
SYMBOL
MEANING
• SAFETY ALERT SYMBOL
Indicates danger, warning, or
caution. May be used in
conjunction with other symbols or
pictographs.
• WARNING - READ
OPERATOR'S MANUAL
Read the Operator’s Manual(s)
and follow all warnings and safety
instructions. Failure to do so can
result in serious injury to the
operator and/or bystanders.
SYMBOL
MEANING
• KEEP BYSTANDERS AWAY
WARNING: Keep all bystanders,
especially children and pets, at
least 50 feet (15 m.) from the
operating area.
• ON/OFF STOP CONTROL
ON / START / RUN
• ON/OFF STOP CONTROL
OFF or STOP
• WEAR EYE AND HEARING
PROTECTION
WARNING: Thrown objects and
loud noise can cause severe eye
injury and hearing loss. Wear eye
protection meeting ANSI Z87.11989 standards and ear
protection when operating this
unit. Use a full face shield when
needed.
The following symbols/decals refer to certain
certification requirements in certain markets:
• Carry out maintenance and
performance checks when the
engine is switched off, with the
stop switch in the Stop position.
• CE
This product is in accordance with
applicable CE directives.
• Always wear approved
protective gloves.
• WEAR APPROVED
PROTECTIVE GLOVES
•
Regular cleaning is required.
•
Ocular control.
• USE ANTI-SLIP, STABLE BOOTS
• THROWN OBJECTS &
ROTATING IMPELLOR BLADE
CAN CAUSE INJURY
WARNING: Keep clear of blower
outlet. Never point the blower at
yourself or others. Objects can be
thrown from blower. Do not
operate unit without proper
attachments and guards in place.
6
• Approved eye protection must
always be used. Wear eye
protection meeting ANSI Z87.11989 standards.
Section 2
Know Your Unit
12
1
11
2
10
3
9
4
8
7
6
5
Blower Components
1 - Spark plug
2 - Choke
3 - Starter handle
4 - Muffler
5 - Fuel tank
6 - Fuel cap
7 - Stop switch
8 - Throttle lever / control
9 - Blow tube
10 - Nozzle
11 - Air filter
12 - Shoulder Harness
7
Section 3
Assembly Instructions
F
A
C
B
E
D
Assembling the Blower
Carton Contents
F - Engine Assembly
Unpacking
1 - Hose Clamp with Screw (2)
Your unit was carefully packed at the factory to
prevent damage during shipment. Unpack the carton
carefully:
1. Remove all contents from the carton.
2 - Flexible Tube
3 - Base Tube
4 - Middle Tube
2. Identify parts and check them with the list of parts
in the above Carton Contents section.
5 - Bent Tube / Nozzle
3. Examine parts for damage.
4. Immediately notify your dealer if a part is missing
or damaged.
1
2
Tube Assembly
1. Place a hose clamp on each end of the flexible
tube (A).
3
2. Connect the flexible tube (A) to the fan’s outlet
tube (B).
4
5
3. Slide the grooved end of the base tube (C) into the
open end of the flexible tube and securely tighten
the screws on the clamps.
NOTE: The base tube is designed to swivel. This
allows you to direct air flow. To avoid the
tube slipping out, the base, middle and
bent tubes must be tightly and perfectly
inserted up to each stopper.
4. Install the middle tube (D) into the base tube, and
install the bent tube / nozzle (E) into the middle
tube.
5. Adjust the shoulder strap to fit your body
comfortably.
8
Section 4
Oil and Fuel
NOTE: This unit is equipped with a 2-stroke
engine that must always run on a mixture
of gas and oil. It is important to measure
the quantity accurately, to ensure the
correct mixing ratio. Small discrepancies in
the amount of oil have a great bearing on
the fuel mix proportions when mixing a
small amount of fuel.
Oil and Fuel Mixing
Instructions
Old and/or improperly mixed
fuel are the main reasons for
the unit not running properly.
Be sure to use fresh, clean
unleaded fuel. Follow the
instructions carefully for the
proper fuel/oil mixture.
Gas Information
The lowest recommended
octane rating is 87. If you run
the engine with gas with a
lower octane than 87,
“knocking” can occur. This
leads to an increase in engine
temperature, which can result
in a serious engine breakdown.
When working at continuous
high revs, a higher octane
gasoline is recommended.
Mixture/Fueling
• Always mix fuel and oil in a
clean container that is
intended for fuel.
• Always begin by filling the
container with half the
amount of fuel required.
Then add the entire oil
quantity. Mix (by shaking)
the mixture, and then fill the
container with the remaining
amount of fuel.
• Mix the fuel mixture carefully, before pouring it into the
fuel tank.
• Do not mix more than one
month’s supply of fuel.
• If you don’t use the unit for
a long period of time, you
must empty and clean the
tank.
• When fueling, be sure to
clean around the fuel cap.
Contamination in the tank
can disrupt operations.
• Ensure that fuel is mixed
thoroughly by shaking the
container before filling the
unit’s fuel tank.
2-stroke Oil
For best results, use 2-stroke
oil that has been specifically
produced for use in small engines.
Mixing ratio is 1:50 (2%).
Contact your dealer
when selecting an oil.
Mixing ratio is 1:33 (3%).
Never use 2-stroke oil
that is intended for
water-cooled outboard
motors (referred to as
outboard motor oil).
Never use oil intended
for 4-stroke engines.
Remove fuel cap slowly to avoid injury from fuel
spray. Never operate the unit without the fuel
cap securely in place.
Add fuel in a clean, well ventilated outdoor area.
Wipe up any spilled fuel immediately. Avoid
creating a source of ignition for spilt fuel. Do not
start the engine until fuel vapors dissipate.
NOTE: Dispose of the old fuel/oil mix in
accordance to Federal, State and Local
regulations.
Gasoline is extremely flammable. Ignited Vapors
may explode. Always stop the engine and allow
it to cool before filling the fuel tank. Do not
smoke while filling the tank. Keep sparks and
open flames at a distance from the area.
9
Section 5
Operation
Starting Instructions
Stop Switch
1. Mix gas with oil. Fill fuel tank with fuel/oil mixture.
See Oil and Fuel Mixing Instructions.
2. Put the Stop Switch in the START position.
3. Place the choke lever up into the CHOKE/CLOSE
position.
4. Fully press and release the primer bulb (air purge
diaphragm) 10 times, slowly, until fuel is visible in
the primer bulb. If you can’t see fuel in the bulb,
press and release the bulb as many times as it
takes before you can see fuel in it. The bulb
doesn’t have to be completely filled.
Close
Open
4. Press the machine body against the ground using
your left hand. Do not use your foot. This is the
starting position.
5. Grip the starter handle, and slowly pull out the
starter rope with your right hand until you feel
some resistance. After you feel resistance, quickly
and powerfully pull the starter cord.
6. As soon as the engine fires, reset the choke lever
down into the OPEN position. Pull the cord until
the engine starts.
7. When the engine starts, quickly move the throttle
to the full throttle position.
NOTE: Do not pull the starter rope out completely.
Do not suddenly release the starter cord
from the fully extended position. These
actions could damage the unit.
NOTE: Choking is unnecessary when starting a
warm engine. Put the Stop Switch in the ON
position, and leave the choke lever in the its
original position. Pull the starter rope.
Stopping Instructions
1. Allow the engine to cool down by idling.
2. Put the Stop Switch in the STOP (O) position.
Operate this unit only in a well ventilated
outdoor area. Carbon monoxide exhaust fumes
can be lethal in a confined area.
Using the Throttle
Air jet speed is controlled with the throttle. Select the
speed that best suits the application. You can set the
throttle to the desired / required throttle position by
moving the throttle lever up or down. Move it up to
blow more air, and move it down to idle.
Avoid accidental starting. Make sure you are in
the starting position when pulling the starter
rope. To avoid serious injury, the operator and
unit must be in a stable position while starting.
Blow
Idle
10
Operation (continued)
Holding the Blower/Vacuum
Before operating the unit, stand in the operating
position. Check for the following:
• Operator is wearing proper clothing, such as boots,
safety glasses or goggles, ear/hearing protection,
gloves, long pants and long sleeve shirt
• Operate power equipment only at reasonable
hours— not early in the morning or late at night
when people might be disturbed. Comply with times
listed in local ordinances. Usual recommendations
are 9:00 am to 5:00 pm, Monday through Saturday.
• To reduce noise levels, limit the number of pieces of
equipment used at any one time.
• To reduce noise levels, operate power blowers at
the lowest possible speed to do the job.
To avoid serious personal injury, wear goggles or
safety glasses at all times when operating this
unit. Wear a face mask or dust mask in dusty
locations.
• Check your equipment before operation, especially
the muffler, air intakes and air filters.
• If the conditions are dusty, the operator is wearing a
dust mask or face mask
• In dusty conditions, slightly dampen surfaces or use
a mister attachment when water is available.
• The unit is in good working condition
• Conserve water by using power blowers instead of
hoses for many lawn and garden applications,
including areas such as gutters, screens, patios,
grills, porches, and gardens.
• The tubes and guards are in place and secure
To prevent serious personal injury or damage to
the unit, make sure blower tubes or vacuum tubes
and the vacuum bag are in place before you
operate the unit.
Operating Tips
• Be sure the vacuum bag is zipped closed before
operating the unit.
• Assure the unit is not directed at anybody or any
loose debris before starting the unit.
• Use rakes and brooms to loosen debris before
blowing.
• Watch out for children, pets, open windows or
freshly washed cars, and blow debris safely away.
• Use the full blower nozzle extension so the air
stream can work close to the ground.
• Make sure the air intake is not blocked. A blocked
intake will reduce the air blowing capacity and
increase the engine’s temperature.
• Do not operate the blower while standing on a
ladder.
• Clean up after using blowers and other equipment.
Dispose of debris appropriately.
• Verify that the unit is in good working condition. Make
sure the tubes and guards are in place and secure.
1. Use the blower for trees, shrubs, flower beds and
hard-to-clean areas.
• Always hold the unit with both hands when
operating. Keep a firm grip on both the front and
rear handle or grips.
• To reduce the risk of hearing loss associated with
sound level(s), hearing protection is required.
2. Use the unit around buildings and for other normal
cleaning procedures.
3. Use the blower around walls, overhangs, fences
and screens.
11
Section 6
Maintenance
To avoid serious personal injury, always turn
your blower off and allow it to cool before you
clean or service it.
Always wear protective gloves during
maintenance operations. Do not carry out
maintenance when the engine is hot.
Daily Maintenance
Weekly Maintenance
1. Clean the unit’s exterior.
2. Check that the throttle control functions safely.
3. Check that the stop switch is functioning properly.
4. Clean the air filter.
5. Check that all the nuts and screws are tightened.
1
3
2
1. Check the starter, the starter rope/cord, and the
return spring.
2. Make sure that the vibration damping elements are
not damaged.
3. Clean the outside of the spark plug. Remove and
check the electrode gap. Remove and check the
electrode gap. Adjust the gap to 0.5 mm or
change out the spark plug.
4. Clean the cooling fins on the flywheel.
5. Clean or replace the muffler’s spark arrest screen.
6. Clean the carburetor area.
7. Clean the cooling fins on the cylinder and check
that the air intake in the starter unit is unblocked.
4
1
2
5
3
7
6
5
4
Monthly Maintenance
1
1. Clean the fuel tank.
2
3
2. Clean the carburetor and its surrounding area.
3. Clean the fan and its surrounding area.
4. Check the fuel filter and the fuel pipe. Replace
them if necessary.
5. Check all cables and connections.
6
4
6. Change the spark plug.
7. Check and clean the muffler’s spark arrestor
screen if necessary (this is not present on mufflers
with catalytic converters).
12
5
7
Maintenance (continued)
Muffler
Only start and use the unit when it is completely
constructed. If you use the unit without all its
covers fitted, you risk serious personal injury.
Carburetor
The unit’s engine is broken in
after it has run through 8-10
tanks of fuel. To ensure the
engine’s peak performance,
you should have your engine
serviced by an authorized
dealer after it has been broken
in. The service technician uses
a revolution counter to adjust
the carburetor for optimum
operating conditions. This will
help the unit produce the least
amount of emissions.
Operation
The carburetor governs engine speed, through the
throttle. Air and fuel are mixed in the carburetor, and
this mixture is adjustable. This adjustment must be
accurate in order to take advantage of the engine’s
optimal output.
The carburetor should be set to adapt to local
conditions, like altitude, climate, gas, and the type of
2-stroke oil used.
Basic Setting
The carburetor is configured at a basic setting at the
factory, before it ships to the customer. This basic
setting is richer than the optimal setting. You should
keep the basic setting during the unit’s first working
hours. Afterwards, the carburetor needs to be finely
tuned by a skilled technician.
NOTE: Some mufflers are fitted with a catalytic
converter. Refer to the Specifications to
determine whether your unit is fitted with a
catalytic converter.
The muffler is designed to
dampen the noise level of
the engine, and to direct
exhaust fumes away from
the user. Exhaust fumes
are hot and contain
sparks, which can result in
fire if the fumes are directed towards dry material.
To prevent this, some
mufflers are equipped
with a spark arrestor
screen.
If your unit has a spark
arrestor screen, you must
clean it regularly. Clean
the screen with a wire
brush.
On mufflers without a catalytic converter, clean the
screen weekly, or replace
it. On mufflers configured
with a catalytic converter,
you should check and
clean the spark arrestor
screen monthly.
if the screen is damaged,
you must replace it. If the screen is blocked frequently,
an impaired catalytic converter may be to blame. if this
is the case, contact your local dealer to inspect the
muffler. A blocked spark arrestor screen will cause the
engine to overheat, possibly damaging the cylinder
and piston.
Fine Adjustment
After the engine has been broken in, it should be finely
adjusted by a qualified technician. First adjust the Ljet, then the idling T screw, and then the H-jet.
Conditions
Never operate a unit that has a defective muffler.
Before making any adjustments, be sure the air filter is
clean and the air filter cover is properly fitted. Any
carburetor adjustment performed with a dirty air filter
will result in a leaner mixture when compared with the
engine performance once the air filter is cleaned. This
can lead to serious engine damage.
13
Maintenance (continued)
Cooling System
Air Filter
To maintain as low of an
operating temperature as
possible, the engine is
equipped with a cooling
system. The cooling system consists of:
1. An air intake on the
starter unit.
The air filter should be
cleaned regularly to remove
dust and dirt. This will help
avoid:
• Carburetor malfunction
2. Cooling fins on the
flywheel.
3. Cooling fins on the
cylinder.
4. A cylinder cover that
leads cold air onto the
cylinder.
Using a brush, clean the cooling system at least once
a week. In difficult conditions, clean it more regularly.
Spark Plug
The condition of the spark
plug is affected by:
• An incorrect carburetor
setting
• An incorrect fuel mixture
(too much faulty oil)
• A dirty air filter
These factors can cause
deposits on the spark plug
electrode. This may result
in a malfunction or starting
difficulties.
NOTE: If the unit is low on power, difficult to start,
or runs poorly while idling, always check
the spark plug first.
If the spark plug is dirty, clean it and check that it has
a 0.5 mm electrode gap. Change the spark plug after
one month of operation, or earlier.
NOTE: Always use the recommended type of
spark plug. An incorrect spark plug can
damage the cylinder and piston.
14
• Problems with starting
• Unnecessary wear to
engine parts.
• Abnormal fuel
consumption
Clean the filter after every 25 hours of operation, or
more regularly if operating conditions are excessively
dusty.
Cleaning the Air Filter
Dismantle the air filter cover and remove the air filter.
Wash the filter in clean, warm soapy water. Ensure
that the filter is dry before you refit it. An air filter that
has been used for a long period of time can never
become completely clean. From time to time, it is
necessary to replace the filter with a new one. You
must always replace a damaged air filter.
If you use your unit in dusty places, you should soak
the air filter in oil.
Oiling the Air Filter
The air filter contains a
solvent that enables the oil
to spread evenly throughout the filter. Therefore,
avoid skin contact with the
filter.
To apply oil, place the filter in a plastic bag and
pour the oil over the filter.
Knead the plastic bag to
distribute the oil. Squeeze
any excess oil out of the
filter inside the plastic
bag. Pour off the excess
before you fit the filter into
the unit.
Never use common engine oil. This could drain
through the filter quickly and collect in the bottom.
Section 11
Specifications
ENGINE*
Engine Type ........................................................................................................................... Air-Cooled, 2-Cycle
Cylinder Capacity ..................................................................................................................................... 40.2 cm3
Cylinder Bore............................................................................................................................................... 40 mm
Stroke Length .............................................................................................................................................. 32 mm
Idle Speed .............................................................................................................................................. 2,500 rpm
Recommended Maximum Speed .......................................................................................................... 7,500 rpm
Maximum Engine Output (according to ISO 8893) ..................................................................... 2 kW/7,500 r/min
Ignition Type/Manufacturer ............................................................................................................... Electronic/ET
Ignition Switch................................................................................................................................. Rocker Switch
Spark Plug....................................................................................................................................... NGK BPMR7A
Spark Plug Gap........................................................................................................................... 0.02 in. (0.5 mm)
Lubrication .................................................................................................................................... Fuel/Oil Mixture
Fuel/Oil Ratio ....................................................................................................................................................50:1
Carburetor/Manufacturer........................................................................................................ Membrane / Walbro
Fuel Tank Capacity ....................................................................................................................................1.6 pints
Catalytic Converter ............................................................................................................................................ No
OTHER SPECIFICATIONS*
Approximate Unit Weight (without fuel) ........................................................................................................... 8 Kg
Noise pressure level (measured according to EN31806 and ISO 7917) ........................................................... 89 dB(A)
Noise power level (measured according to EN 31806 and ISO 10884) ....................................................... 103.5 dB(A)
Vibration levels on handles (measured according to EN 31806 and ISO 7916)
Vibrations when idling ................................................................................................................. max of 1.2 m/s2
Vibrations at maximum speed..................................................................................................... max of 1.2 m/s2
*All specifications are based on the latest product information available at the time of printing. We reserve the
right to make changes at any time without notice.
15
MANUFACTURER’S LIMITED WARRANTY FOR:
The limited warranty set forth below is given by Cub
Cadet Commercial LLC with respect to new
merchandise purchased and used in the United
States, its possessions and territories.
Cub Cadet Commercial LLC warrants this product
against defects in material and workmanship for a
period of two (2) years commencing on the date of
original purchase and will, at its option, repair or
replace, free of charge, any part found to be defective
in material or workmanship. This limited warranty
shall only apply if this product has been operated and
maintained in accordance with the Operator’s Manual
furnished with the product, and has not been subject
to misuse, abuse, commercial use, neglect, accident,
improper maintenance, alteration, vandalism, theft,
fire, water or damage because of other peril or natural
disaster. Damage resulting from the installation or use
of any accessory or attachment not approved by Cub
Cadet Commercial LLC for use with the product(s)
covered by this manual will void your warranty as to
any resulting damage. This warranty is limited to
ninety (90) days from the date of original retail
purchase for any Cub Cadet Commercial product
that is used for rental or commercial purposes, or any
other income-producing purpose.
HOW TO OBTAIN SERVICE: Warranty service is
available, WITH PROOF OF PURCHASE
THROUGH YOUR LOCAL AUTHORIZED SERVICE
DEALER. To locate the dealer in your area, visit our
website at www.cubcadetcommercial.com, check for
a listing in the Yellow Pages, call 1-877-282-8684
or write to P.O. Box 361131, Cleveland, OH 441360019.
This limited warranty does not provide
coverage in the following cases:
A. Tune-ups - Spark Plugs, Carburetor
Adjustments, Filters
B. Wear items - Bump Knobs, Outer
Spools, Cutting Line, Inner Reels, Starter
Pulley, Starter Ropes, Drive Belts
C. Cub Cadet Commercial LLC does not extend
any warranty for products sold or exported
outside of the United States of America, its
possessions and territories, except those sold
through Cub Cadet Commercial’s authorized
channels of export distribution.
Cub Cadet Commercial LLC reserves the right to
change or improve the design of any Cub Cadet
Commercial Product without assuming any obligation
to modify any product previously manufactured.
No implied warranty, including any implied
warranty of merchantability or fitness for a
particular purpose, applies after the applicable
period of express written warranty above as to
the parts as identified. No other express warranty
or guaranty, whether written or oral, except as
mentioned above, given by any person or entity,
including a dealer or retailer, with respect to any
product shall bind Cub Cadet Commercial LLC
During the period of the Warranty, the exclusive
remedy is repair or replacement of the product as
set forth above. (Some states do not allow
limitations on how long an implied warranty lasts, so
the above limitation may not apply to you.)
The provisions as set forth in this Warranty
provide the sole and exclusive remedy arising
from the sales. Cub Cadet Commercial LLC shall
not be liable for incidental or consequential loss
or damages including, without limitation,
expenses incurred for substitute or replacement
lawn care services, for transportation or for
related expenses, or for rental expenses to
temporarily replace a warranted product. (Some
states do not allow limitations on how long an
implied warranty lasts, so the above limitation may
not apply to you.)
In no event shall recovery of any kind be greater than
the amount of the purchase price of the product
sold. Alteration of the safety features of the product
shall void this Warranty. You assume the risk and
liability for loss, damage, or injury to you and your
property and/or to others and their property arising
out of the use or misuse or inability to use the
product.
This limited warranty shall not extend to anyone
other than the original purchaser, original lessee or
the person for whom it was purchased as a gift.
How State Law Relates to this Warranty: This
warranty gives you specific legal rights, and you may
also have other rights which vary from state to state.
To locate your nearest service dealer dial 1-877-2828684.
Cub Cadet Commercial
LLC
P.O. Box 361131
Cleveland, OH 44136-0019