1
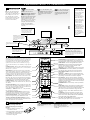
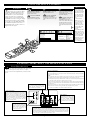
Quick Use and Setup Guide
HDTV Monitor
55PP9401
60PP9401
TABLE OF CONTENTS
Safety/Important Notice . . . . . . . . . . . . . . . . . . . . . . . .1
Best Viewing . . . . . . . . . . . . . . . . . . . . . . . . . . . . . . . .1
Making a Basic Antenna or Cable TV Hookup . . . . . . .1
Making a Basic VCR Hookup . . . . . . . . . . . . . . . . . . .2
Using the Front Panel Jacks . . . . . . . . . . . . . . . . . . . . .2
Performing Basic TV Operations . . . . . . . . . . . . . . . . .3
Learning Remote Control Buttons . . . . . . . . . . . . . . . .3
Using the On-screen Menu . . . . . . . . . . . . . . . . . . . . . .4
Setting the Language Control . . . . . . . . . . . . . . . . . . . .4
Selecting the Tuner Mode . . . . . . . . . . . . . . . . . . . . . .5
Using the Auto Program Control . . . . . . . . . . . . . . . . .5
Using the Channel Edit Control . . . . . . . . . . . . . . . . . .6
Using the Channel List Control . . . . . . . . . . . . . . . . . .6
Setting the TV’s Clock . . . . . . . . . . . . . . . . . . . . . . . . .7
Using the Auto IntelliSense™ Focus Control . . . . . . . .7
Using the Formats Control . . . . . . . . . . . . . . . . . . . . . .8
Learning More about the Rear Panel Jacks . . . . . . . . . .8
WARNING: TO PREVENT FIRE OR
SHOCK HAZARD DO NOT EXPOSE
THIS UNIT TO RAIN OR EXCESSIVE MOISTURE.
HOOKING UP YOUR PROJECTION TV (BASIC TV CONNECTIONS)
BEST VIEWING
T
he major benefit of this projection
television is its large viewing
screen. To see this large screen at its
best, test various locations in the
room to find the optimum spot for
viewing.
NOTE: Be sure to allow a free flow
of air to and from the perforated
back cover of the set.
To avoid cabinet warping, cabinet
color changes, and increased
chance of set failure, do not place
the TV where temperatures can
become excessively hot—for example, in direct sunlight or near a
heating appliance.
Magnetic fields, such as those of
external speakers, may cause the
picture to distort if the speakers
are placed too close to the television. Move the magnetic field
source away from the TV until
there is no picture distortion.
ANTENNA/CABLE TV HOOKUP
T
he TV signal coming into your
home may be from a Cable TV
company or a combination UHF/VHF
antenna. In either case, the basic connection to the TV is very easy.
A Cable TV signal may use a cable
box or a direct connection and can
receive up to 125 channels.
CHECK IT OUT
If the TV signal is from a 75Ω
F-type coaxial cable/connector,
then you’re ready to connect it to the
antenna input on the back of the TV.
If you’re using a cable signal with a
convertor box, first connect the cable
TV signal to the cable signal IN(put)
plug on the converter box. Then connect from the OUT(put) on the converter box to the ANT(enna) input on
the back of the TV.
Connect the coaxial cable/connector to the ANT(enna) A input on the
back of the TV.
If you’re using a cable converter box,
connect the OUT(put) plug from the
converter to the ANT(enna) A input on
the back of the TV.
A UHF/VHF antenna can receive
normal broadcast channels 2–13 for
VHF and 14–69 for UHF band signals.
Unless your TV is connected to a
cable TV system or to a centralized
antenna system, a good outdoor color
TV antenna is recommended for best
performance. But if you are located in
an area with an exceptionally good
signal that is free from interference
and multiple image “ghosts,” an
indoor antenna may be sufficient.
Combination VHF/UHF
Antenna
(Outdoor or Indoor)
300Ω to 75Ω
Adapter
(483521827003)
Cable Converter Box
IN
ANT A
OR
OUT
F-type 75Ω Coaxial
Cable/Connector
use separate UHF
and VHF antennas,
you will need an
optional combiner to
connect to the TV.
To order any optional accessory contact
your dealer or call
the toll-free accessory ordering number
(1-800-851-8885).
more information on
the Rear Panel
jacks.
F-type 75Ω Coaxial
Cable/Connector
F-type 75Ω
Coaxial
Cable/Connector
✔ If you intend to
✔ See page 8 for
Twin-lead
Wire
1
TV Signal from
Cable Company
Note: A 300Ω to 75 Ω Adapter may be
required if the UHF/VHF antenna you are
using has a “twin-lead wire” instead of the
single F-type 75Ω coaxial cable/connector.
✔ To set the TV to
select only the channel numbers in your
area see how to
“Program" or "Add"
channels in memory
on page 5 (Auto
Program section).
2
EL6487E002 H462952
Back of TV
HOOKING UP YOUR TV (BASIC TV CONNECTIONS)
BASIC VCR HOOKUP
CHECK IT OUT
F
ollow the steps to the right
to connect a basic antenna
or cable TV signal to a VCR,
and then the VCR to the TV.
Refer to the owner’s manuals
for your VCR and cable converter box for further information on hookups.
Connect your antenna or
cable TV signal to a two-way signal
splitter.
Connect one end of coaxial
cable to each of the output plugs on
the signal splitter.
Connect one of the signal
splitter outputs to the ANT(enna)
IN(put) on the VCR.
Connect the remaining signal
splitter output to the ANT(enna) A
input on the back of the TV.
Connect either the S-VIDEO or
V(ideo) output jack and the L(eft) and
R(ight) audio output jacks on the back
of the VCR to the matching AV 1 jacks
on the back of the TV.
Connect the INPUT jack on
the back of the cable box to the TO
CONVERTER jack on the back of the
TV. Then connect the OUTPUT jack on
the back of the cable box to the
ANT(enna) B input on the back of the
TV.
FRONT PANEL JACKS
✔ Your TV remote
control allows you
to switch between
two separate
75-ohm antenna
inputs, ANT(enna)
A and ANT(enna) B.
You can display the
ANT(enna) A input
as a main picture or
subpicture (Picturein-Picture). You can
display ANT(enna)
B only as a main
picture. (ANT[enna]
B cannot be displayed as a subpicture.) The antenna
output labeled “TO
CONVERTER”
allows the
ANT(enna) A connection to pass
directly to a different source such as a
cable box, only
when ANT(enna) B
is displayed as a
main picture.
CHECK IT OUT
T
he Front Panel jacks offer
you the convenience of easy
connection to a camcorder or
VCR.
Connect the S-VHS or Video
OUTPUT jack and the audio L(eft)
and R(ight) OUTPUT jacks on the
back of the VCR to the TV’s Front
Panel jacks.
1
2
TV's Front Jack Panel
S-VIDEO VIDEO L/MONO
✔ Be sure to completely insert cord
plugs when connecting to the Front
Panel jacks. If you
don’t, the playedback picture may be
abnormal.
Connect the S-VHS and audio
L(eft) and R(ight) OUTPUT jacks on
the camcorder to the TV’s Front Panel
jacks.
TV's Front Jack Panel
S-VIDEO VIDEO L/MONO
R
AUDIO
AUDIO
R
✔ If you have an
S-VHS VCR, use
the S-INPUT cable
in place of the standard video cable.
✔ If you have a
mono VCR, insert
the audio cable into
the left audio jack of
your TV.
Connect either the S-VIDEO
or the VIDEO Jacks.
OR
S-VHS V
L
R
OUTPUT
Back of VCR
Camcorder
VCR
2
PERFORMING BASIC TV OPERATIONS
TELEVISION
I
n this section, learn how
to use the TV buttons for
basic operation of the TV.
(See page 4 for information on
how to adjust or set TV controls through the on-screen
menu using the buttons on the
front of the TV, if you don’t
want to use the remote.)
CHECK IT OUT
Press the POWER
button to turn the TV on.
After having connected
a broadcast signal source to
the TV, press the INPUT/EXIT
button to select a source. The
source options are Tuner A,
Tuner B, A/V: 1, A/V: 2, Front,
A/V: 3, and A/V: 4. For this
example, choose the source to
which you connected the
broadcast signal (Tuner A or
Tuner B).
Press the CH(annel) selector buttons until the number of
the channel you desire appears
in the right corner of the TV
screen.
✔ Your TV will
Press the VOL(ume) level
buttons to attain your desired
sound level. The volume level
will be displayed on the TV
screen.
appear to be turned
off if no video input
is present when
A/V:1, A/V: 2,
FRNT, A/V: 3, or
A/V: 4 are selected.
Check the Power
Light to make sure
the TV is turned off
when not in use.
✔ Your remote
does not have an
INPUT button. Use
the SOURCE button
to choose among
signal sources. You
can also use the
AV 1, AV 2, AV 3,
and AV 4 buttons to
access signal
sources.
Remote Control Sensor—point
your remote at this area when
selecting channels, adjusting
volume, and sending other
commands with the remote.
ImageMax™ Sensor—this will
make automatic picture adjustments based on the amount of
light in the room to give the
best picture.
1
Power Light—you will see a
red light when the TV is turned
on.
Press the indention on the Front
Panel to access the Front Panel
Jacks.
3
2
PUSH
CH+
POWER INPUT MENU
VOL-
VOL+
EXIT SELECT
CH-
POWER button—With the TV
off, press and hold this button for
five seconds to see an autodemonstration of the on-screen
displays with HELP text.
4
CH+
POWER INPUT MENU
VOL-
VOL+
EXIT SELECT
CH-
Front Panel Jacks (“FRNT” inputs)—Use these
audio/video jacks for a quick hookup from a
camcorder or VCR to instantly view your
favorite show or new recording. Press the
INPUT/EXIT button on the TV until “FRNT”
appears in the top right corner of the TV screen.
If you have mono sound, insert the audio cable
into the left audio jack.
REMOTE
Offering direct access to the on-screen menu, this remote
controls all features and functions of your TV. It also controls virtually all infrared VCRs, laserdisc/DVD players,
and satellite receivers, as well as on/off and channel
up/down on most cable converter/decoders (see pages
31–36 of the Directions for Use manual for setup information).
SOURCE Button—Press to choose from among the TV’s
signal sources: Tuner A, Tuner B, A/V: 1, A/V: 2, FRNT
(Front), A/V: 3, or A/V: 4.
Mode Buttons—This remote can be set up to operate a
VCR, DVD, laserdisc, cable box, or satellite receiver. Press
TV to use the remote with the TV, DVD for DVD and
laserdisc, VCR for VCR, and ACC(essory) for a cable box
or satellite receiver. (See the Directions for Use manual.)
HELP Button—Press when a menu is on screen to view
HELP text. The text gives a description of the displayed
menu. The HELP text will be shown every time a MENU
is displayed, until you press the HELP button again.
FORMAT Button—Press to quickly change the aspect
ratio of the viewable video. Choose from 4:3, Zoom, 16:9,
and Theater.
STATUS/EXIT Button—Press to display the time (after
you have set it) and status of sound (stereo or mono), signal source, and screen format. Also press to clear the TV
screen after setting or adjusting controls.
VOL(ume) +, – Buttons—Press + or – until you obtain
the volume level you want.
A/CH (Alternate Channel) Button—Press to choose
between the last two channels viewed. (This is good for
switching between two sporting events, for example.)
INTELLISENSE Button—Press to automatically adjust
picture convergence using Auto IntelliSense Focus.
TUNER A, TUNER B, and FRONT Buttons—Press to
access either of the two tuners in the TV’s Rear Panel or the
audio/video jacks in the TV’s Front Panel.
REMOTE BATTERIES
Battery Usage CAUTION—To prevent battery leakage which may
result in bodily injury or damage to
the unit:
SOURCE
DVD
TV
HELP
VCR
LIGHT
FORMAT
SWAP
PIP CH
ACC
SOURCE FREEZE
+
–
PIP ON/OFF
PIP POSITION
STATUS/
EXIT
MENU/
SELECT
VOL
CH
1
2
3
4
5
6
7
8
9
A/CH
0
SURF
QTR
INTELLISENSE
TUNER A TUNER B
AV1
AV2
FRONT
AV3
AV4
Remove the battery
compartment lid on the back
of the remote.
• Install ALL batteries correctly, + and
– as marked on the unit.
• Do not mix batteries: (OLD and NEW
or CARBON and ALKALINE, etc.)
• Remove batteries when the unit is
not used for a long time.
3
POWER Button—Press to turn the TV on or off. With the
TV off, press and hold this button for five seconds to see an
auto-demonstration of the on-screen displays with HELP text.
LIGHT Button—Press to back-light the remote control.
PIP Buttons—Press to perform Picture-in-Picture feature
functions. See the section on Picture-in-Picture in the
Directions for Use manual for details.
OK Button—Press to make selections in the on-screen menu.
CURSOR Buttons—Press LEFT, RIGHT, UP, or DOWN to
move through, select, and adjust on-screen menu options.
MENU/SELECT Button—Press to access the TV’s onscreen menu.
CH(annel) +, – Buttons—Press to cycle through all stored
channels that have been placed in TV memory after the “Auto
Programming” function of the TV has been completed.
MUTE Button—Press to reduce the sound to one-half the
normal volume (Soft Mute) (good to use when answering the
telephone). Press the MUTE button again to turn the sound off
completely. Press the button once more to restore the sound, or
press the VOL(ume) + button.
NUMBER Buttons—Press to directly access any numbered
channel.
SURF Button—Press to access the Favorite Channel screen.
Favorite Channel simplifies surfing (going from channel to
channel). It allows you to store up to 36 favorite stations in the
Surf™ memory. Favorite Channel has 6 categories with 6
channels per category. Add or delete channels from the onscreen list
VCR Buttons—Press the VCR buttons to activate certain
VCR commands when the remote is in the VCR mode. The
buttons are for PLAY, STOP, REWIND, FAST FORWARD,
PAUSE, RECORD, AND TIMER features.
AV1, AV2, AV3, AV4 Buttons—Press to access the four
audio/video input options on the TV’s Rear Panel.
Place the batteries (2-AA)
in the remote. Be sure the (+)
and (-) ends of the batteries
line up correctly (inside of case
is marked).
Reattach the battery
lid.
USING THE ON-SCREEN MENU
MENU
T
his section explains how
to make selections or
adjustments within the onscreen menu. The menu is
simply a list of your TV’s
features or controls. Use the
CURSOR buttons on your
remote control or the
CH(annel) selector and
VOL(ume) buttons on the
TV to move among the
menu options. As necessary,
on-screen messages will
provide you with information to guide you. Also, with
the on-screen menu displayed, you can press the
HELP button on the remote
control to receive more onscreen assistance.
Press the
MENU/SELECT button on the
remote to display the On-screen
Menu. Or press the
MENU/SELECT button on the
TV.
To choose an item from
the Menu Bar, press the CURSOR RIGHT or LEFT button. Or
press the VOL(ume) level buttons
on the TV.
To highlight a feature within
the menu, press the CURSOR
DOWN or UP button on the
remote. Or press the CH(annel)
selector buttons on the TV.
To make selections, press the
OK button on the remote or the
MENU/SELECT button on the
TV. To adjust Picture or Sound settings, press the CURSOR RIGHT
or LEFT buttons on the remote. Or
press the VOL(ume) –, + buttons
on the TV.
To move through the list of
options and their setting or
adjustment areas, press the CURSOR DOWN, UP, RIGHT, or
LEFT buttons. Or press the
CH(annel) selector or VOL(ume)
buttons on the TV.
To remove the on-screen
menu, press the STATUS/EXIT
button on the remote. Or press the
INPUT/EXIT button on the TV.
OK
FEATURES PICTURE
SOUND
THEATER
Language
Tuner Mo de
A uto P r og ram
Channel Edit
Channel List
Cl oc k S et
Intel l i S ense
F or mats
List of Options
for Selected
Menu Bar
Item
Menu Bar
To Quit
5
ON THE TV
SETUP
Exit
1
PUSH
CH+
POWER INPUT MENU
VOL-
VOL+
EXIT SELECT
CH-
5
ON THE REMOTE
6
4
6
3
4
2
3
4
2
1
USING THE SETUP CONTROLS
LANGUAGE
T
he Language control
will allow you to select
any of three languages for
all on-screen displays.
Press the MENU/SELECT
button on the remote control to show
the on-screen menu.
Press the CURSOR RIGHT button to enter the Language options
area.
Press the CURSOR DOWN
button to highlight Language.
Press the CURSOR DOWN or
UP button to highlight the Language
of your choice.
OK
5
Menu
SETUP
FEATURES PICTURE
To Menu Bar
6
3
4
2
1
4
SOUND
THEATER
To Quit
Exit
Press the OK button to select
the language.
OK
Menu
To return to the list of Setup
options, press the CURSOR LEFT
button. To return to the Menu Bar,
press the MENU/SELECT button. To
quit the on-screen menu, press the
STATUS/EXIT button.
SETUP
Press OK to set
To Menu Bar
To Quit
Exit
USING THE SETUP CONTROLS
CHECK IT OUT
TUNER MODE
B
y choosing a Tuner Mode,
you are telling the TV the
type of broadcast signal you
have connected. Select Antenna
if you are using an indoor or
outdoor antenna. Choose
Cable 1 or Cable 2 if you have
cable TV.
Press the
MENU/SELECT button on
the remote control to show the
on-screen menu.
Press the CURSOR
DOWN button twice until
Tuner Mode is highlighted.
Press the CURSOR
RIGHT button to move to the
Tuner Mode options area. Press
the CURSOR DOWN or UP
button until you have highlighted the correct option.
Press the OK button to
make your selection.
OK
SETUP
FEATURES PICTURE
SOUND
THEATER
Language
Tuner Mode
Auto Program
Channel Edit
Channel List
Clock Set
IntelliSense
Formats
4
Menu
To Menu Bar
5
To Quit
Exit
Language
Tuner Mode
Auto Program
Channel Edit
Channel List
Clock Set
IntelliSense
Formats
Menu
1
To Quit
✔ The reception
channels for the
Antenna and Cable
signal sources are
shown below.
✔ Refer to your
cable or TV guide
for channel identification standards.
✔ If certain cable
channels are poor or
not possible in
Cable 1 mode, set
Tuner Mode to
Cable 2.
Exit
Press OK to set
SETUP
Menu
Antenna
Cable 1
Cable 2
To Menu Bar
Language
Tuner Mode
Auto Program
Channel Edit
Channel List
Clock Set
IntelliSense
Formats
3
Press OK to set
SETUP
OK
Antenna
Cable 1
Cable 2
OK
2
To return to the list of
Setup options, press the CURSOR LEFT button. To return to
the Menu Bar, press the
MENU/SELECT button. To
quit the on-screen menu, press
the STATUS/EXIT button.
Antenna
Cable 1
Cable 2
To Menu Bar
To Quit
Exit
Reception Band
Cable 1 or Cable 2
Cable Channel
Indicated on
VHF 2~13
the screen
2 ~ 13
VHF 2 ~ 13ch
Midband A~1
A-5 ~ A-1
14 ~ 22
95 ~ 99
UHF 14 ~ 69ch
Super band J~W
23 ~ 36
37 ~ 64
Air
(Antenna)
Hyperband
W + 1 ~ W + 28
65 ~ 125
Ultraband
W + 29 ~ W + 84
AUTO PROGRAM
CHECK IT OUT
U
se this control to automatically
store active TV channels in the TV’s
memory. This will allow you to skip
unused channels when using the
CH(annel) +, – buttons on your remote.
Press the OK button
to start searching for channels and programming the
TV’s memory.
Press the CURSOR
DOWN button repeatedly
until Auto Program is highlighted.
OK
SETUP
FEATURES PICTURE
Language
Tuner Mode
Auto Program
Channel Edit
Channel List
Clock Set
IntelliSense
Formats
4
Menu
To return to the list of
Setup options, press the
CURSOR LEFT button. To
return to the Menu Bar, press
the MENU/SELECT button.
To quit the on-screen menu,
press the STATUS/EXIT button.
Press the CURSOR
RIGHT button to highlight
Search.
Press the
MENU/SELECT button on
the remote control to show
the on-screen menu.
To Menu Bar
5
SOUND
THEATER
Language
Tuner Mode
Auto Program
Channel Edit
Channel List
Clock Set
IntelliSense
Formats
□ Search
To Quit
OK
SETUP
Press OK to set
SETUP
OK
Exit
Menu
FEATURES PICTURE
To Menu Bar
SOUND
THEATER
Auto Program
Searching
Channel 22
3
2
88% Complete
1
Menu
5
To Menu Bar
To Quit
Exit
□ Search
To Quit
Exit
✔ If you press the
EXIT button while
the Auto Program
function is working,
programming will
stop.
✔ If you connect
two antennas, switch
antenna inputs with
the INPUT button
and repeat Auto
Program for the second antenna input.
✔ Remember to
select the correct
Tuner Mode before
using Auto Program
(see the Tuner Mode
section).
✔ See Channel Edit
to learn how to add
or delete channels.
USING THE SETUP CONTROLS
CHANNEL EDIT
S
elect the correct Tuner Mode and run
Auto Program to automatically store
active TV channels (see the sections on
those controls in this publication). Then
use Channel Edit to add or delete channels from the TV’s memory.
Press the
MENU/SELECT button on
the remote control to show
the on-screen menu.
Press the CURSOR
DOWN button repeatedly
until Channel Edit is highlighted.
Press the CURSOR
RIGHT button to enter the
Add/Delete area.
To Add or Delete the
current channel, press the
OK button. If you want to
Add or Delete a different
channel, press the CH(annel)
+ or – buttons to select the
desired channel.
OK
SETUP
FEATURES PICTURE
Language
Tuner Mode
Auto Program
Channel Edit
Channel List
Clock Set
IntelliSense
Formats
5
Menu
To Menu Bar
6
4
SOUND
3
1
THEATER
To Quit
Exit
Press OK to set
SETUP
OK
Channel 2
Add
Delete
Language
Tuner Mode
Auto Program
Channel Edit
Channel List
Clock Set
IntelliSense
Formats
Channel 2
Add
Delete
Next Ch
Ch Ch Or #Keys
Menu
To Quit
To Menu Bar
Exit
Press OK to set
SETUP
OK
2
To return to the list of
Setup options, press the
CURSOR LEFT button. To
return to the Menu Bar, press
the MENU/SELECT button.
To quit the on-screen menu,
press the STATUS/EXIT button.
Press the CURSOR
DOWN or UP button to
highlight Add or Delete.
Language
Tuner Mode
Auto Program
Channel Edit
Channel List
Clock Set
IntelliSense
Formats
Channel 2
Add
Delete
Next Ch
Ch Ch Or #Keys
Menu
To Quit
To Menu Bar
Exit
CHANNEL LIST
C
hannel List allows you to
review labeled channels
(Id). It also shows you which
channels have been added to the
TV’s memory and which ones
are protected by AutoLock.™ See
the section on Channel Edit in
this publication. Learn more
about Channel List and
AutoLock in the Directions for
Use manual that came with your
TV.
Press the
MENU/SELECT button on
the remote control to show
the on-screen menu.
Press the CURSOR
DOWN button repeatedly
until Channel List is highlighted.
To return to the list of
Setup options, press the
CURSOR LEFT button. To
return to the Menu Bar, press
the MENU/SELECT button.
To quit the on-screen menu,
press the STATUS/EXIT button.
Press the CURSOR
RIGHT button to view the
Channel List. When in the
Channel list, pressing the
CURSOR DOWN or UP button will allow you to view
the next eight channels.
OK
SETUP
FEATURES PICTURE
SOUND
THEATER
Language
Tuner Mode
Auto Program
Channel Edit
Channel List
Clock Set
IntelliSense
Formats
Menu
4
To Menu Bar
2
To Quit
SETUP
Exit
Menu
6
Menu
FEATURES PICTURE
Channel List
Ch
Id
9
ESP2
10 HBO
11 HGTV
12
****
13
FOX
14
BET
15
AMC
1
FEATURES PICTURE
Channel List
Ch
Id
2
NBC
3
ABC
4
CBS
5
****
6
CNN
7
COM
8
ESPN
OK
3
SETUP
OK
THEATER
TunerA
Scan
ON
ON
ON
-ON
ON
ON
To Menu Bar
Lock
-ON
-----To Quit
THEATER
TunerA
Scan
ON
ON
ON
-ON
ON
ON
To Menu Bar
SOUND
SOUND
Exit
Lock
-----ON
-To Quit
Exit
USING THE SETUP CONTROLS
CLOCK SET
Y
ou must set the time on the TV’s
clock before you can use the 4 Event
Program or Sleep Timer (see the
Directions for Use manual for details on
those features).
Press the MENU/SELECT
button on the remote control to
show the On-screen Menu.
Press the CURSOR RIGHT
button to enter the Clock Set area.
After you have finished
inputting the time, press the
MENU/SELECT button to return to
the Menu Bar. Or press the STATUS/EXIT button to quit the onscreen menu.
Press the CURSOR DOWN
or UP button to select digits for the
hour. Press the CURSOR RIGHT
button to move to the input area for
the minutes. Press the CURSOR UP
or DOWN to choose the digits for
the minutes. Choose Am or Pm, the
month, day, and year in the same
manner.
Press the CURSOR DOWN
button repeatedly until Clock Set is
highlighted.
SETUP
OK
FEATURES PICTURE
SOUND
THEATER
Language
Tuner Mode
Auto Program
Channel Edit
Channel List
Clock Set
IntelliSense
Formats
Menu
To Menu Bar
SETUP
OK
To s e t t i m e
Clock Set
:__ Am Jan 1 2001
To Quit
OK
SETUP
E xit
Menu
To Menu Bar
To Quit
Exit
To s e t t i m e
Clock Set
12:00 P m May 1 2001
3
4
2
1
Menu
5
To Menu Bar
To Quit
Exit
INTELLISENSE
Y
ou can automatically adjust the TV’s
picture convergence using Auto
IntelliSense Focus. Your projection TV
has three color projection tubes: one for
red, one for green, and one for blue.
When mixed in the proper proportion,
the output of these three color tubes can
produce any color. However, the beams
of light coming from the tubes must be
precisely aligned over each other so that
the colors can be mixed. The alignment
of these picture beams is called “convergence.”
CHECK IT OUT
✔ After Auto
IntelliSense Focus
does its work, the
picture will be at its
best.
✔ You can also
access Auto
IntelliSense Focus
through the Setup
Menu.
NOTE: During the adjustment process, do not press
the INTELLISENSE button
again and do not move the
TV.
Press the INTELLISENSE button on your
remote control to begin
adjusting the TV’s convergence. The process takes
about 15 seconds.
Picture Difficulty:
Color fringes
around objects
I N T EL L IS E N S E
Over a period of time, the picture tubes
can drift out of alignment because of
normal bumps and vibrations or moving
the TV. If you move your TV, or if, after
a time, you notice color rings or halos
around objects, use Auto IntelliSense
Focus to adjust the convergence. This is
how Auto IntelliSense Focus works:
After reviewing a special test pattern,
optical sensors send position information to a controller, which then corrects
the picture. Auto IntelliSense Focus
responds to the natural and man-made
magnetic field conditions where the projection TV is located, so you always
enjoy the best possible picture.
Color Fringes Gone:
Convergence adjusted
SOURCE
DVD
TV
HELP
VCR
LIGHT
FORMAT
SWAP
PIP CH
ACC
SOURCE FREEZE
+
–
PIP ON/OFF
PIP POSITION
STATUS/
EXIT
MENU/
SELECT
VOL
CH
1
2
3
4
5
6
7
8
9
A/CH
0
SURF
1
QTR
INTELLISENSE
TUNER A TUNER B
AV1
AV2
FRONT
AV3
7
AV4
USING THE SETUP CONTROLS
CHECK IT OUT
FORMATS
T
he Formats control is very useful
when setting up reception for High
Definition, Standard Definition, and
NTSC signals. The Comp Color Type
function allows you to automatically
change tint and color coordinate for
DTV programs. Use the HDTV (High
Definition Television) setting for a High
Vision Signal (Y-PbPr) from an HDTV
set-top box. Use the SDTV/DVD setting
for Standard Definition Television or
Digital Video Disc (Y-CbCr) such as a
digital video disc player.
Press the
MENU/SELECT button on
the remote control to show
the on-screen menu.
Press the CURSOR
RIGHT button to enter the
Formats selection area.
Press the CURSOR
DOWN button repeatedly
until Formats is highlighted.
Press the CURSOR
DOWN or UP button to
highlight a screen format you
want to select for the TV picture.
OK
SETUP
FEATURES PICTURE
SOUND
THEATER
Menu
To return to the list of
Setup options, press the
CURSOR LEFT button. To
return to the Menu Bar, press
the MENU/SELECT button.
To quit the on-screen menu,
press the STATUS/EXIT button.
SETUP
OK
Press OK to set
Formats
Screen Formats
Language
Tuner Mode
Auto Program
Channel Edit
Channel List
Clock Set
IntelliSense
Formats
5
Press the OK button to
make your selection. Repeat
steps 4 and 5 to set
V. Position/Comp Color Type
and Video Display.
V. Position
Comp Color Type
Video Display
To Menu Bar
To Quit
Exit
Menu
To Menu Bar
+
Tuner A
2
4x3
16x9
Zoom
Theater
16x9-HD
5
HDTV
SDTV/DVD
i-laced
proscan
To Quit
Exit
.✔ If Comp Color
Type is set improperly (does not match
the actual input signal), the color and
tint of the main picture will be abnormal.
✔ You must be
tuned to A/V: 3 or
A/V: 4 and have an
accessory device
hooked up to the
Y-PbPr input jacks
to access all of the
Formats Menu
options.
✔ All settings will
affect only the component input you are
currently viewing. If
you are using both
sets of component
input jacks, be sure
to set Formats for
both inputs (set
A/V: 3 and A/V: 4).
6
3
4
2
1
LEARNING MORE ABOUT THE REAR PANEL JACKS
JACK DESCRIPTIONS
Y
our TV’s Rear Panel jacks allow the connection
of a variety of accessory devices (“components”). This section explains how you may use the
jacks.
Component: Y-PbPr Inputs
AV 3 and AV 4 provide Y-PbPr jacks for connecting equipment with Component Video capability.
Devices such as DVD players or set-top boxes can be connected to these jacks. You may use standard
video signal for AV 3 and AV 4.
NOTES:
• Your component inputs may be labeled Y, B-Y, and R-Y. In this case, connect the components
B-Y output to the TV’s Pb input and the components R-Y output to the TV’s Pr input.
• Your component outputs may be labeled Y-CbCr. In this case, connect the component output to the
TV’s Pb input and the component Cr output to the TV’s Pr input.
• It may be necessary to adjust Tint to obtain optimum picture quality when using the Y-PbPr inputs.
• To ensure no copyright infringement, the MONITOR OUT output will be abnormal when using
the Y-PbPr jacks.
• When using the Y-PbPr jacks, the TV will automatically change to Split PIP mode. When you have
Picture-in-Picture on and are viewing a Y-PbPr input, only Split mode is possible.
• AV 3 and AV 4 (Y/VIDEO) can be used for standard video input.
S-VIDEO Inputs 1 and 2
AV 1 and AV 2 provide S-VIDEO (Super
Video) jacks for connecting equipment
with S-VIDEO output capability.
Antenna Input/Output
The remote control allows you to switch between two
separate 75-ohm RF antenna inputs, ANT A and ANT B.
The ANT A input can be displayed as a main picture or
subpicture. ANT B can be displayed only as a main
picture. (ANT B cannot be displayed as a subpicture.)
The antenna output labeled “TO CONVERTER” allows
the ANT A connection to pass directly to a different
source such as a cable box only when ANT B is
displayed as the main picture.
AUDIO TO HI-FI Output
These jacks provide variable audio
output to a separate stereo amplifier.
With this connection, the audio to the
stereo can be controlled by the
television’s main volume.
MONITOR OUT
These jacks provide fixed audio and
video signals for recording. Use the
S-VIDEO Output for high-quality
video output. NOTE: S-VIDEO
Output may be used for recording
only when the input is of S-VIDEO
type.
Audio/Video Inputs 1, 2, 3, and 4
The SOURCE button or your remote will step through each video source and antenna source input
each time it is pressed. Use the audio and video inputs to connect accessory devices—VCRs,
camcorders, laserdisc players, DVD players and the like. (If you have mono sound, insert the audio
cable into the left audio jack.) NOTE: You may use VIDEO or S-VIDEO inputs to connect AV 1
and AV 2, but only one of these inputs may be used at a time.
8