1
USER MANUAL
HALF-DIN MOUNTING
MULTIMEDIA PLAYER
Model: DV-190
Thank You!
Thank you for choosing a VALOR Multimedia product. We hope
you will find instructions in this owner's manual clear and easy
to follow. If you take a few minutes to look through it, you'll
learn how to use all the features of your new VALOR Half-Din
Mounting Mobile Multimedia(DVDNCD/CD/MP3/WMA)Player for
maximum enjoyment.
CONTENTS
Installation
Wire Con nection
Unit Display
Remote Control
General Operation
0000 •• 0000 •• 000 •• 00000.0000 •• 000.0.00 •• 00.000000000 0
.00000.00.00 ••• 0
••
0
•• 0
0.0 • • 00 • •
0
•• 000 •• 0
00
• • • • • 0000 • • • 0
0.000.00.00.000.0.000000.000.00000.000.00.0000.00.00 0
0 . 0 • • 00 • • 0
•• 0
•••• 0
• • • 0000.0.00 • • • • 000 ••
0.000.0 •• 0000000
0
0
0
. 0 0 0 . 0 0 0 0 0 • • 0 . 0 . 0 • • • 00 • • • 0
0
0
0
o.
0
0.00000.00000.
0.0000 •••• 00.0.000.000000.
.0000000.00.00000.00000000000000000000.0000 •• 000.0.0 0
Set Up Operation
Audio CD Operation.
Video CD Operation
DVD Operation ..
•• 0
0
0
0
0
0
o.
3
4
5
5
6
8
o. 9
11
12
•• 0.00 ••• 0.00000000.0 •• 000. 0.0.0000.0
0.00 •• 0000 • • • 0.00 • • • • 00.0.0 •• 0.00.0000 •• 0000.0 • • • 0.0
0
0
0
0
0 0 . 0 0 0 0 0 . 0 • • 00 • • • 0 0 0 0 . 0 0 0 0 0 0 0 0 0 0 0 0 0 0 0 . 0 0 . 0 0 . 0 0 0 0 . 0 . 0 00 • •
0
0.0
0 0 . 0 . 0 . 0 • • 000 • • • • 0 0 0 0 . 0 0 0 . 0 . 0 0 0 0 . 0 0 . 0 0 . 0 •• 0.0 • • • • 0 0 0 0 . 0 0 . 0 0 . 0 .
Troubleshooting ..
Specifications
000.00 ••
0
•• 0
• • 0 . 0 . 0 0 0 0 • • 0 0 0 0 0 . 0 • • • 0 0 . 0 0 0 0 • • 0000 • • 0. 00 0
0000000000000000.0.0000.00000.00.000000000000000.000 0
0
0
0
•• 00.000.
0
0
0000000.
14
16
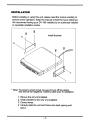
INSTALLATION
Before installing or using this unit, please read this manual carefully to
. ensure correct operation. Keep the manual at hand for future reference.
We recommend having your DV-190 installed by an authorized installer
or reputable installation center.
,
Install Brackets
* Note: To prevent a short circuit, be sure to turn off the ignition
and remove the negative(-) battery cable prior to installation.
1.
2.
3.
4.
Remove the old unifinstalled.
Install brackets to the new unit supplied.
Connect wires.
Carefully slide the unit and frame into dash opening and
secure.
- 3-
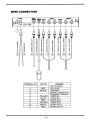
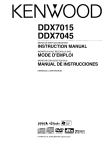
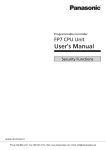
WIRE CONNECTION
DV-190
I:=l
C
W
!;.
>
N
....
Z
0
0
0
W
I-
C
W
...J
...J
I
<
...J
C.
...J
~
0::
w
0
I-
xw
0
:>
:=l
:=l
CD CD 0
0
0
:=l
...J
a
0
Z
CD
!=
0
-
W
~
CD
~
W
0::
::s
(!)
0
~
0
~
0
0
W
l-
Ci
<
Z
TERMINAL NO
1
2
3
4
5
6
7
8
9
10
11
~
w
~
w
!;.
0::
~
Z
0
0
0
<
COLOR
RED
BLACK
YELLOW
WHITE
RED
YELLOW
WHITE
RED
- 4-
C
w
i:
~
!;.
...J
0::
l:=l
I:=l
0
0
0
0
0
0
0
:=l
:=l
@
®
<
<
0
<
REMARK
DC 12V JACK
DC IN 12V
GROUND
DIGITAL AUDIO OUT
EXTERNAL REMOTE
VIDEO IN
AUDIO IN L
AUDIO IN R
VIDEO OUT
AUDIO OUT L
AUDIO OUT R
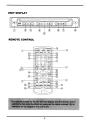
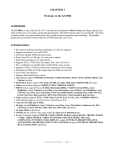
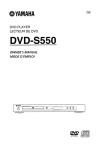
UNIT DISPLAY
®
®
REMOTE CONTROL
G)---+-+t-E~
o
6
.+++-+------
)------+-+++
®
1+-+-------\..7
3 )---..,..---+-t+-=:::=........=±=;:~~:::::44--l---{
:>r++--+------@
-5-
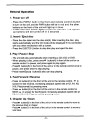
General Operation
1. Power on I off
- Press the PWR(1 both in the front and remote control) button
to turn on the unit, and the PWR button will be in red and the other
buttons on the front of the unit will light up in blue.
- Press the PWR button again to turn off the unit. The lighted
up buttons will be turned off in 3 seconds.
2. Insert I Eject disc
- Place the disc label into the disc slot(9). After inserting the disc, play
starts automatically and the CD mode will be displayed if it is connected
with any other mechanism with a screen.
- Press the EJECT(8 ) button to stop disc play and eject the disc.
3. Play I Pause I Stop
- The unit will play automatically when inserting a CD,VCD or DVD.
- When playing a disc, press once~1I button(4) in front of the unit or on
remote control to pause, and press again to play again.
- Press. button(5) in the front of the unit or in the remote control once to
pause, and press twice to stop playing.
- Press Insert/Eject.. button(8) also can stop playing.
4. Fast Forward I Reverse
- Press .... button(2) in the front of the unit or the remote control, .. in
screen for fast reverse, increasing playback speed rate at X2, X4, X8,
X16, Play(normal) by pressing more.
- Press .. button(3) in the front of the unit or in the remote control or
NEXT, .. in screen for fast forward, increasing playback speed rate at
X2, X4, X8, X16, Play(normal) by pressing more.
5. Chapter Up I Down
- Pressl+4 button(6) in the front of the unit or in the remote control to move to
the previous track or chaper.
- Press~ button(7) in the front of the unit or in the remote control to move to
next track.
-6-
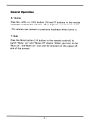
General Operation
6. Volume
Press the +VOL or -VOL button (16 and 17 buttons in the remote
control)to control the volume. 16 is highest, 0 is lowest volume.
-The volume can remain in previous loudness when turns on.
7. Mute
Press the Mute button (14 button in the remote control) to
switch "Mute on" and "Mute off" status. When you turn on the
"Mute on", the"Mute on" icon will be showed on the upper-left
side of the screen.
-7-
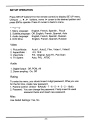
SETUP OPERATION
Press SET UP button(19 in the remote control) to display SET UP menu.
Using ... ,'" ,~ ,~ buttons, move ~ curser to the desired position and
press ENT to operate. Press ~ curser to back to menu.
Language
1.
2.
3.
4.
Menu Language:
Subtitle Language:
Audio Language:
DVD Menu:
English, French, Spanish, Pycck
Off, English, French, Spanish, Auto
English, French, Spanish, Russian
English, French, Spanish, Russian
Video
1.
2.
3.
4.
Picture Mode:
Aspect Ratio
View Mode:
TV System:
Auto1, Aut02, Film, Vide01, Vide02
4:3,16:9
Fill , Original, Auto Fit, Pan Scan
Auto, PAL, NTSC
Audio
1. Digital Output : Off, PCM, All
2. Down sampling: On, Off.
Rating
To enter this menu, you should insert 4-digit password, When you use
for the first time, create new password.
1. Parental control: Unlock - 8(Adult) - 7 - 6 - 5 - 4 - 3 - 2 - 1(kids)
2. Password: You can change the password. Firstly insert the used
password twice and insert new password.
Mise
Use Default Settings: Yes, No
- 8-
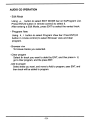
AUDIO CD OPERATION
When you input CD to the slot, and the CD display will show in the
screen, which has current track list on the left side and CD Setup Menu
on the right.
Program Play
You can playa program by selecting the desired tracks in the list.
1. Using .. , T buttons (20,21 buttons in the remote control), select a
track want. The track will be highlighted by a yellow bar.
2. Using ~ button (23 button in the remote control) , go to Program list
on the right side of display.
3. If you want to quit the program list of the Audio CD, using .... button
(button22 in the remote control) to quit.
Program List
- Repeat Play
1) Using .... , ~ button to select REPEAT bar on the Program List. Press
ENT(24 button in the remote control) to change the repeat mode.
* Single: Repeat single track which selected.
* All:
Repeat all tracks in the CD.
*Off: . Cancle the repeat mode
2) Press REPEAT button (26 button in the remote control) directly to
select the repeat mode you want.
3) Repeat A-B: Press RPT A-B (27 button in the remote control) to
make a starting point of A and press again to make a ending point of
B. Then the unit will play from A to B without stop until you press the
button again to turn off the repeating.
-Mode (Random / Normal/Music Intra)
1) Using .... , ~ button to select MODE bar on the Program List. Press
ENT(24 button in the remote control) to change the play mode.
* Normal: Play the track in turn.
* Random: Play the track in a irregular form.
* Music Intro: Play 10 seconds of Intra for each track.
2) Press Random button (30 button in the remote control) directly to
select the play mode you want.
- 9-
AUDIO CD OPERATION
- Edit Mode
Using ... , ~ button to select EDIT MODE bar on the Program List.
Press ENT(24 button in remote control) to select it.
After entering a Edit Mode, press ENT to select the wanted track.
- Program View
Using ... , ~ button to select Program View bar. Press ENT(24
button in remote control) to select Browser view and Clear
program.
- Browser view
To browse tracks you selected.
- Clear program
Select the track you want to delet by ENT, and then press
go to Clear program, and the press ENT.
~
to
- Add to program
Select tracks you want, and move to Add to program, press ENT, and
then tracks will be added to program.
- 10-
VIDEO CD OPERATION
When you input VCD to the slot, and the VCD will play automaticaly and
VCD display will show in the screen.
Play and Repeat
Same with the Audio CD Operation (Page 8).
PSC
PSC(Play Back Control) can be used with a VCD or SVCD that has PBC
built into the disc.
1. To use PBC, insert your VCD or SVCD, then press the PSC button. If
the PSC menu has a list of titles, you can select a title directly by using
the number keys (0-9).
2. You can turn PBC off by pressing again PBC button.
Display Menu
Press DISPLAY button to display VCD DISPLAY menu.
You can select and operate by using. ,"'If ,~ ,~ buIb1s, number keys
(0-9) and ENT button.
1. PBC on / Track number
2. Disc Play Time / Disc Remain Time / Track Play Time / Track Remain
Time
3. Channel: Stereo / Left / Right
4. Sound : Normal/3D Surround .
- 11 -
DVD OPERAliON
Menu
When playa OVO, press Menu button(18 button in the remote control) to
get back to Root Menu screen of the OVO.
Title
When playa OVO, press Title button(13 button in the remote control) to change the
main language of the OVD.
Subtitle
When playa OVO, press Subtitle button(11 button in the remote control)
to select subtitle language of the OVO.
Language
When playa OVO, press Language button(12 button in the remote control) to change
the sound of the DVD.
Display
Press DISPLAY button to display DVD DISPLAY menu.
1. Time (Play Time / Remain Time)
2. Title
3. Chapter Title (Play Chapter / Whole Chapter)
4. Audio
5. Subtile
6. Angle
7. Bitrate
The Display menu disappears after 5 seconds.
A-B Repeat Play
Same with Video CD Operation (Page 8)
-12 -
DVD OPERATION
Zoom
Use the Zoom function to enlarge the video image.
Press ZOOM button (28 button in the remote control) to zoom in. Three
"zoom in" status (Zoom 1,Zoom2,Zoom3) and "zoom off' status can be
selected.
NTSC I PAL Conversion
Press NT/PAL button to convert DVD display mode. You can select
PAL, NTSC or AUTO.
Angle
If the disc has multi-angle function, you can select a desired
angle and display by pressing ANGLE button.
* Little Tips:
When playa DVD, press ~ , ~ to slow the play speed, which can
be reduced into 1/2,1/4,1/6 or 1/8.
- 13 -
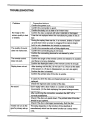
TROUBLESHOOTING
Problem
No image or the
screen quality is bad
or shakes.
The quality of sound
does not make even.
The remote control
does not work.
Replay does not act.
Corrective Actions
Confirm the power is on.
Confirm the connection is good.
Confirm the body is in a state of an instant stop.
Confirm the disc is stained with alien materials or damaged.
It can be not replayed when the manufacturing state of disc is
bad.
During the replay there can be, in a moment, shakes of screen
up-and-down when a screen is chagned from dark to bright,
but it is not a breakdown but should be reassured.
Confirm the connection with a Dolby digital amp.
Confirm the connecting plug is not loose.
Confirm the connecting terminal is not stained by alien
materials.
Confirm the angle of the remote control and distance is suitable
and there is not any obstacles.
. Confirm the flashlight battery of the remote control is enough.
After drawing out the disc, do not use 1 to 2 hours at the state
of the power on. (If dew is disappeared, you can use again.)
Confirm the disc is inserted.
Confirm the printed side of the disc is upside.
In case of a DVD the disc purchased abroad can not be
replayed.
Check the regional code number of the disc.
No sound
Don't replay with a slow motion or a screen of a divided
movements. (In the state replaying the speed-change screen,
no sound.)
After confirming the connection, ascertain the SET UP is
correctly established.
Check if the disc put upside down. The printed side of the disc
should be put upward.
Check if the disc is damaged excessively. Rub the disc.
It does not run as the
good's primary set-up.
The setup depends on the function of the disc(that of
manufacture) which has the same function as a setup menu
runs.
-14-
Problem
Corrective Actions
I cannot choose a ratio
of a screen.
A DVD disc is manufactured as 16:9 wide, 4:3 Movie, and 4:3
screen according to a normal state of manufacture, a 16:9 wide
disc can be seen as a 16:9 wide, 4:3 movie or 4:3 enlarged
mode, and a 4:3 disc always provides a 4:3 screen.
After affirming a DVD disc case, choose the function in suit with
an action and use. For reference a 4:3 standardized disc does
not teleview with an wide.
Dolby digital 5.1
channel cubic sound
does not sound.
Dolby digital 5.1 channel cubic sound can be heard when it is
matched to an exclusive dolby digital amp, and the disc
recorded as 'Dolby digital 5.1 CH' among DVD discs is only
played.
Desirable spoken
language and subtitles
do not motion.
Only language sounds and subtitles recorded on the DVD disc
motion and are replayed according to the recording.
A screen angle does
not motion during the
play.
The reproduction of a screen angle can be modified only if
photographing per each angle is recorded on a DVD disc, and
it moves only in case that an indication of angle presents on the
product.
-15-
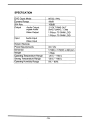
SPECIFICATION
DVD Output Mode
Dynamic Range
SIN Ratio
Output
Audio Output
Digital Audio
Video Output
NTSC I PAL
90dB
100dB
2 VOLT RMS OUT
20HZ-20KHZ + 3dB
1.0Vp-p: 75 OHM LOAD
1.0Vp-p: 75 OHM LOAD
Input
Audio Input
Video Input
External Remote
Power Requirements
Dimension
Weight
Operating Temperature Range
Storage Temperature Range
Operating Humidity Range
DC 12V
174(0) x 178(W) x 26(H )mm
1.3kgs
-20 C - +60 C
-30 C - +80 C
0% - 800/0
-16-
Place
Postage
Here
V,1LOR
MULTIMEDIA
Valor Warranty Validation Dept
18061 Arenth Ave
City of Industry . CA 91748
V,lLOR
ULT
E
I
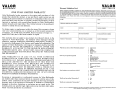
ONE YEAR LIMITED WARRANTY
V,lLOR
MULTIMEDIA
ONE YEAR LIMITED WARRANTY
Valor Multimedia hereby warrants to the original retail purchaser of this
product that should this product or any part thereof, under normal use and
conditions, be proven defective in material or workmanship within one year
parts and labor from the date of original purchase. Such defect(s) will be
repaired or replaced with reconditioned product (at Valor Multimedia's
option) for parts and repair labor. This limited warranty is the purchaser's
exclusive remedy for any such defect(s).
This warranty does not apply to any product of part thereof which, in the
opinion of Valor Multimedia, has suffered or been damaged through
alteration, improper installation, mishandling, misuse,neglect, accident, or
by removal or defacement of the factory serial number/bar codelabel(s). The
opinion of Valor Multimedia with respect to this matter shall be finaI:rHE
EXTENT OF VALOR MULTIMEDIA'S LIABILITY UNDER THIS
WARRANTY IS LI MITED TO THE REPAIR OR REPLACEMENT
PROVIDED ABOVE AND, IN NO EVENT, SHALL THE COMPANY'S
LIABILITY EXCEED THE PURCHASE PRICE PAID BY PURCHASER
FOR THE PRODUCT.
MULTIMEDIA
Please complete all fields to validate your Valor Multimedia limited warranty. Remember to include a copy
of your dated sales invoice. Failure to return this card will result in warranty coverage starting on the date
of manufacture based on your serial number, Special warranty provisions will only be honored if this card
is returned complete. Limitations to warranty periods and exclusions may not apply to your area if
applicable by law. Please check with your local regulatory offices for details regarding warranty regulations
in your area.
NAME
DATE
SHIPPING ADDRESS (NO PO BOXES)
CITY
STATE
To obtain repairs or replacement within the terms of this warranty, please
visit www.valormultimedia.com or contact us at 18061 Arenth Avenue;City
of Industry, CA 91748 (626) 581-8900. Proof of warranty coverage (i.e.dated bill of sale) and a valid serial number is required.
V,lLOR
Warranty Validation Card
IZIP CODE
RETAILER NAME
RETAILER ADDRESS
RETAILER PHONE NUMBER
PRODUCT PURCHASED
PRODUCT SERIAL NUMBER
DATE OF PURCHASE
Why did you choose a Valor Multimedia product?
0
0
0
0
0
How was your product acquired?
THIS WARRANTY IS IN LIEU OF ALL OTHER EXPRESSED
WARRANTIES OR LIABILITIES. ANY IMPLIED WARRANTIES,
INCLUDING ANY IMPLIED WARRANTY OF MERCHANTABILITY,
SHALL BE LIMITED TO THE DURATION OF THIS WRITTEN
WARRANTY. ANY ACTION FOR BREACH OF ANY WARRANTY
HEREUNDER, INCLUDING ANY IMPLIED WARRANTY OF
MERCHANTABILITY, MUST BE BROUGHT WITHIN A PERIOD OF 18
MONTHS FROM THE DATE OF ORIGINAL PURCHASE. IN NO CASE
SHALL THE COMPANY BE LIABLE FOR ANY CONSEQUENTIAL OR
INCIDENTAL DAMAGES FOR BREACH OF THIS OF ANY OTHER
WARRANTY EXPRESS OR IMPUED WHATSOEVER.
PHONE NUMBER
0
0
0
0
0
Where will this product be used?
0
0
0
0
How long have you owned your vehicle?
0
0
0
0
0
No person or representative is authorized to assume for Valor Multimedia
any liability other than expressed herein in connection with the sale of this
product. Some jurisdictions do not allow limitations on how long an implied
warranty lasts or the exclusion of limitation of incidental or consequential
damages so the above limitations or exclusions may not apply to you. This
warranty gives you specific legal rights and you may also have other rights,
which vary from jurisdiction to jurisdiction.
Would you buy another Valor product?
0
0
Would you recommend a Valor product?
0
0
Appearance
Value
Features
Brand Name
Other
Gift
Internet Retailer
Standard Retailer
Specialty Store
Mass Merchant / Discount Retailer
Personal Automobile
RV
Commerci'al Vehicle
Other
Brand New
< I year
1- 2 years
3 - 5 years
> 5 years
Yes
No
Yes
No
PRIVACY NOTICE: Information gathered is used for the sole purpose of product registration. Your personal information will not be
sold or offered for telemarketing or contact unless you request it.