1
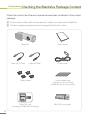
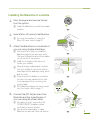
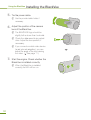
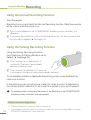
DR400G-HD User manual Ver 1.00 www.avto-blackbox.ru Getting Ready Using the BlackVue BlackVue Software Other Information Contents 2 Before Using This User Manual 3 Safety Instructions 5 BlackVue Features 6 Checking the BlackVue Package Content 7 Checking the main body of the BlackVue 8 Installing the BlackVue 12 Recording 14 Playing a Recorded File 17 Running BlackVue Software 18 The Screen Organization 19 Playing a Recorded File 22 Saving as an Image File / Printing 23 Configuring Your BlackVue Set-up 29 Installing the BlackVue Software 30 Upgrading the Firmware 31 Product Specifications Getting Ready Before Using This User Manual Thank you for purchasing Pittasoft’s BlackVue. This product is a vehicle drive recorder. XX Make sure to read this manual thoroughly in order to use the BlackVue correctly. XX Pittasoft will continue to add new functions and enhancements and apply new technologies to this product. Any information and specifications contained in this manual can be changed without prior notice to users. XX The screenshots and figures presented in this manual may differ from the actual appearances of the product. Conventions Icon Name ] Caution N Note Meaning Indicates that the accompanying function may not operate or be disabled. Indicates a tip or supplementary description to help you operate the accompanying function. Warranty 2 XX Pittasoft co., Ltd shall not be held responsible for any accidental loss or damage to the product due to misuse by the user. XX This product is designed to record/store the scene of a vehicle accident. However, it does not guarantee that it is an exact recording of all accidents. A minor impact that does not trigger the impact sensor may fail to record an event scene. XX This product is a device that assists you to work out the circumstances of the accident. Pittasoft co., Ltd shall not be held responsible for any damage or loss (financial, business or indirect) occurring from an accident. Getting Ready Safety Instructions The following instructions are given to ensure your safety and prevent the loss of property. Read them thoroughly and use the product correctly. ]] Do not disassemble, repair, or remodel the product. This may result in electrical shock, fire or damage to the product. Contact a service center when your product needs to be repaired. Your warranty will be voided if you have disassembled, repaired, or remodeled the product yourself. ]] When cleaning the product, do not spray water directly onto the main body of the product. Be careful that water does not enter the product and that it is not wet. This may result in electric shock, fire or a product malfunction. ]] Do not spray cleaner directly onto the surface of the product. This may result in discoloration or cracks and may cause a product malfunction. ]] Do not impart any force to the product. Be careful that no foreign material enters the product. This may result in a product malfunction. ]] Never operate the product while you are driving. You may be distracted, resulting in a car accident. Make sure to operate the product after stopping your car in a safe location. ]] Do not install the product in a location that hinders your driving or visibility. This may result in an accident. ]] The recorded scenes may be displayed faintly or distorted if the front window of your car is tinted excessively. ]] The optimal temperature range for guaranteed quality is between 0°C and 50°C. In the mid-summer or winter seasons, the video quality may deteriorate a little. ]] This product uses a camera. The quality of the recorded scenes may be degraded in extreme situations, such as when the brightness changes rapidly, when entering or exiting a tunnel, or when the light is too strong at high noon, or when there is no light source at midnight. ]] If the power to the product is disconnected due to a big accident, no scenes will be recorded. 3 Getting Ready Safety Instructions ] Precautions for Using GPS XX Poor GPS signal reception does not affect the video recording performance. The coordinates and travel speed information may be unavailable, but video recording is activated immediately. XX Maintain the ambient temperature to within the recommended range.X The ideal ambient temperature range for the GPS operation is between 0°C and 50°C. In summer or winter, the GPS signal reception may become unstable or it may take longer to establish a satellite connection. XX The GPS requires some time (5 to 30 minutes) to determine its current location when the unit is turned on for the first time or after an extended period of non-use X (3 days or more). XX Avoiding GPS signal interference and re-check the GPS signal strength.. • If and object is placed on top of the GPS model. • If a metallic tinting film has been applied to the vehicle’s windshield. • If there are electromagnetic interference-generating devices inside the vehicle.X (Certain types of remote startup and alarm systems and MP3/CD players) • If other GPS units are in use. • If the weather is cloudy. • If you are driving underneath or through an overpass, inside a tunnel or underground parking facility, in an area with a high concentration of large building structures, near an electrical power plant, near a military base, or near a broadcasting signal tower. ] Caution When Installing the BlackVue 4 XX Installing or operating the product while you are driving may cause an accident. Stop your car at a safe location and install or operate the product. XX If you smell any strange smells or the cigarette jack emits smoke, stop using the product and contact your local product distributor. XX Dust in the cigarette jack may cause excessive heat or fire. Clean it periodically. XX Frequently check whether the main body of the product is installed securely. The BlackVue may fall due to vibrations and result in personal injury or damage to the product. XX Pittasoft is not liable for any product damage or personal injuries that occur due to an accident or carelessness. Getting Ready BlackVue Features High-definition Video The product is equipped with a dedicated IR lens that supports megapixels, which contributes to the reproduction of a sharp and natural image in Full HD (1920x1080@30fps). Smart phone / PC viewer The product comes with a BlackVue-dedicated PC viewer and a smart phone specific (for the Android OS) application. It also provides various ways to check the video or change settings according to your preferences. Normal Recording Records all circumstances while driving in high quality video. Parking Recording Automatic parking mode is provided. If the movement of the vehicles is not detected for a pre-determined period of time (by G-sensor), the mode automatically switches to parking mode. If the movement of the vehicle continues, the parking mode is automatically cancelled. In the parking mode, recordings are made only when a movement is detected by the camera (motion detection) or an impact is imparted (G-sensor). (Created by Pittasoft’s advanced security and safety technologies.) Event (G-Sensor) Recording When an impact is imparted to your car while you are driving, the BlackVue’s builtin G-sensor detects this automatically and starts recording the event. Sound Recording Function Since the BlackVue has a built-in microphone, the surrounding sounds are also recorded when the video scenes are recorded. Video analysis using multiple external devices You can record the video in the common MP4/AVI formats and play it using multiple players. Stylish and Convenient Design The soft and cylindrical design makes the inside of your car more stylish. In addition, you can easily adjust the angle of the camera and capture the inside of your car. Voice Guide Function You can easily use the BlackVue as it guides you with voice instructions for the operations you should perform. GPS Data Recording Powerful sensitive GPS that is embedded in the device records the vehicle’s speed and coordinates whenever recording is in progress. In addition, it is possible to use the GPS data in conjunction with the BlackVue software and Google Maps to plot the vehicle’s navigation path (when connected to the Internet). 5 Getting Ready Checking the BlackVue Package Content Check the product and the accompanied accessories contained in the product package. NN If there is any problem with the accessories, contact your local product distributor. NN The accompanied accessories can be changed without prior notice. BlackVue Video OUT Cable 6 Video IN Cable User manual Power cable Cable holders Double-sided tape X (A spare unit for mounting X the BlackVue onto the vehicle.) Micro SD card (Including the BlackVue Software) Micro SD card reader Getting Ready Checking the main body of the BlackVue Check the main body of the BlackVue. NN For more information on the use of each part, refer to the relevant page. Recording LED indicator GPS Signal LED Holder lock button ( See page 11) Camera lens Holder Microphone [DC IN] terminal ( See page 9) Micro SD card slot [VIDEO OUT] terminal ( See page 11) Buttons on the main body (Parking Recording Button) ( See page 12) 7 Using the BlackVue Installing the BlackVue Inserting / Removing a Micro SD Card 1. Press the Micro SD card lightly and slide it into the BlackVue in the direction shown in the figure. NN To remove the Micro SD card, press it lightly and it will eject. NN Before you insert an SD card into the BlackVue, turn the BlackVue off. ] Caution When Using a Micro SD Card • Insert/Remove the Micro SD card while the BlackVue is turned off. X (Ensure that all the LEDs of the BlackVue are turned off.) • Do not remove the Micro SD card while the BlackVue is reading or writing data. X This may corrupt the data or result in a product malfunction. • Check the data stored on the Micro SD card periodically to ensure that the product operates normally. • Use a Micro SD card provided by Pittasoft. Using a card from other companies may result in data corruption or a product malfunction. • The Micro SD card is an expendable item. Replace it with a new one if it has been used for an extended period of time. • Make sure to back up important data to another storage medium. We do not provide a warranty for any corrupted data that occurs while using the product. 8 Installing the BlackVue in a vehicle 1. Stop the engine and remove the key from the ignition. NN Install the BlackVue in a well-lit and safe location. 2. Insert a Micro SD card into the BlackVue. d NN For more information on using the Micro SD card, refer to page 8. 3. Attach the BlackVue to a windshield of your car using double-sided tape. NN We recommend that you install the BlackVue behind the rear view mirror. X The lens of BlackVue should be located on the center of the vehicle. NN Install it in a location that does not hinder your visibility. NN Wipe all foreign material and moisture from the surface to which the doublesided tape will be attached using a soft and dry cloth. NN If the product is installed on a window hot wire, this may cause the hot wire to be damaged when removing the product later. NN If the BlackVue happens to be removed from the holder, refer to page 11. d d 4. Connect the [DC IN] terminal of the BlackVue and the cigarette jack of your car using the power cable. NN For parking mode, connecting the POWER MAGIC (a battery power controller) is recommended. NN Use a multi power leads, in case BlackVue is used with other car device. d 9 Using the BlackVue Installing the BlackVue 5. Tie the power cable. NN Use the provided cable holder, if necessary. 6. Adjust the position of the camera lens of the BlackVue. NN The BLACKVUE logo should be slightly further down than horizontal. NN Check the data saved during a test drive. Adjust the lens position, if necessary. NN If you connect a mobile video device (smart phone/navigation), you can adjust the angle of the lens viewing the video. ( See page 11.) 7. Start the engine. Check whether the BlackVue is installed correctly. NN When the BlackVue is installed correctly, its LED will turn on. 10 d Connecting the BlackVue to an AV Product Video OUT Cable Video IN cable* 1. Connect the BlackVue’s [VIDEO OUT] terminal to the AV unit using the Video OUT/IN cable (accessory). NN You can view the real-time video of the BlackVue through the connected AV product. NN You cannot play the files recorded by BlackVue. NN If you use the [VIDEO OUT] port of BlackVue, the frame rate decreases. NN However, some navigation systems are not compliant with the provided Video In* cable. Refer to the user manual for the navigation system to check the compatibility with the provided Video In cable. Removing the BlackVue from the Holder 1. While pressing the [LOCK] button for the holder, pull the main body of the BlackVue as shown in the figure. 2. The main body of the BlackVue is easily removed from the holder. NN Assembling it into the holder : Align the grooves of the main body of the BlackVue with those of the holder and slide the main body into the holder until you hear a click. 11 Using the BlackVue Recording Using the Normal Recording Function Start the engine. BlackVue turns on and starts the Normal Recording function. BlackVue records all the videos while the power is on. NN If you connect BlackVue with POWER MAGIC (a battery power controller), it is always on. NN If you select [Normal Record Off] in the [Normal Record] in the Set-up screen, this function will be disabled ( See page 24). Using the Parking Recording Function Using the Parking Recording Function [Auto Switching to Parking Mode] is set by default. ( See page 25.) NN If the movement is not detected for 10 minutes (by G-sensor), it automatically switches to parking mode. NN If the movement is detected for 30 seconds in succession, the parking mode is automatically cancelled. To immediately activate or deactivate the parking mode, press the BlackVue main body’s button. In the parking mode, recordings are made only when a motion is detected by the camera (motion detection) or an impact is imparted to your car (G-sensor). ]] For parking mode, connecting the power of the BlackVue to the POWER MAGIC (a battery power controller) is recommended. Motion Detection Algorithms • This technology is for camera to detect movements. 12 • The proprietary security solution technology of the IP security camera specialized company, PITTASOFT is adopted for motion detection. Using the Event Recording Function When the vehicle is running or parked, if the BlackVue detects an impact over a pre-determined threshold, the video of the before and after is automatically recorded. NN Go to the setup screen and adjust the settings for [G-Sensor] under Sensitivity.X ( See page 26). It is possible to configure different [G-Sensor] settings for the normal recording and parking recording functions. G-Sensor (3 axis acceleration sensor) • BlackVue detects impact with the G-sensor and recording the video. • G-sensor is 3-axis gravity acceleration sensor that detects an impact in X (forward and backward), Y (left and right) and Z axis (upward and downward). • You can play the G-sensor information of the recorded file by using the BlackVue software. • The G-sensor value measured by BlackVue cannot be used as an evidence for traffic accident. Turning off the BlackVue Stop the engine. The BlackVue will turn off after about 5 seconds. All LED indicators of the BlackVue will turn off. NN When the POWER MAGIC (a battery power controller) is connected, separate the power cable connected to the BlackVue. 13 Using the BlackVue Playing a Recorded File BlackVue recordings are saved in MP4/AVI format so that you can easily play the recorded files using a general video player (PC, smart phone or navigation) without file format conversion. NN BlackVue recording files are saved in the ‘Record’ folder of the SD card.X X Playing Recorded Files with a smart phone Downloading BlackVue applications • The company provides useful BlackVue-specific applications for your reference. You can use one of them to play and manage the video clips recorded in BlackVue. • Access Android Market Search for BlackVue Select an application Download d 1. Turn off your BlackVue product and remove the SD card from it. 2. Insert the SD card into your smart phone. NN You can play the recorded video in a smart phone supporting the micro SD card. d 3. From the main menu on your smart phone, select the BlackVue application. The BlackVue viewer will be opened. NN The video can be played using your smart phone’s video player. 4. Tap on a video clip. The video clip will be played. 14 NN If there are a number of files in the SD card, file loading may take some time. d Playing Recorded Files with a Navigation 1. Insert the SD card into the SD card adaptor. Then insert the adaptor (with the SD card inserted) into the SD card reader. 2. Connect the SD card reader to the navigation system. 3. Tap a play-related icon and select the removable disk that contains the video clips. 4. Tap on a video clip. The video clip will be played. NN Playing a video clip may differ depending on the device model. For more information, refer to the user manual of the navigation system. NN If there are a number of files in the SD card, file loading may take some time. 15 Using the BlackVue Playing a Recorded File Playing Recorded Files with a PC 1. Insert the SD card into the SD card adaptor. Then insert the adaptor (with the SD card inserted) into the SD card reader. 2. Connect the SD card reader to the PC. 3. Double-click the “BlackVue.exe” file in the “Applications” folder of the SD card. The BlackVue software will be launched. 4. Tap on a video clip to play it. NN For PC video player, you have to install H.264 video codec and AAC audio codec for normal playback. NN When you play the files on a PC, using BlackVue software is recommended. X ( See page 17) 16 BlackVue Software Running BlackVue Software When playing a BlackVue recording file on a PC, use the BlackVue player software. BlackVue software enables convenient playing and management of BlackVue recording files. NN You can use the BlackVue player directly without installing the program. 1. Insert the SD card into the SD card adaptor. Then insert the adaptor (with the SD card inserted) into the SD card reader. 2. Connect the SD card reader to the PC. 3. Double-click the “BlackVue.exe” file in the “Application” folder of the SD card. BlackVue software runs. NN To install the BlackVue software onto the PC, refer to page 29. 17 BlackVue Software The Screen Organization Playing Screen View Zoom In/OutX G-Sensor View (Adjust using the mouse’s scroll wheel) BlackVue Version information G-Sensor View ( See page 21) / Save Image / Print / X Set-up GPS Information Window File List / Map Timeline 1 Full Screen / Flip Image ( See page 20) 2 Play Control buttons 3 C ontrol the Playing Speed / Control the Volume 4 Play Time Types of Recorded Files : Indicates a Normal Recording file. This is shown in green in the timeline. : Indicates an Event Recording file. This is shown in amber in the timeline. : Indicates a Parking Recording file. This is shown in blue in the timeline. Play Control Buttons : Plays the selected file. / : Moves forward/backward by one frame. : Stops the selected file. / : Plays the previous/next file. : Pauses the selected file. 18 BlackVue Software Playing a Recorded File 1. Click the [ Browse] button and select the folder in which the file is located. NN The files contained in the selected folder are displayed in the list. 2. Double-click the file you want to play. (Alternatively, select the file and click the button.) The selected file starts to be played. NN Scroll mouse wheel to Zoom In/Out in Playing Screen View. X (Min. 0.5X ~ Max. 2.0X) NN You can control the playing speed from 0.5x to 2.0x speed. NN To list only the files with the types you specify, select or deselect the buttons in the [Select Types] section. X (All types are selected by default.) NN Select the checkbox in the date, the files of selected date in the Timeline appears in the list. The recorded file is MP4 or AVI format. • BlackVue saves recorded files in the MP4 or AVI format. You can check the video clip with an MP4/AVI-compliant video player or BlackVue-dedicated player. 19 BlackVue Software Playing a Recorded File Adjusting the Screen XX (Full Screen button) Display the video in full screen. XX (Flip) Flips the display vertically. Using the timeline By using the timeline, you can view the recordings for each hour of the selected date at a single glance. In addition, you can easily search/play a file for the hour you require. XX 1 Select the date. 2 Select the hour. (You can only identify the types of recorded files.) 3 Select the minutes. 4 Select the seconds. View the recording made at the selected time. NN Red circle: Indicates that there is at least one file recorded during the date.X Yellow circle: Indicates the selected date. Deleting/Exporting the file From the player file list, select a file and right-click it to display the context menu. Select Delete to delete the selected file or select Export to save it in a different 20 location. Checking the Map When playing back a recording file, select the Map tab. This plots the vehicle coordinate data from the GPS onto Google Maps. NN To use the Google Maps service, first connect to the Internet. NN Only data from recording files that contain GPS data is displayed. GPS Signal Strength Travel Speed and Coordinates -Green: GPS Data Available - Red: GPS Data Not AvailableZoom : Changes the speed display units. Map Display Options Zoom In/Out (Adjust using the mouse’s scroll wheel) Vehicle Location Opening the MyWay Viewer Press the button. The MyWay Viewer appears. The driving path appears on the map. XX Click the driving path. The recording that was made while driving the path is played. Travel Speed and Coordinates : Changes the speed display units. Pan button Zoom In/Out Driving path - Current file /X 2 previous files /X 2 next files Latitude/Longitude Find My Position Map Display Options Start point of the recordings - Red: The current file - Blue: The previous/next file Vehicle Location 21 BlackVue Software Saving as an Image File / Printing Saving the Selected Screen as an Image File 1. Pause the file by clicking the button while it is being played. Select the scene you want to save. NN To select the scene you want, select the seconds in the timeline or seek the scene by using the / buttons. 2. Click the button. Check the path in which the file will be saved and then click the Save button. The selected scene is saved as an image (jpeg or bmp) file. Printing the Selected Screen 1. Pause the file by clicking the button while it is being played. Select the scene you want to save. NN To select the scene you want, select the seconds in the timeline or seek the scene by using the / buttons. 2. Click the button. The selected scene is printed. 22 BlackVue Software Configuring Your BlackVue Set-up 1. Insert the micro SD card into the PC. ( See page 16) 2. Click the button. The Set-up screen is displayed. NN If the SD card (where the BlackVue firmware is installed) is not connected to the PC, you cannot configure the settings as intended. 3. Configure your BlackVue Set-up. 4. Click the [Save & Close] button. NN If the settings are not saved on the Micro SD card, your configuration of the BlackVue Set-up will not be performed. NN To reset the settings to their default values, click the [Reset] button. 5. Remove the micro SD card of your configuration from the PC and insert it into your BlackVue product. They are applied to the BlackVue automatically. 23 BlackVue Software Configuring Your BlackVue Set-up Setting the Basic 1 2 3 1Time Zone Select the time zone where you are using the BlackVue. This setting is used for the time information for recorded files. 2Image Setting XX Image Quality : Set the image quality for recorded files. The higher the image quality, the larger the file. XX Brightness : Controls the brightness of the recording. 3Recording Setting XX 24 Normal Record • Normal Record On : Records all situations while you are driving. • Normal Record Off : Records only the situations for Event Recording and Parking Recording (Parking mode only). XX Voice Record : Select whether to use the Voice Recording function. XX Date and Time Display : Adds the date and time to the bottom left of the recording. XX Speed Display : Adds the speed to the bottom left of the recording. NN If [Display Off] selected, speed will not be displayed. XX Record File Unit : Sets the Recording File Unit when a file is saved. XX Recording Storage Setting : Storage Allocation: When the storage is full, the oldest file is automatically deleted to record a new video. • Time : When the storage is full, the oldest file is automatically deleted regardless of its type. • Type : You can allocate storage space to each file type separately. When the storage is full, a new video file is recorded after deleting the oldest file of the same type. Even in this mode the event file can be deleted, so please be careful. ] If the event recording limit is full • Event recording files are also deleted from the oldest one. Take care so that necessary files are not deleted. Backup those files onto another storage device. XX Auto Switching to Parking Mode : If no movement is detected by G-sensor for 10 minutes, the product automatically switches to parking mode. If the G-sensor detects the movement of the vehicles for at least 30 seconds, the product automatically switches to normal recording mode. NN The time and function to switch to the parking mode may be affected by the level of the impact of the vehicle. XX File Format : Specify the format of the recording file. 25 BlackVue Software Configuring Your BlackVue Set-up Setting the sensitivity 1 2 1Sensitivity for Normal Recording Determines the sensitivity threshold of the G-sensor for the event recording function in permanent recording mode. 2Sensitivity for Parking Mode Determines the sensitivity thresholds of the G-sensor and the motion detector for the event recording function in parking mode. 26 Advanced sensitivity setting Click the Advanced button for each of the settings. You can configure the sensitivity while watching a recorded video. 1. Open a recorded video (1). Play the video (2). 2. While watching the video, specify the sensitivity as appropriate. Move the control lever up or down to adjust the sensor area.(3) XX The wider the sensor area, the less sensitive the sensor is; the narrower the sensor area, the more sensitive it is. To record the current status To not record the current status Make the sensitivity area smaller so that the current G-sensor graph is outside the sensor area. Widen the sensitivity area so that the current G-sensor graph is in the sensor area. NN Depending on the user-configured sensitivity, if an event to be recorded by the event recording function is detected, the border of the video play screen blinks. 3. Click the [Save & Close] button. 27 BlackVue Software Configuring Your BlackVue Set-up Other 28 XX LED On : You can select an indicator to turn on or off. XX Button LED Color : You can change the color of the indicator. XX Voice Alarm : The BlackVue product plays voice messages during certain events. This option allows you to selectively enable/disable the voice messages. XX Alarm Volume : Allows you to adjust the volume of the voice messages. XX Video Out Option : You can select a video source to output if the video sources are connected. Other Information Installing the BlackVue Software 1. Insert the micro SD card(accessory) into the PC. ( See page 16) 2. Double-click the ‘BlackVueSetup(HD)_E. exe’ file on the Micro SD card. 3. Follow the directions presented by the Setup program until you finish the installation. 4. Check that a shortcut to the BlackVue Software is created on the Windows Desktop. NN Double-click the shortcut to the BlackVue Software to run the program. ] If the version of the firmware is higher than that of the software, the recording file will not be played • Check the versions of the software and the firmware. • If the version of the software is lower, install the software newly. 29 UpgradingtheFirmware OtherInformation Firmwareupgradereferstoupgradingtheproductbydownloadinganew versionoffirmware.Byupgradingthefirmwaretothelatestversion,youcan useBlackVueinbetterenvironment. 1. InsertthemicroSDcardintothePC. (Seepage16) 2. Gotothewebpageand downloadthe firmwareupgradefile. 3. Double-clickthefirmwareupgrade file.Performupgradeaccordingto theinstructionsonthescreen. X N UpgradeX theX SDX cardX toX theX newX firmware.X X N WhenX theX upgradeX isX complete,X theX BlackVueXsoftwareXisXinstalled.XIfXyouX don’tXwantXtoXinstallXtheXsoftware,X pressXtheXCancelXbutton.X 4. InsertthemicroSDcardcontaining updatedfirmwareintotheturned-offBlackVue. TurntheBlackVueon.TheBlackVueautomaticallyupdatesthefirmware. 5.Takecarenottocutthepoweroffwhileupdatingthefirmware. ] ]FormattingtheMicroSDcard •X ItXisXrecommendedXthatXyouXformatXtheXMicroXSDXcardXonceXaXweek. •X IfXtheXrecordedXvideoXdoesXnotXplayXsmoothly,XformatXtheXMicroXSDXcard.X •X ToX ensureX theX stableX operationX ofX theX card,X formatX theX MicroX SDX cardX usingX theX officialX programXrecommendedXbyXtheXSDXcardXassociation.XForXmoreXinformationXaboutXformatting,X ).X •X BackupXanyXimportantXdataXstoredXonXtheXMicroXSDXcardXtoXyourXPC.X 30 •X WhenXformattingXisXcomplete,XupgradeXtheXfirmware.XIfXtheXdefaultXfilesXareXnotXonXtheXMicroX SDXcard,XtheXBlackVueXrecordingXwillXfail. ProductSpecifications OtherInformation Camera CMOSXsensorX/X2,073,600Xpixels Resolution FULLXHD(1920x1080)X/XMaxX30fps CompressionXFormat H.264 Audio ViewXAngle MemoryXorXStorageXDevice GPS Diagonal:X120°X/XHorizontal:X98°X/XVertical:X55° MicroXSDXcardX(MaximumX32GB) Built-in Recording VideoXOutput Dimensions Weight PowerXSupply NormalXRecording,X EventX(G-Sensor)XRecording,X ParkingXRecordingX(MotionXDetectionXAlgorithms) Composite Diameter:X32.0XmmX(1.26Xinch) Length:X101.4XmmX(4.00Xinch) 76Xg 12VX/X24VXDC PowerXConsumption OperationXTemperature -20°CX~X60°C ❏❏ LEDStatus LED StatusXXXXXXXXXXXXXX Booting XREC XGPS Button Off - NormalXblinking Normal OrangeXblinking - - Event RedXnormalXblinking - - Parking GreenXblinking - - NoXSDXcard Off - FastXblinking PowerXoff Red/GreenXcrossXblinking - - StorageXshortage OrangeXon Recording GPS - Transmitting - Green NotXTransmitting - - www.avto-blackbox.ru 31