1
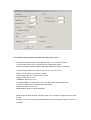
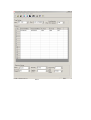
Programming software indicator
THIS PROGRAMMING SOFTWARE ONLY SUITABLE FOR PX-777 PLUS
Summary:
Welcome to use PX series programming software! It is a professional software at setting the
internal functions of PX serials of PX-777/328/338/628/555U/555V/666U/666V/.You can easily
customize the functions by merely several click .As a new member of Puxing interphone series,
it inherits the advantages of the series, such as close to consumer , easy operation and nice usage
Hardware requirements: IBM PC486 or above, 640K RAM
Software requirements:
Windows95 Operation system or above, We recommend windows98 and XP series
With this help documents, you can do following:
o
Full comprehension of the functions of PX series programming software
o
Solving the problems encountered when using the PX series.
Commands
File menu
Programming menu
Port Setup Menu
View menu
Help menu
1. The File menu offers the following commands:
New
Creates a new document.
Use this command to create a new document in the application.
You can open an existing document with the Open command.
.
Open
Opens an existing document.
Use this command to open an existing document in a new window. You can open multiple
documents at once. Use the Window menu to switch among the multiple open documents
Close
Closes an opened document.
Use this command to close all windows containing the active document. the application suggests
that you save changes to your document before you close it. If you close a document without
saving, you lose all changes made since the last time you saved it. Before closing an untitled
document, the application displays the Save As dialog box and suggests that you name and save
the document.
Save
Saves an opened document using the same file name.
Use this command to save the active document to its current name and directory. When you save
a document for the first time, the application displays the Save As dialog box so you can name
your document. If you want to change the name and directory of an existing document before
you save it, choose the Save As command.
Save As Saves an opened document to a specified file name.
Use this command to save and name the active document. the application displays the Save As
dialog box so you can name your document.
Print
Prints a document.
Print Preview Displays the document on the screen as it would appear printed.
Print Setup Selects a printer and printer connection.
Exit
Exits the application.
Use this command to end your the application session. You can also use the Close command on
the application Control menu. the application prompts you to save documents with unsaved
changes.
2. Programming menu commands
The Programming menu includes the following commands:
Read From Radio Read Data From Radio。
Write To Radio Write Data to Radio
Test Mode Debug TX Power,Squelch Level,Low Power Alert on line。
Edit Data
Edit channel Data。
Read From Radio
First Step
Click the "Read From Radio" Submenu under the Programming menu,or the corresponding
button on the toolbar.It presents a processing dialog.
Second Step
Click the Star button, and read the frequency. It displays an dynamic process of application:
Write To Radio Commands (Programming Menu)
You can use this command to input the channel frequency data and general preference into the
Radio
Test Mode(Programming Menu)
Make sure that the radio is connected to a PC serial port with a RS232 connection.
You can modify Transmit Power value, Squelch level, low Power alert Voltage on line. There are
three Frequency choices for each adjustment
(High Frequency,Central Frequency,Low Frequency)
。
Edit Data (Programming Menu)
Use this command and move the cursor into the table of the channel and edit the cell data of the
table.Click Enter of move the mouse will save the data.If there is an error,you will be prompted
and the incorrect data will be deleted。
3. Port Setup menu commands
This menu will let you select one of the four serial ports to work with. Before going on writing
frequency and online debugging, it will automatically check the selected port and you will be
informed if the port is not exist or in busy。
COM1 Selects the first port
COM2 Selects the second port
COM3 Selects the third port
COM4 Selects the forth port
4. View menu commands
The View menu includes the following commands:
Toolbar Shows or hides the toolbar.
Status Bar Shows or hides the status bar.
Toolbar command (View menu)
Use this command to display and hide the Toolbar, which includes buttons for some of the most
common commands in the application, such as File Open. A check mark appears next to the
menu item when the Toolbar is displayed.
See Toolbar for help on using the toolbar.
Status Bar command (View menu)
Use this command to display and hide the Status Bar, which describes the action to be executed by
the selected menu item or depressed toolbar button, and keyboard latch state. A check mark
appears next to the menu item when the Status Bar is displayed.
See Status Bar for help on using the status bar.
5. Help menu commands
The Help menu offers the following commands, which provide you assistance with this
application:
Help Topics Offers you an index to topics on which you can get help.
About
Displays the version number of this application.
1. EXAMPLE (FOR model PX-777/328/338 ONLY)
Set frequency (RX162.9875, TX158.3875) to radio, you can follow as follow:
1) Turn the radio to CHANNEL mode (see user’s manual page 9)
Connect the radio to your computer with our programming cable.
Install the software and fill in software table with needed items (see Fig.1 below )
TYPE SETTING: You can select your model PX-777/328/338
FIELD: you can select your frequency range
TX POWER RANK: from 0-9 (low--High)
MANUAL SETTING: if select close, you could not input frequency with radio keypad.
RECEIVING(MHZ):input needed receiving frequency in Channel 1
TRANSMITTING(MHZ): input needed receiving frequency in Channel 1
RX TONE: input RX CTCSS or DCS tone(QT/DQT.)
TX TONE: input TX CTCSS or DCS tone(QT/DQT.)
W/N: wide bandwidth or narrow bandwidth channel spacing (12.5Khz or 25Khz)
SCAN: if select yes, the scan function is active
TX POWER: Low and High, if you need high power, select high. otherwise select low.
OPT SIGNAL: FSK or DTMF encode
PTT ID: display caller ID function active if ON was selected.
BUSYLOOK: If select on, transmitting is forbidden.
When all desired items finished, Click the “write” icon on toolbar or program menu to write
to radio.
Certainly you can also read factory default setting from the radio by using the “read” icon
on toolbar.
FIG.1
2) Click program optional features
Time out time(TOT): set the total transmitting time.
Spuelch Level: set the squelch level from 0-9
Language Choose: Voice appears when item 14 “VOICE”
was turned on.
PTT ID
ANI: it is the code of radio will transmit and receive
Radio Name: The name will display on another radio when PTT push on a radio.
About the ANI code, this is a example
1) Turn the ANI "On" of the two radio by keypad
2) Click program-->optional features and fill up :
ANI: A123
NAME: PXDZ1
Begin of TX (marked)
End of TX(marked)
Write to radio 1
3) ANI: A123
NAME: PXDZ2
Begin of TX (marked)
End of TX(marked)
Write to radio 2
4) press PTT from radio 1, radio 2 sees the ID PXDZ1 from radio 1 and radio 1 can talk to radio 2
Please note that ANI code must be same for these 2 radios and need to mark Begin of TX&End of TX.
2. EXAMPLE (FOR model PX-628/555U/555V/666U/666V ONLY)
Set frequency (RX162.9875, TX162.9875) to radio, you can follow as follow:
1) Connect the radio to your computer with our programming cable.
Install the software and fill in software table with needed items (see Fig.2 below )
TYPE SETTING: Select your model PX-628/555U/555V/666U/666V/
FIELD: you can select your frequency range
th
SCAN FUNCTION: 16 channel scan on or off.
MONI: Monitor key on or off.
WARNING: Warning on or off
TX POWER RANK: Low and High, if you need high power, please select high.
TX TOTAL TIME: Select continuous transmitting time
SQUELCH LEVEL: from 0 to 9
BAND WIDTH: Wide or narrow bandwidth.
When all desired items finished, Click the “write” icon on toolbar or program menu to write
to radio.
Certainly you can also read factory default setting from the radio by using the “read” icon
on toolbar.
FIG.2