1
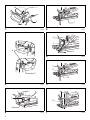
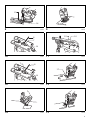
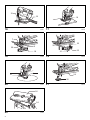
GB
Cordless Jig Saw
Instruction manual
ID
Gergaji Ukir Nirkabel
Petunjuk penggunaan
VI
Maùy cöa loïng chaïy pin
Taøi lieäu höôùng daãn
TH
JV100D
012311
1
2
1
3
012335
2
012312
6
7
4
A
8
4
B
012314
7
9
5
10
3
012313
5
012315
11
12
8
6
2
012316
7
012318
13
14
8
012319
9
012320
15
8
16
7
14
10
012321
7
11
012322
8
17
14
12
012323
13
012324
14
012325
15
012326
3
12
18
16
19
012327
17
012328
7
22
20
20
8
19
23
21
18
012329
19
012330
21
24
25
20
012331
26
24
22
4
012334
21
012333
ENGLISH (Original instructions)
Explanation of general view
1.
2.
3.
4.
5.
6.
7.
8.
9.
Battery
Buttons
Cutting action changing lever
Lock-off button
Switch trigger
Blade holder
Bolt
Hex wrench
Blade
10.
11.
12.
13.
14.
15.
16.
17.
18.
Roller
Hook
Dust cover
Cutting line
Base
Edge
Graduation
Starting hole
Hose
19.
20.
21.
22.
23.
24.
25.
26.
Rip fence (Guide rule)
Fence guide
Rip fence
Threaded knob
Pin
Aluminum base
Anti-splintering device
Cover plate
SPECIFICATIONS
Model
JV100D
Length of stroke
18 mm
Strokes per minute (min-1)
0 - 2,400
Blade type
Max. cutting
capacities
B type
Wood
65 mm
Mild steel
2 mm
Aluminum
4 mm
Overall length
231 mm
Net weight
1.7 kg
Rated voltage
D.C. 10.8 V
• Due to our continuing programme of research and development, the specifications herein are subject to change without
notice.
• Specifications and battery cartridge may differ from country to country.
• Weight, with battery cartridge, according to EPTA-Procedure 01/2003
Symbols
END004-4
The following show the symbols used for the equipment.
Be sure that you understand their meaning before use.
..... Read instruction manual.
Intended use
ENE019-1
The tool is intended for the sawing of wood, plastic and
metal materials. As a result of the extensive accessory
and saw blade program, the tool can be used for many
purposes and is very well suited for curved or circular
cuts.
General Power Tool Safety
Warnings
GEA006-2
WARNING Read all safety warnings and all
instructions. Failure to follow the warnings and
instructions may result in electric shock, fire and/or
serious injury.
Save all warnings and
instructions for future reference.
The term “power tool” in the warnings refers to your
mains-operated (corded) power tool or battery-operated
(cordless) power tool.
Work area safety
1. Keep work area clean and well lit. Cluttered or dark
areas invite accidents.
2. Do not operate power tools in explosive
atmospheres, such as in the presence of
flammable liquids, gases or dust. Power tools
create sparks which may ignite the dust or fumes.
3. Keep children and bystanders away while
operating a power tool. Distractions can cause you
to lose control.
Electrical safety
4. Power tool plugs must match the outlet. Never
modify the plug in any way. Do not use any
adapter plugs with earthed (grounded) power
tools. Unmodified plugs and matching outlets will
reduce risk of electric shock.
5. Avoid body contact with earthed or grounded
surfaces such as pipes, radiators, ranges and
refrigerators. There is an increased risk of electric
shock if your body is earthed or grounded.
6. Do not expose power tools to rain or wet
conditions. Water entering a power tool will increase
the risk of electric shock.
7. Do not abuse the cord. Never use the cord for
carrying, pulling or unplugging the power tool.
Keep cord away from heat, oil, sharp edges or
moving parts. Damaged or entangled cords increase
the risk of electric shock.
5
8. When operating a power tool outdoors, use an
extension cord suitable for outdoor use. Use of a
cord suitable for outdoor use reduces the risk of
electric shock.
9. If operating a power tool in a damp location is
unavoidable, use a ground fault circuit interrupter
(GFCI) protected supply. Use of an GFCI reduces
the risk of electric shock.
Personal safety
10. Stay alert, watch what you are doing and use
common sense when operating a power tool. Do
not use a power tool while you are tired or under
the influence of drugs, alcohol or medication. A
moment of inattention while operating power tools
may result in serious personal injury.
11. Use personal protective equipment. Always wear
eye protection. Protective equipment such as dust
mask, non-skid safety shoes, hard hat, or hearing
protection used for appropriate conditions will reduce
personal injuries.
12. Prevent unintentional starting. Ensure the switch
is in the off-position before connecting to power
source and/or battery pack, picking up or carrying
the tool. Carrying power tools with your finger on the
switch or energising power tools that have the switch
on invites accidents.
13. Remove any adjusting key or wrench before
turning the power tool on. A wrench or a key left
attached to a rotating part of the power tool may result
in personal injury.
14. Do not overreach. Keep proper footing and
balance at all times. This enables better control of
the power tool in unexpected situations.
15. Dress properly. Do not wear loose clothing or
jewellery. Keep your hair, clothing, and gloves
away from moving parts. Loose clothes, jewellery or
long hair can be caught in moving parts.
16. If devices are provided for the connection of dust
extraction and collection facilities, ensure these
are connected and properly used. Use of dust
collection can reduce dust-related hazards.
Power tool use and care
17. Do not force the power tool. Use the correct power
tool for your application. The correct power tool will
do the job better and safer at the rate for which it was
designed.
18. Do not use the power tool if the switch does not
turn it on and off. Any power tool that cannot be
controlled with the switch is dangerous and must be
repaired.
19. Disconnect the plug from the power source and/or
the battery pack from the power tool before
making any adjustments, changing accessories,
or storing power tools. Such preventive safety
measures reduce the risk of starting the power tool
accidentally.
20. Store idle power tools out of the reach of children
and do not allow persons unfamiliar with the
power tool or these instructions to operate the
6
power tool. Power tools are dangerous in the hands
of untrained users.
21. Maintain power tools. Check for misalignment or
binding of moving parts, breakage of parts and
any other condition that may affect the power
tool's operation. If damaged, have the power tool
repaired before use. Many accidents are caused by
poorly maintained power tools.
22. Keep cutting tools sharp and clean. Properly
maintained cutting tools with sharp cutting edges are
less likely to bind and are easier to control.
23. Use the power tool, accessories and tool bits etc.
in accordance with these instructions, taking into
account the working conditions and the work to
be performed. Use of the power tool for operations
different from those intended could result in a
hazardous situation.
Battery tool use and care
24. Recharge only with the charger specified by the
manufacturer. A charger that is suitable for one type
of battery pack may create a risk of fire when used
with another battery pack.
25. Use power tools only with specifically designated
battery packs. Use of any other battery packs may
create a risk of injury and fire.
26. When battery pack is not in use, keep it away from
other metal objects, like paper clips, coins, keys,
nails, screws or other small metal objects, that
can make a connection from one terminal to
another. Shorting the battery terminals together may
cause burns or a fire.
27. Under abusive conditions, liquid may be ejected
from the battery; avoid contact. If contact
accidentally occurs, flush with water. If liquid
contacts eyes, additionally seek medical help.
Liquid ejected from the battery may cause irritation or
burns.
Service
28. Have your power tool serviced by a qualified
repair person using only identical replacement
parts. This will ensure that the safety of the power tool
is maintained.
29. Follow instruction for lubricating and changing
accessories.
30. Keep handles dry, clean and free from oil and
grease.
CORDLESS JIG SAW SAFETY
GEB045-2
WARNINGS
1. Hold power tool by insulated gripping surfaces,
when performing an operation where the cutting
accessory may contact hidden wiring. Cutting
accessory contacting a “live” wire may make exposed
metal parts of the power tool “live” and could give the
operator an electric shock.
2. Use clamps or another practical way to secure and
support the workpiece to a stable platform. Holding
the work by hand or against your body leaves it
unstable and may lead to loss of control.
3. Always use safety glasses or goggles. Ordinary
eye or sun glasses are NOT safety glasses.
4. Avoid cutting nails. Inspect workpiece for any
nails and remove them before operation.
5. Do not cut oversize workpiece.
6. Check for the proper clearance beyond the
workpiece before cutting so that the blade will not
strike the floor, workbench, etc.
7. Hold the tool firmly.
8. Make sure the blade is not contacting the
workpiece before the switch is turned on.
9. Keep hands away from moving parts.
10. Do not leave the tool running. Operate the tool
only when hand-held.
11. Always switch off and wait for the blade to come
to a complete stop before removing the blade from
the workpiece.
12. Do not touch the blade or the workpiece
immediately after operation; they may be
extremely hot and could burn your skin.
13. Do not operate the tool at no-load unnecessarily.
14. Some material contains chemicals which may be
toxic. Take caution to prevent dust inhalation and
skin contact. Follow material supplier safety data.
15. Always use the correct dust mask/respirator for
the material and application you are working with.
SAVE THESE INSTRUCTIONS.
WARNING:
DO NOT let comfort or familiarity with product (gained
from repeated use) replace strict adherence to safety
rules for the subject product. MISUSE or failure to
follow the safety rules stated in this instruction
manual may cause serious personal injury.
IMPORTANT SAFETY
INSTRUCTIONS
ENC009-1
FOR BATTERY CARTRIDGE
1. Before using battery cartridge, read all
instructions and cautionary markings on (1)
battery charger, (2) battery, and (3) product using
battery.
2. Do not disassemble battery cartridge.
3. If operating time has become excessively shorter,
stop operating immediately. It may result in a risk
of overheating, possible burns and even an
explosion.
4. If electrolyte gets into your eyes, rinse them out
with clear water and seek medical attention right
away. It may result in loss of your eyesight.
5. Do not short the battery cartridge:
(1) Do not touch the terminals with any
conductive material.
(2) Avoid storing battery cartridge in a container
with other metal objects such as nails, coins,
etc.
(3) Do not expose battery cartridge to water or
rain.
A battery short can cause a large current flow,
overheating, possible burns and even a
breakdown.
6. Do not store the tool and battery cartridge in
locations where the temperature may reach or
exceed 50°C (122°F).
7. Do not incinerate the battery cartridge even if it is
severely damaged or is completely worn out. The
battery cartridge can explode in a fire.
8. Be careful not to drop or strike battery.
9. Do not use a damaged battery.
SAVE THESE INSTRUCTIONS.
Tips for maintaining maximum battery life
1. Charge the battery cartridge before completely
discharged.
Always stop tool operation and charge the battery
cartridge when you notice less tool power.
2. Never recharge a fully charged battery cartridge.
Overcharging shortens the battery service life.
3. Charge the battery cartridge with room
temperature at 10°C - 40°C (50°F - 104°F). Let a hot
battery cartridge cool down before charging it.
FUNCTIONAL DESCRIPTION
CAUTION:
• Always be sure that the tool is switched off and the
battery cartridge is removed before adjusting or
checking function on the tool.
Installing or removing battery cartridge
(Fig. 1)
• Always switch off the tool before installing or removing
of the battery cartridge.
• To remove the battery cartridge, withdraw it from the
tool while pressing the buttons on both sides of the
cartridge.
• To install the battery cartridge, hold it so that the battery
cartridge front shape fits to that of the battery
installment opening and slip it into place. Always insert
it all the way until it locks in place with a little click. If
not, it may accidentally fall out of the tool, causing
injury to you or someone around you.
• Do not use force when installing the battery cartridge. If
the cartridge does not slide in easily, it is not being
inserted correctly.
7
Battery protection system
The tool is equipped with a battery protection system. This
system automatically cuts off power to the motor to extend
battery life.
The tool will automatically stop during operation if the tool
and/or battery are placed under one of the following
conditions:
• Overloaded:
The tool is operated in a manner that causes it to
draw an abnormally high current. In this situation,
release the trigger switch on the tool and stop the
application that caused the tool to become
overloaded. Then pull the trigger switch again to
restart.
• Low battery voltage:
The remaining battery capacity is too low and the tool
will not operate. If you pull the switch trigger, the
motor runs again but stops soon. In this situation,
remove and recharge the battery.
Selecting the cutting action (Fig. 2)
This tool can be operated with an orbital or a straight line
(up and down) cutting action. The orbital cutting action
thrusts the blade forward on the cutting stroke and greatly
increases cutting speed.
To change the cutting action, just turn the cutting action
changing lever to the desired cutting action position. Refer
to the table to select the appropriate cutting action.
Position
Cutting action
0
Straight line
cutting action
I
Small orbit
cutting action
II
Medium orbit
cutting action
III
Large orbit
cutting action
Applications
For cutting mild steel,
stainless steel and plastics.
For clean cuts in wood
and plywood.
For cutting mild steel,
aluminum and hard wood.
CAUTION:
• Always be sure that the tool is switched off and the
battery cartridge is removed before carrying out any
work on the tool.
Installing or removing saw blade (Fig. 4)
CAUTION:
• Always clean out all chips or foreign matter adhering to
the blade and/or blade holder. Failure to do so may
cause insufficient tightening of the blade, resulting in a
serious personal injury.
• Do not touch the blade or the workpiece immediately
after operation; they may be extremely hot and could
burn your skin.
• Always secure the blade firmly. Insufficient tightening of
the blade may cause blade breakage or serious
personal injury.
• Use only B type blades. Using blades other than B type
blades causes insufficient tightening of the blade,
resulting in a serious personal injury.
To install the blade, loosen the bolt counterclockwise on
the blade holder with the hex wrench.
With the blade teeth facing forward, insert the blade into
the blade holder as far as it will go. Make sure that the
back edge of the blade fits into the roller. Then tighten the
bolt clockwise to secure the blade.
To remove the blade, follow the installation procedure in
reverse. (Fig. 5)
NOTE:
• Occasionally lubricate the roller.
Hex wrench storage (Fig. 6)
For cutting wood and
plywood.
When not in use, store the hex wrench as shown in the
figure to keep it from being lost.
First, insert the hex wrench into the hole. Then push it into
the hook until it locked.
For fast cutting in aluminum
and mild steel.
Dust cover (Fig. 7)
For fast cutting in wood and
plywood.
Switch action (Fig. 3)
CAUTION:
• Before installing the battery cartridge into the tool,
always check to see that the switch trigger actuates
properly and returns to the “OFF” position when
released.
• When not operating the tool, depress the lock-off
button from A side to lock the switch trigger in the OFF
position.
To prevent the switch trigger from accidentally pulled, the
lock-off button is provided.
To start the tool, depress the lock-off button from B side
and pull the switch trigger.
Tool speed is increased by increasing pressure on the
switch trigger. Release the switch trigger to stop. After
use, always press in the lock-off button from A side.
8
ASSEMBLY
CAUTION:
• Always wear safety goggles even when operating the
tool with the dust cover lowered.
Lower the dust cover to prevent chips from flying.
However, when making bevel cuts, raise it all the way.
OPERATION
CAUTION:
• Always hold the base flush with the workpiece. Failure
to do so may cause blade breakage, resulting in a
serious injury.
• Advance the tool very slowly when cutting curves or
scrolling. Forcing the tool may cause a slanted cutting
surface and blade breakage.
Turn the tool on without the blade making any contact and
wait until the blade attains full speed. Then rest the base
flat on the workpiece and gently move the tool forward
along the previously marked cutting line. (Fig. 8)
Bevel cutting (Fig. 9)
Rip fence (optional accessory)
CAUTION:
• Always be sure that the tool is switched off and the
battery cartridge is removed before tilting the base.
• Raise the dust cover all the way before making bevel
cuts.
With the base tilted, you can make bevel cuts at any angle
between 0° and 45° (left or right).
Loosen the bolt on the back of the base with the hex
wrench. Move the base so that the bolt is positioned in the
center of the cross-shaped slot in the base. (Fig. 10)
Tilt the base until the desired bevel angle is obtained. The
edge of the motor housing indicates the bevel angle by
graduations. Then tighten the bolt to secure the base.
(Fig. 11)
CAUTION:
• Always be sure that the tool is switched off and the
battery cartridge is removed before installing or
removing accessories.
1. Straight cuts (Fig. 17)
When repeatedly cutting widths of 160 mm or less,
use of the rip fence will assure fast, clean, straight
cuts.
To install, insert the rip fence into the rectangular hole
on the side of the base with the fence guide facing
down. Slide the rip fence to the desired cutting width
position, then tighten the bolt to secure it. (Fig. 18)
2. Circular cuts
When cutting circles or arcs of 170 mm or less in
radius, install the rip fence as follows.
Insert the rip fence into the rectangular hole on the
side of the base with the fence guide facing up. Insert
the circular guide pin through either of the two holes
on the fence guide. Screw the threaded knob onto the
pin to secure the pin. (Fig. 19)
Now slide the rip fence to the desired cutting radius,
and tighten the bolt to secure it in place. Then move
the base all the way forward. (Fig. 20)
Front flush cuts (Fig. 12)
Loosen the bolt on the back of the base with the hex
wrench and slide the base all the way back. Then tighten
the bolt to secure the base.
Cutouts
Cutouts can be made with either of two methods A or B.
A) Boring a starting hole (Fig. 13)
For internal cutouts without a lead-in cut from an edge,
pre-drill a starting hole 12 mm or more in diameter.
Insert the blade into this hole to start your cut.
B) Plunge cutting (Fig. 14)
You need not bore a starting hole or make a lead-in
cut if you carefully do as follows.
(1) Tilt the tool up on the front edge of the base with
the blade point positioned just above the
workpiece surface.
(2) Apply pressure to the tool so that the front edge
of the base will not move when you switch on the
tool and gently lower the back end of the tool
slowly.
(3) As the blade pierces the workpiece, slowly lower
the base of the tool down onto the workpiece
surface.
(4) Complete the cut in the normal manner.
Finishing edges (Fig. 15)
To trim edges or make dimensional adjustments, run the
blade lightly along the cut edges.
Metal cutting
Always use a suitable coolant (cutting oil) when cutting
metal. Failure to do so will cause significant blade wear.
The underside of the workpiece can be greased instead of
using a coolant.
Dust extraction (Fig. 16)
Clean cutting operations can be performed by connecting
this tool to a Makita vacuum cleaner. Insert the hose of the
vacuum cleaner into the hole at the rear of the tool. Lower
the dust cover before operation.
NOTE:
• Dust extraction cannot be performed when making
bevel cuts.
NOTE:
• Always use blades No. B-17, B-18, B-26 or B-27 when
cutting circles or arcs.
Anti-splintering device
(optional accessory) (Fig. 21)
For splinter-free cuts, the anti-splintering device can be
used. To install the anti-splintering device, move the tool
base all the way forward and fit it from the back of tool
base. When you use the cover plate, install the antisplintering device onto the cover plate.
CAUTION:
• The anti-splintering device cannot be used when
making bevel cuts.
Cover plate (optional accessory) (Fig. 22)
Use the cover plate when cutting decorative veneers,
plastics, etc. It protects sensitive or delicate surfaces from
damage. Fit it on the back of the tool base.
MAINTENANCE
CAUTION:
• Always be sure that the tool is switched off and the
battery cartridge is removed before attempting to
perform inspection or maintenance.
• Never use gasoline, benzine, thinner, alcohol or the
like. Discoloration, deformation or cracks may result.
To maintain product SAFETY and RELIABILITY, repairs,
any other maintenance or adjustment should be
performed by Makita Authorized Service Centers, always
using Makita replacement parts.
OPTIONAL ACCESSORIES
CAUTION:
• These accessories or attachments are recommended
for use with your Makita tool specified in this manual.
9
The use of any other accessories or attachments might
present a risk of injury to persons. Only use accessory
or attachment for its stated purpose.
If you need any assistance for more details regarding
these accessories, ask your local Makita Service Center.
• Jig saw blades
• Hex wrench 3
• Rip fence (guide rule) set
• Anti-splintering device
• Hose (For vacuum cleaner)
• Cover plate (For aluminum base type)
• Various type of Makita genuine batteries and chargers
NOTE:
• Some items in the list may be included in the tool
package as standard accessories. They may differ from
country to country.
10
BAHASA INDONESIA (Petunjuk Asli)
Penjelasan tampilan keseluruhan
1.
2.
3.
4.
5.
6.
7.
8.
9.
10.
11.
12.
13.
14.
15.
16.
17.
Baterai
Tombol
Tuas pengubah kerja
pemotongan
Tombol kunci-mati
Picu sakelar
Penahan bilah
Baut
Kunci hex (segi enam)
Bilah
Roller
Kait
Penutup debu
Garis pemotongan
Alas
Tepi
Garis tahapan
Lubang mulai
18.
19.
20.
21.
22.
23.
24.
25.
26.
Slang
Penggaris pemandu (rip fence)
Pemandu pagar
Penggaris pemandu (rip fence)
Kenop berdrat
Pasak
Alas aluminium
Perangkat anti-remuk
Pelat penutup
SPESIFIKASI
Model
JV100D
Panjang langkah
18 mm
Langkah per menit (men-1)
0 - 2.400
Tipe bilah
Kemampuan
pemotongan maks.
Tipe B
Kayu
65 mm
Baja lunak
2 mm
Aluminium
Panjang keseluruhan
4 mm
231 mm
Berat bersih
1,7 kg
Tegangan yang sesuai
D.C. 10,8 V
• Karena kesinambungan program penelitian dan pengembangan kami, spesifikasi yang disebutkan di sini dapat
berubah tanpa pemberitahuan.
• Spesifikasi dan kartrid baterai dapat berbeda dari satu negara ke negara lainnya.
• Berat, dengan kartrid baterai, menurut Prosedur EPTA 01/2003
Simbol-simbol
END004-4
Berikut ini adalah simbol-simbol yang digunakan pada
mesin ini. Pastikan Anda mengerti makna masing-masing
simbol sebelum menggunakan alat ini.
..... Baca petunjuk penggunaan.
Maksud penggunaan
ENE019-1
Mesin ini dimaksudkan untuk menggergaji bahan kayu,
plastik, dan logam. Sebagai hasil dari program aksesori
dan bilah gergaji yang ekstensif, mesin ini dapat
digunakan untuk banyak keperluan dan sangat cocok
untuk pemotongan melengkung atau melingkar.
Peringatan Keselamatan Umum
Mesin Listrik
GEA006-2
PERINGATAN Bacalah semua peringatan
keselamatan dan semua petunjuk. Kelalaian mematuhi
peringatan dan petunjuk dapat menyebabkan sengatan
listrik, kebakaran, dan/atau cedera serius.
Simpanlah semua peringatan dan
petunjuk untuk acuan di masa
mendatang.
Istilah “mesin listrik” dalam semua peringatan mengacu
pada mesin listrik yang dijalankan dengan sumber listrik
jala-jala (berkabel) atau baterai (nirkabel).
Keselamatan tempat kerja
1. Jagalah tempat kerja selalu bersih dan
berpenerangan cukup. Tempat yang berantakan
atau gelap mengundang kecelakaan.
2. Jangan mengoperasikan mesin listrik dalam
atmosfer yang mudah meledak, seperti bila ada
cairan, gas, atau debu mudah menyala. Mesin listrik
menimbulkan percikan api yang dapat menyalakan
debu atau uap tersebut.
3. Jauhkan anak-anak dan mereka yang tidak
berkepentingan saat mengoperasikan mesin
listrik. Bila perhatian terpecah, Anda dapat
kehilangan kendali.
Keamanan kelistrikan
4. Steker mesin listrik harus cocok dengan
stopkontak. Jangan sekali-kali mengubah steker
dengan cara apa pun. Jangan menggunakan
steker adaptor dengan mesin listrik berarde
(dibumikan). Steker yang tidak diubah dan
stopkontak yang cocok akan mengurangi risiko
sengatan listrik.
5. Hindari sentuhan tubuh dengan permukaan
berarde atau yang dibumikan seperti pipa,
radiator, kompor, dan kulkas. Risiko sengatan listrik
bertambah jika tubuh Anda terbumikan atau terarde.
6. Jangan membiarkan mesin listrik kehujanan atau
kebasahan. Air yang masuk ke dalam mesin listrik
akan meningkatkan risiko sengatan listrik.
11
7. Jangan menyalahgunakan kabel. Jangan sekalikali menggunakan kabel untuk membawa,
menarik, atau mencabut mesin listrik dari
stopkontak. Jauhkan kabel dari panas, minyak,
tepian tajam, atau komponen yang bergerak. Kabel
yang rusak atau kusut memperbesar risiko sengatan
listrik.
8. Bila menggunakan mesin listrik di luar ruangan,
gunakan kabel ekstensi yang sesuai untuk
penggunaan di luar ruangan. Penggunaan kabel
yang sesuai untuk penggunaan luar ruangan
mengurangi risiko sengatan listrik.
9. Jika mengoperasikan mesin listrik di lokasi
lembap tidak dapat dihindari, gunakan pasokan
daya yang dilindungi piranti pemutus arus
kegagalan arde (ground fault circuit interrupter GFCI). Penggunaan GFCI mengurangi risiko
sengatan listrik.
Keselamatan diri
10. Jaga kewaspadaan, perhatikan pekerjaan Anda
dan gunakan akal sehat bila menggunakan mesin
listrik. Jangan menggunakan mesin listrik saat
Anda lelah atau di bawah pengaruh obat bius,
alkohol, atau obat. Sekejap saja lalai saat
menggunakan mesin listrik dapat menyebabkan
cedera diri yang serius.
11. Gunakan alat pelindung diri. Selalu kenakan
pelindung mata. Peralatan pelindung seperti masker
debu, sepatu pengaman anti-selip, helm pengaman,
atau pelindung telinga yang digunakan untuk kondisi
yang sesuai akan mengurangi risiko cedera.
12. Cegah penyalaan yang tidak disengaja. Pastikan
bahwa sakelar berada dalam posisi mati (off)
sebelum menghubungkan mesin ke sumber daya
dan/atau baterai, atau mengangkat atau membawa
mesin. Membawa mesin listrik dengan jari Anda pada
sakelarnya atau mengalirkan listrik pada mesin listrik
yang sakelarnya hidup (on) akan mengundang
kecelakaan.
13. Lepaskan kunci-kunci penyetel sebelum
menghidupkan mesin listrik. Kunci-kunci yang
masih terpasang pada bagian mesin listrik yang
berputar dapat menyebabkan cedera.
14. Jangan meraih terlalu jauh. Pertahankan pijakan
dan keseimbangan yang baik setiap saat. Hal ini
memungkinkan kendali yang lebih baik atas mesin
listrik dalam situasi yang tidak diharapkan.
15. Kenakan pakaian yang sesuai. Jangan memakai
pakaian yang kedodoran atau perhiasan. Jaga
jarak antara rambut, pakaian, dan sarung tangan
Anda dengan bagian mesin yang bergerak.
Pakaian kedodoran, perhiasan, atau rambut panjang
dapat tersangkut pada bagian yang bergerak.
16. Jika tersedia fasilitas untuk menghisap dan
mengumpulkan debu, pastikan fasilitas tersebut
terhubung listrik dan digunakan dengan baik.
Penggunaan pembersih debu dapat mengurangi
bahaya yang terkait dengan debu.
12
Penggunaan dan pemeliharaan mesin listrik
17. Jangan memaksa mesin listrik. Gunakan mesin
listrik yang tepat untuk keperluan Anda. Mesin
listrik yang tepat akan menuntaskan pekerjaan
dengan lebih baik dan lebih aman pada kecepatan
sesuai rancangannya.
18. Jangan gunakan mesin listrik jika sakelar tidak
dapat menghidupkan atau mematikannya. Mesin
listrik yang tidak dapat dikendalikan dengan
sakelarnya adalah berbahaya dan harus diperbaiki.
19. Cabut steker dari sumber listrik dan/atau baterai
dari mesin listrik sebelum melakukan penyetelan,
penggantian aksesori, atau menyimpan mesin
listrik. Langkah keselamatan preventif tersebut
mengurangi risiko hidupnya mesin secara tak
sengaja.
20. Simpan mesin listrik jauh dari jangkauan anakanak dan jangan biarkan orang yang tidak paham
akan mesin listrik tersebut atau petunjuk ini
menggunakan mesin listrik. Mesin listrik sangat
berbahaya di tangan pengguna yang tak terlatih.
21. Rawatlah mesin listrik. Periksa apakah ada bagian
bergerak yang tidak lurus atau macet, bagian yang
pecah dan kondisi lain yang dapat mempengaruhi
penggunaan mesin listrik. Jika rusak, perbaiki
dahulu mesin listrik sebelum digunakan. Banyak
kecelakaan disebabkan oleh kurangnya pemeliharaan
mesin listrik.
22. Jaga agar mesin pemotong tetap tajam dan bersih.
Mesin pemotong yang terawat baik dengan mata
pemotong yang tajam tidak akan mudah macet dan
lebih mudah dikendalikan.
23. Gunakan mesin listrik, aksesori, dan mata mesin,
dll. sesuai dengan petunjuk ini, dengan
memperhitungkan kondisi kerja dan jenis
pekerjaan yang dilakukan. Penggunaan mesin listrik
untuk tujuan yang lain dari peruntukan dapat
menimbulkan situasi berbahaya.
Penggunaan dan pemeliharaan mesin listrik baterai
24. Isi ulang baterai hanya dengan pengisi baterai
(charger) yang ditentukan oleh pabrik pembuat
mesin. Pengisi baterai yang cocok untuk suatu jenis
baterai dapat menimbulkan risiko kebakaran bila
digunakan dengan baterai yang lain.
25. Gunakan mesin listrik hanya dengan baterai yang
khusus ditentukan untuknya. Penggunaan baterai
yang lain dapat menimbulkan risiko cedera dan
kebakaran.
26. Bila baterai tidak sedang digunakan, jauhkanlah
dari benda logam lain, seperti klip kertas, koin,
kunci, paku, sekrup, atau benda logam kecil
lainnya, yang dapat menjadi penghubung antara
terminal-terminalnya. Menghubungsingkatkan
terminal-terminal baterai dapat menyebabkan luka
bakar atau kebakaran.
27. Bila disalahgunakan, baterai dapat mengeluarkan
cairan; hindari terkena cairan ini. Jika terkena
cairan ini secara tidak sengaja, bilaslah dengan
air. Jika cairan mengenai mata, setelah dibilas,
mintalah bantuan medis. Cairan yang keluar dari
baterai dapat menyebabkan iritasi atau luka bakar.
Servis
28. Berikan mesin listrik untuk diperbaiki/diservis
hanya kepada teknisi yang berkualifikasi dengan
menggunakan hanya suku cadang pengganti yang
serupa. Hal ini akan menjamin terjaganya keamanan
mesin listrik.
29. Patuhi petunjuk pelumasan dan penggantian
aksesori.
30. Jagalah agar gagang kering, bersih, dan bebas
dari minyak dan gemuk.
PERINGATAN KESELAMATAN
GERGAJI UKIR NIRKABEL GEB045-2
1. Pegang mesin listrik pada permukaan genggam
yang terisolasi bila dalam melakukan pekerjaan
aksesori pemotong dapat menyentuh kawat
tersembunyi. Aksesori pemotong yang menyentuh
kawat “hidup” dapat menyebabkan bagian logam
yang terbuka pada mesin teraliri arus listrik dan
menyengat pengguna.
2. Gunakan klem atau cara praktis lain untuk
mengamankan dan menyangga benda kerja pada
platform/dudukan yang stabil. Memegang benda
kerja dengan tangan atau menahannya dengan tubuh
akan membuatnya tidak stabil dan dapat
mengakibatkan kehilangan kendali.
3. Selalu kenakan kacamata pengaman. Kacamata
biasa atau kacamata hitam BUKANLAH kacamata
pengaman.
4. Hindari memotong paku. Periksa dan cabut paku
dari benda kerja sebelum memotong.
5. Jangan memotong benda kerja yang terlalu besar.
6. Pastikan adanya ruang bebas yang cukup di
bawah benda kerja sebelum memotong agar bilah
gergaji tidak menghantam lantai, meja kerja, dll.
7. Pegang mesin dengan kuat.
8. Pastikan bilah gergaji tidak menyentuh benda
kerja sebelum sakelar dihidupkan.
9. Jauhkan tangan dari bagian yang bergerak.
10. Jangan tinggalkan mesin dalam keadaan hidup.
Jalankan mesin hanya ketika digenggam tangan.
11. Selalu matikan sakelar dan tunggu hingga bilah
gergaji benar-benar berhenti sebelum menarik
bilah gergaji dari benda kerja.
12. Jangan menyentuh bilah gergaji atau benda kerja
segera setelah pengoperasian selesai; suhunya
mungkin masih sangat panas dan dapat
membakar kulit Anda.
13. Jangan menjalankan mesin dengan nol beban
secara tidak perlu.
14. Bahan tertentu mengandung zat kimia yang
mungkin beracun. Hindari menghirup debu dan
persentuhan dengan kulit. Patuhi data
keselamatan bahan dari pemasok.
15. Selalu kenakan masker debu/respirator yang
sesuai dengan bahan kerja dan sifat pekerjaan
yang Anda lakukan.
SIMPAN PETUNJUK INI.
PERINGATAN:
JANGAN biarkan kenyamanan atau terbiasanya Anda
dengan produk (karena penggunaan berulang)
menggantikan kepatuhan yang ketat terhadap aturan
keselamatan untuk produk yang terkait.
PENYALAHGUNAAN atau kelalaian mematuhi kaidah
keselamatan yang tertera dalam petunjuk
penggunaan ini dapat menyebabkan cedera badan
serius.
PETUNJUK KESELAMATAN
PENTING
ENC009-1
UNTUK KARTRID BATERAI
1. Sebelum menggunakan kartrid baterai, bacalah
semua petunjuk dan tanda peringatan pada (1)
pengisi baterai, (2) baterai, dan (3) produk yang
menggunakan baterai.
2. Jangan membongkar kartrid baterai.
3. Jika waktu pengoperasian telah menjadi terlalu
singkat, segera hentikan pengoperasian. Keadaan
tersebut dapat mengakibatkan risiko timbulnya
panas berlebihan, kemungkinan luka bakar, dan
bahkan ledakan.
4. Jika ada elektrolit yang masuk ke mata, bilaslah
bersih-bersih dengan air bersih dan segera cari
bantuan medis. Hal itu dapat mengakibatkan
hilangnya penglihatan.
5. Jangan menghubungsingkatkan kartrid baterai:
(1) Jangan menyentuh terminal-terminalnya
dengan bahan konduktif.
(2) Hindari menyimpan kartrid baterai dalam
wadah bersama dengan benda logam lainnya
seperti paku, koin, dll.
(3) Jangan biarkan kartrid baterai terkena air
atau hujan.
Hubungan singkat baterai dapat menyebabkan
aliran arus yang besar, panas berlebihan,
kemungkinan luka bakar, dan bahkan kerusakan
permanen.
6. Jangan menyimpan mesin ini dan kartrid baterai di
tempat yang suhunya dapat mencapai atau
melebihi 50°C (122°F).
7. Jangan membakar kartrid baterai bahkan
meskipun kartrid sudah rusak parah atau benarbenar rusak. Kartrid baterai dapat meledak di
dalam api.
8. Berhati-hatilah agar baterai tidak sampai terjatuh
atau terpukul.
9. Jangan gunakan baterai yang rusak.
SIMPAN PETUNJUK INI.
Kiat untuk mempertahankan usia pakai
baterai maksimum
1. Isilah kembali kartrid baterai sebelum baterai
sepenuhnya habis.
Selalu hentikan pengoperasian mesin dan isi
13
kartrid baterai saat Anda merasakan bahwa
tenaga mesin telah berkurang.
2. Jangan sekali-kali mengisi ulang kartrid baterai
yang telah terisi penuh.
Mengisi baterai terlalu banyak akan
memperpendek usia pakai baterai.
3. Isilah kartrid baterai dalam ruangan bersuhu
antara 10°C - 40°C (50°F - 104°F). Biarkan kartrid
baterai yang panas mendingin lebih dahulu
sebelum mengisinya.
Untuk mengubah kerja pemotongan, cukup putar tuas
pengubah kerja pemotongan ke posisi kerja pemotongan
yang diinginkan. Rujuklah tabel untuk memilih kerja
pemotongan yang tepat.
Posisi
0
Kerja
pemotongan
garis lurus
I
Kerja
pemotongan
orbit kecil
II
Kerja
pemotongan
orbit sedang
III
Kerja
pemotongan
orbit besar
DESKRIPSI FUNGSI
PERHATIAN:
• Selalu pastikan bahwa mesin dalam keadaan mati dan
kartrid baterainya telah dilepas sebelum menyetel atau
memeriksa fungsi mesin.
Memasang atau melepas kartrid baterai
(Gb. 1)
• Selalu matikan mesin sebelum memasang atau
melepas kartrid baterainya.
• Untuk mengeluarkan kartrid baterai, tariklah dari mesin
sambil menekan tombol-tombol pada kedua sisi kartrid.
• Untuk memasang kartrid baterai, pegang dan paskan
bagian depan kartrid baterai dengan lubang
pemasangan baterai dan doronglah masuk ke
tempatnya. Selalu masukkan kartrid sepenuhnya
sampai terkunci di tempatnya yang ditandai dengan
suara klik. Jika tidak, komponen ini dapat terlepas dan
jatuh dari mesin, sehingga menyebabkan cedera pada
Anda atau orang lain di sekitar Anda.
• Jangan mendorong paksa kartrid baterai saat
memasangnya. Jika kartrid tidak dapat terdorong
masuk dengan mudah, berarti posisi memasukkannya
belum tepat.
Sistem perlindungan baterai
Mesin ini dilengkapi dengan sistem perlindungan baterai.
Sistem ini secara otomatis memutus aliran daya ke motor
untuk memperpanjang usia pakai baterai.
Mesin akan secara otomatis berhenti beroperasi jika
mesin dan/atau baterainya berada dalam salah satu
keadaan berikut ini:
• Kelebihan beban:
Mesin dioperasikan dengan cara yang membuatnya
menyedot arus yang luar biasa besar. Dalam
keadaan ini, lepaskan sakelar picu mesin dan
hentikan pemakaian yang menyebabkan mesin
kelebihan beban. Kemudian tarik sakelar picu lagi
untuk menjalankan mesin kembali.
• Tegangan baterai rendah:
Kapasitas baterai yang tersisa terlalu sedikit dan
mesin tidak mau beroperasi. Jika Anda menarik picu
sakelar, motor berjalan lagi tetapi segera mati. Dalam
keadaan ini, lepaskan dan isi kembali (cas) baterai.
Memilih kerja pemotongan (Gb. 2)
Mesin ini dapat dioperasikan dengan kerja pemotongan
orbital (melengkung) atau garis lurus (naik dan turun).
Kerja pemotongan orbital mendorong bilah gergaji ke
depan dengan kuat pada langkah pemotongan dan
sangat meningkatkan kecepatan pemotongan.
14
Kerja
pemotongan
Aplikasi
Untuk memotong baja lunak,
baja tahan karat, dan plastik.
Untuk pemotongan yang rapi
pada kayu dan kayu lapis.
Untuk memotong baja lunak,
aluminium, dan kayu keras.
Untuk memotong kayu dan
kayu lapis.
Untuk pemotongan cepat
aluminium dan baja lunak.
Untuk pemotongan cepat
kayu dan kayu lapis.
Kerja sakelar (Gb. 3)
PERHATIAN:
• Sebelum memasang kartrid baterai ke dalam mesin,
selalu pastikan bahwa picu sakelar bekerja dengan
baik dan kembali ke posisi “OFF (MATI)” saat
dilepaskan.
• Bila mesin sedang tidak dioperasikan, tekan tombol
kunci-mati dari sisi A untuk mengunci picu sakelar
dalam posisi OFF.
Untuk mencegah picu sakelar tertarik secara tidak
disengaja, disediakan tombol kunci-mati.
Untuk menjalankan mesin, tekan tombol kunci-mati dari
sisi B dan tarik picu sakelar.
Kecepatan mesin akan meningkat sejalan dengan
semakin kerasnya picu sakelar ditekan. Lepaskan picu
sakelar untuk menghentikannya. Setelah menggunakan,
selalu tekan masuk tombol kunci-mati dari sisi A.
PERAKITAN
PERHATIAN:
• Selalu pastikan bahwa mesin dalam keadaan mati dan
kartrid baterainya dilepas sebelum melakukan
pekerjaan apa pun pada mesin.
Memasang atau melepas bilah gergaji
(Gb. 4)
PERHATIAN:
• Selalu bersihkan semua serpihan atau benda asing
yang menempel pada bilah dan/atau penahan bilah.
Kelalaian untuk melakukan ini dapat menyebabkan
bilah terpasang kurang kencang, sehingga
mengakibatkan cedera serius.
• Jangan menyentuh bilah gergaji atau benda kerja
segera setelah pengoperasian selesai; suhunya
mungkin masih sangat panas dan dapat membakar
kulit Anda.
• Selalu kencangkan bilah kuat-kuat. Pengencangan
bilah yang kurang kuat dapat menyebabkan bilah
patah atau cedera serius.
• Gunakan hanya bilah tipe B. Menggunakan bilah selain
tipe B akan menyebabkan bilah terpasang kurang
kencang, sehingga mengakibatkan cedera serius.
Untuk memasang bilah, kendurkan baut pada penahan
bilah berlawanan arah jarum jam dengan kunci hex.
Dengan gigi bilah menghadap ke depan, masukkan bilah
ke dalam penahan bilah sejauh dapat masuk. Pastikan
bahwa tepi belakang bilah terpasang pas ke dalam roller.
Kemudian kencangkan bautnya searah jarum jam untuk
mengamankan bilah.
Untuk melepas bilah, ikuti prosedur pemasangan secara
terbalik. (Gb. 5)
Kendurkan baut di bagian belakang alas dengan kunci
hex. Gerakkan alas sehingga baut itu terposisikan di
tengah-tengah slot berbentuk silang pada alas. (Gb. 10)
Miringkan alas sampai sudut kemiringan yang diinginkan
diperoleh. Tepi rumah motor menunjukkan sudut
kemiringan dalam garis-garis tahapan. Kemudian
kencangkan bautnya untuk mengencangkan alas.
(Gb. 11)
CATATAN:
• Sekali-kali lumasilah roller.
Pemotongan lepas dapat dilakukan dengan salah satu
metode, A atau B.
Penyimpanan kunci hex (Gb. 6)
Bila tidak sedang digunakan, simpanlah kunci hex seperti
terlihat dalam gambar agar tidak hilang.
Pertama, masukkan kunci hex ke dalam lubang.
Kemudian dorong masuk ke dalam kait sampai terkunci.
Penutup debu (Gb. 7)
PERHATIAN:
• Selalu kenakan kacamata pengaman bahkan saat
mengoperasikan mesin dengan penutup debu
diturunkan.
Turunkan penutup debu untuk mencegah serpihan
beterbangan. Namun demikian, saat melakukan
pemotongan miring, naikkan penutup debu sepenuhnya.
PENGOPERASIAN
PERHATIAN:
• Selalu tahan alas pada posisi rata dengan benda kerja.
Kelalaian untuk melakukan ini dapat menyebabkan
bilah patah, sehingga mengakibatkan cedera serius.
• Majukan mesin dengan sangat perlahan saat
memotong lengkungan atau memutar. Memaksa mesin
dapat menyebabkan permukaan pemotongan
melenceng dan membuat bilah patah.
Hidupkan mesin dengan bilah gergaji tidak menyentuh
apa pun dan tunggu sampai bilah gergaji mencapai
kecepatan penuh. Kemudian letakkan alas secara
mendatar pada benda kerja dan dengan perlahan
gerakkan mesin maju di sepanjang garis pemotongan
yang telah dibuat sebelumnya. (Gb. 8)
Pemotongan miring (Gb. 9)
PERHATIAN:
• Selalu pastikan bahwa sakelar mesin telah dimatikan
dan kartrid baterainya dilepas sebelum memiringkan
alas.
• Naikkan penutup debu sepenuhnya sebelum
melakukan pemotongan miring.
Dengan alas dimiringkan, Anda dapat melakukan
pemotongan miring dengan sudut berapa pun antara 0°
dan 45° (kiri atau kanan).
Pemotongan rata depan (Gb. 12)
Kendurkan baut di bagian belakang alas dengan kunci
hex dan geser mundur alas sepenuhnya. Kemudian
kencangkan bautnya untuk mengencangkan alas.
Pemotongan lepas
A) Mengebor lubang-mulai (Gb. 13)
Untuk pemotongan lepas internal tanpa irisan
pembukaan dari tepi, bor lebih dahulu lubang-mulai
berdiameter 12 mm atau lebih. Masukkan bilah ke
dalam lubang ini untuk memulai pemotongan.
B) Pemotongan tusuk/benam (Gb. 14)
Anda tidak perlu mengebor lubang mulai atau
membuat irisan pembukaan jika Anda melakukan
sebagai berikut dengan hati-hati.
(1) Miringkan mesin dengan tepi depan alas berada
di bawah dan ujung bilah terposisikan tepat di
atas permukaan benda kerja.
(2) Berikan tekanan pada mesin sehingga tepi
depan alas tidak akan bergerak saat Anda
menghidupkan mesin dan dengan halus
turunkan ujung belakang mesin perlahan-lahan.
(3) Sementara bilah melubangi benda kerja,
perlahan-lahan turunkan alas mesin ke atas
permukaan benda kerja.
(4) Selesaikan pemotongan dengan cara normal.
Memoles pinggiran (Gb. 15)
Untuk merapikan pinggiran/tepian atau melakukan
penyesuaian dimensi, tempelkan bilah sedikit-sedikit di
sepanjang tepi potongan.
Pemotongan logam
Selalu gunakan cairan pendingin yang sesuai (minyak
pemotongan) saat memotong logam. Kelalaian untuk
melakukan ini akan menyebabkan keausan bilah yang
signifikan. Sisi bawah benda kerja dapat diberi gemuk bila
cairan pendingin tidak digunakan.
Pengambilan debu (Gb. 16)
Kerja pemotongan yang lebih bersih dapat dilakukan
dengan menghubungkan mesin ini ke mesin pembersih
vakum (vacuum cleaner) Makita. Masukkan slang mesin
pembersih vakum ke dalam lubang pada bagian belakang
mesin ini. Turunkan penutup debu sebelum
menggunakan mesin.
CATATAN:
• Pengambilan debu tidak dapat dilakukan saat
melakukan pemotongan miring.
15
Penggaris pemandu (aksesori tambahan)
PERHATIAN:
• Selalu pastikan bahwa sakelar mesin telah dimatikan
dan kartrid baterainya dilepas sebelum memasang
atau melepas aksesori.
1. Pemotongan lurus (Gb. 17)
Bila melakukan pemotongan dengan lebar 160 mm
atau kurang secara berulang-ulang, penggunaan
penggaris pemandu akan memastikan diperolehnya
pemotongan yang cepat, bersih, dan lurus.
Untuk memasang, masukkan penggaris pemandu ke
dalam lubang persegi panjang pada sisi alas dengan
pemandu pagar menghadap ke bawah. Geser
penggaris pemandu ke posisi lebar pemotongan yang
diinginkan, kemudian kencangkan bautnya untuk
mengencangkannya. (Gb. 18)
2. Pemotongan melingkar
Saat memotong lingkaran atau busur dengan jari-jari
170 mm atau kurang, pasanglah penggaris pemandu
seperti berikut.
Masukkan penggaris pemandu ke dalam lubang
persegi panjang pada sisi alas dengan pemandu
pagar menghadap ke atas. Masukkan pasak
pemandu lingkaran melalui salah satu dari dua lubang
pada pemandu pagar. Sekrupkan kenop berdrat pada
pasak tersebut untuk mengencangkan pasak.
(Gb. 19)
Sekarang geser penggaris pemandu ke jari-jari
pemotongan yang diinginkan, dan kencangkan
bautnya untuk mengencangkannya di tempat.
Kemudian gerakkan alas mesin maju
sepenuhnya. (Gb. 20)
CATATAN:
• Selalu gunakan bilah No. B-17, B-18, B-26 atau B-27
saat memotong lingkaran atau busur/lengkungan.
Perangkat anti-remuk
(aksesori tambahan) (Gb. 21)
Untuk pemotongan yang bebas remukan, perangkat antiremuk dapat digunakan. Untuk memasang perangkat
anti-remuk, gerakkan alas mesin maju sepenuhnya dan
pasang dari bagian belakang alas mesin. Bila Anda
menggunakan pelat penutup, pasang perangkat antiremuk pada pelat penutup.
PERHATIAN:
• Perangkat anti-remuk tidak dapat digunakan saat
melakukan pemotongan miring.
Pelat penutup (aksesori tambahan)
(Gb. 22)
Gunakan pelat penutup saat memotong vinir dekoratif,
plastik, dll. Pelat ini melindungi permukaan sensitif atau
halus dari kerusakan. Pasanglah di bagian belakang alas
mesin.
PERAWATAN
PERHATIAN:
• Selalu pastikan bahwa sakelar mesin telah dimatikan
dan kartrid baterainya dilepas sebelum mencoba
melakukan pemeriksaan atau perawatan.
16
• Jangan sekali-kali menggunakan bensin, tiner, alkohol,
atau bahan sejenisnya. Penggunaan bahan demikian
dapat menyebabkan perubahan warna dan bentuk
serta timbulnya retakan.
Untuk menjaga KEAMANAN dan KEHANDALAN,
perbaikan, perawatan lain, atau penyetelan harus
dilakukan oleh Pusat Servis Resmi Makita dan gunakan
selalu suku cadang Makita.
AKSESORI TAMBAHAN
PERHATIAN:
• Aksesori atau alat tambahan ini dianjurkan untuk
digunakan dengan alat Makita milik Anda yang
disebutkan dalam buku petunjuk ini. Penggunaan
aksesori atau alat tambahan lain dapat menimbulkan
risiko cedera pada orang. Gunakan aksesori atau alat
tambahan sesuai kegunaannya.
Jika Anda membutuhkan bantuan perihal informasi lebih
terperinci mengenai aksesori-aksesori ini, tanyakan
kepada Pusat Servis Makita setempat.
• Bilah gergaji ukir
• Kunci hex 3
• Perangkat penggaris pemandu (rip fence)
• Perangkat anti-remuk
• Slang (Untuk mesin pembersih vakum)
• Pelat penutup (Untuk tipe alas aluminium)
• Berbagai jenis baterai dan pengisi baterai asli Makita
CATATAN:
• Beberapa artikel dalam daftar dapat disertakan dalam
kemasan mesin sebagai aksesori standar.
Kelengkapan ini dapat berbeda dari satu negara ke
negara lainnya.
TIEÁNG VIEÄT (Höôùng daãn Goác)
1.
2.
3.
4.
5.
6.
7.
8.
9.
Pin
Nuùt
Caàn thay ñoåi hoaït ñoäng caét
Nuùt khoaù
Boä khôûi ñoäng coâng taéc
Giaù ñôõ löôõi cöa
Bu-loâng
Côø leâ saùu caïnh
Löôõi xôùi
10.
11.
12.
13.
14.
15.
16.
17.
18.
Giaûi thích veà hình veõ toång theå
Truïc laên
Moùc
Naép che buïi
Ñöôøng caét
Ñeá
Meùp
Khaéc vaïch
Loã moài
OÁng huùt buïi
19.
20.
21.
22.
23.
24.
25.
26.
Thanh cöõ (Thöôùc daãn)
Daãn höôùng thanh cöõ
Thanh cöõ
Nuùm coù ren
OÁng
Ñeá nhoâm
Thieát bò chaën maûnh vuïn
Naép ñaäy
THOÂNG SOÁ KYÕ THUAÄT
Kieåu maùy
JV100D
Chieàu daøi haønh trình
18 mm
Soá nhaùt caét treân moät phuùt (min-1)
0 - 2.400
Loaïi löôõi cöa
Coâng suaát caét
toái ña
Loaïi B
Goã
65 mm
Theùp non
2 mm
Nhoâm
4 mm
Toång chieàu daøi
231 mm
Troïng löôïng tònh
1,7 kg
Ñieän aùp ñònh möùc
Doøng moät chieàu: 10,8 V
• Do chöông trình nghieân cöùu vaø phaùt trieån lieân tuïc cuûa chuùng toâi neân caùc thoâng soá kyõ thuaät döôùi ñaây coù theå thay
ñoåi maø khoâng caàn thoâng baùo.
• Caùc thoâng soá kyõ thuaät vaø hoäp pin ôû moãi quoác gia coù theå khaùc nhau.
• Troïng löôïng, coù hoäp pin, theo quy ñònh EPTA-Procedure 01/2003
Kyù hieäu
END004-4
Phaàn döôùi ñaây cho bieát caùc kyù hieäu ñöôïc duøng cho
thieát bò. Ñaûm baûo raèng baïn hieåu yù nghóa cuûa caùc kyù
hieäu naøy tröôùc khi söû duïng.
..... Ñoïc taøi lieäu höôùng daãn.
Muïc ñích söû duïng
ENE019-1
Duïng cuï ñöôïc söû duïng ñeå caét goã, nhöïa vaø vaät lieäu kim
loaïi. Do chöông trình löôõi cöa vaø phuï tuøng ña daïng,
duïng cuï coù theå ñöôïc söû duïng cho nhieàu muïc ñích vaø
raát phuø hôïp ñeå caét ñöôøng cong vaø ñöôøng troøn.
Caûnh baùo An toaøn Chung daønh
cho Duïng cuï Maùy
GEA006-2
CAÛNH BAÙO Ñoïc taát caû caûnh baùo an toaøn cuõng
nhö taát caû höôùng daãn. Vieäc khoâng tuaân theo caùc caûnh
baùo vaø höôùng daãn coù theå daãn ñeán ñieän giaät, hoaû hoaïn
vaø/hoaëc thöông tích nghieâm troïng.
Löu giöõ taát caû caûnh baùo vaø
höôùng daãn ñeå tham khaûo sau
naøy.
Thuaät ngöõ “duïng cuï maùy” trong caùc caûnh baùo ñeà caäp
ñeán duïng cuï maùy (coù daây) ñöôïc vaän haønh baèng ñieän
hoaëc duïng cuï maùy (khoâng daây) ñöôïc vaän haønh baèng
pin.
An toaøn taïi nôi laøm vieäc
1. Giöõ nôi laøm vieäc saïch seõ vaø coù ñuû aùnh saùng. Nôi
laøm vieäc böøa boän hoaëc toái coù theå daãn ñeán tai naïn.
2. Khoâng vaän haønh duïng cuï maùy trong moâi tröôøng
chaùy noå, ví duï nhö moâi tröôøng coù söï hieän dieän
cuûa caùc chaát loûng, khí hoaëc buïi deã chaùy. Caùc
duïng cuï maùy taïo ra tia löûa ñieän coù theå laøm buïi hoaëc
khí boác chaùy.
3. Giöõ treû em vaø ngöôøi ngoaøi traùnh xa nôi laøm vieäc
khi ñang vaän haønh duïng cuï maùy. Söï sao laõng coù
theå khieán baïn maát khaû naêng kieåm soaùt.
An toaøn veà ñieän
4. Phích caém cuûa duïng cuï maùy phaûi khôùp vôùi oå
caém. Khoâng bao giôø ñöôïc söûa ñoåi phích caém
theo baát kyø caùch naøo. Khoâng söû duïng baát kyø
phích ñieàu hôïp naøo vôùi caùc duïng cuï maùy ñöôïc
noái ñaát (tieáp ñaát). Caùc phích caém coøn nguyeân veïn
vaø oå caém phuø hôïp seõ giaûm nguy cô ñieän giaät.
5. Traùnh ñeå cô theå tieáp xuùc vôùi caùc beà maët noái ñaát
hoaëc tieáp ñaát nhö ñöôøng oáng, boä taûn nhieät, beáp
ga vaø tuû laïnh. Nguy cô bò ñieän giaät seõ taêng leân neáu
cô theå baïn ñöôïc noái ñaát hoaëc tieáp ñaát.
6. Khoâng ñeå duïng cuï maùy tieáp xuùc vôùi möa hoaëc
trong ñieàu kieän aåm öôùt. Nöôùc chaûy vaøo duïng cuï
maùy seõ laøm taêng nguy cô ñieän giaät.
17
7. Khoâng söû duïng daây sai caùch. Khoâng bao giôø söû
duïng daây ñeå mang, keùo hoaëc thaùo phích caém
duïng cuï maùy. Giöõ daây traùnh xa nguoàn nhieät,
daàu, caùc meùp saéc hoaëc caùc boä phaän chuyeån
ñoäng. Daây bò hoûng hoaëc bò roái seõ laøm taêng nguy cô
ñieän giaät.
8. Khi vaän haønh duïng cuï maùy ngoaøi trôøi, haõy söû
duïng daây keùo daøi phuø hôïp cho vieäc söû duïng
ngoaøi trôøi. Vieäc duøng daây phuø hôïp cho vieäc söû
duïng ngoaøi trôøi seõ giaûm nguy cô ñieän giaät.
9. Neáu baét buoäc phaûi vaän haønh duïng cuï maùy ôû nôi
aåm öôùt, haõy söû duïng nguoàn caáp ñieän ñöôïc baûo
veä baèng thieát bò ngaét maïch roø ñieän (GFCI). Söû
duïng GFCI seõ giaûm nguy cô ñieän giaät.
An toaøn caù nhaân
10. Luoân tænh taùo, quan saùt nhöõng vieäc baïn ñang
laøm vaø söû duïng nhöõng phaùn ñoaùn theo kinh
nghieäm khi vaän haønh duïng cuï maùy. Khoâng söû
duïng duïng cuï maùy khi baïn ñang meät moûi hoaëc
chòu aûnh höôûng cuûa ma tuyù, chaát coàn hay thuoác.
Chæ moät khoaûnh khaéc khoâng taäp trung khi ñang vaän
haønh duïng cuï maùy cuõng coù theå daãn ñeán thöông
tích caù nhaân nghieâm troïng.
11. Söû duïng thieát bò baûo hoä caù nhaân. Luoân ñeo thieát
bò baûo veä maét. Caùc thieát bò baûo hoä nhö maët naï
choáng buïi, giaøy an toaøn khoâng tröôït, muõ baûo hoä
hay thieát bò baûo veä thính giaùc ñöôïc söû duïng trong
caùc ñieàu kieän thích hôïp seõ giuùp giaûm thöông tích caù
nhaân.
12. Traùnh khôûi ñoäng voâ tình duïng cuï maùy. Ñaûm baûo
coâng taéc ôû vò trí off (taét) tröôùc khi noái nguoàn ñieän
vaø/hoaëc boä pin, caàm hoaëc mang duïng cuï maùy.
Vieäc mang duïng cuï maùy khi ñang ñaët ngoùn tay ôû vò
trí coâng taéc hoaëc caáp ñieän cho duïng cuï maùy khi
coâng taéc ñang ôû vò trí baät coù theå daãn ñeán tai naïn.
13. Thaùo moïi khoaù hoaëc côø leâ ñieàu chænh tröôùc khi
baät duïng cuï maùy. Vieäc côø leâ hoaëc khoaù vaãn coøn
gaén vaøo boä phaän quay cuûa duïng cuï maùy coù theå
daãn ñeán thöông tích caù nhaân.
14. Khoâng vôùi quaù cao. Luoân giöõ thaêng baèng toát vaø
coù choã ñeå chaân phuø hôïp. Ñieàu naøy cho pheùp ñieàu
khieån duïng cuï maùy toát hôn trong nhöõng tình huoáng
baát ngôø.
15. AÊn maëc phuø hôïp. Khoâng maëc quaàn aùo roäng hay
ñeo ñoà trang söùc. Giöõ toùc, quaàn aùo vaø gaêng tay
traùnh xa caùc boä phaän chuyeån ñoäng. Quaàn aùo
roäng, ñoà trang söùc hay toùc daøi coù theå maéc vaøo caùc
boä phaän chuyeån ñoäng.
16. Neáu thieát bò ñöôïc cung caáp keøm theo caùc boä
phaän ñeå noái thieát bò huùt vaø gom buïi, haõy ñaûm
baûo chuùng ñöôïc keát noái vaø söû duïng ñuùng caùch.
Söû duïng thieát bò gom buïi coù theå laøm giaûm nhöõng
moái nguy hieåm lieân quan ñeán buïi.
Söû duïng vaø baûo quaûn duïng cuï maùy
17. Khoâng eùp buoäc duïng cuï maùy. Söû duïng ñuùng
duïng cuï maùy cho coâng vieäc cuûa baïn. Söû duïng
ñuùng duïng cuï maùy seõ giuùp thöïc hieän coâng vieäc toát
hôn vaø an toaøn hôn theo giaù trò ñònh möùc ñöôïc thieát
keá cuûa duïng cuï maùy ñoù.
18
18. Khoâng söû duïng duïng cuï maùy neáu coâng taéc
khoâng baät vaø taét ñöôïc duïng cuï maùy ñoù. Moïi
duïng cuï maùy khoâng theå ñieàu khieån ñöôïc baèng
coâng taéc ñeàu raát nguy hieåm vaø caàn ñöôïc söûa chöõa.
19. Ruùt phích caém ra khoûi nguoàn ñieän vaø/hoaëc thaùo
boä pin khoûi duïng cuï maùy tröôùc khi thöïc hieän baát
kyø coâng vieäc ñieàu chænh, thay ñoåi phuï tuøng hay
caát giöõ duïng cuï maùy naøo. Nhöõng bieän phaùp an
toaøn phoøng ngöøa naøy seõ giaûm nguy cô khôûi ñoäng
voâ tình duïng cuï maùy.
20. Caát giöõ caùc duïng cuï maùy khoâng söû duïng ngoaøi
taàm vôùi cuûa treû em vaø khoâng cho baát kyø ngöôøi
naøo khoâng coù hieåu bieát veà duïng cuï maùy hoaëc
caùc höôùng daãn naøy vaän haønh duïng cuï maùy.
Duïng cuï maùy seõ raát nguy hieåm neáu ñöôïc söû duïng
bôûi nhöõng ngöôøi duøng chöa qua ñaøo taïo.
21. Baûo döôõng duïng cuï maùy. Kieåm tra tình traïng
leäch truïc hoaëc boù keïp cuûa caùc boä phaän ñoäng,
hieän töôïng nöùt vôõ cuûa caùc boä phaän vaø moïi tình
traïng khaùc maø coù theå aûnh höôûng ñeán hoaït ñoäng
cuûa duïng cuï maùy. Neáu coù hoûng hoùc, haõy söûa
chöõa duïng cuï maùy tröôùc khi söû duïng. Nhieàu tai
naïn xaûy ra laø do khoâng baûo quaûn toát duïng cuï maùy.
22. Luoân giöõ cho duïng cuï caét ñöôïc saéc vaø saïch.
Nhöõng duïng cuï caét ñöôïc baûo döôõng ñuùng caùch coù
löôõi caét saéc seõ ít bò keït hôn vaø deã ñieàu khieån hôn.
23. Söû duïng duïng cuï maùy, phuï tuøng vaø ñaàu duïng cuï
caét, v.v... theo caùc höôùng daãn naøy, coù tính ñeán
ñieàu kieän laøm vieäc vaø coâng vieäc ñöôïc thöïc hieän.
Vieäc söû duïng duïng cuï maùy cho caùc coâng vieäc khaùc
vôùi coâng vieäc döï ñònh coù theå gaây nguy hieåm.
Söû duïng vaø baûo quaûn duïng cuï duøng pin
24. Chæ saïc laïi baèng boä saïc ñöôïc nhaø saûn xuaát chæ
ñònh. Boä saïc thích hôïp cho moät loaïi boä pin coù theå
gaây ruûi ro chaùy khi ñöôïc söû duïng vôùi boä pin khaùc.
25. Chæ söû duïng duïng cuï maùy vôùi caùc boä pin ñöôïc
chæ ñònh cuï theå. Söû duïng baát kyø boä pin naøo khaùc
cuõng coù nguy cô gaây ra chaán thöông hoaëc chaùy.
26. Khi khoâng söû duïng boä pin, haõy caát giöõ boä pin
caùch xa caùc vaät kim loaïi khaùc, nhö ghim keïp
giaáy, tieàn xu, chìa khoaù, ñinh, ñai oác hoaëc caùc
vaät kim loaïi nhoû khaùc, laø nhöõng vaät coù theå trôû
thaønh vaät keát noái moät cöïc vôùi cöïc kia. Chaäp caùc
cöïc pin vaøo nhau coù theå gaây boûng hoaëc chaùy.
27. Trong caùc tröôøng hôïp söû duïng sai muïc ñích, pin
coù theå tieát ra chaát loûng; haõy traùnh tieáp xuùc. Neáu
baïn voâ tình tieáp xuùc vôùi chaát loûng naøy, haõy röûa
saïch baèng nöôùc. Neáu chaát loûng naøy tieáp xuùc vôùi
maét, baïn phaûi tìm theâm söï trôï giuùp veà y teá. Chaát
loûng tieát ra töø pin coù theå gaây raùt hoaëc boûng.
Baûo döôõng
28. Ñeå nhaân vieân söûa chöõa ñuû trình ñoä baûo döôõng
duïng cuï maùy cuûa baïn vaø chæ söû duïng caùc boä
phaän thay theá ñoàng nhaát. Vieäc naøy seõ ñaûm baûo
duy trì ñöôïc ñoä an toaøn cuûa duïng cuï maùy.
29. Tuaân theo höôùng daãn daønh cho vieäc boâi trôn vaø
thay phuï tuøng.
30. Giöõ tay caàm khoâ, saïch, khoâng dính daàu vaø môõ.
CAÛNH BAÙO AN TOAØN DAØNH CHO
MAÙY CÖA LOÏNG CHAÏY PIN GEB045-2
1. Caàm duïng cuï maùy baèng beà maët keïp caùch ñieän
khi thöïc hieän moät thao taùc trong ñoù phuï tuøng caét
coù theå tieáp xuùc vôùi daây daãn kín. Phuï tuøng caét tieáp
xuùc vôùi daây daãn “coù ñieän” coù theå laøm caùc boä phaän
kim loaïi traàn cuûa duïng cuï ñieän “tieáp ñieän” vaø coù theå
laøm ngöôøi vaän haønh bò ñieän giaät.
2. Duøng keïp hoaëc laøm theo caùch khaû thi khaùc ñeå
giöõ chaët vaø ñôõ phoâi gia coâng treân beä vöõng chaéc.
Giöõ phoâi gia coâng baèng tay hoaëc tyø vaøo cô theå seõ
laøm phoâi khoâng chaéc chaén vaø coù theå daãn ñeán maát
kieåm soaùt.
3. Luoân söû duïng kính baûo hoä hoaëc kính an toaøn.
Kính maét thoâng thöôøng hay kính raâm KHOÂNG
phaûi laø kính an toaøn.
4. Traùnh caét ñinh. Kieåm tra phoâi xem coù ñinh
khoâng vaø thaùo ñinh tröôùc khi vaän haønh.
5. Khoâng caét phoâi coù kích thöôùc quaù lôùn.
6. Kieåm tra khoaûng troáng phuø hôïp caùch phoâi gia
coâng tröôùc khi caét ñeå löôõi cöa khoâng caét vaøo
saøn, baøn gia coâng, v.v...
7. Caàm chaéc duïng cuï.
8. Ñaûm baûo löôõi cöa khoâng tieáp xuùc vôùi phoâi gia
coâng tröôùc khi baät coâng taéc.
9. Ñeå tay traùnh xa caùc boä phaän chuyeån ñoäng.
10. Khoâng ñeå maëc duïng cuï hoaït ñoäng. Chæ vaän
haønh duïng cuï khi caàm treân tay.
11. Luoân taét nguoàn vaø ñôïi löôõi cöa döøng haún tröôùc
khi thaùo löôõi cöa ra khoûi phoâi.
12. Khoâng chaïm ngay vaøo löôõi cöa hoaëc phoâi sau
khi vaän haønh; chuùng coù theå cöïc noùng vaø coù theå
laøm boûng da.
13. Khoâng vaän haønh duïng cuï ôû cheá ñoä khoâng taûi
neáu khoâng caàn thieát.
14. Moät soá vaät lieäu coù theå chöùa hoaù chaát ñoäc. Haõy
caån thaän ñeå traùnh hít phaûi buïi vaø tieáp xuùc vôùi da.
Tuaân theo döõ lieäu an toaøn cuûa nhaø cung caáp vaät
lieäu.
15. Luoân söû duïng maët naï choáng buïi/bình thôû thích
hôïp khi laøm vieäc vôùi vaät lieäu vaø duïng cuï.
LÖU GIÖÕ CAÙC HÖÔÙNG DAÃN NAØY.
CAÛNH BAÙO:
KHOÂNG ñöôïc ñeå söï thoaûi maùi hay quen thuoäc vôùi
saûn phaåm (coù ñöôïc do söû duïng nhieàu laàn) thay theá
vieäc tuaân thuû nghieâm ngaët caùc quy ñònh veà an toaøn
daønh cho saûn phaåm naøy. VIEÄC DUØNG SAI hoaëc
khoâng tuaân theo caùc quy ñònh veà an toaøn ñöôïc neâu
trong taøi lieäu höôùng daãn naøy coù theå daãn ñeán thöông
tích caù nhaân nghieâm troïng.
HÖÔÙNG DAÃN QUAN TROÏNG VEÀ
AN TOAØN
ENC009-1
DAØNH CHO HOÄP PIN
1. Tröôùc khi söû duïng hoäp pin, haõy ñoïc taát caû
höôùng daãn vaø kyù hieäu caûnh baùo treân (1) boä saïc
pin, (2) pin vaø (3) saûn phaåm duøng pin.
2. Khoâng thaùo rôøi hoäp pin.
3. Neáu thôøi gian vaän haønh ngaén hôn quaù möùc, haõy
ngöøng vaän haønh ngay laäp töùc. Ñieàu naøy coù theå
daãn ñeán ruûi ro quaù nhieät, coù theå gaây boûng vaø
thaäm chí laø noå.
4. Neáu chaát ñieän phaân rôi vaøo maét, haõy röûa saïch
baèng nöôùc saïch vaø tìm chaêm soùc y teá ngay laäp
töùc. Chaát naøy coù theå khieán baïn giaûm thò löïc.
5. Khoâng ñeå hoäp pin ôû tình traïng ñoaûn maïch:
(1) Khoâng chaïm vaøo cöïc pin baèng vaät lieäu
daãn ñieän.
(2) Traùnh caát giöõ hoäp pin trong hoäp coù
caùc vaät kim loaïi khaùc nhö ñinh, tieàn xu,
v.v...
(3) Khoâng ñeå hoäp pin dính nöôùc hoaëc
ngoaøi trôøi möa.
Ñoaûn maïch pin coù theå gaây ra doøng ñieän
lôùn, quaù nhieät, coù theå gaây boûng vaø thaäm
chí laø hoûng hoùc.
6. Khoâng caát giöõ duïng cuï vaø hoäp pin ôû nôi nhieät ñoä
coù theå leân tôùi hoaëc vöôït quaù 50°C (122°F).
7. Khoâng ñoát hoäp pin ngay caû khi hoäp pin ñaõ bò hö
haïi naëng hoaëc hö hoûng hoaøn toaøn. Hoäp pin coù
theå noå khi tieáp xuùc vôùi löûa.
8. Haõy caån troïng khoâng laøm rôi hoaëc laøm meùo pin.
9. Khoâng söû duïng pin hoûng.
LÖU GIÖÕ CAÙC HÖÔÙNG DAÃN NAØY.
Meïo duy trì tuoåi thoï toái ña cho pin
1. Saïc pin tröôùc khi heát pin.
Luoân ngöøng vaän haønh duïng cuï vaø saïc pin khi
baïn thaáy duïng cuï bò yeáu pin.
2. Khoâng bao giôø saïc laïi pin khi hoäp pin ñaõ ñöôïc
saïc ñaày.
Saïc quaù möùc seõ laøm giaûm tuoåi thoï cuûa pin.
3. Saïc pin ôû nhieät ñoä phoøng 10°C - 40°C (50°F 104°F). Ñeå cho hoäp pin noùng nguoäi tröôùc khi
saïc.
MOÂ TAÛ CHÖÙC NAÊNG
THAÄN TROÏNG:
• Luoân ñaûm baûo raèng ñaõ taét duïng cuï vaø thaùo hoäp pin
tröôùc khi ñieàu chænh hoaëc kieåm tra chöùc naêng treân
duïng cuï.
Laép hoaëc thaùo hoäp pin (Hình 1)
• Luoân taét coâng taéc duïng cuï tröôùc khi laép hoaëc thaùo
hoäp pin.
• Ñeå thaùo hoäp pin, keùo hoäp pin ra khoûi duïng cuï ñoàng
thôøi nhaán caùc nuùt ôû hai beân hoäp pin.
• Ñeå laép hoäp pin, giöõ hoäp pin sao cho phaàn tröôùc cuûa
hoäp pin vöøa vôùi phaàn ñaàu laép pin vaø laép hoäp pin vaøo
vò trí. Phaûi ñöa pin vaøo cho ñeán khi hoäp pin khôùp vaøo
vò trí vôùi moät tieáng laùch caùch nhoû. Neáu khoâng, pin coù
theå baát ngôø vaêng ra khoûi duïng cuï, gaây thöông tích
cho baïn hoaëc ngöôøi xung quanh.
• Khoâng duøng löïc khi laép hoäp pin. Neáu hoäp pin khoâng
tröôït vaøo deã daøng thì coù nghóa laø pin ñang ñöôïc laép
khoâng ñuùng caùch.
19
Heä thoáng baûo veä pin
Duïng cuï ñöôïc trang bò heä thoáng baûo veä pin. Heä thoáng
naøy töï ñoäng ngaét ñieän ñoäng cô ñeå keùo daøi tuoåi thoï cuûa
pin.
Duïng cuï seõ töï ñoäng ngöøng hoaït ñoäng neáu duïng cuï vaø/
hoaëc pin ôû moät trong caùc tình traïng sau:
• Bò quaù taûi:
Duïng cuï ñöôïc vaän haønh theo caùch khieán noù söû
duïng doøng ñieän cao baát thöôøng. Trong tình huoáng
naøy, haõy thaû coâng taéc khôûi ñoäng treân duïng cuï vaø
döøng söû duïng theo caùch khieán duïng cuï bò quaù taûi.
Sau ñoù, keùo laïi coâng taéc khôûi ñoäng ñeå khôûi ñoäng
laïi.
• Ñieän aùp pin thaáp:
Dung löôïng pin coøn laïi quaù thaáp vaø duïng cuï seõ
khoâng hoaït ñoäng. Neáu baïn keùo boä khôûi ñoäng coâng
taéc, ñoäng cô chaïy laïi nhöng seõ sôùm döøng. Trong
tình huoáng naøy, haõy thaùo pin ra vaø saïc laïi pin.
Choïn hoaït ñoäng caét (Hình 2)
Duïng cuï naøy coù theå vaän haønh vôùi hoaït ñoäng caét theo
quyõ ñaïo hoaëc theo ñöôøng thaúng (leân vaø xuoáng). Hoaït
ñoäng caét theo quyõ ñaïo ñaåy löôõi cöa veà phía tröôùc treân
haønh trình caét vaø taêng ñaùng keå toác ñoä caét.
Ñeå thay ñoåi hoaït ñoäng caét, chæ caàn xoay caàn thay ñoåi
hoaït ñoäng caét veà vò trí hoaït ñoäng caét mong muoán.
Tham khaûo baûng ñeå choïn hoaït ñoäng caét phuø hôïp.
Vò trí
Hoaït ñoäng caét
ÖÙng duïng
Ñeå caét theùp non,
theùp khoâng gæ vaø nhöïa.
0
Thao taùc cöa
theo
hoaït ñoäng caét Ñeå caét goïn goã
vaø goã daùn.
I
Caét theo quyõ
ñaïo nhoû
II
Ñeå caét goã vaø goã daùn.
Caét theo quyõ
ñaïo trung bình Ñeå caét nhanh nhoâm vaø theùp
non.
III
Caét theo quyõ
ñaïo lôùn
Ñeå caét theùp non, nhoâm vaø
goã cöùng.
Ñeå caét nhanh goã vaø goã daùn.
Hoaït ñoäng cuûa coâng taéc (Hình 3)
THAÄN TROÏNG:
• Tröôùc khi laép hoäp pin vaøo duïng cuï, luoân kieåm tra
xem boä khôûi ñoäng coâng taéc coù khôûi ñoäng ñuùng vaø
trôû veà vò trí “TAÉT” khi ñöôïc nhaû ra hay khoâng.
• Khi khoâng vaän haønh duïng cuï, aán vaøo nuùt khoùa töø
maët A ñeå khoùa boä khôûi ñoäng coâng taéc trong vò trí
OFF (TAÉT).
Nuùt khoaù ñöôïc trang bò ñeå traùnh boä khôûi ñoäng coâng taéc
bò voâ tình keùo.
Ñeå khôûi ñoäng duïng cuï, aán vaøo maët B cuûa nuùt khoaù vaø
keùo boä khôûi ñoäng coâng taéc.
Taêng toác ñoä duïng cuï baèng caùch taêng aùp löïc leân boä
khôûi ñoäng coâng taéc. Nhaû boä khôûi ñoäng coâng taéc ñeå
döøng. Sau khi söû duïng, luoân nhôù aán maët A cuûa nuùt
khoaù.
20
QUAÙ TRÌNH LAÉP RAÙP
THAÄN TROÏNG:
• Luoân chaéc chaén raèng duïng cuï ñaõ ñöôïc taét nguoàn vaø
hoäp pin ñaõ ñöôïc thaùo ra tröôùc khi thöïc hieän baát kyø
coâng vieäc naøo treân duïng cuï.
Laép hoaëc thaùo löôõi cöa (Hình 4)
THAÄN TROÏNG:
• Luoân lau saïch taát caû phoi hoaëc vaät laï baùm vaøo löôõi
cöa vaø/hoaëc giaù ñôõ löôõi cöa. Khoâng laøm nhö vaäy coù
theå laøm cho löôõi cöa vaën khoâng ñuû chaët daãn ñeán
thöông tích caù nhaân nghieâm troïng.
• Khoâng chaïm ngay vaøo löôõi cöa hoaëc phoâi sau khi
vaän haønh; chuùng coù theå cöïc noùng vaø coù theå laøm
boûng da.
• Luoân giöõ löôõi cöa chaéc chaén. Vaën löôõi cöa khoâng
chaët coù theå laøm vôõ löôõi cöa hoaëc gaây thöông tích caù
nhaân nghieâm troïng.
• Chæ söû duïng löôõi cöa loaïi B. Söû duïng löôõi cöa khaùc
löôõi cöa loaïi B coù theå laøm cho vieäc vaën löôõi cöa
khoâng ñuû chaët daãn ñeán thöông tích caù nhaân nghieâm
troïng.
Ñeå laép löôõi cöa, haõy nôùi loûng bu loâng treân giaù ñôõ löôõi
cöa ngöôïc chieàu kim ñoàng hoà baèng côø leâ saùu caïnh.
Khi raêng löôõi cöa höôùng veà phía tröôùc, haõy ñöa löôõi
cöa vaøo giaù ñôõ löôõi cöa saâu heát möùc. Ñaûm baûo raèng
meùp sau cuûa löôõi cöa vöøa vôùi truïc laên. Sau ñoù, sieát
chaët bu loâng theo chieàu kim ñoàng hoà ñeå coá ñònh löôõi
cöa.
Ñeå thaùo löôõi cöa, thöïc hieän ngöôïc laïi quy trình laép.
(Hình 5)
CHUÙ YÙ:
• Thænh thoaûng tra daàu truïc laên.
Caát giöõ côø leâ saùu caïnh (Hình 6)
Khi khoâng söû duïng, caát giöõ côø leâ saùu caïnh nhö ñöôïc
minh hoaï trong hình ñeå traùnh laøm maát.
Tröôùc heát, ñöa côø leâ saùu caïnh vaøo loã. Sau ñoù, aán côø leâ
vaøo moùc cho ñeán khi khoaù laïi.
Naép che buïi (Hình 7)
THAÄN TROÏNG:
• Luoân ñeo kính baûo hoä ngay caû khi vaän haønh duïng
cuï coù naép che buïi ñöôïc haï xuoáng.
Haï thaáp naép che buïi ñeå ngaên phoi vaêng ra. Tuy nhieân,
khi thöïc hieän caét vaùt, haõy naâng naép che buïi heát côõ.
VAÄN HAØNH
THAÄN TROÏNG:
• Luoân giöõ ñeá ngang baèng vôùi phoâi. Khoâng laøm nhö
vaäy coù theå laøm vôõ löôõi cöa, daãn ñeán thöông tích
nghieâm troïng.
• Tieán duïng cuï raát chaäm khi caét ñöôøng cong hoaëc khi
cuoán. Duøng löïc ñaåy duïng cuï coù theå laøm beà maët caét
bò leäch vaø löôõi cöa bò vôõ.
Baät duïng cuï maø khoâng ñeå löôõi cöa tieáp xuùc vôùi baát cöù
vaät gì vaø ñôïi cho tôùi khi löôõi cöa ñaït tôùi vaän toác cao
nhaát. Sau ñoù, ñaët maët phaúng ñeá leân phoâi gia coâng vaø di
chuyeån duïng cuï nheï nhaøng veà phía tröôùc doïc theo
ñöôøng caét ñaõ ñaùnh daáu tröôùc ñoù. (Hình 8)
Cöa vaùt (Hình 9)
Thanh cöõ (phuï tuøng tuyø choïn)
THAÄN TROÏNG:
• Luoân chaéc chaén taét duïng cuï vaø thaùo hoäp pin tröôùc
khi nghieâng ñeá.
• Naâng naép che buïi heát côõ tröôùc khi thöïc hieän caét vaùt.
Khi ñeá nghieâng, baïn coù theå thöïc hieän caét vaùt ôû baát kyø
goùc naøo töø 0° ñeán 45° (traùi hoaëc phaûi).
Nôùi loûng bu loâng ôû maët sau cuûa ñeá baèng côø leâ saùu
caïnh. Di chuyeån ñeá sao cho bu loâng naèm ôû vò trí giöõa
khe hình chöõ thaäp ôû ñeá. (Hình 10)
Nghieâng ñeá cho tôùi khi ñaït ñöôïc goùc caét vaùt mong
muoán. Meùp voû hoäp ñoäng cô cho bieát goùc caét vaùt theo
khaéc vaïch. Sau ñoù, vaën bu loâng ñeå giöõ chaët ñeá.
(Hình 11)
THAÄN TROÏNG:
• Luoân chaéc chaén taét maùy cöa vaø thaùo hoäp pin tröôùc
khi laép hoaëc thaùo caùc phuï tuøng.
1. Caét thaúng (Hình 17)
Khi caét vôùi ñoä roäng laø 160 mm trôû xuoáng nhieàu laàn,
haõy söû duïng thanh cöõ ñeå ñaûm baûo caét nhanh
choùng, goïn vaø thaúng.
Ñeå laép thanh cöõ, haõy ñöa thanh cöõ vaøo loã hình chöõ
nhaät ôû maët beân cuûa ñeá vôùi daãn höôùng thanh cöõ
höôùng xuoáng döôùi. Tröôït thanh cöõ vaøo vò trí coù ñoä
roäng caét mong muoán, sau ñoù vaën bu loâng ñeå giöõ
chaët thanh cöõ. (Hình 18)
2. Cöa theo hình troøn
Khi caét voøng troøn hoaëc voøng cung coù baùn kính
170 mm trôû xuoáng, haõy laép thanh cöõ nhö sau.
Ñöa thanh cöõ vaøo loã hình chöõ nhaät ôû maët beân cuûa
ñeá vôùi daãn höôùng thanh cöõ höôùng leân treân. Ñöa
choát daãn höôùng voøng troøn qua moät trong hai loã treân
daãn höôùng thanh cöõ. Baét vít nuùm coù ren leân treân
choát ñeå giöõ chaët choát. (Hình 19)
Baây giôø, tröôït thanh cöõ vaøo baùn kính caét mong
muoán, sau ñoù vaën bu loâng ñeå giöõ chaët thanh cöõ ôû
ñuùng vò trí. Sau ñoù, di chuyeån ñeá hoaøn toaøn veà phía
tröôùc. (Hình 20)
Ñöôøng caét ngang phía tröôùc (Hình 12)
Nôùi loûng bu loâng ôû maët sau cuûa ñeá baèng côø leâ saùu
caïnh vaø tröôït ñeá hoaøn toaøn veà phía sau. Sau ñoù, vaën
bu loâng ñeå giöõ chaët ñeá.
Veát caét mieäng khuyeát
Coù theå taïo ra caùc veát caét mieäng khuyeát baèng moät trong
hai phöông phaùp A hoaëc B.
A) Khoan moät loã moài (Hình 13)
Ñoái vôùi caùc veát caét mieäng khuyeát beân trong maø khoâng
coù ñöôøng caét daãn vaøo töø meùp, haõy khoan tröôùc moät loã
moài coù ñöôøng kính 12mm trôû leân. Ñöa löôõi cöa vaøo loã
naøy ñeå baét ñaàu caét.
B) Phay chìm (Hình 14)
Baïn khoâng caàn khoan moät loã moài hoaëc thöïc hieän
ñöôøng caét daãn vaøo neáu baïn thöïc hieän caån thaän nhö
sau.
(1) Nghieâng duïng cuï höôùng leân meùp phía tröôùc
cuûa ñeá vôùi ñieåm löôõi cöa ñöôïc ñaët ngay treân
beà maët phoâi gia coâng.
(2) Taùc duïng löïc leân duïng cuï sao cho meùp tröôùc
cuûa ñeá khoâng di chuyeån khi baïn baät duïng cuï
vaø nheï nhaøng haï thaáp daàn phaàn sau cuûa
duïng cuï.
(3) Khi löôõi cöa aên vaøo phoâi, haõy haï thaáp daàn ñeá
duïng cuï xuoáng beà maët phoâi.
(4) Hoaøn taát quaù trình caét theo caùch thoâng
thöôøng.
Hoaøn thieän caùc meùp (Hình 15)
Ñeå caét caùc meùp hoaëc ñieàu chænh kích thöôùc, haõy chaïy
löôõi cöa nheï nhaøng doïc theo meùp caét.
Caét kim loaïi
Luoân söû duïng chaát laøm maùt phuø hôïp (daàu laøm nguoäi)
khi caét kim loaïi. Khoâng laøm nhö vaäy seõ laøm löôõi cöa bò
moøn ñaùng keå. Maët döôùi cuûa phoâi gia coâng coù theå ñöôïc
tra môõ thay vì söû duïng chaát laøm maùt.
Loaïi boû buïi (Hình 16)
Coù theå thöïc hieän thao taùc caét tinh baèng caùch noái duïng
cuï naøy vôùi maùy huùt buïi cuûa Makita. Ñöa oáng huùt buïi
cuûa maùy huùt buïi vaøo loã ôû phía sau cuûa duïng cuï. Haï
thaáp naép che buïi tröôùc khi vaän haønh.
CHUÙ YÙ:
• Khoâng theå loaïi boû buïi khi thöïc hieän caét vaùt.
CHUÙ YÙ:
• Luoân söû duïng löôõi cöa Soá B-17, B-18, B-26 hoaëc
B-27 khi caét voøng troøn hay voøng cung.
Thieát bò chaën maûnh vuïn (phuï tuøng tuyø
choïn) (Hình 21)
Ñeå coù laùt caét khoâng coù maûnh vuïn, coù theå söû duïng thieát
bò chaën maûnh vuïn. Ñeå laép thieát bò chaën maûnh vuïn, haõy
di chuyeån ñeá duïng cuï hoaøn toaøn veà phía tröôùc vaø ñöa
thieát bò vaøo töø maët sau ñeá duïng cuï. Khi baïn söï duïng
naép ñaäy, haõy laép thieát bò chaën maûnh vuïn leân treân naép
ñaäy.
THAÄN TROÏNG:
• Khoâng ñöôïc söû duïng thieát bò chaën maûnh vuïn khi
thöïc hieän caét vaùt.
Taám che (phuï tuøng tuyø choïn) (Hình 22)
Söû duïng naép ñaäy naøy khi caét goã daùn trang trí, nhöïa,
v.v... Naép ñaäy coù taùc duïng baûo veä nhöõng beà maët nhaïy
caûm hoaëc tinh xaûo khoâng bò hö hoûng. Laép naép ñaäy ôû
maët sau ñeá duïng cuï.
BAÛO DÖÔÕNG
THAÄN TROÏNG:
• Luoân chaéc chaén raèng baïn ñaõ taét nguoàn vaø thaùo hoäp
pin cuûa duïng cuï ra tröôùc khi thöïc hieän kieåm tra hoaëc
baûo trì.
• Khoâng bao giôø duøng xaêng, eùt xaêng, dung moâi, coàn
hoaëc hoaù chaát töông töï. Coù theå xaûy ra hieän töôïng
maát maøu, bieán daïng hoaëc nöùt vôõ.
Ñeå duy trì ÑOÄ AN TOAØN vaø ÑOÄ TIN CAÄY cuûa saûn
phaåm, vieäc söûa chöõa, baûo döôõng hoaëc baát kyø ñieàu
chænh naøo khaùc ñeàu phaûi do Trung taâm Baûo trì Ñöôïc uyû
quyeàn cuûa Makita thöïc hieän, luoân söû duïng caùc boä
phaän thay theá cuûa Makita.
21
PHUÏ KIEÄN TUYØ CHOÏN
THAÄN TROÏNG:
• Caùc phuï tuøng hoaëc phuï kieän naøy ñöôïc khuyeán nghò
söû duïng vôùi duïng cuï Makita cuûa baïn ñöôïc chæ ñònh
trong taøi lieäu naøy. Vieäc söû duïng baát kyø phuï tuøng
hoaëc phuï kieän naøo khaùc coù theå daãn ñeán ruûi ro
thöông tích cho con ngöôøi. Chæ söû duïng phuï tuøng
hoaëc phuï kieän vôùi muïc ñích ñöôïc neâu.
Neáu baïn caàn baát kyø söï hoã trôï naøo ñeå bieát theâm chi tieát
veà caùc phuï tuøng naøy, haõy hoûi Trung taâm Baûo trì Makita
taïi ñòa phöông cuûa baïn.
• Löôõi cöa loïng
• Côø leâ saùu caïnh soá 3
• Boä thanh cöõ (thöôùc daãn)
• Thieát bò chaën maûnh vuïn
• OÁng huùt buïi (Cho maùy huùt buïi)
• Naép ñaäy (Cho loaïi ñeá nhoâm)
• Coù nhieàu loaïi pin vaø boä saïc pin Makita chính haõng
CHUÙ YÙ:
• Moät soá muïc trong danh saùch coù theå ñöôïc bao goàm
trong goùi duïng cuï laøm caùc phuï kieän chuaån. Caùc
muïc naøy ôû moãi quoác gia coù theå khaùc nhau.
22
(
)
10.
11.
12.
13.
14.
15.
16.
17.
18.
1.
2.
3.
4.
5.
6.
7.
8.
9.
(
19.
20.
21.
22.
23.
24.
25.
26.
(
)
JV100D
18
0 - 2,400
B
65
2
4
231
1.7
D.C. 10.8 V
-1)
•
•
•
EPTA 01/2003
END004-4
GEA006-2
.....
/
ENE019-1
(
"
)
"
(
)
23
11.
1.
2.
12.
/
3.
13.
4.
(
)
14.
5.
15.
6.
16.
7.
17.
8.
18.
9.
(GFCI)
19.
GFCI
10.
20.
24
/
21.
GEB045-2
1.
"
"
22.
"
"
2.
23.
3.
24.
25.
26.
4.
5.
6.
7.
8.
9.
10.
27.
11.
12.
28.
29.
13.
14.
15.
/
30.
:
(
)
25
2.
3.
10°C - 40°C
(50°F - 104°F)
ENC009-1
1.
(1)
(2)
(3)
:
•
2.
3.
(
•
•
4.
•
5.
:
(1)
(2)
•
(3)
6.
50°C (122°F)
7.
/
8.
:
•
:
9.
•
:
1.
(
(
26
)
2)
1)
(
4)
:
•
/
•
0
•
•
B
B
I
II
III
(
(
3)
5)
:
•
:
•
(
"OFF"
•
6)
A
OFF
(
B
7)
:
•
A
:
•
:
•
27
•
(
15)
(
(
(
)
8)
9)
(
:
16)
•
Makita
•
0°
(
45° (
:
)
•
(
10)
)
:
•
(
11)
(
A
A)
(
1.
12)
(
17)
160
B
(
13)
18)
2.
170
12
B)
(
14)
(
19)
(1)
(
(2)
:
•
(3)
(4)
28
20)
B-17, B-18, B-26
B-27
:
(
)(
•
21)
:
•
(
)(
22)
:
•
•
Makita
Makita
:
•
Makita
Makita
•
•
•
•
•
•
•
3
(
)
(
)
(
)
Makita
29
30
31
Makita Corporation
Anjo, Aichi, Japan
885079-377
ALA
www.makita.com