1
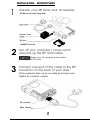
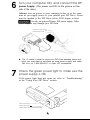
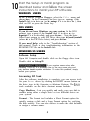
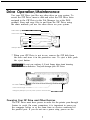
EPSON
®
Installation/User’s Guide
For IBM Compatible PCs
with a Parallel Port Connection
m02184
Table of Contents
INSTALLING YOUR ZIP DRIVE
General Notes
1
Installation Instructions
2
USING YOUR ZIP DRIVE
Getting the Most of Your ZIP Drive
9
Drive Operation/Maintenance
11
ZIP Disks
13
Troubleshooting
13
This guide shows how to install the parallel port model of the ZIP
Drive using your PC’s printer connection. If you encounter any
problems while installing your ZIP Drive, refer to “Troubleshooting”
in the “Using Your ZIP Drive” section.
This model of the ZIP Drive cannot be used on Macintosh computers.
To connect to a Macintosh (including the PowerBook), use the SCSI
model of the ZIP Drive.
Using Your Printer With ZIP
Your ZIP Drive lets you use a printer and your ZIP Drive at the same
time, even if your computer has only one parallel port. Step 5 of
this guide shows you how to connect a printer to the ZIP Drive.
The README.TXT file on the Install disk and the “Using Your ZIP
Drive” section of the manual have additional information on using
a printer with your ZIP Drive.
Enhancing ZIP Drive Transfer Speed
The parallel port model of the ZIP Drive supports three data
transfer modes which have different transfer speeds. To ensure
the broadest base of compatibility for the ZIP Drive, the Ersox
Installation software automatically uses the most compatible
mode; however, this may not be the fastest mode available on your
computer. If your computer has a bi-directional parallel port or an
EPP chip set, you may be able to use a faster mode of data transfer
which will significantly improve the performance of you ZIP Drive.
For detailed instructions on changing the data transfer speed for
your ZIP Drive, refer to ZIP Tools Help in your EPSON ZIP Tools
Window group or to the section on “Speed Options for the Parallel
Port ZIP Drive” in the README.TXT file on the Install disk.
OS/2 support
If you want to use your ZIP Drive in an OS/2 operating
environment, you need to purchase Ersox driver software
for OS/2. Call Erso~ at 1-800-922-8911 to order driver
software, ($9.95 for shipping and handling), or use the EPSON
Download Service at (310) 782-4531 to download a driver.
INSTALLATION INSTRUCTIONS
1
Unpack your ZIP Drive and accessories.
ZIP Manual and Install Floppy Disks
External Power
ZIP Drive /
1OOMB ZIP Tools Disk
2
Turn off your computer’s power switch
and pick up the ZIP data cable.
Always turn off computer power before
connecting the ZIP Drive.
3
Connect one end of the cable to the ZIP
connector on the back of your drive.
(If the connector does not go on easily try turning it over.
Tighten all connector screws.)
ZIP Connector
White Connect
4
Connect the other end of the cable to your
computer’s parallel port (printer port).
(If a printer is connected to the only parallel port,
disconnect it and use pass-through feature described
in Step 5.)
The parallel port may be marked with a printer icon. A
parallel port may also be labeled “Printer” or not marked
at all. Check your computer Owner’s Manual if you are
unable to locate your computer’s parallel port.
5
You can connect a printer to the ZIP Drive
using a standard printer cable.
The ZIP Drive must have power in order for the printer passthrough feature to work.
3
6
Turn your computer ON, and connect the ZIP
power Supply. (The power cord fits in the groove on the
side of the drive.)
Always turn on power to your computer before or at the same
time as you supply power to your parallel port ZIP Drive. Power
must be applied to the ZIP Drive before DOS begins to load.
Use only an approved Epson, ZIP power supply. Other
power supplies may damage your ZIP Drive.
Computer Power Cord
Printer Power Cord \
n
7
Tip: To make it easier to move your ZIP Drive between home and
work, you may want to purchase an extra power supply and cable.
Call EPSON at 1-800-922-8911 to order ZIP accessories.
Check the green power light to make sure the
power supply is OK.
If the power light does not come on, refer to “Troubleshooting”
in the “Using Your ZIP Drive” section.
Green Power Light
Amber Data Light (Flasher when drive is transferring data)
8
Insert the 100MB Took disk into the ZIP Drive.
Always make sure the green power light is on before inserting
(or ejecting) a ZIP disk. When you insert a ZIP disk, the amber
data light on the ZIP Drive will flash momentarily.
Disk Eject Button
9
Insert the appropriate Install disk into
your computer’s floppy disk drive.
WINDOWS/DOS USERS
Use Windows/DOS Install Disk
WINDOWS 95 USERS
Use Windows 95 Install Disk
5
10
Start the Setup or Install program as
described below and follow the screen
instructions to install your ZIP software.
WINDOWS USERS
In the Windows Program Manager, select the File menu and
choose Run. In the Command Line box, type a: setup if the
Install disk is in drive a: (or b: setup if it is in drive b: ), then
click on OK or press the Enter key.
DOS USERS
If you do not have Windows on your system: At the DOS
prompt, type a:guest if the Install disk is in drive a: (or
b:guest if it is in drive b:), and press Enter. Note the drive
letter Guest assigns to your ZIP Drive, then type d:\scsi\install
(where d: is the ZIP Drive letter), and press Enter.
If you need help: refer to the “Troubleshooting” section of
this manual. There is also troubleshooting information in the
README.TXT file on the Install disk.
WINDOWS 95 USERS
Software Setup
Open MY Computer and double click on the floppy drive icon.
Double click on Setup95.
If your system seems slow after
installing Tools 95, it is probably due to the way some plug and
play devices handle system refreshes. To solve this problem, simply
restart your system.
Accessing ZIP Took
After the software installation is complete, you can access tools
for your EPSON drives by clicking the RIGHT mouse button on
the drive icon in My Computer or Windows Explorer. The EI’SON
tools available on the drive shortcut menus include:
Copy Machine - Lets you quickly and easily copy one disk to
another using either a single drive or two different drives on
your system.
Format - The format tool includes a Short Format option for
quickly erasing a disk and a Long Format option for verifying
the disk surface. You can also choose to make the disk bootable
or assign a volume name.
6
Protect - Lets you select software protection options for ZIP
disks. Lets you secure a disk with a password.
Make Nonremovable - Sets up a removable disk to install or
run software that requires a fixed disk.
Status - Gives you quick access to information about your drive
and disks.
Eject - Enables you to eject a disk with a mouse click.
Properties - Provides special information about your ZIP Drive
and disk, lets you set drive sleep time and other startup
preferences, and enables you to run drive diagnostics.
In addition to the tools listed on the drive shortcut menus,
Copy Machine, Guest95 and the ZIP help files are available
from the Tools 95 program group-just click the Start button
and point to Programs, then Tools 95.
Guest95
Guest95 allows you to move your ZIP Drive from one computer
to another with ease. Now there’s no need to reboot the system
when you add a parallel port ZIP Drive. Simply attach the ZIP
Drive to any compatible PC and run the Guest95 program to
assign a drive letter.
Any time you install new ZIP hardware on your system, you can
use Guest95 to load the drivers needed by Windows 95. You can
run Guest95 from the Tools installation disk or from your EI’SO~T
ZIP Tools program group. Refer to the Guest95 Help file for
detailed information.
Note: When using Windows 95 with the ZIP Drive, the ZIP Tools
disk is write-protected and contains Macintosh files that are now
not usable. To remove the write protection and “Reclaim” the Tools
disk for use, you must do the following:
1 Double-click on the My Computer icon.
2 Double-click on the C: hard drive icon.
3
4
Double-click on the Tools 95 icon to open the folder.
Double-click on the Reclaim icon to run program.
7
Congratulations! When the software
installation is complete, your ZIP Drive
will be ready to use.
Use your ZIP Drive just like any other drive on your system.
Your ZIP Drive will have its own drive letter in the File Manager.
You can store and copy files to and from your ZIP Drive using
the same methods you use for your other drives. For additional
information on using your new drive and ZIP ‘Tools software,
refer to the ZIP User’s Guide.
8
Using Your ZIP Drive
Getting the Most out of Your ZIP Drive
A Tremendous Value
Your ZIP Drive gives you unlimited, high capacity, high performance
storage. It’s like having a hard disk upgrade, mobile storage, and a backup
drive all in one affordable and easy solution. With your ZIP Drive you can:
Expand your computer
storage-1OOMB at a time
Back up your hard disk or
any other disk drive on your
system quickly and easily
Take work home or on
the road
Protect sensitive information
Keep financial and business
records safe and secure
Move your work to different
locations and computers
Create a multimedia library
Store large scanned or
downloaded files
Organize large amounts
of information
Collect stuff from on-line
services without filling up
your hard drive
Design and demo
multimedia presentations
Use one disk per account,
project, or client
Archive old files and
e-mail messages
Share large files with co-workers,
clients, friends, and service
bureaus
Give your kids disks for
school work and other stuff
Save absolutely anything you
don’t want to throw away
Store and run all your games
9
lul
lul
Extend Your Hard Disk (hard disk upgrade alternative)
Are you constantly running out of hard disk space? Your ZIP Drive and disks
give you unlimited storage for all your information. By placing files on ZIP
disks, you have ready access to them without filling up your hard disk. ZIP
Tools software will help you find any files you need, and ZIP Drive’s harddisk-like performance will let you access information quickly.
Move information
Do you need to move information between different work locations? Between
home and work? To and from clients? Your ZIP Drive and disks offer complete
mobility. ZIP disks fit in a shirt pocket; your ZIP Drive is easy to carry and quick
to set up. The Guest program allows you to use your ZIP Drive temporarily
almost anywhere.
Back Up Your Hard Disk
Your ZIP Drive makes backups fast and simple. You don’t need special backup
software-just copy critical files to a ZIP disk. Copying is lightning fast, and you
end up with an exact duplicate of your original files. If you need to restore a
file, simply copy it back to your hard drive, or just access it directly from the
ZIP Drive.
lul
Create a Multimedia Library-Images. Sounds, and Video
Because of their high capacity, removability, and random access, ZIP disks are
ideal for storage-hungry image, sound, and video files. Clips can come from a
variety of sources, including scanners, CD-ROMs, and video input devices. You
can create and store multimedia presentations and demonstrations, including
video, that you can replay directly from the ZIP disk.
Archive Your Important Records
Do you need to keep files for a number of years? Archive your valuable files on
a ZIP disk and store them in a safe place. Whenever you need them, you can
access them quickly.
Get Organized
If you work on lots of different projects or with many different clients, try
segmenting your work onto different disks. You can organize your information
by project, client, date, or whatever. ZIP disks give you the capacity to get all
associated files onto a single disk. Then, switching between projects and
customers is as simple as inserting another ZIP disk.
iul
Secure Sensitive files
To keep sensitive or confidential information safe, store it on a ZIP disk and use
your ZIP Tools software to assign a password that must be used in order to read
from or write to the disk. At work, you can protect sensitive information such
as personnel files, company directories, and product plans and designs. At
home, you can secure personal information such as tax records, budgets, and
computerized checkbooks.
10
Drive Operation/Maintenance
Use your ZIP Drive just like any other drive on your system. To
access the ZIP Drive, insert a disk and select the ZIP Drive letter
assigned to the ZIP Drive in the File Manager (or at the DOS
prompt). Store and copy files to and from the ZIP Drive using
the same methods you use for other drives on your system.
Amber Data Light -____--~
Green Power Light ~-
g &-;fl
/
Disk Eject Button*
* When your ZIP Drive is not in use, remove the ZIP disk from
the drive and store it in the protective case. To eject a disk, push
the eject button.
Do not use ordinary 3.5 inch floppy drive head cleaning
diskettes or data diskettes. They will damage your ZIP Drive.
ZIP Dal:a
Connector
Printer Pass-Through Connector
Emergency Disk Eject (use only when power is disconnected) -___-- 1
Powering Your ZIP Drive and Other Devices
The ZIP Drive must have power in order for the printer pass-through
feature to work. On some computers, it is important to power up
the computer before or at the same time as devices connected to
the parallel port. If you do not use a power strip, power on the
11
computer first, then turn on your printer and immediately connect
power to the ZIP Drive. Power must be applied to the ZIP Drive
before your operating system begins to load.
n
Printer Issues: If you encounter problems using a printer connected to
the ZIP Drive, refer to the “Troubleshooting” section of this manual,
or to the information in Section 8 of the README.TXT file on the
install disk for Windows/DOS.
Automatic Sleep Mode
The ZIP Drive has an automatic sleep mode designed to reduce
power consumption and prolong the life of ZIP disks. Sleep mode
automatically spins down a disk after 15 minutes of inactivity.
When the disk is accessed, it automatically spins back up again.
You can change the sleep mode time using your ZIP Tools software.
Disk Eject in Case of Power Loss
The ZIP Drive must be powered on for normal disk insertion and
removal. If you need to eject a disk during a power failure, disconnect the power supply from the ZIP Drive and push a straightened
paper clip into the emergency disk eject hole on the back of the
drive (see illustration).
Never force a disk into or out of the ZIP Drive.
ZIP Tools Software
Your 100MB ZIP Tools disk contains a complete package of software
tools to help you manage everything you use and create with your
ZIP Drive. The ZIP Setup or Install program automatically installs
ZIP Tools for your system.
ZIP Tools Disk
Make sure you keep all of the original files on your ZIP Tools disk
in case you need to reinstall your ZIP Tools software.
GuestTM
The Guest program is a portable driver that lets you easily move
your ZIP Drive from one computer to another. When you run
Guest, you can use your ZIP Drive without having to permanently
install the driver or ZIP Tools software.
The Guest program for either system can be loaded from the
Install disk. For instructions on using Guest, refer to the
GUESTHLP.TXT file on the Install disk or to Guest Help which
is installed in the ZIP Tools group.
12
Enhancing ZIP Drive Transfer Speed
Your ZIP Tools software package includes a parallel port accelerator
that can automatically set up your system to use the fastest transfer
mode for the ZIP Drive that is supported by your computer’s parallel
port. To use the accelerator, first install your ZIP Drive according to
the Installation instructions, then double click on the Parallel Port
Accelerator icon that is installed with your Erson- Tools software.
(If you are installing the ZIP Drive on a DOS-only system, refer to
the README.TXT file on the Install disk for instructions).
For additional information about your ZIP Drive’s data transfer
speed, refer to ZIP Tools Help in your EIWN ZIP Tools Windows
group or to the README.TXT file on the Install disk.
ZIP Disks
Additional disks for your ZIP Drive are available pre-formatted for
Windows/DOS in 100MB capacity.
Read/Write Protecting ZIP Disks
Your ZIP Tools software includes a special read/write protect feature
that allows you to:
n
Write Protect a disk through software instead of with a
mechanical write protect switch.
n
Write Protect a disk and assign a password that must be used
to remove the write protection.
Read Protect a disk so that it cannot be read from, or written to,
unless the user enters the password you assign.
For information on using Read/Write Protect, refer to the ZIP Tools
Help file.
n
Troubleshooting
If you encounter a problem while installing or using your ZIP
Drive, check this section for help.
Electrical power should be turned off before connecting or
disconnecting any cables; otherwise, computer equipment could be damaged.
1
Green power light does not come on, or ZIP disk cannot
be inserted.
Make sure you are using an EI’SON ZIP power supply and that it is
connected to the ZIP Drive as shown in the Installation instructions.
Make sure the power supply is plugged into a working power outlet.
13
2
Computer does not start up properly after the ZIP Drive
is installed.
(a) Turn off your computer and disconnect power from the ZIP
Drive. Turn on the computer first, then immediately connect
the ZIP power (or use a power strip to turn on both at the same
time).
(b) Disconnect the ZIP Drive from the computer and restart. Refer
to the README.TXT file or to MANUAL.EXE on the Install disk
for additional problem-solving information.
The software cannot find the ZIP Drive or the ZIP Drive is not
assigned a drive letter.
(a) Turn off your computer and disconnect power from the ZIP
Drive. Turn on the computer first, then immediately connect
the ZIP Power (or use a power strip to turn on both at the same
time). Make sure the green power light on the ZIP Drive is ON.
(b) Make sure you are using the data cable that came with the drive.
(c) Make sure the data cable for the ZIP Drive is connected as shown
in the Installation instructions, and that the cable connections
are straight and secure. Tighten all connector screws firmly
and evenly, both on the connector to the ZIP Drive and to
the computer.
(d) Make sure the ZIP Drive is connected to a parallel port (printer
port) connection on the computer. This model of the ZIP
Drive will not work if it is connected to a serial port or to a
SCSI connection.
(e) Reinstall your ZIP Tools software.
(f) If the computer still doesn’t recognize the ZIP Drive, the parallel
port on the computer may not be compatible with the ZIP
Drive. (This happens very rarely.) Try installing the ZIP Drive
on a different computer. If a different computer recognizes the
ZIP Drive, the problem could be an incompatible parallel port.
To solve this problem, you need to add a new parallel port
to your computer (see the information under #6). If neither
computer recognizes the ZIP Drive, contact EPSON as described
at the end of this manual.
Data transfer problems or erratic drive operation.
(a) Make sure the ZIP cable is correctly and completely connected
to both the ZIP Drive and the computer. Tighten all connector
screws firmly and evenly both on the connector to the ZIP
Drive and to the computer.
14
(b) There may be a problem with the parallel port I/O card
in your computer. Refer to the problem-solving information
under #6. Turn off your computer and disconnect power from
the ZIP Drive. Turn on the computer first, then immediately
connect the ZIP power (or use a power strip to turn on both at
the same time).
5
6
ZIP transfer speed seems slow.
If your computer has a bi-directional parallel port or an EPP chip
set, you may be able to use a faster mode of data transfer which
will significantly improve the performance of your ZIP Drive. To
optimize the ZIP Drive’s performance on your computer, run
C:\ZlI’TOOLS\OPTPPMl.EXE and reboot your system.
Problems with pass-through devices, ZIP Drive data transfers.
or software dongles that hook to the parallel port.
Your ZIP Drive is designed to the latest parallel port specifications,
however, because there is no single set of parallel port specifications
accepted across the industry, there are some parallel port/multi I/O
adapters, parallel port peripherals, and software dongles that are not
fully compatible with the ZIP Drive and may cause unpredictable
results when used on the same parallel port connection as the ZIP
Drive. If you are experiencing problems with your ZIP Drive, or if you
want to connect other parallel port devices or dongles, it would be
best to add another parallel port to your computer. Most computer
stores carry simple l/O cards which let you easily add a new parallel
port. If you plan to use software dongles on the same parallel port
connection as your ZIP Drive, contact the provider for your dongle
before connecting it to make sure you have a device that is
compatible with the ZIP Drive.
More Problem-Solving Help
Refer to the README.TXT file or to MANUAL.EXE on the Install
disk for additional problem solving information. To view the
README file, enter TYPE README. TXT MORE at the DOS prompt
for the Install disk. To view the electronic manual, type MANUAL,
and press the Enter key. If your ZIP Drive still does not operate
correctly after checking the suggested solutions in the electronic
documentation, refer to “Contacting ErsoV in this manual.
Warranty
This product carries a one year limited warranty. For complete
warranty information, refer to the detailed warranty statement
shipped with this product.
Note: When preparing your ZIP Drive for return to E11so~ for
repair, include the data cable and AC adapter. DO NOT include
your ZIP Tools and Driver diskettes.
15
United States FCC Information
The computer equipment described in this installation guide generates and uses radio
frequency (RF) energy. If the equipment is not installed and operated in strict accordance
with the manufacturer’s instructions, interference to radio and television reception may result.
n Interference This equipment complies with Part 15 of the FCC Rules and its operation is
subject to the following conditions: (1) the equipment may not cause harmful interference,
and (2) the equipment must accept any interference received, including interference that
may cause undesired operation.
Part 15, Class B, of the FCC Rules, is designed to provide reasonable protection against
radio and television interference in a residential installation. Although the equipment
has been tested and found to comply with allowed RF emission limits, as specified
in the above cited Rules, there is no guarantee that interference will not occur in a
particular situation. Interference can be determined by turning the equipment off
and on while monitoring radio or television reception. The user may be able to
eliminate any interference by implementing one or more of the following measures:
n Reorient the affected device and/or its receiving antenna.
n Increase the distance between the affected device and the computer equipment.
. Plug the computer and its peripherals into a different branch circuit from that used
by the affected device.
WA&NC Only the manufacturer’s cable or an equivalent double shielded, host
Interface cable should be used with external subsystems. Other types of cable may
vlolate FCC rules and regulations. AC Adaptor with ferrite core must be used for RF
interference suppression. Also, changes or modifications to the electronics or enclosure
of this product must be expressly approved by EPSON; otherwise, the user’s authorit)
to operate the equipment may be voided by the FCC.
Canadian DOC Information
This dlgital apparatus does not exceed the Class B limits for radio noise emissions
from digltal devices as set out in the Radio Interference Regulations of the Canadian
Department of Communications.
German BZT Information
EIW~\ hereby certifies that the Epson-manufactured equipment referenced in this
guide is in compliance with the requirements of BMPT Vfg 243/1991 RF suppression.
The normal operation of some equipment (such as signal generators) may be subject
to specific restrictions. Please observe the notices in the owner’s manual.
The marketing and sale of the equipment was reported to the Central Office for
Telecommunication Permits (BZT). The BZT has the right to retest this equipment
to verify compliance with the regulation.
Contacting EPSON
If you encounter problems while installing or using your ZIP Drive, you can find help
under “Troubleshooting” in your manual or in the electronic documentation included
with your ZIP software. You can access a complete installation manual from the Install
dish for Windows/DOS by entering A:MANUAL at the DOS prompt. Two text files on
the Install disk also contain help information (README.TXT and GUESTHLP.TXT).
Corporate Mailing Address
Eno\- America, Inc.
ZOi;O Madrona Avenue
lorrance, CA 90503
USA
Phone Numbers
ZIP Drive Help Information:
Technical Support
800-922-89 11
310-;xI?-~600
on the Information Superhighway
Internet Home Page:
http:/iwww.epson.com
CompuServe:
GO EPSON
EIWIS Download Service:
310-782-4531
EPSON
KIWI\ is a registered trademark of Seiko Epson Corporation. Iomega is a registered
trademark. and the Iomega logo and ZIP are trademarks of Iomega Corporation.
All other company and product names mentioned in this document are tradema&
ot thclr rerpective companies.
(.op r:cht c 1995 Iomega Corporation.
®
2/96
EPSON
ZIP-489.PAR