1
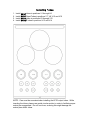
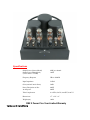
REX II Power
WARRANTY REGISTRATION FORM
Unit Serial Number:
_______________________________________
Customer Name:
_______________________________________
Address:
_______________________________________
_______________________________________
Date of Purchase:
_______________________________________
Purchased From:
Dealer Name:
_______________________________________
Address:
_______________________________________
_______________________________________
IMPORTANT NOTE:
In order to receive the full five year product warranty, please
mail this completed form together with a copy of your sales
receipt to Balanced Audio Technology at the address below,
within thirty days of purchase.
Failure to do so will result in the product being warrantied for
one year from the date of manufacture.
1300 First State Blvd. Wilmington DE 19804 Tel: 302-999-8855 Fax: 302-999-8818
REX II Power
Special Edition
Balanced Power Amplifier
Owner's Manual
1300 First State Blvd. Wilmington DE 19804 Tel: 302-999-8855 Fax: 302-999-8818
Introduction
Thank you for your purchase of the Balanced Audio Technology REX II
Power vacuum tube amplifier. Please read this owner’s manual to obtain
the full benefit of the REX II Power in your system. This manual provides
you with necessary safety information and operating procedures for this
exceptional unit.
WARNINGS:
To prevent the possibility of serious injury, electrical shock, or fire:
DO NOT operate with the bottom cover removed.
DO NOT expose to rain or moisture.
DO NOT defeat the ground
Power-plug.
DO NOT replace fuses with anything other than the same type and rating
as supplied by the factory.
Package Contents
Included in the box should be the following:
Description
REX II Power Amplifier
6C33C-B Output Tubes
6SN7 Signal Tubes
6H30 Super Tubes
6V6 Power Tubes
Power Cord
Torx Wrench (T-10)
Spare Cover Screws
Spare Fuses
Owner’s Manual
Optional Accessories
Quantity
1
4
1
6
4
2
1
5
2
1
(as ordered)
Save all the packaging materials in a safe dry area for the unlikely event
that you need to return the REX II Power to the factory for service.
Installing Tubes
1.
2.
3.
4.
Install 6SN7 tubes in positions V1 through V6
Install 6H30 SuperTubes in positions V7, V8, V15 and V16
Install 6C33 tubes in positions V9 through V12
Install 6V6GT tubes in positions V13 and V14
NOTE: Care must be exercised when installing the 6C33 output tubes. While
inserting the tubes, please use gentle circular motion in order to facilitate proper
socket pin engagement. Do not use force, as doing this might damage the
socket pins and/or tubes.
Physical Placement
It is recommended that you provide open space above the unit for proper
ventilation, with no electronic components or shelves placed directly
overhead.
Mount the unit on a hard surface with proper ventilation underneath.
Avoid placing the unit directly on a carpeted floor, as doing so will block
the ventilation slots in the unit’s bottom cover.
Connecting the REX II Power to Your System
For Balanced Preamplifiers:
Use balanced XLR interconnects. The left and right channel input
connectors are clearly marked on the back panel of the REX II Power.
Note: The REX II Power XLR inputs are wired as follows:
Pin 1:
Pin 2:
Pin 3:
common/shield
positive
negative
For Single-Ended Preamplifiers:
Single-ended preamplifiers have RCA connectors. The REX II Power power
amplifier is designed to work with either balanced or single-ended
preamplifiers connected to its inputs. All that is required to connect a
single-ended preamplifier with RCA connectors to the
REX II Power’s
inputs is the optional balanced to single-ended adapters. These adapters are
available from Balanced Audio Technology.
For Speaker Connections:
The speaker connectors are clearly marked on the back panel of the REX II
Power amplifier. There are three sets of output taps marked LOW,
MEDIUM and HIGH for connecting a variety of speakers to the REX II Power
output. Please note that some experimentation may be required. Try
each output tap until you find the one that gives the most balanced
performance in your system.
NOTE: Please refer to Figure 1 for proper connection and polarity.
Operating the REX II Power
Normal operation of the REX II Power amplifier requires simply turning the
unit on. There are no meters to connect, bias setpoints to remember, or
drifting bias points to adjust. Please read the Autobias Feature section
for more details.
Turning the REX II Power ON:
The main power switch is located at the rear of the unit. When you turn
the unit on, it will go through a gentle power-on sequence. After about
one minute, four LED’s visible from the top of the chassis should light up.
This indicates that full operating bias has been reached and the unit is
now ready to play.
Turning the REX II Power OFF:
The unit can be turned Off at any time (even while playing). If needed,
please wait at least 30 seconds before turning the unit ON again.
Autobias Feature:
The REX II Power implements a sophisticated autobias circuit that
automatically compensates for tube aging and line voltage fluctuations,
as well as marginal mismatching of tubes. The successful operation of
the autobias circuit is noted by individual LED’s that glow visibly next to
each output tube when viewed from the top of the chassis. A total of
four LED’s should light up to indicate proper operation of the circuit. If
one of the LED’s fails to light up (after the unit is warm), there could be
two reasons for this problem:
1. The particular output tube is defective. In this case replacing
this tube with a known good one should turn the LED ON again.
2. The amplifier was overstressed and its thermal protection was
activated. Simply turning it OFF and then ON again will clear that
protection.
NOTE: For more details on the operation of the REX II Power protection
circuit please see the correcponding chapter.
Protection Circuits
Your REX II Power amplifier is equipped with two types of sophisticated
protection circuits.
Thermal Protection .
Thermal protection circuits monitor power
dissipation in each of the unit’s four output tubes. Should the power
dissipation in that part of the circuit exceed the preset value, the
protection mechanism will disable that particular tube. The corresponding
green LED will then go out.
When this happens, simply turn the unit OFF using the rear panel power
switch, then turn it back ON after waiting a couple of minutes. That
should clear the thermal protection mechanism.
Overcurrent Protection .
There are four independent overcurrent protection circuits monitoring the currents flowing through each
output tube. Should the current excee the preset value, the protection
circuit will disable that particular tube, and the green LED will go OFF.
To clear the fault one should simply power cycle the unit OFF and then
back ON.
Understading the Overcurrent Protection .
The REX II Power can enter over-current protection mode if either of the
following conditions take place:
1. The unit is being driven hard into a speaker that represents a
particularly difficult load. At a point of peak demand the overcurrent protection may become activated. Power cycling the unit
will restore its operation.
2. An over-current protection due to an intermittent internal
discharge in one of the power tubes.
The internal discharge can take several forms. In some instances the
weak spot in the tube will evaporate, and the tube will continue working
normally for an extended period of time.
In other cases the tube might continue activating the protection circuit,
indicating the need for replacement.
The standard recommendation is to ignore the first occurance, and
replace the tube following any further events.
What to do when the LED light goes out:
If you notice that one or more green LED’s goes out, the first step should
be to RECORD THEIR POSITIONS.
Then turn the unit OFF by using its main power switch, wait a couple of
minutes and turn it back ON.
If the same tubes exhibit the same fault again, they should be replaced.
While it is always best to replace a matched pair of tubes, it is not always
absolutely required. If your unit is farily new, then you might consider
replacing just one faulty tube. The factory can supply a tube with similar
characteristics.
Replacing the Fuse:
WARNING: Please turn the unit OFF and disconnect the power
cord before proceeding.
There are NO internal fuses in the REX II Power amplifier.
The main power fuse is Slow-Blow type, located on the amplifier’s back
panel, and should only be replaced with the same type and rating fuse:
100-120V
10A
200-240V
7A
If the unit still fails to operate properly, please contact the factory for
professional service.
Factory supplied fuse should only be replaced with the same
type and rating part.
Replacing Output Tubes:
In order to replace the 6C33C-B output tubes, please contact the factory
and supply them with the unique identification number stamped on the
side of the tube needing replacement. This information will be used by
Balanced Audio Technology to provide an optimal replacement tube for
your amplifier.
Please do not substitute any random tube as a replacement.
Although the automatic bias circuit in the REX II Power will accept virtually
any random set of output tubes, the unit will not be guaranteed to meet
all of its performance specifications under such conditions.
Finally, the determination that a single tube replacement is prudent
rests solely with the customer, based on actual hours of use for the
particular set of tubes. The factory assumes no responsibility for any
performance decrease under such conditions.
Servicing:
The Balanced Audio Technology REX II Power should require no service
other than tube replacement to maintain its high performance. Please
direct any further service inquiries to the factory.
Cleaning:
To remove dust, occasionally wipe the front and top surfaces of your REX
II POWER with a damp soft cloth. If fingerprints appear, you may use a
mild, non-alkaline soap solution. Do not use abrasive cleaners, as they
may damage the fine finish of the unit.
Specifications
Output Power (Stereo Model)
Output Power (Monoblock)
(At less than 3 % THD)
80W per channel
160W
Frequency Response
5Hz to 200kHz
Input Impedance
215kΩ
Gain (nominal into 8 Ohms)
26dB
Power Dissipation at idle:
At full powe:
480W
900W
Tube Complement:
4 x 6H30, 2x6V6, 6x6SN7, 4x6C33
Dimensions
17” x 24” x 9”
Weight (net)
100lb
REX II Power Five Year Limited Warranty
Terms and Conditions
1. Limited Warranty
Upon receipt of the attached warranty registration form, Balanced Audio Technology
warrants the purchased product to be free from manufacturing, materials, and workmanship
defects for five years from date of original purchase, excepting vacuum tubes, subject to
the following conditions. Failure to return the enclosed warranty registration form
together with a copy of your sales receipt within 30 days from original
purchase will result in a warranty period of one year from the date of
manufacture.
2. Vacuum Tubes
The 6SN7, 6H30 and 6V6 vacuum tubes (including replacements under warranty) are
warrantied for one year from the date of the original REX II Power purchase. The output
6C33C-B vacuum tubes are warrantied for ninety days.
3. Limited to Original Purchaser
This warranty is for the sole benefit of the original purchaser of the covered product, and
may not be transferred to a subsequent purchaser of the product.
4. Conditions and Limitations
This warranty is subject to certain conditions and limitations, as follows. This warranty is
void and inapplicable if the product has not been used in accordance with the instructions
found elsewhere in this manual, or if it has been misused or abused, damaged by accident or
neglect, or in transport once in possession of the purchaser. The warranty is also void if the
product has been repaired, modified, or tampered with by anyone other than Balanced Audio
Technology or its specifically authorized agents.
5. Remedy
If this product contains a materials, manufacturing, or workmanship defect that cannot be
repaired at the dealership where the product was purchased, it must be packed in original
packaging and returned to Balanced Audio Technology via insured freight, at the owners
expense. If replacement packaging materials are required, they will be supplied by the
factory at a nominal charge. Returned products must be accompanied by a written
description of the defect, and a return authorization number (available from
the factory via phone or fax). Upon receipt of defective product, Balanced Audio
Technology agrees to repair the product without charge for parts (except vacuum tubes if
the unit is more than one year old), or labor. The product will then be returned via prepaid,
insured freight, with carrier at the sole determination of Balanced Audio Technology. This
constitutes the purchasers sole remedy.
6. Design Changes
Balanced Audio Technology reserves the right to modify its products or change
specifications at any time without obligation or liability to previous purchasers.
7. Miscellaneous
Any implied warranties relating to the above product shall be limited to the duration of this
warranty. This warranty does not extend to any incidental or consequential costs or
damages to the purchaser. This warranty gives you specific legal rights. You may also have
other rights which vary from state to state.