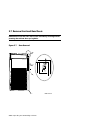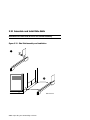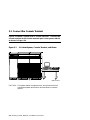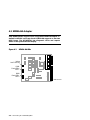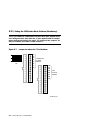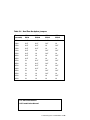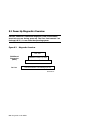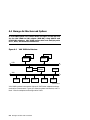
1
DEC 10000 AXP System
VAX 10000
Installation Guide
Order Number EK–100EB–IN.002
This guide is intended for use by Digital customer service engineers and
self-maintenance customers installing a DEC 10000 AXP or VAX 10000
system.
digital equipment corporation
maynard, massachusetts
First Printing, November 1992
The information in this document is subject to change without notice and should
not be construed as a commitment by Digital Equipment Corporation.
Digital Equipment Corporation assumes no responsibility for any errors that may
appear in this document.
The software, if any, described in this document is furnished under a license and
may be used or copied only in accordance with the terms of such license. No responsibility is assumed for the use or reliability of software or equipment that is
not supplied by Digital Equipment Corporation or its affiliated companies.
Copyright © 1992 by Digital Equipment Corporation.
All Rights Reserved.
Printed in U.S.A.
The following are trademarks of Digital Equipment Corporation:
Alpha AXP
AXP
DEC
DECchip
DEC LANcontroller
DECnet
DECUS
DWMVA
OpenVMS
ULTRIX
UNIBUS
VAX
VAXBI
VAXELN
VMScluster
XMI
The AXP logo
dT
OSF/1 is a registered trademark of the Open Software Foundation, Inc.
FCC NOTICE: The equipment described in this manual generates, uses, and may
emit radio frequency energy. The equipment has been type tested and found to
comply with the limits for a Class A computing device pursuant to Subpart J of
Part 15 of FCC Rules, which are designed to provide reasonable protection against
such radio frequency interference when operated in a commercial environment.
Operation of this equipment in a residential area may cause interference, in which
case the user at his own expense may be required to take measures to correct the
interference.
Contents
Preface ...................................................................................................... ix
Chapter 1 Installation Overview
1.1
Installation Flowchart ........................................................... 1-2
Chapter 2 Unpacking and Assembling Cabinets
2.1
2.2
2.3
2.4
2.5
2.6
2.7
2.8
2.9
2.10
2.11
2.12
2.13
2.14
2.15
2.16
2.17
2.18
2.19
2.20
2.21
Inspect the Shipment ............................................................. 2-2
Collect Tools and Resources .................................................. 2-4
Remove Cartons and Packing Material ................................ 2-6
Remove Cabinets from Pallets .............................................. 2-8
Position the Cabinets ........................................................... 2-10
Remove Cabinet Top Covers ................................................ 2-12
Remove Front and Rear Doors ............................................ 2-14
Install Side Spacers ............................................................. 2-16
Level All Cabinets ................................................................ 2-18
Install Top Spacers .............................................................. 2-20
Install Bottom Spacers ........................................................ 2-22
Assemble and Install Side Skirts ........................................ 2-24
Assemble and Install Front Skirts ...................................... 2-26
Install End Panels ................................................................ 2-28
Identify and Route Battery Cables ..................................... 2-30
Connect Battery Cables ....................................................... 2-32
Install Battery Cable Connectors ........................................ 2-34
Connect the Power Control Cable ....................................... 2-36
Reinstall Cabinet Tops and Doors ....................................... 2-38
Connect the I/O Cable(s) ...................................................... 2-40
Connect the DSSI Cables ..................................................... 2-42
iii
Chapter 3 Making Console, Ethernet, and FDDI
Connections
3.1
3.2
3.3
Connect the Console Terminal .............................................. 3-2
Connect the Ethernet Cable .................................................. 3-4
Connect the FDDI Cable ........................................................ 3-6
Chapter 4 Connecting to a DSSI Subsystem
4.1
4.2
4.3
4.4
4.5
4.6
DSSI Installation Overview .................................................. 4-2
Single-Host Systems .............................................................. 4-4
KFMSA-BA Adapter .............................................................. 4-6
Cables ..................................................................................... 4-8
Install DSSI Cables to ISEs ................................................ 4-10
Set Node IDs ......................................................................... 4-12
Chapter 5 Connecting to a CI VMScluster
5.1
5.2
5.2.1
5.2.2
5.2.3
5.2.4
5.2.5
5.3
CIXCD Installation Configuration Rules ............................. 5-2
Setting CIXCD Parameters ................................................... 5-4
Setting the VMScluster Node Address (Mandatory) ..... 5-6
Verifying Quiet Slot DELTA Time = 10 (Mandatory) ... 5-8
Setting Boot Time (Optional) ........................................ 5-10
Setting Extend Header, Extend ACK Timeout, and
Disable Arbitration (Optional) ...................................... 5-12
Setting Cluster Size (Optional) ..................................... 5-14
Cabling the System to a Star Coupler ................................ 5-16
Chapter 6 Powering Up the System
6.1
6.2
6.3
Prepare to Check the AC Power ............................................ 6-2
Measure the AC Power ......................................................... 6-4
Turn the Power On and Check Indicators ............................ 6-6
Chapter 7 System Self-Test
7.1
7.2
iv
Check Module Status LEDs .................................................. 7-2
Check the Self-Test Display .................................................. 7-4
Chapter 8 Diagnostics and Utilities
8.1
8.2
8.3
8.4
8.5
8.6
8.6.1
8.6.2
8.7
8.8
8.9
8.10
8.11
8.12
8.13
8.14
8.15
8.16
Console Load Devices ............................................................. 8-2
Verification Overview ............................................................ 8-4
Power-Up Diagnostics Overview ........................................... 8-6
Run System Self-Test ............................................................ 8-8
Show Commands for Installation ........................................ 8-10
Verify SCSI Devices ............................................................. 8-12
Check SCSI Devices Using Console Commands .......... 8-12
Check Console Output Against Physical Devices ........ 8-14
Verify Console Load Device Path ........................................ 8-16
Booting OpenVMS Alpha AXP from an RRD42 ................. 8-18
Booting OSF/1 from an RRD42 ........................................... 8-20
Booting OpenVMS VAX from an InfoServer ...................... 8-22
Selecting an Ethernet Service ............................................ 8-24
Set Commands for Booting ................................................. 8-26
Booting LFU with an RRD42 on a DEC 10000 System ..... 8-28
Booting LFU on a VAX 10000 System ................................ 8-30
Booting the Standalone Backup .......................................... 8-32
Running UETP .................................................................... 8-34
Appendix A Storage Architecture Overview
A.1
A.2
Storage Architecture and Options ......................................... A-2
DSSI and CI VMSclusters Compared ................................... A-4
Appendix B DSSI Concepts
B.1
B.2
B.3
DSSI Basics ............................................................................ B-2
Integrated Storage Elements (ISEs) ..................................... B-4
Dual-, Tri-, and Quad-Host Systems ..................................... B-6
Appendix C Digital Remote Services Console
Installation
Examples
7-1
8-1
Self-Test Results .................................................................... 7-4
Self-Test Display .................................................................... 8-8
v
8-2
8-3
8-4
8-5
8-6
8-7
8-8
8-9
8-10
8-11
8-12
8-13
8-14
8-15
Show Configuration ............................................................. 8-10
Show Device .......................................................................... 8-10
Show Network ...................................................................... 8-10
Checking SCSI Devices ........................................................ 8-12
CD-ROM OpenVMS Alpha AXP Boot ................................. 8-18
CD-ROM OSF/1 Boot .......................................................... 8-20
Sample InfoServer Boot ....................................................... 8-22
Selecting an Ethernet Service ............................................. 8-24
Set Boot Commands ............................................................. 8-26
DEC 10000 LFU Booting ..................................................... 8-28
VAX 10000 LFU Booting ..................................................... 8-30
Booting OpenVMS Alpha AXP on a DEC 10000 System
with an RRD42 ..................................................................... 8-32
Booting OpenVMS VAX on a VAX 10000 with an
InfoServer ............................................................................. 8-32
Running UETP ..................................................................... 8-34
Figures
1-1
2-1
2-2
2-3
2-4
2-5
2-6
2-7
2-8
2-9
2-10
2-11
2-12
2-13
2-14
2-15
2-16
2-17
2-18
2-19
2-20
2-21
2-22
2-23
vi
Installation Flowchart ........................................................... 1-2
Inspection Flowchart ............................................................. 2-2
Packing Material .................................................................... 2-6
Preparation and Removal from Pallet .................................. 2-8
Cabinet Positioning for 3-Cabinet System .......................... 2-10
Cabinet Positioning for 5-Cabinet System .......................... 2-11
Cabinet Top Cover Removal (System and Expander
Cabinets) ............................................................................... 2-12
Door Removal ....................................................................... 2-14
Installing Side Spacers ........................................................ 2-16
Leveler Foot Adjustment ..................................................... 2-18
Installing Top Spacers ......................................................... 2-20
Installing Bottom Spacers ................................................... 2-22
Side Skirt Assembly and Installation ................................. 2-24
Front Skirt Assembly and Installation ............................... 2-26
End Panel Installation ......................................................... 2-28
Battery Cable Routing ......................................................... 2-30
Battery Cable Connections .................................................. 2-32
Battery Cable Connector Locations .................................... 2-34
Power Control Cable ............................................................ 2-36
Power Control Cable Routing .............................................. 2-37
Cabinet Tops and Doors ....................................................... 2-38
I/O Cable Connections ......................................................... 2-40
DSSI Cable Connection ........................................................ 2-42
Cabling and Terminating Disk Bricks ................................ 2-43
3-1
3-2
3-3
3-4
4-1
4-2
4-3
4-4
4-5
5-1
5-2
5-3
5-4
5-5
5-6
5-7
5-8
6-1
6-2
6-3
7-1
8-1
8-2
8-3
8-4
8-5
A-1
A-2
B-1
B-2
C-1
3-Cabinet System, Console Terminal, and Printer .............. 3-2
Control Panel and Console Terminal Port ............................ 3-3
I/O Panel–Ethernet Port ........................................................ 3-4
I/O Panel–FDDI Port ............................................................. 3-6
Single-Host System ................................................................ 4-4
KFMSA-BA LEDs .................................................................. 4-6
I/O Ports for DSSI Cables ...................................................... 4-8
DSSI Cable Installation ....................................................... 4-10
Setting the KFMSA-BA Node ID on the I/O Panel ............ 4-12
CIXCD Jumper to Set Quiet Slot DELTA Time ................... 5-2
XMI Backplane Segments D and E ....................................... 5-4
Jumper Locations for CI Port Address ................................. 5-6
Set Quiet Slot DELTA Time Jumpers .................................. 5-8
Jumper Locations for Boot Time ......................................... 5-10
Jumper Pins for Extend Header, Extend ACK Timeout,
and Disable Arbitration ...................................................... 5-12
Cluster Size Jumpers ........................................................... 5-14
VMScluster Port Connectors ............................................... 5-16
Circuit Breaker ...................................................................... 6-2
Measuring System Power ...................................................... 6-4
CCL and Control Panel LEDs ............................................... 6-6
Powering Up and Checking the LEDs .................................. 7-2
Accessing the Console Load Device ....................................... 8-2
Verification Procedure ........................................................... 8-4
Diagnostic Overview .............................................................. 8-6
SCSI PIU with SBBs ............................................................ 8-14
DEMNA LEDs ...................................................................... 8-16
VAX 10000 Architecture ........................................................ A-2
CI and DSSI Compared ......................................................... A-4
ISEs for the DSSI Storage Bus .............................................. B-4
Examples of Dual-Host Configurations ................................ B-6
Remote Console Cable Connections ...................................... C-1
Tables
1
2
2-1
2-2
4-1
4-2
4-3
5-1
DEC 10000/VAX 10000 Documentation ................................. xi
Related Documents ................................................................ xiii
Tools and Resources ............................................................... 2-4
Battery Cable Labeling ........................................................ 2-31
DSSI and Related Documentation ........................................ 4-2
DSSI Installation ................................................................... 4-3
DSSI Cable Kits ..................................................................... 4-9
CI Port True Address ............................................................. 5-7
vii
5-2
5-3
5-4
5-5
6-1
7-1
8-1
8-2
A-1
B-1
B-2
viii
CI Port Complement Address ................................................ 5-7
Quiet Slot DELTA Time Backplane Jumpers ...................... 5-9
Boot Time Backplane Jumpers ........................................... 5-11
Cluster Size Backplane Jumpers ........................................ 5-15
AC Input Voltage Specifications ........................................... 6-5
LEDs After Self-Test .............................................................. 7-3
Power-Up Diagnostics ............................................................ 8-7
SCSI SBB LED Functions ................................................... 8-15
VAX 10000 System I/O Adapters .......................................... A-3
DSSI Concepts ........................................................................ B-2
DSSI Concepts (Continued) ................................................... B-3
Preface
Intended Audience
This manual is written for Digital customer service engineers and selfmaintenance customers who require information on installing a DEC
10000 AXP system or a VAX 10000 system.
Document Structure
This manual uses a structured documentation design. Topics are organized into small sections for efficient on-line and printed reference. Each
topic begins with an abstract. You can quickly gain a comprehensive overview by reading only the abstracts. Next is an illustration or example,
which also provides quick reference. Last in the structure are descriptive
text and syntax definitions.
This manual has eight chapters and three appendixes, as follows:
•
Chapter 1, Installation Overview, provides a flowchart which summarizes the installation process.
•
Chapter 2, Unpacking and Assembling Cabinets, shows how to
unpack and assemble all cabinets and related cabling for the system.
•
Chapter 3, Making Console, Ethernet, and FDDI Connections,
shows how to connect the console and Ethernet and FDDI devices if
present to the system.
•
Chapter 4, Connecting to a DSSI Subsystem, shows how to connect to a DSSI subsystem, if present.
•
Chapter 5, Connecting to a CI VMScluster, shows how to connect
to a CI VMScluster, if present.
•
Chapter 6, Powering Up the System, explains how to start the system by applying main power.
•
Chapter 7, System Self-Test, describes the system self-test and its
results.
•
Chapter 8, Diagnostics and Utilities, describes how to verify system operation using diagnostics and utilities.
•
Appendix A contains an overview of storage architectures for the VAX
10000 system.
ix
•
Appendix B describes some generally important DSSI concepts.
•
Appendix C explains how to connect the remote services console to
the system.
Conventions Used in This Document
Terminology. Unless specified otherwise, the use of "system" refers to
either a DEC 10000 AXP or VAX 10000 system. The DEC 10000 AXP systems use the Alpha AXP architecture. References in text use DEC 10000
to refer to DEC 10000 AXP systems.
When a discussion applies to only one system, an icon is used to highlight
that system. Otherwise, the discussion applies to both systems. Thus, the
abstract for a module that applies only to DEC 10000 systems would look
like this:
This section shows a sample boot of OpenVMS Alpha AXP
DEC from the RRD42 CD drive for DEC 10000 systems. The first
10000
step is issuing the show device command to determine the
location of the RRD42.
Book titles. In text, if a book is cited without a product name, that book is
part of the hardware documentation. It is listed in Table 1 along with its
order number.
Icons. Icons such as those shown below are used in illustrations for designating part placement in the system described. A shaded area in the icon
shows the location of the component or part being discussed.
Front
x
Rear
Documentation Titles
Table 1 lists the books in the DEC 10000 and VAX 10000 documentation
set. Table 2 lists other documents that you may find useful.
Table 1 DEC 10000/VAX 10000 Documentation
Title
Order Number
Installation Kit
EK–1000B–DK
Site Preparation Guide
EK–1000B–SP
Installation Guide
EK–100EB–IN
Hardware User Information Kit
EK–1001B–DK
Operations Manual
EK–1000B–OP
Basic Troubleshooting
EK–1000B–TS
Service Information Kit—VAX 10000
EK–1002A–DK
Platform Service Manual
EK–1000A–SV
System Service Manual
EK–1002A–SV
Pocket Service Guide
EK–1000A–PG
Advanced Troubleshooting
EK–1001A–TS
Service Information Kit—DEC 10000
EK–1002B–DK
Platform Service Manual
EK–1000A–SV
System Service Manual
EK–1002A–SV
Pocket Service Guide
EK–1100A–PG
Advanced Troubleshooting
EK–1101A–TS
xi
Table 1 DEC 10000/VAX 10000 Documentation (Continued)
Title
Order Number
Reference Manuals
Console Reference Manual
EK–70C0B–TM
KA7AA CPU Technical Manual
EK–KA7AA–TM
KN7AA CPU Technical Manual
EK–KN7AA–TM
MS7AA Memory Technical Manual
EK–MS7AA–TM
I/O System Technical Manual
EK–70I0A–TM
Platform Technical Manual
EK–7000A–TM
Upgrade Manuals
KA7AA CPU Installation Guide
EK–KA7AA–IN
KN7AA CPU Installation Guide
EK–KN7AA–IN
MS7AA Memory Installation Guide
EK–MS7AA–IN
KZMSA Adapter Installation Guide
EK–KXMSX–IN
DWLMA XMI PIU Installation Guide
EK–DWLMA–IN
DWMBB VAXBI PIU Installation Guide
EK–DWMBB–IN
H7237 Battery PIU Installation Guide
EK–H7237–IN
H7263 Power Regulator Installation Guide
EK–H7263–IN
BA654 DSSI Disk PIU Installation Guide
EK–BA654–IN
BA655 SCSI Disk and Tape PIU
Installation Guide
EK–BA655–IN
Removable Media Installation Guide
EK–TFRRD–IN
xii
Table 2 Related Documents
Title
Order Number
General Site Preparation
Site Environmental Preparation Guide
EK–CSEPG–MA
System I/O Options
BA350 Modular Storage Shelf Subsystem
Configuration Guide
EK–BA350–CG
BA350 Modular Storage Shelf Subsystem
User’s Guide
EK–BA350–UG
BA350-LA Modular Storage Shelf User’s Guide
EK–350LA–UG
CIXCD Interface User Guide
EK–CIXCD–UG
DEC FDDIcontroller 400 Installation/Problem
Solving
EK–DEMFA–IP
DEC LANcontroller 400 Installation Guide
EK–DEMNA–IN
DEC LANcontroller 400 Technical Manual
EK–DEMNA–TM
DSSI VAXcluster Installation and Troubleshooting
Manual
EK–410AA–MG
InfoServer 150 Installation and Owner’s Guide
EK–INFSV–OM
KDM70 Controller User Guide
EK–KDM70–UG
KFMSA Module Installation and User Manual
EK–KFMSA–IM
KFMSA Module Service Guide
EK–KFMSA–SV
RRD42 Disc Drive Owner’s Manual
EK–RRD42–OM
RF Series Integrated Storage Element User Guide
EK–RF72D–UG
TF85 Cartridge Tape Subsystem Owner’s Manual
EK–OTF85–OM
TLZ06 Cassette Tape Drive Owner’s Manual
EK–TLZ06–OM
xiii
Table 2 Related Documents (Continued)
Title
Order Number
Operating System Manuals
Alpha Architecture Reference Manual
EY–L520E–DP
DEC OSF/1 Guide to System Administration
AA–PJU7A–TE
DECnet for OpenVMS Network Management Utilities
AA–PQYAA–TK
Guide to Installing DEC OSF/1
AA–PS2DA–TE
OpenVMS Alpha Version 1.0 Upgrade and
Installation Manual
AA–PQYSA–TE
VMS Upgrade and Installation Supplement:
VAX 7000–600 and VAX 10000–600 Series
AA–PRAHA–TE
VMS Network Control Program Manual
AA–LA50A–TE
VMSclusters and Networking
HSC Installation Manual
EK–HSCMN–IN
SC008 Star Coupler User’s Guide
EK–SC008–UG
VAX Volume Shadowing Manual
AA–PBTVA–TE
Peripherals
Installing and Using the VT420 Video Terminal
EK–VT420–UG
LA75 Companion Printer Installation and User Guide
EK–LA75X–UG
xiv
Chapter 1
Installation Overview
This chapter provides a quick overview of the installation procedure and
relates the steps of the procedure with chapters in this manual. It consists
of one section:
•
Installation Flowchart
Installation Overview 1-1
1.1 Installation Flowchart
In general, a system is installed as shown in Figure 1-1.
Figure 1-1
Installation Flowchart
Unpack and
Assemble
All Cabinets
Chapter 2
Connect Console,
Ethernet, FDDI
Chapter 3
Chapter 5
DSSI
Subsystem
?
Chapter 4
Appendix A
Appendix B
Yes
Install DSSI
1-2 Installation Overview
No
CI
VMScluster
?
Yes
Install CI
VMScluster
No
Power Up System
Chapter 6
System Self-Test
Chapter 7
Verification
(Diagnostics and
Utilities)
Chapter 8
BXB-0306A-92
In general, the procedure is as follows (Figure 1-1):
1.
Unpack and assemble all cabinets as described in Chapter 2.
2.
Connect the console, and, if appropriate, make the Ethernet and FDDI
connections as described in Chapter 3.
3.
If connecting to a DSSI subsystem (VAX 10000 systems only), refer to
Chapter 4 for installation instructions and to Appendix A and Appendix B for background information.
4.
If connecting to a CI VMScluster, refer to Chapter 5 for installation instructions.
5.
Power up the system as described in Chapter 6.
6.
Observe and consider the results of the system self-test as described in
Chapter 7.
7.
Verify system operation by running various diagnostics and utilities as
described in Chapter 8.
Installation Overview 1-3
Chapter 2
Unpacking and Assembling
Cabinets
This chapter describes how to unpack and assemble the cabinets that comprise the system. A 3-cabinet system has one system cabinet, one expander cabinet, and one battery cabinet. A 5-cabinet system has one system cabinet, two expander cabinets, and two battery cabinets.
Sections in this chapter include:
•
Inspect the Shipment
•
Collect Tools and Resources
•
Remove Cartons and Packing Material
•
Remove Cabinets from Pallets
•
Position the Cabinets
•
Remove Cabinet Top Covers
•
Remove Front and Rear Doors
•
Install Side Spacers
•
Level All Cabinets
•
Install Top Spacers
•
Install Bottom Spacers
•
Assemble and Install Side Skirts
•
Assemble and Install Front Skirts
•
Install End Panels
•
Identify and Route Battery Cables
•
Connect Battery Cables
•
Install Battery Cable Connectors
•
Connect the Power Control Cable
•
Reinstall Cabinet Tops and Doors
•
Connect the I/O Cable(s)
•
Connect the DSSI Cables
Unpacking and Assembling Cabinets 2-1
2.1 Inspect the Shipment
Check to ensure that all system equipment is at the installation
site.
Figure 2-1
Inspection Flowchart
Check Equipment
Against Shipping List
Incomplete or
Damaged
Shipment
Yes
Customer
Contacts Carrier
Yes
Enter in LARS Report
Notify Customer
No
Missing or
Incorrect
Equipment
Contact
Unit Manager
Continue Unpacking
BXB-0012-92
2-2 Unpacking and Assembling Cabinets
NOTE: Physically inspect the system to be sure parts have not become loose
during shipment.
If you find a damaged container or package, notify the customer. Wait until the customer contacts the insurance company and gives you permission
to continue unpacking.
Compare items listed on the Product Delivery Document (in a slip envelope
on the shipping box) with the packing slip contained in a plastic envelope
on the shipping box. Items should be compared throughout the installation procedure as boxes are unpacked and cabinets are opened.
It is important to record information on damaged or opened containers on
the Labor Activity Reporting System (LARS) form.
Unpacking and Assembling Cabinets 2-3
2.2 Collect Tools and Resources
You will need the items listed in Table 1-1 to unpack and install
the cabinets. The removal of a cabinet from a pallet requires at
least two people.
Table 2-1
Tools and Resources
Item
Use
Product Delivery
Document and
packing slip
To verify that all hardware has been delivered
Utility knife
To remove straps from cabinet shipping boxes
Adjustable
wrench
To remove pallet brackets and to adjust leveler
feet
Level
To verify that the cabinet is properly leveled
Socket wrench set
To remove and install bolts
Torque wrench
To install bolts which must not be overtightened.
Large Phillips
screwdriver
To remove and install screws and to remove the
1/4 turn skirt fasteners
Offset Phillips
screwdriver
To remove and install 1/4 turn fasteners in the
battery cabinet.
Flathead screwdriver
For installation of IOP cable(s)
Digital voltmeter
To check AC and DC voltages
Table or bench
Work space for unpacking and installation
2-4 Unpacking and Assembling Cabinets
Review requirements such as power, environmental, and space requirements for the system.
NOTE: Since the cabinet is heavy and has a high center of gravity, removing it from the pallet requires at least two people.
For more information:
Site Preparation Guide
Unpacking and Assembling Cabinets 2-5
2.3 Remove Cartons and Packing Material
Take off the cartons and remove all packing material to prepare
cabinets for removal from pallets.
Figure 2-2
Packing Material
5
6
7
BXB-0096A-92
2-6 Unpacking and Assembling Cabinets
Use the following procedure to unpack a cabinet:
1.
Position the carton so that the front faces an open space with enough
clearance to allow the cabinet to be rolled down ramps.
2.
Using a utility knife, cut the shipping straps from the carton.
3.
Remove the outside top cardboard cover.
4.
Remove the outside shipping box. This is typically done by using a
7/16" socket wrench to remove two bolts that hold the box together.
5.
Remove the inside top cardboard cover.
6.
Remove the protective plastic wrapping by slipping it up and over the
cabinet.
7.
Identify and put aside the components of the cabinet installation kit
which includes two end panels, six end panel brackets, one or two sets
of side, top, and bottom spacers, front and side skirts, and a plastic
bag containing hardware such as nuts and bolts.
8.
Locate and remove the two control panel keys for the system cabinet.
The keys are typically tie-wrapped to the system cabinet’s rear grill.
Insert one key into the control panel and put the other key away in a
safe place.
9.
Locate the box that contains the ramp kit and open it (see Figure 2-2).
NOTE: It’s a good idea to save all packing materials intact in case the system needs to be shipped in the future.
Unpacking and Assembling Cabinets 2-7
2.4 Remove Cabinets from Pallets
Check cabinets for external damage. Remove the four shipping
brackets that attach a cabinet to a pallet. Insert the ramps on the
front of the pallet and remove the cabinet.
WARNING:
Figure 2-3
At least two people are required to remove a cabinet from its
pallet.
Preparation and Removal from Pallet
4
2
BXB-0097-92
2-8 Unpacking and Assembling Cabinets
WARNING:
Serious injury may result if the cabinet is improperly handled or proper safety conditions are not met. Check the
cabinet sides, top, and front and rear doors for damage. If
the cabinet is damaged, do the following:
a. Enter the location and extent of the damage on the LARS report.
b. Notify the customer and your unit manager.
c. Stop unpacking until the customer gives you permission to continue.
1.
Using an adjustable wrench, remove the four bolts and shipping
brackets that hold the cabinet leveler feet to the pallet (see Figure
2-3).
2.
Check the leveler feet. They should be in the uppermost position, away
from the floor (see Section 2.9).
3.
Attach the ramps by fitting the prongs into the holes on the front of
the pallet. Place the ramps so that the runners are on the inside. Align
the arrows on the ramps and pallet (see Figure 2-3).
4.
The plastic grills on the front and back doors are fragile. If you want
to remove the doors to avoid damage to the grills, refer to Section 2.7
for more information.
5.
With two people working together (one in front and one in back),
slowly roll the cabinet off the pallet down the ramps. Move the cabinet
into position. This should be done on a firm level floor, not on a carpet.
6.
Repeat 1 through 5 for all cabinets in the system.
NOTE: Make sure the space under the cabinet is clear of any debris or extraneous materials.
Unpacking and Assembling Cabinets 2-9
2.5 Position the Cabinets
From left to right as viewed from the front, the cabinets are positioned battery, expander, system for the 3-cabinet system, and battery, expander, system, expander, battery for the 5-cabinet system.
Figure 2-4
Battery
Cabinet
Cabinet Positioning for 3-Cabinet System
Expander
Cabinet
System
Cabinet
BXB-0047-92
2-10 Unpacking and Assembling Cabinets
Figure 2-5
Battery
Cabinet
Cabinet Positioning for 5-Cabinet System
Expander
Cabinet
System
Cabinet
Expander
Cabinet
Battery
Cabinet
BXB-0031-92
Position the cabinets as illustrated in Figure 2-4 for the 3-cabinet system
and as illustrated in Figure 2-5 for the 5-cabinet system. The battery cabinet with the logo is always the leftmost cabinet as viewed from the front.
For more information:
Site Preparation Guide
Unpacking and Assembling Cabinets 2-11
2.6 Remove Cabinet Top Covers
Remove the top covers of all cabinets.
Figure 2-6
Cabinet Top Cover Removal (System and Expander
Cabinets)
Rear
BXB-0340-92
2-12 Unpacking and Assembling Cabinets
1.
Open the back door of a system or expander cabinet and locate a tab
on the middle of the back underside of the top cover (see Figure 2-6).
There is a screw in this tab which secures the top cover to the cabinet
body. Remove the screw with a Phillips screwdriver.
2.
Lift off the cabinet top cover and place it aside for now.
3.
Repeat 1 and 2 for the top covers of all system and expander cabinets.
4.
The battery cabinet top cover is not secured with a screw and is removed by simply lifting it off. Remove the top covers of all battery
cabinets in the system and place aside for now.
Unpacking and Assembling Cabinets 2-13
2.7 Remove Front and Rear Doors
Remove the front and rear doors of all cabinets by locating and depressing the cabinet door spring bolts.
Figure 2-7
Door Removal
BXB-0339-92
2-14 Unpacking and Assembling Cabinets
1.
To remove a door, open it and locate the spring bolt at the top inside
corner of the door (Figure 2-7).
2.
Depress the spring bolt and the door can be easily tilted away and
lifted from the cabinet.
3.
Repeat 1 and 2 for all doors in the system.
Unpacking and Assembling Cabinets 2-15
2.8 Install Side Spacers
Install one side spacer in the front and one side spacer in the back
of all adjoining cabinets.
Figure 2-8
Installing Side Spacers
3
3
BXB-0336A-92
2-16 Unpacking and Assembling Cabinets
1.
Locate two side spacers in the installation kit. Side spacers are long
aluminum brackets that are installed vertically between adjoining
cabinets.
2.
As shown in Figure 2-8, align the holes in the side spacer tabs with
the threaded inserts on a cabinet. For cosmetic purposes, make sure
the finished side of the spacer faces the outside of the cabinet.
3.
Use two Phillips head screws from the installation kit to attach a
spacer to a cabinet. Install one spacer in the front of the cabinet and
one spacer in the rear of the cabinet (see Figure 2-8).
4.
Repeat 1 through 3 for each pair of adjoining cabinets.
Unpacking and Assembling Cabinets 2-17
2.9 Level All Cabinets
Level the cabinets by adjusting the rubber feet on all the cabinets
and checking the cabinets with a bubble level. All holes intended
for intercabinet bolts must be aligned.
Figure 2-9
Leveler Foot Adjustment
Locknut
Leveler
Hexnut
Leveler
Foot
2-18 Unpacking and Assembling Cabinets
BXB-0013-92
Do the following for all cabinets in the system:
1.
Use an adjustable wrench to lower and adjust the leveler feet of a cabinet. A shipping bracket can also be used to adjust the leveler feet,
since the bracket cutout and leveler feet hexnuts are the same size. In
order for the cabinet skirts to be installed properly later, the leveler
feet must now be lowered sufficiently for the cabinet wheels to be off
the floor.
2.
Use a bubble level while adjusting the feet and make sure cabinets are
properly leveled in three dimensions (top to bottom, side to side, and
front to rear). The operation is complete when all intercabinet bolt
holes are aligned. Bolt holes are located at the tops of the cabinets
and at the bottom door hinges of the cabinets.
Unpacking and Assembling Cabinets 2-19
2.10 Install Top Spacers
Insert top spacers between adjoining cabinets and bolt the tops of
the cabinets together.
Figure 2-10 Installing Top Spacers
1
3
BXB-0337A-92
2-20 Unpacking and Assembling Cabinets
1.
Locate a top spacer in the installation kit. A top spacer is a short aluminum bracket that is installed horizontally between the tops of adjoining cabinets (see Figure 2-10).
2.
Align the two sets of holes in the top spacer with the two sets of holes
in the tops of the frames of two adjoining cabinets.
3.
Insert two 80 mm (3.15 in) long bolts from the installation kit (one bolt
per set of holes), position accompanying washers properly, attach accompanying nuts, and tighten.
4.
Repeat 1 through 3 for each pair of adjoining cabinets.
Unpacking and Assembling Cabinets 2-21
2.11 Install Bottom Spacers
Insert bottom spacers between adjoining cabinets and and bolt the
bottoms of the cabinets together through the front and back bottom door hinge brackets.
Figure 2-11 Installing Bottom Spacers
BXB-0338B-92
2-22 Unpacking and Assembling Cabinets
1.
Locate two bottom spacers in the installation kit. Bottom spacers are
small aluminum cylinders that are bolted between the two lower door
hinges in the front and back of adjoining cabinets. In the kit, a bottom
spacer is part of an assembly that includes the spacer, a 40 mm (1.6
in) long bolt, an accompanying nut, and washers.
2.
Disassemble a bottom spacer assembly and insert the bolt through
the holes in the lower door hinges in the front of the adjoining cabinets, making sure the bottom spacer and washers are positioned properly as you insert the bolt (see Figure 2-11).
3.
Install nut and tighten.
4.
Repeat 1 through 3 for the bottom spacer in the rear of the adjoining
cabinets.
5.
Repeat 1 through 4 for each pair of adjoining cabinets.
Unpacking and Assembling Cabinets 2-23
2.12 Assemble and Install Side Skirts
Assemble and install side skirts for the cabinet assembly.
Figure 2-12 Side Skirt Assembly and Installation
1
2
BXB-0330A-92
2-24 Unpacking and Assembling Cabinets
1.
Assemble a side skirt by attaching a side skirt "upper" to a side skirt
"main" with four self-tapping screws (all assembly components are
contained in the installation kit) as shown in Figure 2-12.
2.
Attach the side skirt to the outside base of the side of the cabinet assembly (see Figure 2-12). This is done by aligning the two 1/4 turn
Phillips fasteners in the skirt with the matching holes in the cabinet
base. Then simply push the fasteners into the holes. Do not try to
screw them in.
3.
Repeat 1 and 2 for the other side of the cabinet assembly.
Unpacking and Assembling Cabinets 2-25
2.13 Assemble and Install Front Skirts
Assemble and install front skirts for all cabinets in the cabinet assembly.
Figure 2-13 Front Skirt Assembly and Installation
2
1
2-26 Unpacking and Assembling Cabinets
BXB-0331A-92
1.
Assemble a front skirt by inserting a left-hand endcap and a righthand endcap into either end of a front center skirt piece (all assembly
components are contained in the installation kit) as shown in Figure
2-13.
2.
Attach the front skirt to the outside base of the front of a cabinet by
aligning the two 1/4 turn Phillips fasteners in the skirt assembly with
the matching holes in the cabinet base (see Figure 2-13). Then simply
push the fasteners into the holes.
3.
Repeat 1 and 2 for the fronts of all cabinets in the cabinet assembly.
Unpacking and Assembling Cabinets 2-27
2.14 Install End Panels
If necessary, install the end panels and brackets onto both ends of
the cabinet assembly.
Figure 2-14 End Panel Installation
2
2
2
BXB-0328D-92
2-28 Unpacking and Assembling Cabinets
1.
Locate a set of three end panel mounting brackets, and associated
Phillips head screws from the installation kit. Each bracket set consists of one wide and two narrow brackets.
2.
Attach the three brackets to a cabinet frame as shown in Figure 2-14.
Mount the wide bracket at the top, and the other two at the middle
and bottom of the frame. Each bracket has a "lower lip" which should
be facing upward to properly engage the end panel in the steps that
follow. Align the holes in each bracket with the corresponding
threaded inserts in the frame. Then attach each bracket to the frame
with two Phillips head screws as illustrated in Figure 2-14.
3.
Locate an end panel and its two associated 40 mm (1.6 in) long bolts
and washers from the installation kit. For 3-cabinet systems, note
that the battery cabinet end panel is different from the system cabinet
end panel.
4.
Position the end panel so that it is centered with respect to the front
and back of the cabinet assembly.
5.
Lift the end panel, push in, and lower it while doing the following
three things simultaneously:
a. Engage the tabs of the top bracket with the corresponding holes in
the end panel;
b. Engage the lip of the middle bracket with the corresponding groove
in the end panel; and
c. Engage the lip of the lower bracket with the corresponding groove
in the end panel. When properly installed, the end panel should be
tight and flush against the cabinet frame.
6.
Insert the two bolts with washers from the inside of the frame through
the holes in the cabinet frame and into the matching threaded inserts
in the end panel. You may need to tap on the ends of the panel to
align the holes.
7.
Carefully tighten the bolts with a 10 mm hex wrench, preferably a
torque wrench. Recommended maximum torque is 20 in-lbs. Do not
overtighten the bolts or bumps on the end panel exterior will appear.
8.
Repeat 1 through 7 for the other side of the cabinet assembly.
Unpacking and Assembling Cabinets 2-29
2.15 Identify and Route Battery Cables
Take heed of warnings and cautions associated with the batteries.
Identify and route cables from battery cabinet(s) to expander cabinet(s) for all battery cabinets in the system.
Figure 2-15 Battery Cable Routing
Battery
Cabinet
Expander
Cabinet
System
Cabinet
Expander
Cabinet
Rear
Battery
Cabinet
BXB-0354-92
= 3-Cabinet VAX 10000
WARNING:
Batteries present a risk of electrical shock and high short circuit current. Remove watches, rings, necklaces, jewelry and
any other other conductive items which might accidently short
circuit a battery. Use gloves and tools with insulated handles
such as those in the power safety tool kit (22-00518-02).
WARNING:
Batteries are sealed and gas or liquid emission is unlikely. If
batteries should rupture, however, leaking electrolyte may be
exposed and if the rupture is due to operational failure, highly
dangerous and corrosive mist or fumes may also be expelled.
If electrolyte is exposed because of battery case damage, remove all power from the local area, mask or insulate the terminals of the undamaged batteries, remove the damaged battery or batteries, and clean the immediate area. If, however,
there is any possibility of mist or fumes having been expelled,
evacuate all personnel immediately, shut down the power to
2-30 Unpacking and Assembling Cabinets
the site, and disable all air circulation equipment. If appropriate, quarantine the site and start an environmental disaster recovery process. Avoid touching anything without proper
protective clothing. If electrolyte contacts the skin, WASH IT
OFF IMMEDIATELY and use the appropriate Customer Service Process for followup medical treatment. If electrolyte contacts the eyes, FLUSH IMMEDIATELY AND THROUGHLY
WITH WATER FOR 15 MINUTES and follow the recommended Digital Health and Safety Group procedure.
CAUTION:
Before starting, make sure that the battery cable connectors in the battery cabinets (see Figure 2-17 for locations)
are all disconnected. Also disconnect all power regulators
in the expander cabinet(s) by backing them out of their
slots approximately 1 to 2 inches. Failure to follow these precautionary steps may lead to damage of the regulators and/or
fuses. Do not reinstall regulators until battery cables and fuses
have all been installed. Do not defeat the operation of the stop
tabs on the regulators.
The battery cables are tie-wrapped together in a coil at the bottom of a battery cabinet. There are six large diameter battery power cables (three orange
and three blue) terminated with metal ring terminals and one group of
smaller diameter battery sense cables terminated with a square 9-pin connector.
The six large diameter battery power cables are grouped as three pairs of orange (+) and blue (–) connections. Each pair is to be connected to a corresponding power regulator in the expander cabinet. The end of each pair has a
color coded label attached to it as shown in Table 2-2. The label text indicates
to which regulator the pair must be connected (A, B, or C).
Table 2-2
Battery Cable Labeling
Label Text
Label Color
A
Green
B
Blue
C
White
Route the cables from a battery cabinet to the DC distribution box in an expander cabinet as illustrated in Figure 2-15.
Unpacking and Assembling Cabinets 2-31
2.16 Connect Battery Cables
Connect the battery power cables to the terminals of the battery
cable terminal block and connect the battery sense cable.
Figure 2-16 Battery Cable Connections
Battery Cable Terminal Block (Cover Off)
Battery Sense Connector
Expander
Cabinet
Rear
Battery
48 V +
_
A
+
_B
+
_C
DC Distribution Box
BXB-0355-92
2-32 Unpacking and Assembling Cabinets
1.
Locate the DC power distribution box in the rear of an expander cabinet (see Figure 2-16). Remove the plastic cover of the battery cable
terminal block by unscrewing two nuts.
2.
Observe the labeling of the battery cable terminal block. Connect the
+ and – leads of the cable pair labeled "A" (green label) to the top two
terminals labeled + and – (see Figure 2-16). Use a 13 mm socket
wrench or nut driver to tighten each connection (a maximum of 10 inlbs is recommended).
3.
Connect the cable pairs labeled "B" to the center two terminals labeled
+ and – (see Figure 2-16).
4.
Connect the cable pairs labeled "C" to the bottom two terminals labeled + and – (see Figure 2-16).
5.
Replace the cover of the battery cable terminal block and secure it by
screwing in the two nuts you removed in step 1. The cover has a cutout in its left side through which the six battery power cables pass.
6.
Plug the male 9-pin connector of the battery sense cable into the female 9-pin connector near the battery cable terminal block (see Figure
2-16).
Unpacking and Assembling Cabinets 2-33
2.17 Install Battery Cable Connectors
Install battery cable connectors in all battery cabinets. These connectors are shipped disconnected from the factory.
Figure 2-17 Battery Cable Connector Locations
Battery
Cable
Connectors
Battery
Cabinet
Front
Battery
Cabinet
Rear
BXB-0353A-92
2-34 Unpacking and Assembling Cabinets
Install battery cable connectors as follows:
1.
Remove all battery PIU covers in all battery cabinets. This is done by
using a low-profile rachet Phillips screwdriver to unscrew two 1/4 turn
fasteners at the top of a battery PIU cover. When the two 1/4 turn fasteners pop up, tilt away and remove the battery PIU cover.
2.
Locate and connect all battery cable connectors. Their locations are as
shown in Figure 2-17. Each battery cabinet has four battery cable
connectors accessible from the front and two from the back.
3.
Replace all battery PIU covers.
4.
From the front of the expander cabinet(s), reinstall all power regulators by pushing them in until the stop tab on top of a power regulator
is reached. Wait 30 seconds, lift the stop tab, and push the regulator
in all the way. Tighten the two Phillips head screws on the regulator
to complete the installation.
Unpacking and Assembling Cabinets 2-35
2.18 Connect the Power Control Cable
Connect the power control cable from the control panel on the system cabinet to the cabinet control logic (CCL) module in the expander cabinet.
Figure 2-18 Power Control Cable
Left Expander
Front
System
Right Expander
Console
Rear
Expander
BXB-0044E-92
2-36 Unpacking and Assembling Cabinets
WARNING:
Before beginning this procedure, ensure that the system is
powered off.
1.
Plug one end of the power control cable into the jack marked Left Expander located on the top right of the system cabinet as viewed from
the front. If a second expander cabinet is installed, plug another
power control cable into the jack marked Right Expander.
2.
Route each power control cable through a cable routing channel to the
rear of the system cabinet and into the top of the expander cabinet(s)
as illustrated in Figure 2-19.
3.
Remove the CCL module access plate on each expander cabinet. The
access plate is located in the upper top left (as viewed from the rear)
of the expander cabinet. Remove the plate by removing three screws.
4.
Plug the other end of each power control cable into jack J2 located on
the upper right of the CCL module.
5.
Replace each CCL module access plate by replacing the three screws.
Figure 2-19 Power Control Cable Routing
System
Cabinet
Front
System
Cabinet
Rear
Expander
Cabinet
Rear
BXB-0021E-92
Unpacking and Assembling Cabinets 2-37
2.19 Reinstall Cabinet Tops and Doors
Replace the tops and doors of all cabinets.
Figure 2-20 Cabinet Tops and Doors
BXB-0341A-92
2-38 Unpacking and Assembling Cabinets
1.
Locate all front and rear doors you removed in Section 2.7.
2.
To replace a door, first position the door so that the pin in the bottom
hinge is inserted into the corresponding hole at the bottom of the door.
3.
Lift and position the door while depressing the spring bolt until the
bolt lines up with the hole in the top hinge.
4.
Release the spring bolt to insert it into the top hinge.
5.
Repeat 2 through 4 for all doors in the system.
6.
Locate all cabinet tops and associated screws you removed in Section
2.6.
7.
Replace a cabinet top by placing it on top of a cabinet so that the tab
faces the rear of the cabinet; then press down.
8.
For system and expander cabinets, use the screw previously removed
from a top to reattach the top to a cabinet frame.
9.
Repeat 6 and 7 for all cabinet tops in the system. See Figure 2-20.
Unpacking and Assembling Cabinets 2-39
2.20 Connect the I/O Cable(s)
Connect the I/O cable(s) between the system and expander cabinets.
Figure 2-21 I/O Cable Connections
Rear
Expander
Rear
System
BXB-0032G-92
2-40 Unpacking and Assembling Cabinets
1.
Open the rear doors of the system and expander cabinets.
2.
Using a flathead screwdriver, install the unlabeled end of the I/O cable (DEC P/N 17-03085-02) to the topmost open IOP connector on the
rear of the LSB card cage in the system cabinet (as shown in Figure
2-21). Tighten the two thumbscrews to hold the I/O cable in place.
3.
Bend the I/O cable 90° downward.
4.
Route the I/O cable through the cable trough in the center of the
blower to the expander cabinet as shown in Figure 2-21.
5.
Using a flathead screwdriver, install the end of the I/O cable labeled
PIU to the XMI PIU bulkhead connector (located in lower PIU quadrant). Tighten the two thumbscrews to hold the I/O cable in place.
6.
Repeat 2 through 5 for all I/O cables in the system.
Unpacking and Assembling Cabinets 2-41
2.21 Connect the DSSI Cables
Connect the DSSI cable between the I/O bulkhead and the
Connect the disk brick cables and terminators. The configuration shown here is only one of many
possible configurations; the I/O bulkhead shown is in the
bottom rear of the expander cabinet and the disk bricks
are in the upper front of the expander cabinet. The installation guidelines here, however, are generally applicable.
VAX disk bricks.
10000
Figure 2-22 DSSI Cable Connection
Rear
Expander
Front
Expander
BXB-0032H-92
2-42 Unpacking and Assembling Cabinets
1.
Attach one end of the DSSI cable (BC21Q-06 or BC21Q-09) to the XMI
PIU bulkhead connector in the rear of the expander cabinet (see Figure 2-22). If necessary, install a terminator plug to properly terminate
this end of the DSSI cable.
2.
Route the DSSI cable through the upper cable trough on the right rear
of the exapnder cabinet to the front of the expander cabinet. Now
route the DSSI cable to the topmost disk brick.
3.
Attach the end of the DSSI cable to the connector on the left of the
disk brick in the top of the disk PIU. If only one disk brick is present,
attach a terminator plug to the other connector (see Figure 2-23).
4.
If two or more disk bricks are present, use short jumper cables
(BC21Q-01) to daisy-chain the disk bricks (see Figure 2-23) on a single
channel. Install the jumpers and terminator as shown in Figure 2-23.
Figure 2-23 Cabling and Terminating Disk Bricks
One Brick
Single Channel
Two Bricks
Single Channel
Three Bricks
Single Channel
Terminator
DSSI Cable
Jumper
BXB-0342-92
For more information:
RF Series Integrated Storage Element User Guide
Unpacking and Assembling Cabinets 2-43
Chapter 3
Making Console, Ethernet, and FDDI
Connections
This chapter describes how to connect the console terminal and how to
make Ethernet and FDDI connections. It consists of the following sections:
•
Connect the Console Terminal
•
Connect the Ethernet Cable
•
Connect the FDDI Cable
Making Console, Ethernet, and FDDI Connections 3-1
3.1 Connect the Console Terminal
Figure 3-1 shows a system with a console terminal. Connect the
console terminal to the console terminal port in the system cabinet
as shown in Figure 3-2.
Figure 3-1
3-Cabinet System, Console Terminal, and Printer
LA75 Companion Printer
d i g i t a l
BXB-0341B-92
CAUTION: The system cabinet, console terminal, and printer should all
use the same power distribution source to ensure a common
ground.
3-2 Making Console, Ethernet, and FDDI Connections
1.
Unpack the VT420 console terminal. The console terminal signal cable
is shipped in the loose piece box and consists of a 17-01364-02 cable
and H8575-A adapter.
2.
Connect one end of the 17-01364-02 cable to the connector to the right
of the control panel. Connect one end of the cable ground wire to the
cabinet grounding screw nearby (see Figure 3-2). Connect the other
end of the cable to the H8575-A, which connects to a 25-pin Dsubminiature connector on the console terminal. Connect the other
end of the cable ground wire to one of the screws on the H8575-A.
3.
If an LA75 printer is not present, skip this step. Unpack the LA75
printer. Connect the BC16E-25 signal cable to the printer and to the
console terminal. Plug in the printer.
4.
The following are the default terminal characteristics. If the terminal
does not have these characteristics, they must be set accordingly:
•
Baud rate = 9600 (transmit = receive)
•
8 bits, no parity
•
1 Stop Bit
•
Xoff at 64
Figure 3-2
Control Panel and Console Terminal Port
Disable
Secure
Enable
Front
Left Expander
Restart
Key On
Right Expander
Run
Fault
Console
BXB-0015C-92
For more information:
Installing and Using the VT420 Video Terminal
LA75 Companion Printer Installation and User
Guide
Making Console, Ethernet, and FDDI Connections 3-3
3.2 Connect the Ethernet Cable
If the system includes an Ethernet port, connect the Ethernet cable to the I/O bulkhead panel and to the Ethernet transceiver.
Figure 3-3
I/O Panel–Ethernet Port
I/O Bulkhead
Ethernet
Port
Rear
Expander
BXB-0063A-92
3-4 Making Console, Ethernet, and FDDI Connections
The DEC LANcontroller 400 (DEMNA) adapter connects to the Ethernet
via a BN3x or BN4x transceiver cable.
1.
Remove the rear panel shield and connect the transceiver cable (E0BNE3H-05) to the Ethernet port on the I/O bulkhead panel (see Figure 3-3).
2.
Connect the other end of the cable to an Ethernet transceiver. See the
appropriate Ethernet transceiver manual for more information.
For more information:
DEC LANcontroller 400 Installation Guide
Making Console, Ethernet, and FDDI Connections 3-5
3.3 Connect the FDDI Cable
If the system includes an FDDI port, connect the FDDI cable to the
I/O bulkhead panel and to the FDDI transceiver.
Figure 3-4
I/O Panel–FDDI Port
I/O Bulkhead
FDDI
Port
Rear
Expander
BXB-0311A-92
3-6 Making Console, Ethernet, and FDDI Connections
The XMI-to-FDDI controller (DEMFA) adapter connects to the FDDI ring
via a BN24B-10 fiber optic cable.
1.
Remove the rear panel shield and connect the transceiver cable to the
FDDI port on the I/O bulkhead panel (see Figure 3-4).
2.
Connect the other end of the cable to the FDDI network. See the appropriate FDDI manual for details on how this is acomplished.
For more information:
DEC FDDIcontroller 400 Installation/Problem Solving
Making Console, Ethernet, and FDDI Connections 3-7
Chapter 4
Connecting to a DSSI Subsystem
This chapter provides installation procedures for installing
VAX TF tape and RF disk drives (known as integrated storage
10000
elements or ISEs) with the Digital Storage System Interconnect (DSSI) bus supported by the KFMSA-BA adapter.
General information on DSSI topics is provided in Appendix A and Appendix B.
Sections in this chapter include:
•
DSSI Installation Overview
•
Single-Host Systems
•
KFMSA-BA Adapter
•
Cables
•
Install DSSI Cables to ISEs
•
Set Node IDs
Connecting to a DSSI Subsystem 4-1
4.1 DSSI Installation Overview
This chapter provides guidelines for installation. Please refer to
the manuals listed in Table 4-1 for complete installation instructions. The main steps in installation include cabling, terminating
the DSSI bus, setting node IDs for the bus, and changing parameters on the ISEs as required (see Table 4-2).
Table 4-1
DSSI and Related Documentation
Title
Description
DSSI VAXcluster Installation and Troubleshooting
Manual (EK-410AA-MG)
Multi-host mixed DSSI VMScluster
systems. Includes configuration rules,
supported ISEs, and detailed installation instructions.
KFMSA Module Installation
and User Manual
(EK-KFMSA-IM)
For installing KFMSA-BA adapters
into existing systems. Describes setting termination and node IDs for the
adapters.
KFMSA Module Service
Guide (EK-KFMSA-SV)
Troubleshooting and module diagnostics for the KFMSA-BA adapter.
TF85 Cartridge Tape Subsystem Owner’s Manual
(EK-OTF85-OM)
Operating and user instructions for
the TF85 tape drive.
TF85B Tape Subsystem
Overview (EK-TF85B-OV)
Overview of the TF85 tape subsystem
including configuration rules, booting,
and field-replaceable units.
DEC 7000 AXP System VAX
7000 Console Reference Manual (EK-70C0B-TM)
Discusses the cdp and set host –dup
commands for configuring DSSI subsystems and running resident DUP
diagnostics.
4-2 Connecting to a DSSI Subsystem
Table 4-2
DSSI Installation
Location
Single-Host Configuration
DSSI VMScluster
Cable Installation
ISE in VAX
10000
No change. All cables are
factory installed.
Attach cables from disk
PIU to additional host
systems.
Bus Termination
System and
expander
cabinet
Install termination on each unused connector as necessary.
Node ID Settings
KFMSA-BA
No change. Leave at factory
setting of node ID 7.
Set second host node ID
to 6, a third host to 5,
and a fourth host to 4.
ISEs
No change. Should be set correctly at factory. Tapes
are set to node ID 0; through-bus configuration node
IDs are 1 to 4; split-bus configuration node IDs are 5
and 6.
ISE Parameter Changes
See KFMSA Module Installation and User Manual for
directions on changing parameters.
ISEs
Adding Hosts to Existing DSSI Subsystems
New and
original hosts
Reconfigure DSSI storage bus, setting node IDs, termination, and possibly changing split-bus.
For more information:
Appendix A and Appendix B of this manual
KFMSA Module Installation and User Manual
Connecting to a DSSI Subsystem 4-3
4.2 Single-Host Systems
A single-host configuration consists of a VAX 10000 system connected to ISEs on the DSSI bus. The ISEs can be in the system
cabinet or in expander cabinets.
Figure 4-1
Single-Host System
ISE
0
ISE
1
ISE
2
ISE
3
ISE
4
ISE
5
ISE
6
ISE
4
ISE
5
ISE
6
XMI
7
DSSI Bus 1
KFMSA
DSSI Bus 2
7
ISE
0
ISE
1
ISE
2
ISE
3
BXB-0072A-92
4-4 Connecting to a DSSI Subsystem
A VAX 10000 system can have a maximum of 84 RF drives and a TF tape
drive in the system cabinet and expander cabinets. The system cabinet can
hold up to 12 RF drives and each expander cabinet can contain 36 RF
drives. Up to 12 KFMSA-BA adapter modules are supported on the system.
On single-host systems, disk PIUs in expander cabinets are cabled as
through-bus.
For more information:
KFMSA Module Installation and User Manual
KFMSA Module Service Guide
Connecting to a DSSI Subsystem 4-5
4.3 KFMSA-BA Adapter
VAX 10000 systems support DSSI using the KFMSA-BA adapter installed in the XMI card cage. Each KFMSA-BA supports or has two
DSSI buses. The KFMSA-BA has diagnostic LEDs and reports
status to the system self-test display.
Figure 4-2
KFMSA-BA LEDs
Yellow
Self-Test LED
DSSI
Fault LEDs,
Port 1
DSSI
Fault LEDs,
Port 2
BXB-0071A-92
4-6 Connecting to a DSSI Subsystem
The KFMSA-BA runs a self-test during power-up, and the console displays
results on the system self-test display. The yellow LED on the KFMSA-BA
lights to indicate that self-test passed.
If a KFMSA-BA fails self-test, check the diagnostic LEDs on the module.
Two sets of four red LEDs report status for each of the logical ports associated with the two physical buses.
Of the eight nodes configured between any two terminators on KFMSA-BA
adapters, one to three nodes can be KFMSA-BA adapters. The remaining
nodes can be RF disk or TF tape integrated storage elements (ISEs).
For more information:
KFMSA Module Installation and User Manual
KFMSA Module Service Guide
Connecting to a DSSI Subsystem 4-7
4.4 Cables
Each KFMSA module has two separate DSSI buses (ports) cabled
from the XMI backplane. The cable from XMI backplane section D
(upper section) is designated as bus 1, and the cable from section E
is bus 2. These cables connect to the XMI PIU bulkhead at a DSSI
connector.
Figure 4-3
I/O Ports for DSSI Cables
I/O Panel
2
1
0
2
3 4 5
6
7
Off
2
1
0
2
1
3 4 5
6
7
Off
1
BXB-0073C-92
NOTE: For standalone systems with DSSI PIUs, node ID settings are factory set to 7 and require no change. For multi-hosts, reset node ID
settings as required.
4-8 Connecting to a DSSI Subsystem
The DSSI buses are configured physically by the cable. Check your cables
before beginning installation. If you need additional cables, see Table 4-3.
The overall physical bus length is limited to 24 m (80 ft). Therefore, systems and devices on the DSSI bus must reside close to each other. One external DSSI cable is required for each bus connection between systems;
two cables are required to connect two systems and an expander cabinet.
Removable terminators must be properly installed. See the DSSI VAXcluster Installation and Troubleshooting Manual and the KFMSA Module
Installation and User Manual for specific instructions on where and how to
install the terminator(s).
Table 4-3
DSSI Cable Kits
P/N
Qty—Length
Function
CK-SF200-LM
1 108 in (2.7 m)
1 70 in (1.8 m)
For VAX to SF connections. Contains two cables (BC21Q-09 and
BC21R-5L). One kit is required
for each DSSI bus used (maximum of two kits per KFMSA).
CK-KFMSA-LJ
2 48 in (1.2 m)
Internal cable set, connecting
XMI backplane at KFMSA
adapter to XMI I/O bulkhead on
the VAX 6000 system. Used
when the VAX 6000 is the end
node of a DSSI subsystem.
CK-KFMSA-LN
2 48 in (1.2 m)
Internal cable set, connecting
XMI backplane at KFMSA
adapter to XMI I/O bulkhead on
VAX 7000/10000 systems. Used
when the VAX 7000/10000 is not
an end node of a DSSI subsystem.
For more information:
DSSI VAXcluster Installation and Troubleshooting
Manual
KFMSA Module Installation and User Manual
Connecting to a DSSI Subsystem 4-9
4.5 Install DSSI Cables to ISEs
Each KFMSA-BA module has two separate DSSI buses (ports). Attach ISEs to the DSSI bus by cabling them to the XMI I/O bulkhead
at the appropriate DSSI connector. Record bus and node ID on
configuration sheets. See Figure 4-4.
Figure 4-4
DSSI Cable Installation
KFMSA Node ID Select Knob
2
1
0
2
3 4 5
6
7
Off
2
1
0
2
1
3 4 5
6
7
Off
1
BXB-0073A-92
4-10 Connecting to a DSSI Subsystem
1.
XMI Node Number
Locate the XMI slot of the KFMSA-BA by looking in the XMI card
cage. The XMI node number and physical slot number are the same.
2.
DSSI Bus Number
Each KFMSA-BA module has two separate DSSI buses (ports) cabled
from XMI backplane sections D and E. The cable from section D (upper section) is designated as bus 1, and the cable from section E is bus
2. Each bus presents a discrete set of registers to the host. Note that
for communication to occur, the host software must identify which
DSSI bus is attached to which ISE. Use the color-coded labels (from
the KFMSA Module Installation and User Manual) at each connector
end of a cable to make maintenance easier. Record the label colors on
the configuration sheet, also found in the manual.
When attaching the cables to a disk PIU:
1.
Open the cabinet door.
2.
For each populated bus, install one external cable to one of the
KFMSA-BA disk controller ports. Tighten the two screws that secure
each cable to the XMI I/O bulkhead.
3.
If the system has more than one KFMSA-BA adapter, install additional DSSI cables to the XMI I/O bulkhead, as above.
4.
Install terminators where needed.
For more information:
KFMSA Module Installation and User Manual
Connecting to a DSSI Subsystem 4-11
4.6 Set Node IDs
Node IDs are factory set and usually do not require changing. If
required, set the KFMSA-BA node ID on the XMI I/O bulkhead. Set
the DSSI node IDs for the ISEs using the switches on the disk PIU.
Record the IDs on the configuration sheet.
Figure 4-5
2
1
0
Setting the KFMSA-BA Node ID on the I/O Panel
3 4 5
6
7
Off
KFMSA Node ID Select Knob
2
0
2
3 4 5
6
7
Off
2
1
0
2
1
3 4 5
6
7
Off
1
BXB-0073B-92
4-12 Connecting to a DSSI Subsystem
The node IDs for KFMSA-BA modules are factory set with both ports having the node ID of 7. KFMSA-BA node IDs for single-host systems do not
have to be changed. For a dual-host system, the second host system’s
KFMSA-BA node ID must be set to 6. On a tri-host system, the third host
system’s KFMSA-BA node ID must be set to 5. On a quad-host system, the
fourth host system’s KFMSA-BA node ID must be set to 4.
If the second and third hosts have multi-host I/O panels (as shown in Figure 4-5), use the KFMSA-BA select knob to change the KFMSA-BA node
ID.
If required, set the DSSI node IDs for the ISEs using the switches on the
disk PIU.
NOTE: The new ISE node IDs are not in effect until each device is turned
off, then on (power-cycled). After power-cycling, the node IDs have
been changed at the ISE level.
In addition to the physical space requirements, the ISEs and operating
system generate additional parameters to communicate with the host: system ID, node name, MSCP/TMSCP unit numbers, allocation class, and
force name.
For more information:
KFMSA Module Installation and User Manual
Connecting to a DSSI Subsystem 4-13
Chapter 5
Connecting to a CI VMScluster
VAX 10000 systems interface with various devices and sysVAX tems through XMI bus adapters. The CIXCD adapter con10000
nects the VAX 10000 system through the XMI bus to a
VMScluster. If your system connects to a DSSI subsystem,
this installation must be done before the CI connections
(see Chapter 4).
Sections in this chapter include:
•
CIXCD Installation Configuration Rules
•
Setting CIXCD Parameters
— Setting the VMScluster Node Address (Mandatory)
— Verifying Quiet Slot DELTA Time = 10 (Mandatory)
— Setting Boot Time (Optional)
— Setting Extend Header, Extend ACK Timeout, and Disable
Arbitration (Optional)
— Setting Cluster Size (Optional)
•
Cabling the System to a Star Coupler
Connecting to a CI VMScluster 5-1
5.1 CIXCD Installation Configuration Rules
Follow these rules to install a CIXCD adapter for the HSC, adapters on other CI nodes, and the CIXCD itself. The key parameter to
be set is the Quiet Slot DELTA Time; you must use jumpers or
switches to set this parameter to 10, rather than accepting the default value of 7.
Figure 5-1
CIXCD Jumper to Set Quiet Slot DELTA Time
1 2
D
E
SLOT
1
2
3
4
5
31
01
32
02
33
03
34
04
35
05
6
XMI
36
06
37
07
38
08
39
09
40
10
41
11
42
12
43
13
44
14
45
15
W28
W29
W30
Change
Quiet Slot DELTA
Time
SECTION E
BXB-0036-92
5-2 Connecting to a CI VMScluster
To install a system with a CIXCD adapter into an existing cluster, there
are mandatory steps. The first four steps apply to the VMScluster configuration.
1.
Ensure that the LINK module on the HSC has a Quiet Slot DELTA
Time of 10. If it does not, you must change it to 10 using a switch,
wire, or board replacement and switch, depending on the model of the
HSC. Check the HSC Installation Manual for details.
2.
Set the Quiet Slot DELTA Time to 10 on all nodes installed on the
cluster. Every CI node must have Quiet Slot DELTA Time set to 10.
3.
Check that the VMS version running on all nodes is compatible with
the new version of VMS being installed. This is done by checking the
VMS versions against the Software Product Description or the required VMS version for your system.
4.
Check the HSC microcode and LINK module against required versions in the Cluster Revision Matrix. Update the required version
level as needed.
5.
Set the Quiet Slot DELTA time on the CIXCD to 10. Install a jumper
between pins E15 and E45 on the XMI backplane’s CIXCD segment.
You cannot leave a default configuration. You must change the Quiet
Slot DELTA Time to 10. The default configuration for a system without
jumpers installed is:
•
CI Node Address = 0
•
Quiet Slot DELTA Time = 7 (must be set to 10)
•
Boot Time = 1500 seconds
•
Normal CI Arbitration
•
Normal Header systems in the cluster
•
Cluster Size = 16
•
Short ACK Timeout
CAUTION: Failure to follow these configuration rules may result in unreliable operation.
For more information:
HSC Installation Manual
Connecting to a CI VMScluster 5-3
5.2 Setting CIXCD Parameters
To set parameters for the CIXCD adapter to other than default values, you must install jumpers on the backplane. Note that these
jumpers are only placed in segments D2 and E2.
Figure 5-2
XMI Backplane Segments D and E
1 2
D
Rear
E
Slot
1
2
3
4
5
6
BXB-0038-92
5-4 Connecting to a CI VMScluster
Refer to Figure 5-2 to determine which jumper corresponds to which backplane pin. The XMI backplane contains 29 pins that may need jumpers on
the backplane in sections D and E. The corresponding jumpers are denoted
W1 through W30, with W9 being reserved.
The module functions that can be modified by jumper placement are the
following:
•
Set CI port address (mandatory)
•
Set Quiet Slot DELTA Time to 10 (mandatory)
•
Boot time
•
Disable arbitration
•
Extend header
•
Cluster size
•
Extend ACK timeout
The general procedure for installing jumpers is as follows:
1.
Open the rear cabinet door and the I/O bulkhead door. Use a flashlight for best visibility.
2.
Find the XMI backplane slot corresponding to the CIXCD module.
The internal cables are connected to the pins on the leftmost section of
the module as seen from the rear. The jumpers are installed on the
pins of the rightmost segment of the module.
3.
Install jumpers between backplane pins to set the desired module parameters.
4.
Close the I/O bulkhead door and the cabinet door.
For more information:
CIXCD Interface User Guide
Connecting to a CI VMScluster 5-5
5.2.1 Setting the VMScluster Node Address (Mandatory)
The CI port address is obtained from the CIXCD port adapter module’s backplane slot, with both the CI port address and its complement configured exactly the same. To configure the jumpers for
the port address, see Table 5-1 and Table 5-2.
Figure 5-3
Jumper Locations for CI Port Address
1 2
D
31
01
32
02
33
03
34
04
35
05
E
SLOT
1
2
3
4
XMI
5
6
36
06
37
07
38
08
W1
W2
W3
W4
W5
W6
W7
W8
Complement
CI Node
Address
31
01
32
02
39
09
33
03
40
10
34
04
41
11
35
05
42
12
36
06
43
13
37
07
44
14
38
08
45
15
39
09
40
10
41
11
42
12
Section D
43
13
44
14
45
15
W16
W17
W18
W19
W20
W21
W22
W23
True
CI Node
Address
Section E
BXB-0037-92
5-6 Connecting to a CI VMScluster
Table 5-1
CI Port True Address
CI Node
Addr (10)
W16
E1/31
W17
E2/32
W18
E3/33
W19
E4/34
W20
E5/35
W21
E6/36
W22
E7/37
W23
E8/38
0
OUT
OUT
OUT
OUT
OUT
OUT
OUT
OUT
1
OUT
OUT
OUT
OUT
OUT
OUT
OUT
IN
2
OUT
OUT
OUT
OUT
OUT
OUT
IN
OUT
IN
IN
OUT
IN
IN
IN
IN
IN
.
.
.
223
Table 5-2
CI Port Complement Address
CI Node
Addr (10)
W1
D1/31
W2
D2/32
W3
D3/33
W4
D4/34
W5
D5/35
W6
D6/36
W7
D7/37
W8
D8/38
0
OUT
OUT
OUT
OUT
OUT
OUT
OUT
OUT
1
OUT
OUT
OUT
OUT
OUT
OUT
OUT
IN
2
OUT
OUT
OUT
OUT
OUT
OUT
IN
OUT
IN
IN
OUT
IN
IN
IN
IN
IN
.
.
.
223
NOTE: CI node addresses 224–255 are reserved for Digital.
Connecting to a CI VMScluster 5-7
5.2.2 Verifying Quiet Slot DELTA Time = 10 (Mandatory)
The Quiet Slot DELTA Time must be set to 10. Check the backplane at segment E. Jumper these pins if they are not already
jumpered. These bits force the LINK module to increase the Quiet
Slot DELTA Time. See Table 5-3.
Figure 5-4
Set Quiet Slot DELTA Time Jumpers
1 2
D
E
SLOT
1
2
3
4
5
31
01
32
02
33
03
34
04
35
05
6
XMI
36
06
37
07
38
08
39
09
40
10
41
11
42
12
43
13
44
14
45
15
W28
W29
W30
Change
Quiet Slot DELTA
Time
SECTION E
BXB-0036-92
5-8 Connecting to a CI VMScluster
NOTE: The Quiet Slot DELTA Time must be set to 10 on all systems in a
cluster when any one system uses a CIXCD adapter.
For new systems just being installed, manufacturing should have
jumpered pins E45 and E15 (see Figure 5-4). Check the backplane at segment E. Jumper these pins if they are not already jumpered.
Table 5-3
Quiet Slot DELTA Time Backplane Jumpers
Quiet Slot
Count
W28
E13/43
W29
E14/44
W30
E15/45
7
OUT
OUT
OUT
10
OUT
OUT
IN
Reserved
OUT
IN
OUT
Reserved
OUT
IN
IN
Reserved
IN
OUT
OUT
Reserved
IN
OUT
IN
Reserved
IN
IN
OUT
Programmable
IN
IN
IN
Connecting to a CI VMScluster 5-9
5.2.3 Setting Boot Time (Optional)
Boot time is the length of time the port waits after power-up to
exit the UNINIT state. See Table 5-4. The default setting has all
jumpers set to out, with 1500 seconds as the boot time.
Figure 5-5
Jumper Locations for Boot Time
1 2
D
E
SLOT
1
2
3
4
5
31
01
32
02
33
03
34
04
35
05
6
XMI
36
06
37
07
38
08
39
09
40
10
41
11
42
12
43
13
44
14
45
15
W24
W25
W26
W27
Boot Time
Section E
BXB-0080-92
5-10 Connecting to a CI VMScluster
Table 5-4
Boot Time Backplane Jumpers
Time
(seconds)
W24
E9/39
W25
E10/40
W26
E11/41
W27
E12/42
1500
OUT
OUT
OUT
OUT
1400
OUT
OUT
OUT
IN
1300
OUT
OUT
IN
OUT
1200
OUT
OUT
IN
IN
1100
OUT
IN
OUT
OUT
1000
OUT
IN
OUT
IN
0900
OUT
IN
IN
OUT
0800
OUT
IN
IN
IN
0700
IN
OUT
OUT
OUT
0600
IN
OUT
OUT
IN
0500
IN
OUT
IN
OUT
0400
IN
OUT
IN
IN
0300
IN
IN
OUT
OUT
0200
IN
IN
OUT
IN
0100
IN
IN
IN
OUT
0000
IN
IN
IN
IN
For more information:
HSC Installation Manual
Connecting to a CI VMScluster 5-11
5.2.4 Setting Extend Header, Extend ACK Timeout, and
Disable Arbitration (Optional)
Each of these parameters is set by the absence or presence of a
single jumper. The specific jumpers are detailed in this module.
Figure 5-6
Jumper Pins for Extend Header, Extend ACK Timeout,
and Disable Arbitration
1 2
31
01
32
02
D
33
03
34
04
35
05
E
SLOT
1
2
3
4
5
6
XMI
36
06
37
07
38
08
39
09
40
10
41
11
42
12
43
13
44
14
45
15
Section D
5-12 Connecting to a CI VMScluster
W10 Disable ARB
W11 Extend Header
W12 Extend ACK TO
BXB-0079-92
Extend Header Selection
Jumper W11 (D11/41) controls the extend header bit, which when set, allows the LINK module to extend the number of bit-synchronous characters
in the header.
Jumper OUT
Jumper IN
=
=
Normal header (default)
Extended header
Extend ACK Timeout Selection
The extend ACK timeout bit forces the LINK module to increase the timeout period for an ACK return. The jumper representing this bit is W12
(D12/42).
Jumper OUT
Jumper IN
=
=
Short timeout (default)
Long timeout
Disable Arbitration Selection
The disable arbitration selection bit when set, defeats the normal arbitration sequence and allows the LINK module to transmit after waiting only
one basic Quiet Slot DELTA Time. The jumper that controls this bit is
W10 (D10/40).
Jumper OUT
Jumper IN
=
=
Normal CI arbitration (default)
Disable normal CI arbitration
For more information:
HSC Installation Manual
Connecting to a CI VMScluster 5-13
5.2.5 Setting Cluster Size (Optional)
The cluster size bits cause the arbitration logic to arbitrate for
more than 16 nodes (which is the default). See Table 5-5.
Figure 5-7
Cluster Size Jumpers
1 2
D
E
SLOT
1
2
3
4
5
6
XMI
31
01
32
02
33
03
34
04
35
05
36
06
37
07
38
08
39
09
40
10
41
11
42
12
43
13
44
14
45
15
W13
W14
W15
Cluster
Size
Section D
BXB-0081-92
5-14 Connecting to a CI VMScluster
Table 5-5
Cluster Size Backplane Jumpers
Node Count
(decimal)
W13
E13/43
W14
E14/44
W15
E15/45
16
OUT
OUT
OUT
32
OUT
OUT
IN
64
OUT
IN
OUT
128
OUT
IN
IN
224
IN
OUT
OUT
Reserved
IN
OUT
IN
Reserved
IN
IN
OUT
Reserved
IN
IN
IN
For more information:
HSC Installation Manual
Connecting to a CI VMScluster 5-15
5.3 Cabling the System to a Star Coupler
Attach two pairs of BNCIA cables to the XMI I/O panel for the
VMScluster connection. Figure 5-8 shows the connectors on the
VMScluster port.
Figure 5-8
VMScluster Port Connectors
Transmit
Connectors
Rear
XMI I/O Bulkhead
A
B
A
B
Receive
Connectors
5-16 Connecting to a CI VMScluster
BXB-0039A-92
At the rear of the cabinet:
1.
Open the door.
2.
Attach the cables to the VMScluster port by hand. Screw the TNC type
connectors into the receptacles and label the cables.
3.
Route the cables to the SC008.
BNCIA cables can be ordered in these lengths:
•
BNCIA-10 10 m (32 ft)
•
BNCIA-20 20 m (65 ft)
•
BNCIA-45 45 m (145 ft)
For more information:
SC008 Star Coupler User’s Guide
Connecting to a CI VMScluster 5-17
Chapter 6
Powering Up the System
This chapter provides an overview of the power-up procedure for the system.
Sections include:
•
Prepare to Check the AC Power
•
Measure the AC Power
•
Turn the Power On and Check Indicators
Powering Up the System 6-1
6.1 Prepare to Check the AC Power
As a preliminary step before checking the AC power, make sure
that the power cable is not plugged in and that the breaker switch
is off.
Figure 6-1
Circuit Breaker
Front
Rear
A
A - Regulator slot A
B - Regulator slot B
C - Regulator slot C
S - Sensor circuit
C
B
A
S
6-2 Powering Up the System
Breaker
Indicator
B
C
Power
Regulators
BXB-0049C-92
1.
At this point, the AC power cord should still be unplugged.
2.
Pull down the circuit breaker handle on the AC input box (see Figure
6-1).
3.
At the control panel, make sure the keyswitch is in the Disable position.
The circuit breaker controls power to the system. For normal operation,
the circuit breaker must be in the on position, in which the handle is
pushed up. To shut the circuit breaker off, push the handle down.
Current overload causes the circuit breaker to trip to the off position, so
that power to the system is turned off.
Powering Up the System 6-3
6.2 Measure the AC Power
With a digital multimeter, check the AC power supplied at the receptacle at the installation site.
Figure 6-2
A
Measuring System Power
50-60 Hz (120/208 V NOMINAL)
NEMA L21-30R
V
V
50-60 Hz (202 V NOMINAL)
NEMA L21-30R
B
V
V
PHASE X
PHASE X
NEUTRAL
PHASE Y
PHASE Y
GND
GND
PHASE Z
PHASE Z
C
V
V
50-60 Hz (380-415 V NOMINAL)
IEC 309 TYPE
V
V
PHASE 3
PHASE 2
NEUTRAL
PHASE 1
GND
V
BXB-0040-92
6-4 Powering Up the System
1.
Check that the receptacle provided is correct. This should have been
done during site preparation.
2.
Using a voltmeter, measure the voltages between all three phases and
each phase to neutral (see Figure 6-2). Verify that the voltages are
within the range specified in Table 6-1. If the voltages are out of
range, contact an electrician.
3.
Plug the power cord into the receptacle.
Table 6-1
AC Input Voltage Specifications
Voltage
Measurement
208V A
Nominal
202V B
Nominal
380V C
Nominal
415V C
Nominal
phase–phase
180–220V
180–220V
331–407V
360–443V
phase–neutral
104–128V
None
190–235V
208–256V
NOTE: In some installations, power regulators must be balanced so the AC
power distribution system will not be overloaded. Balancing
means connecting AC power so that the loads from the regulators
are evenly distributed among the AC phases. This ensures that any
one phase does not draw excessive power. There are three slots for
power regulators, with each slot representing a phase. Power regulators may be moved to different slots to balance the load among
AC phases.
For more information:
Site Preparation Guide
Powering Up the System 6-5
6.3 Turn the Power On and Check Indicators
Power up the system by pushing up the circuit breaker handle on
the AC input box. Place the keyswitch in the Enable position; then
monitor the state of the system as it is powering up.
Figure 6-3
CCL and Control Panel LEDs
Key On
Disable
Secure
Enable
Run
Restart
Key On
Fault
Run
Fault
Front
Rear
PIU 2
Quadrant 2
PIU 4
Quadrant 4
PIU 1
Quadrant 1
PIU 3
Quadrant 3
Power
LED
Rear
PIU 1
PIU 2
PIU 3
PIU 4
TOP VIEW
Front
BXB-0044F-92
6-6 Powering Up the System
1.
Turn the power on by pushing the circuit breaker handle up.
2.
Go to the front of the cabinet and check that the green power regulator
LED(s) are blinking.
3.
Place the control panel keyswitch in the Enable position. The following should occur (see Figure 6-3):
a. The yellow Fault indicator on the control panel blinks slowly
(about once per second) indicating power sequencing is taking
place. If the LED blinks rapidly (about 8 times per second), a failure during the power-up sequence occurred and you should refer to
the Advanced Troubleshooting manual for diagnostic assistance.
b. The blowers turn on.
c. The yellow Fault indicator stays on continuously for a short time
indicating self-test is taking place. Module self-test LEDs light as
described in Section 7.1 and a self-test console display appears on
the console terminal as described in Section 7.2. The console
prompt appears at the end of a successful self-test display.
d. The yellow Fault indicator goes out when self-test passes for all
modules in the system.
Go to the rear and check the CCL LEDs (see Figure 6-3) for system and
expander cabinets.
The cabinet control logic (CCL) module has four LEDs that are visible
through a shield slot when a system or expander cabinet rear door is
opened. These LEDs verify that the enable signals have been sent to the
power regulators for PIUs 1 to 4. The LEDs are numbered one to four,
corresponding to the PIUs. There are no LEDs associated with PIUs 5 and
6 in the top of an expander cabinet.
The LEDs are lit if a PIU is present and power sequencing has been completed. If a LED is not lit, the PIU is not present, the PIU is not cabled
correctly, or the CCL module has not enabled the PIU.
The CCL module also has a power LED that lights when the circuit
breaker is turned on; the LED indicates that 5 VDC is present on the CCL
module.
For more information:
Basic Troubleshooting
Advanced Troubleshooting
Powering Up the System 6-7
Chapter 7
System Self-Test
On power-up, the system runs an automatic self-test. Self-test results are
indicated by module LEDs, the self-test display at the console terminal,
and the Fault light on the control panel.
Sections in this chapter include:
•
Check Module Status LEDs
•
Check the Self-Test Display
System Self-Test 7-1
7.1 Check Module Status LEDs
Check the system module status LEDs for self-test success. If the
LEDs indicate failure, refer to the Basic Troubleshooting manual
for more information.
Figure 7-1
Powering Up and Checking the LEDs
Rear
Front
Self-Test LEDs
BXB-0348A-92
7-2 System Self-Test
Processor and memory modules have a green LED that lights when the
module passes or completes self-test. These LEDs can be viewed through
holes in the shield of the module enclosure from the front and rear of the
cabinet when the doors are open (see Figure 7-1). I/O modules have a yellow LED that lights when the module passes self-test. The I/O module
LEDs can also be seen through holes in the PIU enclosure shield. The
DWLMA has a yellow self-test LED and four others which after successful
start-up are lit as shown in Table 7-1.
Table 7-1
LEDs After Self-Test
Module
Self-Test Passed
Self-Test Failed
Processor
Green ON
Green OFF
Memory
Green ON
Green OFF or ON1
I/O
Yellow ON
Yellow OFF
DWLMA
Yellow ON
Green ON
Green ON
Red OFF
Red OFF
Yellow OFF
1The green LED on the memory module indicates that self-test completed, not passed.
For more information:
Basic Troubleshooting
System Self-Test 7-3
7.2 Check the Self-Test Display
Self-test results are displayed on the console terminal. The pass
(+) or fail (-) status of each module is indicated.
Example 7-1
F
E
D
C
Self-Test Results
B
A
9
1
8
7
6
5
4
3
2
1
0
NODE #
A
o
.
o
.
+
.
M
+
.
+
.
+
.
.
.
.
.
.
.
.
.
.
.
.
.
.
.
.
.
.
.
.
.
.
.
.
.
.
.
.
.
.
.
.
.
.
.
.
P
+
E
+
E
+
E
P
+
B
+
B
+
B
TYP
ST1
BPD
ST2
BPD
ST3
BPD
+
+
.
.
.
.
.
.
.
.
.
.
.
.
.
.
.
.
.
.
+
+
.
.
+
+
.
.
+
+
.
.
1
12
3
4
133
13
3
5
.
.
.
.
.
.
.
.
.
.
.
.
.
.
.
.
.
.
.
.
.
.
.
.
. A0 . . . . . .
.256 . . . . . .
Firmware Rev = V1.0-1625 SROM Rev = V1.0-0
7-4 System Self-Test
C0 XMI +
C1 XMI +
C2
C3
. ILV
. 256Mb
SN=GA01234567
11 The NODE # line lists the (hexadecimal) node numbers on the LSB
and XMI buses. Node numbers and slot numbers are identical. Nodes 0
through 3 reflect the right-to-left position of the LSB slots as viewed from
the front of the cabinet. Nodes 4 through 8 reflect the right-to-left position
of12 the LSB slots as viewed from the rear of the cabinet. XMI entries use
nodes
1 through E.
2
2
The TYP line indicates the type of module at each LSB node:
•
An adapter: the I/O port module (A)
•
A memory module (M)
•
A processor (P)
A period (.) indicates that the slot is not populated or that the module is
not reporting.
33
The ST1–ST3 lines show the results of the testing. This information
is taken from the self-test bit in the LCNR register of each module. The entries are:
•
+ (pass)
•
− (ST2 or ST3 fail)
•
o (does not apply). In this example, the I/O port module has "o" because there is no module-resident self-test.
4
The BPD line indicates boot processor designation. The results on
this line indicate:
•
The boot processor (B)
•
Processors eligible to become the boot processor (E)
•
Processors ineligible to become the boot processor (D)
The BPD line is printed three times. After the first determination of the
boot processor, the processors go through two more rounds of testing.
Since it is possible for a processor to pass self-test at line ST1 and fail ST2
or ST3 testing, the processors again determine the boot processor following
each round of tests.
45
The I/O channel lines C0 through C3 indicate the I/O channel that connects the XMI I/O bus to the system bus and indicates self-test results for
the DWLMA and all XMI adapters. In this example, self-test passed on
XMI nodes 1, 2, 3, and 8. Note the similar results for the second XMI.
For more information:
Basic Troubleshooting
System Self-Test 7-5
Chapter 8
Diagnostics and Utilities
After the system passes self-test, you must verify proper system operation.
First verify the presence of SCSI devices, then verify the boot device load
path. After the path is verified, you can boot the operating system and use
operating system-based test programs (such as UETP) to complete system
verification.
All functions previously provided by off-line loadable diagnostics and utilities are now provided by the console (ROM-based) or not supported at all.
The Loadable Firmware Update (LFU) Utility is currently the only supported off-line loadable program. It is used to update firmware on any
module residing on the LSB or XMI bus.
Sections in this chapter include:
•
Console Load Devices
•
Verification Overview
•
Power-Up Diagnostics Overview
•
Run System Self-Test
•
Show Commands for Installation
•
Verify SCSI Devices
•
Verify Console Load Device Path
•
Booting OpenVMS Alpha AXP from an RRD42
•
Booting OSF/1 from an RRD42
•
Booting OpenVMS VAX from an InfoServer
•
Selecting an Ethernet Service
•
Set Commands for Booting
•
Booting LFU with an RRD42 on a DEC 10000 System
•
Booting LFU on a VAX 10000 System
•
Booting the Standalone Backup
•
Running UETP
Diagnostics and Utilities 8-1
8.1 Console Load Devices
The RRD42 compact disk (CD) drive is the in-cabinet console load
device for DEC 10000 systems. The InfoServer is the console load
device for VAX 10000 systems. During system installation the console load device is used to boot standalone backup. It is also used
to boot the Loadable Firmware Update (LFU) Utility.
Figure 8-1
Accessing the Console Load Device
XMI
KZMSA
RRD42
XMI
DEMFA
InfoServer
FDDI
DECbridge 500
Ethernet
XMI
DEMNA
InfoServer
Ethernet
BXB-0005E-92
8-2 Diagnostics and Utilities
The console load device is used for:
•
Installing or updating software
•
Loading the standalone backup program
•
Interchanging user data
•
Updating module firmware
The RRD42 compact disk (CD) drive is the console load device for
DEC
DEC 10000 systems. It is installed in the system cabinet and used
10000
to access software and on-line documentation. The KZMSA
adapter is installed in the XMI card cage and allows access to the
RRD42 drive.
The InfoServer is the console load device for VAX 10000 systems.
VAX
10000 It is an Ethernet-based compact disk (CD) drive, which is part of
a local area network. The InfoServer is used to access CD-ROMs
for software installation and for on-line documentation on VAX
10000 systems.
For more information:
RRD42 Disc Drive Owner’s Manual
InfoServer 150 Installation and Owner’s Guide
Diagnostics and Utilities 8-3
8.2 Verification Overview
The following process is used to verify the system after installation.
Figure 8-2
Verification Procedure
1
Power Up System.
Self-Test Runs.
2
Enter show
configuration to get
booting mnemonics
3
Check console load
device hardware
4
Use show network
command (for VAX
10000) or show device
command (for DEC
10000) to get target
device name
5
Boot
Operating System
6
Verify System Under
Operating System
BXB-0041C-92
8-4 Diagnostics and Utilities
1
When the system powers up, self-test runs. Verify that all tests have
passed by checking the results in the self-test display.
2
Use the show configuration command to determine the self-test
status for the I/O adapter through which loading will be performed.
For RRD42 CD drive booting, check the status of the KZMSA I/O
adapter. For InfoServer booting, check the status of the DEMNA or
DEMFA I/O adapter. Determine the mnemonic assigned to the I/O
adapter associated with the target boot device.
3
Check the console load device hardware. For VAX 10000 systems,
check the Ethernet adapter by examining the self-test results and the
green test light on the module, which reports the results of the Ethernet loopback test.
4
Using the mnemonic in step 2, use the show network for the VAX
10000 (such as show network demna0) or a show device command
for the DEC 10000 to obtain the assigned name of the target device.
5
Load and run the operating system.
6
Verify the system under the installed operating system.
For more information:
Console Reference Manual
Diagnostics and Utilities 8-5
8.3 Power-Up Diagnostics Overview
Self-test, additional ROM-based diagnostics, and console-based
exercisers are run during power-up. The User Environment Test
Package (UETP) is run under the operating system.
Figure 8-3
Diagnostic Overview
Self-Test
ROM-Based
Diagnostics
(RBDs)
On-Line
Additional Power-Up Tests
Standalone Exercisers
User Environment Test Package (UETP)
BXB-0065-92
8-6 Diagnostics and Utilities
The tests summarized in Table 8-1 run when the system is powered up.
Table 8-1
Power-Up Diagnostics
Test Name
Test Group
CPU Self-Test
Self-Test
Memory Array Self-Test
Self-Test
XMI Device Adapter Self-Test
Self-Test
Device Peripheral Self-Test
Self-Test
Power Subassembly Self-Test
Self-Test
CPU/Memory Interaction Tests
Additional Power-up Tests
Multiprocessor Tests
Additional Power-up Tests
IOP Tests
Additional Power-up Tests
DWLMA Tests
Additional Power-up Tests
Cache/Memory Exerciser
Console-based Exerciser
Disk Exerciser1
Console-based Exerciser
Floating-Point Exerciser
Console-based Exerciser
Network Exerciser1
Console-based Exerciser
1Run in internal loopback (at I/O adapter) mode only.
NOTE: Refer to the Advanced Troubleshooting manual for information on
running console-based diagnostics and utilities using the cdp, set
host, and test commands.
Diagnostics and Utilities 8-7
8.4 Run System Self-Test
Gather adapter self-test and address information using self-test results as shown in Example 8-1.
Example 8-1
F
E
.
.
.
.
D
.
.
.
.
C
.
.
.
.
Self-Test Display
B
.
.
.
.
A
.
.
.
.
9
.
.
.
.
8
7
6
5
4
3
2
1
0
NODE #
A
o
.
o
.
+
.
M
+
.
+
.
+
.
.
.
.
.
.
.
.
.
.
.
.
.
.
.
.
.
.
.
.
.
.
.
.
.
.
.
.
.
.
.
.
.
.
.
.
P
+
E
+
E
+
E
P
+
B
+
B
+
B
TYP
ST1
BPD
ST2
BPD
ST3
BPD
+
+
.
.
.
.
.
.
.
.
.
.
.
.
.
.
.
.
.
.
+
+
.
.
+
+
.
.
+
+
.
.
. A0
.256
.
.
.
.
.
.
.
.
.
.
.
.
Firmware Rev = V1.0-1625
8-8 Diagnostics and Utilities
SROM Rev = V1.0-0
1
1
2
2
C0 XMI + 3
C1 XMI +
C2
C3
.
.
ILV
256Mb
SN = GAO1234567
1
Check the ST1 line in the self-test results to see that all CPU and
memory modules passed self-test. Note that on a system with more
than one processor, failing processors are disabled and do not appear
in the ST1 line.
2
Check the ST2 and ST3 lines to see that all modules on the LSB and
the IOP module passed the first and second tests.
3
Check the C0 XMI line to determine which modules on the XMI bus
passed self-test.
For more information:
Basic Troubleshooting
Diagnostics and Utilities 8-9
8.5 Show Commands for Installation
Use show commands to obtain information on the system configuration, devices used for booting and the Ethernet controllers.
Example 8-2
Show Configuration
>>> show configuration 1
Name
Type
Rev
Mnemonic
KN7AA
KN7AA
MS7AA
IOP
(8001)
(8001)
(4000)
(2000)
0000
0000
0000
0001
kn7aa0
kn7aa1
ms7aa0
iop0
C0 XMI
2+ KZMSA
3+ DEMNA
8+ DWLMA
(0C36)
(0C03)
(102A)
003E
060B
0104
xmi0
kzmsa0
demna0
dwlma0
C1 XMI
2+ KZMSA
3+ DEMNA
8+ DWLMA
(0C36)
(0C03)
(102A)
003E
060B
0104
xmi1
kzmsa1
demna1
dwlma1
LSB
0+
1+
7+
8+
Example 8-3
Show Device
>>> show device 2
polling for units on kzmsa0, slot 2, xmi0...
dka100.1.0.1.0
DKA100
RRD42
Example 8-4
Show Network
>>> show net 3
polling for units on demna0, slot 3, xmi0...
exa0.0.0.3.0 08-00-2B-0B-BB-ED
8-10 Diagnostics and Utilities
1
2
3
Use the show configuration command to see a listing of the modules in the system. In this example, the command is executed on a
DEC 10000 system and shows the module LSB and XMI slot number,
module name, module type, revision, mnemonic, and if self-test
passed.
The show device command displays information about each I/O device. Polling checks the XMI bus for device configurations. The next
line contains the console device name, the name of the device given
by the device controller, and the device type.
Show network displays information about Ethernet and FDDI controllers. Polling checks the XMI bus for device configurations. Show
net includes information such as the console device name of the network device with path information and the network controller’s hardware address in hex.
For more information:
Basic Troubleshooting
Operations Manual
Console Reference Manual
Diagnostics and Utilities 8-11
8.6 Verify SCSI Devices
8.6.1 Check SCSI Devices Using Console Commands
To verify SCSI devices, issue the console command show
DEC device. Check the output against the physical SBBs (stor10000
age building blocks). Nodes are set by the physical position of the SBB and do not have to be set.
Example 8-5
Checking SCSI Devices
1
Initializing...
F
E
D
C
B
A
9
8
A
o
.
o
.
+
.
7
M
+
.
+
.
+
.
6
.
.
.
.
.
.
.
5
.
.
.
.
.
.
.
4
.
.
.
.
.
.
.
3
.
.
.
.
.
.
.
2
.
.
.
.
.
.
.
1
.
.
.
.
.
.
.
.
.
.
.
+
+
.
.
.
.
.
.
.
.
.
.
.
.
.
.
.
.
.
.
+
+
.
.
.
.
.
.
.
.
.
.
.
.
.
.
.
.
.
.
.
.
.
.
.
.
.
.
+
+
.
.
. A0
. 256
.
.
.
.
.
.
.
.
.
.
.
.
Firmware Rev = V1.0-2216
SROM Rev = V1.0-1
>>> show device
polling for units on kzmsa0, slot 13, xmi0...
2
dka0.0.0.13.0
DKA0
RZ26
dka100.1.0.13.0
DKA100
RZ26
dka200.2.0.13.0
DKA200
RZ26
dka300.3.0.13.0
DKA300
RZ26
dka400.4.0.13.0
DKA400
RZ26
dka500.5.0.13.0
DKA500
RZ26
dka600.6.0.13.0
DKA600
RZ26
2
RZ26
dkb0.0.1.13.0
DKB0
dkb100.1.1.13.0
DKB100
RZ26
dkb200.2.1.13.0
DKB200
RZ26
dkb300.3.1.13.0
DKB300
RZ26
dkb400.4.1.13.0
DKB400
RZ26
dkb500.5.1.13.0
DKB500
RZ26
dkb600.6.1.13.0
DKB600
RZ26
8-12 Diagnostics and Utilities
0
P
+
B
+
B
+
B
NODE #
TYP
ST1
BPD
ST2
BPD
ST3
BPD
C0 XMI +
C1 XMI +
C2
C3
.
.
ILV
256MB
SYS SN = GAO1234567
3
3
Basics:
•
An XMI PIU is required to house the KZMSA adapter.
•
Each KZMSA has two ports. Each port has a maximum of eight nodes
per bus, including the initiator (the KZMSA adapter).
•
Each SCSI (BA655) PIU has two shelves; each modular storage shelf
(BA350) has a power supply and can hold seven 3.5" SBBs (such as
RZ26s or TLZ06s), two 5.25" SBBs (such as the RZ73 drives), or a combination of these.
•
The two shelves in a SCSI PIU can each be on their own bus or can be
daisy-chained together, provided there are no conflicting SCSI nodes.
•
The system cabinet can house a maximum of two BA655 SCSI PIUs.
•
SCSI configurations are discrete within a cabinet; that is, the bus and
all nodes reside within one cabinet, either the system cabinet or the expander cabinet.
For installation, all cabling and node setting has been completed prior to
shipping. To check the configuration, check self-test and issue a show device console command:
1
The system goes through self-test. Check that the KZMSA adapter
passed self-test.
2
Issue a show device command. In this example, the KZMSA is in
slot 13 (slot D) of the XMI that is channel 0. There are two ports off
this KZMSA (see 2 ). The devices from port 1 are listed first, followed by the devices from port 2.
3
Each port connects to a shelf housing seven RZ26s on one bus. All
devices in this example are reporting to the console and are working.
For more information:
BA350 Modular Storage Shelf:
Subsystem Configuration Guide
Subsystem User’s Guide
User’s Guide
Diagnostics and Utilities 8-13
8.6.2 Check Console Output Against Physical Devices
Next check the output from the show device command
DEC against the physical SBBs in the SCSI PIUs.
10000
Figure 8-4
SCSI PIU with SBBs
Shelf 1
Shelf 2
Slot
&
Node
0
Front
1
2
Rear
3
SBBs
4
5
Green LED
6
Yellow LED
Power
Supplies
BXB-0362-92
8-14 Diagnostics and Utilities
Check the output from the show device command against the physical
SBBs in the SCSI PIU. There should be a one-to-one correspondence between SBBs reporting to the console and physical devices mounted in the
PIU. Note that the node number reported by the console corresponds to
the physical position of an SBB within a shelf; the slots and nodes are
numbered 0 to 6, from top to bottom (see Figure 8-4).
Each SBB has two LEDs. The green LED on the left lights when the SBB
is mounted and being accessed.
Table 8-2
SCSI SBB LED Functions
SBB
LED Condition
Green LED
Yellow LED
Disk or tape
Off
No activity
Normal
Flashing
Activity
Spinning up or down
On
Activity
Not used
Off
Shelf fault
Power fault
On
Shelf okay
Power okay
Power supply
If you encounter any problems, reseat the SBBs and reissue show device.
If you need further testing, use the test command. Refer to BA350 documentation if you need to reconfigure the buses.
For more information:
Console Reference Manual
Advanced Troubleshooting
BA350 Modular Storage Shelf Subsystem Configuration Guide or User’s Guide
Diagnostics and Utilities 8-15
8.7 Verify Console Load Device Path
If your console load device is an InfoServer, check the EthVAX ernet adapter’s power-up loopback test results.
10000
Figure 8-5
DEMNA LEDs
Self-Test OK LED
Connector
Edge
External
Loopback LED
BXB-0042-92
8-16 Diagnostics and Utilities
Check the Ethernet adapter’s self-test results. The show configuration
printout is the most convenient display of the results. A "+" indicates the
adapter passed self-test.
Independent of the module’s internal self-test is an external loopback test.
The loopback test runs independently at power-up and its results are not
included in the self-test. That is, a DEMNA could pass self-test but fail the
external loopback test. The results of the external loopback testing are reported by the External Loopback LED on the module. It is a green LED below the yellow Self-Test OK LED.
Open the front cabinet door. Noting the adapter’s card cage position from
the show configuration printout, locate the module in the appropriate
card cage and slot.
If the External Loopback LED is not lit, the module may have passed selftest, but may not be able to send or receive commands.
For more information:
DEC LANcontroller 400 Installation Guide
Diagnostics and Utilities 8-17
8.8 Booting OpenVMS Alpha AXP from an RRD42
This section shows a sample boot of OpenVMS Alpha AXP
The first
step is issuing the show device command to determine the
location of the RRD42.
DEC from the RRD42 CD drive for DEC 10000 systems.
10000
Example 8-6
CD-ROM OpenVMS Alpha AXP Boot
>>> show device
1
polling for units on kdm700, slot 1, xmi0...
dua2.2.0.1.0
R2TDYC$DIA2
RF73
dua3.3.0.1.0
R2TDYC$DIA3
RF73
polling for units on kzmsa0, slot 2, xmi0...
dka100.1.0.2.0
dka100
RRD42
2
>>> boot -flags 0,0 dka100.1.0.2.0
Booting...
Connecting to boot device dka100
initializing HWRPB at 2000
initializing page table at 1ee000
initializing machine state
jumping to bootstrap at 1fa000
3
OpenVMS AXP (TM) Operating System, Version V1.0
8-18 Diagnostics and Utilities
4
1
Show device displays information about each I/O device. Polling
checks the XMI bus for device configurations. The next line contains
three columns. The first column contains the device type and unit
number, node number, device channel number, XMI node number,
and I/O channel number, separated by periods. The second column
displays the name of the device given by the device controller. The
third column shows the device type.
2
In the boot command, -flags indicates that additional command parameters follow, 0 is the system root of the boot device, 0 is the bootstrap option, dk is the device code of the boot device, a is the boot
device controller designation, and 100 specifies the hexadecimal unit
number of the boot device. The 1 is the node number, 0 is the channel number, 2 is the XMI node number, and 0 is the I/O channel
number.
3
The system boots standalone backup from the RRD42.
4
The operating system banner appears.
For more information:
OpenVMS Alpha Version 1.0 Upgrade and Installation Manual
Diagnostics and Utilities 8-19
8.9 Booting OSF/1 from an RRD42
This section shows a sample boot of OSF/1 from the RRD42
DEC CD drive for DEC 10000 systems. The first step is issuing
10000
the show device command to determine the location of the
RRD42.
Example 8-7
CD-ROM OSF/1 Boot
>>> show device
1
polling for units on kdm700, slot 1, xmi0...
dua2.2.0.1.0
R2TDYC$DIA2
RF73
dua3.3.0.1.0
R2TDYC$DIA3
RF73
polling for units on kzmsa0, slot 2, xmi0...
dka100.1.0.2.0
dka100
RRD42
2
>>> boot dka100.1.0.2.0
Booting...
Connecting to boot device dka100
initializing HWRPB at 2000
initializing page table at 1ee000
initializing machine state
jumping to bootstrap at 1fa000
3
AXPboot - Wed Aug 19 10:18:32 EDT 1992
OSF boot - Wed Aug 19 10:18:40 EDT 1992
The system is ready.
DEC OSF/1 X2.0A-7 (Rev 6); Wed Aug 19 10:22:40 EDT 1992
8-20 Diagnostics and Utilities
4
1
Show device displays information about each I/O device. Polling
checks the XMI bus for device configurations. The next line contains
three columns. The first column contains the console device name.
The second column displays the name of the device given by the device controller. The third column shows the device type.
2
In the boot command, dk is the device code of the boot device, a is
the boot device controller designation, and 100 specifies the hexadecimal unit number of the boot device. The 1 is the node number, 0
is the channel number, 2 is the XMI node number, and 0 is the I/O
channel number.
3
The system boots from the RRD42.
4
The operating system banner appears.
For more information:
DEC OSF/1 Guide to System Administration
Diagnostics and Utilities 8-21
8.10 Booting OpenVMS VAX from an InfoServer
This section shows a sample OpenVMS VAX boot from an
VAX InfoServer using the Ethernet. The first step is issuing the
10000
show network command.
Example 8-8
Sample InfoServer Boot
>>> show network 1
polling for units on demna0, slot 3, xmi0...
exa0.0.0.3.0 08-00-2B-0B-BB-ED
>>> boot exa0 -file ISL_LVAX_BL10
2
Initializing...
F
E
.
.
.
.
D
.
.
.
.
C
.
.
.
.
B
.
.
.
.
A
+
+
.
.
9
.
.
.
.
8
7
6
5
4
3
2
1
0
NODE #
A
o
.
o
.
+
.
M
+
.
+
.
+
.
.
.
.
.
.
.
.
.
.
.
.
.
.
.
.
.
.
.
.
.
.
.
.
.
.
.
.
.
.
.
.
.
.
.
.
P
+
E
+
E
+
E
P
+
B
+
B
+
B
TYP
ST1
BPD
ST2
BPD
ST3
BPD
+
+
.
.
.
.
.
.
.
.
.
.
.
.
.
.
.
.
.
.
+
+
.
.
.
.
.
.
+
+
.
.
. A0
.256
.
.
.
.
.
.
.
.
.
.
.
.
3
C0 XMI +
C1 XMI +
C2
C3
.
.
ILV
256Mb
Firmware Rev = V1.0-1625 SROM Rev = V1.0-0 SYS SN = GAO1234567
Booting...
Connecting to boot device exa0 -file ISL_LVAX_BL10
Created boot device: exa0.0.0.3.0
Resulting file is mopdl:ISL_LVAX_BL10/exa0.0.0.3.0
.....
Load complete !
8-22 Diagnostics and Utilities
1
Show network displays information about network controllers.
Polling checks the XMI buses for device configurations. Show net includes information such as the console device name of the network
device with path information (exa0.0.0.3.0) and the Ethernet controller’s hardware address in hex (08-00-2B-0B-BB-ED).
2
Boot standalone backup across the Ethernet by specifying the console
device name of the network device with path information exa0 followed by the Initial System Load (ISL) file name ISL_LVAX_ and
its version number BL10. To boot over the FDDI, the device mnemonic is fx rather than ex.
3
System self-test results are displayed if the environment variable
boot_reset is set on.
NOTE: The ISL file name must be specified in uppercase letters.
For more information:
Console Reference Manual
VMS Upgrade and Installation Supplement:
VAX 7000-600 and VAX 10000-600 Series
Diagnostics and Utilities 8-23
8.11 Selecting an Ethernet Service
NOTE:
The second step of booting over the Ethernet with an InfoVAX Server is selecting the service that boots standalone
10000
backup OpenVMS VAX.
Example 8-9
Selecting an Ethernet Service
Network Initial System Load Function
Version 1.1
FUNCTION
ID
1
2
3
4
5
1
FUNCTION
-
Display Menu
Help
Choose Service
Select Options
Stop
Enter a function ID value: 3
OPTION
ID
1
2
-
2
OPTION
Find Services
Enter known Service Name
Enter an Option ID value: 1
Working
Servers found: 2
4
Service Name Format:
Service Number
Service Name
Server Name
Ethernet ID
#1
VMS054
ESS_08002B0BBBED
08-00-2B-0B-BB-ED
#2
CD_BIN_83371
ESS_08002B0BBBED
08-00-2B-0B-BB-ED
8-24 Diagnostics and Utilities
3
#3
INFO3$RZ57
INFO3
08-00-2B-26-A6-98
#4
CD_DOC_0050
INFO3
08-00-2B-16-04-98
Enter a Service number or <CR> for more: 1
5
1
The Network Initial System Load Function menu is displayed.
2
The system prompts you for a function ID value. Enter a 3 to select the
Choose Service function.
3
The Service options menu is displayed. Enter 1 to display the available Ethernet servers and services. In this example two servers are
found on the Ethernet.
4
Each server has two services, 1 and 2. The service names are listed
(such as INFO3$RZ57) followed by the InfoServer names (such as
INFO3), and the Ethernet ID (such as 08-00-2B-26-A6-98). In this example, service #1 of server #1 VMS054, is used to boot OpenVMS
VAX.
5
Enter 1 to select service #1.
For more information:
InfoServer 150 Installation and Owner’s Guide
VMS Upgrade and Installation Supplement:
VAX 7000-600 and VAX 10000-600 Series
Diagnostics and Utilities 8-25
8.12 Set Commands for Booting
Use the set command to define a default boot device or issue a
nickname as shown in Example 8-10.
Example 8-10 Set Boot Commands
>>>
>>>
>>>
>>>
set boot_reset on 1
set bootdef_dev dua2.4.0.2.0
set boot_osflags "0,6,7" 3
boot 4
2
[the system now initializes and boots]
>>> create -nv work
5
>>> set work "-flags 0,6,7 dua6.14.0.12.1"
>>> set auto_action restart 7
>>> boot work 8
[the system now initializes and boots]
8-26 Diagnostics and Utilities
6
1‘
Set boot_reset on to initialize the system before booting.
2
If you boot from the same boot device each time, you can store the
disk name by defining the default boot device. This is done by using
the set bootdef_ dev command. The default boot device is used for
booting during power-up and auto restarts.
3
Use set boot_osflags to define the boot command flag parameters of
0, 6, and 7. The flags can also be specified as done in step 6.
4
Booting can now be done from that device by typing boot or just b.
5
Use the create command to create the environment variable work.
The -nv parameter stores the environment variable work.
6
This is an example of booting from a system that is part of a
VMScluster. To boot from the cluster system disk, a nickname is created by equating the boot parameters to an environment variable as
shown. A nickname is used so boot parameters do not have to be entered when the system boots, and it stores boot command qualifiers.
7
Used to set the auto_action environment variable so the system will
restart after an error halt.
8
Booting can now be done from that device by typing boot work.
NOTE: Refer to the Console Reference Manual for more information on set
commands and environment variables.
For more information:
Console Reference Manual
VMS Upgrade and Installation Supplement:
VAX 7000-600 and VAX 10000-600 Series
Diagnostics and Utilities 8-27
8.13 Booting LFU with an RRD42 on a DEC 10000
System
The Loadable Firmware Update (LFU) is supplied on the
DEC DEC 7000/10000 AXP Console CD-ROM (Part Number AG10000
PQW3*-RE, where * is the letter that denotes the disk revision). Make sure this CD-ROM is mounted in the RRD42 incabinet CD drive. Boot LFU from the CD-ROM.
Example 8-11 DEC 10000 LFU Booting
>>> show device
1
polling for units
dua2.2.0.1.0
dua3.3.0.1.0
polling for units
dka100.1.0.2.0
on kdm700, slot 1, xmi0...
R2TDYC$DIA2
RF73
R2TDYC$DIA3
RF73
on kzmsa0, slot 2, xmi0...
dka100
RRD42
>>> boot dka100
Booting...
2
Copyright Digital Equipment Corporation
1992
All Rights Reserved.
Loadable Environment Rev: V1.0-1625
Jul 12 1992
10:50:56
***** Loadable Firmware Update Utility *****
Version 2.1
16-jun-1992
------------------------------------------------------------------Function
Description
------------------------------------------------------------------Display
Exit
List
Displays the system’s configuration table.
Return to loadable offline operating environment.
Lists the device types and firmware revisions
supported by this revision of LFU.
Modify
Modifies port parameters and device attributes.
Show
Displays device mnemonic, hardware and firmware
revisions.
Update
Replaces current firmware with loadable data
image.
Verify
Compares loadable and device images.
? or Help
Scrolls the function table.
------------------------------------------------------------------Function?
3
8-28 Diagnostics and Utilities
1
Use the show device command to find the name of the RRD42 CD
drive.
2
Enter the boot command to boot from the RRD42. The RRD42 has a
device name of dka100.
3
LFU starts, displays a summary of its commands, and issues its
prompt (Function?).
Diagnostics and Utilities 8-29
8.14 Booting LFU on a VAX 10000 System
LFU is used to update firmware on any module in the sysVAX tem. LFU is supplied on the VAX 7000/10000 Console CD10000
ROM (Part Number AG-PQW1*-RE, where * is the letter
that denotes the disk revision). Make sure this CD-ROM is
mounted in one of the system’s InfoServers. Boot the Initial System Load (ISL) program, and select the service corresponding to the console CD-ROM.
Example 8-12 VAX 10000 LFU Booting
>>> boot exa0 -file ISL_LVAX_V01
Resulting file is mopdl:ISL_LVAX_V01/exa0
...... Load complete!
[boot information]
Network Initial System Load Function
Version 1.1
FUNCTION
FUNCTION
ID
1
Display Menu
2
Help
3
Choose Service
4
Select Options
5
Stop
Enter a function ID value: 3
OPTION
OPTION
ID
1
Find Services
2
Enter known Service Name
Enter an Option ID value: 1
1
2
3
Working
Servers found:: 3
Service Name Format:
Service Number
Service Name
Server Name
Ethernet ID
#1
INFO4$RZ57
INFO4
08-00-2B-26-A6-98
#2
6000_DIAG_H
INFO3
08-00-2B-16-04-D4
#3
VAX7000_V01
OPUS_ESS
08-00-2B-18-A9-75
Enter a Service Number or <CR> for more: 3
8-30 Diagnostics and Utilities
4
Copyright Digital Equipment Corporation
1992
All Rights Reserved.
Loadable Environment Rev: V1.0-1625
Jul 12 1992 10:50:56
***** Loadable Firmware Update Utility *****
Version 2.1
16-jun-1992
------------------------------------------------------------------Function
Description
------------------------------------------------------------------Display
Exit
List
Displays the system’s configuration table.
Return to loadable offline operating environment.
Lists the device types and firmware revisions
supported by this revision of LFU.
Modify
Modifies port parameters and device attributes.
Show
Displays device mnemonic, hardware and firmware
revisions.
Update
Replaces current firmware with loadable data
image.
Verify
Compares loadable and device images.
? or Help
Scrolls the function table.
------------------------------------------------------------------Function?
5
1
Enter the boot command as shown. Note that the ISL file name must
be typed in upper case. The final two characters are the ISL file version, which you can read from the last two characters of the volume label printed on the CD-ROM.
2
Enter 3, to select Choose Service from the Function menu.
3
Enter 1 to select Find Services from the Option menu.
4
Enter the number of the service named VAX7000_Vnn. This service
name is the volume label printed on the CD-ROM. In this example,
service number 3 supplies the console CD-ROM.
5
LFU starts, displays a summary of its commands, and issues its
prompt (Function?).
For more information:
System Service Manual
Diagnostics and Utilities 8-31
8.15 Booting the Standalone Backup
After you have booted the standalone backup using the RRD42 CD
drive or the InfoServer on the Ethernet, the OpenVMS operating
system banner appears.
Example 8-13
Booting OpenVMS Alpha AXP on a DEC 10000 System
with an RRD42
>>> boot dka0 1
OpenVMS Alpha AXP Version V5.5-2 Major Version id = 1 Minor
Version ID = 1 2
PLEASE ENTER DATE AND TIME (DD-MMM-YYY HH::MM) 14-APR-1992 14:40
Configuring devices... 3
Available device
DUA2
device type RF73
Available device
DUA3
device type RF73
Available device
DUC1
device type RA92
.
.
Enter "YES" when all needed devices are available.
%BACKUP-I-IDENT, Stand-alone BACKUP V5.5-2; the date\
is 14-APR-1992 14:40 4
$ 5
Example 8-14
Booting OpenVMS VAX on a VAX 10000 with an
InfoServer
>>> boot exa0 -file ISL_LVAX_BL10 6
VAX/VMS Version V5.5-2 Major Version id = 1 Minor Version ID = 0
7
PLEASE ENTER DATE AND TIME (DD-MMM-YYY HH::MM) 14-APR-1992 14:40
Configuring devices... 8
Available device
DUA2
device type RF73
Available device
DUA3
device type RF73
Available device
DUC1
device type RA92
.
.
Enter "YES" when all needed devices are available.
%BACKUP-I-IDENT, Stand-alone BACKUP V5.5-2; the date\
is 14-APR-1992 14:40 9
$ 10
8-32 Diagnostics and Utilities
1
Boot the standalone backup from the RRD42 by specifying the console name of the device as shown in Section 8.8.
2
The OpenVMS Alpha AXP banner appears and the procedure asks
for the date and time.
3
The procedure displays a list of local devices on the system. Enter
YES when all needed devices are available.
4
When booting is completed, it displays an identification message.
5
The OpenVMS Alpha AXP prompt appears. Refer to the OpenVMS
Alpha Version 1.0 Upgrade and Installation Manual to build the system disk.
6
Boot standalone backup across the Ethernet by specifying the console
device name of the network device as shown in Section 8.10.
7
The OpenVMS banner appears and the procedure asks for the date
and time.
8
The procedure displays a list of local devices on the system. Enter
YES when all needed devices are available.
9
When booting is completed, it displays an identification message.
10
The OpenVMS prompt appears. Refer to the VMS Upgrade and Installation Supplement to build the system disk.
Diagnostics and Utilities 8-33
8.16 Running UETP
After the operating system is booted, run the User Environment
Test Package (UETP). First log in and check the devices. Then
start the tests.
Example 8-15 Running UETP
Username: SYSTEST
Password:
$ @UETP
1
2
Welcome to OpenVMS VAX UETP Version V5.5-2
3
%UETP-I-ABORTC, UUETINITOO to abort this test, type ^C
You are running on a VAX 10000 CPU with yyyyy pages of
memory
The system was booted from _xxxx:[SYS0]
Run "ALL" UETP phases or a "SUBSET" [ALL] ? ALL
How many passes of UETP do you wish to run [1] ?
How many simulated user loads do you want [145] ?
Do you want Long or Short report format [Long] ?
4
UETP starting at 14-NOV-1991 13:12:23.00 with parameters:
DEVICE LOAD DECNET CLUSTER phases, 1 pass, 145 loads, long
report.
4
8-34 Diagnostics and Utilities
1
Enter SYSTEST as the username. Obtain the password from the system manager. After you log in, check all devices.
2
Enter the command @UETP to start the program.
3
The UETP banner appears, and the program prompts you with questions. The default answer for each question is in brackets. Press Return if you wish to enter the default answer. UETP testing begins
when the final question is answered.
4
DEVICE, CLUSTER, and DECNET phases require additional setup
to be tested. See the VMS Upgrade and Installation Supplement and
related OpenVMS VAX documentation.
For more information:
VMS Upgrade and Installation Supplement:
VAX 7000-600 and VAX 10000-600 Series
Diagnostics and Utilities 8-35
Appendix A
Storage Architecture Overview
VAX 10000 systems can connect to disk and tape drives in
VAX several different ways. This appendix provides some gen10000
eral information on the various alternatives.
Sections in this chapter include:
•
Storage Architecture and Options
•
DSSI and VMSclusters Compared
Storage Architecture Overview A-1
A.1 Storage Architecture and Options
A VAX 10000 system can connect disks and tapes on the XMI bus
via the VAX 10000 to XMI adapter (DWLMA) using KDM70 and
KFMSA-BA adapters. VAX 10000 systems also have multiple paths
for CI, DSSI, and Ethernet connections.
Figure A-1
VAX 10000 Architecture
Processors
Memory
LSB
IOP
DWLMA
CLOCK
XMI
DEMNA
DEMFA
CIXCD
KFMSA
KDM70
BXB-0054A-92
VAX 10000 systems have several choices of VMScluster adapters and communication interconnects. Figure A-1 shows a system architecture, and Table A-1 lists the adapters and configuration limits.
A-2 Storage Architecture Overview
Table A-1
Adapter
VAX 10000 System I/O Adapters
Maximum Configuration
Per XMI
Per System
CIXCD
6
10
DEMFA
4
8
DEMNA
4
161
KDM70
3
12
KFMSA
6
122
1 The system can deliver transceiver power for 4 DEMNAs per PIU.
2 The maximum number of KFMSAs is derived as follows: (25 minus the number of CIXCDs) divided by two.
For more information:
DSSI VAXcluster Installation Guide
Storage Architecture Overview A-3
A.2 DSSI and CI VMSclusters Compared
The Digital Storage System Interconnect (DSSI) bus is supported
on VAX 10000 systems using the KFMSA-BA adapter. It is a daisychained multi-drop bus that connects up to eight nodes. Logically,
each DSSI bus is equivalent to a small CI, including the associated
logical Star Coupler. A CI storage unit and HSC is equivalent to a
DSSI ISE (see Figure A-2).
Figure A-2
CI and DSSI Compared
NI -- Ethernet
VAX
VAX
NI
Adapter
VAX
NI
Adapter
CI
Adapter
VAX
NI
Adapter
CI
Adapter
NI
Adapter
KFMSA
KFMSA
DSSI
HSC
CI
Tape/Disk
Tape/Disk
CI Equivalent
of DSSI's ISE
A-4 Storage Architecture Overview
Controller
Controller
Tape/Disk
Tape/Disk
ISE
ISE
DSSI
BXB-0070C-92
On both CI and DSSI, all nodes directly connect to each other. The DSSI
bus requires electrical terminators at both ends to ensure signal integrity
because it is DC-coupled (the CI bus does not require physical termination).
Logically, each DSSI bus is equivalent to a small CI with its Star Coupler.
The RF/TF devices on the DSSI are functionally equivalent to a combination of HSC and RA/TA devices on the CI. Like the HSC, each ISE controller can communicate with multiple VAX 10000 hosts on the DSSI and order disk seeks. ISEs do not have to share an HSC like CI devices, so each
additional ISE linearly increases I/O throughput and bandwidth.
DSSI can be implemented in single- or multi-host mode. In single-host, one
system has access to integrated storage elements (ISEs) across the DSSI
storage bus. In multi-host configurations, the systems remain functionally
independent while their common DSSI storage bus, together with
VMScluster software, makes ISEs available to each system, providing multiple data paths for access to ISEs.
For more information:
KFMSA Module Installation and User Manual
Storage Architecture Overview A-5
Appendix B
DSSI Concepts
This chapter gives an overview of the Digital Storage SysVAX tem Interconnect (DSSI) bus supported by the KFMSA-BA
10000
adapter. Installation instructions appear in Chapter 3.
Sections in this chapter include:
•
DSSI Basics
•
Integrated Storage Elements (ISEs)
•
Dual-, Tri-, and Quad-Host Systems
DSSI Concepts B-1
B.1 DSSI Basics
Table B-1 summarizes DSSI terminology and concepts. The indicated references provide more information.
•
VAX 10000 systems support DSSI subsystems in single-, dual-, tri-, or
quad-host configurations using the KFMSA-BA adapter.
•
Each KFMSA-BA adapter has two buses, each of which can attach
seven additional nodes (ISEs or another KFMSA-BA adapter).
•
ISEs can be RF disk or TF tape drives.
•
RF ISEs are housed in disk PIUs in the system or expander cabinets.
•
TF85 ISEs are housed in the system cabinet.
Table B-1 DSSI Concepts
Term
Reference
Definition
Control
panel
DSSI
VAXcluster
Installation
Guide
An enclosure interface that allows remote control of DSSI node ID selection
and ISE operating status.
DSSI
DSSI
VAXcluster
Installation
Guide
Digital Storage System Interconnect. A
DSA-based storage interconnect used by
the KFMSA-BA adapter and the RF and
TF series integrated storage elements to
transfer data and to communicate with
each other.
Dual-host
Section B.3
Storage configuration where ISEs are
shared between two DSSI adapters on a
DSSI subsystem with two host systems.
ISE
Section B.2
Integrated storage element. On the
DSSI storage bus, all RF and TF storage
devices are ISEs.
B-2 DSSI Concepts
Table B-2 DSSI Concepts (Continued)
Term
Reference
Definition
KFMSA-BA
Section 4.3
XMI adapter for RF disks and TF
tapes; enables connection to these
devices.
MSCP
Section B.2
Mass storage control protocol. An
application layer protocol used by
the host to perform disk I/O operations and I/O control functions.
Node name
DSSI VAXcluster
Installation Guide
A 6-character (maximum) value assigned to each ISE. The node name
of each ISE must be unique across
the system topology.
Quad-host
Section B.3
Four host systems sharing ISEs on
the DSSI storage bus.
Single-host
Section 4.2
Storage configuration where ISEs
are connected to only one host system.
Split-bus
DSSI VAXcluster
Installation Guide
A mode of operation where the bus
servicing the ISEs in the system
cabinet is different from the bus
servicing the ICSs in the expander
cabinets.
Throughbus
DSSI VAXcluster
Installation Guide
A mode of operation where all ISEs
are on the same DSSI bus.
Tri-host
Section B.3
Three host systems sharing ISEs
on the DSSI storage bus.
DSSI Concepts B-3
B.2 Integrated Storage Elements (ISEs)
Of the eight nodes available between any two terminators on a
DSSI bus, a maximum of three nodes can be KFMSA-BA adapters,
the rest ISEs. ISEs are RF disks and TF tapes that populate up to
seven nodes on any DSSI bus. Each ISE has a controller and a disk
or tape drive.
Figure B-1
ISEs for the DSSI Storage Bus
Single-Host
ISE
0
ISE
1
ISE
2
ISE
3
ISE
4
ISE
5
ISE
6
ISE
5
ISE
6
XMI
7
DSSI Bus 1
KFMSA
DSSI Bus 2
7
ISE
0
ISE
1
ISE
2
ISE
3
ISE
4
ISE
0
ISE
1
ISE
2
ISE
3
ISE
4
Host System 1
Host System 2
XMI
XMI
7
DSSI Bus 1
6
DSSI Bus 2
6
KFMSA
KFMSA
7
ISE
0
B-4 DSSI Concepts
ISE
1
ISE
2
ISE
3
ISE
4
BXB-0072-92
Each DSSI bus has a limit of eight physical addresses: one, two, or three
adapters (KFMSA-BAs) and from one to seven ISEs (RF disks or TF tapes).
Each ISE has a controller in the physical (tape or disk) drive which uses
the mass storage protocol (MSCP) or tape MSCP.
Each connection has an initiator and a target node. Any node on the bus
can act as either an initiator or a target. The actual communications are
limited to two nodes at a time. Arbitration mechanisms accommodate multiple dialogues on the DSSI bus.
The ISE receives a complete packet of information requesting a task to be
done. The controller interprets the packet and performs the task without
any further communication from other DSSI nodes. The controller has a
command queue and handles access requests. It can start and monitor an
internal diagnostic, and provide status of the storage element.
DSSI Concepts B-5
B.3 Dual-, Tri-, and Quad-Host Systems
The DSSI can connect dual-host, tri-host, and quad-host systems
and ISEs.
Figure B-2
Examples of Dual-Host Configurations
Host 1
XMI
ISE
0
7
ISE
1
ISE
2
ISE
3
ISE
4
ISE
5
ISE
4
ISE
5
KFMSA
7
Host 2
DSSI Bus 1
XMI
DSSI Bus 2
6
KFMSA
ISE
0
6
Host 1
ISE
0
ISE
1
ISE
1
ISE
2
ISE
3
ISE
2
ISE
4
XMI
ISE
3
Host 2
XMI
7
DSSI Bus 1
6
DSSI Bus 2
6
KFMSA
KFMSA
7
ISE
0
B-6 DSSI Concepts
ISE
1
ISE
2
ISE
3
ISE
4
BXB-0072B-92
Figure B-2 shows a dual-host configuration with one KFMSA in each system. For DSSI VMSclusters, each system can have up to six KFMSA-BA
adapters.
The ISEs can be in the system cabinet, expander cabinets, or storage cabinets. Dual-, tri-, and quad-host systems must have:
•
Two or more VAX 10000 or VAX systems
•
Software licenses of
First System
Additional Systems
OpenVMS
OpenVMS1
VMScluster
VMScluster
DECnet full-function
DECnet end-node
1On any cluster, the maximum difference in OpenVMS revision levels between any two
systems cannot be greater than one.
•
DSSI adapters (KFMSA-BA adapters for VAX 10000 systems)
•
Ethernet hardware
•
No more than six ISEs on each DSSI bus
For more information:
KFMSA Module Installation and User Manual
DSSI VAXcluster Installation and Troubleshooting
Manual
DSSI Concepts B-7
Appendix C
Digital Remote Services Console
Installation
The Remote Services Console (RSC) allows customer services to troubleshoot VAX 10000 systems from a Digital Service Center. The system console terminal port is used to connect the RSC to a system. If the system
has a DMB32 or a DHB32 option, a port can be used to connect a telephone
line to the RSC. See Figure C-1.
The Digital Service Center can run a series of diagnostics to verify the RSC
connection to the system. For more information, see the Remote Services
Console Field Service Manual, the Remote Services Console User’s Guide,
and the DF112 Modem Family User’s Guide.
Figure C-1
Remote Console Cable Connections
VAX CPU
CONSOLE TERMINAL
PORT
CONSOLE
TERMINAL
A1
A2
REMOTE SERVICES
CONSOLE
B1
B2
OPTIONAL
MODEM
REMOTE
STATION
BXB-0332-92
Digital Remote Services Console Installation C-1
Index
A
AC power
checking, 6-2
input voltages, 6-5
measuring, 6-4
B
Booting
LFU, 8-28
OpenVMS Alpha AXP, 8-18
OpenVMS VAX, 8-22
OSF/1, 8-20
standalone backup, 8-23, 8-33
Boot command, 8-18
Boot time, 5-10
BPD line, 7-5
power control, 2-37
remote console, C-1
Star Coupler, 5-16
Carton removal, 2-6
CCL module, 2-37
LEDs, 6-6
CD-ROMs, 8-3
CIXCD, A-3
adapter, 5-1
default configuration, 5-3
jumpers, 5-5
parameters, 5-4
CI port address, 5-6
Console
load devices, 8-2
terminal, 3-2
Create command, 8-26
Current overload, 6-3
C
Cabinets
damage, 2-9
leveling, 2-18
pallet removal, 2-8
unpacking, 2-7
Cables
battery, 2-30
BC16E-10 signal, 3-3
BC16E-25 signal, 3-3
BC21Q DSSI cable, 2-43
BN24B-10, 3-7
BN3x transceiver, 3-3
BN4x transceiver, 3-5
BNCIA, 5-16
DSSI, 2-42, 4-8
Ethernet, 3-4
I/O cables, 2-40
D
DEC LANcontroller 400, 3-5
DEMFA, A-3
DEMNA, A-3
LEDs, 8-16
loopback LED, 8-17
loopback test, 8-17
Disable arbitration, 5-13
Disk PIU, 4-5, 4-11, B-2
DSSI
basics, B-2
bus length, 4-9
bus number, 4-11
cabling ISEs, 4-8
disk PIU, 4-5, 4-11, B-2
dual-host configurations, B-6
installation overview, 4-2
Index-1
multi-host configurations, B-6
node IDs, 4-3, 4-12
physical addresses, B-5
single-host configurations, 4-4,
A-5
termination, 2-43
DWLMA LEDs, 7-3
E
Equipment damages, 2-3
Ethernet
adapter check, 8-5
self-test, 8-17
servers, 8-25
service selection, 8-24
Ethernet-based compact disk
server, 8-3
Expander cabinet
I/O cable, 2-40
placement, 2-10
power control cable, 2-36
XMI PIU, 2-41
Extend ACK timeout, 5-13
Extend header, 5-13
External loopback LED, 8-17
K
KDM70, A-2
KFMSA-BA, 4-3, 4-5, 4-6, A-2, A-3,
B-3
LEDs, 4-6
nodes, 4-7
node IDs, 4-13
self-test, 4-7
KZMSA, 8-3
L
LARS form, 2-3
LA75, 3-3
Leveler feet, 2-9
LFU
RRD42 booting, 8-28
LINK module, 5-3, 5-8
M
Main circuit breaker, 6-3
Memory module LEDs, 7-3
MSCP, B-3, B-5
Multi-host, A-5
N
F
FDDI, 3-6
Network initial system load
function, 8-24
H
P
HSC link module, 5-3
Packing material, 2-6
PIU, 6-7
Power-up diagnostics, 8-6, 8-7
Processor module LEDs, 7-3
I
Indicator check, 6-6
InfoServer, 8-2
Installation overview, 1-1,
ISE, 4-1, 4-3, A-5, B-2, B-4
ISL, 8-31
I/O channel lines, 7-5
Q
Quiet Slot DELTA Time, 5-2, 5-3,
5-8, 5-9
R
Ramps, attaching, 2-9
Index-2
Ramp kit, 2-7
RRD42, 8-3
S
V
VMScluster, A-4, B-7
node address, 5-6
size, 5-15
SCSI
devices, 8-12, 8-14
LEDs, 8-15
PIU, 8-13
Self-test, 7-4, 8-7
BPD line, 7-5
C# XMI line, 8-9
display, 8-8
I/O channel line, 7-5
LEDs, 7-3
NODE# line, 7-5
ST lines, 8-9
TYP line, 8-9
Set boot_def dev command, 8-26
Set boot_reset command, 8-26
Set work command, 8-26
Shipment inspection, 1-2, 2-2
Show configuration command,
8-10, 8-17
Show device command, 8-10, 8-12,
8-15, 8-18
Show net command, 8-10, 8-22
Split-bus, B-3
Standalone backup
booting, 8-32
Status LEDs check, 7-2
System power-up, 6-1
T
Tape MSCP, B-5
Through-bus, B-3
Tools, unpacking, 2-4
U
UETP
running, 8-34
Index-3