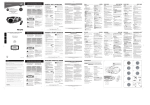
1
5:48 PM
Page 1
3300
CD Soundmachine
AZ
Return your Warranty Registration card today to
ensure you receive all the benefits you’re entitled to.
E
WH
Y INS
ID
Registering your product
within 10 days confirms
your right to maximum
protection under the
terms and conditions of
your Philips warranty.
Your completed Warranty
Registration Card serves
as verification of ownership in the event of product theft or loss.
Returning your Warranty
Registration Card right
away guarantees you’ll
receive all the information
and special offers which
you qualify for as the
owner of your model.
6.
7.
8.
9.
Know these
safety symbols
For Customer Use
Enter below the Serial No. which is located on the rear of the cabinet. Retain this
information for future reference.
CAUTION
Model No. _______________________
RISK OF ELECTRIC SHOCK
DO NOT OPEN
Serial No. ________________________
This “bolt of lightning” indicates uninsulated material
within your unit may cause
an electrical shock. For the safety of
everyone in your household, please do
not remove product covering.
WARNING: TO REDUCE THE RISK OF
The “exclamation point” calls
attention to features for
which you should read the
enclosed literature closely to prevent
operating and maintenance problems.
CAUTION: To prevent electric
FIRE OR ELECTRIC SHOCK, THIS APPARATUS
SHOULD NOT BE EXPOSED TO RAIN OR
MOISTURE, AND OBJECTS FILLED WITH
LIQUIDS, SUCH AS VASES, SHOULD NOT
BE PLACED ON THIS APPARATUS.
10.
11.
shock, match wide blade of plug to
wide slot, and fully insert.
Renvoyez votre carte d’enregistrement de garantie pour vous
assurer de recevoir tous les avantages auxquels vous avez droit.
English
Knoxville, Tennessee 37914-1810, U.S.A.
• Dès que l’achat de votre appareil
Philips est enregistré, vous avez droit à
tous les avantages dont bénéficient les
possesseurs des produits Philips.
Meet Philips at the Internet
• Remplissez et renvoyez votre carte
d’enregistrement de garantie jointe à
votre appareil sans tarder et vous bénéficierez de ces avantages importants.
Français
http://www.philips.com
Español
W
Vérification
de garantie
Confirmation
de possession
Enregistrement
du modèle
Enregistrez votre produit
dans les 10 jours pour
confirmer votre droit à
une protection maximum
selon les termes et les
conditions de votre
garantie Philips.
Votre carte d’enregistrement de garantie
prouve que vous possédez
l’appareil en cas de vol ou
de perte du produit.
Renvoyez votre carte d’enregistrement de garantie dès
aujourd’hui pour vous assurer de recevoir toutes les
informations, les offres et les
bonus auxquels vous avez
droit en tant que possesseur
de ce modèle.
symboles de
sécurite
EL 6475-E004: 02/8
Conservez ces instructions.
sur roulettes, un support, un pied, une
3.
Respectez les avertissements.
étagère ou une table de type recom-
4.
Suivez toutes les instructions.
mandé par le fabricant. Si vous utilisez un
5.
N’utilisez pas cet appareil à proximité d’une
meuble sur roulettes, veillez à le déplacer
source d’eau.
avec précaution afin d’éviter tout acci-
Nettoyez l’appareil uniquement avec un chif-
dent corporel si l’équipement se renver-
fon sec.
sait.
6.
7.
8.
Cet espace vous est réservé
Inscrivez ci-dessous le numéro de série situé
à l’arrière du bloc. Conservez cette information pour vous y reporter à l’avenir.
12.
N’obstruez aucun orifice de ventilation.
Le « point d’exclamation »
attire votre attention sur des
sujets risquant de provoquer
des problèmes de fonctionnement et
d’entretien si vous ne lisez pas les informations s’y reportant.
doit rester inutilisé pendant une période de temps
fabricant.
prolongée.
N’installez pas l’appareil près d’une source de
Canada
qualifié. Une réparation sera nécessaire si l’appareil a
de chaleur, cuisinières, ou autres appareils (même des
subi des dommages tels que détérioration du cordon
amplificateurs) dégageant de la chaleur.
d’alimentation ou de la prise, liquide renversé sur l’ap-
Ne détruisez pas la sécurité incorporée dans la
pareil, ou encore si un objet est tombé dessus, si l’ap-
prise de terre ou prise
pareil a été exposé à la pluie ou à l’humidité, s’il ne
prise polarisée est dotée de
English:This digital apparatus does not exceed the Class B limits for radio noise emissions from digital apparatus as set out in the Radio Interference Regulations of the Canadian Department of Communications.
Prise
polarisée C.A.
Français: Cet appareil numérique n'émet pas de bruits radioélectriques dépassant les
limites applicables aux appareils numériques de Classe B prescrites dans le Règlement sur
le Brouillage Radioélectrique édicté par le Ministère des Communications du Canada.
murale dont vous disposez, consultez un électricien
The set complies with the FCC-Rules, Part 15 and with 21 CFR 1040.10.
Operation is subject to the following two conditions:
1.This device may not cause harmful interference, and
2.This device must accept any interference received, including interference that
may cause undesired operation.
Confirmación
del dueño
Registro
del modelo
Registre su producto dentro de 10 días para confirmar su derecho a máxima
protección bajo los términos y condiciones de la
garantía de Philips.
Su Tarjeta de Registro de
la Garantía comprueba
que Ud. es el dueño del
aparato en caso de robo
o pérdida del producto.
La devolución inmediata de
su Tarjeta de Registro de la
Garantía le garantiza que
recibirá toda la información
y todas las promociones
especiales que le corresponden por ser el dueño
de su modelo.
Conozca estos
L’appareil répond aux normes FCC, Part 15 et 21 CFR 1040.10.
Fonctionnement soumis aux deux conditions suivantes :
1. Cet appareil ne doit pas provoquer d’interférences nuisibles, et
2. Cet appareil doit accepter toute interférence reçue, y compris les interférences
susceptibles de provoquer un fonctionement peu satisfaisant.
El aparato cumple las normas FCC, Parte 15 y 21 CFR 1040.10.
Funcionamiento dependiente de dos condiciones siguientes:
1. Este aparato no puede provocar interferencia dañina, y
2. Este aparato debe aceptar cualquier interferencia recibida, incluyendo las
interferencias que pueden provocar un funcionamiento insuficiente.
simbolos de
seguridad
de marcher dessus ou de le pincer particulièrement
PRECAUCION: PARA REDUCIR EL RIESGO DE SACUDIDA ELECTRICA,NO RETIRE
LA CUBIERTA (NI EL PANEL POSTERIOR). ESTE APARATONO CONTIENE NINGUNA
PARTE QUE PUEDA SER REPARADA POREL USARIO. DE SER NECESARIO ALGUN
SERVICIO O REPARACIONDEL APARATO, LLEVELO UN TECNICO CALIFICADO.
El símbolo del «rayo» indica
que algún material no aislado
dentro de su unidad podría
resultar en una sacudida eléctrica. Para
la seguridad de todos, favor de no
remover la cubierta del producto.
El «signo de exclamación» le
llama la atención a características sobre las que Ud.
debe leer la información adjunta
detenidamente para evitar problemas
de funcionamiento y mantenimiento.
DM AC
HI NE
DBB
PR
3
2
1
CD•FM•
AM
IR SENSO
R
-
See B
See A
B
CD
VO
LU
ME
LE
UFF
SH
1
%
$
#
AT
PE
RE
SEA
TU
NER
H
RC
3
PR
ES
ND
BA
CD
B
VOLUM
E
REPEAT
SHUFFL
E
MUTE
BASS
ET
NIN
@
G
L
RO
TU
NT
E CO
MOT
L RE
TA
DIGI
SEARCH
!
0
TUNER
3
PRESET
BAND
4
TUNING
DIGITAL
REMOTE
CONTRO
L
2
3
4
5
6
7
8
9
BACK PANEL (See 1)
#
# AC MAINS - inlet for power cord.
$ Battery compartment - for 6 batteries, type
R-14, UM2 or C-cells.
REMOTE CONTROL (See A)
IMPORTANT!
1 CD – selects CD sound source
2 y – switches the set to standby / on if set
operating on AC power. (Switches set off only if
battery powered)
3 VOLUME +, – adjusts volume level (up, down)
4SHUFFLE – plays all CD tracks in random order
5BASS – selects DBB on/off
62; – starts/ pauses CD playback
7SEARCH 5, 6 – searches backwards/ forwards
within a track
8BAND – selects FM (AM) waveband
9PRESET 3, 4 – selects a preset radio station
(up, down)
0TUNING ∞, § – tunes to tuner stations
(down, up)
!TUNER – selects tuner sound source
@9 – stops CD playback;
– erases a CD programme
#¡, ™ – skips to the beginning of a current track
previous/ subsequent track
$MUTE – interrupts/ resumes sound
%REPEAT – repeats a track /programme/ entire CD
• Incorrect use of batteries can cause electrolyte
leakage and will corrode the compartment or cause
the batteries to burst.
• Do not mix battery types: e.g. alkaline with carbon
zinc. Only use batteries of the same type for the
set.
• When inserting new batteries, do not try to mix old
batteries with the new ones.
• Batteries contain chemical substances, so
they should be disposed of properly.
-
CAUTION
Use of controls or adjustments or
performance of procedures other than
herein may result in hazardous radiation
exposure or other unsafe operation.
POWER SUPPLY
Whenever convenient, use the AC power supply to
conserve battery life. Make sure you remove the
power plug from the set and wall outlet before
inserting batteries.
Using AC Power
1. Check if the AC power supply, as shown on the
type plate located on the bottom of the set,
corresponds to your local power supply. If it does
not, consult your dealer or service center.
2. Connect the power cord to the outlet.
3. To disconnect the power supply, unplug the set
from the outlet.
BASIC FUNCTIONS
Placing your set
To avoid possible staining
of surfaces, please do not
stand this set in vertical
position over a long
period.
The type plate is located on the bottom of the
set.
BASIC FUNCTIONS
Switching on and off and selecting function
1. Press POWER on the set (or y on remote
control) to switch on.
2. Press CD•FM•AM once or more to select :
CD / Tuner function, and operate the respective
function controls.
3. Press POWER to switch off the set.
Note : The DBB setting, radio band preset and the
volume level (maximum to 20) will be retained in the
set's memory.
Storing your remote control
This set has a special built-in storage compartment for
your remote control. The storage compartment has a
latch to keep your remote control in place, and is
located inside the CD compartment. (See B)
Batteries (not included)
• Insert 6 batteries, type R-14, UM-2 or C-cells,
(preferably alkaline) with the correct polarity. (See 6)
• Remote control
Insert 2 batteries, type AAA, R03 or UM4
(preferably alkaline). (See 8)
Adjusting volume and sound (See 2)
-
1. Adjust the volume with the VOLUME +, controls.
™ Display shows the volume level in number from
0-32.
2. Press DBB once or more to select dynamic bass
boost on or off.
™ Display: shows
when activated.
2
DIGITAL TUNER
7
DIGITAL TUNER
Tuning to radio stations
3
FM
X
4
DBB
1. Press POWER to on, then press CD•FM•AM (or
TUNER on remote control) to select TUNER.
™ TU is displayed briefly and then the radio
station frequency, waveband and, if
programmed, a preset number are shown (See 3)
2. Press CD•FM•AM ( or BAND on remote control)
once or more to select your waveband.
3. Press and hold SEARCH ∞ or § until the
frequency in the display starts running.
™ The radio automatically tunes to a station of
sufficient reception. Display shows Srch
during automatic tuning.
4. Repeat step 2 if necessary until you find the
desired station.
• To tune to a weak station, press ∞ or § briefly
and repeatedly until you have found optimal
reception.
To improve radio reception:
• For FM, extend, incline and turn the telescopic
antenna. Reduce its length if the signal is too
strong.
5
Ne mélangez pas les piles (pas de piles neuves avec
• For AM , the set uses a built-in antenna. Direct this
antenna by turning the whole set.
PROGRAM
des usagées ou de piles au carbone avec des alcalines, etc.).
●
Enlevez les piles lorsque l’appareil reste inutilisé pen-
Programming radio stations
dant une longue période.
You can store up to a total of 30 radio stations (20 FM
and 10 AM) in the memory, manually or automatically
(Autostore).
EL 6475-F003: 02/8
6
8
DIGITAL TUNER
CD PLAYER
CD PLAYER
Manual programming
Playing a CD
Finding a passage within a track
1. Tune to your desired station (see Tuning to radio
stations).
2. Press PROGRAM to activate programming.
™ PROGRAM flashes.
3. Press TUNER PRESET 4 ,3 once or more to select
a preset number.
• Remote control : Press PRESET 3, 4 once or
more to select a preset station.
4. Press PROGRAM to confirm.
5. Repeat steps 1-4 to store other stations.
This CD player plays Audio Discs including CDRecordables and CD-Rewritables.
1. Adjust the CD•FM•AM to CD.
2. Open the CD Door.
™ OPEN is displayed.
3. Insert a CD with the printed side facing up and
close the door.
™ nocd if no CD inserted/ CD dirty, incorrectly
inserted or damaged.
™ nFcd if you have inserted a non-finalized CDR(W).
4. Press 2; to start playback.
™ dAtA if your CD contains non-audio i.e. data
files.
5. To pause playback press 2;. Press 2; again to
resume play.
™ Display: B flashes during pause.
6. To stop CD playback, press the 9 button.
1. Press and hold SEARCH ∞ or §.
– The CD is played at high speed and low volume.
2. When you recognize the passage you want,
release ∞ or § to resume normal playback.
Note : During a CD program or if SHUFFLE/
REPEAT active, searching is only possible within a
track.
Note : You can erase a preset station by storing
another frequency in its place.
Autostore
Autostore automatically starts programming radio
stations from preset 1. Available stations are
programmed in order if the station with sufficient
reception strength. Any previous presets e.g. manually
programmed will be erased.
• Press PROGRAM for 2 seconds or more to activate autostore programming.
™ The display shows AUtO, PROGRAM blinks,
followed by the radio station details when
stored.
After all stations are stored, the first preset station
will then automatically play.
To listen to a preset station
Note : CD play will also stop when:
- the CD door is opened
- the CD has reached the end
- you select FM / AM function.
Selecting a different track
Different play modes: SHUFFLE and REPEAT
You can select and change the various play modes
before or during playback, and combine the modes
with PROGRAM. (See 4)
SHUFFLE - tracks of the entire CD/ program
are played in random order
SHUFFLE REPEAT ALL - to repeat the
entire CD/ program continuously in random order
REPEAT ALL - repeats the entire CD/ program
REPEAT - plays the current track continuously
1. To select play mode, press MODE once or more.
2. Press 2; to start playback if in the stop position.
3. To select normal playback, press MODE
repeatedly until the various modes are no longer
displayed.
– You can also press the 9 button to cancel your
play mode.
• Press SEARCH ∞ or § once or repeatedly to
select your track.
• In the pause / stop position, press 2; to start
playback.
• Press the TUNER PRESET 4 ,3 buttons once or
more until the desired preset station is displayed.
• Remote control : optionally, press PRESET 3, 4 to
select your preset station.
Symbole d’ un appareil de classe II
Ce symbole indique que l’appareil est équipé d’un système à double isolation.
INSTRUCCIONES IMPORTANTES DE SEGURIDAD
LIMITED WARRANTY
PORTABLE AUDIO
1.
2.
3.
4.
5.
8.
9.
No. de serie ______________________
ADVERTENCIA: PARA REDUCIR
MAC5097
Installez toutes les piles correctement, + et - tels
options recommandés par le fabricant.
No. de modelo ____________________
sacudida eléctrica, introduzca
la patilla
f
ancha del enchufe al ondo de la ranura ancha.
SO UN
de raccordement sur l’appareil lui-même.
Para uso del cliente:
Escriba abajo el número de serie que se
encuentra en el panel posterior. Guarde
esta información para el futuro.
PRECAUCION: Para evitar
00 CD
qu’indiqués sur l’appareil.
●
11. Utilisez uniquement des accessoires ou
7.
EL RIESGO DE INCENDIO O DESCARGA
ELÉCTRICA, ESTE APARATO NO DEBE
EXPONERSE A LA LLUVIA NI LA HUMEDAD,
Y NO SE DEBE COLOCAR SOBRE EL
APARATO NINGÚN OBJETO QUE
CONTENGA LÍQUIDO, POR EJEMPLO UNA
JARRA.
AZ 33
d’endommager l’appareil :
●
aux endroits des prises, mâles et femelles, et au point
PRECAUCION
RIESGO DE SACUDIDA ELECTRICA
NO ABRIR
POW
ER
SET
TUNER PRE
blessures corporelles, des dommages matériels, ou
pour remplacer et adapter votre prise murale.
6.
Verificación
de la garantía
5
4
E
1 PROGRAM
CD: - programs tracks and reviews the program;
Tuner: - programs preset radio stations.
2 CD•FM•AM - selects CD /FM / AM function
3 IR SENSOR - infrared for remote control
4 TUNER PRESET 4 ,3 - selects a preset radio
station.
5 OPEN•CLOSE - opens / closes CD door.
6 Telescopic antenna - improves FM reception.
7 VOLUME +, - to adjust volume level.
8 DBB (Dynamic Bass Boost) - activates a more vivid
bass response.
9 2; - starts or pauses CD playback.
9 - to stop playback or erase a CD program.
SEARCH ∞ , §
CD: - searches backward and forward within a track;
- skips to the beginning of a current track/
previous/ later track.
Tuner: - (down, up) tunes to radio stations.
0 POWER - power on / off switch
! MODE - selects different play modes: e.g. REPEAT
or SHUFFLE (random) order.
@ Display - shows the status of the set.
toute fuite des piles qui risquerait de causer des
10. Protégez le cordon d’alimentation pour éviter
ATTENTION: Pour éviter les
chocs électriques, introduire la lame la
plus large de la fiche dans la borne
f
correspondante de la prise et pousser
jusqu’au ond.
• Sírvase llenar y devolver en seguida
la Tarjeta de Registro de la Garantía
empacada con su aparato y saque
provecho de estas ventajas importantes.
OS
SE A R
CH
fonctionne pas correctement ou s’il a fait une chute.
plus large, qui assure la mise à la terre pour votre
MAC5097
• Una vez que se registre la compra de
su aparato Philips, Ud. tiene derecho a
todas las ventajas correspondientes al
dueño de un producto Philips.
•CL
ST
OP
15. PRÉCAUTION d’emploi des piles – Afin d’éviter
dont une plus large que l’autre. Une prise de terre est
DANGER: AFIN D'ÉVITER TOUT RISQUE
Envie hoy su Tarjeta de Registro de la Garantía
para recibir todas las ventajas correspondientes.
EN
SE
14. Pour toute réparation, faites appel à un personnel
chaleur comme par exemple des radiateurs, bouches
dotée de deux fiches semblables et d’une troisième,
Printed in China
OP
PA
U
13. Débranchez l’appareil pendant les orages ou s’il
polarisée fournie. Une
N° de série ______________________
DE FEU OU DE CHOC ÉLECTRIQUE, CET
APPAREIL NE DOIT PAS ETRE EXPOSÉ À LA
PLUIE OU À L'HUMIDITÉ ; D'AUTRE PART,
AUCUN OBJET CONTENANT DU LIQUIDE,
TEL QU'UN VASE, NE DOIT ETRE DISPOSÉ
SUR CET APPAREIL.
PL
AY
•
Utilisez uniquement un meuble
Installez l’appareil selon les instructions du
sécurité. Si la prise fournie ne convient pas à la prise
Cet « éclair à pointe de
flèche » indique qu’un matériau non isolé, situé à l’intérieur
de l’unité, risque de provoquer un choc
électrique. Pour la sécurité de chacun,
nous vous prions de ne pas retirer le
boîtier de ce produit.
TOP AND FRONT PANEL (See 1)
7
8
9
0
!
@
$
Lisez ces instructions.
N° de modèle ____________________
ATTENTION: POUR REDUIRE LE RESQUE DE CHOC ELECTRIQUE, NE PAS ENLEVER
LE COUVERCLE (NI LE PANNEAU ARRIERE). CET APPAREIL NE COMPORTE AUCUNE
PIECE POUVANT TRE REPAREE PAR L’UTILISATEUR. CONFIER SON ENTRETIEN A
UN TECHNICIEN QUALIFIE.
●
2.
deux lames
RISQUE DE CHOC ELECTRIQUE
NE PAS OUVRIR
●
1.
AT T E N T I O N
CLASS 1
LASER PRODUCT
●
CONSIGNES DE SÉCURITÉ IMPORTANTES
9.
Connaissez ces
AZ 3300
15.
6
1 x AC power cord
1 x Remote Control
POWER SUPPLY
Class II equipment symbol
This symbol indicates that the unit has a double insulation system.
MAC5097
PHILIPS CONSUMER ELECTRONICS NORTH AMERICA
14.
CONTROL
ACCESSORIES
4
CAUTION: TO REDUCE THE RISK OF ELECTRIC SHOCK, DO NOT
REMOVE COVER (OR BACK). NO USER-SERVICEABLE PARTS
INSIDE. REFER SERVICING TO QUALIFIED SERVICE PERSONNEL.
13.
Use only with the cart,
stand, tripod, bracket, or table
specified by the manufacturer or
sold with the apparatus. When a
cart is used, use caution when
moving the cart/apparatus combination to avoid injury from
tip-over.
Unplug this apparatus during lightning
storms or when unused for long periods of
time.
Refer all servicing to qualified service
personnel. Servicing is required when the
apparatus has been damaged in any way,
such as power-supply cord or plug is damaged, liquid has been spilled or objects
have fallen into the apparatus, the apparatus has been exposed to rain or moisture,
does not operate normally, or has been
dropped.
Battery usage CAUTION – To prevent
battery leakage which may result in bodily
injury, property damage, or damage to the
unit:
Install all batteries correctly, + and - as
marked on the unit.
Do not mix batteries (old and new or
carbon and alkaline, etc.).
Remove batteries when the unit is not
used for a long time.
ODE
or
Visit us on the web at www.philips.com
Model
Registration
12.
M
1-800-531-0039
Owner
Confirmation
Read these instructions.
Keep these instructions.
Heed all warnings.
Follow all instructions.
Do not use this apparatus near
water.
Clean only with dry cloth.
Do not block any ventilation openings. Install in accordance with the
manufacturer´s instructions.
Do not install near any heat sources
such as radiators, heat registers, stoves, or
other apparatus (including amplifiers) that
produce heat.
Do not defeat
the safety
purpose of the
AC Polarized
polarized or
Plug
grounding-type plug. A polarized plug has
two blades with one wider than the other.
A grounding type plug has two blades and
a third grounding prong.The wide blade or
the third prong are provided for your safety. If the provided plug does not fit into
your outlet, consult an electrician for
replacement of the obsolete outlet.
Protect the power cord from being
walked on or pinched, particularly at plugs,
convenience receptacles, and the point
where they exit from the apparatus.
Only use attachments/accessories
specified by the manufacturer.
E
M
EE
Warranty
Verification
1.
2.
3.
4.
5.
English
1
LU
VO
CALL US BEFORE YOU CONSIDER
RETURNING THE PRODUCT!
Return
your Warranty
Registration Card
within 10 days
S
Philips representatives are ready to help you with
any questions about your new product.We can guide you
through Connections, First-time Setup, or any of the Features.
We want you to start enjoying your new product right away!
RTAN
PO
• So complete and return the Warranty
Registration Card enclosed with your
purchase at once, and take advantage
of these important benefits.
T!
Need help? Call us!
IM
• Once your Philips purchase is registered,
you’re eligible to receive all the privileges
of owning a Philips product.
IMPORTANT SAFETY INSTRUCTIONS
RAM
4/2/03
OG
AZ3300/17
10.
11.
Lea estas instrucciones.
Conserve estas instrucciones.
Lea todos los avisos.
Siga todas las instrucciones.
No utilice este aparato cerca del
agua.
Para limpiar el aparato utilice sólo
un trapo seco.
No tape las aperturas de ventilación. Proceda a su instalación de
acuerdo con las instrucciones del
fabricante.
No instale el equipo cerca de fuentes
de calor – Como radiadores, calentadores,
estufas o cualquier otro aparato (incluyendo los amplificadores) generador de calor.
No anule la
seguridad de la
clavija de corriente
Clavija
polarizada
(ya sea de tipo polarde CA
izado o
con toma de tierra). Las clavijas polarizadas
tienen dos patillas, una más ancha que la
otra. Las que disponen de toma de tierra
tienen dos patillas y una tercera que es la
de conexión a tierra.Tanto la patilla más
ancha como la toma de tierra han sido
incorporadas a la clavija para su seguridad
personal. Si la clavija suministrada con el
equipo no es compatible con su toma de
corriente, consulte a un electricista para
sustituir la toma de corriente obsoleta.
Proteja debidamente el cable impidiendo que pueda pisarse o incluso perforarse, especialmente en la parte más
próxima a la clavija y en el punto de salida
del equipo.
Utilice exclusivamente aquellos dispositivos/ accesorios recomendados
por el fabricante.
12.
Coloque el equipo exclusivamente sobre aquellos carros,
bases, trípodes, soportes o
mesas especificados por el comerciante o vendidos con el
equipo. Cuando utilice un carro,
tenga cuidado al desplazar el
conjunto carro/ equipo para evitar posibles daños por vuelco.
13. Desenchufe el aparato durante tormentas eléctricas o cuando no vaya a ser
utilizado durante largo tiempo.
14. Confíe el mantenimiento y las
reparaciones a personal técnico especializado. El equipo deberá repararse siempre
que haya resultado dañado de alguna manera, como por ejemplo por daños en el
cable o en la clavija, por derrame de líquido sobre el equipo, por objetos que
hubieran podido introducirse en su interior,
por exposición del equipo a la lluvia o a
ambientes húmedos, cuando el equipo no
funcione con normalidad o cuando hubiera
sufrido algún tipo de caída.
15. Uso de las pilas – ADVERTENCIA: Para
prevenir escapes en las pilas, que pueden
ocasionar lesiones físicas, daños a
su propiedad o dañar la unidad:
● Instale todas las pilas correctamente, + y como está marcado en la unidad.
● No mezcle las pilas (viejas con nuevas o
de carbono y alcalinas, etc.).
● Extraiga las pilas cuando no vaya a usar la
unidad durante largo tiempo.
EL 6475-S003: 02/8
Símbolo del equipo Clase II
Este símbolo indica que la unidad tiene un sistema doble de aislamiento.
One Year Free Exchange
This product must be carried in for an exchange.
WHO IS COVERED?
You must have proof of purchase to exchange the product.
A sales receipt or other document showing that you purchased the product is considered proof of purchase. Attach
it to this owner’s manual and keep both nearby.
WHAT IS COVERED?
Warranty coverage begins the day you buy your product.
For one year thereafter, a defective or inoperative product
will be replaced with a new, renewed or comparable product at no charge to you. A replacement product is covered
only for the original warranty period.When the warranty
on the original product expires, the warranty on the
replacement product also expires.
WHAT IS EXCLUDED?
Your warranty does not cover:
• labor charges for installation or setup of the product,
adjustment of customer controls on the product, and
installation or repair of antenna systems outside of the
product.
• product repair and/or part replacement because of
misuse, accident, unauthorized repair or other cause
not within the control of Philips.
• reception problems caused by signal conditions or
cable or antenna systems outside the unit.
• a product that requires modification or adaptation to
enable it to operate in any country other than the
country for which it was designed, manufactured,
approved and/or authorized, or repair of products
damaged by these modifications.
• incidental or consequential damages resulting from the
product. (Some states do not allow the exclusion of
incidental or consequential damages, so the above
exclusion may not apply to you.This includes, but is not
limited to, prerecorded material, whether copyrighted
or not copyrighted.)
• a product used for commercial or institutional purposes.
WHERE IS EXCHANGE AVAILABLE?
You may exchange the product in all countries where the
product is officially distributed by Philips. In countries
where Philips does not distribute the product, the local
Philips service organization will attempt to provide a
replacement product (although there may be a delay if the
appropriate product is not readily available).
BEFORE REQUESTING EXCHANGE...
Please check your owner's manual for assistance. If you
have additional questions, call us at 1-800-531-0039.
EXCHANGING A PRODUCT IN U.S.A.,
PUERTO RICO, OR U.S.VIRGIN ISLANDS...
Contact 1-800-531-0039 to arrange an exchange. Or, ship
the product, insured and freight prepaid, and with proof of
purchase enclosed, to the address listed below.
Philips Exchange Program
Suite A
406 North Irish Street
Greeneville TN 37745
(In U.S.A., Puerto Rico, and U.S.Virgin Islands, all implied warranties, including implied warranties of merchantability and fitness for a particular purpose, are limited in duration to the
duration of this express warranty. But, because some states do
not allow limitations on how long an implied warranty may
last, this limitation may not apply to you.)
EXCHANGING A PRODUCT IN CANADA...
Please contact Philips at:
1-800-661-6162 (French Speaking)
1-800-531-0039 (English or Spanish Speaking)
(In Canada, this warranty is given in lieu of all other warranties. No other warranties are expressed or implied,
including any implied warranties of merchantability or fitness for a particular purpose. Philips is not liable under any
circumstances for any direct, indirect, special, incidental or
consequential damages, howsoever incurred, even if notified
of the possibility of such damages.)
REMEMBER...
Please record below the model and serial numbers found
on the product. Also, please fill out and mail your warranty
registration card promptly. It will be easier for us to notify
you if necessary.
MODEL #
__________________________________
SERIAL #
__________________________________
CD PLAYER
SAFETY AND MAINTENANCE
Programming track numbers
SAFETY & MAINTENANCE INFORMATION
(See 7)
In the stop position, select and store your CD tracks in
the desired sequence. Up to 20 tracks can be stored in
the memory.
1. Press SEARCH ∞ or § on the set to select your
desired track number.
2. Press PROGRAM.
™ Display: PROGRAM, Prog briefly and your
selected track number. (See 5)
™ If you attempt to program without first
selecting a track number, noSE is shown.
3. Repeat steps 1-2 to select and store all desired
tracks.
™ Display: FULL if you try to program more
than 20 tracks.
Reviewing the program
In the stop position, press and hold PROGRAM until
the display shows all your stored track numbers in
sequence.
Erasing a program
You can erase the program by either:
• pressing 9 twice
™ CLr is displayed briefly and PROGRAM
disappears.
• You select FM / AM function.
• Open the CD door.
• Don't expose the set, batteries, CDs to humidity,
rain, sand or excessive heat.
• Clean the set with a dry cloth. Don't use any
cleaning agents containing alcohol, ammonia,
benzene or abrasives as these may harm the set.
• Place the set on a hard and flat surface so that the
system does not tilt. Make sure there is good
ventilation to prevent the set overheating.
• The mechanical parts of the set contain
self-lubricating bearings and must not be oiled or
lubricated.
CD player and CD handling
• If the CD player cannot read CDs correctly, use a
cleaning CD to clean the lens before taking the set
to repair.
• The lens of the CD player should never be touched!
• Sudden changes in the surrounding temperature
can cause condensation on the lens of your CD
player. Playing a CD is then not possible. Do not
attempt to clean the lens but leave the set in a
warm environment until the moisture evaporates.
• Always close the CD door to avoid dust on the lens.
• To clean the CD, wipe in a straight line from the
center towards the edge using a soft, lint-free
cloth. Do not use cleaning agents as they may
damage the disc.
• Never write on a CD or attach any stickers to it.
TROUBLESHOOTING
If a fault occurs, first check the points listed below before taking the set for repair.
If you are unable to remedy a problem by following these hints, consult your dealer or service center.
WARNING: Do not open the set as there is a risk of electric shock. Under no circumstances should you try to repair the set yourself, as this will
invalidate the warranty.
No sound /power
dAtA indication
–
•
–
•
–
•
– CD contains non-audio files
• Press SEARCH ∞ or § once or more to skip to a
CD audio track, instead of the data file
Volume not adjusted
Adjust the VOLUME
Power cord not securely connected
Connect the AC power cord properly
Batteries drained/ incorrectly inserted
Insert (fresh) batteries correctly
Severe radio hum or noise
– Electrical interference: set too close to TV, VCR or
computer
• Move the set to increase the distance
Poor radio reception
– Weak radio signal
• FM: Adjust the FM telescopic antenna
The CD skips tracks
–
•
–
•
CD damaged or dirty
Replace or clean CD
SHUFFLE or PROGRAM is active
Switch off SHUFFLE / PROGRAM
Remote control does not function properly
–
•
–
•
Batteries exhausted/ incorrectly inserted
Insert (fresh) batteries correctly
Distance/ angle between the set too large
Reduce the distance/ angle
nocd indication
–
•
–
•
CD badly scratched or dirty
Replace/ clean CD, see Maintenance
Laser lens steamed up
Wait until lens has cleared
nFcd indication
– CD-R(W) is blank/ not finalized
• Use a finalized CD-R(W)
Environmental information
We have done our best to reduce the packaging and make it easy to separate into 3 materials:
cardboard, expandable polystyrene, polyethylene.
This warranty gives you specific legal rights.You may have other rights which vary from state/province to state/province.
Philips, P.O. Box 520890, Miami, FL 33152, USA, (402) 536-4171
EL6095T004 / 8-02
Your set consists of materials which can be recycled if disassembled by a
specialized company. Please observe the local regulations regarding the
disposal of packaging, dead batteries and old equipment.
2
7
DBB
3
FM
X
4
REPEAT ALL
SHUFFLE
5
PROGRAM
6
8
6 x R14/UM2/C-cells
2 x AAA/R03/UM4
5:48 PM
Page 1
3300
CD Soundmachine
AZ
Return your Warranty Registration card today to
ensure you receive all the benefits you’re entitled to.
E
WH
Y INS
ID
Registering your product
within 10 days confirms
your right to maximum
protection under the
terms and conditions of
your Philips warranty.
Your completed Warranty
Registration Card serves
as verification of ownership in the event of product theft or loss.
Returning your Warranty
Registration Card right
away guarantees you’ll
receive all the information
and special offers which
you qualify for as the
owner of your model.
6.
7.
8.
9.
Know these
safety symbols
For Customer Use
Enter below the Serial No. which is located on the rear of the cabinet. Retain this
information for future reference.
CAUTION
Model No. _______________________
RISK OF ELECTRIC SHOCK
DO NOT OPEN
Serial No. ________________________
This “bolt of lightning” indicates uninsulated material
within your unit may cause
an electrical shock. For the safety of
everyone in your household, please do
not remove product covering.
WARNING: TO REDUCE THE RISK OF
The “exclamation point” calls
attention to features for
which you should read the
enclosed literature closely to prevent
operating and maintenance problems.
CAUTION: To prevent electric
FIRE OR ELECTRIC SHOCK, THIS APPARATUS
SHOULD NOT BE EXPOSED TO RAIN OR
MOISTURE, AND OBJECTS FILLED WITH
LIQUIDS, SUCH AS VASES, SHOULD NOT
BE PLACED ON THIS APPARATUS.
10.
11.
shock, match wide blade of plug to
wide slot, and fully insert.
Renvoyez votre carte d’enregistrement de garantie pour vous
assurer de recevoir tous les avantages auxquels vous avez droit.
English
Knoxville, Tennessee 37914-1810, U.S.A.
• Dès que l’achat de votre appareil
Philips est enregistré, vous avez droit à
tous les avantages dont bénéficient les
possesseurs des produits Philips.
Meet Philips at the Internet
• Remplissez et renvoyez votre carte
d’enregistrement de garantie jointe à
votre appareil sans tarder et vous bénéficierez de ces avantages importants.
Français
http://www.philips.com
Español
W
Vérification
de garantie
Confirmation
de possession
Enregistrement
du modèle
Enregistrez votre produit
dans les 10 jours pour
confirmer votre droit à
une protection maximum
selon les termes et les
conditions de votre
garantie Philips.
Votre carte d’enregistrement de garantie
prouve que vous possédez
l’appareil en cas de vol ou
de perte du produit.
Renvoyez votre carte d’enregistrement de garantie dès
aujourd’hui pour vous assurer de recevoir toutes les
informations, les offres et les
bonus auxquels vous avez
droit en tant que possesseur
de ce modèle.
symboles de
sécurite
EL 6475-E004: 02/8
Conservez ces instructions.
sur roulettes, un support, un pied, une
3.
Respectez les avertissements.
étagère ou une table de type recom-
4.
Suivez toutes les instructions.
mandé par le fabricant. Si vous utilisez un
5.
N’utilisez pas cet appareil à proximité d’une
meuble sur roulettes, veillez à le déplacer
source d’eau.
avec précaution afin d’éviter tout acci-
Nettoyez l’appareil uniquement avec un chif-
dent corporel si l’équipement se renver-
fon sec.
sait.
6.
7.
8.
Cet espace vous est réservé
Inscrivez ci-dessous le numéro de série situé
à l’arrière du bloc. Conservez cette information pour vous y reporter à l’avenir.
12.
N’obstruez aucun orifice de ventilation.
Le « point d’exclamation »
attire votre attention sur des
sujets risquant de provoquer
des problèmes de fonctionnement et
d’entretien si vous ne lisez pas les informations s’y reportant.
doit rester inutilisé pendant une période de temps
fabricant.
prolongée.
N’installez pas l’appareil près d’une source de
Canada
qualifié. Une réparation sera nécessaire si l’appareil a
de chaleur, cuisinières, ou autres appareils (même des
subi des dommages tels que détérioration du cordon
amplificateurs) dégageant de la chaleur.
d’alimentation ou de la prise, liquide renversé sur l’ap-
Ne détruisez pas la sécurité incorporée dans la
pareil, ou encore si un objet est tombé dessus, si l’ap-
prise de terre ou prise
pareil a été exposé à la pluie ou à l’humidité, s’il ne
prise polarisée est dotée de
English:This digital apparatus does not exceed the Class B limits for radio noise emissions from digital apparatus as set out in the Radio Interference Regulations of the Canadian Department of Communications.
Prise
polarisée C.A.
Français: Cet appareil numérique n'émet pas de bruits radioélectriques dépassant les
limites applicables aux appareils numériques de Classe B prescrites dans le Règlement sur
le Brouillage Radioélectrique édicté par le Ministère des Communications du Canada.
murale dont vous disposez, consultez un électricien
The set complies with the FCC-Rules, Part 15 and with 21 CFR 1040.10.
Operation is subject to the following two conditions:
1.This device may not cause harmful interference, and
2.This device must accept any interference received, including interference that
may cause undesired operation.
Confirmación
del dueño
Registro
del modelo
Registre su producto dentro de 10 días para confirmar su derecho a máxima
protección bajo los términos y condiciones de la
garantía de Philips.
Su Tarjeta de Registro de
la Garantía comprueba
que Ud. es el dueño del
aparato en caso de robo
o pérdida del producto.
La devolución inmediata de
su Tarjeta de Registro de la
Garantía le garantiza que
recibirá toda la información
y todas las promociones
especiales que le corresponden por ser el dueño
de su modelo.
Conozca estos
L’appareil répond aux normes FCC, Part 15 et 21 CFR 1040.10.
Fonctionnement soumis aux deux conditions suivantes :
1. Cet appareil ne doit pas provoquer d’interférences nuisibles, et
2. Cet appareil doit accepter toute interférence reçue, y compris les interférences
susceptibles de provoquer un fonctionement peu satisfaisant.
El aparato cumple las normas FCC, Parte 15 y 21 CFR 1040.10.
Funcionamiento dependiente de dos condiciones siguientes:
1. Este aparato no puede provocar interferencia dañina, y
2. Este aparato debe aceptar cualquier interferencia recibida, incluyendo las
interferencias que pueden provocar un funcionamiento insuficiente.
simbolos de
seguridad
de marcher dessus ou de le pincer particulièrement
PRECAUCION: PARA REDUCIR EL RIESGO DE SACUDIDA ELECTRICA,NO RETIRE
LA CUBIERTA (NI EL PANEL POSTERIOR). ESTE APARATONO CONTIENE NINGUNA
PARTE QUE PUEDA SER REPARADA POREL USARIO. DE SER NECESARIO ALGUN
SERVICIO O REPARACIONDEL APARATO, LLEVELO UN TECNICO CALIFICADO.
El símbolo del «rayo» indica
que algún material no aislado
dentro de su unidad podría
resultar en una sacudida eléctrica. Para
la seguridad de todos, favor de no
remover la cubierta del producto.
El «signo de exclamación» le
llama la atención a características sobre las que Ud.
debe leer la información adjunta
detenidamente para evitar problemas
de funcionamiento y mantenimiento.
DM AC
HI NE
DBB
PR
3
2
1
CD•FM•
AM
IR SENSO
R
-
See B
See A
B
CD
VO
LU
ME
LE
UFF
SH
1
%
$
#
AT
PE
RE
SEA
TU
NER
H
RC
3
PR
ES
ND
BA
CD
B
VOLUM
E
REPEAT
SHUFFL
E
MUTE
BASS
ET
NIN
@
G
L
RO
TU
NT
E CO
MOT
L RE
TA
DIGI
SEARCH
!
0
TUNER
3
PRESET
BAND
4
TUNING
DIGITAL
REMOTE
CONTRO
L
2
3
4
5
6
7
8
9
BACK PANEL (See 1)
#
# AC MAINS - inlet for power cord.
$ Battery compartment - for 6 batteries, type
R-14, UM2 or C-cells.
REMOTE CONTROL (See A)
IMPORTANT!
1 CD – selects CD sound source
2 y – switches the set to standby / on if set
operating on AC power. (Switches set off only if
battery powered)
3 VOLUME +, – adjusts volume level (up, down)
4SHUFFLE – plays all CD tracks in random order
5BASS – selects DBB on/off
62; – starts/ pauses CD playback
7SEARCH 5, 6 – searches backwards/ forwards
within a track
8BAND – selects FM (AM) waveband
9PRESET 3, 4 – selects a preset radio station
(up, down)
0TUNING ∞, § – tunes to tuner stations
(down, up)
!TUNER – selects tuner sound source
@9 – stops CD playback;
– erases a CD programme
#¡, ™ – skips to the beginning of a current track
previous/ subsequent track
$MUTE – interrupts/ resumes sound
%REPEAT – repeats a track /programme/ entire CD
• Incorrect use of batteries can cause electrolyte
leakage and will corrode the compartment or cause
the batteries to burst.
• Do not mix battery types: e.g. alkaline with carbon
zinc. Only use batteries of the same type for the
set.
• When inserting new batteries, do not try to mix old
batteries with the new ones.
• Batteries contain chemical substances, so
they should be disposed of properly.
-
CAUTION
Use of controls or adjustments or
performance of procedures other than
herein may result in hazardous radiation
exposure or other unsafe operation.
POWER SUPPLY
Whenever convenient, use the AC power supply to
conserve battery life. Make sure you remove the
power plug from the set and wall outlet before
inserting batteries.
Using AC Power
1. Check if the AC power supply, as shown on the
type plate located on the bottom of the set,
corresponds to your local power supply. If it does
not, consult your dealer or service center.
2. Connect the power cord to the outlet.
3. To disconnect the power supply, unplug the set
from the outlet.
BASIC FUNCTIONS
Placing your set
To avoid possible staining
of surfaces, please do not
stand this set in vertical
position over a long
period.
The type plate is located on the bottom of the
set.
BASIC FUNCTIONS
Switching on and off and selecting function
1. Press POWER on the set (or y on remote
control) to switch on.
2. Press CD•FM•AM once or more to select :
CD / Tuner function, and operate the respective
function controls.
3. Press POWER to switch off the set.
Note : The DBB setting, radio band preset and the
volume level (maximum to 20) will be retained in the
set's memory.
Storing your remote control
This set has a special built-in storage compartment for
your remote control. The storage compartment has a
latch to keep your remote control in place, and is
located inside the CD compartment. (See B)
Batteries (not included)
• Insert 6 batteries, type R-14, UM-2 or C-cells,
(preferably alkaline) with the correct polarity. (See 6)
• Remote control
Insert 2 batteries, type AAA, R03 or UM4
(preferably alkaline). (See 8)
Adjusting volume and sound (See 2)
-
1. Adjust the volume with the VOLUME +, controls.
™ Display shows the volume level in number from
0-32.
2. Press DBB once or more to select dynamic bass
boost on or off.
™ Display: shows
when activated.
2
DIGITAL TUNER
7
DIGITAL TUNER
Tuning to radio stations
3
FM
X
4
DBB
1. Press POWER to on, then press CD•FM•AM (or
TUNER on remote control) to select TUNER.
™ TU is displayed briefly and then the radio
station frequency, waveband and, if
programmed, a preset number are shown (See 3)
2. Press CD•FM•AM ( or BAND on remote control)
once or more to select your waveband.
3. Press and hold SEARCH ∞ or § until the
frequency in the display starts running.
™ The radio automatically tunes to a station of
sufficient reception. Display shows Srch
during automatic tuning.
4. Repeat step 2 if necessary until you find the
desired station.
• To tune to a weak station, press ∞ or § briefly
and repeatedly until you have found optimal
reception.
To improve radio reception:
• For FM, extend, incline and turn the telescopic
antenna. Reduce its length if the signal is too
strong.
5
Ne mélangez pas les piles (pas de piles neuves avec
• For AM , the set uses a built-in antenna. Direct this
antenna by turning the whole set.
PROGRAM
des usagées ou de piles au carbone avec des alcalines, etc.).
●
Enlevez les piles lorsque l’appareil reste inutilisé pen-
Programming radio stations
dant une longue période.
You can store up to a total of 30 radio stations (20 FM
and 10 AM) in the memory, manually or automatically
(Autostore).
EL 6475-F003: 02/8
6
8
DIGITAL TUNER
CD PLAYER
CD PLAYER
Manual programming
Playing a CD
Finding a passage within a track
1. Tune to your desired station (see Tuning to radio
stations).
2. Press PROGRAM to activate programming.
™ PROGRAM flashes.
3. Press TUNER PRESET 4 ,3 once or more to select
a preset number.
• Remote control : Press PRESET 3, 4 once or
more to select a preset station.
4. Press PROGRAM to confirm.
5. Repeat steps 1-4 to store other stations.
This CD player plays Audio Discs including CDRecordables and CD-Rewritables.
1. Adjust the CD•FM•AM to CD.
2. Open the CD Door.
™ OPEN is displayed.
3. Insert a CD with the printed side facing up and
close the door.
™ nocd if no CD inserted/ CD dirty, incorrectly
inserted or damaged.
™ nFcd if you have inserted a non-finalized CDR(W).
4. Press 2; to start playback.
™ dAtA if your CD contains non-audio i.e. data
files.
5. To pause playback press 2;. Press 2; again to
resume play.
™ Display: B flashes during pause.
6. To stop CD playback, press the 9 button.
1. Press and hold SEARCH ∞ or §.
– The CD is played at high speed and low volume.
2. When you recognize the passage you want,
release ∞ or § to resume normal playback.
Note : During a CD program or if SHUFFLE/
REPEAT active, searching is only possible within a
track.
Note : You can erase a preset station by storing
another frequency in its place.
Autostore
Autostore automatically starts programming radio
stations from preset 1. Available stations are
programmed in order if the station with sufficient
reception strength. Any previous presets e.g. manually
programmed will be erased.
• Press PROGRAM for 2 seconds or more to activate autostore programming.
™ The display shows AUtO, PROGRAM blinks,
followed by the radio station details when
stored.
After all stations are stored, the first preset station
will then automatically play.
To listen to a preset station
Note : CD play will also stop when:
- the CD door is opened
- the CD has reached the end
- you select FM / AM function.
Selecting a different track
Different play modes: SHUFFLE and REPEAT
You can select and change the various play modes
before or during playback, and combine the modes
with PROGRAM. (See 4)
SHUFFLE - tracks of the entire CD/ program
are played in random order
SHUFFLE REPEAT ALL - to repeat the
entire CD/ program continuously in random order
REPEAT ALL - repeats the entire CD/ program
REPEAT - plays the current track continuously
1. To select play mode, press MODE once or more.
2. Press 2; to start playback if in the stop position.
3. To select normal playback, press MODE
repeatedly until the various modes are no longer
displayed.
– You can also press the 9 button to cancel your
play mode.
• Press SEARCH ∞ or § once or repeatedly to
select your track.
• In the pause / stop position, press 2; to start
playback.
• Press the TUNER PRESET 4 ,3 buttons once or
more until the desired preset station is displayed.
• Remote control : optionally, press PRESET 3, 4 to
select your preset station.
Symbole d’ un appareil de classe II
Ce symbole indique que l’appareil est équipé d’un système à double isolation.
INSTRUCCIONES IMPORTANTES DE SEGURIDAD
LIMITED WARRANTY
PORTABLE AUDIO
1.
2.
3.
4.
5.
8.
9.
No. de serie ______________________
ADVERTENCIA: PARA REDUCIR
MAC5097
Installez toutes les piles correctement, + et - tels
options recommandés par le fabricant.
No. de modelo ____________________
sacudida eléctrica, introduzca
la patilla
f
ancha del enchufe al ondo de la ranura ancha.
SO UN
de raccordement sur l’appareil lui-même.
Para uso del cliente:
Escriba abajo el número de serie que se
encuentra en el panel posterior. Guarde
esta información para el futuro.
PRECAUCION: Para evitar
00 CD
qu’indiqués sur l’appareil.
●
11. Utilisez uniquement des accessoires ou
7.
EL RIESGO DE INCENDIO O DESCARGA
ELÉCTRICA, ESTE APARATO NO DEBE
EXPONERSE A LA LLUVIA NI LA HUMEDAD,
Y NO SE DEBE COLOCAR SOBRE EL
APARATO NINGÚN OBJETO QUE
CONTENGA LÍQUIDO, POR EJEMPLO UNA
JARRA.
AZ 33
d’endommager l’appareil :
●
aux endroits des prises, mâles et femelles, et au point
PRECAUCION
RIESGO DE SACUDIDA ELECTRICA
NO ABRIR
POW
ER
SET
TUNER PRE
blessures corporelles, des dommages matériels, ou
pour remplacer et adapter votre prise murale.
6.
Verificación
de la garantía
5
4
E
1 PROGRAM
CD: - programs tracks and reviews the program;
Tuner: - programs preset radio stations.
2 CD•FM•AM - selects CD /FM / AM function
3 IR SENSOR - infrared for remote control
4 TUNER PRESET 4 ,3 - selects a preset radio
station.
5 OPEN•CLOSE - opens / closes CD door.
6 Telescopic antenna - improves FM reception.
7 VOLUME +, - to adjust volume level.
8 DBB (Dynamic Bass Boost) - activates a more vivid
bass response.
9 2; - starts or pauses CD playback.
9 - to stop playback or erase a CD program.
SEARCH ∞ , §
CD: - searches backward and forward within a track;
- skips to the beginning of a current track/
previous/ later track.
Tuner: - (down, up) tunes to radio stations.
0 POWER - power on / off switch
! MODE - selects different play modes: e.g. REPEAT
or SHUFFLE (random) order.
@ Display - shows the status of the set.
toute fuite des piles qui risquerait de causer des
10. Protégez le cordon d’alimentation pour éviter
ATTENTION: Pour éviter les
chocs électriques, introduire la lame la
plus large de la fiche dans la borne
f
correspondante de la prise et pousser
jusqu’au ond.
• Sírvase llenar y devolver en seguida
la Tarjeta de Registro de la Garantía
empacada con su aparato y saque
provecho de estas ventajas importantes.
OS
SE A R
CH
fonctionne pas correctement ou s’il a fait une chute.
plus large, qui assure la mise à la terre pour votre
MAC5097
• Una vez que se registre la compra de
su aparato Philips, Ud. tiene derecho a
todas las ventajas correspondientes al
dueño de un producto Philips.
•CL
ST
OP
15. PRÉCAUTION d’emploi des piles – Afin d’éviter
dont une plus large que l’autre. Une prise de terre est
DANGER: AFIN D'ÉVITER TOUT RISQUE
Envie hoy su Tarjeta de Registro de la Garantía
para recibir todas las ventajas correspondientes.
EN
SE
14. Pour toute réparation, faites appel à un personnel
chaleur comme par exemple des radiateurs, bouches
dotée de deux fiches semblables et d’une troisième,
Printed in China
OP
PA
U
13. Débranchez l’appareil pendant les orages ou s’il
polarisée fournie. Une
N° de série ______________________
DE FEU OU DE CHOC ÉLECTRIQUE, CET
APPAREIL NE DOIT PAS ETRE EXPOSÉ À LA
PLUIE OU À L'HUMIDITÉ ; D'AUTRE PART,
AUCUN OBJET CONTENANT DU LIQUIDE,
TEL QU'UN VASE, NE DOIT ETRE DISPOSÉ
SUR CET APPAREIL.
PL
AY
•
Utilisez uniquement un meuble
Installez l’appareil selon les instructions du
sécurité. Si la prise fournie ne convient pas à la prise
Cet « éclair à pointe de
flèche » indique qu’un matériau non isolé, situé à l’intérieur
de l’unité, risque de provoquer un choc
électrique. Pour la sécurité de chacun,
nous vous prions de ne pas retirer le
boîtier de ce produit.
TOP AND FRONT PANEL (See 1)
7
8
9
0
!
@
$
Lisez ces instructions.
N° de modèle ____________________
ATTENTION: POUR REDUIRE LE RESQUE DE CHOC ELECTRIQUE, NE PAS ENLEVER
LE COUVERCLE (NI LE PANNEAU ARRIERE). CET APPAREIL NE COMPORTE AUCUNE
PIECE POUVANT TRE REPAREE PAR L’UTILISATEUR. CONFIER SON ENTRETIEN A
UN TECHNICIEN QUALIFIE.
●
2.
deux lames
RISQUE DE CHOC ELECTRIQUE
NE PAS OUVRIR
●
1.
AT T E N T I O N
CLASS 1
LASER PRODUCT
●
CONSIGNES DE SÉCURITÉ IMPORTANTES
9.
Connaissez ces
AZ 3300
15.
6
1 x AC power cord
1 x Remote Control
POWER SUPPLY
Class II equipment symbol
This symbol indicates that the unit has a double insulation system.
MAC5097
PHILIPS CONSUMER ELECTRONICS NORTH AMERICA
14.
CONTROL
ACCESSORIES
4
CAUTION: TO REDUCE THE RISK OF ELECTRIC SHOCK, DO NOT
REMOVE COVER (OR BACK). NO USER-SERVICEABLE PARTS
INSIDE. REFER SERVICING TO QUALIFIED SERVICE PERSONNEL.
13.
Use only with the cart,
stand, tripod, bracket, or table
specified by the manufacturer or
sold with the apparatus. When a
cart is used, use caution when
moving the cart/apparatus combination to avoid injury from
tip-over.
Unplug this apparatus during lightning
storms or when unused for long periods of
time.
Refer all servicing to qualified service
personnel. Servicing is required when the
apparatus has been damaged in any way,
such as power-supply cord or plug is damaged, liquid has been spilled or objects
have fallen into the apparatus, the apparatus has been exposed to rain or moisture,
does not operate normally, or has been
dropped.
Battery usage CAUTION – To prevent
battery leakage which may result in bodily
injury, property damage, or damage to the
unit:
Install all batteries correctly, + and - as
marked on the unit.
Do not mix batteries (old and new or
carbon and alkaline, etc.).
Remove batteries when the unit is not
used for a long time.
ODE
or
Visit us on the web at www.philips.com
Model
Registration
12.
M
1-800-531-0039
Owner
Confirmation
Read these instructions.
Keep these instructions.
Heed all warnings.
Follow all instructions.
Do not use this apparatus near
water.
Clean only with dry cloth.
Do not block any ventilation openings. Install in accordance with the
manufacturer´s instructions.
Do not install near any heat sources
such as radiators, heat registers, stoves, or
other apparatus (including amplifiers) that
produce heat.
Do not defeat
the safety
purpose of the
AC Polarized
polarized or
Plug
grounding-type plug. A polarized plug has
two blades with one wider than the other.
A grounding type plug has two blades and
a third grounding prong.The wide blade or
the third prong are provided for your safety. If the provided plug does not fit into
your outlet, consult an electrician for
replacement of the obsolete outlet.
Protect the power cord from being
walked on or pinched, particularly at plugs,
convenience receptacles, and the point
where they exit from the apparatus.
Only use attachments/accessories
specified by the manufacturer.
E
M
EE
Warranty
Verification
1.
2.
3.
4.
5.
English
1
LU
VO
CALL US BEFORE YOU CONSIDER
RETURNING THE PRODUCT!
Return
your Warranty
Registration Card
within 10 days
S
Philips representatives are ready to help you with
any questions about your new product.We can guide you
through Connections, First-time Setup, or any of the Features.
We want you to start enjoying your new product right away!
RTAN
PO
• So complete and return the Warranty
Registration Card enclosed with your
purchase at once, and take advantage
of these important benefits.
T!
Need help? Call us!
IM
• Once your Philips purchase is registered,
you’re eligible to receive all the privileges
of owning a Philips product.
IMPORTANT SAFETY INSTRUCTIONS
RAM
4/2/03
OG
AZ3300/17
10.
11.
Lea estas instrucciones.
Conserve estas instrucciones.
Lea todos los avisos.
Siga todas las instrucciones.
No utilice este aparato cerca del
agua.
Para limpiar el aparato utilice sólo
un trapo seco.
No tape las aperturas de ventilación. Proceda a su instalación de
acuerdo con las instrucciones del
fabricante.
No instale el equipo cerca de fuentes
de calor – Como radiadores, calentadores,
estufas o cualquier otro aparato (incluyendo los amplificadores) generador de calor.
No anule la
seguridad de la
clavija de corriente
Clavija
polarizada
(ya sea de tipo polarde CA
izado o
con toma de tierra). Las clavijas polarizadas
tienen dos patillas, una más ancha que la
otra. Las que disponen de toma de tierra
tienen dos patillas y una tercera que es la
de conexión a tierra.Tanto la patilla más
ancha como la toma de tierra han sido
incorporadas a la clavija para su seguridad
personal. Si la clavija suministrada con el
equipo no es compatible con su toma de
corriente, consulte a un electricista para
sustituir la toma de corriente obsoleta.
Proteja debidamente el cable impidiendo que pueda pisarse o incluso perforarse, especialmente en la parte más
próxima a la clavija y en el punto de salida
del equipo.
Utilice exclusivamente aquellos dispositivos/ accesorios recomendados
por el fabricante.
12.
Coloque el equipo exclusivamente sobre aquellos carros,
bases, trípodes, soportes o
mesas especificados por el comerciante o vendidos con el
equipo. Cuando utilice un carro,
tenga cuidado al desplazar el
conjunto carro/ equipo para evitar posibles daños por vuelco.
13. Desenchufe el aparato durante tormentas eléctricas o cuando no vaya a ser
utilizado durante largo tiempo.
14. Confíe el mantenimiento y las
reparaciones a personal técnico especializado. El equipo deberá repararse siempre
que haya resultado dañado de alguna manera, como por ejemplo por daños en el
cable o en la clavija, por derrame de líquido sobre el equipo, por objetos que
hubieran podido introducirse en su interior,
por exposición del equipo a la lluvia o a
ambientes húmedos, cuando el equipo no
funcione con normalidad o cuando hubiera
sufrido algún tipo de caída.
15. Uso de las pilas – ADVERTENCIA: Para
prevenir escapes en las pilas, que pueden
ocasionar lesiones físicas, daños a
su propiedad o dañar la unidad:
● Instale todas las pilas correctamente, + y como está marcado en la unidad.
● No mezcle las pilas (viejas con nuevas o
de carbono y alcalinas, etc.).
● Extraiga las pilas cuando no vaya a usar la
unidad durante largo tiempo.
EL 6475-S003: 02/8
Símbolo del equipo Clase II
Este símbolo indica que la unidad tiene un sistema doble de aislamiento.
One Year Free Exchange
This product must be carried in for an exchange.
WHO IS COVERED?
You must have proof of purchase to exchange the product.
A sales receipt or other document showing that you purchased the product is considered proof of purchase. Attach
it to this owner’s manual and keep both nearby.
WHAT IS COVERED?
Warranty coverage begins the day you buy your product.
For one year thereafter, a defective or inoperative product
will be replaced with a new, renewed or comparable product at no charge to you. A replacement product is covered
only for the original warranty period.When the warranty
on the original product expires, the warranty on the
replacement product also expires.
WHAT IS EXCLUDED?
Your warranty does not cover:
• labor charges for installation or setup of the product,
adjustment of customer controls on the product, and
installation or repair of antenna systems outside of the
product.
• product repair and/or part replacement because of
misuse, accident, unauthorized repair or other cause
not within the control of Philips.
• reception problems caused by signal conditions or
cable or antenna systems outside the unit.
• a product that requires modification or adaptation to
enable it to operate in any country other than the
country for which it was designed, manufactured,
approved and/or authorized, or repair of products
damaged by these modifications.
• incidental or consequential damages resulting from the
product. (Some states do not allow the exclusion of
incidental or consequential damages, so the above
exclusion may not apply to you.This includes, but is not
limited to, prerecorded material, whether copyrighted
or not copyrighted.)
• a product used for commercial or institutional purposes.
WHERE IS EXCHANGE AVAILABLE?
You may exchange the product in all countries where the
product is officially distributed by Philips. In countries
where Philips does not distribute the product, the local
Philips service organization will attempt to provide a
replacement product (although there may be a delay if the
appropriate product is not readily available).
BEFORE REQUESTING EXCHANGE...
Please check your owner's manual for assistance. If you
have additional questions, call us at 1-800-531-0039.
EXCHANGING A PRODUCT IN U.S.A.,
PUERTO RICO, OR U.S.VIRGIN ISLANDS...
Contact 1-800-531-0039 to arrange an exchange. Or, ship
the product, insured and freight prepaid, and with proof of
purchase enclosed, to the address listed below.
Philips Exchange Program
Suite A
406 North Irish Street
Greeneville TN 37745
(In U.S.A., Puerto Rico, and U.S.Virgin Islands, all implied warranties, including implied warranties of merchantability and fitness for a particular purpose, are limited in duration to the
duration of this express warranty. But, because some states do
not allow limitations on how long an implied warranty may
last, this limitation may not apply to you.)
EXCHANGING A PRODUCT IN CANADA...
Please contact Philips at:
1-800-661-6162 (French Speaking)
1-800-531-0039 (English or Spanish Speaking)
(In Canada, this warranty is given in lieu of all other warranties. No other warranties are expressed or implied,
including any implied warranties of merchantability or fitness for a particular purpose. Philips is not liable under any
circumstances for any direct, indirect, special, incidental or
consequential damages, howsoever incurred, even if notified
of the possibility of such damages.)
REMEMBER...
Please record below the model and serial numbers found
on the product. Also, please fill out and mail your warranty
registration card promptly. It will be easier for us to notify
you if necessary.
MODEL #
__________________________________
SERIAL #
__________________________________
CD PLAYER
SAFETY AND MAINTENANCE
Programming track numbers
SAFETY & MAINTENANCE INFORMATION
(See 7)
In the stop position, select and store your CD tracks in
the desired sequence. Up to 20 tracks can be stored in
the memory.
1. Press SEARCH ∞ or § on the set to select your
desired track number.
2. Press PROGRAM.
™ Display: PROGRAM, Prog briefly and your
selected track number. (See 5)
™ If you attempt to program without first
selecting a track number, noSE is shown.
3. Repeat steps 1-2 to select and store all desired
tracks.
™ Display: FULL if you try to program more
than 20 tracks.
Reviewing the program
In the stop position, press and hold PROGRAM until
the display shows all your stored track numbers in
sequence.
Erasing a program
You can erase the program by either:
• pressing 9 twice
™ CLr is displayed briefly and PROGRAM
disappears.
• You select FM / AM function.
• Open the CD door.
• Don't expose the set, batteries, CDs to humidity,
rain, sand or excessive heat.
• Clean the set with a dry cloth. Don't use any
cleaning agents containing alcohol, ammonia,
benzene or abrasives as these may harm the set.
• Place the set on a hard and flat surface so that the
system does not tilt. Make sure there is good
ventilation to prevent the set overheating.
• The mechanical parts of the set contain
self-lubricating bearings and must not be oiled or
lubricated.
CD player and CD handling
• If the CD player cannot read CDs correctly, use a
cleaning CD to clean the lens before taking the set
to repair.
• The lens of the CD player should never be touched!
• Sudden changes in the surrounding temperature
can cause condensation on the lens of your CD
player. Playing a CD is then not possible. Do not
attempt to clean the lens but leave the set in a
warm environment until the moisture evaporates.
• Always close the CD door to avoid dust on the lens.
• To clean the CD, wipe in a straight line from the
center towards the edge using a soft, lint-free
cloth. Do not use cleaning agents as they may
damage the disc.
• Never write on a CD or attach any stickers to it.
TROUBLESHOOTING
If a fault occurs, first check the points listed below before taking the set for repair.
If you are unable to remedy a problem by following these hints, consult your dealer or service center.
WARNING: Do not open the set as there is a risk of electric shock. Under no circumstances should you try to repair the set yourself, as this will
invalidate the warranty.
No sound /power
dAtA indication
–
•
–
•
–
•
– CD contains non-audio files
• Press SEARCH ∞ or § once or more to skip to a
CD audio track, instead of the data file
Volume not adjusted
Adjust the VOLUME
Power cord not securely connected
Connect the AC power cord properly
Batteries drained/ incorrectly inserted
Insert (fresh) batteries correctly
Severe radio hum or noise
– Electrical interference: set too close to TV, VCR or
computer
• Move the set to increase the distance
Poor radio reception
– Weak radio signal
• FM: Adjust the FM telescopic antenna
The CD skips tracks
–
•
–
•
CD damaged or dirty
Replace or clean CD
SHUFFLE or PROGRAM is active
Switch off SHUFFLE / PROGRAM
Remote control does not function properly
–
•
–
•
Batteries exhausted/ incorrectly inserted
Insert (fresh) batteries correctly
Distance/ angle between the set too large
Reduce the distance/ angle
nocd indication
–
•
–
•
CD badly scratched or dirty
Replace/ clean CD, see Maintenance
Laser lens steamed up
Wait until lens has cleared
nFcd indication
– CD-R(W) is blank/ not finalized
• Use a finalized CD-R(W)
Environmental information
We have done our best to reduce the packaging and make it easy to separate into 3 materials:
cardboard, expandable polystyrene, polyethylene.
This warranty gives you specific legal rights.You may have other rights which vary from state/province to state/province.
Philips, P.O. Box 520890, Miami, FL 33152, USA, (402) 536-4171
EL6095T004 / 8-02
Your set consists of materials which can be recycled if disassembled by a
specialized company. Please observe the local regulations regarding the
disposal of packaging, dead batteries and old equipment.
8:53 AM
Page 1
3300
CD Soundmachine
AZ
Return your Warranty Registration card today to
ensure you receive all the benefits you’re entitled to.
E
WH
Y INS
ID
Registering your product
within 10 days confirms
your right to maximum
protection under the
terms and conditions of
your Philips warranty.
Your completed Warranty
Registration Card serves
as verification of ownership in the event of product theft or loss.
Returning your Warranty
Registration Card right
away guarantees you’ll
receive all the information
and special offers which
you qualify for as the
owner of your model.
6.
7.
8.
9.
Know these
safety symbols
For Customer Use
Enter below the Serial No. which is located on the rear of the cabinet. Retain this
information for future reference.
CAUTION
Model No. _______________________
RISK OF ELECTRIC SHOCK
DO NOT OPEN
Serial No. ________________________
This “bolt of lightning” indicates uninsulated material
within your unit may cause
an electrical shock. For the safety of
everyone in your household, please do
not remove product covering.
WARNING: TO REDUCE THE RISK OF
The “exclamation point” calls
attention to features for
which you should read the
enclosed literature closely to prevent
operating and maintenance problems.
CAUTION: To prevent electric
FIRE OR ELECTRIC SHOCK, THIS APPARATUS
SHOULD NOT BE EXPOSED TO RAIN OR
MOISTURE, AND OBJECTS FILLED WITH
LIQUIDS, SUCH AS VASES, SHOULD NOT
BE PLACED ON THIS APPARATUS.
10.
11.
shock, match wide blade of plug to
wide slot, and fully insert.
Renvoyez votre carte d’enregistrement de garantie pour vous
assurer de recevoir tous les avantages auxquels vous avez droit.
English
Knoxville, Tennessee 37914-1810, U.S.A.
• Dès que l’achat de votre appareil
Philips est enregistré, vous avez droit à
tous les avantages dont bénéficient les
possesseurs des produits Philips.
Meet Philips at the Internet
• Remplissez et renvoyez votre carte
d’enregistrement de garantie jointe à
votre appareil sans tarder et vous bénéficierez de ces avantages importants.
Français
http://www.philips.com
Español
W
Vérification
de garantie
Confirmation
de possession
Enregistrement
du modèle
Enregistrez votre produit
dans les 10 jours pour
confirmer votre droit à
une protection maximum
selon les termes et les
conditions de votre
garantie Philips.
Votre carte d’enregistrement de garantie
prouve que vous possédez
l’appareil en cas de vol ou
de perte du produit.
Renvoyez votre carte d’enregistrement de garantie dès
aujourd’hui pour vous assurer de recevoir toutes les
informations, les offres et les
bonus auxquels vous avez
droit en tant que possesseur
de ce modèle.
symboles de
sécurite
EL 6475-E004: 02/8
Conservez ces instructions.
sur roulettes, un support, un pied, une
3.
Respectez les avertissements.
étagère ou une table de type recom-
4.
Suivez toutes les instructions.
mandé par le fabricant. Si vous utilisez un
5.
N’utilisez pas cet appareil à proximité d’une
meuble sur roulettes, veillez à le déplacer
source d’eau.
avec précaution afin d’éviter tout acci-
Nettoyez l’appareil uniquement avec un chif-
dent corporel si l’équipement se renver-
fon sec.
sait.
6.
7.
8.
Cet espace vous est réservé
Inscrivez ci-dessous le numéro de série situé
à l’arrière du bloc. Conservez cette information pour vous y reporter à l’avenir.
12.
N’obstruez aucun orifice de ventilation.
Le « point d’exclamation »
attire votre attention sur des
sujets risquant de provoquer
des problèmes de fonctionnement et
d’entretien si vous ne lisez pas les informations s’y reportant.
doit rester inutilisé pendant une période de temps
fabricant.
prolongée.
N’installez pas l’appareil près d’une source de
Canada
qualifié. Une réparation sera nécessaire si l’appareil a
de chaleur, cuisinières, ou autres appareils (même des
subi des dommages tels que détérioration du cordon
amplificateurs) dégageant de la chaleur.
d’alimentation ou de la prise, liquide renversé sur l’ap-
Ne détruisez pas la sécurité incorporée dans la
pareil, ou encore si un objet est tombé dessus, si l’ap-
prise de terre ou prise
pareil a été exposé à la pluie ou à l’humidité, s’il ne
polarisée fournie. Une
fonctionne pas correctement ou s’il a fait une chute.
Prise
polarisée C.A.
English:This digital apparatus does not exceed the Class B limits for radio noise emissions from digital apparatus as set out in the Radio Interference Regulations of the Canadian Department of Communications.
Français: Cet appareil numérique n'émet pas de bruits radioélectriques dépassant les
limites applicables aux appareils numériques de Classe B prescrites dans le Règlement sur
le Brouillage Radioélectrique édicté par le Ministère des Communications du Canada.
• Sírvase llenar y devolver en seguida
la Tarjeta de Registro de la Garantía
empacada con su aparato y saque
provecho de estas ventajas importantes.
blessures corporelles, des dommages matériels, ou
dotée de deux fiches semblables et d’une troisième,
d’endommager l’appareil :
●
The set complies with the FCC-Rules, Part 15 and with 21 CFR 1040.10.
Operation is subject to the following two conditions:
1.This device may not cause harmful interference, and
2. This device must accept any interference received, including interference that
may cause undesired operation.
Confirmación
del dueño
Registro
del modelo
Registre su producto dentro de 10 días para confirmar su derecho a máxima
protección bajo los términos y condiciones de la
garantía de Philips.
Su Tarjeta de Registro de
la Garantía comprueba
que Ud. es el dueño del
aparato en caso de robo
o pérdida del producto.
La devolución inmediata de
su Tarjeta de Registro de la
Garantía le garantiza que
recibirá toda la información
y todas las promociones
especiales que le corresponden por ser el dueño
de su modelo.
Conozca estos
L’appareil répond aux normes FCC, Part 15 et 21 CFR 1040.10.
Fonctionnement soumis aux deux conditions suivantes :
1. Cet appareil ne doit pas provoquer d’interférences nuisibles, et
2. Cet appareil doit accepter toute interférence reçue, y compris les interférences
susceptibles de provoquer un fonctionement peu satisfaisant.
El aparato cumple las normas FCC, Parte 15 y 21 CFR 1040.10.
Funcionamiento dependiente de dos condiciones siguientes:
1. Este aparato no puede provocar interferencia dañina, y
2. Este aparato debe aceptar cualquier interferencia recibida, incluyendo las
interferencias que pueden provocar un funcionamiento insuficiente.
simbolos de
seguridad
de marcher dessus ou de le pincer particulièrement
PRECAUCION: PARA REDUCIR EL RIESGO DE SACUDIDA ELECTRICA,NO RETIRE
LA CUBIERTA (NI EL PANEL POSTERIOR). ESTE APARATONO CONTIENE NINGUNA
PARTE QUE PUEDA SER REPARADA POREL USARIO. DE SER NECESARIO ALGUN
SERVICIO O REPARACIONDEL APARATO, LLEVELO UN TECNICO CALIFICADO.
El símbolo del «rayo» indica
que algún material no aislado
dentro de su unidad podría
resultar en una sacudida eléctrica. Para
la seguridad de todos, favor de no
remover la cubierta del producto.
El «signo de exclamación» le
llama la atención a características sobre las que Ud.
debe leer la información adjunta
detenidamente para evitar problemas
de funcionamiento y mantenimiento.
00 CD
SO UN
DM AC
HI NE
DBB
PR
3
2
1
CD•FM•
AM
IR SENSO
R
-
See B
See A
B
CD
ME
LU
VO
LE
UFF
1
%
$
#
SH
AT
PE
RE
H
RC
SEA
NER
TU
ND
BA
3
CD
B
VOLUM
E
REPEAT
SHUFFL
E
MUTE
BASS
ET
ES
PR
@
G
NIN
L
RO
TU
NT
E CO
MOT
L RE
TA
DIGI
SEARCH
!
0
TUNER
3
PRESET
BAND
4
TUNING
DIGITAL
REMOTE
CONTRO
L
2
3
4
5
6
7
8
9
BACK PANEL (See 1)
#
2
# AC MAINS - inlet for power cord.
$ Battery compartment - for 6 batteries, type
R-14, UM2 or C-cells.
REMOTE CONTROL (See A)
IMPORTANT!
1 CD – selects CD sound source
2 y – switches the set to standby / on if set
operating on AC power. (Switches set off only if
battery powered)
3 VOLUME +, – adjusts volume level (up, down)
4SHUFFLE – plays all CD tracks in random order
5BASS – selects DBB on/off
62; – starts/ pauses CD playback
7SEARCH 5, 6 – searches backwards/ forwards
within a track
8BAND – selects FM (AM) waveband
9PRESET 3, 4 – selects a preset radio station
(up, down)
0TUNING ∞, § – tunes to tuner stations
(down, up)
!TUNER – selects tuner sound source
@9 – stops CD playback;
– erases a CD programme
#¡, ™ – skips to the beginning of a current track
previous/ subsequent track
$MUTE – interrupts/ resumes sound
%REPEAT – repeats a track /programme/ entire CD
• Incorrect use of batteries can cause electrolyte
leakage and will corrode the compartment or cause
the batteries to burst.
• Do not mix battery types: e.g. alkaline with carbon
zinc. Only use batteries of the same type for the
set.
• When inserting new batteries, do not try to mix old
batteries with the new ones.
• Batteries contain chemical substances, so
they should be disposed of properly.
-
CAUTION
Use of controls or adjustments or
performance of procedures other than
herein may result in hazardous radiation
exposure or other unsafe operation.
POWER SUPPLY
Whenever convenient, use the AC power supply to
conserve battery life. Make sure you remove the
power plug from the set and wall outlet before
inserting batteries.
Using AC Power
1. Check if the AC power supply, as shown on the
type plate located on the bottom of the set,
corresponds to your local power supply. If it does
not, consult your dealer or service center.
2. Connect the power cord to the outlet.
3. To disconnect the power supply, unplug the set
from the outlet.
BASIC FUNCTIONS
Placing your set
To avoid possible staining
of surfaces, please do not
stand this set in vertical
position over a long
period.
The type plate is located on the bottom of the
set.
BASIC FUNCTIONS
Switching on and off and selecting function
1. Press POWER on the set (or y on remote
control) to switch on.
2. Press CD•FM•AM once or more to select :
CD / Tuner function, and operate the respective
function controls.
3. Press POWER to switch off the set.
Note : The DBB setting, radio band preset and the
volume level (maximum to 20) will be retained in the
set's memory.
Storing your remote control
This set has a special built-in storage compartment for
your remote control. The storage compartment has a
latch to keep your remote control in place, and is
located inside the CD compartment. (See B)
Batteries (not included)
• Insert 6 batteries, type R-14, UM-2 or C-cells,
(preferably alkaline) with the correct polarity. (See 6)
• Remote control
Insert 2 batteries, type AAA, R03 or UM4
(preferably alkaline). (See 8)
DIGITAL TUNER
7
DIGITAL TUNER
Tuning to radio stations
DBB
1. Press POWER to on, then press CD•FM•AM (or
TUNER on remote control) to select TUNER.
™ TU is displayed briefly and then the radio
station frequency, waveband and, if
programmed, a preset number are shown (See 3)
2. Press CD•FM•AM ( or BAND on remote control)
once or more to select your waveband.
3. Press and hold SEARCH ∞ or § until the
frequency in the display starts running.
™ The radio automatically tunes to a station of
sufficient reception. Display shows Srch
during automatic tuning.
4. Repeat step 2 if necessary until you find the
desired station.
• To tune to a weak station, press ∞ or § briefly
and repeatedly until you have found optimal
reception.
3
FM
X
4
REPEAT ALL
SHUFFLE
To improve radio reception:
• For FM, extend, incline and turn the telescopic
antenna. Reduce its length if the signal is too
strong.
5
Ne mélangez pas les piles (pas de piles neuves avec
• For AM , the set uses a built-in antenna. Direct this
antenna by turning the whole set.
PROGRAM
Enlevez les piles lorsque l’appareil reste inutilisé pen-
Programming radio stations
dant une longue période.
You can store up to a total of 30 radio stations (20 FM
and 10 AM) in the memory, manually or automatically
(Autostore).
EL 6475-F003: 02/8
Symbole d’ un appareil de classe II
Ce symbole indique que l’appareil est équipé d’un système à double isolation.
INSTRUCCIONES IMPORTANTES DE SEGURIDAD
6
8
Adjusting volume and sound (See 2)
-
1. Adjust the volume with the VOLUME +, controls.
™ Display shows the volume level in number from
0-32.
2. Press DBB once or more to select dynamic bass
boost on or off.
™ Display: shows
when activated.
8.
9.
ADVERTENCIA: PARA REDUCIR
10.
11.
Lea estas instrucciones.
Conserve estas instrucciones.
Lea todos los avisos.
Siga todas las instrucciones.
No utilice este aparato cerca del
agua.
Para limpiar el aparato utilice sólo
un trapo seco.
No tape las aperturas de ventilación. Proceda a su instalación de
acuerdo con las instrucciones del
fabricante.
No instale el equipo cerca de fuentes
de calor – Como radiadores, calentadores,
estufas o cualquier otro aparato (incluyendo los amplificadores) generador de calor.
No anule la
seguridad de la
clavija de corriente
Clavija
polarizada
(ya sea de tipo polarde CA
izado o
con toma de tierra). Las clavijas polarizadas
tienen dos patillas, una más ancha que la
otra. Las que disponen de toma de tierra
tienen dos patillas y una tercera que es la
de conexión a tierra.Tanto la patilla más
ancha como la toma de tierra han sido
incorporadas a la clavija para su seguridad
personal. Si la clavija suministrada con el
equipo no es compatible con su toma de
corriente, consulte a un electricista para
sustituir la toma de corriente obsoleta.
Proteja debidamente el cable impidiendo que pueda pisarse o incluso perforarse, especialmente en la parte más
próxima a la clavija y en el punto de salida
del equipo.
Utilice exclusivamente aquellos dispositivos/ accesorios recomendados
por el fabricante.
12.
Coloque el equipo exclusivamente sobre aquellos carros,
bases, trípodes, soportes o
mesas especificados por el comerciante o vendidos con el
equipo. Cuando utilice un carro,
tenga cuidado al desplazar el
conjunto carro/ equipo para evitar posibles daños por vuelco.
13. Desenchufe el aparato durante tormentas eléctricas o cuando no vaya a ser
utilizado durante largo tiempo.
14. Confíe el mantenimiento y las
reparaciones a personal técnico especializado. El equipo deberá repararse siempre
que haya resultado dañado de alguna manera, como por ejemplo por daños en el
cable o en la clavija, por derrame de líquido sobre el equipo, por objetos que
hubieran podido introducirse en su interior,
por exposición del equipo a la lluvia o a
ambientes húmedos, cuando el equipo no
funcione con normalidad o cuando hubiera
sufrido algún tipo de caída.
15. Uso de las pilas – ADVERTENCIA: Para
prevenir escapes en las pilas, que pueden
ocasionar lesiones físicas, daños a
su propiedad o dañar la unidad:
● Instale todas las pilas correctamente, + y como está marcado en la unidad.
● No mezcle las pilas (viejas con nuevas o
de carbono y alcalinas, etc.).
● Extraiga las pilas cuando no vaya a usar la
unidad durante largo tiempo.
EL 6475-S003: 02/8
Símbolo del equipo Clase II
Este símbolo indica que la unidad tiene un sistema doble de aislamiento.
DIGITAL TUNER
CD PLAYER
CD PLAYER
Manual programming
Playing a CD
Finding a passage within a track
1. Tune to your desired station (see Tuning to radio
stations).
2. Press PROGRAM to activate programming.
™ PROGRAM flashes.
3. Press TUNER PRESET 4 ,3 once or more to select
a preset number.
• Remote control : Press PRESET 3, 4 once or
more to select a preset station.
4. Press PROGRAM to confirm.
5. Repeat steps 1-4 to store other stations.
This CD player plays Audio Discs including CDRecordables and CD-Rewritables.
1. Adjust the CD•FM•AM to CD (or CD on remote
control)
2. Open the CD Door.
™ OPEN is displayed.
3. Insert a CD with the printed side facing up and
close the door.
™ nocd if no CD inserted/ CD dirty, incorrectly
inserted or damaged.
™ nFcd if you have inserted a non-finalized CDR(W).
4. Press 2; to start playback.
™ dAtA if your CD contains non-audio i.e. data
files.
5. To pause playback press 2;. Press 2; again to
resume play.
™ Display: B flashes during pause.
6. To stop CD playback, press the 9 button.
1. Press and hold SEARCH ∞ or §.
– The CD is played at high speed and low volume.
2. When you recognize the passage you want,
release ∞ or § to resume normal playback.
Note : You can erase a preset station by storing
another frequency in its place.
Autostore
Autostore automatically starts programming radio
stations from preset 1. Available stations are
programmed in order if the station with sufficient
reception strength. Any previous presets e.g. manually
programmed will be erased.
• Press PROGRAM for 2 seconds or more to activate autostore programming.
™ The display shows AUtO, PROGRAM blinks,
followed by the radio station details when
stored.
After all stations are stored, the first preset station
will then automatically play.
To listen to a preset station
• Press the TUNER PRESET 4 ,3 buttons once or
more until the desired preset station is displayed.
• Remote control : optionally, press PRESET 3, 4 to
select your preset station.
Note : CD play will also stop when:
- the CD door is opened
- the CD has reached the end
- you select FM / AM function.
Different play modes: SHUFFLE and REPEAT
You can select and change the various play modes
before or during playback, and combine the modes
with PROGRAM. (See 4)
SHUFFLE - tracks of the entire CD/ program
are played in random order
SHUFFLE REPEAT ALL - to repeat the
entire CD/ program continuously in random order
REPEAT ALL - repeats the entire CD/ program
REPEAT - plays the current track continuously
1. To select play mode, press MODE once or more.
2. Press 2; to start playback if in the stop position.
3. To select normal playback, press MODE
repeatedly until the various modes are no longer
displayed.
– You can also press the 9 button to cancel your
play mode.
Selecting a different track
• Press SEARCH ∞ or § once or repeatedly to
select your track.
• In the pause / stop position, press 2; to start
playback.
2 x AAA/R03/UM4
6 x R14/UM2/C-cells
LIMITED WARRANTY
PORTABLE AUDIO
1.
2.
3.
4.
5.
No. de serie ______________________
MAC5097
AZ 33
options recommandés par le fabricant.
No. de modelo ____________________
sacudida eléctrica, introduzca
la patilla
f
ancha del enchufe al ondo de la ranura ancha.
Installez toutes les piles correctement, + et - tels
de raccordement sur l’appareil lui-même.
Para uso del cliente:
Escriba abajo el número de serie que se
encuentra en el panel posterior. Guarde
esta información para el futuro.
PRECAUCION: Para evitar
ER
lines, etc.).
●
11. Utilisez uniquement des accessoires ou
7.
EL RIESGO DE INCENDIO O DESCARGA
ELÉCTRICA, ESTE APARATO NO DEBE
EXPONERSE A LA LLUVIA NI LA HUMEDAD,
Y NO SE DEBE COLOCAR SOBRE EL
APARATO NINGÚN OBJETO QUE
CONTENGA LÍQUIDO, POR EJEMPLO UNA
JARRA.
POW
ESET
T U NE R P R
CH
des usagées ou de piles au carbone avec des alca-
aux endroits des prises, mâles et femelles, et au point
PRECAUCION
RIESGO DE SACUDIDA ELECTRICA
NO ABRIR
5
4
E
qu’indiqués sur l’appareil.
●
pour remplacer et adapter votre prise murale.
6.
Verificación
de la garantía
OS
SEAR
1 PROGRAM
CD: - programs tracks and reviews the program;
Tuner: - programs preset radio stations.
2 CD•FM•AM - selects CD /FM / AM function
3 IR SENSOR - infrared for remote control
4 TUNER PRESET 4 ,3 - selects a preset radio
station.
5 OPEN•CLOSE - opens / closes CD door.
6 Telescopic antenna - improves FM reception.
7 VOLUME +, - to adjust volume level.
8 DBB (Dynamic Bass Boost) - activates a more vivid
bass response.
9 2; - starts or pauses CD playback.
9 - to stop playback or erase a CD program.
SEARCH ∞ , §
CD: - searches backward and forward within a track;
- skips to the beginning of a current track/
previous/ later track.
Tuner: - (down, up) tunes to radio stations.
0 POWER - power on / off switch
! MODE - selects different play modes: e.g. REPEAT
or SHUFFLE (random) order.
@ Display - shows the status of the set.
toute fuite des piles qui risquerait de causer des
10. Protégez le cordon d’alimentation pour éviter
MAC5097
• Una vez que se registre la compra de
su aparato Philips, Ud. tiene derecho a
todas las ventajas correspondientes al
dueño de un producto Philips.
•CL
15. PRÉCAUTION d’emploi des piles – Afin d’éviter
dont une plus large que l’autre. Une prise de terre est
murale dont vous disposez, consultez un électricien
ATTENTION: Pour éviter les
chocs électriques, introduire la lame la
plus large de la fiche dans la borne
f
correspondante de la prise et pousser
jusqu’au ond.
Envie hoy su Tarjeta de Registro de la Garantía
para recibir todas las ventajas correspondientes.
EN
E
14. Pour toute réparation, faites appel à un personnel
chaleur comme par exemple des radiateurs, bouches
plus large, qui assure la mise à la terre pour votre
DANGER: AFIN D'ÉVITER TOUT RISQUE
Printed in China
OP
PA
US
ST
OP
Utilisez uniquement un meuble
Installez l’appareil selon les instructions du
prise polarisée est dotée de
N° de série ______________________
DE FEU OU DE CHOC ÉLECTRIQUE, CET
APPAREIL NE DOIT PAS ETRE EXPOSÉ À LA
PLUIE OU À L'HUMIDITÉ ; D'AUTRE PART,
AUCUN OBJET CONTENANT DU LIQUIDE,
TEL QU'UN VASE, NE DOIT ETRE DISPOSÉ
SUR CET APPAREIL.
PL
AY
•
13. Débranchez l’appareil pendant les orages ou s’il
sécurité. Si la prise fournie ne convient pas à la prise
Cet « éclair à pointe de
flèche » indique qu’un matériau non isolé, situé à l’intérieur
de l’unité, risque de provoquer un choc
électrique. Pour la sécurité de chacun,
nous vous prions de ne pas retirer le
boîtier de ce produit.
TOP AND FRONT PANEL (See 1)
7
8
9
0
!
@
$
Lisez ces instructions.
N° de modèle ____________________
ATTENTION: POUR REDUIRE LE RESQUE DE CHOC ELECTRIQUE, NE PAS ENLEVER
LE COUVERCLE (NI LE PANNEAU ARRIERE). CET APPAREIL NE COMPORTE AUCUNE
PIECE POUVANT TRE REPAREE PAR L’UTILISATEUR. CONFIER SON ENTRETIEN A
UN TECHNICIEN QUALIFIE.
●
2.
deux lames
RISQUE DE CHOC ELECTRIQUE
NE PAS OUVRIR
●
1.
AT T E N T I O N
CLASS 1
LASER PRODUCT
●
CONSIGNES DE SÉCURITÉ IMPORTANTES
9.
Connaissez ces
AZ 3300
15.
6
1 x AC power cord
1 x Remote Control
POWER SUPPLY
Class II equipment symbol
This symbol indicates that the unit has a double insulation system.
MAC5097
PHILIPS CONSUMER ELECTRONICS NORTH AMERICA
14.
CONTROL
ACCESSORIES
4
CAUTION: TO REDUCE THE RISK OF ELECTRIC SHOCK, DO NOT
REMOVE COVER (OR BACK). NO USER-SERVICEABLE PARTS
INSIDE. REFER SERVICING TO QUALIFIED SERVICE PERSONNEL.
13.
Use only with the cart,
stand, tripod, bracket, or table
specified by the manufacturer or
sold with the apparatus. When a
cart is used, use caution when
moving the cart/apparatus combination to avoid injury from
tip-over.
Unplug this apparatus during lightning
storms or when unused for long periods of
time.
Refer all servicing to qualified service
personnel. Servicing is required when the
apparatus has been damaged in any way,
such as power-supply cord or plug is damaged, liquid has been spilled or objects
have fallen into the apparatus, the apparatus has been exposed to rain or moisture,
does not operate normally, or has been
dropped.
Battery usage CAUTION – To prevent
battery leakage which may result in bodily
injury, property damage, or damage to the
unit:
Install all batteries correctly, + and - as
marked on the unit.
Do not mix batteries (old and new or
carbon and alkaline, etc.).
Remove batteries when the unit is not
used for a long time.
ODE
or
Visit us on the web at www.philips.com
Model
Registration
12.
M
1-800-531-0039
Owner
Confirmation
Read these instructions.
Keep these instructions.
Heed all warnings.
Follow all instructions.
Do not use this apparatus near
water.
Clean only with dry cloth.
Do not block any ventilation openings. Install in accordance with the
manufacturer´s instructions.
Do not install near any heat sources
such as radiators, heat registers, stoves, or
other apparatus (including amplifiers) that
produce heat.
Do not defeat
the safety
purpose of the
AC Polarized
polarized or
Plug
grounding-type plug. A polarized plug has
two blades with one wider than the other.
A grounding type plug has two blades and
a third grounding prong.The wide blade or
the third prong are provided for your safety. If the provided plug does not fit into
your outlet, consult an electrician for
replacement of the obsolete outlet.
Protect the power cord from being
walked on or pinched, particularly at plugs,
convenience receptacles, and the point
where they exit from the apparatus.
Only use attachments/accessories
specified by the manufacturer.
E
M
EE
Warranty
Verification
1.
2.
3.
4.
5.
English
1
LU
VO
CALL US BEFORE YOU CONSIDER
RETURNING THE PRODUCT!
Return
your Warranty
Registration Card
within 10 days
S
Philips representatives are ready to help you with
any questions about your new product.We can guide you
through Connections, First-time Setup, or any of the Features.
We want you to start enjoying your new product right away!
RTAN
PO
• So complete and return the Warranty
Registration Card enclosed with your
purchase at once, and take advantage
of these important benefits.
T!
Need help? Call us!
IM
• Once your Philips purchase is registered,
you’re eligible to receive all the privileges
of owning a Philips product.
IMPORTANT SAFETY INSTRUCTIONS
RAM
4/25/03
OG
AZ3300/17
One Year Free Exchange
This product must be carried in for an exchange.
WHO IS COVERED?
You must have proof of purchase to exchange the product.
A sales receipt or other document showing that you purchased the product is considered proof of purchase. Attach
it to this owner’s manual and keep both nearby.
WHAT IS COVERED?
Warranty coverage begins the day you buy your product.
For one year thereafter, a defective or inoperative product
will be replaced with a new, renewed or comparable product at no charge to you. A replacement product is covered
only for the original warranty period.When the warranty
on the original product expires, the warranty on the
replacement product also expires.
WHAT IS EXCLUDED?
Your warranty does not cover:
• labor charges for installation or setup of the product,
adjustment of customer controls on the product, and
installation or repair of antenna systems outside of the
product.
• product repair and/or part replacement because of
misuse, accident, unauthorized repair or other cause
not within the control of Philips.
• reception problems caused by signal conditions or
cable or antenna systems outside the unit.
• a product that requires modification or adaptation to
enable it to operate in any country other than the
country for which it was designed, manufactured,
approved and/or authorized, or repair of products
damaged by these modifications.
• incidental or consequential damages resulting from the
product. (Some states do not allow the exclusion of
incidental or consequential damages, so the above
exclusion may not apply to you.This includes, but is not
limited to, prerecorded material, whether copyrighted
or not copyrighted.)
• a product used for commercial or institutional purposes.
WHERE IS EXCHANGE AVAILABLE?
You may exchange the product in all countries where the
product is officially distributed by Philips. In countries
where Philips does not distribute the product, the local
Philips service organization will attempt to provide a
replacement product (although there may be a delay if the
appropriate product is not readily available).
BEFORE REQUESTING EXCHANGE...
Please check your owner's manual for assistance. If you
have additional questions, call us at 1-800-531-0039.
EXCHANGING A PRODUCT IN U.S.A.,
PUERTO RICO, OR U.S.VIRGIN ISLANDS...
Contact 1-800-531-0039 to arrange an exchange. Or, ship
the product, insured and freight prepaid, and with proof of
purchase enclosed, to the address listed below.
Philips Exchange Program
Suite A
406 North Irish Street
Greeneville TN 37745
(In U.S.A., Puerto Rico, and U.S.Virgin Islands, all implied warranties, including implied warranties of merchantability and fitness for a particular purpose, are limited in duration to the
duration of this express warranty. But, because some states do
not allow limitations on how long an implied warranty may
last, this limitation may not apply to you.)
EXCHANGING A PRODUCT IN CANADA...
Please contact Philips at:
1-800-661-6162 (French Speaking)
1-800-531-0039 (English or Spanish Speaking)
(In Canada, this warranty is given in lieu of all other warranties. No other warranties are expressed or implied,
including any implied warranties of merchantability or fitness for a particular purpose. Philips is not liable under any
circumstances for any direct, indirect, special, incidental or
consequential damages, howsoever incurred, even if notified
of the possibility of such damages.)
REMEMBER...
Please record below the model and serial numbers found
on the product. Also, please fill out and mail your warranty
registration card promptly. It will be easier for us to notify
you if necessary.
MODEL #
__________________________________
SERIAL #
__________________________________
CD PLAYER
SAFETY AND MAINTENANCE
Programming track numbers
SAFETY & MAINTENANCE INFORMATION
(See 7)
In the stop position, select and store your CD tracks in
the desired sequence. Up to 20 tracks can be stored in
the memory.
1. Press SEARCH ∞ or § on the set to select your
desired track number.
2. Press PROGRAM.
™ Display: PROGRAM, Prog briefly and your
selected track number. (See 5)
™ If you attempt to program without first
selecting a track number, noSE is shown.
3. Repeat steps 1-2 to select and store all desired
tracks.
™ Display: FULL if you try to program more
than 20 tracks.
Reviewing the program
In the stop position, press and hold PROGRAM until
the display shows all your stored track numbers in
sequence.
Erasing a program
You can erase the program by either:
• pressing 9 twice
™ CLr is displayed briefly and PROGRAM
disappears.
• You select FM / AM function.
• Open the CD door.
• Don't expose the set, batteries, CDs to humidity,
rain, sand or excessive heat.
• Clean the set with a dry cloth. Don't use any
cleaning agents containing alcohol, ammonia,
benzene or abrasives as these may harm the set.
• Place the set on a hard and flat surface so that the
system does not tilt. Make sure there is good
ventilation to prevent the set overheating.
• The mechanical parts of the set contain
self-lubricating bearings and must not be oiled or
lubricated.
CD player and CD handling
• If the CD player cannot read CDs correctly, use a
cleaning CD to clean the lens before taking the set
to repair.
• The lens of the CD player should never be touched!
• Sudden changes in the surrounding temperature
can cause condensation on the lens of your CD
player. Playing a CD is then not possible. Do not
attempt to clean the lens but leave the set in a
warm environment until the moisture evaporates.
• Always close the CD door to avoid dust on the lens.
• To clean the CD, wipe in a straight line from the
center towards the edge using a soft, lint-free
cloth. Do not use cleaning agents as they may
damage the disc.
• Never write on a CD or attach any stickers to it.
TROUBLESHOOTING
If a fault occurs, first check the points listed below before taking the set for repair.
If you are unable to remedy a problem by following these hints, consult your dealer or service center.
WARNING: Do not open the set as there is a risk of electric shock. Under no circumstances should you try to repair the set yourself, as this will
invalidate the warranty.
No sound /power
–
•
–
•
–
•
Volume not adjusted
Adjust the VOLUME
Power cord not securely connected
Connect the AC power cord properly
Batteries drained/ incorrectly inserted
Insert (fresh) batteries correctly
Severe radio hum or noise
– Electrical interference: set too close to TV, VCR or
computer
• Move the set to increase the distance
Poor radio reception
– Weak radio signal
• FM: Adjust the FM telescopic antenna
dAtA indication
– CD contains non-audio files
• Press SEARCH ∞ or § once or more to skip to a
CD audio track, instead of the data file
The CD skips tracks
–
•
–
•
CD damaged or dirty
Replace or clean CD
SHUFFLE or PROGRAM is active
Switch off SHUFFLE / PROGRAM
Remote control does not function properly
–
•
–
•
Batteries exhausted/ incorrectly inserted
Insert (fresh) batteries correctly
Distance/ angle between the set too large
Reduce the distance/ angle
nocd indication
–
•
–
•
CD badly scratched or dirty
Replace/ clean CD, see Maintenance
Laser lens steamed up
Wait until lens has cleared
nFcd indication
– CD-R(W) is blank/ not finalized
• Use a finalized CD-R(W)
Environmental information
We have done our best to reduce the packaging and make it easy to separate into 3 materials:
cardboard, expandable polystyrene, polyethylene.
This warranty gives you specific legal rights.You may have other rights which vary from state/province to state/province.
Philips, P.O. Box 520890, Miami, FL 33152, USA, (402) 536-4171
EL6095T004 / 8-02
Your set consists of materials which can be recycled if disassembled by a
specialized company. Please observe the local regulations regarding the
disposal of packaging, dead batteries and old equipment.