1
www.gaynortelesys.com
WebPro
Administration Guide
For the NEC SV8100 Phone System
Issue 1
CPU Version 6.0
Table of Contents
For the NEC SV8100 Phone System .............................................................................................................. 1
Introduction .................................................................................................................................................. 4
A Quick Word of Wisdom ............................................................................................................................. 5
Getting Started.............................................................................................................................................. 6
Logging In .................................................................................................................................................. 6
Home Page ................................................................................................................................................ 7
System Configuration ................................................................................................................................ 8
System Data .............................................................................................................................................. 8
Wizards ................................................................................................................................................... 10
Copy ........................................................................................................................................................ 11
Swap ........................................................................................................................................................ 12
WebPro Settings and Accounts Setup .................................................................................................... 13
Session Management .............................................................................................................................. 13
System Initialization ................................................................................................................................ 13
Phone System Programming ....................................................................................................................... 15
Section 10-XX: System Configuration......................................................................................................... 15
MB 10-01: Time and Date Setup ............................................................................................................ 15
MB 10-04: Music On Hold Setup ............................................................................................................ 15
MB 10-21: CD-CP00 Hardware Setup..................................................................................................... 16
MB 10-24: Daylight Savings Setup ......................................................................................................... 16
Section 11-XX: System Numbering Plan..................................................................................................... 16
MB 11-02: Extension Numbering ........................................................................................................... 16
MB 11-04: Virtual Extension Numbering ............................................................................................... 17
MB 11-10 thru MB 11-16: Service Codes ............................................................................................... 18
Section 12-XX: Night Mode Service............................................................................................................ 20
MB 12-04: Holiday Night Mode Switching ............................................................................................. 20
Section 13-XX: Speed Dialing ..................................................................................................................... 20
MB 13-04: Speed Dialing Number and Name ........................................................................................ 20
WebPro Administration Guide
Page 1
Section 15-XX: Extension Setup ................................................................................................................. 22
MB 15-01: Extension Basic Setup ........................................................................................................... 22
MB 15-07: Function Keys ....................................................................................................................... 23
MB 15-09: Virtual Extension Ring Assignment....................................................................................... 27
MB 15-11: Virtual Extension Delayed Ring Assignment ........................................................................ 28
MB 15-20: LCD Line Key Name Assignment ........................................................................................... 28
MB 15-22: Mobile Extension Speed Dial Target .................................................................................... 29
Section 20-XX: System Options .................................................................................................................. 29
MB 20-16: Selectable Display Message ................................................................................................. 29
MB 20-17: Operator’s Extension ............................................................................................................ 30
MB 20-29: Timer Class for Extensions.................................................................................................... 30
Section 21-XX: Outgoing Service ................................................................................................................ 31
MB 21-04: Toll Restriction Class for Extensions ..................................................................................... 31
MB 21-13: ISDN Calling Party Number Setup for Extensions................................................................. 32
Section 22-XX: Incoming Call Service ......................................................................................................... 33
MB 22-04: Incoming Ring Group Extension Assignment ....................................................................... 33
MB 22-10: DID Translation Area Setup .................................................................................................. 33
MB 22-11: DID Translation Table ........................................................................................................... 34
Section 23-XX: Answer Service................................................................................................................... 35
MB 23-02: Call Pickup Groups ................................................................................................................ 35
24-XX: Hold/Transfer Service ..................................................................................................................... 36
MB 24-01: Hold System Options ............................................................................................................ 36
MB 24-02: Transfer System Options ...................................................................................................... 37
MB 24-09: Call Forwarding Fixed Settings ............................................................................................. 37
Section 30-XX: DSS/DLS Consoles .............................................................................................................. 38
MB 30-03: DSS Console Key Assignment ............................................................................................... 38
Section 31-XX: External Speakers and Paging ............................................................................................ 39
MB 31-02: Internal Paging Group Assignment....................................................................................... 39
MB 31-03: Internal Paging Group Setting .............................................................................................. 39
Section 32-XX: Doorphones and Sensors ................................................................................................... 40
MB 32-02: Doorphone Ring Assignment................................................................................................ 40
Section 35-XX: SMDR and Account Codes ................................................................................................. 40
WebPro Administration Guide
Page 2
MB 35-06: Verified Account Code Table ................................................................................................ 41
Section 90-XX: Maintenance Command .................................................................................................... 41
MB 90-06: Trunk Control ....................................................................................................................... 41
MB 90-56: NTP Setup ............................................................................................................................. 42
How Do I? .................................................................................................................................................... 43
DID (Direct Line) Programming ............................................................................................................... 43
Mobile Extension: ................................................................................................................................... 43
Music on Hold ......................................................................................................................................... 45
Park and Retrieve Keys: .......................................................................................................................... 46
Geek Speak..................................................................................................... Error! Bookmark not defined.
WebPro Administration Guide
Page 3
Introduction
This document is will provide a general walk through of WebPro for the NEC SV8100 phone
system. WebPro is a web based application used to manage the NEC SV8100 system. WebPro is rich
with features to help users more easily manage their system when compared to conventional handset
programming.
Please note that each system is custom designed to fit the customer’s specific needs. Some of
the features and steps mentioned in this document may not apply to your system. Access codes and
extension numbers may be changed in order to accommodate your numbering plan. There may be
areas that you have access to that are not covered in this document. There may also be areas that are
covered but you do not have access to. If this occurs, contact your installing tech and request that they
enable these areas.
More information can be attained by contacting Gaynor
Telesystems.
AmeriCom
Important Note:
If you are unsure about the change you want to make, STOP! When you click apply, the change is
made immediately. It is possible to unintentionally make a change that will affect how the system
operates, so that the system appears to be broken or down.
If this happens, contact Gaynor Telesystems immediately. Gaynor is not responsible for any damage
caused by incorrect programming changes made by anyone other than a Gaynor Technician.
WebPro Administration Guide
Page 4
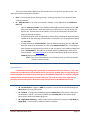
A Few Words of Wisdom
If you have a problem with a specific phone or feature, check another phone that is working the
way that you want it to work. Study and copy the programing of that phone to the one that is not
working properly. This is the easiest way to troubleshoot problems.
If you are assigning a memory block that allows different options for the multiple night modes,
assign the same data for each Night Mode, unless you specifically want the phone to act different in that
Night Mode. For example; if assigning MB 21-04: Toll Restriction Class for Extensions, enter the same
class for each Night Mode. Failure to do so would remove any restrictions you have created when the
system is switched into another mode. For most installations, only modes one and two are used. This
still should not stop you from assigning all modes. It is always possible for someone to inadvertently put
the system into the wrong mode by mistake, or on purpose. Having these modes assigned makes sure
that your system continues to function normally.
WebPro Administration Guide
Page 5
Getting Started
WebPro is the easiest and most efficient way to maintain your phone system. This guide only
shows the basic items you need to make the basic changes that are done for day to day business. Many
of the more advanced items are not covered in this guide. If you would like more advanced training,
contact Gaynor
Telesystems.
AmeriCom
Logging In
1.
To log into the system, open any web browser and in the address field enter the IP address of
the phone system.
2. The default login is:
User Name: ADMIN1
Password: 0000
Note: Your IP address and login (if different) will be provided by the tech installing your system.
WebPro Administration Guide
Page 6
Home Page
After logging in you are brought to the home screen. Each link will take you to a different portion of the
database. They will be described in greater detail later in this document.
Programming
System Configuration – Shows the physical layout of the phone system including circuit card
types and port numbers.
System Data – This is where the majority of the phone system programming is done. Most of
your time will be spent in this area of WebPro.
Wizards – Lists all of the memory blocks needed for programming features in a step by step
format.
Copy – Allows you to quickly copy programming from one phone to another.
Swap – Allows you to swap two phones to quickly move people when they are changing desks.
Administration
WebPro Settings – This is the basic IP information and ports for WebPro and PC Pro access.
Accounts Setup – Shows same information as WebPro Settings.
Session Management – Shows who has logged into WebPro along with dates and times.
System Initialization – This area allows you to re-set the phone system without physically
powering down and back on the unit.
Other
Help – Basic help info, including how to use some of the WebPro features.
WebPro Administration Guide
Page 7
Logout – Ends WebPro session.
Site Information – Basic information about the site including; Site Name, IP Address, System ID
(if a multi-site system), and current software version.
Links – If a UM8000 voice mail or another Special Application card is installed in the system, the
links to configure them will be placed here.
System Configuration
The Blade Configuration page shows the physical layout of the phone system along with the
types of cards installed and what physical ports they are using. There are links to reset circuit cards and
delete circuit cards on this page. Do not do either unless specifically instructed to by a Gaynor
technician. This page is to be used for information gathering only.
System Data
All programming changes are done through the Memory Blocks in System Data. Memory Blocks
are specific locations within the database that hold system information. When talking to a tech they will
instruct you to go to a specific memory block and make a change.
For example when asking for instructions on how to change the name in the display of a phone,
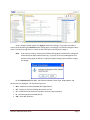
a tech will tell you to go to Memory Block 15-01-01. On the System Data page, the left side lists the
memory blocks available. Expand 15-XX: Extension Setup and click on 15-01: Extension Basic Setup.
The first entry 01 – Name is the Memory Block you are looking for. In the upper right of the screen is
the ICM Extension pull down that will allow you select the extension that you want to make the change
for. Do not forget this step or you will be applying the change to the lowest extension on your system
(this usually ends up being the receptionist phone).
WebPro Administration Guide
Page 8
Once a change has been made, click Apply to confirm the change. If you make a mistake or
want to undo something click Refresh before clicking Apply. Once Apply is clicked the change has been
made. The only way to go back is to input the old information manually and re-apply it.
Note: If you move to another memory block without clicking Apply or Refresh the change will
automatically be applied without warning. If you click on one of the Navigation Links
without clicking Apply or Refresh, a popup will appear asking if you would like to apply
the change.
On the ICM Extension pull down, the Extension Number, Phone Type, Display Name, and
Physical Port are displayed. The five Phone Types are:
MLT – Multiline Terminal (Standard NEC Digital Phone)
SLT – Single Line Terminal (Analog device such as a fax)
VE – Virtual Extension (Extension that does not have a physical phone)
IP – IP Phone (Network attached phone)
VM – Voice Mail Extension
WebPro Administration Guide
Page 9
Wizards
The Wizards area is a step by step walk through on programing specific features in the phone
system. They can be helpful when looking for all that is involved to set up a specific feature, but
sometimes take you to areas that are not completely necessary to program the feature you need.
WebPro Administration Guide
Page 10
Once a feature is selected the Memory Blocks are gone through in a step by step manner with
the Apply button replaced with a Next button. When you have gone through all of the Memory Blocks
necessary for the feature you are trying to program, the Next button is replaced with a Finish button.
This will take you back to the Wizards main page.
Copy
This section is used to quickly duplicate the programming of one phone to another. It is
effective but not the most efficient way to set up a phone. It is recommended that you use the System
Data section to program a phone rather than Copy.
WebPro Administration Guide
Page 11
To copy an extension select the Copy From Extension and the Copy To Extension (hold Ctrl to
select multiple extensions) and select the memory blocks to copy.
Swap
Swap is the easiest and quickest way to move phones around without calling a technician out to
do it for you. All programming will be swapped, including voice mail. The only other thing that will need
to be done is to physically swap the phones.
To swap phones select the two extensions in the Extension1 and Extension2 fields and click
Apply.
Note: There must be working phones at each location in order to do a Swap. If there is not a
working phone at one or both locations, a tech will need to go onsite and make the
physical connections for the phones.
WebPro Administration Guide
Page 12
WebPro Settings and Accounts Setup
These pages are for information gathering only. They show the IP address of the phone system.
If this IP address is changed, you will no longer be able to connect to the phone system.
Session Management
Session Management shows the last few times you have logged into WebPro. It shows the date,
time, and how long logged in.
System Initialization
This area is to reset of the phone system without doing a physical power-down.
Note: It is not recommended to re-set the phone system unless instructed to do so by a
Gaynor technician. The phone system can take from 2-10 minutes to reset depending
on how many phones and special applications there are.
WebPro Administration Guide
Page 13
To reset the system, click on 2nd Initialization and a warning popup appears.
Important Note:
Once you click “Ok” the phone system goes down immediately. Any calls currently in progress
are dropped. The displays in all phones will go blank and not come back until after the phone
system is back online.
WebPro Administration Guide
Page 14
Phone System Programming
This section will go over the Memory Blocks (MB) listed in the System Data section of WebPro.
The most important areas will be covered while areas that are not normally adjusted will be skipped. If
you require more information on the areas not covered contact Gaynor and it will be provided for you.
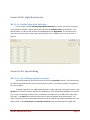
Section 10-XX: System Configuration
MB 10-01: Time and Date Setup
Enter the Time and Date information in this memory block. Input the hour in 24 hour format.
MB 10-04: Music On Hold Setup
Use 10-04-01 to select Music On Hold (MOH) type. Options are Internal or External. Internal
uses the built in music that the CPU provides. External uses the BGM/MOH output on the front of the
CPU. A mono 1/8th inch audio cable is needed to plug into whatever music device you supply.
WebPro Administration Guide
Page 15
Note: Do not forget to provide a power supply for the music device. If the device is not set on
repeat or the batteries go dead, music on hold will stop operating.
MB 10-21: CD-CP00 Hardware Setup
This memory block is used to select the CPU input source for Music On Hold. Do not adjust this
memory block unless directed to by a tech.
MB 10-24: Daylight Savings Setup
Turn on and off Automatic Daylight Savings. The dates can also be adjusted in this memory
block as well.
Section 11-XX: System Numbering Plan
MB 11-02: Extension Numbering
This memory block is used to assign extension numbers to physical ports in the system. It is also
used to assign extensions for IP Phones, and Mobile Extension as well. Extension numbers must be
valid numbers that fit within the numbering plan of the system. By default all extensions are three digits
WebPro Administration Guide
Page 16
in length and can start with 1, 2, or 3. This may be different on your system. Talk to the technician to
get the numbering plan for your system.
The Station Port is the physical port on each card. Use the System Configuration screen to see
what ports are assigned to each card. The connection blocks will also be labeled with the port numbers
as well, for cross-connecting the phones.
Note: If you do not have the proper tools or training, please do not attempt to cross-connect
phones yourself. Damage can be caused to the circuit cards by improper connections
and shorts. A flathead screwdriver is not considered the proper tool!
To assign an extension number for IP Phones and Mobile Extension, select a port that is not
being used by a circuit card and input a valid extension number. Please note that there are limitations
to what ports can be used by your system, they vary depending on the size and licenses your system
has. The technician installing your system will set up a range of ports that can be used for both IP
Phones and Mobile Extension.
Note: After applying a change in MB 11-02 you must go to the Home Page and Logout of
WebPro in order for the change to take effect. When assigning extensions for IP
Phones, the IP Phone must connect and register to the system before more
programming can be done on it.
MB 11-04: Virtual Extension Numbering
This memory block is used to assign extension numbers to Virtual ports on the system. Virtual
Extensions do not have a physical phone attached but can be programmed and called just like a regular
WebPro Administration Guide
Page 17
phone. They are used for people who need an extension number and voice mail box, but do not have a
desk to sit at.
Virtual extensions are assigned the same way as physical (real) extensions, except it does not
matter what port they are on. Find the first open (blank) port and assign the extension number to use
(remember that it must be a valid extension number within your numbering plan).
In some cases, incoming lines are routed through virtual extensions to allow us more flexibility
in how we handle the calls. The most common example of this is with the Incoming key on the phones.
This will be explained in greater detail during Extension Setup.
Important Note:
AmeriCom
Do not delete a Virtual Extension unless instructed to do so by a Gaynor
Tech or are 100% sure
that it is no longer being used by the phone system. Deleting a virtual extension that is currently in
use can create a lot of problems, including incoming calls no longer ringing properly.
MB 11-10 thru MB 11-16: Service Codes
These memory blocks list all of the service codes for accessing the different features of the
phone system. You will notice that some of them are blank. These are features that are not enabled or
licensed for your phone system. These memory blocks are to be used for reference only. Please do not
change these codes unless asked to do so.
WebPro Administration Guide
Page 18
Important Note:
Changing the access codes in this memory block will directly affect the level of remote service
AmeriCom
we can give you. Gaynor
Telesystems has a set standard that we use for the service codes of all our
customers in order to make it easier for us to help you over the phone. If you change a service code,
we will no longer be able to give you the correct code without logging into the system to check what
has been changed.
WebPro Administration Guide
Page 19
Section 12-XX: Night Mode Service
MB 12-04: Holiday Night Mode Switching
If your system is set for Automatic Night Mode Switching this is where you can set the system
to not switch for holidays. Find the day of year and input the Schedule Pattern you would like. The
default pattern you will use is 2, which is the standard after hours Night Mode. The tech that set up
your system can give you the exact pattern you will need to use. Holidays can be set up one year in
advance.
Section 13-XX: Speed Dialing
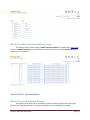
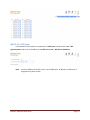
MB 13-04: Speed Dialing Number and Name
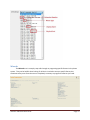
The system allows for each phone to have 20 of its own speed dial numbers. The system has up
to 2,000 shared speed dials that can be accessed from any phone. The system numbers are assigned in
this memory block.
To assign a speed dial, pick a bin (Speed Dial) that is empty and input it the phone number in the
Number field. Input the number exactly as you would dial it on the phone (after dialing 9 for an outside
line). If you are inputting a number that is in a different area code, be sure to add the 1 in front of the
area code. In the Name field, input the name that you want this number to be referenced by. The
phone system will list the names alphabetically so you do not need to worry about inputting them in any
specific order. The Transfer Mode and Destination Number fields will remain blank for speed dials.
WebPro Administration Guide
Page 20
The speed dials can be accessed two ways. The first is to press the Dir menu key followed by the
SYS menu key. You can scroll through the speed dials by name. When you find the one you are looking
for, just lift the handset or press speaker and the number will be dialed. The second is if you know the
bin number of the speed dial, you can press Redial followed by the last three numbers of the bin
number. For example; in the screen shot above, pressing Redial followed by 001 would call the Gaynor
Yuba City number (741-2044).
You can also block or re-route a phone number from this memory block as well. To block a
number find an open bin (use a higher number, preferably above 1,000) and input the number in the
Number field as it appears in the Caller ID. In the Name field give it an appropriate name to properly
document what it is being used for. Change the Transfer Mode field to Internal Dial. Set the
Destination Number to the extension that you want the call re-routed to. To block a call, create a
virtual extension in MB 11-04 and set the Destination Number to that extension. This will send the call
to an extension that is not assigned to ring anywhere, essentially blocking the call from reaching anyone
in your business without the caller ever knowing. Unless you forward the virtual extension somewhere
or have it ring on a phone, the call will ring until the caller hangs up.
WebPro Administration Guide
Page 21
Note: Remember that the phone system can only block calls based on Caller ID. If someone is
being blocked and calls from another number, they will get through. Some businesses
use multiple phone numbers for outbound calls. Blocking them all could be a difficult
task.
Section 15-XX: Extension Setup
MB 15-01: Extension Basic Setup
Important Note:
When making changes in MB 15-XX it is very important to remember to change to the proper
extension number in the ICM Extension pull down before making any changes. Failure to do so will
result in a change being made to the wrong extension. In most cases, the primary phone or reception
phone is the first extension that shows up.
WebPro Administration Guide
Page 22
Refer to the System Data section for information on how to select the proper extension and
what each means.
01 – Extension Name: Is used to program the name that shows up in the phones display. All
extension numbers can be given a name, including Virtual Extensions. If your voicemail is an In-Mail,
this memory block is used for the Spell by Name Directory. The name can be up to 12 Characters and
cannot include special characters (< >, { }, [ ], \ /, etc).
02 – Outgoing Trunk Line Preference: Is used to select if the extension is to grab a direct line
without having to dial 9 before the phone number. This memory block should only be checked for
phones that do not need to dial extension to extension calls such as faxes, lobby phones, etc (note:
calling voice mail is an extension to extension call).
Note: It is a good idea to give all extensions a name even if they are not assigned to a person.
A short description goes a long way when trying to remember what each extension
number is used for years from now.
Leave the rest of the data at default on this page unless instructed to do so by a Gaynor tech.
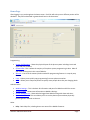
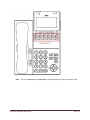
MB 15-07: Function Keys
Function Keys are the line keys that are on the phone. They can be programmed in a variety of
ways to make your most used features or most called people just a button away. The buttons are
numbered from top left to top right as Function Key’s one through six and continue on to the next row’s
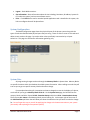
in order. The number of buttons on a phone can range from as little as two buttons, to as many as 32.
The image below shows a 12 button phone and how the Function Keys are numbered.
WebPro Administration Guide
Page 23
Note: The term Line Keys and Function Keys is interchangeable and you will hear both used.
WebPro Administration Guide
Page 24
To assign a Function Key, after selecting the extension to modify, find the key to program and
click the pull down in the Function field. Scroll through the Feature Options until you find the one you
are trying to program and click it. If the Feature Option requires Additional Data, enter it in the next
field. The first 16 Function Keys are shown on the first page. To advance to the next 16 click the small
blue arrow pointing to the right next to the Function Key (1~48) field in the upper right.
WebPro Administration Guide
Page 25
There are several Feature Options for the Function Keys, most of which you will not use. The
most important ones will be discussed here.
None: This blanks out the key making it empty. Pressing a key that is set as none will cause
nothing to happen.
01 – DSS/One Touch: This is the most common used key. Its use depends on the Additional
Data field.
o Input an extension number in the Additional Data field to make the button act as a BLF
(Busy Lamp Field) button. When that extension is off hook (or in use), the button will
light up red. The extension can be called or a call can be transferred to the extension
simply by pressing the button.
o To make the button call an outside phone number when pressed enter 9 and the phone
number to call the same way you would dial it on the phone (i.e. for long distance 1 and
the area code).
o To make the button a Feature button, input the feature code along with any additional
data that needs to be dialed after the code in the Additional Data field. For example, to
make a button to call forward your phone to your cell phone, in the Additional Data field
enter *741192232979. This code can be broken down as, *741 (Feature Code to Call
Forward All Call – see MB 11-11-01), 1 (to set Call Forward), 9 (to grab an outside line),
2232979 (phone number to forward to).
Note: If you use a Feature Button to set a Feature Code, you will need another
button to cancel it as well.
Important Note:
If a button is not working, find a phone that it is working on to use as a reference. This is the
easiest way to troubleshoot a feature button that is not working. Another way is to step through the
process manually on the phone before entering it in the Additional Data field. For example, using the
example above, manually forward your phone using the *741 code to see the exact steps that are
necessary to forward the phone. Note those steps, and put them in the Additional Data field.
03 – Do Not Disturb: Program a DND key on phone. You can also access DND through the
Menu Keys on the top of the phone.
05 – Headset: If using a wired headset program a Headset key on the phone to easily turn
the headset on and off. Connect the headset to the Headset jack on the bottom of the
phone next to where the Handset plugs into.
09 – Night Mode Switching: Used for Administrative phones to put system in Day Mode or
Night Mode. In most cases no Additional Data is necessary.
WebPro Administration Guide
Page 26
77 – In-Skin Voice Mail: This key is to get MWI (Message Waiting Indication) for a mailbox
other than the one attached to the phone (General Mailboxes, Department Mailboxes, etc.).
Input the mailbox number in the Additional Data field.
*00 – ICM Key: Placing an Intercom key on your phone will allow you to place internal calls
on hold and easily pick them back up.
*01 – Trunk Key: If you have a small system with only a few lines you might have Trunk
Keys. These represent Line 1, Line 2, Line 3, etc.
*03 – Virtual Extension Key: In most installations, the incoming calls will be routed through
a Virtual Extension. Placing a Virtual Extension (or even a real extension) on a line key on
multiple phones allows you to call that one extension and make several phones ring. Please
note that this Option only makes the key flash when the extension is called. To make it ring,
go to MB 15-09 as well.
*08 – CAP Key: In most installations, along with using Virtual Extension Keys to route the
incoming calls, CAP or Call Appearance Keys are used in the place of Trunk Keys. CAP keys
are not tied to a specific trunk and therefore allow more flexibility when assigning line keys.
CAP keys will be assigned by your installing technician on each phone. Each CAP key can
handle one outside phone call. Conference calls use one CAP key per outside caller that is
added to the conference call. To assign a CAP key, select this option and enter 0000 as the
Additional Data. Once you click apply, the next available CAP key will be selected and the
0000 will be changed to that number.
Important Note:
At least one CAP or Trunk key must be programmed on a phone in order for it to make or
receive outside calls. Outside calls can ring a phone with no CAP or Trunk key, but the user will not be
able to answer that line.
MB 15-09: Virtual Extension Ring Assignment
This memory block is used for function keys are assigned as Virtual Extension Keys. Find the
extension number that has the virtual key to ring, find the function key the Virtual Extension Key is on,
and check the check box for each mode that you want the Virtual Extension Key to ring.
WebPro Administration Guide
Page 27
MB 15-11: Virtual Extension Delayed Ring Assignment
This memory block is for when a Virtual Extension key is needed to ring after a set period of time
(10 Seconds by Default) rather than right away. To set delayed ringing, first assign the extension to ring
in MB 15-09, and then check the same boxes in this MB to enable delayed ringing.
Note: It must be set (checked) in both memory blocks in order for delayed ringing to work.
MB 15-20: LCD Line Key Name Assignment
For users that have purchased a DESI-Less LCD phone (model DTL-8LD), this MB is used to
program the names for each key. When Function Keys are assigned in MB 15-07 default values are
placed in this MB, but it is usually wise to re-name the key to something that makes the key easier to
identify by the user.
WebPro Administration Guide
Page 28
MB 15-22: Mobile Extension Speed Dial Target
This memory block is used to assign a mobile extension number to a speed dial bin (MB 13-04).
If you have Mobile Extension numbers available they will be listed here, assign the speed dial bin and
leave the rest set at default.
Section 20-XX: System Options
MB 20-16: Selectable Display Message
This memory bock allows you to customize the optional display messages when putting the
system into Do Not Disturb (DND). There are 20 messages total, one through 10 are already
WebPro Administration Guide
Page 29
programmed but can be modified. The # sign requires the user to enter numbers when they select that
message.
MB 20-17: Operator’s Extension
This memory block selects the extension numbers that will ring when another phone dials 0.
This is only for internal calls and does not affect when an outside caller dials 0 out of a voice mail box or
Auto Attendant. You can have up to eight total extensions ring. They will all ring at the same time.
MB 20-29: Timer Class for Extensions
This memory block is used mostly with Mobile Extension. Select the mobile extension number
in the upper right of the screen, and change the 0 to the class ID given to you by your installing
technician. Remember to make the change for all Night Modes.
WebPro Administration Guide
Page 30
Section 21-XX: Outgoing Service
MB 21-04: Toll Restriction Class for Extensions
If you system has been set up with Toll Restriction, this is where you will assign the restrictions
to each extension. Your installing technician will give you a list of restriction classes. Each class will
restrict a phone in a different manner. One may be for local calls only, one may be for only calls within
your area code, and another may allow two or more area codes along with your local area code.
The restriction classes can be as open or as restrictive as you like. A phone can be restricted all
the way so that it can only dial 911 and one other specific phone number. Work with your installing
technician to set up these restriction classes.
Note: When restricting a phone, always remember to allow 911 calls.
To assign the class to a phone, select the extension number in the upper right of the screen,
change the default 2 to the proper class for all night modes. The default class of 2 only blocks 1900 and
976 calls. All others are allowed.
WebPro Administration Guide
Page 31
MB 21-13: ISDN Calling Party Number Setup for Extensions
If you have a PRI, you are allowed to change the outbound Caller ID for each extension. Select
the extension number in the upper right, and enter the area code and number that you would like to
show up on the outbound Caller ID for that extension. The number must be entered in a 10 digit format
with the area code, followed by the number with no spaces or dashes. Example: 5302232979. Any
entry left blank will use the default Caller ID (usually the company main number).
Important Note:
Caller ID spoofing is against the law (intentionally entering the wrong Caller ID to
mislead someone). You are only allowed to enter numbers that are attached to the
PRI (i.e. direct numbers or the company main number). Some providers will even
block a call if the Caller ID does not match one of the numbers attached to the PRI.
Note: This memory block only works if you have a PRI. Analog lines or super trunks (T1’s) do
not support this feature.
WebPro Administration Guide
Page 32
Section 22-XX: Incoming Call Service
MB 22-04: Incoming Ring Group Extension Assignment
If your system is set up as Squared (line keys are set as trunk keys) then this is where you assign
what phones ring on incoming calls. Just enter the extension number that you want to ring in one of the
open fields. To make a phone quit ringing on incoming calls, remove the extension.
MB 22-10: DID Translation Area Setup
This memory block is to be used for information gathering purpose only. Please do not adjust
this MB unless directed to do so by a Gaynor Telesystems technician.
If your system has a PRI or DID’s then the incoming phone numbers are programmed in the next
two memory blocks. This MB will give you a general idea of where to look in the next MB (MB 22-11), to
find the number you want to program. In a typical setup, DID Translation Table 01 is used in Day Mode,
DID Translation Table 02 is used for Night Mode. The rest, if programed, are used for other modes, or
other sites if in a multi-site setup.
The area in Range 1 and Range 2 are the two different groups. Not all will match the screen
shot below, (some will be reversed or use a different range) but the general idea is, the unique set of
numbers in Range 1 is for the main numbers, and other numbers that need to go to different places
during different night modes (i.e. front desk during the day, and the Auto Attendant during the night).
The set of numbers in Range 2 are the same and will always go to the same place no matter what mode
the system is in. These are used for Direct Lines, fax lines, etc. Note the ranges used so that you can
easily find the number you want to modify in the next MB.
WebPro Administration Guide
Page 33
MB 22-11: DID Translation Table
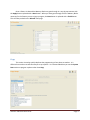
This MB is used to assign the specific DID’s to route to the different extensions on the phone
system. Find the range that is used in your system by checking out MB 22-10 and enter that number in
the DID Translation Table Entry (1-2000) field in the upper right of the screen. Navigate through the
different entries by using the blue left and right arrows.
Each entry is set up as follows:
01 – Received Number: This is the last four digits of the phone number you are looking for.
Scroll through the numbers until you find the one you want to modify. If looking for a
direct line, it will usually be closely related to the DID Translation Table Entry.
For example; if the direct number you are looking for is 224-9262 and the range is 100200, then look for table 162 to have an entry of 9262 for this field.
02 – Target Number: This is the extension number that the phone number should go to. An
entry of 196 will mean that the call is being sent to voice mail.
03 – Dial-in Name: This is the name that shows up in the display of the phone when a person
dials that number. It is always a good idea to give this field a name that describes what
the line is used for so that another person working on the phone system will know that
the line is used for a specific purpose.
04~11: Do not adjust these memory blocks unless instructed to do so by a Gaynor Tech. They
can cause odd side effects when messed with.
WebPro Administration Guide
Page 34
Section 23-XX: Answer Service
MB 23-02: Call Pickup Groups
Call Pickup Groups allow a user to pick up another ringing phone from their phone by dialing *#.
By default all phones are in the same pickup group. This can be a problem if phones are spread over a
large area. If this is left default, someone could inadvertently pick up a call from another department
while trying to pick up the call at the next desk over. There is a total of 64 pickup groups, use them to
your advantage.
To program this memory block, select the extension to change, and assign a Call Pickup Group
to it. The Priority Order is only used if two extensions in the same group are ringing at the same time.
The extension with the highest priority will be answered first.
WebPro Administration Guide
Page 35
Note: It is a good idea to document what groups are assigned to each specific department or
area. There is no place in the system to assign names to the groups.
24-XX: Hold/Transfer Service
MB 24-01: Hold System Options
This memory block is to adjust the timers used for placing calls on hold. The timers are as
follows:
01 – Normal Hold Recall Time: This is the time before a phone call recalls (starts beeping the
phone) when a call is placed on normal hold by pressing the Hold button.
02 – Normal Hold Callback Time: This is the time that a call will beep the phone during a Recall
event. Once this timer is up, the call goes back on hold and the Recall Timer starts over.
03 – Exclusive Hold Recall Time: This is the timer for when a call is placed on Exclusive Hold.
This is done by pressing the Feature key before pressing the Hold key.
04 – Exclusive Hold Recall Callback Time: This is the same as 02 except for Exclusive Hold.
05 – Long Hold Condition Forced Release Time: This timer will hang up on a call that is placed
on hold for too long. By default this timer is not used.
06 – Park Hold Time Recall Time: This is the Hold Recall timer for a call that is Parked.
07 – Extended Park Hold Recall Time: This timer is used if a call is set for Extended Park. By
default, this timer is not used.
WebPro Administration Guide
Page 36
MB 24-02: Transfer System Options
This memory block adjusts the timers and options for transferred calls. They are as follows:
01 – Transfer to Busy Extension: This selects if you want the ability to receive a second call
while on the phone. Check the box to enable.
02 – Ringback Tone to Transferred Calls: This selection allows you to choose what the caller
hears when they are transferred. The options are Ringback Tone or Music On Hold (Hold Tone).
03 – Delayed Call Forward Time: This timer adjusts the amount of time a call will ring a phone
before following the call forwarding programing in MB 24-09. This is usually to voice mail.
Gaynor usually sets this timer around 18 seconds, which is about four rings.
04 – Transfer Recall Time: This is the timer is used if a call is not no-answer forwarded to a
destination. After this timer expires, the call will return to the person that transferred the call.
05 ~ 13: These are usually left at default. If you need more information, contact a Gaynor Tech.
MB 24-09: Call Forwarding Fixed Settings
This memory block controls the call forwarding settings for both real and virtual extensions.
When a phone goes to voice mail after it is not answered, that is configured here.
01 – Call Forward Type selects the type of forwarding that will be done. The options are:
No Call Forward: The call will ring until it is answered.
Call Forward Both Ring: This is used to make two extensions ring at once. Assign this if
you are using Mobile Extension. Set the phone to have Mobile Extension to both ring
and assign the Mobile Extension number in fields 02~05.
WebPro Administration Guide
Page 37
Call Forward No Answer: This will forward the call if it is not answered by the time the
timer in MB 24-02-03 expires.
Call Forward Busy/No Answer: This is the same as above, but also forwards the call if
the extension is busy as well. This selection is typically used to forward a call to voice
mail. To forward a call to voice mail, select this option and enter the extension number
of voice mail in fields 02~05 .
Call Forward Busy: This will only forward a call if the extension is busy.
Note: The default extension to voice mail is 196. This may be different on your system,
depending on your numbering plan.
You can use options 02~05 to customize the forwarding depending on where the call originates.
For example, a phone can forward to a different extension (or outside phone number) if it is an
extension to extension intercom call than if it is a call from the outside world. Typically though, all of
these options are set to the same value. Options 06 and 07 are only used if you have Centrex lines and
need to do a Centrex transfer.
Section 30-XX: DSS/DLS Consoles
MB 30-03: DSS Console Key Assignment
If you have the large 60 button DSS side console on your phone, the keys for that device are
programed here. This memory block is programmed the same way as MB 15-07. If you have multiple
DSS consoles, select the console you want to program in the upper right before making changes.
Consult your installing tech to find out what number each console has.
WebPro Administration Guide
Page 38
Section 31-XX: External Speakers and Paging
MB 31-02: Internal Paging Group Assignment
This memory block is used to assign paging groups to the phones. You can have up to 64 paging
groups, but only 32 phones can be in a paging group. This includes the All Call Page group.
MB 31-03: Internal Paging Group Setting
This memory block is used to document what each page group is used for. This also shows up
on the display when that specific group is being paged.
WebPro Administration Guide
Page 39
Section 32-XX: Doorphones and Sensors
MB 32-02: Doorphone Ring Assignment
If your system has door phones, this memory block is used to assign the phones that will ring
when a door phone button is pressed. Select the door phone to program in the upper right, and enter
the extension numbers to ring for each mode in the open fields.
Section 35-XX: SMDR and Account Codes
WebPro Administration Guide
Page 40
MB 35-06: Verified Account Code Table
If your system is set up to use Forced Account Codes this is the area that those account codes
are entered into. A phone that is set to use Forced Account Codes will not be allowed to make an
outside call unless the user dials a code that exists in this memory block. It is up to you to keep track of
what each code is used for. Usually this is done through your SMDR software.
Section 90-XX: Maintenance Command
MB 90-06: Trunk Control
This memory block is used to busy out trunks. This is only to be used if a phone line has an issue
such as static, or is dead. Setting the trunk to Set Busy Out will make it so that the trunk is not grabbed
when dialing 9 for an outside line. When the line has been repaired remember to change it back to
Reset Busy Out so that the line can be used again.
WebPro Administration Guide
Page 41
MB 90-56: NTP Setup
If you would like your system to synchronize to a NTP server, check the box in 01 – NTP
Synchronization and enter the IP Address of the NTP server in 02 – NTP Server IP Address.
Note: Use the IP Address of the NTP server, not the DNS name. By default, no DNS server is
assigned to the phone system.
WebPro Administration Guide
Page 42
How Do I?
This section will cover some of the basic and most common features that you may want to
program up.
DID (Direct Line) Programming
DID’s are direct lines that can be assigned to each individual extension or department. If you
have a PRI, you probably have a bank of DID’s that you can assign to your employees.
Programming:
MB 22-10 – Look at the ranges assigned here. This will tell you where to look for the DID’s in the
next memory block. The range you will most likely be using will be the one that is the same for
all DID Translation Table Areas that are assigned.
MB 22-11 – Scroll through the DID Translation Table Entries to find the DID you would like to
assign.
o 22-11-01 – this is the last four digits of the phone number to assign. This entry should
already exist.
o 22-11-02 – Enter the extension number that the DID will go to.
Note: To un-assign a DID, make this field blank.
o 22-11-03 – Enter a name that will show in the display when this number is called. It is
always a good idea to enter something here even if you do not think it is necessary. This
help with documentation later on.
Usage:
Once the DID is programmed, call it to test. Caller ID should show in the display along with the
name programmed in MB 22-11-03. If the call is not answered, it should ring into voice mail just
like any other call to that extension.
Mobile Extension:
This feature links your cell phone to your desk phone so that they act as one extension for
incoming calls. If the call is not answered on your cell phone, the call will go to the NEC voice mail,
rather than the cell phone voice mail.
WebPro Administration Guide
Page 43
Before continuing, work with your Gaynor tech to find the port range that you should be
assigning the Mobile Extension numbers to as well as the limitations on how many Mobile Extensions
you can have. Your system is limited on the number of ports based on the licenses that you purchase.
Each mobile extension uses an additional port license.
Programing:
MB 11-02 – Assign an extension number to an open port. Pick a port that is in the range given
to you buy a Gaynor tech. Use an extension number that is within your numbering range but is
similar to your desk phone. For example, if your extension is 235, assign your mobile extension
as 335. This is not required, but will make it much easier to maintain in the future.
Note: After assigning the extension number, you must log out and back in so that the
extension number will be available for programming.
MB 13-04 – Pick a speed dial bin that is in the higher range but is also related somehow to the
extension number. Using the example above, we would use Speed Dial bin 1335. Assign the cell
phone number in the Number field. Give it a name in the Name field such as “Ron Mobile Ext.”
Leave the Transfer Mode, Destination Number and Incoming Ring Pattern at default.
MB 15-01 – Go to the Mobile Extension number and give it a proper name. This step is not
required, but is a good idea for documentation.
MB 15-22 – Find the Mobile Extension number in the Extension field and assign the Speed Dial
bin created above in the Mobile Extension Speed Dial Target field. The Connection
Confirmation field should be left at default but can be turned off if necessary. This field makes
the user dial * in order to connect the call. This is done so that the cell phone voice mail cannot
answer the call by mistake. The other two fields should be left at default.
MB 20-29 – Your installing tech should create a timer class for mobile extensions. Assign the
Mobile Extension number to this Class of Service for all modes. Do not assign the desktop
phone, just the Mobile Extension number.
MB 24-09 – Select the Mobile Extension number, and set it to Call Forward Busy/No Answer for
the Call Forward Type. Assign 02~05 to 196 (or the pilot of Voice Mail if different).
MB 15-07 – In order to turn this feature on and off, you must have a Set and Cancel button.
Select the extension number and find the two keys you want to assign. Set both as 01 –
DSS/One Touch Key.
o For the Set or On key, assign the second data as follows: *7451{ext}. Where {ext} is the
Mobile Extension number
o For the Cancel or Off key, assign the second data as follows: *7450.
Usage:
To use this feature, press the Set (On) key and the Speaker key. Once a call is transferred to the
desk phone, it will also ring the cell phone. When the call is answered on the cell phone, you
will hear a series of beeps. Press the * key to take the call. If the * key is not pressed, or the call
is not answered, it will go to the NEC voice mail.
WebPro Administration Guide
Page 44
To turn the feature off, press the Cancel (Off) key followed by the Speaker key.
Important Note:
Your cell phone may not ring right away. There is a delay between the time a call is placed, and
the time it takes before your cell phone starts to ring. This is a limitation of cell phone carriers, not the
NEC phone system. Your phone system may also take additional steps to press the * key. Work with
your
Gaynor tech to adjust the voice mail timer so that you can get the call in time.
AmeriCom
Music on Hold
This feature allows callers to hear music or your favorite radio station while placed on hold
rather than silence. This is especially important if you have an up-front Auto Attendant. When a call is
transferred to an extension, the caller knows that they are on hold and have not been hung up on.
Programming:
MB 10-04-01 – Set to External for using an external device, such as a CD player, or iPod. Set to
Internal, if you would like the default MOH tones. This is not recommended, these tones are
horrible and you will get a lot of complaints about them. Do not use Service Tone!! This
selection plays a busy tone to the callers on hold.
Usage:
Plug in your device to the front of the main processor’s CN8 MOH connector. The cable needed
is a 1/8th inch mono cable. The volume is adjusted on the device itself. Be sure to call in and
test the volume to make sure you are not blowing out your callers ears.
Night Mode Switching
Night Mode is typically used to turn the Auto Attendant on and off. This can be setup in a
number of ways. The easiest is to program a button to turn Night Mode on and off. You can also dial a
service code from an Administrative phone (*718 at default). There are a total of eight possible night
modes, but typically only modes 1 and 2 are used.
Programming:
WebPro Administration Guide
Page 45
MB 15-07 – Pick the extension (must be Administrative extension) and the line key to assign the
Night Mode key to. Set the Function field to 09 – Night Mode Switching. For the Additional
Data, assign the night mode that the system should switch into when the button is pressed (18). Set this field to 0 to make it a toggle button to go between modes 1 and 2.
MB 12-04 – If your system automatically switches to night mode, use this memory block to
assign the holidays and what mode the system should be in for those holidays. This will not
activate the Holiday Greeting in the voice mail, instead it will make sure that the phone system
does not switch into Day Mode on the Holiday.
Usage:
Press the Night Mode button that you programmed and press Speaker, or dial the Night Mode
Service Code (*718 at default) followed by the mode that you want the system to be in. Check
with your installing technician to see exactly how many Night Modes are set up on your system,
along with what each mode does.
Note: Only Administrative phones can put the system into Night Mode. If a non Admin phone
tries to put the system in Night Mode, nothing will happen. To find out what phones are
Administrative phones, or to assign a phone as Admin, talk to your installing tech.
Park and Retrieve Keys:
This feature is used for systems that are set up as CAP and CAR where instead of seeing each
individual lines on the phone, you will see Call keys. These keys are unique to your phone. Any call that
you take will show up on your phone but not others.
Programming:
Go to MB 15-07
Select the extension and key to program.
Assign the key as 01 – DSS/One Touch
o For a Park key, assign the second data as *4
o For a Retrieve key, assign the second data as 4#
Note: Be sure to check the programing of a phone that has a proper working Park and Retrieve
keys before assigning. In some cases the second data will be three digits, such as 4*0.
This is to make the Parking process easier by only having to dial one number after
pressing park rather than two.
Usage:
WebPro Administration Guide
Page 46
To Park a call, press the Transfer key, followed by the Park key and a location number. This will
be 00~64. If you are using the third digit as described above, the location number will be 0~9.
To Retrieve a call, press the Retrieve key followed by the location number.
Speed Dial Numbers
The phone system can have up to 2000 system speed dials and each phone can have 20 of it’s
own dedicated personal speed dials. The system speed dials are programmed through WebPro, and the
personal speed dials are programmed by each user at their phone.
Programming:
System Speed Dials
MB 13-04 – Pick an open Speed Dial bin (number) and assign the number just as
you would dial it
WebPro Administration Guide
Page 47