1
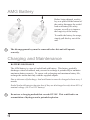
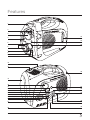
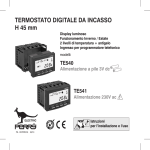
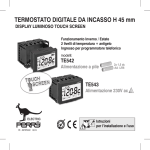
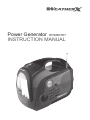
Power Generator RPS8807DT
INSTRUCTION MANUAL
Warnings and Precautions
TO PREVENT FIRE OR SHOCK HAZARDS, DO NOT EXPOSE
THIS UNIT TO RAIN OR MOISTURE.
The unit generates the same potentially lethal AC power as a normal
household wall outlet. Do not insert foreign objects into the AC Outlet,
the DC Power Socket and Cable Port, or the ventilation holes.
This symbol, located on back or bottom of the unit, is intended to alert the user to the
presence of uninsulated “dangerous voltage” within the product’s enclosure that may
be of sufficient magnitude to constitute a risk of electric shock to persons.
This symbol, located on back or bottom of the unit, is intended to alert the user to
the presence of important operating and maintenance (servicing) instructions in the
literature accompanying the appliance.
CAUTION: TO PREVENT ELECTRIC SHOCK, MATCH WIDE
BLADE OF PLUG TO WIDE SLOT, FULLY INSERT.
To reduce the risk of electric shock, do not remove cover (or back). There are no user-serviceable parts inside. Please refer any servicing to qualified service personnel.
WARNING: Changes or modifications to this unit not expressly approved by the party
responsible for compliance could void the user’s authority to operate the equipment.
NOTE: This equipment has been tested and found to comply with the limits for a Class B
digital device, pursuant to Part 15 of the FCC Rules. These limits are designed to provide
reasonable protection against harmful interference in a residential installation. This equipment generates, uses, and can radiate radio frequency energy and, if not installed and used
in accordance with the instructions, may cause harmful interference to radio communications. However, there is no guarantee that interference will not occur in a particular installation. If this equipment does cause harmful interference to radio or television reception,
which can be determined by turning the equipment off and on, the user is encouraged to
try to correct the interference by one or more of the following measures:
• Reorient or relocate the receiving antenna.
• Increase the separation between the equipment and receiver.
• Connect the equipment into an outlet on a circuit different from that to which the receiver is connected.
• Consult the dealer or an experienced radio/TV technician for help.
2
Warnings and Precautions
!
The dis-engagement key must be removed before this unit will operate
correctly.
!
Do not use a charging method for the unit that exceeds 15V DC. This could
lead to an accumulation of hydrogen and a potential explosion.
!
The compressor is designed for short term operation only. Operating the
compressor over an extended period of time will cause the compressor unit to
overheat, which could lead to fire.
!
Never leave the compressor unattended while in operation. The compressor
is capable of inflating to 250 PSI. Do not exceed the recommended pressure
of either the compressor or the object being inflated. If either recommended
pressure is exceeded, an explosion may result.
!
There is a danger of explosion if you attempt to charge standard AA batteries
in the Flashlight. Only use rechargeable AA NiMH batteries or the built-in
NiMH battery.
3
AMG Battery
Before being shipped, a safety
key was placed in the bottom of
the unit to disengage the sealed
lead-acid battery for safety
reasons, as well as to improve
the longevity of the battery.
To enable the battery for usage,
simply pull this key out of the
unit.
!
The dis-engagement key must be removed before this unit will operate
correctly.
Charging and Maintenance
BATTERY DISCHARGE
The AGM battery is a type of sealed lead acid battery. This battery gradually
discharges when left unused, and you need to recharge it periodically to maintain
maximum battery capacity. To ensure safe recharging and maximum battery life,
recharge the station unit only with the supplied adaptor.
Due to inherent self-discharge, lead acid batteries must be charged at least every 3
months.
Sealed lead acid batteries function best if they are discharged to only about 85% of
nominal voltage (10.2V on 12V battery).
!
Do not use a charging method that exceeds 15V DC. This could lead to an
accumulation of hydrogen and a potential explosion.
4
Features
1
2
3
4
23
24
5
25
6
7
8
9
10
11
26
12
13
14
15
16
17
18
19
20
27
28
29
21
30
31
22
32
5
Features Defined
1
Power Diagnostics Press the BATTERY LEVEL button to view the charge of the sealed lead acid
battery. The Charge and AC Output indicators show the status of the battery. If the Charge indicator is
red, unit is charging, and if it is green, the unit is fully charged. The AC Output indicator shows when
the AC output is switched on.
2
Air Hose Use the Air Hose to inflate an inflatable object.
3
Flashlight The inset flashlight can be removed from the unit by pressing the RELEASE button.
4 Torch Power Press the TORCH button to switch the inset Flashlight on and off.
5
DC Power (12V) Press the DC power button to enable or disable the DC SOCKET.
6
AC SOCKETS (120V) Use the AC 120V SOCKETS to power external devices. The AC Power button
must be switched to the on position for the sockets to receive power.
7
AC Power (120V/60Hz) Press the AC power button to enable or disable the AC SOCKETS.
8
DC IN 12 Use the DC IN jack to charge the unit, using an AC Adapter or DC car charger.
9
Air Compressor Power Press the AIR COMPRESSOR power button to turn the air compressor on and
off.
10 LAMP Toggle the LAMP switch between ALL, ONE, OFF, and EMERGENCY to adjust the lamp’s
light settings. If the switch is set to EMERGENCY and the unit is charging through the DC In, it will
automatically detect a power outage and power on the unit’s lamp.
11 Air Gauge Use the air gauge to view the pounds per square inch or kilogram per square centimeters of
air pressure, of an inflatable object.
12 Triple Fluorescent Lamp The Triple Fluorescent Lamp can be adjusted to different light settings using
the LAMP toggle switch.
13 LCD Display View the Time, AM Indicator, PM Indicator, and Radio Frequency through this Liquid
Crystal Display.
14 CLK ADJ/DISPLAY Press and hold the CLOCK button to set the clock and alarms. Press the DISPLAY button to cycle through the clock, alarm 1, and alarm 2 on the LCD display.
15 FUNCTION Press the FUNCTION button to cycle through AM, FM, WB (weatherband) radio, or
AUX Input.
16 ALARM 2 Press the ALARM 2 button to activate the alarm to buzzer or radio.
17 ALARM 1 Press the ALARM 1 button to activate the alarm to buzzer or radio.
18 MEM/ALERT Press the MEM button to save a radio station to the power generators memory. With
the power off, press the ALERT button to activate the alert feature, which sounds an alarm when emergency weather information is being broadcast through the weatherband.
19 SLEEP Press the SLEEP button to set the power generator to go off in 10 - 90 minutes.
20 VOLUME Press + or - on the VOLUME button to increase or decrease the volume.
21 Accessory Compartment Use the Accessory Compartment to store Air Hose attachments.
6
Features Defined
22 SNOOZE Press the SNOOZE button to delay ALARM 1 or ALARM 2 for 5 minutes after either one
has sounded.
23 Thermometer Use the thermometer to view the temperature in Fahrenheit or Celsius.
24 Release Press the Release button to release the inset flashlight from it’s compartment.
25 DC SOCKET (12V) Plug in to the DC 12V SOCKET using a car adapter to power external devices.
26 FM Antenna The FM extendable antenna provides flexibility and range when adjusting the FM reception. An AM Antenna is built into the player.
27 POWER Press the POWER button to turn the generator on or off.
28 - TUN/MIN/HR + Press + and - on the TUN button to change the AM, FM, or Weatherband radio frequency. Press + and - on the MIN and HR buttons to adjust the minute and hour when setting the clock
and alarms.
29 - MEM + Press + and - on the MEM button to cycle through the saved AM and FM radio stations.
30 AUX In Use the AUX (auxiliary) jack to connect other audio devices to the player.
31 SIREN Toggle the SIREN switch to ON to activate an emergency siren. When activated the Flashlight
will blink.
32 Reset Using a paperclip, press the reset button to restore all default factory settings on the power generator.
Run Times Chart
Powers and/or Recharges
Watts Run
Rating Time
AC Powered Products
Digital Cameras
2
50 Hrs
Camcorders
10
10 Hrs
Worklights
25
4 Hr
Color TVs (up to 13”)
48
2 Hrs
Portable Radios
50
2 Hrs
Laptop Computers
60
2 Hrs
Video Game Consoles
60
2 Hrs
Lamps
70
1 Hrs
Cell Phones
3
90 Hr
Portable Electric Coolers
60
3 Hrs
Portable Car Vacs
90
2 Hrs
DC Powered Products
7
Weatherband
National Oceanic and Atmospheric Agency (NOAA) 7 band
weatherband alerts you to the latest news and weather, specific to
the largest nearby city. In addition, you can tune into other local
broadcasts with the AM/FM radio.
8
Special Features
OP E
The flashlight can be run off
of the internal rechargeable
NiMh Battery, or it will take
4-AA Rechargeable Alkaline
Batteries.
N
“A
A
”U
M
-3
“A
S
A
IZ
E
”U
M
-3
S
IZ
E
EN
A
”U
M
-3
S
IZ
E
LI
”U
KA
A
AL
“A
M
ON
NE
OP
LE
AB
GE
AR
CH H)
RE i-m O FF
(N
S IZ E
ZE
-3 S I
” U M-3
” UM
“AA
“AA
“A
-3
S
IZ
E
INE
ON
S IZ E
ALKAL
E
- 3 S IZ
” U M-3
” UM
“AA
“AA
OFF
LE
RGEAB
RECHA )
(Ni-mH
!
Set the switch inside the battery compartment to NiMH to set the unit to
charge either the NiMH built-in battery or rechargeable AA NiMH batteries.
Set the switch to Alkaline when using non-rechargeable AA batteries.
!
There is a danger of explosion if you attempt to charge standard AA batteries.
Only use rechargeable AA NiMH batteries or the built-in NiMH battery, with
the switch set to NiMH.
Use the included air compressor adapters to inflate a variety
of inflatable objects.
These different air compressor
attachments can be stored in
the accessory compartment.
Emergency On
If the LAMP function switch is set to EMERGENCY and the unit is plugged into an
AC Outlet, the unit will automatically detect a power outage and power on the unit’s
lamp.
9
Operations
Setting the Clock & Alarms
a.
Press and hold the CLK ADJ button until the clock hour blinks
b.
Press Tune +/- to change the clock hour
c.
Press the CLK ADJ button
d.
Press Tune +/- to change the clock minute
e.
Press the CLK ADJ button again to set the ALM 1
f.
Press Tune +/- to change the ALM 1 hour
g.
Press the CLK ADJ button
h.
Press Tune +/- to change the ALM 1 minute
i.
Press the CLK ADJ button again to set the ALM 2
j.
Press Tune +/- to change the ALM 2 hour
k.
Press the CLK ADJ button
l.
Press Tune +/- to change the ALM 2 minute
m.
Press the CLK ADJ button
Using the AC Out Power (200W Maximum Output)
a.
Plug an AC appliance into one of the two AC outlets.
b.
Press the AC Power switch to turn the AC power on, the AC Power Indicator will
illuminate when the AC power is on.
c.
Use the appliance freely, and remember to recharge the unit afterwards.
This unit has built-in protection against output overload in the AC sockets. If you
connect an appliance that draws more than 200W, or one which draws excessive
surge power, the power to the AC outlet automatically shuts off. To resume AC
outlet use, switch off the AC power switch ,and then switch back on.
See the Run Times Chart on page 7 for length of use times.
10
Operations
Using the DC Out Power
a.
Plug an DC appliance into the DC outlet.
b.
Press the DC Power switch to turn the DC power on.
c.
Use the appliance freely, and remember to recharge the unit afterwards.
Using the Air Compressor
!
a.
Check the object you intend to inflate to find the appropriate PSI.
b.
Check the valve on the object you intend to inflate to find the appropriate valve
connector attachment for that specific object.
c.
Open the latch on the valve connector and place the valve connector securely on a
valve stem, then close the latch.
d.
Turn the Air Compressor on by flipping the Air Compressor Power switch.
e.
Once the Air Compressor Gauge reaches the appropriate psi, or lbs/in2, turn the Air
Compressor off and disconnect the valve connector.
The compressor is designed for short term operation only. Operating the
compressor over an extended period of time will cause the compressor unit to
overheat, which could lead to fire.
Allow the compressor to cool down for 10 minutes after each 10 minutes of continuous operation. There is an automatic shut-off if the compressor overheats.
!
Never leave the compressor unattended while in operation. The compressor
is capable of inflating to 250 PSI. Do not exceed the recommended pressure
of either the compressor or the object being inflated. If either recommended
pressure is exceeded, an explosion may result.
11
Service Information
Address
Phone Fax
Email Website
2116 Carr Street, St. Louis MO, 63106
1-314-621-2881
1-314-588-1805
[email protected]
www.weather-x.net
To download this Instruction Manual in English, Spanish, or French
visit the Support section at
www.weather-x.net.
Para descargar este manual de
instrucción en inglés, español, o
francés visite la sección de la ayuda en www.weather-x.net.
Pour télécharger ce manuel
d’instruction en anglais, espagnol,
ou le Français visitez la section de
soutien à www.weather-x.net.
© 2007 DPI, Inc. All NOAA related logos and references are trademarked or registered trademarks of the National Oceanic
and Atmospheric Administration (NOAA), U.S. Department of Commerce