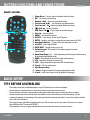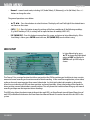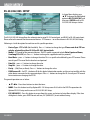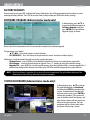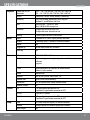
1
SVAT ELECTRONICS now you can see 4CH 15" LCD-DVR All-In-One System H.264 DVR with 4 Indoor/Outdoor Hi-Res Night Vision Security Cameras COMPLETE SYSTEM INSTRUCTION MANUAL Version 1.0 www.svat.com Model #: CLEARVU11 www.svat.com IMPORTANT! PLEASE READ! NEED HELP? DO NOT RETURN THIS PRODUCT TO THE STORE Please contact a SVAT customer support representative first regarding any additional information on product features, specifications or assistance with set-up. Please contact us via one of the methods below: Email: [email protected] Online live web chat: Visit www.svat.com Toll free telephone: 1.866.946.7828 Toll free fax: 1.888.771.1701 For more product information visit www.svat.com Note: This is manual version 1.1 for this product, you may find updated versions by visiting our website. CLEARVU11 2 IMPORTANT! PLEASE READ! PRODUCT WARRANTY INFORMATION Please visit our website at www.svat.com for information about your product’s warranty. We take quality very seriously. This is why all of our products come with a one year warranty from the original purchase date against defects in workmanship and materials. If you have warranty or support issues please contact us using any of the following methods: Phone: 1.866.946.7828 Fax: 1.888.771.1701 Email: [email protected] Website: www.svat.com SVAT USA 2315 Whirlpool St., Unit 333 Niagara Falls, NY USA 14305 SVAT CANADA 4080 Montrose Road Niagara Falls, ON Canada L2H 1J9 Warranty Terms 1. 2. 3. 4. 5. 6. 7. 8. SVAT products are guaranteed for a period of one year from the date of purchase against defects in workmanship and materials. This warranty is limited to the repair, replacement or refund of the purchase price at SVAT’s option. This warranty becomes void if the product shows evidence of having been misused, mishandled or tampered with contrary to the applicable instruction manual. Routine cleaning, normal cosmetic and mechanical wear and tear are not covered under the terms of this warranty. The warranty expressly provided for herein is the sole warranty provided in connection with the product itself and no other warranty, expressed or implied is provided. SVAT assumes no responsibilities for any other claims not specifically mentioned in this warranty. This warranty does not cover shipping costs, insurance, or any other incidental charges. You MUST call SVAT before sending any product back for repair. You will be sent a Return Authorization form with return instructions. When returning the product for warranty service, please pack it carefully in the original box with all supplied accessories, and enclose your original receipt or copy, and a brief explanation of the problem (include RA #). This warranty is valid only in Canada and the continental U.S. This warranty cannot be re-issued. CAUTION RISK OF ELECTRIC SHOCK, DO NOT OPEN MONITOR TO REDUCE THE RISK OF ELECTRIC SHOCK, DO NOT REMOVE THE COVER (BACK). NO USER SERVICEABLE PARTS INSIDE. REFER SERVICING TO QUALIFIED SERVICE PERSONNEL. CLEARVU11 www.svat.com TABLE OF CONTENTS SVAT ELECTRONICS now you can see Table of Contents INTRODUCTION................................................................................................................................................................ 3 WHAT IS INCLUDED.......................................................................................................................................................... 3 BUTTON FUNCTIONS AND CONNECTIONS......................................................................................................................... 4 15” LCD/DVR............................................................................................................................................. 5 REMOTE CONTROL.................................................................................................................................... 6 BASIC SETUP ................................................................................................................................................................ 6 TIPS BEFORE ASSEMBLING....................................................................................................................... 6 MOUNTING THE CAMERA.......................................................................................................................... 7 WIRING THE CAMERAS............................................................................................................................. 7 POWERING THE SYSTEM........................................................................................................................... 8 GENERAL INFORMATION.................................................................................................................................................. 9 MAIN SCREEN........................................................................................................................................... 9 TEXT INPUT............................................................................................................................................ 10 USING THE MOUSE.................................................................................................................................. 11 MOTION DETECTION SETUP USING THE MOUSE....................................................... 12 PTZ SETUP USING THE MOUSE................................................................................ 12 VIDEO ADJUSTMENT ICONS.................................................................................... 12 COMMON ICONS..................................................................................................... 12 ALPHA-NUMERIC KEY............................................................................................ 13 MAIN MENU.................................................................................................................................................................. 13 LOGIN/LOGOUT....................................................................................................................................... 13 STATUS DISPLAY..................................................................................................................................... 14 VIDEO ADJUSTMENT............................................................................................................................... 15 BACKUP DEVICE...................................................................................................................................... 15 SETUP.................................................................................................................................................... 16 PRE-CAMERA SET UP . ........................................................................................... 17 CAMERA SETUP...................................................................................................... 18 TITLE......................................................................................... 18 VIDEO LOSS SETTINGS................................................................ 18 MOTION DETECTION................................................................... 20 MOTION SETTINGS..................................................................... 20 MOTION SETUP................................... 20 COVERT...................................................................................... 22 CALL BY EVENT.......................................................................... 22 DWELL TIME.............................................................................. 23 AUDIO........................................................................................ 23 RECORD QUALITY AND RECORD IPS............................................ 23 EVENT RECORD IPS..................................................................... 23 PRE-RECORD IPS........................................................................ 23 NORMAL RECORD IPS................................................................. 23 ALARM SETUP........................................................................................................ 24 SEQ DISPLAY SETUP................................................................................................ 25 SCHEDULED RECORD SETUP....................................................... 27 HDD SETUP .............................................................................. 28 CLEARVU11 1 TABLE OF CONTENTS SVAT ELECTRONICS now you can see HDD FORMAT/CLEAR.....................................................................30 PASSWORD...............................................................................................................31 SYSTEM SETUP..........................................................................................................32 RS-232/422/485 SETUP............................................................................................33 NETWORK SETUP......................................................................................................34 EMAIL SETUP................................................................................35 ADVANCED NETWORK SETUP........................................................36 FACTORY DEFAULTS...................................................................................................37 SOFTWARE UPGRADE.............................................................................................................................37 SYSTEM SHUTDOWN..............................................................................................................................37 NETWORKING GUIDE........................................................................................................................................................38 CONNECTING YOUR DVR TO THE ROUTER................................................................................................38 FINDING THE DVR’S IP ADDRESS..............................................................................................................39 PREPARING YOUR COMPUTER FOR VIEWING THE DVR..............................................................................40 VIEWING YOUR DVR ON YOUR COMPUTER...............................................................................................41 INSTALL THE ACTIVEX CONTROLS ..............................................................................42 CONFIGURING YOUR ROUTER (PORT FORWARDING)...................................................43 FINDING YOUR DEFAULT GATEWAY.............................................................................43 CONNECTING THE DVR USING A ROUTER....................................................................44 FINDING YOUR IP ADDRESS.......................................................................................45 DYNAMIC DNS...............................................................................46 IF YOU CANNOT CONNECT..............................................................48 VIEWING YOUR DVR OUSTIDE YOUR NETWORK........................................................................................49 REMOTE VIEWING ........................................................................49 SEARCH MENU..................................................................................................................................................................52 SEARCH BY TIME.....................................................................................................................................52 PLAYBACK/ARCHIVE FOR SERACH BY TIME................................................................53 SERACH BY EVENT...................................................................................................................................55 PLAYBACK/ARCHIVE FOR SEARCH BY EVENT..............................................................56 SEARCH BY ARCHIVED FILES....................................................................................................................56 PLAYBACK FOR ARCHIVED FILES................................................................................57 PDA/MOBILE PHONE REMOTE ACCESS...............................................................................................................................57 CD SOFTWARE AND ARCHIEVED VIEWING ........................................................................................................................57 KEYBOARD CONTROL SIMULATOR...........................................................................................................58 TROUBLE SHOOTING ........................................................................................................................................................59 SPECIFICATIONS ..............................................................................................................................................................66 CAMERA SPECIFICATIONS.......................................................................................................................68 NOTES AREA ....................................................................................................................................................................70 CLEARVU11 2 INTRODUCTION SVAT ELECTRONICS now you can see You have just purchased a state of the art, ultra sleek, all-in-one LCD/DVR. This digital video system is especially designed for DIY surveillance. Your new system contains a H.264 compression system, which means that you will get more high quality video in less storage space. H.264 compression is a revolutionary way to store data and is highly compatible with surveillance applications. This LCD/DVR system also features six-fold operation without sacrificing the functionality, performance and reliability of the recording. Your new Clearvu11 is designed to be easy to setup and easy to configure to all your surveillance needs. If at any time you have questions, we are always here to help. Call our 24/7 live customer support line to get intelligent and understandable answers to any questions you may have about your new product. WHAT IS INCLUDED 15" LCD DVR with 320GB Hard 4 Outdoor Night Vision Cameras Drive 4 x 60ft. 4 PIN DIN to RCA (male) Power Cables 4 Window Warning Stickers 10ft RJ-45 Cable Software CD • • • • • 5 RCA to BNC Connectors CLEARVU11 8.5 ft. DC12V Power Adapter for DVR 1 - 4 port power supply for Cameras Mounting Hardware Quick Start Guide Instruction Manual 1 Year Warranty 24/7 Online/ Toll Free Support PS-2 Mouse 3 BUTTON FUNCTIONS AND CONNECTIONS SVAT ELECTRONICS now you can see 15" LCD/DVR 2 1 4 3 5 9 6 7 8 10 25 26 27 28 29 15 14 13 12 11 16 23 21 24 20 19 18 17 22 30 CLEARVU11 4 BUTTON FUNCTIONS AND CONNECTIONS SVAT ELECTRONICS now you can see 1. Monitor Speaker 2. MENU/ESC – Displays the main menus & returns you to the previous set of menus 3. Camera Selection Buttons (Ch1-Ch4) – Switches from full screen for selected camera 4. MODE/*/MARK – Toggles between live mode and playback mode 5. Quad View Mode (+/-) – Cycle between quad and single mode viewing or to change contents 6. CALL/BACKUP button – Copies playback images to USB storage device 7. Play/Pause (►/ ) – Plays recorded images, or pauses playback 8. Stop/PTZ button (■/PTZ) – Stops playback, or enters/exits PTZ control 9. LEDs –Indicators for POWER, & HDD access 10. Remote Control Infrared (IR) Sensor 11. Down/Delete button (►/DEL) – Moves curser vertically, controls PTZ cameras, works as “del” key 12. Right button (►►) – Fast forward, pans camera in PTZ controls 13. Enter ( ) – Confirms selection in navigating onscreen menus for DVR 14. Up/Backspace button (▲/BS) – Move vertically between camera views, works as “Backspace” key 15. Left button – Moves cursor horizontally, rewinds, pans camera in PTZ controls 16. Hard Drive Cover 17. Power Switch (POWER) – Turns the DVR off and on 18. Power Cord Inlet (POWER IN) – For DC-IN 19. Mouse plug port (PS/2) – For PS/2 mouse connection 20. LAN (Ethernet) – Connects DVR to the internet 21. Video Input Connectors – Connects cameras with BNC connectors (Ch1-Ch4) 22. Video Output Connectors – Connects additional TV monitors 23. Audio Input/Output Connectors –For connecting audio supported accessories 24. RS-485 Connector/Alarm Output Connectors/Alarm Input Connectors 25. Power – Turns the LCD monitor off/on 26. MENU/ENTER –Confirms selection in navigating monitor options 27. LEFT/- - Move left through monitor options 28. RIGHT/+ - Move right through monitor options 29. AUTO/ESC – Exits the monitor display options 30. USB Port – Connects flash drive for backup CLEARVU11 5 BUTTON FUNCTIONS AND CONNECTIONS SVAT ELECTRONICS now you can see REMOTE CONTROL 2 1 4 3 11 5 6 7 8 9 10 12 13 14 15 16 17 18 19 21 22 23 20 1. Alarm Reset – Cancels alarm activation/silences buzzer 2. REC – Force manual recording 3. Rewind (◄◄) – Rewinds in playback mode 4. Fast Forward (►►) – Fast forwards in playback mode 5. Step Forward - (► )- Moves playback ahead one frame 6. ( ) Back-up– Creates a backup 7. Play/Pause (►/ ) – Plays or pauses recorded images 8. Stop (■) – Stops playback 9. MENU – Calls up menu options 10.ESC/PTZ – Exits screen, or calls up PTZ options 11.ENTER - Confirms selection in navigating onscreen menus for DVR 12.Directional Buttons – Toggles the curser around the screen. 13.x2/GOTO – Enters digital zoom. 14.MUTE/NEXT – Toggles muting on or off 15. Volume Control - Only works with audio supported cameras (not included) 16. Quad View Mode (+/-) – Cycle between quad and single mode viewing or to change highlighted values 17. MODE - Cycles between Quad and Single mode viewing 18. SEQ - Sequences through camera views 19. CALL - Copies playback images onto USB Storage Device 20. Search - Calls up search menu 21. Alpa/Numeric keys 22. */mark - Toggles between live mode and playback mode. 23. #/code - Used in text input to call up different languages BASIC SETUP TIPS BEFORE ASSEMBLING • • • • • • The camera should be installed between 8 and 13ft above the area to be monitored. Ensure there are no obstructions in the camera’s view, to maximize viewing area. Ensure that the sunshade is positioned to avoid glare and position camera away from direct sunlight. Decide whether the camera will be wall-mounted or sit on a desk/table top. If wall mounting, use the mounting hardware in the package. We recommend that the mounting bracket is secured using the included screws for all installations. This camera comes with 60ft of video/power wire. Please make sure that you mount the cameras no more than 60ft from the TV/monitor/VCR/DVR. We recommend using a surge protected power bar to protect the cameras internal circuitry. CLEARVU11 6 BASIC SETUP SVAT ELECTRONICS now you can see MOUNTING THE CAMERA 1. Screw the mounting bracket into the camera’s mounting hole, turning it clockwise. 2. Mount the camera in the desired location no more than 60 feet from the DVR unless you have purchased additional wiring. You may wall mount or desk mount these cameras. 3. Adjust cameras to the desired viewing angles. WIRING THE CAMERAS Follow these instructions for the installation of each camera. The 60ft video/power wire has two connections: one for video out, and one for power. 1. Plug the 4PIN DIN female connection on the camera into the 4PIN DIN male connection on the 60ft video/power wire. 1 2 3 4 2. Plug the camera’s power supply into one of the 4 ports of the power supply. 3. Plug the four port power supply into the 12 V adapter. 4. Plug the power supply into the 12 V adapter. 5. Attach all of the BNC to RCA adapters to the camera inputs and the monitor outputs on the back of the LCD/DVR. 6. Connect the male RCA plug from the 60 ft power wire to the BNC connectors on the channel inputs (1-4) on the back of the DVR. 6 7 7. Plug the other end into the female end of the 3.5 mm wire from the camera. CLEARVU11 7 BASIC SETUP SVAT ELECTRONICS now you can see POWERING THE SYSTEM 1. Insert the power supply wire into the rear DC 12V Port on the LCD/DVR. 2. Plug the mouse into the PS2 port at the back of the LCD/DVR (recommended). 3. Insert the power cord into the power supply. 4. Plug the power cord into a power outlet. 5. Turn on the master switch on the back right of the system. 6. Press POWER on the top panel of the system if it doesn’t start after turning on the master switch. NOTE: We recommend using a surge protected power bar and/or Uninterrupted Power Supply (UPS) backup to prevent damage to your DVR system. CLEARVU11 8 GENERAL INFORMATION SVAT ELECTRONICS now you can see MAIN SCREEEN NOTE: The following instructions are described for use with the remote control. Front panel buttons may not match with the following directions. It is recommended that you use the included mouse or remote for full function. You must be logged in to access all the DVR menus. Please refer to page 13 for login instructions. The split-window screen, as shown above, is the main screen after system start-up. There are two types of on screen viewing modes, 1-Window and 4-Window. The system will remember the last viewing mode before normal shutdown. In addition to the split windows, the system time is displayed on the lower-left corner, the hard drive information on the lower-right corner, and the scrolling event messages (if shown while certain events occur), across the bottom. The system information, from left to right at the bottom of the screen, is described as the following: (1) SEQ display ON/OFF or playback state – SEQ icon shown for SEQ display ON, other icons for different playback states. (2) Backup state – Backup icon shown for backup. (3) Manual record ON/OFF – REC icon shown for ON. (4) Current Zoom – x1, x2, or x4. (5) Mute state –Speaker icon shown for not mute, not shown for mute. (6) Alarm recording percentage. (7) Normal recording percentage. CLEARVU11 9 GENERAL INFORMATION SVAT ELECTRONICS now you can see TEXT INPUT (To be used with remote control) There are certain circumstances where the system requires the user to enter text, such as system login, camera title setup, and so on. Below are the instructions on how to enter text using the remote control: 1. Press ENTER to edit the highlighted option. The flashing cursor will be shown to indicate the editing point. To aid in finding which key represents which letter, a keypad legend will be shown as below. 2. Press ◄► to move the cursor to the left/right. 3. Press #/code in text editing mode to change text case. (If you are in the number only mode, pressing #/ code will have no effects.) Indicators on the screen show the current setting: 123 = Number only abc = No capital letters ABC = All capital letters CODE = Internal code for the selected language, such as Chinese, Japanese, etc. 4. Press 2 for “2”, “a/A”, “b/B”, “c/C”. 5 for “j/J”, “k/K”, “l/L”. MUTE for “6”, “m/M”, “n/N”, “o/O”. Please refer to the Keyboard legend for any other alpha-numeric entries. 5. Press */mark to bring up a list of punctuation marks and special characters. The highlighted character in the list shows the selected one. Press ▲▼◄► to change the selection. 6. If you make a mistake, press BS (▲) to remove the character to the left of the cursor, or press DEL (▼) to delete the character at the current cursor position. 7. In text editing mode, internal code box, and mark list, press ENTER to exit and save changes, press ESC/ PTZ to exit without making changes. CLEARVU11 10 GENERAL INFORMATION SVAT ELECTRONICS now you can see USING THE MOUSE To make use of the mouse when operating the DVR please move the cursor to the bottom of the screen. You will see the icons of the mouse functions displayed. When you move the cursor over the icons, you will see the name of that icon. Below is a list of the icons and what their use is. Using the mouse is the simplest way of operating the DVR. Menu – Used to call up the full menu Forwards – Used to control the playback speed. It can be set for fast forward or slow forward 7. Play/Pause – Alternates between playback and pausing the playback. 8. Stop - Stops using playback mode 1. 2. 3. 4. 5. 6. 9. Search – Used to call up the search options ESC – Used to escape out of some menu options Backwards – Used to play the recorded footage in reverse. Can toggle between fast or slow reverse play Single Step – Will pause the playback. If paused and this button is pressed it will advance the playback slightly each time it is pressed. Copy –Pulls up the backup menu. A backup device must be connected. (See backup for more details) Sequence – Used to cycle live viewing mode between single camera, quad screen and sequence 10. & 11. Used to hide/reveal the viewing modes (removes icons adjacent to these) Camera selections – choose between cameras 1,2,3,and 4. 12. 13. 14. 15. 16. PTZ – Activates PTZ controls (see PTZ) Mode – Cycles between live viewing and playback on the selected camera Alarm Reset – Used to reset the buzzer and the alarm relay output Record – Manually start recording as per “Normal Record IPS” settings 17. x 2 Activates zoom mode - After pressing this button, a yellow box will appear. Move the yellow box by clicking the outside of it in the direction you want it to move. Clicking thw yellow box with zoom in 2x on what was selected by the yellow box. This can be done up to 4x digital zoom 18. Volume – Turns muting on or off CLEARVU11 11 GENERAL INFORMATION SVAT ELECTRONICS now you can see COMMON ICONS VIDEO ADJUSTMENT ICONS USING THE MOUSE MOTION DETECTION SETUP USING THE MOUSE Move the cursor to Menu -›Setup -› Camera -› Motion setting -› Detection setting Move the cursor to the bottom of the screen, the icons of motion detection will be displayed. PTZ SETUP USING THE MOUSE The PTZ camera functions and their corresponding icons are shown below. CLEARVU11 12 GENERAL INFORMATION SVAT ELECTRONICS now you can see ALPHA-NUMERIC KEYBOARD MAIN MENU While in the split-window display, press MENU (MENU/ESC) to call up Menu display as shown. We recommend using the mouse. With the mouse the menu is found by dragging the cursor to the bottom of the screen. If you are using the remote, simply press the menu button. There are a variety of displays under the Menu display. In Menu display and all the subsequent displays, the items enabled are shown in black-colored text, and those disabled in white-colored text. You will need to login before being able to access all functions of the DVR. Once logged in, the text will be black. The user’s operations are described as the followings: LOGIN AND LOGOUT • (▲▼ )Press these buttons to change the highlighted item. • ENTER Press this button to enter the detailed display of the highlighted option. For the details of each option, please refer to the corresponding sections. • ESC (MENU/ESC) Press this button to escape from Menu display, and return to splitwindow display. There are three password levels in the system, including Administrator (Admin) (highest), Supervisor, and Operator (lowest). If the user does not login to the system, he/she will be treated as “Guest” and can only view live video display. The system allows up to 18 user accounts. The administrator can set up the login name and password for each user. The Administrator can operate every aspect of the DVR while the Supervisor can only operate live video display, image playback and the archive. The Operator can only operate live video display. To login/logout of the system, press MENU when in the split-window display to call up the Menu display, and then press ENTER when the Login/Logout option is highlighted to enter the Login/Logout display as shown. CLEARVU11 13 MAIN MENU SVAT ELECTRONICS now you can see In Login/Logout menu, follow the Text Input method to enter the Login name and Password • Press ▲▼ to highlight login name, Use the text input method to enter the login name. Press Enter • Press ▲▼ to highlight password name, Use the text input method to enter the login name. Press Enter. • Press ENTER to login the system. • To logout of the system, just press ▲▼ to highlight and select the Logout option, and then press ENTER. • Press ESC (MENU/ESC) to exit without making changes. The preset administrator login name is “aa” and the password if “11”. The use can user this username to login to the system for the first time. STATUS DISPLAY In Menu display, press ▲▼ to change the highlighted option to Status, and then press ENTER to call up Status display as shown. The Status display is read only. The status display includes: • Alarm Recording Hard Drive Status • Normal Recording Hard Drive Status • Camera Event Status • Alarm Input Status • Product Serial Number • Product Version Number Press ESC (MENU/ESC) to exit from the Status display, and return to Menu display. CLEARVU11 14 MAIN MENU SVAT ELECTRONICS now you can see VIDEO ADJUSTMENT In Menu display, press ▲▼ to change the highlighted option to Video Adjustment, and then press ENTER to call up Video Adjustment display as shown. There are 4 items which can be adjusted, including Brightness, Contrast, Hue, and Saturation. The operations are as below: • ▲▼ - Press these buttons to select the items. • Numeric (CH1 – CH4) - Press these buttons to select the camera you wish to adjust . • (+/-) Press these buttons to adjust the selected item. • SEQ - Press this button to reset the settings for this camera to factory default values. • CALL - Press this button to reset the settings for all cameras to factory default values. • MODE - Press this button to restore the values to original setting. • ESC (MENU/ESC) - Press this button to escape from this screen, and return to Menu display. The settings will be saved for future reference. BACKUP DEVICE In Menu display, press ▲▼ to change the highlighted option to Backup Device, and then press ENTER to call up Backup Device display as shown below. The system supports a variety of USB 2.0 storage devices. (It will also support USB 1.0) The operations are as below: • ▲▼◄►Press these buttons to select the items. • ESC (MENU/ESC) -Press this button to escape from this screen, and return to previous display. • Connect/Disconnect – If the backup device is disconnected (as shown in Current Status), please plug the device in one of the backup ports (USB) and/or insert a DVD for DVD device, and then press ENTER to command the system to connect with it. If the device is already connected (E.g. R/W - Read/write, as shown in Current Status), please press ENTER to command the system software to disconnect with the device, and then unplug the device from the backup port. CLEARVU11 15 MAIN MENU SVAT ELECTRONICS now you can see NOTES: 1. DO NOT format the DVD disc for better performance and compatibility. 2. Before using USB pen drive, please format it to FAT32 file system by Windows XP or higher. 3. The backup device has to be connected by the system software before it can be used to read/write. 4. Some backup devices may have compatibility problems. Please contact Customer Support at 1-866-9467828 for any issues you may have. 5. Please DO NOT unplug the backup device when it’s connected, or the system may act abnormally or even shut down. Always disconnect the device from the backup device menu before removing it. • Backup - Press ENTER when this item is selected to backup the configurations of this unit to the corresponding device. This will be used to restore your configuration settings at a later time. • Restore - Press ENTER when this item is selected to restore the configuration settings from the corresponding backup device to this DVR. Tested USB 2.0 Drives (the DVR is not limited to only these devices) • Macpower’s Alumni Prefect USB 2.0 - PF-U2MS • Transcend’s JetFlash 150/V60 Series • Apacer’s Handy Steno AH220 • Pretec’s i-Disk Wave 512M-Black • Kingston’s DataTraveler USB Flash Drive • SanDisk’s Cruzer micro USB Flash Drive • Sony’s MICRO VAULT Classic Series NOTE: The DVR is not limited to only these backup devices. Other backup devices may work normally. SETUP (Administrator mode only) In Menu display, press ▲▼ to change the highlighted option to Setup, and then press ENTER to call up Setup Menu display as shown. To enter the Setup Menu display of the system, you must be logged in as an administrator. CLEARVU11 16 MAIN MENU SVAT ELECTRONICS now you can see From the setup menu, you can access various aspects of the system, including camera setup, schedule setup, network setup and password setup. • ▲▼- Press these buttons to change the highlighted item. • ENTER - Press this button to enter the setup of the highlighted option. For the details of each option, please refer to the corresponding sections. • ESC (MENU/ESC) -- Press this button to escape from Setup Menu display, and return to Menu display. PRE-CAMERA SETUP In Setup Menu display, press ▲▼ to change the highlighted option to Pre-Camera, and then press ENTER to call up the PreCamera Setup display as shown. Up to 4 cameras can be connected to the system. The Pre-Camera Setup allows the administrator to define some fundamental attributes for the installed cameras. The general operations are as below: • ▲▼◄► - Press these buttons to select the items. • Numeric (CH1-CH4) - Press these buttons to select the camera. • ESC (MENU/ESC) - Press this button to escape from this screen, and return to Setup Menu display. If the contents have been modified, a Save dialog will be shown to ask the user to save the changes, press ENTER to exit and save, ESC (MENU/ESC) to exit without saving. Following is a brief description for each item and its specific operations: • REC Resolution – the record resolution for all the cameras in the system. For NTSC, it can be 720x480, 720x240, or 360x240; for PAL, 720x576, 720x288, or 360x288. Press +/- buttons to select the resolution. • Watermark - press ENTER buttons to change the value. The watermark will permanently record time and date over the video clips. This is very important when logging video data, and using video as evidence. • Installed – whether this camera is installed or not. Press ENTER or +/- to check/uncheck this item. The default setting is “” - checked. When the camera is checked saying it is installed you can adjust the settings of that camera in the Camera Settings menu. If it is not checked, no adjustments can be made. • PTZ ID – the PTZ ID of this camera if it’s a PTZ camera. The PTZ ID has to be consistent with the setting of this camera. Please refer to the manual of the camera for the ID settings. Press +/- buttons to change the value (N/A or 0-255). The default setting is “N/A” – Not Available, which means that it’s not a PTZ camera. CLEARVU11 17 MAIN MENU SVAT ELECTRONICS now you can see CAMERA SETUP In Setup Menu display, press ▲▼ to change the highlighted option to Camera, and then press ENTER to call up Camera Setup display as shown. The Camera Setup allows the administrator to define the attributes for each camera. Up to 4 cameras can be connected to the system. This menu allows you to adjust various aspects for each camera. Important settings for cameras are: video loss settings, motion detection, record quality, and IPS (Images per second) settings. TITLE The title (Max. 8 characters) of this camera. Please follow the Text Input method to name each camera. Naming the cameras will help you immediately identify the location you are viewing (e.g.backdoor, office, etc.). VIDEO LOSS SETTINGS This menu is used to setup the action settings when video loss is detected for this camera. Press ENTER on Settings to call up Video Loss Setup menu for the camera. CLEARVU11 18 MAIN MENU SVAT ELECTRONICS now you can see Video loss settings are very important for surveillance, since anytime you lose footage, you lose valuable information. The Clearvu11 can perform various tasks when it detects loss of any video, depending on howit is setup. You can adjust the settings for each individual camera. In Camera Setup, press ENTER to call up Video Loss Setup of the selected camera as shown when the highlighted option is on Settings in the Video Loss row for the camera you wish to setup. Each camera will have its own settings and can be different from the other 3 cameras. The Video Loss Setup allows the administrator to define how the system responds to the detected video loss for the camera. The following is a brief description for each item and its specific operations: Duration – this displays how long (in seconds) the Alarm Out relay and the Buzzer will keep being triggered after video loss is detected for this camera. The Alarm Out relay and the Buzzer will be reset immediately once the camera returns to normal. Press +/- buttons to adjust the value (3 seconds-60 minutes, or discrete). Pre-record – this allows you to define how long before video loss is detected this camera shall be recorded using the pre-record IPS. Which means there can be up to 10 seconds of video always being recorded before a video loss occurs. The most recent “10 seconds” will always be in the buffer. Press +/- buttons to adjust the value (0-10 seconds, discrete). Please note that the actual pre-record time may be shorter than the value set if the total size of the pre-record pictures exceeds the pre-record buffer size of the system. Alarm Out – to define which Alarm Output will be triggered when video loss of this camera is detected. Press +/buttons to select none (N/A) or one of the Alarm Outputs (1-2). Buzzer – used to activate the internal Buzzer or not when video loss of this camera is detected. Press ENTER or +/- to check/uncheck this item. The default setting is “” - checked. Log – this selection allows you to create an event log (or not) when the system detects video loss. Press ENTER or +/to check/uncheck this item. The default setting is “” - checked. Screen Message – this selection allows you to display the event message on the screen (or not). A message will appear on the scrolling information section at the bottom of the display. Press ENTER or +/- to check/uncheck this item. The default setting is “” - checked. E-mail – this option will send an event e-mail to a pre-determined email address when video loss is detected. The e-mail will be sent to the predefined receivers at the moment the event is triggered. Press ENTER or +/- to check/ uncheck this item. The default setting is “–” - unchecked. You can set up the pre-determined e-mail in the network setup menu. The general operations are as below: • ▲▼- Press these buttons to select the items. • Numeric (CH1-CH4) - Press these buttons to select the camera. • COPY ( ) - Press this button to copy the Video Loss settings of the focus camera to all the following cameras. (E.g. focus camera is 1, its Video Loss settings will be copied to those of cameras 2-4.) • ESC (MENU/ESC) - Press this button to escape from this screen, and return to Camera Setup display. If the Save dialog is shown, press ENTER to exit and save, ESC (MENU/ESC) to exit without saving. CLEARVU11 19 MAIN MENU SVAT ELECTRONICS now you can see MOTION DETECTION The Clearvu11 has bulit in motion detection available for each camera . Press ENTER or +/- to check/uncheck this item. The default setting is “” - checked. MOTION SETTINGS This is the link used to setup the motion settings for this camera. Press ENTER on Settings to call up Motion Setup menu for the camera. MOTION SETUP In Camera Setup, press ENTER to call up Motion Setup as shown when the highlighted option is Settings in the motion setup row for the camera you wish to setup. The Motion setup allows you to define how the system responds to detected motion for the selected camera. Following is a brief description for each item and its specific operations: • Duration – response duration to define how long the DVR will record after motion is detected for this camera. Press +/- buttons to adjust the value (3 seconds - 60 minutes, or discrete). • Goto Preset – to define the preset position to go to if motion is detected (only works with PTZ cameras). For more details about preset locations, please refer to PTZ Control. • Pre-record – will define how long before motion is detected this camera will record at pre-record IPS. Press +/- buttons to adjust the value (0-10 seconds, discrete). Please note that the actual pre-record time may be shorter than the value set if the total size of the pre-record pictures exceeds the pre-record buffer size of the system. • Post-record – will define how long after motion is detected this camera will record at the set Event Record IPS. Press +/- buttons to adjust the value (0 second - 60 minutes, or discrete). • Alarm Out – will define which Alarm Output will be triggered when motion of this camera is detected. Press +/- buttons to select none (N/A) or one of the Alarm Outputs (1-2). CLEARVU11 20 MAIN MENU SVAT ELECTRONICS now you can see • Detection Settings - Calls up a grid system used for masking areas of the camera’s view. Fully explained on the next page. • Buzzer – this option allows you to choose to activate the internal buzzer (or not) when motion of this camera is detected. Press ENTER or +/- to check/uncheck this item. The default setting is “” - checked • Log – this option allows you to choose to log your events. Press ENTER or +/- to check/uncheck this item. The default setting is “” - checked. • Screen Message – to display the event message on the screen or not. Press ENTER or +/- to check/uncheck this item. The default setting is “” - checked. • E-mail – to send the event e-mail to a pre-determined email or not. The e-mail will be sent to the predefined receivers when the event is triggered. Press ENTER or +/- to check/uncheck this item. The default setting is “–” - unchecked. The general operations are as below: • ▲▼-- Press these buttons to select the items. • Numeric (CH1-CH4) - Press these buttons to select the camera. • COPY ( ) - Press this button to copy the Motion settings, including Detection settings, of the focus camera to all the following cameras. (E.g. focus camera is 1, its Motion settings will be copied to those of cameras 2-4.) • ESC (MENU/ESC) - Press this button to escape from this screen, and return to Camera Setup display. If the Save dialog is shown, press ENTER to exit and save, ESC (MENU/ESC) to exit without saving. CLEARVU11 21 MAIN MENU SVAT ELECTRONICS now you can see DETECTION SETTINGS This menu allows you to setup the motion detection settings, including detection area and sensitivity, when motion is detected for this camera. 10 being the most sensitive and 1 being the least sensitive. Press ENTER in Settings to call up Motion Detection Setup (as shown) for this camera. In Motion Detection Setup, the video area is divided into many small grids, and the area with transparent grids is the area which will be detected for motion. The gray grids represent the area that is not detected for motion. Following is a brief description of the operations: Numeric (CH1-CH4) - Press these buttons to select the camera. ▲▼◄►- Press these buttons to move the Mask window. (+/-) - Press these buttons to resize the Mask window. ENTER - Press this button to set/reset the area under the Mask window. MODE - Press this button to set/reset the whole video area. SEQ - Press this button to decrease the sensitivity, from 10 – 1, for the motion detection of this camera. (10 is the most sensitive). • CALL - Press this button to increase the sensitivity, from 1 – 10, for the motion detection of this camera. (10 is the most sensitive). • SEARCH - Press this button to test the motion detection of this camera. The detected motion will be shown on the screen. Press this button again to stop testing. • ESC (MENU/ESC) - Press this button to escape from Motion Detection Setup, and return to Motion Setup. • • • • • • COVERT If the camera is covert, the video of this camera can only be viewed if the user has logged in as Administrator. Press ENTER or +/- to check/uncheck this item. The default setting is “–” - unchecked. CALL BY EVENT This option allows you to switch the monitor display to show just the video of this camera if certain events occur for this camera. There are 4 options, including Off, Motion, Alarm, Both (Motion & Alarm). Press +/- buttons to select one. CLEARVU11 22 MAIN MENU SVAT ELECTRONICS now you can see DWELL TIME Dwell time refers to how long the video of the motion detection will stay on the screen. If Call By Event is set to Motion, Alarm, or Both. Press +/- buttons to adjust the value (3 seconds-60 minutes, discrete) to choose the “dwell time”. AUDIO The AUDIO IN corresponding to this camera. If selected, the audio data for the selected AUDIO IN will be recorded with the video data for this camera. Press +/- buttons to select none (N/A) or the AUDIO Inputs (1/2). The default setting is “N/A”. RECORD QUALITY AND RECORD IPS A brief explanation of IPS and recording quality will help you get the most of your system and the storage space you have. IPS (images per second) is the rate that the camera captures video. The less the IPS, the choppier the video will be, the higher the IPS the smoother the video will be. However, the higher the IPS, the more space on your hard drive the video will take. Note that you have a TOTAL of 120 IPS (30/camera) for all the cameras combined. To save space, and optimize your video logs, it is often recommended to set the normal record IPS low, so that when nothing out of the ordinary is happening the video quality is low, but not taking up too much space. You can then set the Event Record IPS and the Pre-Record IPS to a higher IPS so when an event occurs you guarantee a better quality video. This will help save space so you will not run out of hard drive space when an important event happens, and provide you with the optimal video for the times when it is most necessary. Record Quality – Sets the record quality for this camera. Press +/- buttons to select the value (1-9, with 1 the lowest (rough) quality, 9 the highest (fine) quality). Event Record IPS – the IPS (Images Per Second) for this camera if an event (Motion, Alarm) occurs for this camera. This camera will be recorded at this rate for post-record time since the event occurs. (Please refer to the following sections for post-record time.) Press +/- buttons to select the value (30 (NTSC)/ 0 – 25 (PAL), discrete). Pre-record IPS – the Pre-record IPS for this camera if an event (Video Loss, Motion, Alarm) occurs for this camera. This camera is recorded at this rate for Pre-record time before the event occurs. Please note that the total Event Record IPS / Pre-record IPS should not exceed the system recording capacity (NTSC: 120/CIF, 60/Half-D1, 30/ Full-D1; PAL: 100/CIF, 50/Half-D1, 25/Full-D1), or the system will lower the actual rate automatically at recording. Normal Record IPS – the normal record IPS for this camera. This camera will be recorded at this rate if no event occurs. Press +/- buttons to select the value (0 – Pre-record IPS for this camera, discrete). NOTE: The total Event Record IPS/Pre-record IPS can not exceed the system recording capacity (NTSC: 120/CIF, 60/Half-D1, 30/Full-D1; PAL: 100/CIF, 50/Half-D1, 25/Full-D1), or the system will lower the actual rate automatically at recording. CLEARVU11 23 MAIN MENU SVAT ELECTRONICS now you can see The general operations are as below: • ▲▼◄►- Press these buttons to select the items. The display will scroll left/right if the selected item is not shown on the screen. • Numeric (CH1-CH4) - Press these buttons to select the camera. • COPY ( ) - Press this button to copy all the settings - excluding detailed Motion settings, Video Loss settings, Title/Audio - of the focus camera to all the following cameras. (E.g. focus camera is 1, its settings will be copied to those of cameras 2-4.) • ESC (MENU/ESC) - Press this button to escape from this screen, and return to Setup Menu display. If the Save dialog is shown, press ENTER to exit and save, ESC (MENU/ESC) to exit without saving. ALARM SETUP In Setup Menu display, press ▲▼ to change the highlighted option to Alarm, and then press ENTER to call up Alarm Setup display as shown. The Alarm Setup allows the administrator to define the attributes for each alarm input, and the actions if it’s triggered. There are up to 4 alarm inputs which can be connected to the system. Following is a brief description for each item and its specific operations: • Normal State – press +/- buttons to select N/A, Close or Open. Please check the signal type, normally close or normally open, connected to the alarm input terminal on the rear panel of the system. If there’s no signal connected, please select N/A – Not Available, and the following items will not be setup. The default setting is Open. • Focus Camera – the camera corresponding to this alarm input. • Duration – response duration to define how long (in seconds) the Alarm Out relay and the Buzzer will stay on for after this alarm input is triggered. However, the Alarm Out relay and the Buzzer will be reset immediately once this alarm input returns to normal. Press +/- buttons to adjust the value (3-60 seconds, discrete). • Goto Preset – to define the preset position to go to for the Focus Camera if this alarm input is triggered (only available for PTZ cameras). • Pre-record – to define how long before this alarm input is triggered the Focus Camera will be recorded at prerecord IPS. Press +/- buttons to adjust the value (0-10 seconds, discrete). Please note that the actual pre-record time may be shorter than the value set if the total size of the pre-record pictures exceeds the pre-record buffer size of the system. CLEARVU11 24 MAIN MENU SVAT ELECTRONICS now you can see • Post-record – to define how long after this alarm input is triggered the Focus Camera shall be intensively recorded at Event Record IPS. Press +/- buttons to adjust the value (0 second - 60 minutes, discrete). • Alarm Out – to define which Alarm Output will be triggered when this alarm input is triggered. Press +/buttons to select none (N/A) or one of the Alarm Outputs (1-2). • Buzzer – to activate the internal Buzzer or not when this alarm input is triggered. Press ENTER or +/- to check/ uncheck this item. The default setting is “” - checked. • Log – allows you to either log an event or not. Press ENTER or +/- to check/uncheck this item. The default setting is “” - checked. • Screen Message – to display the event message on the screen or not. Press ENTER or +/- to check/uncheck this item. The default setting is “” - checked. • E-mail – to send an event e-mail to a pre-determined email or not. The e-mail will be sent to the predefined receivers when the event is triggered. Press ENTER or +/- to check/uncheck this item. The default setting is “–” unchecked. The general operations are as below: • ▲▼◄►- Press these buttons to select the items. • Numeric (CH1-CH4) - Press these buttons to select the alarm input. • COPY ( ) - Press this button to copy the settings of the focus alarm input to all the following alarm inputs. (E.g. focus alarm input is 1, its settings will be copied to those of alarm inputs 2-4.) • ESC (MENU/ESC) - Press this button to escape from this screen, and return to Setup Menu display. If the Save dialog is shown, press ENTER to exit and save, ESC (MENU/ESC) to exit without saving. SEQ DISPLAY SETUP In Setup Menu display, press ▲▼ to change the highlighted option to SEQ Display, and then press ENTER to call up SEQ Display Setup as shown. The SEQ Display Setup allows the administrator to define the display pages while in SEQ Display for main monitor and call monitor. There are 1 display type - 1-Window for main monitor, and 1 display type for call monitor. CLEARVU11 25 MAIN MENU SVAT ELECTRONICS now you can see Following is a brief description of each item and its specific operations: • Total Pages – total pages for the SEQ Display Type. The maximum number varies according to the display type. Press +/- buttons to select the desired number from the available list. • Dwell Time – the dwell time (3 ~ 60 seconds) for each page of this display type. Press +/- buttons to change the value. • Page Settings – used to set the camera in each viewing window for each page of this SEQ Display Type. Press ENTER to call up Display Page Setup as shown. In Display Page Setup, the split window display for the current page is shown. And the title of the camera for the focus window is highlighted. Following is a brief description of the operations: • Numeric (CH1-CH4) - Press these buttons to change the camera for the current page. • (+/-) - Press these buttons to change the current page for this SEQ Display Type. • ESC (MENU/ESC) - Press this button to escape from Display Page Setup, and return to SEQ Display Setup. The general operations are as below: • ▲▼◄►- Press these buttons to select the items. • ESC (MENU/ESC) - Press this button to escape from this screen, and return to Setup Menu display. If the Save dialog is shown, press ENTER to exit and save, ESC (MENU/ESC) to exit without saving. CLEARVU11 26 MAIN MENU SVAT ELECTRONICS now you can see SCHEDULED RECORD SETUP In Setup Menu display, press ▲▼ to change the highlighted option to Scheduled Record, and then press ENTER to call up Scheduled Record Setup as shown The Scheduled Record Setup allows the administrator to define when and how to record with the system. There are up to 16 time segments (T1 – T16) for each weekday. Each time segment will allow you to set up recording settings for certain periods of the day. To set up the time segments: - Select the day of the week you wish to setup. - Choose what time you want this segment to start (e.g. 9 am, when you open your business) - Set up the alarm, motion and normal recording settings for this time. A/V stands for Audio and Visual, A for audio, V for visual, No for no alarm. (e.g. you may wish to set them all for no, since you will be there at 9 am) - Set up the next time segment the same way. The end time of this time segment is implicitly set as the start time of next time segment, or the start time of the first time segment of the same weekday if it is the last one. (e.g. you may wish to set up the motion and alarm settings to start at 12 noon, since you will be gone for lunch. Therefore, from 9 am to 12 noon, there are not alarm or motion settings, at 12 noon it will start to detect motion and alarms) - Continue to do this until you have scheduled the entire day. (e.g. Noon-5 no action, 5pm-midnight motion and alarm, start the next day at midnight until 9 am etc.) Following is a brief description for each item and its specific operations: • Start – the start time of the time segment, which will go up in increments of 30 minutes. (The end time of this time segment is implicitly set as the start time of next time segment, or the start time of the first time segment of the same weekday if it is the last one.) Press +/- buttons to select the desired start time. Example: If the user sets the start time of T1/MON as 9:00, T2/MON as 18:00, T3-T16/MON as N/A (Not Available), then T1/MON is 9:00-18:00, T2/MON is 0:00-9:00, and 18:00-24:00. • Alarm – record mode (No, Video, or Audio/Video) when certain alarm input is triggered. Press +/- buttons to change the value. • Motion – record mode (No, Video, or Audio/Video) when motion is detected for a selected camera. Press +/- buttons to change the value. CLEARVU11 27 MAIN MENU SVAT ELECTRONICS now you can see • Normal – normal record mode, including, A/V (Audio/Video), V (Video only), or No (No Video). Press +/buttons to change the value. The general operations are as below: • ▲▼◄►- Press these buttons to select the items. The display will scroll left/right if the selected item is not shown on the screen. • COPY ( ) - Press this button to copy the settings of the focus weekday to all the following weekdays. (E.g. focus weekday is TUE, its settings will be copied to those of weekdays WED-SAT.) • ESC (MENU/ESC) - Press this button to escape from this screen, and return to Setup Menu display. If the Save dialog is shown, press ENTER to exit and save, ESC (MENU/ESC) to exit without saving. HDD SETUP In Setup Menu display, press ▲▼ to change the highlighted option to HDD, and then press ENTER to call up HDD Setup as shown. The Clearvu11 has a unique function that allows you to adjust the DVR to partition your hard drive to store a certain amount of normal recording and a certain amount of alarm recording. In the surveillance applications, alarm video/ audio can be much more important than normal video/audio. So, this digital video/audio recorder is designed to allow the user to divide each HDD into alarm partition and normal partition. Alarm video/audio will be recorded in alarm partition, normal video/audio in normal partition. This will prevent the hard drive from filling up with normal recording and tape over the important alarm recordings. The HDD Setup allows the administrator to format/clear each HDD, set Alarm Record size and Normal Record size of each HDD, and define the behaviors for Alarm Record and Normal Record if it reaches the end of the last HDD in the system. CLEARVU11 28 MAIN MENU SVAT ELECTRONICS now you can see The following is a brief description of each item and its specific operations: • Size (GB) – the total HDD storage in GB (Giga-Byte) for Alarm Record and Normal Record respectively. This item is just for information. Please refer to the section on HDD format/clear for detailed information and setup. • Auto Overwrite – allows you to automatically overwrite the recorded video/audio from HDD#1 when the Alarm/Normal Record disk drive capacity is full. If Auto Overwrite is disabled and the Alarm/Normal Record disk drive capacity reaches the end, the system will not overwrite the recorded video/audio, and hence not record Alarm/Normal video/audio, until the user presses the Alarm Reset button. Press ENTER or +/- to check/ uncheck this item. The default setting is “” - checked. • HDD Full Action –Activates certain actions when Alarm/Normal Record disk drive capacity reaches the end of the last HDD. Press ENTER or +/- to check/uncheck this item. The default setting is “” - checked. • Duration – response duration to define how long (in seconds) the Alarm Out relay and the Buzzer will keep being triggered after the corresponding selection, Alarm Record or Normal Record, is full. Press +/- buttons to adjust the value (3-60 seconds, discrete). • Alarm Out – to define which Alarm Output will be triggered when the corresponding selection, Alarm Record or Normal Record, is full. Press +/- buttons to select none (N/A) or one of the Alarm Outputs (1-2). • Buzzer – to activate the internal Buzzer or not when the corresponding partition, Alarm Record or Normal Record, is full. Press ENTER or +/- to check/uncheck this item. The default setting is “” - checked. • Log – to log to event logs or not. Press ENTER or +/- to check/uncheck this item. The default setting is “” checked. • E-mail – to send the event e-mail to a pre-determined email address or not. The e-mail will be sent to the predefined receivers when the event is triggered. Press ENTER or +/- to check/uncheck this item. The default setting is “–” - unchecked. The general operations are as below: • ▲▼◄►- Press these buttons to select the items. • MODE - Format/Clear - Press this button to format/clear the HDDs as described in the next section. • ESC (MENU/ESC) - Press this button to escape from this screen, and return to Setup Menu display. If the Save dialog is shown, press ENTER to exit and save, ESC (MENU/ESC) to exit without saving. CLEARVU11 29 MAIN MENU SVAT ELECTRONICS now you can see HDD FORMAT/CLEAR In HDD Setup display, press MODE to call up HDD Format/Clear screen as shown. The HDD must be formatted before it can be used to record video/audio. The HDD Format/Clear screen allows the administrator to format and/or clear each HDD, and set the size for Alarm Record option and Normal Record option for each HDD. The general operations are as below: • MODE - Format Press this button to format the HDD. A confirmation dialog will be shown on the screen, press ENTER to confirm, or ESC (MENU/ESC) to cancel. Please note that it will take a few minutes to format the HDD. NOTE: If the HDD has not been formatted yet, it will be formatted and split up with default record size, 30% for Alarm record and 70% for Normal record. If it has been formatted before, it will be formatted according to the Alarm REC Size (%) and Normal REC Size (%) displayed on the screen, but the previously recorded contents within the new size won’t be cleared and will be accessible. • SEQ - Clear Press this button to clear the HDD. A confirmation dialog will be shown on the screen, press ENTER to confirm, or ESC (MENU/ESC) to cancel. • CALL - Physical Format Press this button to physically format the selected HDD. A confirmation dialog will be shown on the screen, press ENTER to confirm, or ESC (MENU/ESC) to cancel. Please note that the recording will be always optimized for performance & lifetime no matter if it’s the first time or the one hundredth time. The formatting of the HDD would only take about 1 minute. We strongly recommend that the user use this physical format function to format the HDD for the first time. NOTE: The HDD will be physically formatted and split up with default record size, 30% for Alarm record and 70% for Normal record. All the previously recorded will be erased. CLEARVU11 30 MAIN MENU SVAT ELECTRONICS now you can see • ESC (MENU/ESC) - Press this button to escape from this screen, and return to HDD Setup display. If the Save dialog is shown, press ENTER to exit and save, ESC (MENU/ESC) to exit without saving. Following is a brief description for each item and its specific operations: • Size (GB) – the total storage in GB (Giga-Byte) for the HDD if it has been formatted. This item is just for information. • Alarm Record(%) – Alarm Record Size (in percentage) for this HDD. Please follow the Text Input method described in Section 4.1 to change the value. • Normal Record(%) – Normal Record Size (in percentage) for this HDD. This item is just for information. PASSWORD SETUP In Setup Menu display, press ▲▼ to change the highlighted option to Password, and then press ENTER to call up Password Setup menu as shown. The Password Setup allows the administrator to add new users, delete existing ones, and/or modify the user’s name, password, and/or level. There are three password levels in the system, including Administrator (highest), Supervisor, and Operator (lowest). The Operator can operate live video display, the Supervisor live video display, image playback and archive, and the Administrator everything. The system allows up to 18 different user accounts. The preset administrator login name is “aa” and the passowrd is “11”. The user can use this username to login to the system for the first time. The general operations are as below: • ▲▼◄►- Press these buttons to select the items. The display will scroll up/down if the selected item is not shown on the screen. • MODE => Select/Deselect as default - Press this button to select this user as the default one at login, or deselect if this user is the default login user. An asterisk (*) will be shown preceding the number for the default login user. This login name/password will be the default one each time the login dialog is shown, so the user doesn’t have to bother to enter the text to login the system every time. • ESC (MENU/ESC) - Press this button to escape from this screen, and return to Setup Menu display. If the Save dialog is shown, press ENTER to exit and save, ESC (MENU/ESC) to exit without saving. NOTE: If the asterisk (*) is removed from all users there is no default username or password saved when loggin into the DVR CLEARVU11 31 MAIN MENU SVAT ELECTRONICS now you can see Following is a brief description for each item and its specific operations: • Login Name – please follow the Text Input method • Password – this item accepts numbers only. Please follow the Text Input method. • Level – the password level (Administrator, Supervisor, or Operator) for this user. Press +/- buttons to change the level SYSTEM SETUP In Setup Menu display, press ▲▼ to change the highlighted option to System, and then press ENTER to call up System Setup as shown. The System Setup allows the administrator to set the system time, time zone, time synchronization, language, etc. Following is a brief description for each item and its specific operations: • Time Zone – press +/- buttons to select the time zone for the system. • Daylight Saving Time – press ENTER or +/- to check/uncheck this item to set the timezone that the DVR will be located. • System Time • Synchronization – time synchronized with TSP Server. Press ENTER or +/- to check/uncheck this item. The default setting is “–” - unchecked. • TSP Server – TSP (Time Synchronization Protocol) server name if Time Synchronization is enabled. The system will try to do time synchronization with the specified TSP server at the system preset interval. • Date – system date. Press +/- buttons to modify each of these items. • Time – system time. Press +/- buttons to modify each of these items. • Display Format – format used for the system time displayed on the lower-left corner of the main screen. Press +/- buttons to select the desired format. • Language – press +/- buttons to select the language for the system. The languages supported include: English, Turkish, simplified Chinese, Russian, Portuguese, and Italian The general operations are as below: • ▲▼◄►- Press these buttons to select the items. • ESC (MENU/ESC) - Press this button to escape from this screen, and return to Setup Menu display. If the Save dialog is shown, press ENTER to exit and save, ESC (MENU/ESC) to exit without saving. Please note that if the selected language is changed, the user will be asked to reboot the system for the newly selected language to take effect. CLEARVU11 32 MAIN MENU SVAT ELECTRONICS now you can see RS-232/422/485 SETUP In Setup Menu display, press ▲▼ to change the highlighted option to RS-232/422/485, and then press ENTER to call up RS232/422/485 Setup as shown. The RS-232/422/485 Setup allows the administrator to setup RS-232 control port, and RS422 or RS-485 control port. Please refer to the manuals for the connected devices - PTZ cameras – to set these items in RS-232/422/485 Setup. Following is a brief description for each item and its specific operations: • Device Type – PTZ or N/A (Not Available). Press +/- buttons to change the type. Please note that PTZ can only be selected for either RS-232 or RS-485, but not both. • Model – PTZ model of the connected devices. The PTZ models supported include Pelco D protocol Dome, SamSung SCC-641P, etc. Press +/- buttons to change the supported model (or protocol). • Baud Rate – press +/- buttons to change the value. This is a specific value defined by your PTZ camera. Please consult your PTZ manual for the baud rate and protocol. • Data Bit – press +/- buttons to change the value. • Stop Bit – press +/- buttons to change the value. • Parity – (Odd, Even, or None). Press +/- buttons to change the value. • DVR/Camera ID – for PTZ - the device ID for this digital video/audio recorder, and it must not conflict with the other devices connected in the same control port. Press +/- buttons to change the ID. Consult your PTZ manual for instructions on changing the PTZ ID. The general operations are as below: • ▲▼◄►- Press these buttons to select the items. • MODE - Press this button to call up Optional RS-232 Setup screen if it’s built in the DVR. The operations for Optional RS-232 Setup are the same as RS-232/422/485 Setup. • ESC (MENU/ESC) - Press this button to escape from this screen, and return to Setup Menu display. If the Save dialog box is shown, press ENTER to exit and save, ESC (MENU/ESC) to exit without saving. CLEARVU11 33 MAIN MENU SVAT ELECTRONICS now you can see NETWORK SETUP The general operations are as below: • ▲▼◄►- Press these buttons to select the items. • ESC (MENU/ESC) - Press this button to escape from this screen, and return to Setup Menu display. If the Save dialog is shown, press ENTER to exit and save, ESC (MENU/ESC) to exit without saving. Following is a brief description for each item and its specific operations: • Net Type – Static IP, PPPoE, or DHCP. DHCP can only be used for intranet (LAN) access, while Static IP and PPPoE can be used for both internet & intranet access. Press +/- buttons to change the Net Type. Please contact your network administrator for this. • IP Address – Ethernet IP address for the system. To get a static IP address, please contact your local ISP (Internet Service Provider). Please follow the Text Input method described in the begining of the manual to modify these items. • Net Mask – Net Mask for the IP address. Please follow the Text Input method described at the begining of the manual to modify these items. • Gateway – Gateway IP address for the system. Please follow the Text Input method described in the begining of the manual to modify these items. • DNS – DNS (Domain Name Server) IP address for the system. Please follow the Text Input method described in the begining of this manual to modify these items. • Username – PPPoE username for the system if PPPoE is used. Please follow the Text Input method described in the begining of this manual to modify this item. • Password – PPPoE password for the system if PPPoE is used. Please follow the Text Input method described in the begining of this manual to modify this item. • DDNS Type – Dynamic, Static, or Custom DDNS (Dynamic Domain Name Server) type. Please contact your local DDNS Service Provider to get the DDNS URL, username, and password. Press +/- buttons to change this item. • URL – the URL (Uniform Resource Locators) for the system if PPPoE is used. Please follow the Text Input method described in the begining of this manual to modify this item. • DDNS Username – DDNS username for the system if PPPoE is used. Please follow the Text Input method described in the begining of this manual to modify this item. • DDNS Password – DDNS password for the system if PPPoE is used. Please follow the Text Input method described in the begining of this manual to modify this item. • Use the ◄► keys to navigate over to E-mail or Adv. CLEARVU11 34 MAIN MENU SVAT ELECTRONICS now you can see E-MAIL SETUP In Network Setup, press ENTER to call up E-mail Setup as shown when the highlighted option is E-mail. The E-mail Setup allows the administrator to set all e-mail related parameters. When an event occurs and E-mail is enabled for the corresponding action, an e-mail will be sent based on the parameters set here. Contact ISP or E-mail provider to acquire the SMTP server and authentication information. The general operations are as below: • ▲▼- Press these buttons to select the items. • ESC (MENU/ESC) - Press this button to escape from this screen, and return to Network Setup display. If the Save dialog is shown, press ENTER to exit and save, ESC (MENU/ESC) to exit without saving. Following is a brief description for each item and its specific operations: • SMTP Server – SMTP mail server name. Please contact your email provider for this information. • Authentication – whether the SMTP mail server requires authentication. Press ENTER or +/- to check/ uncheck this item. • Username – username if the SMTP mail server requires authentication. • Password – password if the SMTP mail server requires authentication. • Mail From – the e-mail address of this DVR unit, i.e. the sender of the e-mails • Mail To #1-5 – the receivers’ e-mail addresses. The system can send the e-mails originated from the triggered events to up to 5 different receivers. • Attachment – attached picture for the e-mail sent. The value could be (N/A, Original picture, QCIF picture). Press +/- buttons to change this item. CLEARVU11 35 MAIN MENU SVAT ELECTRONICS now you can see ADVANCED NETWORK SETUP In Network Setup, press ENTER to call up Advanced Network Setup as shown when the highlighted option is Adv. The Advanced Network Setup allows the administrator to set advanced network parameters. If the user is not familiar with network administration, please DO NOT modify the items in this dialog. The general operations are as below: • ▲▼- Press these buttons to select the items. • ESC (MENU/ESC) -Press this button to escape from this screen, and return to Network Setup display. If the Save dialog is shown, press ENTER to exit and save, ESC (MENU/ESC) to exit without saving. Following is a brief description for each item and its specific operations: • Control Port – the control port for remote access. The default value is 67. Please follow the Text Input method described in the begining of this manual to modify this item. • Data Port – the data port for remote access. The default value is 68. . • HTTP Port – the HTTP (web page) port for remote access. The default value is 80.. • WAP Picture quality press+/- to change the initial value. Options are normal, fine, and superfine. Note: If the Control Port or Data Port is not available or accessible during remote access, the system will reset the ports to their default values, i.e. 67/68. NOTE: If the control port or data port is not available or accessible during remote access, the system will reset the ports to their default values, i.e. 67/68. CLEARVU11 36 MAIN MENU SVAT ELECTRONICS now you can see FACTORY DEFUALTS If you choose to reset your DVR, highlight the Factory Default tab. You will be prompted to either confirm or cancel resetting to factory defaults. Press ESC to cancel or Enter to fully restore your DVR to the factory settings. SOFTWARE UPGRADE (Administrator mode only) In Menu display, press ▲▼ to change the highlighted option to Software Upgrade, and then press ENTER to call up Software Upgrade display as shown. Please note that a backup device must be connected to complete the software upgrade. The operations are as below: • ▲▼◄►- Press these buttons to select the items. • ESC (MENU/ESC) - Press this button to escape from this screen, and return to Menu display. Following is a brief description for each item and its specific operations: • Backup Device – press ENTER to call up Backup Device dialog (if there is a backup device connected). • Disk Storage – to select the disk storage to upgrade. Press +/- buttons to select the available storage. • Upgrade File – press ENTER to start the upgrade process when the highlighted file is a correct upgrade file. A confirmation dialog will be shown on the screen, press ENTER to confirm to upgrade the system software. NOTE : After the software is upgraded, the system will restart immediately. The split window display will be shown after restart, this may take a few minutes to complete. SYSTEM SHUTDOWN (Administrator mode only) In Menu display, press ▲▼ to change the highlighted option to Shutdown, and then press ENTER to shutdown the system. A confirmation dialog box will be shown on the screen, press ENTER to confirm the shutdown. The system will save all the files and all the settings, and then display a power-off message in the rolling screen message area. The user may power off the system safely when the power-off message is shown. CLEARVU11 37 NETWORKING GUIDE SVAT ELECTRONICS now you can see Before you start let’s make sure that you have everything you need to do this properly. You should have these ready and connected before beginning: n DVR connected to a router. n Router connected to the Internet. n A PC or laptop that is connected to the same router that the DVR is connected to. The PC can be connected by a wired or wireless connection. n Internet Explorer 5.0 or greater (To check the version of Internet Explorer: Open IE. In the top menu bar click on “Help” and then click on “About Internet Explorer”. The version of IE will be displayed). n A genuine and fully updated version of Windows XP or Vista. Important: The computer and DVR need to be connected to the same router. A computer will not always be necessary at the location to view the DVR. NOTE: This guide was created using a cable modem and some procedures will be slightly different depending on your hardware. If you are using a DSL modem, you may need to enter your PPPoE settings into the DVR (User name and password provided by your ISP). For more information refer to your modem’s manual or contact your Internet Service Provider (ISP). CONNECTING YOUR DVR TO THE ROUTER 1. Power off the DVR by using the power switch on the back of the DVR. 2. Connect the included network cable to the back of the DVR in the LAN port. 4. Once both ends are connected, power on the DVR by using the power switch on the back of the DVR. 3. Connect the other end of the network cable to an available port on the router. The port on the router should be labeled 1-4, or 1-8. CLEARVU11 38 NETWORKING GUIDE SVAT ELECTRONICS now you can see NOTE: If you look at the router there should be a green “link” light indicating that the DVR is properly connected to the port that it was plugged into. If this light is on, you can proceed to finding the DVR’s IP Address. FINDING THE DVR’S IP ADDRESS Once the DVR is connected to the router you will need to find the IP address of the DVR. This is referred to as the “Internal IP Address” of the DVR. To check the DVR’s IP address: 1. 2. 3. 4. 5. 6. Press the Menu button. Select Login / Logout. Type in your username and press ENTER. Type in your password and press ENTER. Select Setup and press ENTER. Select Network and press ENTER. You are now at the network setup screen. Make sure the “Net Type” is set to DHCP. This setting is acceptable for most users. If your router does not support DHCP or the DVR needs to store PPPoE (ADSL) settings contact your network administrator or ISP (Internet Service Provider) for the proper IP address settings. NOTE: By default, the DVR network settings are set to DHCP. This means the DVR will automatically get an IP address from the router when it is connected properly. 7. Write down your IP address, Subnet Mask, Default Gateway, and DNS on the notes section. This information will be used to view the DVR on your computer and also assist in being able to view the DVR over the Internet. 8. Press “ESC” to exit out of Menu. Press ENTER to save changes. 9. Once you see confirmation, Press ENTER again. You have successfully configured your network settings. CLEARVU11 39 NETWORKING GUIDE SVAT ELECTRONICS now you can see PREPARING YOUR COMPUTER FOR VIEWING THE DVR Any computer that is accessing the DVR will need to be configured to install and run ActiveX controls and the Microsoft Visual C++ 2005 SP1. (This will require you to be logged into the computer as an Administrator). Either of the following 2 methods will prepare your computer for this: Method 1 (Recommended): Add the DVR’s IP address to the Trusted Sites in Internet Explorer. 1. Open up Internet Explorer. 2. Click on Tools. 3. Click on Internet Options. 4. Click on the Security Tab. 5. Click on Trusted Sites. 6. Click on Sites. 7. Type in the IP address of the DVR in the following format: http://192.168.0.93 and click Add. 8. If “Require server verification (https:) for all sites” is selected you will need to uncheck the selection box. * The IP address used in the example above is for internal network viewing. If you are trying to access the DVR from a location other than where the DVR is located than you will be adding the “External IP Address” to the trusted sites list (see “Finding your External IP Address”). 9. Now you need to change the default settings for the Trusted Sites zone. Click on Default level and change the security level of the zone to Low. This is done by sliding the slider security level to the bottom. (This will allow ActiveX controls to be downloaded and installed on your computer). 10.Click Apply. 11.Click OK. CLEARVU11 40 NETWORKING GUIDE SVAT ELECTRONICS now you can see Method 2: 1. Open Internet Explorer. Go to the drop down menu in the Tools area and select Internet Options. 2. Select the Security Tab and then click on the Custom Level button in this tab. 3. Change the ActiveX Settings to the ones seen in the image: • Download signed ActiveX controls: PROMPT • Download unsigned ActiveX controls: PROMPT • Initialize and script ActiveX controls not marked as safe: PROMPT • Run ActiveX controls and plug-ins: ENABLE • Script ActiveX controls marked as safe for scripting: ENABLE If this is an option: • Allow automatic prompting for file and code downloads: ENABLE. 4. Press OK. 5.Press APPLY. 6. Close out of the Options window. NOTE: You will need to complete the steps above for every computer you wish to view the DVR from. NOTE: If you do not have the ActiveX installed and the previous step did not download it, go to http://www. download.com and search for ActiveX. Download the ActiveX Download control. VIEWING YOUR DVR ON YOUR COMPUTER Now that the proper settings have been set up on the DVR and the computer has been configured to download the proper controls, you are ready to view the DVR on your computer. Type in the IP address of the DVR in the Internet Explorer browser in the following format: http://192.168.0.93 * The IP address used in the example above is for internal network viewing. If you are trying to access the DVR from a location other than where the DVR is located than you will be typing in the External Address (see “Finding the DVR’s IP Address”). CLEARVU11 41 NETWORKING GUIDE SVAT ELECTRONICS now you can see Install the ActiveX controls and Microsoft Visual C++ 2005 SP1 After typing the IP address into the Internet Explorer address bar and pressing ENTER: 1. There will be a yellow information bar that pops up below the address bar in Internet Explorer. Click on the yellow information bar and then select “Install ActiveX control”. Please be patient as the installation process can take 1-2 minutes. 2. Read the terms of the License agreement and press “YES” to continue with the installation. 3. After the Microsoft Visual C++ 2005 SP1 has been installed, you will be prompted to install the CMSPlugin.cab software. This is required to view and control the DVR. Select “INSTALL” to begin the installation. 4. Once the ActiveX control and Microsoft C++ 2005 PS1 have been installed, you will be prompted to type in a username and password. This is the same username and password that is used to access the menu system of the DVR. By default the username is “aa” and the password is “11”. Follow any instructions on screen and then log into the DVR by using a proper username and password. CLEARVU11 42 NETWORKING GUIDE SVAT ELECTRONICS now you can see CONFIGURING YOUR ROUTER (PORT FORWARDING) TO VIEW THE DVR EXTERNALLY * Your router will need to be configured properly before being able to view the DVR from a location different than the DVR* Port forwarding is a necessary step that opens a path on your home/business network to allow you to view your DVR from outside your network (over the Internet). There are hundreds of makes and brands of routers on the market and these instructions have been made using a D-Link router (Model DI-604). If you have a router that is different than the example shown, you can find step by step instructions on www.portforward.com. NOTE: SVAT technical support cannot troubleshoot modems, since changing these settings can potentially render your modem inoperable. ONCE YOU ARE ON PORTFORWARD.COM: 1. Find your router make and model in the list of routers and click on it. 2. If you see an advertisement, click on “Click here to skip this advertisement” in the top right-hand corner. 3. You will see a list of various applications. Any application will outline the port forwarding steps, but it is recommended to find a link for any DVR or IP camera and click that. 4. Follow the instructions but make sure you forward the correct port number (the port number assigned to your DVR). The default port numbers that need to be forwarded are 67, 68 and 80. All three ports need to be configured. FINDING YOUR DEFAULT GATEWAY (ROUTER’S IP ADDRESS) Your default gateway can be found by opening up a command prompt window and typing in IPconfig. Open the command prompt by completing one of these methods: 1. Select Start on your desktop, then select Run. Type in “cmd” and press ENTER. 2. Select Start on your desktop, then select All Programs. Click on Accessories and then select Command Prompt. 3. Hold down the Windows button and press letter “R” on your keyboard. Once the command prompt is open, type in IPconfig and press ENTER. This will list your computer’s IP address, subnet mask and default gateway. Your default gateway is the router your computer and the DVR are connected to. The subnet mask and default gateway on your computer should be the same as the DVR. CLEARVU11 43 NETWORKING GUIDE SVAT ELECTRONICS now you can see CONNECTING THE DVR USING A D-LINK ROUTER (EXAMPLE) In this example a D-Link D1-604 router was used. The steps for your router may be similar to the following steps. These instructions have also been created without a firewall in place. If you have a firewall, please consult a computer technician or your network administrator. You need to configure the router to forward the port numbers that the DVR uses. This will allow a computer over the internet to properly communicate with the DVR. The CLEARVU11 by default uses ports 67, 68, 80. All 3 ports need to be configured. 1. Open your web browser. Enter the ROUTER IP address (default gateway) in the address bar and press ENTER. 2. Enter the user name “admin”. Leave the password blank followed by pressing the OK button (unless you have set up a user name and password for your router). In this situation, our router username is “admin” and the password is blank. Your router’s default username and password can be found by visiting www.portfoward.com and following the steps outlined in “Configuring Your Router.” *If the default username and password are not working, contact your network administrator (or the person who configured your router.) * It is necessary to log on to your router to configure the port forwarding and access your DVR remotely. 3. Select the Advanced tab. CLEARVU11 44 NETWORKING GUIDE SVAT ELECTRONICS now you can see 4. Select the Virtual Server tab. • Select the Enabled check box. • In the Name field type in “DVR80”. • In the Private IP field enter the DVR’s IP address. • In the Protocol field, select Both (This will enable both TCP and UDP). • In the Private port enter the port number you need to forward. By default this DVR is set to port 80. Use port 80 unless you have a reason to change the DVR to another port (not recommended). • In the Public port re-enter the port number you entered in the private port field (e.g. 80). • In the Schedule field, select Always. • Click “Apply”. 5. Repeat all instructions listed in Step 4 (above) twice more, but enter port 67 the second time and port 68 the third time instead of port 80. You will also have to rename these to DVR67 and DVR68. 6. When complete, select the “Apply” button located at the bottom of the page to save your changes. 7. Port forwarding is now complete. You are now set up to view your DVR from anywhere in the world! To view your DVR remotely, type your External IP Address into the address bar in Internet Explorer. FINDING YOUR EXTERNAL IP ADDRESS Your external IP address will be used to access the DVR when the user is not at the same location as the DVR. For example, if the DVR is set up at home and the user wants to view the DVR while they are at work they would type in the External IP address of the DVR. There are many ways to find your External IP Address. The simplest way is to go to www.whatsmyip.org. This site will display your External IP Address in the top portion of the screen. If you go to www.portforward.com, it will also display this IP address. * Port forwarding needs to be configured properly before being able to view the DVR externally.* CLEARVU11 45 NETWORKING GUIDE SVAT ELECTRONICS now you can see DYNAMIC DNS Instead of having to remember and enter your IP address every time you want to access the DVR online, you can set up the DVR so that it is associated with a website URL (domain name) that is easy for you to remember. 1. Open internet explorer and type http://www.dyndns.com in the address bar. 2. Create a new account by clicking the “Create Account” link. 3. Enter your preferred user name, email address, and password. 4. The optional information can be left blank, unless you would like to enter it. 5. Read and agree to the Terms of Service by checking the boxes and click “Create Account”. 6. Check your email for a confirmation message from the site. You need to click the link in the body of this message in order to activate your account. 7. When you click the link, a window appears that displays “Account Confirmed”. Click the “login” link and enter the username and password you created. CLEARVU11 46 NETWORKING GUIDE SVAT ELECTRONICS now you can see 8. 9. 10. 11. Click on the “Services” button located on the top menu bar. Click on the Dynamic DNS link. Click on the “Get Started” link located on the menu on the right side of the screen. Type in a host name (subdomain name). We recommend you use your name, company name, or something that is easy for you to remember. 12. Choose a domain name from the dropdown menu. We recommend using the dyndns.org suffix. 13. In the IP address field, type in your external IP address. You may also have the option to “use detected IP address”, which will fill your IP address in for you. 14. Leave all of the other options as is, and click “Create New Host”. If you are having difficulty setting up this account contact DynDNS.com. This service is not supported by SVAT-USA CLEARVU11 47 NETWORKING GUIDE SVAT ELECTRONICS now you can see To configure the DVR to work with DDNS: 1) 2) 3) 4) 5) 6) Press Menu and Select Login / Logout Type in the username and password. (default username is “aa”. Default password is “11” Select Setup Select Network Change the Net Type to static. Note that the DHCP IP information should be copied over to Static. Navigate to DDNS and press - / + to choose the DDNS website you have created. Our instructions were for DynDNS.org. The following information will be acquired from the DDNS account you have set up online. 7) Enter the hostname of your DDNS account. (ex BriansDVR.dyndns.org) 8) Enter the username of the account you created 9) Enter the password of the account you created The DVR will now automatically log on to your DDNS account and update the website with your current External IP Address. IF YOU CANNOT CONNECT USING YOUR EXTERNAL IP ADDRESS If the Remote Viewing Software does NOT pop up, it could be that: • Make sure you are using Internet Explorer 6.0 or later. • Port forwarding is not set up. • You are not an administrator on the computer and cannot install the Microsoft add-on program. • A pop-up blocker is preventing the controls or DVR from showing up. • Your router is blocking your computer from using the External IP Address. Try connecting to this address from a remote computer that is not on the same network. • A DSL modem is preventing a connection. • Port 80 is being blocked by your ISP (Internet Service Provider). Try changing the HTTP port to 2000. Port forwarding will need to be set up for this port also. Check all your network connections and go through the above steps again to make sure a configuration error was not made. You may have to configure PPPoE settings to match the settings provided to you by your Internet Service Provider (ISP). Consult your ISP for more information on your PPPoE settings. If using a http port other then 80 the IP address must be entered with the port number at the end. (ex. http://74.11.213.177:2000 or http://74.11.213.177 :2000) some Internet Explorer browesers require a space before the port number. CLEARVU11 48 NETWORKING GUIDE SVAT ELECTRONICS now you can see REMOTE VIEWING Now that you know your external IP address, you can perform a test to ensure your DVR is accessible from outside your network (over the internet). 1. Open Internet Explorer, and in the address bar type in the External IP Address you just acquired from www.whatsmyip.org. It should be similar to the following: http://74.11.213.177 2. Press ENTER. The video images can be displayed in several types of split-window screens, including 1/4/9/16-Window. And the focus window is surrounded by a frame border. In addition to the video windows, there are different icons on the lower corner and the right corner of the screen for status display and control. (The “.L” following the camera title stands for Live display, “.P” for Playback, and the camera title with white background has detected motion.) NOTE 1: The frame rate is limited by the bandwidth of the network and the pre-record IPS of the camera NOTE 2: The picture quality depends on the recording resolution and recording quality of the camera When the user leaves Internet Explorer. he/she may be asked to save changes to files, please click on OK or Yes to save the changes. The operations and descriptions for these icons are as below: 1. -Click on these icons for 1/4/9/16-Window display. 2. 3. 4. CLEARVU11 - Click on this icon to switch to or return from SEQ display mode. - Click on this icon to toggle between live mode and playback mode for all the video windows. - Click on this icon to freeze/unfreeze the video images for all the video windows. 49 NETWORKING GUIDE SVAT ELECTRONICS now you can see 5. - Click on this icon to enable/mute the audio input from the PC, button down for enable, button up for mute. If enabled, the audio input from the PC will be sent to the DVR. The default setting is ‘mute’. 6. - Click on this icon to enable/mute the audio output from the camera for the focus window, button down for enable, button up for mute. The default setting is ‘mute’. 7. 8. - Playback panel for playback buttons, including Fast Backward, Fast Forward, Single Step, Play, Pause, Stop, and Copy (from left to right). Please note that the Copy function can be used to archive both live and playback streams. Please check/uncheck the cameras to be archived when the Copy Dialog is shown, and then click on OK or Apply button. If the user click on Apply button and select & highlight one of the cameras, the current copying status for that camera will be shown in the dialog. - PTZ control panel. If the camera in the focus window is a PTZ camera, these buttons in the PTZ control panel can be used for PTZ control. The operations include Tilt Up/Down, Pan Left/Right, Zoom In/Out, Focus Near, Focus Far, Iris – (darker), Iris + (brighter). 9. Camera 10. Alarm In 11. Alarm Out - Status indicators for cameras 1-16 (GREEN for normal, RED for motion) for the DVR. Click on any of these icons to select the corresponding camera of the DVR to be displayed in the focus window. - Status indicators for alarm inputs 1-4 (GREEN for normal, RED for alarm) for the DVR. - Alarm outputs 1-2 (GREEN for normal state, RED for triggered state) for the DVR. For Administrator, click on any of these icons to control the corresponding alarm output from normal to triggered, or from triggered back to normal. 12. Search by Time: - Click on this icon to call up Search-by-Time dialog. Please select the time (Year, Month, Date, Hour, and Minute) and recorded video/audio type (Alarm, Motion, Video Loss, and Normal) to search for playback. Click on Search button to start the search of the recorded video/audio. (If it failed, the result will be shown on the title of the dialog.) Now, you may use the playback buttons to play the recorded video/audio. Please note that there must be some cameras in playback mode for the search to succeed. 13. Search by Event - Click on this icon to call up Search-by-event dialog. The event logs will be shown on the screen. Please select the event type and source ID to search for the event logs. Click on Refresh, Up, or Down to update the event logs. Click on the desired event log to highlight and select it. Click on the OK button to search the recorded video/audio for the highlighted event log. Now, you may use the playback buttons to play the recorded video/audio. CLEARVU11 50 NETWORKING GUIDE SVAT ELECTRONICS now you can see 14. - Click on this icon to call up search-PC-video dialog. Please select the file, and then click on Open. Now, you may use the playback buttons to play the recorded video/audio in the file. 15. - Click on this icon to show/hide full PTZ control panel. The user can click on the PTZ Panel (but outside of any object in it) (to call up the Context menu) to move it. 16. Setup- Click on this icon to call up Setup dialog. 17. - Click on this icon to call up remote Software Upgrade dialog. Please select the DVR device and upgrade file in the PC, and then click on Start button to start the software upgrade process. The Upgrade status will be updated according to the progress. When the upgrade file is uploading, the user may click on Stop/Close button to stop the upgrade process. After the software in the DVR is upgraded, the DVR will restart immediately and the PC will be disconnected from the DVR. NOTE : There must be at least one formatted HDD in the DVR for the remote upgrade to succeed. Following is a brief description for each item: • Device Name – any meaningful name for the (DVR) device. • Address – IP address or URL domain name for the (DVR) device. It should be the same as the IP address (for Static IP) or URL (for PPPoE) in Network Setup for the (DVR) device. • Control Port – the control port for the (DVR) device. The default value is 67. • Data Port – the data port for the (DVR) device. The default value is 68. • User Name – the login user name for the (DVR) device. It must be in the list in Password Setup for the (DVR) device. Please note that different levels of users have different available operations. • Password – the corresponding password for the login user name for the (DVR) device. • Auto Connection – whether the user wants to connect automatically to this (DVR) device. • Connected – whether this PC is connected with the (DVR) device now. System Requirements of Remote PC It is recommended to access the digital video/audio recorder using a PC that meets the following system requirements. If you use a PC that does not meet the following system requirements, it may cause problems such as slow imaging or the browser unable to operate. • PC - IBM PC/AT compatible. • CPU - Intel® Pentium® 4, 1.4 GHz or above. • OS - MicroSoft® Windows® XP or Windows® 2000 with SP4. • Monitor - 1024 x 768 or above. • Memory (DRAM) - 512MB. • Network Interface - Ethernet, 10/100 Base-T. • Web Browser - MicroSoft® Internet Explorer® 6.0 or above. • DirectX - MicroSoft® DirectX® 9.0 or above. CLEARVU11 51 SEARCH MENU SVAT ELECTRONICS now you can see There are three ways to search the recorded video/audio for playback: (a) Search by time, (b) Search by event, (c) Search archived files. In split-window display, press SEARCH button to call up Search Menu display as shown. The user’s operations are described as the followings: • ▲▼- Press these buttons to change the highlighted item. • ENTER - Press this button to enter the corresponding Search display of the highlighted item. The Search displays and their operations are described in the following sections, followed by the playback operations of the searched video/audio. • ESC (MENU/ESC) - Press this button to escape from Search Menu display, and return to split-window display. SEARCH BY TIME The screen for Search By Time is shown on the right side: The Status field will show the ‘Recorded from’ time based on the selected Video/Audio before searching - alarm section if Alarm, Motion, or Video Loss, is checked, and normal section if Normal is checked. CLEARVU11 52 SEARCH MENU SVAT ELECTRONICS now you can see The general operations are as below: • ▲▼- Press these buttons to select the desired fields. • ESC (MENU/ESC) - Press this button to escape from this screen, and return to split-window display. • SEARCH / MODE - Press this button to start searching the recorded video/audio with the selected search time and video/audio type for playback. The search result will be shown on the bottom of this dialog if it failed. If there’s no camera in playback mode, all the cameras in the current split window will be set to playback mode. • Play Button (► )- Press this button to start playing the recorded video/audio with the selected search time and video/audio type. The search result will be shown on the bottom of this dialog if it failed. If there’s no camera in playback mode, all the cameras in the current split window will be set to playback mode. ) - Press this button to backup (copy) the selected type of recorded video/audio starting • Copy Button ( from the Search Time (described below) in the HDD to the connected backup device without playback. The Backup display (described in Section 8.4) will be shown. Please note that this kind of backup is performed in the background, and the user can still do almost all the operations. Following is a brief description for each item and its specific operations: • Search Time – (Year, Month, Date, Hour, Minute) for the recorded video/audio. The playback (or backup) will start from the time entered here when the user press the playback buttons (or Copy button) later. Press +/buttons to modify each item. • Video/Audio – (Alarm, Motion, Video Loss, Normal). Check the types of the recorded video/audio you want to search for playback. Press ENTER or +/- to check/uncheck each item. Playback/Archive For Search By Time In split-window display, press the MODE button to change through the live/playback mode for the focus window and the other windows on the screen. The video windows for the windows in playback mode are grayed, while those in live mode display live video. After the playback windows and cameras are all set as you want, you may use the following buttons to control the playback: • Play/Pause (►/ ) - Press this button to play the recorded video/audio searched at forward speed 1X, or pause the playback. If the playback is paused, press this button again to resume playing. Note that audio can only be played at forward speed 1X. • Stop (■ )- Press this button to stop playing the recorded video/audio. If the user presses this button later, the playback will start from the beginning. • Fast Forward ( ►►/► on the remote controller, ► on the front panel) - Press this button for fast forward playback. Each time this button is pressed, the forward playback speed will become faster, from 2X, 4X, 8X, up to 16X, and then back to 2X. • Fast Backward (◄◄/◄ on the remote controller, ◄ on the front panel) - Press this button for fast CLEARVU11 53 SEARCH MENU SVAT ELECTRONICS now you can see backward playback. Each time this button is pressed, the backward playback speed will become faster, from 2X, 4X, 8X, up to 16X, and then back to 2X. • Single Step ( ► ) on the remote controller, ( ►/del) on the front panel) - Press this button to play the recorded images frame by frame. ) - Press this button to copy or stop copying the playback video/audio to the storage device • Copy ( connected to the USB port. The Backup display will be shown as below. The following is a brief description for the operations in Backup display: • ▲▼◄►- Press these buttons to select the items. )- Press this button to start backup (copy) or apply the revised settings if it’s copying, and • Copy Button ( return to the previous display. There will be a Copy icon on the lower-right corner indicating that the selected video/audio is being archived to the storage device. For DVD disc, the files won’t be written to the disc until the storage size reaches 1 GB or the user stops copying. Writing to the disc may take more than 1 minute for every 100 MB (depending on the disc type). • Stop (■ )- Press this button to stop copying and return to the previous display. The Copy icon will disappear. • ESC (MENU/ESC) - Press this button to cancel, and return to the previous display. The description for each item and its specific operations is as below: • Backup Device – represents the backup device connected to the system. Press ENTER on the left button to call up Backup Device dialog if there’s no backup device connected. Press +/- buttons on the right selection to select the connected device. Please follow the steps described earlier to connect the backup device before copying. • Backup Speed – 1-9, with 1 the lowest speed, 9 the highest speed. Press +/- buttons to select the value. • Directory – the directory in the backup device to store the archived files. • Cameras – the video/audio of the cameras to be archived. Press ENTER or +/- to select/deselect each of the selectable cameras. • End Time – (Year, Month, Date, Hour, Minute) for the recorded video/audio for the backup without playback of Search By Time. The files will be backup from the start time to the end time entered here when the user presses the COPY button to start copying. Press +/- buttons to modify each item. Except the playback buttons, the user can still do all the other operations in split-window display as if there is no playback. CLEARVU11 54 SEARCH MENU SEARCH BY EVENT SVAT ELECTRONICS now you can see The screen for Search By Event - Log display, is shown below: There are four different types of event logs, including Alarm, Motion, Video Loss, and System. Up to 1000 of the most recent event logs can be stored in the system. The general operations are as below: • ▲▼◄►- Press these buttons to select the items. • ESC (MENU/ESC) - Press this button to escape from this screen, and return to split-window display. • MODE- Refresh - Press this button to refresh the log display. If there are new event logs after the screen is last updated, the log list shown will be updated accordingly. • SEQ - Page Up • X2 - Page Down - Press SEQ/X2 to Page Up/Down the Log display. • Numeric (ENTER) - Press these buttons to select the display page of the event logs, the log list will also be updated. (Please note that only 1/2/3/4 are available when using the keypad on the front panel.) Following is a brief description for each item and its specific operations: • Event Type – allows you to choose the type of the events (Record, Alarm, Motion, Video Loss, System) to be shown in the log list. The Event Type “System” includes all system related events, such as power on/off, and will not trigger recording. Press ENTER or +/- to check/uncheck the event type for the log list. • Source ID – reveals the source which triggered the event. It’s used to filter the events to be shown in the log list. For Alarm, it’s the alarm input number; for Motion and Video Loss, it’s the camera number. Press ENTER or +/- to check/uncheck each item. • Log List – the event logs according to the Event Type and Source ID selected. The user may: (1) press ENTER to enter Event Playback display of the selected event log in this list, (2) press Play Button (► ) to playback directly, or CLEARVU11 ) to backup (copy) the selected recorded video/audio to the connected (3) press Copy Button ( backup device without playback. 55 SEARCH MENU SVAT ELECTRONICS now you can see The Backup display will be shown. Please note that this kind of backup without playback is performed in the background, and the user can still do almost all the operations. Playback/Archive For Search By Event In Log display, press ENTER to enter Event Playback display of the selected event log, or press Play Button (►/ ) to playback directly. This display is the same as full screen display of the main display, and the playback buttons remain effective. The operations are as below: • Playback Buttons (►/ ,■ ,►►,◄◄, ► , ENTER)- These buttons are all the same as in Playback/ Archive For Search By Time. • Other Buttons - All the other buttons are the same as in Basic Operations. SEARCH ARCHIVED FILES The screen for Search Archived Files is shown to the left. Note that for this option to work, a backup device must be connected: The operations are as below: • ▲▼◄►- Press these buttons to select the items. • ESC (MENU/ESC) - Press this button to escape from this screen, and return to split-window display. Following is a brief description for each item and its specific operations: • Backup Device – press ENTER to call up Backup Device dialog (if there’s no Backup device connected). • Disk Storage – allows you to select which disk storage you wish to search in for the archived files. Press +/buttons to select the available storage. • Archived File List – lists the archived files in the selected Disk Storage. Please select the file, and then press ENTER to enter the Archived File Playback display of the selected file in this list, or press Play Button ( ) to playback it directly. You may press MODE to delete the selected file. CLEARVU11 56 SEARCH MENU SVAT ELECTRONICS now you can see NOTE : The format of the filename is camNN-YYYYMMDD-hhmmss.h264, where NN stands for camera number, YYYY year, MM month, DD date, hh hour, mm minute, and ss second. Playback For Archived Files In Search Archived Files display, press ENTER to enter Archived File Playback display of the selected file, or press Play Button (►) to playback it directly. This display is the same as full screen display of the main display, and the playback buttons remain effective. The operations are as below: • Playback Buttons (►/ ,■ ,►► ,◄◄ , ► , ENTER) - These buttons are all the same as in Playback/ ) is not effective in this display. Archive For Search By Time. Please note that COPY button ( • Other Buttons - All the other buttons are the same as in Basic Operations. PDA/Mobile Phone Remote Access The digital video/audio recorder can also be remotely accessed by using a web browser installed on a PDA or mobile phone that (1) supports xHTML and MJPEG file format, and (2) has screen resolution at 320x240 or above. Please enter the domain name or IP address of the digital video/audio recorder in the Location/Address field of the web browser, and the remote login display will be shown. (For most of the mobile devices, the DVR will automatically redirect to the correct web page, EX. http://192.168.1.120/wap.htm for IP address http://192.168.1.120. If not, please enter the full address with /wap.htm. The user may need to enter http://192.168.1.120:800/wap.htm if HTTP port has been changed to 800.) Please enter the correct login name and password for the digital video/ audio recorder to login the system, and the screen to the left will be shown on your mobile device. ID- Insert Login name here PSWD - Insert Login name password PIC Size - Choose the resolution to use with your phone browser. CLEARVU11 57 PDA/MOBILE PHONE REMOTE VIEWING SVAT ELECTRONICS now you can see The following is a brief description of each item and its specific operation. - will apply your changes - Q1, 1-4 will choose whether to view quad screen or an individual camera - IS-30S will choose your refresh rate - Alarm Outputs 1 and 2 (Unchecked for normal, Checked for Triggered) Administrator can trigger the alarm output and uncheck to set back to normal. - Status Indicators for alarm inputs 1-4. (Unchecked for normal, checked for triggered) There are several Windows utility programs on the bundled CD, HEM Player, Keyboard Control Simulator, and M4V/H.264 to AVI Conversion Utility. The HEM Player is meant to play archived/backed up files on your PC. The AVI Conversion utility converts H.264 files to standard *.AVI files. Please insert the CD in the CD-ROM or DVD-ROM drive in your PC, and then double click on /Setup.exe in the CD to install, and Utilities/Setup.exe to install the utility programs. Please follow the instructions on the screen to install the software in the default directory “Program Files\Hyper Electronics Mappers” or the directory entered by the user. For this model, please refer to the manual for HEM. For the other utility programs, please refer to the following paragraphs. HEM PLAYER Before running HEM Player in your PC, please make sure of the following: 1. DirectX® End-User Runtime 9.0 or above has been installed in your PC successfully. If not, please log on to http://www. microsoft.com to get the free download of it. 2. Please go to Start->Setup->Control, select Display->Settings, and set the Screen Resolution to at least 1024x768 and Color to 32-bit. CLEARVU11 58 CD SOFTWARE AND ARCHIVE VIEWING SVAT ELECTRONICS now you can see To run the HEM Player under Microsoft® Windows® XP or Windows® 2000, please select Start >Programs->Hyper Electronics Mappers->HemPlayer, and the screen will be shown as below. Since this utility is a free player utility for archived files, from USB backup or remote backup, some of the functions are disabled. The mouse cursor will change to “Hand” type if it’s on those enabled function icons. The operations and their descriptions are the same as in Remote Access. To select an archived file for playback, please click on File menu, and then select Open. After an archived file is opened, the user may click on the player buttons to play the file. The following diagram shows the screen after the Play button is pressed. The user may print the whole player screen (including the current video image) or the current video image by selecting File menu, and then select Print or Print Video respectively. KEYBOARD CONTROL SIMULATOR To run the Keyboard Control Simulator under Windows, please select Start->Programs->Hyper Electronics Mappers->KCtrlSimulator, and the screen will be shown as below. Please note that most of the buttons correspond to the keypads on the front panel. If you connect the PC through RS232 and use an RS-232/RS-485 converter to connect to multiple DVRs, you would be able to control multiple DVRs via the simulation software. Please refer to Optional Connections to connect/cascade the DVRs to the PC. To select the DVR to control, please click on the button as circled in the above diagram to set the corresponding DVR ID. Please note that the RS-232/422/485 setup, including the DVR ID, in the DVRs must be configured correctly (Model must be set as Control Protocol). Please use the buttons MAIN-AUX ON, MAIN-AUX OFF, CALL-AUX ON, CALL-AUX OFF to switch on/off the output of the controlled DVR. NOTE: UP-LEFT, UP-RIGHT, DOWN-LEFT, and DOWN-RIGHT are to control the PTZ cameras diagonally. CLEARVU11 59 CD SOFTWARE AND ARCHIVE VIEWING SVAT ELECTRONICS now you can see M4V/H.264 TO AVI CONVERSION UTILITY To run the M4V/H.264 to AVI Conversion Utility, please select Start->Programs->Hyper Electronics Mappers->M4V2AVI or double-click on the file AVI_ Converter.EXE, and the screen will be shown like the one to the right. • Please select the archived video footage for the source file. • Select the target directory for the converted audio/video files • Click OK to begin the conversion. The converted .AVI files can be played by Windows Media Player if DivX or the other MPEG-4 decoder (for.M4V) or H.264 decoder (for H.264) is installed in the PC. Information Sheet Please fill in the information you receive during this installation in the areas below: Your router manufacturer: ____________________________________________________Example: D-Link Your router model #:_______________________________________________________ Example: DI-524 Default Gateway (Router IP Address): _____________________________________________ Subnet Mask: ___________________________________________________________ DVR IP (Internal IP Address):__________________________________________http:// Port #: ___________ Example: 192.168.1.101 Example: 2000 External IP:________________________________________________________Example: 14.14.243.113 DynDNS Username:___________________________________________________ Example: myname1234 DynDNS Password:___________________________________________________ Example: 123ABC DynDNS Domain Chosen:________________________________________________Example: dyndns.org Sign-In URL:___________________________________________________Example:myname1234.dyndns.org CLEARVU11 60 TROUBLESHOOTING GUIDE Cannot see icons or access the menu (using the mouse) SVAT ELECTRONICS now you can see • Move the mouse cursor to the bottom of the screen. A task bar of available options will appear. You will need to login before you can utilize most of the functions. Some icons are missing (using • If you can not view the icons that appear on the mouse menu click on the mouse) icon ( ) to reveal the hidden icons next to it. Password information is saved in login. • The default username and Password is automatically saved to promptly log you into the menu system. • If you would like to have a different default username and password saved for quick access, or if you want to remove this feature: 1. Call up the Main Menu 2. Select Setup 3. Select Password - Notice an asterisk (*) next to the default username and password. This can be changed to a different username or can be turned off completely. 4. To select a different default username or disable the current default username. Highlight the username you would like to change. 5. Press the MODE/*/MARK button to change the default status of the highlighted username. 6. Exit the Menu. 7. When Prompted Save your configuration settings. •Login settings can be found and changed in the Menu > Setup > Password DVR is making a loud beeping sound • This beeping is referenced in the menu as a “buzzer”. The buzzer may go off if the DVR experiences any one of the following: video loss on a camera, motion detection, alarm/normal hard drive partition is full, or an alarm input is triggered. • Reference the manual for instructions on where to find and enable/disable the buzzer function for each possibility. Blue Screen while loading up. • The DVR will display a blue screen while booting up. Please be patient as this can take up to 30 seconds. Cannot hear recorded audio when playing back • The cameras that are included with this DVR system do not support audio. • To record or monitor audio on this DVR you will need to connect a camera that has a microphone built in or connect an external microphone to the audio input on the back of the DVR. CLEARVU11 61 TROUBLESHOOTING GUIDE SVAT ELECTRONICS now you can see My screen is grey after viewing saved footage • This grey screen is one of the viewing modes the DVR can go into. From the live viewing mode press the “Mode” button to change the selected camera to a playback screen. Press the “Mode” button once more to switch to a full screen playback screen. Press the “Mode” button once more to switch back to live monitoring. VGA Options is not changing any display settings • This feature is only available if your version of the DVR has a VGA output connection on the back of the DVR. It will not affect your DVR or video output if there is no VGA output connection. Play back video is choppy • Option 1: The playback may be in “Slow Forward” mode. Turn this mode off by using the mouse and clicking the “Play/Pause” button twice to switch back into normal playback speed. • Option 2: The smoothness of the playback of your recorded video footage will depend on how many IPS the footage was recorded with. (See the camera Setup section in the manual for full descriptions.) If the video was only recorded in 1 IPS than there will only be 1 image per second during playback. 30 IPS will provide the smoothest playback. Not receiving emails from the DVR • Verify all SMTP server email information is correct. Contact your ISP or email provider for the proper information. If this is set up correctly make sure that email alerts are turned on for the feature you would like to receive emails about (motion, alarm, HDD full). Can not set up DDNS •The DVR must be set up to use a Static IP if DDNS is to be used. The color on the camera picture is too purple, blue, etc •Try adjusting the settings in the camera setup screen to improve/change the image quality. Unusual coloring can also be caused by the type of lighting that is used. The cameras do not react well to halogen lighting. Try focusing the cameras away from these lights. •Make sure that the cameras are not pointing directly at a light source such as a lamp or a sunny window. Video footage plays slow and choppy when viewing the DVR over a remote connection • The DVR can support a maximum of 5 (five) users connected to DVR via the web interface at one time. • Each connected user will slow down the network speed to the other connected devices. • For best results view with only one person connected to the DVR via Internet Explorer or mobile device. CLEARVU11 62 TROUBLESHOOTING GUIDE Remote control is not working. SVAT ELECTRONICS now you can see • You first need to log in to the DVR before being able to use the remote control functions On the Remote control: 1. Press Menu 2. Select Login / Logout 3. Enter Username 4. Enter Password 5. Select Login You can now navigate through the menu with the remote control or exit the menu to use other features that the remote control has. • Make sure that the batteries are installed correctly. • Make sure the batteries are new. My DVR did not record at the set time • Option 1. The clock is a 24 hour clock. Make sure you set it for the right time. E.g. 2 pm = 14:00. • Option 2. Verify the scheduled recording time frames. If T1 is set to 6:30 and T2 is set to 17:00 this means you are setting up a time frame from 6:30 in the morning until 5:00 in the afternoon. Depending on the recordings you have set in the T1 recording block you can set the Alarm, Motion, and/or Normal recording modes record Video only (V), Audio/Video (A/V), or No Recording (No). If you set Alarm to No, Motion to No, and Normal to “V”. Than the first time segment “T1” will record continuous Video from 6:30 am to 5:00 pm (17:00). • Option 3. Verify your time is set correctly. If the DVR is in a time zone that uses daylight savings make sure that “Daylight Saving Time” is set to on. • Option 4. If the DVR System Time is set up for “Synchronization”, make sure that the DVR is properly connected to the internet. ( Time settings can be found and changed in the Menu > Setup > System menu option) Cannot connect SD Card • This feature is only available if your version of the DVR has a SD card input. If your DVR does not have this connection then you will be unable to use the SD Card back up function. Use the USB Drive or USB DVD options for backing up your footage. Cannot set Normal Record IPS to 30 IPS • The Pre-record IPS needs to be set to a value equal to or greater than the desired Normal Record IPS. The maximum IPS (Images per second) that can be set per camera is 30. This will allow you to set the Normal Record IPS up to 30 IPS CLEARVU11 63 TROUBLESHOOTING GUIDE SVAT ELECTRONICS now you can see Web viewer is very small and does not look like the manual This DVR is fully functional with Internet Explorer 6.0 or greater. If you are using a different browser then you will be redirected to the wap.htm version of the web interface. This is the same interface that would be used on a mobile device. This mode will allow you to view a single or all 4 cameras simultaneously and adjust your refresh rate. LCD Screen is black • Make sure the DVR is plugged in to a working power outlet or surge protector. If connected to a surge protector make sure the surge protector is turned on. • Make sure the master power switch on the back of the DVR is switched to the on position. ( the “ | ” should be pressed in) • Once both of these steps have been verified try pressing the power button on the top of the DVR. This controls the power for the LCD screen only. Even with the LCD screen turned off the DVR will still function as normal. Recording can continue even with no power to the LCD screen. Can not access any of the menu options (Menu Options are in white text). • If “Login / Logout” and “Status” are in black text the rest of the main menu options are in white text this means no user is logged in or a guest account is logged in. Log in as a supervisor or administrator •The menu option you are trying to access is in white text instead of black. This means the feature is unavailable in the current mode. This could be because the current user does not have enough permissions to make a change to this setting. It could also mean the parent feature is not enabled. Ex. If the network type is set to “Static IP” than all of the data input fields below are in white text and can not be adjusted. If the Net Type is changed to DHCP than these fields become black and can be edited. Can not view DVR on the computer CLEARVU11 • Verify the following while referring to the included networking guide. • Make sure you are entering the proper IP address of the DVR. You will enter the Internal IP address into the Internet Explorer address bar when the computer is connected to the same router as the DVR. • You will enter the External IP address into the Internet Explorer address bar when the computer trying to access the DVR is not connected to the same router. This will require an internet connection. • Port forwarding will need to have been set up according to the networking guide. • Follow the instructions found on www.portfoward.com for detailed instructions or contact your router manufacturer for assistance with port forwarding on your particular model of router • Make sure you are logged into the computer as an administrator to install the required application and ActiveX controls. 64 TROUBLESHOOTING GUIDE “Warning: Connect to device DVR#........... Failed message while using Internet Explorer.” when I try to view the software over the web. SVAT ELECTRONICS now you can see • If you see this dialogue box using the Internet Explorer web viewing software: • It means that viewing software can not connect to one of the DVRs that it is configured to use. You need to remove any DVR’s that are not currently being used. • Click on Device Config. This will pull up the Device List. • Select the DVR that is not using the proper IP address and Click remove. You should no longer receive this warning message Camera Troubleshooting I cannot see at night with my IR night vision cameras • The night vision turns on automatically when light levels drop. Try the camera in a pitch black setting. The areas that it is in may have too much light and may not activate the sensor. My camera is not displaying any image •Verify the connections are snug and tight fitting. Disconnect and reconnect each connection. 4pin/4pin, power/power, RCA/RCA. • Make sure the power adapter is plugged in to an active electrical outlet. If everything is connected, cup your hands around the camera lens and you should see the red LEDs illuminate. Make sure it is dark enough to activate the light sensor. • If the LEDs do not illuminate, try switching the power adapter with a working camera’s power adapter. This will indicate if it is the power adapter which needs to be replaced. • Verify the pins on the 4pin din connection are not bent and are being properly inserted to the proper connector. • If no power/video signal even with the new power adapter, connect the camera that is in question to a working cable set. (Disconnect a working camera and connect the camera in question to that cable set) The camera should function correctly. If the camera functions correctly the test indicates that there is a bad cable. My camera is being displayed in black and white. • Night vision mode does not display color only black and white. Make sure there is enough lighting in the room to check if color is working. • Power cycle the DVR by pressing the power switch to the off position. Leave for 10 seconds and power on again. If the cameras still display in black and white try replacing the power supply for the B/W camera with a properly working camera’s power supply. Lines displayed on screen / scrolling lines / electrical noise / interference. • Try replacing the power supply with a properly working camera’s power supply. • Test the camera out on a different 60ft cable set. The video signal could be getting disrupted by a different power source. If the cables are being run parallel to electrical lines or near other electrical devices try and reposition the camera (and cable) to avoid these sources The camera is not displayed on the Live Display screen. It is just 4 blue boxes • Check all connections to make sure they are secure and properly connected. • Check your power supply to ensure that the camera is powered up CLEARVU11 65 SPECIFICATIONS System Video Audio Record Display CLEARVU11 SVAT ELECTRONICS now you can see O.S Embedded Linux 2.6 Multiplex Sixfold operation - simultaneous record, live, playback, backup, control, & remote access Certification FCC, CE, LVDS, etc. FCC, CE, LVDS, etc. Format NTSC/EIA or PAL/CCIR Input 4-CH, BNC, 1Vp-p/75ohm Monitor 15”LCD Output BNC x 1, 1Vp-p/75ohm Loss detection Yes Motion detection Yes, with configurable detection area & sensitivity Input 1 RCA-jack connectors, line-in level (100mV-2Vrms) Output 1 RCA-jack connectors, line-out level (up to 2Vrms) Compression Video: H.264 Audio: ADPCM Frame rate (IPS) & Resolution NTSC – 30 / 720*480, 60 / 720*240, 120 / 360*240 PAL – 25 / 720*576, 50 / 720*288, 100 / 360*288 Mode Manual/Schedule/Alarm/Motion Pre-record time 0 - 10 seconds Post-record time 0 - 60 minutes Resolution NTSC – 720*480, PAL – 720*576 Split windows 1/4 Frame rate Up to 30 (NTSC) / 25 (PAL) IPS per display window Freeze Yes Sequential switch User adjustment Digital Zoom X2, X4 66 SPECIFICATIONS Playback Alarm Network Control Setup CLEARVU11 SVAT ELECTRONICS now you can see Frame rate (IPS) & Resolution NTSC – 30 / 720*480, 60 / 720*240, 120 / 360*240 PAL – 25 / 720*576, 50 / 720*288, 100 / 360*288 Search Date/time, Camera, Alarm, Motion, & Video Loss Operation Play, Fast Forward, Backward, Pause, Stop, etc. Remote I.E. and HEM can also Print HDD Half-size DVR - 1 set of 3.5“ HDD, Max. 320GB of HDD storage size Partitions Configurable alarm partition size Configurable auto-overwrite or not Backup 1 USB 2.0 ports for USB 2.0 disk drives Input 4 contact or TTL/CMOS signal, polarity selectable Output 1 Normally Open, 1 Normally Closed relay output Buzzer Yes Triggered by Sensor input, Video loss, & Motion Event log Yes Ethernet 1 RJ-45 10/100BaseT Ethernet connector Web Remote setup, monitoring, backup, alarm notification, & remote software upgrade E-mail Alarm notification to stationary or mobile devices Video 1/4 split-window Audio Bidirectional Protocol TCP/IP, HTTP, PPPoE, DHCP, DDNS, TSP Remote users Up to 5 users simultaneously Bandwidth TCP/IP type dynamic sliding window control Remote Stations PC I/R 1 D-type female connector for PTZ 1 optional D-type female connector for PTZ RS-232 2-pin for PTZ control RS-485 1 D-type female connector for PTZ 1 optional D-type female connector for PTZ Local On screen setup via keypad, I/R remote controller Remote Setup & upload via Windows application software Multi-lingual Yes 67 SPECIFICATIONS Reliability SVAT ELECTRONICS now you can see System recovery Auto power on after power loss recovery Timer Built-in real time clock Security Multi-level password (3 levels, up to 18 accounts) Power DC12V-5A 18W Max. Operating Temperature 0oC ~ +50oC Camera Specifications (CMOS Model) Image sensor 1/4” CMOS Color Outdoor use Yes IP Rating IP55 Resolution 400 TV Lines Night Vision Yes Number of IR LEDs and Range 11, up to 20ft IR LED control Auto Min. Illumination 0 lux Battery Operable No Viewing Angle 65 Degrees Focal Length 6.0 mm Focus Type Fixed Focus Connector RCA Sun Shield yes Housing Material Metal Housing Color Platinum Silver Electronic shutter speed 1/60 ~ 1/100,000 sec Signal/Noise Ratio >48dB Operating Temperature -10° ~ 60° /Degrees Camera Power Input DC 12V 200mA Dimensions 81 L x 55 W x51 H mm Weight 275 g CLEARVU11 68 SPECIFICATIONS SVAT ELECTRONICS now you can see Camera Specifications (CCD Model) Image Sensor 1/4 “ CCD Color Resolution 420 TV Lines Outdoor Use Yes IP Rating IP65 Focal Length 3.6 mm Focus Type Fixed Night Vision Yes Number of IR LEDs and Range 12, up to 15 ft IR LED Control Automatic, CDS Sensor Min. Illumination 0 Lux IR Wavelength 850nm Video Output 4 PIN DIN to RCA w/ 60ft Extension Wire TV System NTSC Microphoone No Motion Detection No Viewing Angle 60 Degrees Electronic Shutter 1/50 ~ 1/500000 sec BLC No AGC Auto ELC Auto Power Adapter Input 120 V 60 Hz IR Cut Filter No White Balance Auto Sun Shield Yes Camera Power Input DC 12V 200 mA Housing Material Anodized Aluminum Housing Color Platinum Silver Signal/Noise Ratio >48dB Camera Bracket Yes Operating Temperature -14°F ~ 122°F Operating Humidity .98 Dimensions/Weight 5.3” x 4.5” x 2.3”/0.8 lbs (with stand) CLEARVU11 69 NOTES AREA CLEARVU11 SVAT ELECTRONICS now you can see 70 SVAT ELECTRONICS now you can see VISIT US ON THE WEB! Product Information Specification Sheets User Manuals Software Updates Quick Start Guides Firmware Upgrades www.svat.com Disclaimer SVAT does not endorse any of SVAT products for any illegal activities. SVAT is not responsible or liable in any way shape or form for any damage, vandalism, theft or any other action that may occur while a SVAT product is in use by the consumer. Model# CLEARVU11 www.svat.com