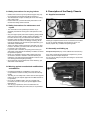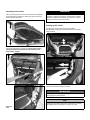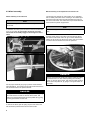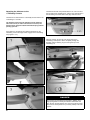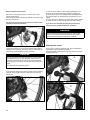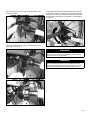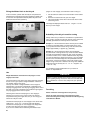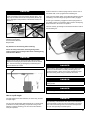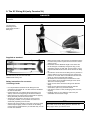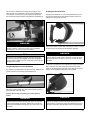
1
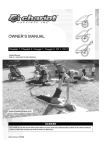
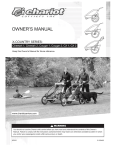
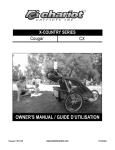
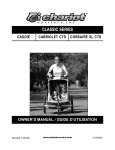
OWNER’S MANUAL
Cabriolet, Corsaire XL, Captain XL
Original Manual
Keep in a safe place for later reference
www.chariotcarriers.com
DAN G E R
You should not use the Chariot child carrier before you have read and understood the contents of this Owner’s Manual.
Failure to follow this warning may result in serious or fatal injury.
Date of issue: 07/2006
„Zwei plus zwei“ Marketing GmbH
Stolberger Straße 1
D-50933 Köln
Telefon: +49 - 2 21 - 95 14 70 - 0
Telefax: +49 - 2 21 - 95 14 70 - 20
E-Mail: [email protected]
„Zwei plus zwei“ Marketing GmbH retains all rights to this
Owner’s Manual.
No texts, details or illustrations from this Manual may be either
reproduced or distributed, or indeed become the subject of
unauthorised use for commercial purposes, nor may they be
made available to others.
Additional Manuals for using this trailer may be ordered as
separate items from „Zwei plus zwei“ Marketing GmbH or
downloaded from www.zweipluszwei.com.
Great care has been taken in assembling this Manual.
Nevertheless, should you discover any errors, we would be
grateful if you could bring them to our attention.
Table of Contents
1.General Items........................................................................ 3
2.Overview of Components...................................................... 4
3.Safety....................................................................................
3.1 Explanation of symbols and instructions...........................
3.2 General safety instructions................................................
3.3 Safety information for all travelling situations....................
3.4 Safety instructions for carrying infants.................................
3.5 Safety instructions for maintenance and repairs...............
3.6 Warning against unauthorised modifications.....................
4
4
5
5
6
6
6
4.Description of the Ready Chassis......................................... 6
4.1 Supplied as standard........................................................ 6
4.2 Assembly and folding up................................................... 6
4.3 Wheel assembly................................................................ 8
4.4 Fitting the handlebar.......................................................... 9
4.5 Seat and seatbelts............................................................ 10
4.6 Climate control.................................................................. 12
4.7 Parking brake.................................................................... 14
4.8 Adjusting the suspension (Corsaire XL and Captain XL).. 16
5.The Cycling Kit...................................................................... 17
• Safety instructions for use as a Bicycle Trailer........................... 17
6.The Jogging Kit..................................................................... 26
• Safety instructions for use as a Jogging Stroller.................. 26
7.The Strolling Kit..................................................................... 29
• Safety instructions for use as a Stroller............................... 29
8.The Hiking Kit........................................................................ 31
• Safety instructions for use as a Hiking Carrier,,,,,,,,,,,.......... 31
9.The XC Skiing Kit.................................................................. 33
• Safety instructions for use as an XC Skiing Carrier............. 33
10.The Walking Kit................................................................... 36
• Safety instructions for use as Walker................................... 36
11.Accessories......................................................................... 38
12.Service, Care and Storage.................................................. 38
13.Specifications...................................................................... 39
14.Warranty and Guarantee..................................................... 39
Manual compiled by:
prodek GmbH
Stolberger Straße 1
D-50933 Köln
Telefon: +49 - 2 21 - 95 14 70 - 40
Telefax: +49 - 2 21 - 95 14 70 - 61
E-Mail: [email protected]
www.prodek.de
2
1. General Items
Intended Use
Congratulations on buying this child transporter!
Use as intended
You have decided to buy a product from the CTS-series (Child
Transport System) of the Canadian manufacturer Chariot
Carriers Inc.
Your new child transporter stands out because of its excellent
quality, user-friendliness, high safety standards and great
versatility.
The Child Transport System enables you go for bike rides,
walks or jogging with your children without having to park a fleet
of special vehicles in the garage or basement.
It consists of a basic unit - passenger compartment with
chassis, parking brake, handlebar, two 20” wheels (Cabriolet
and Corsaire XL) or two 18“ wheels (Captain XL) and at least
one of the following accessory sets:
The carrier is intended for use, within the performance ranges
specified above, for the carrying of children in daylight hours on
sidewalks, light traffic public roads, smooth paths, and beginner
level ski trails. Luggage may also be carried in the storage bags
intended for that purpose, provided the children in the carrier
are not put at risk.
If the child carrier is used as a Bicycle Trailer in conditions of
poor visibility, at dusk or in the hours of darkness, it is highly
recommended to be retrofitted with a safety approved working
light set.
As part of the use as intended, you should also follow this
Owner’s Manual and comply with the prescribed maintenance
requirements.
Use not as intended
• The Cycling Kit (hitch arm, hitch, front, rear and spoke re
flectors, safety flag) converts the base to a bicycle trailer
• The Jogging Kit (16“ front wheel with two wheel arms)
converts the basic unit to a jogging stroller.
• The Stroller Kit (an 8“ stroller twin wheel) converts the basic
unit to a stroller..
• The Hiking Kit (drawbar with shoulder strap) converts the
basic unit to a hiker.
• The XC skiing Kit (- only Corsaire XL - skier and drawbar
with waist strap) converts the basic unit to a sleigh hiker
• The Walking Kit (drawbar with waist strap) converts the
basic unit to a walker.
Any use that goes beyond the above is not as intended.
Use not as intended is primarily the conveying of people
together with animals, use of this carrier on rough off-road
terrain, use for commercial purposes, overloading, excessive
speed and improper repair of defects or modifications.
The manufacturer is not liable for damages arising from use that
is not as intended – this is at the risk of the user.
Who is this Manual intended for?
This Manual is intended for the purchaser and user of the
carrier, who is also responsible for keeping it in proper
condition, carrying out maintenance as prescribed and
performing repairs.
When using this carrier, please also follow the owner’s manual
of the bicycle used for towing and the specifications given there
regarding the maximum allowable full load for the bicycle.
Performance characteristics of the Ready Chassis, valid for
all CTS Conversion Kits
Cargo load
Maximum age of the children,
Corsaire XL, Captain XL
Maximum body height of the children,
Corsaire XL, Captain XL
Maximum age of the children,
Cabriolet
Maximum body height of the children,
Cabriolet
45 kg/100 lb,
maximum of 2 children
6 Jahre
117 cm
4 Jahre
103 cm
3
2. Overview of Components
3. Safety
DAN G E R
The purpose of this section is to acquaint you with the symbols
and safety instructions and make you aware of general dangers
that might arise in using the carrier. In addition, here you will
get to know about the particular dangers when using the carrier
in road traffic, as well as being warned against unauthorised
rebuilds or modifications.
Here you will find instructions where failure to comply may
result in risk to health, life and limb, both of the user and of
the occupants of the carrier.
This section, which is entitled »Safety«, is the most important
section in this Owner’s Manual. For this reason you need
to read through it with particular care and take note of all
instructions.
Instructions introduced with this symbol indicate possible risk
of material damage. Failure to heed this warning may result
in material damage.
3.1 Explanation of symbols and instructions
In this Owner’s Manual all items relating to safety are provided
with a warning.
In the designation of the possible hazards, distinctions are drawn
based on the severity of the possible harm that may arise.
4
WARN I N G
TIP
Here you will find instructions that will make using the product easier for you.
3.2 General safety instructions
As regards the children in the carrier
Basics
• When converting with other CTS Conversion Kits, no
child should be sitting in the carrier, nor when carrying out
maintenance or repair work.
• The permitted total cargo load of the carrier is limited to 45 kg.
This must never be exceeded. The cargo load is the weight
of the children together with any luggage there might be.
• Please explain to your child that he/she must not bounce,
fidget or lean out of the carrier.
• Before using the carrier, please read through the Owner’s
Manual carefully. Failure to comply with the safety
instructions may result in serious personal injury or death, to
both the user and/or the occupants of the carrier.
• When using the carrier, always comply with local safety and
accident prevention regulations, as well as the local Road
Traffic Act, all of which may restrict use in some way.
• Safe and appropriate use of the carrier is your responsibility.
Before using the carrier for the first time, acquaint yourself
with its handling characteristics away from public roads and
without carrying children. An empty carrier will tip over more
easily when going over obstacles with one wheel only than
one carrying a load. A fully loaded carrier makes greater
demands on the deceleration devices.
• Negotiate inclines and corners with the utmost caution and
reduce speed when doing so.
As regards the children carried
• Never leave your child unsupervised in the carrier.
• Regularly check that your children are appropriately clothed
and that they feel comfortable especially in hot and cold
temperatures.
• Only children who can sit up without support may be carried,
unless the Chariot Infant Sling is used.
• The maximum height of children who may be carried is:
103 cm for the Cabriolet, 117 cm for Captain XL and
Corsaire XL
• In carriers maximum two children maybe carried.
• Make sure that the limbs, clothing or toys of the child do not
come into contact with the carrier wheels or the rear wheel of
the towing bicycle.
As regards the carrier
• Never carry any heavy or sharp protruding items in the
storage space of the carrier if you are also carrying children
at the same time (risk of injury on braking).
• Items of luggage should be well secured so that they cannot
move around during the journey. Unsecured items of luggage
and overloading reduce riding stability and make the carrier
more difficult to handle.
• The carriers are bicycle carriers and must never be towed
behind motorised vehicles.
• The carriers must not be carried on the roof of a vehicle,
even when folded, as they will get damaged.
• At various points on the carrier, self-locking nuts are used. If
these have been loosened they must not be reused. Once
they have been loosened they lose their original function,
and this can lead to unexpected loosening of the screw
connection with potentially serious consequences.
• Do not use the carrier at temperatures below -20°C /-4°F
and do not store it at these temperatures. The windows may
break.
• When folding up or opening the carrier, there is a risk of
pinching your hand or fingers.
3.3 Safety information for all travelling situations
As regards the children carried
• Never carry items of luggage on the seat next to your child.
• Never carry animals together with your children.
As regards the carrier
• Take care when travelling over uneven surfaces. The carrier
can overturn if driven with one wheel only across uneven
ground, even at very low speed.
• In the event of the carrier tipping over, the handlebar acts as
a safety bar. For this reason keep it permanently fitted.
• Before each journey check the tire pressure. The minimum
recommended pressure is 30 psi (2.1 bar) and the maximum
is 35 psi (2.5 bar). Even if a higher pressure is permitted
for the tires fitted, the Manufacturer recommends that
35 psi (2.5 bar) not be exceeded. Air pressure that is too high
considerably reduces the comfort of the children, especially
on carriers without suspension.
• Do not use compressed air lines (e.g. at service stations).
The tyres may burst due to the small volume of the tubes.
• Never go up or down steps with the carrier.
• Before each journey check that the wheels are fully engaged.
• Before each journey check that the folding auto-lock disk is
fully engaged.
• Before each journey check that the spring buttons of the
handlebar are fully engaged.
As regards the children in the carrier
• Never carry your children without fastening all the seatbelts
in the proper manner, otherwise your child could be seriously
or even fatally injured in the event of an accident. Always
make sure the seatbelts are properly adjusted to the height
of your child.
• When travelling faster than walking pace, always use at the
very least the mesh component of the two-in-one weather
cover.
• As the children get in and out, the parking brake must be on
to prevent the carrier from accidentally rolling away.
5
3.4 Safety instructions for carrying infants
4. Description of the Ready Chassis
• Children who cannot as yet sit up without support may only
be carried using the Chariot infant Sling (accessory).
• The Manufacturer accepts no liability for use of other sitting
aids or baby seats.
• Please make sure you follow the safety instructions in the
Chariot Infant Sling Owner’s Manual
4.1 Supplied as standard
3.5 Safety instructions for maintenance and
repairs
• The maintenance work specified (see Section 12) is
absolutely essential for the long-term safe operation of the
carrier.
• Only use original spare parts. When replacing safety-related
parts, such as the frame, wheels, hitcharm and fabric, only
have this carried out by an Authorized Chariot Retailer.
• Regularly check all safety-related parts, such as the frame,
wheels, hitcharm and fabric, for damage or tearing. At the
first sign of damage have the relevant part replaced by your
Authorized Chariot Retailer.
• Tears in the fabric actually represent a high safety risk. Due
to tears in the fabric your child could come into contact with
the wheels or the road surface.
• If you find a tear in the fabric, stop using and contact your
Authorized Chariot Retailer immediately: the fabric can either
be repaired or replaced.
• Never try to straighten out bent safety-related parts such
as the frame, wheels or hitcharm. Have the relevant part
replaced by your Authorized Chariot Retailer. There is a risk
of it cracking and subsequently breaking.
• We recommend annual maintenance of the wheels by your
Authorized Chariot Retailer.
3.6 Warning against unauthorised modifications
and additions
• Unauthorised rebuilds or modifications of the carrier are
not permitted for reasons of safety and render the warranty
invalid.
• The fitting of a car safety seat or other seats or seat supports
that do not carry the express approval of the Manufacturer is
not permitted.
• Do not fit any additional parts, such as a luggage rack,
for instance, that do not carry the express approval of the
Manufacturer.
• The carrying of pedal cars, which are attached to the
handlebar or some other part of the carrier, is not permitted.
6
Passenger compartment with two-in-one weather cover folded
up, two 20” wheels (Cabriolet and Corsaire XL) or two 18“
wheels (Captain XL), handlebar and parking brake
4.2 Assembly and folding up
Transport strap lock (only on the Cabriolet and Corsaire XL)
To be able to assemble the passenger compartment, you first
need to undo the transport strap lock.
You can use the strap lock anytime for holding the carrier fixed
in its folded state.
Assembly of the carrier
With one hand, lift the rear end of the top frame tube upwards,
at the same time as holding the bottom part of the rear of the
carrier with the other hand.
DAN G E R
Before each journey make sure that both auto-lock disks are
engaged. If this does not happen, the passenger compartment may collapse unintentionally and injure your child or
cause you to lose control of the carrier.
Folding up the carrier
To fold up the carrier, pull on both auto-lock disks
simultaneously, at the same time as pushing the W shaped
frame forwards.
Pull the W shaped frame rearwards, until the frame is fully
uprighted and both right-hand and left-hand auto-lock
disks audibly engage.
This is how the auto-lock disk is released.
WARN I N G
Do not attempt to fold up the passenger compartment without
disengaging the auto-lock disk.
TIP
Folding up with wheels attached is made easier if you apply
the parking brake (see Section 4.7) before you start.
auto-lock
disk
7
4.3 Wheel assembly
Wheel assembly on the Captain XL and Corsaire XL
Wheel assembly on the Cabriolet
The wheels of the Captain XL and Corsaire XL are equipped
with so-called push-button axles. Pressing on the rubber cap in
the wheel centre will loosen the retaining balls which lock the
axle in the axle socket. The wheels can only be assembled and
removed with the plastic cap pushed in.
TIP
The easiest way to assemble the wheel is to lay the carrier
on its side.
To assemble the wheel, push the axle into the axle socket until
it can go no further. As you do this, the spring clip of the
axle socket must audibly engage in the axle groove of the
wheel.
TIP
The easiest way to fit the wheel is to lay the carrier on its
side.
To fit the wheel, press in the rubber cap and insert the wheel
axle into the axle socket until it can go no further. Release the
rubber cap. By moving the wheel from side to side, check that it
is locked in the axle socket and cannot be pulled off.
DAN G E R
Always check that both wheels are properly seated by pulling
the wheel hard to one side without pressing the unlocking
button. To do this, lift the carrier, and make sure that the fitted
wheel cannot be pulled off, by giving it a few good shakes on
each side.
Spring clip
Test for proper assembly by trying to pull the wheel outwards
after assembling. The wheel’s axle should remain locked in the
axle socket and cannot be pulled outwards.
DANGER
Always check that both wheels are properly seated by pulling
the wheel hard to one side. To do this, lift the carrier, and
make sure that the fitted wheel cannot be pulled off, by giving
it a few good shakes on each side.
To remove the wheel, pull the spring clip out of the hole in the
axle socket and pull the wheel out of the axle socket.
8
4.4 Fitting the handlebar
Safety wrist strap
Push the handlebar into the upper frame open tube ends.
Depress both spring buttons simultaneously and push both
ends of the handlebar at the same time into the tube ends until
the spring buttons engage.
On the rear left upper frame tube, as seen in the direction of
travel, there is the safety wrist strap, which is required to secure
the carrier to the wrist when using it as a Jogging Stroller or
Stroller. In all other carrier uses, this wrist strap should be stored
safely in the storage compartment at the rear of the carrier.
The handlebar can be height adjusted for two different
positions: remove by depressing the spring buttons together,
pull out the handlebar, rotate it 180° and re-insert the handlebar
into the tube ends.
DAN G E R
Always make sure the safety wrist strap is safely stored in
the storage compartment when it is not in use. If this is not
done it could get caught in the wheel spokes, and this may
result in an accident.
DANGER
Before each journey make sure that the spring buttons of the
handlebar are fully engaged. A handlebar that works loose
may have serious safety consequences, especially when the
carrier is used as a Jogging Stroller or Stroller.
9
4.5 Seat and seatbelts
With the tried and tested 5-point seatbelt system, your children
are securely and comfortably strapped into the Chariot.
The Captain XL and Corsaire XL have an additional cross brace
in the frame, which is there to anchor the waist belts and brace
the seat.
12. On each side of the buckle, the waist belt has a loose belt
end for adjusting to fit correctly on the child. Adjust the waist
belt until it is tight and the buckle is in the centre in front of
the crotch belt.
13. Finally check that all belts are tight. However, avoid putting
too much pressure on the child’s body.
14. Make sure that the padded shoulder harness’s belt position
is correctly adjusted, as described below.
padded shoulder
harness
buckle of the
shoulder harness
(under tab)
lap belt
crotch harness
To fasten the child into the carrier, proceed as follows:
Adjusting the padded shoulder harness
1. The shoulder harness always stays fastened to the crotch
belt by their shared middle buckle.
2. Undo both of the top buckles of the padded shoulder
harness on the back rest. Take off the shoulder harness
towards the front.
3. Open the waist belt.
4. Place the child on the seat.
5. Make sure that the crotch belt is between the child’s legs.
6. The shoulder harness’s upper two buckles are attached to
vertical straps. Now move both upper buckles until they are
directly above the shoulders of the child.
7. Draw the shoulder harness upwards over the child’s
shoulders and click both of the upper buckles into their
respective buckles on the vertical straps. Make sure that
you do not pinch the child’s neck with the buckles.
8. Once again make sure that the crotch belt is between the
child’s legs.
9. All belts can be adjusted. The shoulder harness can be
adjusted to fit correctly by pulling tight or loosening the loose
ends of the upper securing straps to equal degrees. The
loose end of the crotch belt can be pulled tight or loosened
like this as well.
10. Adjust the shoulder harness and crotch belt to fit so that all
belts are tight and the lower end of the padded shoulder
harness with the “Chariot” logo is level with the child’s lower
chest region.
11. Fasten the waist belt. The waist belt must be on the outside
of the crotch belt.
10
To achieve the correct size of the padded shoulder harness,
sleeve through or remove the shoulder belts with the plastic
buckle through these adjustment loops, as indicated below:
XS: Do not sleeve through any adjustment loops; thus unsleeve
the shoulder belts from all loops. (without illustration)
S: Only sleeve through the lowest webbing loop. When sized for
XS and S, the un-used, upper sections of the shoulder harness
go loose over the children‘s shoulders. Smooth them down their
back for comfort.
M: Sleeve through both webbing loops. This is the default
setting.
TIP
Always sleeve or unsleeve the shoulder belts as described above equally on both sides of the padded shoulder
harness, otherwise the shoulder harness will not sit properly,
and correct fit of the seatbelts is not possible.
TIP
Depending on manufacturing tolerance, the above mentioned loops may turn out to be too narrow to pull the buckles
through them. To make unthreading easier in this situation,
you can unthread the buckles and then rethread them as in
the illustration below.
L: Sleeve through both webbing loops and the top cord loop.
DAN G E R
Always make sure you thread the belt through correctly (see
illustration above). If this is not the case, the belt could slip
out of the buckle. This would result in the seatbelt failing, with
potentially serious or fatal consequences for your child in the
event of an accident.
Whenever you thread the belt through again, always give
it a good pull to check that it cannot be pulled out of the
buckle.
DAN G E R
Always make sure the seatbelts are correctly fastened
around your child. If this is not the case, your child could be
seriously or even fatally injured in the event of an accident.
Always make sure the seatbelts are correctly adjusted to the
height of your child.
DAN G E R
Before each journey check all buckles. If this is not done, the
belt system may fail in the event of an emergency, with the
serious consequences mentioned above.
Comparison of different adjustments of the padded shoulder
harness for children of different heights.
DAN G E R
Always take particular care that the shoulder harness is correctly adjusted for height, as described above. In the event of
an emergency, incorrect adjustment of the shoulder harness
can result in the child getting strangled.
11
If only one child is being carried, the manufacturer
recommends that the child be placed in the centre of the
seat.
If you want to use the central sitting position, then strap
the child in as follows:
1. Fasten one of the shoulder harnesses to the middle two
vertical straps buckles on the backrest.
2. Use the two middle waist belts.
3. Use the additional crotch belt located in the middle of the
seat.
4. The second shoulder harness, the two outer crotch belts,
and the outer two waist belts are not used.
5. Adjust the belts as previously described.
4.6 Climate control
The two-in-one weather cover
All models are equipped with the Chariot two-in-one weather
cover, which consists of a plastic window that can be rolled up
with mesh beneath it.
DANGER
In this case too, all the hazard warnings given above apply!
DANGER
Any other use of the belt system apart from that described is
not permitted and may result in your child being seriously or
even fatally injured in the event of an accident.
TIP
The insect net also provides limited UV protection.
12
The two-in-one weather cover (Cabriolet and Corsaire
XL) is attached to the bottom of the front of the passenger
compartment with two buckles.
Rear flap
The rear flap (Cabriolet and Corsaire XL) is attached at the
bottom by two velcro fasteners
The two-in-one weather cover of the Captain XL is attached at
the front by two tabs to the relevant protrusions in the floor pan.
The rear flap of the Captain XL is attached at the bottom to the
floor pan by 3 tabs and to the sides by two velcro fasteners.
WARNI NG
Always make sure that the two-in-one weather cover is securely attached at the front.
TIP
Make sure that the front section of the two-in-one weather
cover is pulled over the front ends of the passenger compartment or over the ends of the floor pan (Captain XL), to help
ensure that no water can penetrate the interior.
For better ventilation during high temperatures, the rear flap can
be opened, rolled up and secured in place by two elastic loops.
There is an insect mesh located under the rear flap and on the
Cabriolet and Corsaire XL this is attached at the bottom by two
velcro fasteners, but on the Captain XL by two tabs to the floor
pan. This should be closed if the rear flap is open.
13
4.7 Parking brake
The rear flap can also be used at the front as a sunscreen.
For this, it has to be sleeved under the rolled up two-in-one
weather cover towards the front. On the forward sides of the
passenger compartment at this point there are velcro fasteners.
Open these fasteners and connect them to the velcro fasteners
on the rear flap.
Installing the parking brake
The two-in-one weather cover can also be closed with the
sunscreen in place.
Use an 13 mm wrench to loosen the securing nut on the short
lever in the centre of the brake rigging.
For parking when used as a Stroller or Jogging Stroller, the
carriers are equipped with a parking brake.
Lay the carrier on its roof. To prevent damage, make sure you
have a suitable surface to do this on. Unscrew the nuts from the
two bolts protruding from the bottom at the sides towards the
rear.
Front side air vent
For additional ventilation of the interior, the carriers are
equipped with a side air vent to the front of each side window. It
can be opened either fully or partly from the inside by means of
a fabric flap.
Now guide the bolt on the brake pivoting mechanism through
the hole in the centre at the rear of the carrier, and the two
side bolts on the carrier through their respective holes in the
two long brake bars. Make sure that you position the brake as
illustrated.
14
Screw the two self-locking nuts onto the two side bolts. Screw
them on so that the end of the bolt protrudes through the nut,
but not so tight that the brake cannot move.
DAN G E R
Always make sure that the self-locking nuts are only screwed
onto the bolts until the end of the bolt protrudes through the
nut. If this does not happen, the self-locking nuts cannot fulfil
their self-locking function, and this may result in the brake
working loose. You run the risk of an accident!
Operating the parking brake
When the parking brake is released the operating lever points to
the right and should be resting up against the lower rear edge of
the carrier (seen in the direction of travel).
Cabriolet und Corsaire XL: Inside the carrier, screw the third
self-locking nut onto the bolt of the brake pivoting mechanism.
To apply the brake, the operating lever must be moved
completely to the left. Once you have moved it past the
middle of the carrier, the operating lever should automatically
overcenter into the left and closed position.
Now both brake arms press on the tires, thereby stopping the
wheels from turning.
Captain XL: Screw the third self-locking nut onto the bolt of the
brake pivoting mechanism.
DAN G E R
Depending on the tire pressure, the operating lever can snap
with some force into its closed position. Be careful when
doing so as you risk getting trapped!
DAN G E R
The parking brake is not suitable for deceleration of a moving
carrier.
In this case too, screw this on so that the end of the bolt
protrudes through the nut, but not so tight that the brake cannot
move.
15
4.8 Adjusting the suspension
(Captain XL and Corsaire XL only)
The Captain XL and Corsaire XL are equipped with adjustable
suspension.
After loosening the knob, it is possible to move the clamp that
surrounds both leaf springs. The more this clamp is moved
in the direction of the wheel axle, the stiffer the suspension
becomes (see the weight scale on the top spring).
The weight indications on the scale are calculated from the
weight of the child(ren) and cargo (ie. You do not need to add
the weight of the carrier).
The weight indications on the scale relate first and foremost to
use as a Bicycle Trailer. For other uses it may be a good idea
to set the suspension softer. If you discover that when riding
over bumps the suspension can be felt and likely heard , then
the suspension is set too soft and you need to move the knob
rearwards.
WARNI NG
Make sure that you retighten the knobs once you have adjusted the clamp.
TI P
Where there are different weights on each of the two sides of
the carrier, or where only one side is loaded, we recommend
that the spring stiffness on each side be adjusted to the
weight of the side in question.
16
5. The Cycling Kit
As an alternative to the “Chariot” Cycling Kit, the Cycling Kit can
be supplied with the Weber hitcharm and hitch.
“Weber” Cycling Kit:
Weber hitcharm without hitch, front, rear and spoke reflectors,
safety flag. You can either choose the Weber hitch with
adjustable kickstand (Weber B) or the Weber hitch for rear-axle
attachment (Weber E).
Safety instructions for use as a Bicycle Trailer
The assembled bicycle trailer (CTS Ready Chassis +
Cycling Kit)
General safety instructions for operation as a bicycle
trailer:
Basics
Supplied as standard
“Chariot” Cycling Kit
Chariot hitcharm with Axle-Mount ezHitch (including
quick-release skewer) and ezClick attachment, front,
rear and spoke reflectors and safety flag
• Please make sure you read the safety instructions in the
“Safety” section at the beginning of this Owner’s Manual.
• Only cyclists who are experienced and strong enough may
tow bicycle trailers. If you wish to carry children in the bicycle
trailer, you must be 16 years old or over.
• Make sure that your bicycle is in good and safe condition.
We recommend you have your bicycle regularly serviced by
a bicycle retailer.
• If you are not sure whether your bicycle is suitable for towing
a trailer, please ask your bicycle retailer.
• We recommend that especially long rear wheel mudguards
and rear-view mirrors be fitted to the bicycle that is to tow.
• When using this trailer, please also follow the Owner’s
Manual of the bicycle used for towing. Find out whether your
bicycle is permitted for use in towing bicycle trailers and the
permitted overall weight of the bicycle/trailer vehicle.
• When parking the vehicle, make sure it cannot tip over.
Attaching the trailer changes the bicycle’s centre of gravity,
so that certain types of kickstands cannot be used in
connection with a trailer. The bicycle may tip over. The trailer
and bicycle may get damaged. If in doubt ask your specialist
dealer.
17
As regards the children carried
Performance characteristics when used as a
Bicycle Trailer
• For riders of bicycles and children being carried who can sit
without support, we recommend wearing a suitable approved
helmet.
Top speed
25 km/h / 15 mph
As regards the trailer
Top speed on corners
walking pace
• When the trailer is towed behind a bicycle, the stroller wheels
must never be fixed in their use position (wheels down). They
may only be carried in their out-of-use position (wheels up).
• Remember that on right-hand turns the radius of the turn is
restricted. If the rear wheel of the bicycle comes into contact
with the hitcharm, there is a risk of the cyclist falling and
injury.
• Please ensure that when manoeuvring, the trailer is not set
at an angle of more than 90° to the bicycle, otherwise the
hitch may be damaged.
Permitted hitcharm load
(tongue or nose weight, to be ensured
by good load distribution, see page 24)
1 - 6 kg/2.2-13.2lb
Permissible rear wheel size
on the towing bicycle
26 or 28 inches/700cc
As regards the children in the trailer
• Please remember that the trailer should only be connected or
unconnected provided there is no child in the trailer.
• Never cycle without closing the two-in-one weather cover
otherwise your child may be injured by insects, dirt or grit
thrown up from the road.
Legal requirements
Remember that at dusk and in the dark, the bicycle and carrier
must be equipped with regulation working lighting. Rear batterypowered lights for instance are suitable as working lighting.
They can be attached to the exposed tube ends on the top right
and left on the rear of the carrier, or hooked onto the web tabs
located on the upper corners of the back flap.
Please ensure the following before each journey:
• Make sure that the hitcharm is correctly fitted and secured to
the trailer: see pages 20 / 21.
• Make sure the hitch is firmly attached on the bicycle. A hitch
that is not securely attached may work loose from the rear
axle and result in losing the trailer.
• Make sure that the hitcharm is correctly coupled up and
secured to the bicycle: see pages 22 / 23.
• Before each journey, check the full function of the warning
devices: spoke reflectors, front and rear reflectors, safety
flag, and lights if necessary.
• Remember that at dusk and in the dark, the bicycle and
trailer must be equipped with regulation working lighting.
• Before each journey make sure that the maximum trailer
cargo load is not being exceeded and the specified
permissible hitcharm load (nose weight) is maintained.
Pay attention to the following when travelling:
• Always cycle with care and look well ahead. Avoid applying
emergency braking. When applying emergency braking,
there is the risk that the rear wheel of the bicycle may pull to
one side and you lose control of the bicycle/trailer vehicle.
• The maximum permissible speed for towing this trailer is
25 km/h / 15 mph. Take corners/turns at walking pace, as
there is a risk of tipping over.
• Remember that the steering and braking characteristics of
your bicycle are different when towing a trailer.
• Always avoid going over obstacles with one wheel of the
trailer only, especially on corners – the trailer might tip over,
even at walking pace!
18
Ask your specialist dealer for suitable lights and the right way to
attach them.
Assembly
For fastening the front and rear reflectors you need a Philips
screwdriver.
Assembling the reflectors and safety flag
If you want to use your Chariot as a Bicycle Trailer, all reflectors
and safety flags must be installed.
Exception: If you use tires with reflective strips, the spoke
reflectors can be left off.
Position a spoke reflector between two outer spokes and an
inner spoke in such a way that the inner spoke lies in the guide
slot of the reflector.
Screw the red reflectors into the rear grommets on the
passenger compartment.
Guide the plastic clip with its slot over the inner spoke into the
hole of the reflector and secure by tightening it a quarter turn
using a screwdriver.
Screw the white reflectors into the front grommets on the
passenger compartment.
Push the two safety flag rods together and guide the bottom
end of the rod through the cord loop at the back left side of
the two-in-one weather cover. Push the end of the rod into
the sleeve located at the lower left corner of the passenger
compartment until it can go no further.
Attach two
reflectors on each
wheel (as shown,
opposite each
other to the right
and left of the
valve).
19
Attaching the hitcharm to the
CTS Ready Chassis
The hitcharm should now protrude about 2 cm / 3/4 inch out of
the rear side of the VersaWing 2.0, and the rear vertical holes in
the VersaWing 2.0 and hitcharm must align with each other.
The hitcharm is attached to the CTS Ready Chassis into the left
“VersaWing 2.0” bracket.
The hitcharm must always be attached into the left-hand
side of the carrier (as seen in the direction of travel). The
hitcharm must always be attached with both spring buttons
pointing upwards.
Press down the small button and slide the hitcharm into the
VersaWing 2.0 until the large button engages in the VersaWing
2.0 (Figures 1 to 3).
Insert the security pin into the rear vertical hole of the
VersaWing 2.0 and push it down completely through the
hitcharm until the retaining ring is touching the top of the
VersaWing 2.0.
DAN G E R
The security pin must always be inserted, in addition to the
large spring button in the bicycle hitcharm! A hitcharm that
has not been secured properly may come loose during travel,
with serious consequences for your child, possibly even fatal
injuries.
20
Attaching the Axle-Mount ezHitch
The Axle-Mount ezHitch must always be attached to the
left-hand side of the bicycle (as seen in the direction of
travel).
Bicycle with solid axle
The quick-release skewer is not used in this case.
Correctly installed hitcharm.
DANGER
Unscrew the rear wheels left-hand axle nut and the spacer or
plane washer.
Install the Axle-Mount ezHitch on the axle.
The opening for the hitch ball and the vertical hole for the
security pin must point forward.
Make sure that the hitcharm is correctly attached and secured to the carrier. Any kind of incorrect assembly may lead
to loss of the carrier during travel, with serious consequences
for your child, possibly even fatal injuries.
Attaching the hitcharm to the bicycle
(Chariot Axle-Mount ezHitch)
Your specialist dealer fits the Chariot Axle-Mount ezHitch to
your bicycle on delivery of the carrier.
In certain special cases, however, you may have to fit it
yourself, e.g. after removing the rear wheel or when fitting the
Axle-Mount ezHitch to a second bicycle. Assembly for such
cases is described below.
In all cases, we recommend that you have the Axle-Mount
ezHitch fitted by your specialist dealer.
Screw the wheels axle nut and the spacer or plain washer back
on and tighten them securely.
DAN G E R
Depending on the hub type, the existing torque support
washer for the hub must stay on the frame. Please follow
the assembly instructions for the hub and the manufacturer’s
torque specifications when fastening the axle nut. If in doubt
always ask your specialist retailer.
DAN G E R
The rear wheels axle nut must be tightened on the axle
thread by at least 5 full turns, so that adequate clamping
force is ensured. A thread which is too short can lead to
accidental loosening of the rear wheel, with damage and
accidents as a result.
If in doubt ask your specialist retailer!
Axle-Mount ezHitch and accompanying quick-release skewer.
21
Bicycle with quick-release axle
Remove the existing quick-release. Loosen the nut of the
Chariot quick-release.
Push the quick-release axle through the hitch and then through
the axle of the wheel.
The opening for the hitch ball and the vertical hole for the
security pin must point forward.
In order to ensure that the hub is clamped sufficiently in the
dropouts, the quick-release lever must begin gripping as it
moves from the open to the middle position, and approaching
the closed position you should clearly feel resistance as you
tighten.
If it is too easy or too difficult to move the quick-release, tighten
or loosen the lock nut on the other side of the hub to adjust.
If you don’t feel confident operating the quick-release,
please ask your specialist retailer for assistance.
DAN G E R
Always make sure that the quick-release is correctly attached. An incorrectly tensioned quick-release may result in
the rear wheel coming loose and lead to accidents.
Attaching the carrier
Fit the quick-release nut on the right-hand side. Both skewer
springs must be located in such a way that the narrow side of
each spring points towards the centre of the hub.
From the front, insert the elastomer ball, which is attached to
the hitcharm, into the Axle-Mount ezHitch.
Pull the hitch ball rearward to the end of the socket in the axle
mounted hitch cup.
DANGER
1
The quick-release nut must be tightened on the axle thread
by at least 5 full turns, so that adequate clamping force is
ensured. A thread which is too short can lead to accidental
loosening of the rear wheel, with damage and accidents as a
result.
If in doubt ask your specialist retailer!
Close the quick-release lever with the end of the lever pointing
upwards. In this position there is enough space to insert the
security pin.
2
22
Push the security pin from the top through both holes of the
Axle-Mount ezHitch.
Finally, always attach the hitch’s back-up safety strap around the
bicycle frame. To do this, from above, put the hitch back-up safety
strap around the chain stay, and attach the hook of the hitch backup safety strap to the hitcharm D-ring located on the underside of
the hitcharm.
6
3
Secure the pin by pulling the hole of the rubber tab over the
protruding end of the pin.
DAN G E R
Always attach the hitch’s back-up safety strap in the manner
described above. It serves as additional protection against
losing the carrier during operation.
DAN G E R
Do not use the Bicycle Trailer if you cannot attach the hitch’s
back-up safety strap around your bicycle frame for any reason!
Contact your specialist retailer for assistance if this occurs.
4
5
23
Fixing the Weber hitch to the bicycle
(tongue or nose weight), use a bathroom scale to help you:
In this connection, please read carefully the comprehensive
manufacturer’s instructions which are supplied by Weber both
for the hitch with adjustable kickstand (Weber B) and for the
Weber Axle-Mount Hitch (Weber E).
1. Put the bathroom scales next to the hitcharm of the loaded
carrier.
2. Stand on the scales and note your own weight.
3. Lift up the hitcharm at the hitch to around 30 cm/12 inches
above the ground.
The weight as displayed should now be 1 - 6 kg/2.2 – 13.2 lb
above your own weight.
Suitability of the bicycle used for towing
Always make sure you follow the manufacturer’s specifications
in the owner’s manual of the bicycle used for towing, where the
suitability specifications of the bicycle are to be found.
Weber B
Example 1: If the manufacturer states »This bicycle is suitable
for pulling an unbraked trailer of overall weight 40 kg«, then
you may add a maximum load of 30 kg, since the carrier itself
weighs approximately 11 kg/24 lb (e.g. Cabriolet).
Example 2: If the manufacturer states »The permissible
bicycle full load of 120 kg/ 265 lb may not be exceeded. Please
note that the permissible full load may also not be exceeded if
you attach a trailer,« then, in order to determine the cargo load,
you need to subtract the weight of the bicycle, your own weight
and the carrier unloaded weight from the permissible full load.
For instance, if the bicycle weighs 15 kg/ 33 lb and the cyclist
weighs 72 kg/ 159 lb, then a maximum of 22 kg/ 49 lb additional
cargo load may be carried (120 - 15 - 72 - 11 = 22)/(265 – 33
– 159 – 24 = 49).
Weber E
You will find the weight specifications for your carrier in
Section 13 “Specifications”.
Use
Weight distribution and hitcharm load (tongue or nose
weight) on the hitch
The exact position of the seat in the Chariot has been specially
chosen so as to give optimum weight distribution if there are
only children sitting in the carrier.
The only other factor in weight distribution is the weight of
luggage items. The storage compartment is intended for the
carrying of luggage items. The carrying of luggage items next to
the child on the seat is prohibited. We would also urge against
carrying luggage items in the foot space.
DAN G E R
If there is nothing specified in the owner’s manual of your bicycle regarding towing a trailer, this does not mean that there
are no limitations. In such a case, always ask your specialist
retailer.
Travelling
Please ensure the following before each journey:
Checking of the hitcharm load (tongue or nose weight) is
important if you want to carry a heavy load in the storage
compartment along with a light child, or if you are using your
Chariot as a Bicycle Trailer.
The hitcharm load (tongue or nose weight) on the carrier hitch
needs to be 1 - 6 kg / 2.2 – 13.2 lb for safe road handling.
The hitcharm load (tongue or nose weight) is the weight that
you lift on the hitch when the carrier is loaded up.
If you are not confident about estimating the hitcharm load
24
Follow all safety instructions at the beginning of this
section and the general safety instructions at the beginning
of the Owner’s Manual.
DANGER
Push the hitcharm in until the spring buttons, which is now on
the outside side, come up against the VersaWing 2.0.
When used as a Bicycle Trailer, the stroller wheels must
never be installed in their use position (wheels down). They
may only be carried in their out-of-use position (wheels up).
For a description of the positions of the stroller wheels, see
Section 7.
Then press the smaller button in and slide the hitcharm into the
VersaWing 2.0 until the large spring button audibly engages.
On this type of assembly, engagement of the spring button is
not visible, however you should be able to see the small spring
button returned to its normal “out” position.
Insert the security pin through the horizontal hole at the back of
the VersaWing 2.0.
Correct assembly of the stroller
wheels for carrying them
out-of-use when used as a
Bicycle Trailer.
Wrong!!!
Pay attention to the following when travelling:
Follow all safety instructions at the beginning of this
section and the general safety instructions at the beginning
of the Owner’s Manual.
DANGER
When turning round or manoeuvring the outfit, the angle
between the towing bicycle and the carrier must not exceed
90°, The hitch ball may get damaged (overstretched) and
lose its stiffness as a result.
DAN G E R
Make sure the spring button engages correctly. Before use,
ensure that the hitcharm is securely locked by giving it a
good forward pull. If this is not the case, the hitcharm might
work lose during travel and you could lose the carrier.
DAN G E R
Only park the carrier on flat surfaces and secure it with the
parking brake.
DAN G E R
Inline skating with the pull wagon is not permitted.
Use as a pull wagon
On short stretches and level surfaces, the carrier may be used
as a pull wagon.
For this, insert the hitcharm rotated through 90° in the left-hand
(in direction of travel) VersaWing 2.0 (the same wing as the
hitcharm is used for trailering). The front end of the hitcharm
must point upwards.
DAN G E R
Any assembly of the hitcharm other than the one described
is not permitted. Any kind of incorrect assembly may lead to
loss of the carrier during travel, with serious consequences
for your child, possibly even fatal injuries.
25
6. The Jogging Kit
• When pushing the jogging stroller, always put the wrist safety
strap around your wrist.
• Inline skating is with the Jogging stroller is not permitted.
• To get used to the specific handling characteristics, first carry
out a practice run without children, but with maximum load,
and away from road traffic.
• The parking brake is not suitable for deceleration of a moving
carrier.
• So as to prevent it from tipping backwards, the storage
compartment at the rear of the carrier may not be loaded with
excessive weight. Carry out the following check: Depress the
handlebar by about 15 cm. The carrier should return to its
original standing position and should not tip backwards.
Performance characteristics when used as a
Jogging Stroller
The assembled Jogging Stroller
(CTS Ready Chassis + Jogging Kit)
Supplied as standard
Jogging Kit: 16”
wheel with quick-release skewer, and 2 wheel arms with
ezClick attachment
Safety instructions for use as a Jogging Stroller
• Please make sure you read the safety instructions in the
“Safety” section at the beginning of this Owner’s Manual.
• Before each journey check that all components are properly
fitted, particularly the front quick-release wheel, the rear
wheels, and the handlebar.
• Do not park the carrier on roads or other places which are on
an incline.
• If you leave the jogging stroller standing, always secure it
with the parking brake.
• When parking the carrier, make sure it cannot tip over.
26
Top speed on straight aways
15 km/h / 9 mph
Top speed on corners
walking pace
Top speed on hills/inclines
walking pace
Assembly
The wheel arm should nowprotrude about 2 cm / 3/4 inch out of
the rear side of the VersaWing 2.0.
Push the wheel arms, with the bend toward the centre of the
carrier and wheel dropouts pointing downwards, into each
VersaWing 2.0.
DAN G E R
Make sure that the wheel arms are correctly attached to the
carrier. Incorrect attachment may lead to loss of the front
wheel during travel and this may lead to an accident.
Press the small button in for each and push the wheel arms into
the VersaWing 2.0 until the large button engages
(Figures 1 to 3).
Guide the quick-release axle through the wheel axle and screw
on the nut. Both skewer springs must be located on each side
so that the narrow side points towards the centre of the hub.
27
DAN G E R
Tip the carrier backwards and put it down on the handlebar.
Insert the wheel in the axle dropouts.
When using the carrier as a Jogging Stroller, always put the
safety wrist strap, which is fastened securely on the left rear
upper frame tube, around your wrist. This prevents the carrier
from accidentally rolling away.
Close the quickrelease lever.
In order to ensure that the hub is clamped sufficiently in the
axle dropouts, the quick-release lever must begin gripping as it
moves from the open to the middle position, and approaching
the closed position you should clearly feel resistance as you
tighten.
If it is too easy or too difficult to move the quick-release, tighten
or loosen the lock nut on the other side of the hub to adjust.
To correct
directional trueness
(ie. The carrier not
rolling straight):
If you don’t feel confident operating the quick-release
skewer, please ask your specialist retailer for assistance.
DANGER
Always make sure that the quick-release is correctly installed. An incorrectly tensioned quick-release may lead to the
rear wheel coming loose, resulting in accidents.
The dropouts of the wheel arms are screwed on and their holes
are slotted. After loosening both screws, the dropout can be
moved. This is possible on both the right-hand and the left-hand
side dropout. If the Jogging Stroller is pulling to the right, the
dropout on the right-hand side must be moved forwards, and
the one on the left-hand side backwards (or vice versa).
WARN I N G
Please ensure that your child does not stand on the wheel
arms when entering or leaving the carrier. If at any time you
stop, do not allow anyone to sit on the wheel arms. Applying
a load on either wheel arm may result in the aluminium axle
sockets working loose.
28
7. The Strolling Kit
Travelling
Weight distribution
DANGER
So as to prevent it from tipping backwards, the storage
compartment at the rear of the carrier may not be loaded
with excessive weight. Carry out the following check: push
downwards on the handlebar by about 150 mm. The carrier
should return to its original standing position and should not
tip backwards.
The assembled Stroller (CTS Ready Chassis + Strolling Kit)
Supplied as
standard
Strolling Kit:
2 x 8” stroller
wheels
Safety instructions for use as a Stroller
• Please make sure you read the safety instructions in the
“Safety” section at the beginning of this Owner’s Manual.
• Before each journey check that all components are properly
fitted, particularly the stroller casters and the handlebar.
• Do not park the carrier on roads or other places which are on
an incline.
• If you leave the stroller stationary, always secure it with the
parking brake.
• When pushing the stroller, always put the wrist safety strap
around your wrist.
• Inline skating with the stroller is not permitted.
• The foot activated parking brake is not suitable for
deceleration of a moving carrier.
• So as to prevent it from tipping backwards, the storage
compartment at the rear of the carrier may not be loaded
with excessive weight. Carry out the following check: push
downwards on the handlebar by about 150 mm. The carrier
should return to its original standing position and should not
tip backwards.
29
Performance characteristics
Inline skating with the Stroller is not permitted.
Assembly
If you want to convert the carrier from Stroller to another CTS
Conversion Kit, you can store the stroller wheels on the top of
the VersaWing 2.0 .
To attach them proceed as described above.
The caster fork arms should point forwards.
To attach the stroller wheel, press the plastic button on the
side of the VersaWing 2.0 until it can go no further. Then, from
below, insert the upward pointing caster shaft of the stroller
wheel into the vertical hole of the VersaWing 2.0 until it can go
no further.
DAN G E R
Always make sure that the stroller wheels are fully engaged
and locked.
Travelling
Weight distribution
Release the plastic button. This now clicks back towards the
outside, resulting in locking of the attachment axle of the stroller
wheel.
DAN G E R
So as to prevent it from tipping backwards, the storage
compartment at the rear of the carrier may not be loaded
with excessive weight. Carry out the following check: push
downwards on the handlebar by about 150 mm. The carrier
should return to its original standing position and should not
tip backwards.
DANGER
Always make sure that the stroller wheels are properly and
fully engaged and locked. To check this pull the stroller
wheels up and down in a vertical direction. Make sure that
the plastic locking button has fully clicked back. Incorrect
assembly may lead to accidents.
30
8. The Hiking Kit
DANGER
When using the carrier as a Jogging Stroller, always put the
safety wrist strap, which is fastened securely on the left rear
upper frame tube, around your wrist. This prevents the carrier
from accidentally rolling away.
Supplied as standard
DANGER
2 hiking arms with shoulder harness and waist strap
When used as a Bicycle Trailer, the stroller wheels must
never be installed in their use position (wheels down). They
may only be carried in their out-of-use position (wheels up).
Serious accidents may otherwise result.
Correct assembly of the stroller
wheels for carrying them
out-of-use when used as a
Bicycle Trailer.
Wrong!!!
Safety instructions for use as a Hiking Carrier
• Please make sure you read the safety instructions in the
“Safety” section at the beginning of this Owner’s Manual.
• Before each journey check that all components are properly
fitted, particularly the wheels and the hiker arms.
• Always make sure that the security pin of the hiker arms
is properly installed so as to prevent the carrier from
accidentally separating from the arms.
• Be mindful of the space needed due to the width and length
of the carrier. Take care in oncoming traffic on narrow paths!
• Please remember that controlling a fully loaded hiker
requires experience and good physical fitness.
• Particular care is needed on slopes, uneven terrain and
when stopping. Do not use on steep or difficult hiking trails.
• First take the hiker for a practice run without children, but
with the maximum load. Perform the practice run on terrain
that is more difficult to cover than that which you want to
travel later with children.
31
Assembly
Lay both the hiking arms with shoulder harness and waist strap
as shown in the “Supplied as standard” illustration in front of the
carrier. The waist strap must be attached to the insides of both
arms.
The shoulder strap, which is attached in a similar way to that
of a backpack, can be adjusted in three positions: at the chest
strap at the front,
Insert each arms into the VersaWing 2.0 until the vertical holes
in the arms and VersaWing 2.0 are aligned with each other.
The arms should now protrude about 2 cm / 3/4 inch out of the
rear side of the VersaWing 2.0.
at the back strap on top for adjusting the height of the waist strap
Now secure the arms by inserting the security pin from above
through the vertical hole in the arm and VersaWing 2.0 until it
stops. Lock the security pin by looping the spring clip over the
pins end that protrudes underneath the VersaWing 2.0.
and at the waist strap itself.
DANGER
Always make sure that the security pin of the hiking arms
are properly inserted to prevent the carrier from accidentally
rolling away. You run the risk of an accident!
TIP
The holes in the hiking arms are larger than the security pins,
so that the arms can rotate slightly around their longitudinal
axes (in order to adapt to narrow or wide hips, and single and
double width carriers).
32
9. The XC Skiing Kit (only Corsaire XL)
DAN G E R
It is not permitted to assemble the XC Skiing Kit to the Cabriolet and the Captain XL. The skis cannot be installed in the manner
described.
The assembled
XC Skiing Carrier
(CTS Ready Chassis +
Skiing Kit)
Supplied as standard
Skis with frames, ski arms with waist belt,
additional self-locking nuts
Safety instructions for use as an
XC Skiing Carrier
• It is not permitted to assemble the XC Skiing Kit to the
Cabriolet and the Captain XL. The skis cannot be installed in
the manner described.
• Please make sure you read the safety instructions in the
“Safety” section at the beginning of this Owner’s Manual.
• Before each journey check that all components are properly
fitted, particularly the skis and the tow bars.
• Always make sure that the security pin of the tow bars
are properly installed, so as to prevent the carrier from
accidentally separating from the arms.
• Always make sure the buckle on the strap is securely closed
and the strap fits tightly. If this is not done, the XC Skiing
Carrier might get separated from you and slide away. You run
the risk of an accident!
• Make sure the length of the tow bars are adjusted correctly,
to ensure that your skis or poles will not come into contact
with the carrier.
• Remember that the additional weight of the carrier with
the XC skiing kit considerably changes the way you ski,
particularly going up or down hills. For this reason, only an
experienced skier should use the carrier with the XC skiing
kit.
• First take the carrier with the XC skiing kit for a practice run
without children, but with the maximum load. Perform the
practice run on terrain that is more difficult to ski than that
which you want to travel later with children.
• Be mindful of the increased space needed when crosscountry skiing, due to the width and length of the carrier.
Take care in oncoming traffic!
• Never use the carrier with the XC skiing kit for downhill
skiing.
• Never tow the carrier with the XC skiing kit behind a
snowmobile, quad or any motorized vehicle
• Use extreme caution on hills, challenging trails, and when
stopping.
• Regularly check on your children to ensure they are
comfortable and are warm enough.
TIP
Check that use of the XC Skiing Carrier is allowed in the
skiing region where you intend to use it.
33
Assembly
Fitting the ski arms to the carrier
Attaching the skis to the carrier
Remove the wheels (for this, press the rubber cap in the centre
of the wheel).
Insert each arm into the VersaWing 2.0 until the vertical holes
in the arms and VersaWing 2.0 are aligned with each other. The
arms should now, at the back in the slot of the VersaWing 2.0,
protrude about 2 cm / 3/4“ over the plastic edge.
To attach the skis, press the spring button in and insert the
attachment axle into the axle socket until it can go no further.
Release the spring button. By moving the skis from side to side,
check that they are locked in the axle socket and cannot be
pulled off.
Now secure the arms by inserting the security pin from above
through the vertical hole in the arm and VersaWing 2.0 until it
stops. Lock the security pin by looping the spring clip over the
pins end that protrudes underneath the VersaWing 2.0.
DANGER
Always make sure that the ski tips point towards the front.
DANGER
Before each journey make sure that the skis are securely
locked in the axle socket.
DAN G E R
Always make sure that the security pins of the ski arms are
properly inserted to prevent the carrier from accidentally
sliding away. You run the risk of an accident!
TIP
The holes in the ski arms are larger than the security pins,
so that the arms can rotate slightly around their longitudinal
axes (in order to adapt to narrow or wide hips, and single and
double width carriers).
34
Length adjustment of the ski arms
The ski arms are adjustable for length. To do this, withdraw the
security pin which connects the two ski arm tubes.
If required, the waist belt can be adjusted for larger and smaller
hips. To do this, undo both attachment screws and reinstall
them into the appropriate grommets. When refitting the screws,
always use the additional self-locking nuts supplied.
Move both tubes towards each other until the desired holes in
both tubes align with each other.
Reinsert the security pin, pushing it in until it goes no
further.
DANGER
Always make sure that the security pins which connect both
tubes of the drawbar are properly inserted in to prevent the
carrier from accidentally sliding away. You run the risk of an
accident!
Putting on the waist belt
DAN G E R
Once self-locking nuts have been loosened they cannot be
reused. Once they have been loosened, they lose their securing function, and this can lead to unexpected loosening of
the screw connection with potentially serious consequences.
Always put the waist belt on so that the padded area is at the
back and the strap with its side-release buckle is at the front.
Always close the buckle with care!
Adjust the 2 straps on either side of the buckle to that it is a tight
fit around your hips, and so that the buckle is centered.
DANGER
Always make sure the buckle on the strap is securely closed
and the strap fits tightly. If this is not done, the XC Skiing
Carrier might get separated from you and slide away. You run
the risk of an accident!
35
10. The Walking Kit
The assembled Walker
(Ready Chassis + Walking Kit)
Supplied as standard
Fitting the drawbars to the carrier
Identical for all models.
Insert each drawbar into the VersaWing 2.0 until the vertical
holes in the arms and VersaWing 2.0 are aligned with each
other. The drawbars should now, at the back in the slot of the
VersaWing 2.0, protrude about 2 cm / 3/4“ over the plastic edge.
Drawbars with hip strap, additional self-locking nuts
Safety instructions for use as Walker
• Please make sure you read the safety instructions in the
“Safety” section at the beginning of this Owner’s Manual.
• Before each journey check that all components are properly
fitted, particularly the wheels and the tow bars.
• Always make sure that the security pin of the tow bars
are properly installed, so as to prevent the carrier from
accidentally separating from the bars.
• Make sure the length of the tow bars is adjusted correctly,
to ensure that your poles cannot come into contact with the
carrier.
• Be mindful of the space needed due to the width and length
of the carrier. Take care in oncoming traffic on narrow paths!
• Please remember that controlling a fully laden walker
requires experience and good physical fitness.
• Particular care is needed on slopes, uneven terrain and
when stopping.
• First take the walker for a practice run without children, but
with the maximum load. Perform the practice run on terrain
that is more difficult to cover than that which you want to
travel later with children.
36
Now secure the drawbars by inserting the security pin from
above through the vertical hole in the arm and VersaWing 2.0
until it stops. Lock the security pin by looping the spring clip
over the pins end that protrudes underneath the VersaWing 2.0.
Putting on the waist belt
Always put the waist belt on so that the padded area is at the
back and the strap with its side-release buckle is at the front.
Always close the buckle with care!
DANGER
Always make sure that the security pins of the drawbars are
properly inserted to prevent the carrier from accidentally
running away. You run the risk of an accident!
TIP
The holes in the drawbars are larger than the security pins,
so that the arms can rotate slightly around their longitudinal
axes (in order to adapt to narrow or wide hips, and single and
double width carriers).
Length adjustment of the drawbars
The drawbars are adjustable for length. To do this, withdraw the
security pin which connects the two drawbar tubes.
Adjust the 2 straps on either side of the buckle to that it is a tight
fit around your hips, and so that the buckle is centered.
DAN G E R
Always make sure the buckle on the strap is securely closed
and the strap fits tightly. If this is not done, the Carrier might
get separated from you and run away. You run the risk of an
accident!
If required, the waist belt can be adjusted for larger and smaller
hips. To do this, undo both attachment screws and reinstall
them into the appropriate grommets. When refitting the screws,
always use the additional self-locking nuts supplied.
Move both tubes towards each other until the desired holes in
both tubes align with each other.
Reinsert the security pin, pushing it in until it goes no
further.
DANGER
Always make sure that the security pins which connect both
tubes of the drawbar are properly inserted in to prevent the
carrier from accidentally running away. You run the risk of an
accident!
DAN G E R
Once self-locking nuts have been loosened they cannot be
reused. Once they have been loosened, they lose their securing function, and this can lead to unexpected loosening of
the screw connection with potentially serious consequences.
37
11. Accessories
Fabric
Travel Bag
Axle-Mount ez-Hitch for additional bike
Storage Cover
Rain Cover
Infant Sling
Baby Bivy
Baby Supporter
Bunting Bag
Jogging Brake Kit
Check the fabric regularly for signs of damage (e.g. tears).
DAN G E R
Tears in the fabric actually represent a high safety risk. Due
to tears in the fabric, your child could come into contact with
the wheels or the road surface.
Contact your authorized Chariot retailer immediately if
you find a tear in the fabric. The fabric can be repaired or
replaced.
12. Service, Care and Storage
Clean the fabric regularly with domestic soap or a mild
cleansing agent and warm water. Never use thinners or
cleaning solvent.
Hitcharm
Check the hitcharm regularly for signs of damage (e.g. cracks).
Storage
DANGER
If there is any kind of damage whatsoever to the hitcharm,
then it must be replaced so as to prevent breakage and the
resulting risk of accident.
If in doubt ask your authorized Chariot retailer.
Store your Chariot CTS in a dry and well-ventilated place.
Before storing your carrier, it should be dry to prevent the
growth of mould and the formation of mildew. Expose your
carrier as little as possible to direct sunlight to prevent fabric
colours from fading. Do not store the Bicycle Trailer coupled to
the bicycle over a long period of time.
WARN I N G
Wheels
Clean the wheel axles,
the retaining balls and the
push-button pin regularly.
Apply some grease or oil
to the retaining balls and
push-button pin.
As well as rubber, tires contain many chemical substances
which improve their physical characteristics. In unfavourable
circumstances, these substances may lead to staining of the
transparent side and front windows on the carrier. For this
reason, always store wheels in such a way that they do not
come into contact with these windows.
General Maintenance
DANGER
If the retaining balls and push-button pin are not regularly
maintained, they may lose their securing function. This may
result in the wheel being lost and lead to serious accidents.
Have the wheels (tires, rims, tension of spokes, axle bearing)
checked by your specialist retailer at least once every year.
Clean the wheels regularly and give them a protective wax,
particularly just before the onset of Winter.
38
Look after your carrier. All painted, chrome or galvanised parts
(including screw connectors) should be regularly cleaned and
protected using standard products for this purpose. Ask your
specialist retailer about suitable products for protecting your
carrier.
13. Specifications
L x W x H, without hitcharm,
Cabriolet
L x W x H, without hitcharm,
Corsaire XL
L x W x H, without hitcharm,
Captain XL
L x W x H, folded up,
Cabriolet
L x W x H, folded up,
Corsaire XL
L x W x H, folded up,
Captain XL
Maintenance and care of bicycle trailers and
jogging strollers:
100 x 82 x 92 cm
101 x 82 x 98 cm
101 x 85 x 100 cm
104 x 82 x 37 cm
functional-related wear occurs in bicycle trailers or jogging
strollers in the components and parts listed in the following
table. Reaching the wear limit very much depends on how well
the users have looked after and maintained the product as well
as the particular type and intensity of use such as:
106 x 82 x 36 cm
• Mileage in km
98 x 78 x 27 cm
Unladen weight of the Ready Chassis
Cabriolet
Corsaire XL
Captain XL
11,1 kg / 24,4 lb
13,4 kg / 29,5 lb
15,1 kg / 33,2 lb
Cargo load
45 kg / 100 lb
Wheel size for Ready Chassis,
Modelle Cabriolet, Corsaire XL
Wheel size for Ready Chassis,
Modelle Captain XL
Wheel size for Jogger Kit
Irrespective of
• Type of use
• Intensity of use
• Care and maintenance
• Loading of:
Passengers
Baggage
• Type of ride:
Degree of acceleration and braking
• Fast cornering
20“
18“
16“
14. Warranty and Guarantee
• Effects of the weather:
UV rays
Humidity
Dirt
Temperature
Salty air
Contact with salt water
Roads gritted with salt
• Storage
The statutory warranty covers defects. Damage resulting from
improper use, use of force, lack of maintenance, or normal wear
and tear, is excluded from such a statutory defect warranty.
The period of statutory warranty depends on the law of the
country in question.
Our products have components or parts which are also subject
to natural wear and tear arising from normal use, depending
very much on the type and degree of use and also how well the
individual product has been serviced and maintained.
In particular where there has been a lot of use (day in day out
and in all kinds of weather), individual parts or components
can reach their wear limit before the statutory guarantee period
has expired. Just because a product has become prematurely
worn because of use, it does not generally mean the product is
defective.
• Level of maintenance:
Service intervals
Means of maintenance
Storage
Servicing and inspection work
Please look at the following table: ‘Wear factors’.
You can see from this table which factors particularly affect
the wear and tear on individual parts.
For your information we have therefore listed in the following
table the important parts affected by wear and tear, and have
named typical contributing factors relating to use, which may
considerably influence wear limit.
39
www.chariotcarriers.com
40