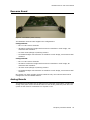
1
Telephony Hardware
Manual
MAXCS 6.7
February 2013
WARNING! Toll fraud is committed when individuals unlawfully gain access to customer
telecommunication systems. This is a criminal offense. Currently, we do not know of any
telecommunications system that is immune to this type of criminal activity. AltiGen
Communications, Inc. will not accept liability for any damages, including long distance charges,
which result from unauthorized and/or unlawful use. Although AltiGen Communications, Inc. has
designed security features into its products, it is your sole responsibility to use the security
features and to establish security practices within your company, including training, security
awareness, and call auditing.
NOTICE: While every effort has been made to ensure accuracy, AltiGen Communications, Inc.,
will not be liable for technical or editorial errors or omissions contained within the
documentation. The information contained in this documentation is subject to change without
notice.
This documentation may be used only in accordance with the terms of the AltiGen
Communications, Inc., License Agreement.
MAX Communication Server, MaxAdministrator, MaxCommunicator, MaxAgent, MaxSupervisor,
MaxOutlook, MaxInSight, MaxCall, Enterprise Manager, AltiServ, AltiLink, AltiConsole, VRPlayer,
Zoomerang, IPTalk, Alti-Mobile Extension, InTouch Dialer, AltiReport, and SuperQ are
trademarks or registered trademarks of AltiGen Communications, Inc. All other brand names
mentioned are trademarks or registered trademarks of their respective manufacturers.
AltiGen's products are protected under one or more of the following U.S. patents, with other U.S.
patents pending: 6532230; 6192344; 6292549; 6493439; 6909780; 6738465; 6754202;
6766006; 6928078; 6909709; 6956848; 7058047; 7013007; 7027578; 7280649; 7308092.
AltiGen Communications, Inc.
410 East Plumeria Dr.
San Jose, CA 95134
Telephone: 888-AltiGen (258-4436)
Fax: 408-597-9020
E-mail: [email protected]
Web site:
www.altigen.com
Copyright © AltiGen Communications, Inc. 2013. All rights reserved.
Contents
About This Manual . . . . . . . . . . . . . . . . . . . . . . . . . . . . . . . . . . . . . . 1
Warranty and Limitation of Liability . . . . . . . . . . . . . . . . . . . . . . . . 3
Warranty . . . . . . . . . . . . . . . . . . . . . . . . . . . . . . . . . . . . . . . . . . . . . . . . . 3
Internet and Security Disclaimer . . . . . . . . . . . . . . . . . . . . . . . . . . . . . . . 4
Limitation of Liability . . . . . . . . . . . . . . . . . . . . . . . . . . . . . . . . . . . . . . . . . 4
FCC and Industry Canada Compliance . . . . . . . . . . . . . . . . . . . . . . . 5
FCC Requirements . . . . . . . . . . . . . . . . . . . . . . . . . . . . .
Service Requirements . . . . . . . . . . . . . . . . . . . . . . . . . .
Equipment Attachment Limitations - Industry Canada . . . .
Port Identification, Facility Interface, Service Order Codes.
Disruption of Network . . . . . . . . . . . . . . . . . . . . . . . . . .
Direct Inward Dialing (DID) Answering Supervision . . . . .
Class A Equipment . . . . . . . . . . . . . . . . . . . . . . . . . . . .
.
.
.
.
.
.
.
.
.
.
.
.
.
.
.
.
.
.
.
.
.
.
.
.
.
.
.
.
.
.
.
.
.
.
.
.
.
.
.
.
.
.
.
.
.
.
.
.
.
.
.
.
.
.
.
.
.
.
.
.
.
.
.
.
.
.
.
.
.
.
.
.
.
.
.
.
.
.
.
.
.
.
.
.
.
.
.
.
.
.
.
5
6
6
7
9
9
9
CHAPTER 1
Safety Guidelines . . . . . . . . . . . . . . . . . . . . . . . . . . . . . . . . . . . . . .11
Seguridad . . . . . . . . . . . . . . . . . . . . . . . . . . . . . . . . . . . . . . . . . . . . . . 11
Sicherheit . . . . . . . . . . . . . . . . . . . . . . . . . . . . . . . . . . . . . . . . . . . . . . 12
Safety with Electricity . . . . . . . . . . . . . . . . . . . . . . . . . . . . . . . . . . . . . . . 13
Seguridad en El Manejo de La Electricidad . . . . . . . . . . . . . . . . . . . . . . . . 14
Elektrosicherheit. . . . . . . . . . . . . . . . . . . . . . . . . . . . . . . . . . . . . . . . . . 15
UL Regulatory Safety Requirements . . . . . . . . . . . . . . . . . . . . . . . . . . . . . 15
Requisitos Reglamentarios de Seguridad de La Asociación de Aseguradores (UL) 17
Sicherheitserfordernisse gemäß UL (Underwriter's Laboratories, Inc.) . . . . . 18
Power Failure . . . . . . . . . . . . . . . . . . . . . . . . . . . . . . . . . . . . . . . . . . . . . 19
Wiring . . . . . . . . . . . . . . . . . . . . . . . . . . . . . . . . . . . . . . . . . . . . . . . . . . 20
Additional Requirements for Australia . . . . . . . . . . . . . . . . . . . . . . . . . . . . 20
Additional Requirements for USA and Canada . . . . . . . . . . . . . . . . . . . . . . . 20
Instructions for Hardwired Earth Connection . . . . . . . . . . . . . . . . . . . . . . . 21
UL Hardware Preparation . . . . . . . . . . . . . . . . . . . . . . . . . . . . . . . . . . . . . 23
Preparación del Equipo UL . . . . . . . . . . . . . . . . . . . . . . . . . . . . . . . . . . . 24
Gerätevorbereitung gemäß UL (Underwriter's Laboratories, Inc.) . . . . . . . . 25
Safety Instructions - Rack Mount Instructions . . . . . . . . . . . . . . . . . . . . . . 26
Instrucciones de Seguridad - Instrucciones de Montaje en Rack . . . . . . . . . 26
Sicherheitshinweise - Rack Mount Anleitung. . . . . . . . . . . . . . . . . . . . . . . 26
CHAPTER 2
Telephony Hardware Handling Requirements . . . . . . . . . . . . . . . .29
Proper Grounding and Loop Current
Uninterruptible Power Supply (UPS)
Operating Environment . . . . . . . . .
Proper Board Handling Procedures .
.
.
.
.
.
.
.
.
.
.
.
.
.
.
.
.
.
.
.
.
.
.
.
.
.
.
.
.
.
.
.
.
.
.
.
.
.
.
.
.
.
.
.
.
.
.
.
.
.
.
.
.
.
.
.
.
.
.
.
.
.
.
.
.
.
.
.
.
.
.
.
.
.
.
.
.
.
.
.
.
.
.
.
.
.
.
.
.
.
.
.
.
.
.
.
.
.
.
.
.
.
.
.
.
.
.
.
.
.
.
.
.
. 29
. 29
. . 30
. . 32
Electrostatic Discharge (ESD) Warning
Packaging for Shipment and Storage .
Proper System Shutdown . . . . . . . . . . .
On-Board Battery . . . . . . . . . . . . . . . .
.
.
.
.
.
.
.
.
.
.
.
.
.
.
.
.
.
.
.
.
.
.
.
.
.
.
.
.
.
.
.
.
.
.
.
.
.
.
.
.
.
.
.
.
.
.
.
.
.
.
.
.
.
.
.
.
.
.
.
.
.
.
.
.
.
.
.
.
.
.
.
.
.
.
.
.
.
.
.
.
.
.
.
.
.
.
.
.
.
.
.
.
.
.
.
.
.
.
.
.
.
.
.
.
32
32
32
32
CHAPTER 3
AltiGen Triton/Proton Telephony Boards . . . . . . . . . . . . . . . . . . . .33
Telephony Board Options . . . . . . . . . . . . . . .
Functional Specifications of Telephony Boards
Triton Analog Extension Board . . . . . . . . . .
Triton Analog Trunk Board . . . . . . . . . . . . .
Proton Analog Trunk Board . . . . . . . . . . . .
Triton T1E1/PRI Board. . . . . . . . . . . . . . . .
Triton VoIP Board . . . . . . . . . . . . . . . . . . .
Triton Resource Board . . . . . . . . . . . . . . . .
Triton 30-Party MeetMe Conference Board . .
Telephony Board Installation . . . . . . . . . . . .
Power Requirements . . . . . . . . . . . . . . . . . .
Station Conference Resource Limits . . . . . . .
.
.
.
.
.
.
.
.
.
.
.
.
.
.
.
.
.
.
.
.
.
.
.
.
.
.
.
.
.
.
.
.
.
.
.
.
.
.
.
.
.
.
.
.
.
.
.
.
.
.
.
.
.
.
.
.
.
.
.
.
.
.
.
.
.
.
.
.
.
.
.
.
.
.
.
.
.
.
.
.
.
.
.
.
.
.
.
.
.
.
.
.
.
.
.
.
.
.
.
.
.
.
.
.
.
.
.
.
.
.
.
.
.
.
.
.
.
.
.
.
.
.
.
.
.
.
.
.
.
.
.
.
.
.
.
.
.
.
.
.
.
.
.
.
.
.
.
.
.
.
.
.
.
.
.
.
.
.
.
.
.
.
.
.
.
.
.
.
.
.
.
.
.
.
.
.
.
.
.
.
.
.
.
.
.
.
.
.
.
.
.
.
.
.
.
.
.
.
.
.
.
.
.
.
.
.
.
.
.
.
.
.
.
.
.
.
.
.
.
.
.
.
.
.
.
.
.
.
.
.
.
.
.
.
.
.
.
.
.
.
.
.
.
.
.
.
.
.
.
.
.
.
.
.
.
.
.
.
.
.
.
.
.
.
33
34
34
36
37
38
39
39
40
40
41
42
CHAPTER 4
AltiGen MAX1000/MAX2000 Telephony Boards . . . . . . . . . . . . . . .43
MAX1000 System . . . . . . . . . . . . . . . . . . .
MAX1000 Series Access Boards . . . . . . . .
Installing Access Boards . . . . . . . . . . . . .
Removing Access Boards . . . . . . . . . . . . .
Wiring Specification . . . . . . . . . . . . . . . .
System Limitation for MAX1000 . . . . . . . .
MAX1000-R System . . . . . . . . . . . . . . . . .
Additional Hardware . . . . . . . . . . . . . . . .
System Limitation for MAX1000-R . . . . . .
MAX2000 System . . . . . . . . . . . . . . . . . . .
System Limitation for MAX2000 System . .
.
.
.
.
.
.
.
.
.
.
.
.
.
.
.
.
.
.
.
.
.
.
.
.
.
.
.
.
.
.
.
.
.
.
.
.
.
.
.
.
.
.
.
.
.
.
.
.
.
.
.
.
.
.
.
.
.
.
.
.
.
.
.
.
.
.
.
.
.
.
.
.
.
.
.
.
.
.
.
.
.
.
.
.
.
.
.
.
.
.
.
.
.
.
.
.
.
.
.
.
.
.
.
.
.
.
.
.
.
.
.
.
.
.
.
.
.
.
.
.
.
.
.
.
.
.
.
.
.
.
.
.
.
.
.
.
.
.
.
.
.
.
.
.
.
.
.
.
.
.
.
.
.
.
.
.
.
.
.
.
.
.
.
.
.
.
.
.
.
.
.
.
.
.
.
.
.
.
.
.
.
.
.
.
.
.
.
.
.
.
.
.
.
.
.
.
.
.
.
.
.
.
.
.
.
.
.
.
.
.
.
.
.
.
.
.
.
.
.
.
.
.
.
.
.
.
.
.
.
.
.
.
.
.
.
.
.
.
.
.
.
.
.
.
.
.
.
.
.
.
.
.
.
43
44
47
48
48
48
48
49
49
49
50
CHAPTER 5
MAX4000 Server and Vision Boards . . . . . . . . . . . . . . . . . . . . . . . .51
MAX4000 Server . . . . . . . .
Vision Access Boards . . . . .
Board Status LEDs . . . . .
T1E1 Access Board . . . . .
Resource Board . . . . . . .
Analog Boards . . . . . . . .
Wiring Specification . . . .
Installing Boards . . . . . .
Removing Boards . . . . . .
Swapping a Power Supply
.
.
.
.
.
.
.
.
.
.
.
.
.
.
.
.
.
.
.
.
.
.
.
.
.
.
.
.
.
.
.
.
.
.
.
.
.
.
.
.
.
.
.
.
.
.
.
.
.
.
.
.
.
.
.
.
.
.
.
.
.
.
.
.
.
.
.
.
.
.
.
.
.
.
.
.
.
.
.
.
.
.
.
.
.
.
.
.
.
.
.
.
.
.
.
.
.
.
.
.
.
.
.
.
.
.
.
.
.
.
.
.
.
.
.
.
.
.
.
.
.
.
.
.
.
.
.
.
.
.
.
.
.
.
.
.
.
.
.
.
.
.
.
.
.
.
.
.
.
.
.
.
.
.
.
.
.
.
.
.
.
.
.
.
.
.
.
.
.
.
.
.
.
.
.
.
.
.
.
.
.
.
.
.
.
.
.
.
.
.
.
.
.
.
.
.
.
.
.
.
.
.
.
.
.
.
.
.
.
.
.
.
.
.
.
.
.
.
.
.
.
.
.
.
.
.
.
.
.
.
.
.
.
.
.
.
.
.
.
.
.
.
.
.
.
.
.
.
.
.
.
.
.
.
.
.
.
.
.
.
.
.
.
.
.
.
.
.
.
.
.
.
.
.
.
.
.
.
.
.
.
.
.
.
.
.
.
.
.
.
.
.
.
.
.
.
.
.
.
.
.
.
.
.
.
.
.
.
.
.
.
.
.
.
.
.
.
.
.
.
.
.
.
.
.
.
.
.
.
.
.
.
.
.
.
.
.
.
.
.
.
.
.
.
.
.
.
.
.
.
51
52
52
53
55
55
57
57
58
58
Swapping a Hard Drive . . . . . . . . . . . . . . . . . . . . . . . . . . . . . . . . . . . . .
59
Index . . . . . . . . . . . . . . . . . . . . . . . . . . . . . . . . . . . . . . . . . . . . . . . 61
About This Manual
This handbook is for dealers, administrators, and technicians who are responsible for
installing an AltiGen telephony system and need to know about:
• System requirements
• Federal Communications Commission (FCC) and Underwriters Laboratories (UL)
safety requirements
• AltiGen telephony boards
• Board handling procedures
• System limitations
• Other information related to the hardware of an AltiGen system
Telephony Hardware Manual
1
2 Telephony Hardware Manual
Warranty and Limitation of Liability
Following is a statement of product warranty and limitation of liability.
Warranty
What The Warranty Covers
AltiGen Communications warrants its hardware products to be free from defects in
material and workmanship during the warranty period. If a product proves to be
defective in material or workmanship during the warranty period, AltiGen
Communications will, at its sole option, repair, refund or replace the product with a like
product.
How Long the Warranty Is Effective
All AltiGen Communications products are warranted for one (1) year for all parts from
the date of the first end user purchase.
Whom the Warranty Protects
This warranty is valid only for the first end user purchaser.
What the Warranty Does Not Cover
1.
Any product on which the serial number has been defaced, modified or removed.
2.
Damage, deterioration or malfunction resulting from:
• Accident, misuse, neglect, fire, water, lightning, or other acts of nature,
unauthorized product modification, or failure to follow instructions supplied with
the product.
• Repair or attempted repair by anyone not authorized by AltiGen Communications.
• Any damage of the product due to shipment.
• Removal or installation of the product.
• Causes external to the product, such as electric power fluctuations or failure.
• Use of supplies or parts not meeting AltiGen Communications’ specifications.
• Normal wear and tear.
• Any other cause which does not relate to a product defect.
3.
Shipping, installation, set-up and removal service charges.
Note: At AltiGen’s sole discretion, if the product(s) is determined to be repairable, the
then current Out of Warranty charge shall apply.
How to Obtain Service
End user customers, contact your Authorized AltiGen Dealer for service.
Authorized AltiGen Dealers must follow the steps below for service:
1.
Take or ship the product (shipment prepaid) to AltiGen Communications, Inc.
All materials being returned to AltiGen must have an associated RMA number. RMA
numbers are issued by AltiGen Customer Service and can be obtained from AltiGen’s
authorized dealer web site, at https://dealer.altigen.com (click “Technical Support,”
then click “Submit RMA Request”) or by calling 1-888-AltiGen. AltiGen reserves the
right to refuse return of any material that does not have an RMA number. The RMA
number should be clearly marked on the outside of the box in which the
material is being returned. For example:
Telephony Hardware Manual
3
Limitation of Liability
Attn: RMA #123
AltiGen Communications, Inc.
410 East Plumeria Dr.
San Jose, CA 95134
Upon authorization of return, AltiGen will decide whether the malfunctioning product
will be repaired or replaced.
2.
To obtain warranty service, you must provide 1) date/proof of purchase, 2) serial
number of product, 3) your name and company name, 4) your shipping address and
5) description of the problem.
3.
For additional information, log onto AltiGen’s authorized dealer web site, at
https://dealer.altigen.com.
Effect of State Law
This warranty gives you specific legal rights, and you may also have other rights which
vary from state to state. Some states do not allow limitations on implied warranties and/
or do not allow the exclusion of incidental or consequential damages, so the above
limitations and exclusions may not apply to you.
Sales Outside the U.S.A.
For AltiGen Communications products sold outside of the U.S.A., contact your AltiGen
Communications dealer for warranty information and services.
Internet and Security Disclaimer
AltiGen Communications assumes no liability for the security of customer computer
systems, web sites and networks. Any computer connected to the Internet is at risk to
the system being compromised. While there are many ways to configure an effective,
secure firewall platform, customer implementations will vary, and as such, AltiGen
Communications cannot specify firewall settings. You may refer to the section on
firewalls in this document for a list of recommended ports used by various AltiGen
applications.
Limitation of Liability
Except for personal injury, direct damages to tangible personal property proximately
caused by AltiGen products and liability otherwise expressly assumed in a written
agreement signed by AltiGen, the liability of AltiGen, its affiliates, suppliers, and
authorized resellers for any claims, losses, damages, or expenses from any cause
whatsoever (including acts of omission of third parties), regardless of the form of action,
whether in contract, tort or otherwise, shall not exceed an amount equal to the lesser
of the direct damages proven or the purchase price of the product. In no event shall
AltiGen or its affiliates, suppliers, or authorized resellers be liable for incidental,
consequential, or any other indirect loss or damage (including lost profits or revenues)
incurred in connection with the product. This limitation of liability shall survive failure of
the exclusive remedy set forth in the limited warranty referred to in this book under
“Warranty.”
4 Telephony Hardware Manual
FCC and Industry Canada Compliance
This section describes the requirements for compliance with Federal Communications
Commission (FCC) Rules and Industry Canada CS-03 standard.
Statement
This equipment has been tested and found to comply with the limits for a Class A digital
device, pursuant to Part 15 and Part 68 of the FCC Rules. These limits are designed to
provide a reasonable protection against harmful interference when the equipment is
operated in a commercial environment. This equipment generates, uses, and can radiate
radio frequency energy and, if not installed and used in accordance with the instruction
manual, may cause harmful interference to radio communications. However, there is no
guarantee that interference will not occur in a particular installation. Operation of this
equipment in a residential area is likely to cause harmful interference, in which case, the
user will be required to correct the interference at his own expense.
Cet appareil numérique de la classe A est conforme à la norme NMB-003 du Canada.
FCC Requirements
1.
The Federal Communications Commission (FCC) has established rules that permit
this device to be directly connected to the telephone network. Standardized jacks
are used for these connections. This equipment should not be used on party lines or
coin phones.
2.
If this device is malfunctioning, it may also be causing harm to the telephone
network; this device should be disconnected until the source of the problem can be
determined and until repair has been made. If this is not done, the telephone
company may temporarily disconnect service.
3.
The telephone company may make changes in its technical operations and
procedures; if such changes affect the compatibility or use of this device, the
telephone company is required to give adequate notice of the changes. You will be
advised of your rights to file a complaint with the FCC.
4.
If the telephone company requests information on what equipment is connected to
their lines, inform them of:
• The telephone number to which this unit is connected.
• The ringer equivalence number. [Example: 0.0B. See tables under “Port
Identification, Facility Interface, Service Order Codes” on page 7.]
• The USOC jack required. [Example: RJ-21X. See tables under “Port Identification,
Facility Interface, Service Order Codes” on page 7.]
• The FCC Registration Number. [See label on board/equipment.]
• Industry Canada (Industrie Canada) Certification Number.
[See label on board/equipment.]
The second and fourth Items are indicated on the label. The Ringer Equivalence Number
(REN) is used to determine how many devices can be connected to your telephone line.
In most areas, the sum of the RENs of all devices on any one line should not exceed five
(5.0A). If too many devices are attached, they may not ring properly.
Telephony Hardware Manual 5
FCC Requirements
Service Requirements
In the event of equipment malfunction, all repairs should be performed by our Company
or an authorized agent. It is the responsibility of users requiring service to report the
need for service to AltiGen or to one of our authorized agents. Service can be obtained
at your Authorized AltiGen Dealer.
Equipment Attachment Limitations - Industry Canada
NOTICE: The Canadian Industry Canada label identifies certified equipment. This
certification means that the equipment meets certain telecommunications network
protective, operational, and safety requirements. The Department does not guarantee
the equipment will operate to the user’s satisfaction.
Before installing this equipment, users should ensure that it is permissible to be
connected to the facilities of the local telecommunications company. The equipment
must also be installed using an acceptable method of connection. In some cases, the
company’s inside wiring associated with the single line individual service may be
extended by means of a certified connector assembly (telephone extension cord). The
customer should be aware that compliance with the above conditions may not prevent
degradation of service in some situations.
Repairs to the certified equipment should be made by an authorized Canadian
maintenance facility designated by the supplier. Any repairs or alterations made by the
user to this equipment, or equipment malfunctions, may give the telecommunications
company cause to request the user to disconnect the equipment.
Users should ensure for their own protection that the electrical ground connections of
the power utility, telephone lines, and internal metallic water pipe system, if present, are
connected together. This precaution may be particularly important in rural areas.
Caution! Users should not attempt to make such connections themselves, but should
contact the appropriate electrical inspection authority, or electrician, as
appropriate.
WARNING!
Changes or modifications to this unit not expressly approved in
writing by AltiGen Communications, Inc., could void the user’s
authority to operate this equipment.
6 Telephony Hardware Manual
Port Identification, Facility Interface, Service Order Codes
The following tables list the manufacturer’s network interface port designations, Facility
Interface Codes (FIC), Ringer Equivalence Number (REN), or Service Codes and the
network jacks for the required facilities. The facility interface and service order codes are
with reference to the codes specified in Table 5 of Appendix D of FCC Form 730
Application Guide of January 1998.
Table 1. Network Digital Trunk Interfaces for Digital Services (Triton)
Triton T1/E1 PRI FCC Registration No., Part 68 5SMUSA-25184-PF-E
Manufacturer Port
Identifier
Facility Interface
Code (FIC)
Service
Order Code
(SOC)
Network Jack
ALTI-T1E1-1
04DU9-BN
(SF)
6.0P/AS.2
RJ-48Ca
04DU9-DN
B8ZS)
(SF
6.0P/AS.2
RJ-48Ca
04DU9-1KN
(ESF)
6.0P/AS.2
RJ-48Ca
04DU9-1SN
B8ZS)
(ESF
6.0P/AS.2
RJ-48Ca
(USOC)
a. The Triton T1/PRI interface (ALTI-T1E1-1) connects to the Public Switched Telephone
Network through an FCC registered NCTE which specifies the type of network jack to
be used.
Table 2. Network Digital Trunk Interfaces for Digital Services (MAX1000/2000 family)
MAX T1/E1 PRI FCC Registration No., Part 68 US:5SMPF13BMAX1000
and US: 5SMPF13BMAX2000
Manufacturer Port
Identifier
Facility Interface
Code (FIC)
Service
Order Code
(SOC)
Network Jack
ALTI-M0404-T1E1
04DU9-BN
(SF)
6.0P/AS.2
RJ-48Ca
04DU9-DN
B8ZS)
(SF
6.0P/AS.2
RJ-48Ca
04DU9-1KN
(ESF)
6.0P/AS.2
RJ-48Ca
04DU9-1SN
B8ZS)
(ESF
6.0P/AS.2
RJ-48Ca
(USOC)
ALTI-M0000-T1E1
a. The MAX1000/2000 family of T1/PRI interface (ALTI-M0404-T1E1 and ALTI-M0000-
T1E1) connects to the Public Switched Telephone Network through an FCC registered
NCTE which specifies the type of network jack to be used.
Telephony Hardware Manual 7
FCC Requirements
Table 3. Network Digital Trunk Interfaces for Digital Services (MAX4000 family)
MAX T1/E1 PRI FCC Registration No., Part 68 US:5SMPF13BMAX4000
Manufacturer Port
Identifier
Facility Interface
Code (FIC)
Service
Order Code
(SOC)
Network Jack
ALTI-VT1E1SM-1PT,
ALTI-VT1E1-2
04DU9-BN
(SF)
6.0P/AS.2
RJ-48Ca
04DU9-DN
B8ZS)
(SF
6.0P/AS.2
RJ-48Ca
04DU9-1KN
(ESF)
6.0P/AS.2
RJ-48Ca
04DU9-1SN
B8ZS)
(ESF
6.0P/AS.2
RJ-48Ca
(USOC)
a. The MAX4000 T1/PRI interface (ALTI-VT1E1SM-1PT, ALTI-VT1E1-2) connects to the
Public Switched Telephone Network through an FCC registered NCTE which specifies
the type of network jack to be used.
Table 4. Triton Analog Trunk Interfaces for Loop Start/Ground Start
and Loop Start Services
Network Jack
Manufacturer Port
Identifier
Facility Interface
Code (FIC)
REN
(USOC)
ALTI-TTAT-12GS
02GS2/02LS2
0.5B
RJ-21X
ALTI-TTAT-12
02LS2
0.5B
RJ-21X
ALTI-TTAT-8
02LS2
0.5B
RJ-21X
Table 5. Proton Analog Trunk Interfaces for Loop Start and Loop Start Services
Proton Series Registration No., Part 68 US:5SMPF13BPROTON
Network
Jack
Manufacturer Port
Identifier
Facility Interface
Code (FIC)
REN
(USOC)
ALTI-P0800
02LS2
1.3B
RJ-21X
Table 6. MAX1000/2000 family of Analog Trunk Interfaces for Loop Start
and Loop Start Services
Network Jack
Manufacturer Port
Identifier
Facility Interface
Code (FIC)
REN
(USOC)
ALTI-M0408
02LS2
1.3B
RJ-21X
ALTI-M0804
02LS2
1.3B
RJ-21X
8 Telephony Hardware Manual
Table 7. MAX4000 family of Analog Trunk Interfaces for Loop Start
and Loop Start Services
Network Jack
Manufacturer Port
Identifier
Facility Interface
Code (FIC)
REN
(USOC)
ALTI-V0404
02LS2
1.3B
RJ-21X
ALTI-V0416
02LS2
1.3B
RJ-21X
Disruption of Network
If any Triton, Proton, or MAX boards disrupt the telephone network, the telephone
company can discontinue your service temporarily. If possible, the telephone company
will notify you in advance. If advance notice is not practical, they will notify you as soon
as possible. You are also informed of your right to file a complaint with the FCC.
Direct Inward Dialing (DID) Answering Supervision
Customers allowing Triton T1/PRI, Triton, Proton, or MAX Analog Extension/DID to be
operated in such a manner as to not provide for proper answer supervision is a violation
of Part 68 of the FCC rules.
Proper answer supervision occurs when:
1.
The MAX Communication Server system returns answer supervision to the PSTN
when DID calls are:
• Answered by the called station.
• Answered by the attendant.
• Routed to a recorded announcement that can be administered by the customer.
2.
The AltiServ system returns answering supervision on all DID calls forwarded to the
PSTN.
Class A Equipment
This is a Class A product. In a domestic environment, this product may cause radio
interference, in which case, the user may be required to take adequate measures.
Telephony Hardware Manual 9
FCC Requirements
10 Telephony Hardware Manual
CHAPTER
1
Safety Guidelines
The following information is included in this publication for the use and safety of
installation and maintenance personnel.
Important Safety Instructions
• Read all of the instructions before attempting to operate the equipment and before
connecting the power supply.
• Always follow basic safety precautions to reduce the risk of fire, electrical shock, and
injury to persons.
• To prevent fire or shock hazard, do not expose the unit to rain, moisture, or install
this product near water. Never spill liquid of any kind on this product.
• Never push objects of any kind into this product through module openings or
expansion slots, as they may touch dangerous voltage points or short out parts,
which could result in the risk of fire or electrical shock.
• Refrain from opening the cabinet as there are high voltage components inside. Refer
servicing to qualified service personnel. If you are a qualified service personnel,
power down everything before opening.
• Do not attach the power supply cord to building surfaces. Do not allow anything to
rest on the power cord or allow the cord to be abused by persons walking on it.
• To protect this equipment from overheating, do not block the slots and openings in
the module housings that are provided for ventilation.
• Avoid using a telephone (other than a cordless type) during an electrical storm.
• There may be a remote risk of electric shock from lightning.
• Do not use the telephone to report a gas leak in the vicinity of the leak.
Seguridad
La siguiente información se incluye en la presente publicación para la utilización y
seguridad del personal instalador y de mantenimiento.
Información de Seguridad de Importancia
• Lea todas las instrucciones antes de que intente operar el equipo y antes de conectar
la fuente de alimentación.
Telephony Hardware Manual
11
• Observe siempre las precauciones básicas de seguridad, a fin de reducir el riesgo de
incendio, electrochoque y de lesiones al personal.
• Con objeto de evitar incendios o el riesgo de electrochoque, no exponga la unidad a
la lluvia, humedad, ni tampoco instale este producto cerca del agua. Jamás derrame
ninguna clase de líquido sobre el producto.
• Jamás inserte objeto alguno, de ninguna clase, a través de las aberturas del módulo
o de las ranuras de expansión de este producto, ya que podrían establecer contacto
con puntos de voltaje peligrosos, o provocar cortos circuitos en los componentes del
producto, y esto a su vez podría originar el riesgo de incendio o de electrochoque.
• Absténgase de abrir el gabinete ya que éste contiene componentes de alto voltaje.
Asígnele el mantenimiento únicamente a personal capacitado. Si usted forma parte
de dicho personal capacitado, corte absolutamente toda la energía eléctrica antes de
que abra el gabinete.
• No sujete el cordón del suministro eléctrico a las superficies del edificio. No permita
que objeto alguno descanse sobre el cordón del suministro eléctrico, ni que la gente
lo maltrate al caminar sobre él.
• A fin de evitar el sobrecalentamiento del equipo, no obstruya las ranuras y aberturas
que se encuentran sobre las cubiertas del módulo, ya que éstas se suministran para
su ventilación.
Sicherheit
Die in dieser Veröffentlichung enthaltene Information befaßt sich mit der Sicherheit von
Personal sowohl beim Einbau als auch bei der Wartung des Geräts.
Wichtige Sicherheitsbestimmungen
• Vor Einschaltung der Stromversorgung und der Inbetriebnahme des Geräts mit allen
Bestimmungen sorgfältig vertraut machen.
• Um die Gefahr von Feuer, elektrischem Schlag und anderen persönlichen
Verletzungen zu verhüten, sind grundsätzliche Vorsichtsmaßnahmen zu beachten.
• Zur Vermeidung von Feuer oder elektrischem Schlag muß verhütet werden, das
Gerät Regen oder Feuchtigkeit auszusetzen, oder aber es in Wassernähe zu
installieren. Es darf auf keinen Fall Flüssigkeit auf das Gerät verschüttet werden.
• Um die Gefahr von Feuer oder elektrischem Schlag auszuschalten, die durch
Berührung mit Spannungsteilen oder einem elektrischen Kurzschluß entstehen
kann, dürfen auf keinen Fall Objekte irgendeiner Art durch Modulöffnungen oder
Erweiterungsschlitze in das Gerät eingeführt werden.
• Das Gehäuse enthält Hochspannungsteile und sollte deshalb nicht geöffnet werden.
Wartung ist von qualifiziertem Wartungspersonal durchzuführen.. Im Wartungsfalle
ist vor der Öffnung des Gehäuses sämtliche Stromzufuhr abzuschalten.
• Stromversorgungskabel nicht an Gebäudeteilen befestigen. Keine Gegenstände auf
das Stromversorgungskabel legen oder auf das Kabel treten.
• Zur Verhütung der Überhitzung des Gerätes ist die Verschließung von
Ventilationsschlitzen und -öffnungen im Modulgehäuse zu vermeiden.
12 Telephony Hardware Manual
Safety Guidelines
Safety with Electricity
DANGER
Do not take chances with your life. Follow
these safety guidelines carefully.
High Voltages
• Observe all safety regulations and read the warnings, cautions, and notes posted on
the equipment.
• Find the switch to power off the cabinet. Read the posted instructions.
• Ensure that equipment can not be powered from another source or controlled from
a different circuit breaker or disconnecting switch.
• When a procedure requires that you power off the system:
• Lock the wall box-switch in the off position.
• Attach a DO NOT OPERATE tag to the wall box-switch.
• Never assume that the power is turned off. Always check to ensure that a circuit
does not have power.
Note: Unit must have ground wire attached if trunks are attached and system is
unplugged.
• Do not work alone. Work with another person who knows the locations of the poweroff switches, especially if you are working with exposed electrical circuits. (See note
above.)
• Follow the instructions in the manual carefully, especially when working with circuits
that are powered. Disconnect power when instructed to do so in the procedures.
• Disconnect all power before working near power supplies unless otherwise instructed
by a maintenance procedure.
• Disconnect all power before installing changes in machine circuits unless otherwise
instructed by a maintenance procedure.
• High voltages capable of causing shock are used in this equipment. Be extremely
careful when measuring high voltages and when servicing cards, panels, and boards
while the system is powered on.
• Do not wear jewelry or other metal objects when working on the equipment.
• When possible, work with one hand so that a circuit is not created.
• Use caution when installing or modifying telephone lines. Never install telephone
wiring during an electrical storm.
• Never install a telephone jack where it can get wet unless the jack is specifically
designed for wet conditions.
• Never touch uninsulated telephone wires or terminals unless the telephone line has
been disconnected at the network interface.
Telephony Hardware Manual
13
Safety with Electricity
Seguridad en El Manejo de La Electricidad
DANGER/PELIGRO
Do No ponga en riesgo su vida. Sigua estos lineamientos de
seguridad al pie de la letra.
Alto Voltaje
• Observe todas las normas de seguridad y lea las advertencias, avisos de precaución
y notas que se encuentran adheridos al equipo.
• Encuentre el interruptor que corta la corriente eléctrica del gabinete. Lea las
instrucciones que se encuentran adheridas.
• Cerciórese de que la corriente eléctrica del equipo no pueda encenderse desde otra
fuente, ni controlares desde ningún otro interruptor de circuitos o interruptor de
desconexión.
• Cuando alguno de los procedimientos requiera que corte usted la corriente eléctrica
del sistema:
• Fije el interruptor del centro de carga que se encuentra empotrado en la pared, en
la posición de apagado (off).
• Pegue una etiqueta de NO OPERAR sobre el interruptor del centro de carga.
• Jamás presuponga que la energía eléctrica se encuentra apagada. Cerciórese
siempre de que el circuito no tiene energía eléctrica.
Nota: Cuando existan troncales conectadas a la unidad y el sistema se encuentre
desenchufado, la unidad deberá tener instalado el cable de conexión a tierra.
• No trabaje sólo. Trabaje con alguna otra persona que conozca las ubicaciones de los
interruptores de apagado de la corriente eléctrica, particularmente, si está usted
trabajando con circuitos eléctricos descubiertos. (Lea la nota anterior).
• Siga al pié de la letra las instrucciones contenidas en el manual, particularmente,
cuando trabaje con circuitos que tengan energía eléctrica. Desconecte la energía
cuando las instrucciones del procedimiento se lo indiquen.
• Desconecte toda la energía eléctrica antes de trabajar cerca de cualquier fuente de
alimentación, salvo que el procedimiento de mantenimiento le instruya lo contrario.
• Desconecte toda la energía eléctrica antes de efectuar cualquier cambio en los
circuitos de la máquina, salvo que el procedimiento de mantenimiento le instruya lo
contrario.
• El alto voltaje que utiliza este equipo puede ocasionar electrochoques. Tenga sumo
cuidado al medir los altos voltajes y al darle mantenimiento a las tarjetas, paneles
y placas cuando la energía eléctrica del equipo se encuentre encendida.
• No use alhajas u otros objetos de metal cuando trabaje en el equipo.
• Cuando le sea posible, trabaje con una sola mano, a fin de no producir un circuito.
• Tenga cuidado cuando instale o modifique líneas telefónicas. Jamás instale cableado
telefónico durante una tormenta eléctrica.
• Nunca instale un conector telefónico en donde pueda mojarse, salvo cuando el
conector se encuentre especialmente diseñado para funcionar en condiciones de
humedad.
• Jamás toque cables o terminales telefónicas que no tengan aislante, a menos que
haya desconectado la línea telefónica desde la interfase de la red.
14 Telephony Hardware Manual
Safety Guidelines
Elektrosicherheit
DANGER/GEFAHR
Nicht mit dem Leben spielen.
Sicherheitsrichtlinien sorgfältig beachten.
Hochspannung
• Alle Sicherheitsregeln beachten und am Gerät angebrachte Warnungen und
Hinweise lesen.
• Stellen Sie fest, wo sich der Gehäuseschalter befindet. Anleitung lesen.
• Stellen Sie sicher, daß das Gerät weder durch eine andere Stromquelle versorgt noch
durch eine andere Sicherung oder Trennschalter kontrolliert werden kann.
• Sollte ein Verfahren die Abschaltung der Anlage erfordern:
• Wandschalter in der "AUS" - Position sperren
• Kennzeichen "NICHT BETÄTIGEN" am Wandschalter anbringen
• Gehen Sie NIE davon aus, daß der Strom abgeschaltet ist, sondern überprüfen Sie
es.
Note: Anmerkung: Gerät muß geerdet sein, wenn Kabel angeschlossen und die
Anlage abgeschaltet ist.
• Nicht alleine arbeiten. Arbeiten Sie mit jemandem, der weiß, wo sich der AUSSchalter befindet, besonders dann, wenn an freiliegenden Schaltkreisen gearbeitet
wird. (Siehe obige Anmerkung).
• Beachten Sie die Anleitungen im Handbuch sorgfältig, besonders dann, wenn an
eingeschalteten Schaltkreisen gearbeitet wird. Strom abschalten, wenn ein
Verfahren das vorsieht.
• Falls nicht anderweitig durch ein Wartungsverfahren bestimmt, ist der Strom bei
Arbeiten nahe der Stromversorgung abzuschalten.
• Falls nicht anderweitig durch ein Wartungsverfahren bestimmt, ist der Strom bei
Änderungen am Maschinenstromkreis abzuschalten.
• Dieses Gerät enthält Hochspannungen, die elektrischen Schlag verursachen können.
Äußerste Vorsicht ist geboten beim Messen von Hochspannung und beim Warten von
Schalttafeln und Steckkarten solange der Strom eingeschaltet ist.
• Bei Arbeiten am Gerät keinen Schmuck oder metallische Gegenstände tragen.
• Möglichst mit einer Hand arbeiten, um keinen Stromkreislauf entstehen zu lassen.
• Vorsicht bei der Installation oder Modifizierung von Telefonleitungen. Keine
Telefonleitungen bei Gewittern legen.
• Keine Telefonbuchse installieren, wo die Gefahr besteht, daß sie angefeuchtet wird,
es sei denn die Buchse ist für Feuchtigkeit besonders ausgelegt.
• Vermeiden Sie das Berühren von nichtisolierten Telefonkabeln oder Terminals, wenn
die Telefonleitung an den Netzschnittstellen nicht abgeschaltet ist.
UL Regulatory Safety Requirements
(Requisitos Reglamentarios de Seguridad de La Asociación de Aseguradores
(UL)/Sicherheitserfordernisse gemäß UL (Underwriter's Laboratories, Inc.))
Telephony Hardware Manual
15
UL Regulatory Safety Requirements
Host Computer
1.
Model AltiGen/MAX Communication Server apparatus is approved for connection to
Telecommunications Systems specified in these instructions for use subject to the
conditions set out in them. Any other usage will INVALIDATE this approval.
2.
The host machine shall be “CE” marked, with the internal ISA and PCI slots operating
at SELV in accordance with EN60950, 1992, issue 2, +A4.
3.
This apparatus MUST be professionally installed.
4.
The host machine MUST be hardwired earthed in accordance with EN60950, 1992,
issue 2, +A4, 1997, cl. 6.2.1.2 with an earth wire from the host machine earthing
terminal to the building earth.
5.
The host machine SELV circuit is connected to the protective earthing terminal in
accordance with EN60950 cl. 2.5.
6.
The host machine ISA bus pins B1, B10, or B31 (edge connectors on CPU motherboard/backplane) MUST be less than 0.1 Ohms to host machine earthing terminal.
ISA bus
B1
B10
ISA bus
B31
7.
AltiGen complies with PCI Board specifications Rev. 2.1 (5V 32-bit).
8.
The power required by the host machine and the total of all adapter cards installed
within the host environment, together with any ancillary apparatus, shall not exceed
the power specification of the host machine.
9.
It is essential that, when other option cards are introduced that use or generate a
hazardous voltage, the minimum creepages and clearances specified in the following
table are maintained. A hazardous voltage is one that exceeds 42.4V peak AC or 60V
DC. If you have any doubt, seek advice from a competent engineer before installing
other adapters into the host machine.
Clearance (mm)
Creepage (mm)
Voltage used or
generated by host
or other cards
2.0
2.4 (3.8)
Up to 50 Vrms or Vdc
2.6
3.0 (4.8)
Up to 125 Vrms or Vdc
4.0
5.0A (8.0)
Up to 250 Vrms or Vdc
4.0
6.4 (10.0)
Up to 300 Vrms or Vdc
For a host or other expansion card fitted in the host, using or generating voltages
greater than 300V (rms or dc), advice from a competent safety engineer must be
obtained before installation of the relevant equipment.
Any other usage will INVALIDATE the approval of the apparatus, if as a result, it
then ceases to conform to the standards against which approval was granted.
10. For the following AltiServ platforms — AltiServ1A-IP, AltiServ1E-IP, and Alti-Office
1B — make sure the input voltage selection switch (115/230V) is on the back of the
chassis and is set to the proper voltage for your installation.
16 Telephony Hardware Manual
Safety Guidelines
Requisitos Reglamentarios de Seguridad de La Asociación
de Aseguradores (UL)
Computadora Principal
1.
El aparato modelo AltiGen/MAX Communication Server se encuentra aprobado para
conectarse a los Sistemas de Telecomunicaciones que se especifican en estas
instrucciones y para emplearse bajo las condiciones que se indican en las mismas.
Cualquier utilización distinta INVALIDA esta aprobación.
2.
La computadora principal deberá encontrarse marcada con "CE", y sus ranuras
internas ISA y PCI deberán estar operando en SELV, conforme lo indica el EN60950,
1992, edición 2, +A4.
3.
La instalación de este aparato la DEBEN ejecutar profesionales.
4.
La máquina principal DEBE conectarse a tierra conforme lo dispone el EN60950,
1992, edición 2, +A4, 1997, cl. 6.2.1.2, utilizando cable de conexión a tierra desde
la terminal a masa de la máquina principal a la conexión a tierra del edificio.
5.
El circuito SELV de la máquina principal debe conectarse a la terminal protectora de
aterrizada de conformidad con el EN60950 cl. 2.5.
6.
Las clavijas de los canales de distribución ISA B1, B10, o B31 de la máquina principal
(conectores planos de entrada lateral de la placa matriz/panel de fondo
(motherboard/back plane)) de la unidad central de proceso (CPU), DEBEN tener
menos de 0.1 ohmios en la conexión a tierra de la máquina principal.
ISA bus
B1
B10
ISA bus
B31
7.
El AltiGen debe cumplir con las especificaciones de las Placas PCI, Rev. 2.1 (5V 32bit).
8.
La energía eléctrica que requiere la máquina principal y el total del conjunto de
tarjetas de los adaptadores instalados dentro del ámbito de la máquina principal,
junto con cualquier aparato auxiliar adicional, no deberá exceder las especificaciones
de energía eléctrica de la máquina principal.
9.
Es esencial que, cuando se introduzcan tarjetas opcionales que utilicen o generen
voltajes peligrosos, también se mantengan las distancias y longitudes de
frotamiento mínimas y máximas que se especifican en la tabla que aparece a
continuación. Voltaje peligroso es aquel que excede de 42.4 voltios, en su valor
máximo de cresta en la corriente alterna o, de 60 voltios, en su valor máximo de
cresta en la corriente directa. Si tiene usted alguna duda, obtenga asesoría de un
ingeniero competente, antes de instalar otros adaptadores en la máquina principal.
Distancia (mm)
Longitud de
Frotamiento
(mm)
Voltaje empleado o
generado por la tarjeta
madre u otras tarjetas
2.0
2.4 (3.8)
Hasta 50 Vrms o Vdc
2.6
3.0 (4.8)
Hasta 125 Vrms o Vdc
4.0
5.0A (8.0)
Hasta 250 Vrms o Vdc
4.0
6.4 (10.0)
Hasta 300 Vrms o Vdc
Telephony Hardware Manual
17
UL Regulatory Safety Requirements
Para la tarjeta de la computadora principal o para las demás tarjetas de ampliación
que se inserten en la principal y que utilicen o generen voltajes superiores a los 300
voltios (rms o dc), deberá obtener asesoría de un ingeniero competente en materia
de seguridad, antes de proceder a instalar el equipo en cuestión.
Cualquier uso distinto INVALIDARÁ la aprobación otorgada al aparato, si como
resultado de dicho uso, éste deja de cumplir con los estándares para los cuales se
otorgó la aprobación.
10. Para las plataformas siguientes de AltiServ — AltiServ1A-IP, AltiServ1E-IP, and AltiOffice 1B — se cerciora de el interruptor de la selección del voltaje de entrada (115/
230V) está en la parte posteriora del chasis y se fija al voltaje apropiado para su
instalación.
Sicherheitserfordernisse gemäß UL (Underwriter's
Laboratories, Inc.)
Host Computer/Wirtsrechner
1.
Das Gerät Model AltiGen/MAX Communication Server ist nur in Verbindung mit
Telekommunikationssystemen zugelassen, die den gegebenen Anleitungen gemäß
den darin geforderten Bedingungen entsprechen. Anderweitige Verwendung setzt
diese Zulassung außer Kraft.
2.
Das Hauptgerät ist mit "CE" zu bezeichnen, wobei die internen ISA und PSI
Steckplätze bei SELV gemäß EN60950, 1992, Ausgabe 2, +A4, fungieren.
3.
Das Gerät darf nur von ausgebildetem Personal installiert werden.
4.
Das Hauptgerät ist festzuverdrahten und gemäß EN60950, 1992, Ausgabe 2, +A4,
1997, cl. 6.2.1.2 mit einem Erdleiter vom Hauptgeräterdanschluß zum Gebäude zu
erden.
5.
Der Hauptgerätschaltkreis SELVist mit dem Sicherungserdanschluß gemäß EN60950
cl. 2.5. verbunden
6.
Die Hauptgerät ISA Bus Kontaktanschlüsse B1, B10, oder B31 (Randstecker auf CPU
Grundplatine/Hauptplatine) MÜSSEN weniger als 0.1 Ohm zum
Hauptgeräterdanschluß haben.
ISA bus
B1
B10
ISA bus
B31
7.
AltiGen entspricht den PCI Board Anforderungen Rev. 2.1 (5V 32-bit).
8.
Der Energiebedarf für das Hauptgerät sowie aller Anschlußkarten im Hauptrechner,
einschließlich von Zusatzgerät, darf die für das Hauptgerät spezifizierte Leistung
nicht überschreiten.
9.
Die in der folgenden Tabelle vorgesehenen Minimalwerte müssen für den Fall
beachtet werden, daß mit der Einführung von zusätzlichen Karten riskante
Stromspannungen entweder benötigt oder verursacht werden. Dabei gilt als riskant
eine Spannung, die Spitzenwerte von 42.4V AC (Wechselstrom) oder 60V DC
18 Telephony Hardware Manual
Safety Guidelines
(Gleichstrom) überschreitet. Im Zweifelsfalle ist ein zuständiger Ingenieur zu Rate
zu ziehen.
Spannungseinheit
Abstand (mm)
Schlupf (mm)
für Gerät oder
Zusatzkarten
2.0
2.4 (3.8)
Bis zu 50 Vrms oder
Vdc
2.6
3.0 (4.8)
Bis zu 125 Vrms oder
Vdc
4.0
5.0A (8.0)
Bis zu 250 Vrms oder
Vdc
4.0
6.4 (10.0)
Bis zu 300 Vrms oder
Vdc
Vor dem Einbau einer Haupt- oder Erweiterungskarte in den Hauptrechner , die
Werte von 300V (rms or dc) überschreiten, ist der zuständige Sicherhaitsingenieur
zu Rate zu ziehen.
Anderweitige Benutzung des Geräts, deren Ergebnis die Außerkraftsetzung der
erteilten Genehmigung zum Betrieb des Geräts zur Folge hat, macht diese
Genehmigung ungültig.
10. Für die folgenden AltiServ Plattformen — AltiServ1A-IP, AltiServ1E-IP, and AltiOffice 1B — überprüfen der Eingang Spannung Vorwählerschalter (115/230V) ist auf
der Rückseite des Chassis und wird eingestellt auf die korrekte Spannung für Ihre
Installation.
Power Failure
(Fallas en La Energía Eléctrica/Netzausfall)
In the event of a power failure, the first telephone extension on each card (except for
the CD0012UD) is connected directly to the first exchange line, thus permitting access
to dial the emergency services. This telephone must be powered from the PSTN or have
local battery backup capable of calling the emergency services four hours after the power
failure event occurs.
En caso de ocurrir una falla en la energía eléctrica, la primera extensión telefónica de
cada tarjeta (salvo en lo que respecta a la CD0012UD), se conecta directamente a la
primera línea de la central, para así permitir el acceso a la marcación de los servicios de
emergencia. Este equipo debe alimentarse a partir del PSTN, o contar con un respaldo
de batería local con capacidad suficiente para llamar a los servicios de emergencia,
durante cuatro horas después de que ocurra la falla en la energía eléctrica.
Bei Netzausfall wird der erste Telefonanschluß jeder Karte (mit der Ausnahme von
CD0012UD) direkt mit der Vermittlung verbunden und garantiert dadurch Zugang zu
Notdiensten. Der Anschluß muß von PSTN, betrieben werden oder aber eine örtliche
Notstromversorgung haben, die es ermöglicht, Notdienste bis zu vier Stunden nach dem
Netzausfall anzurufen.
Telephony Hardware Manual
19
Wiring
Wiring
(Cableado/Schaltung)
All wiring must conform to National Telecommunications Wiring Regulations and the
National Electrical Wiring Regulations.
Todo el cableado deberá cumplir con las Normas Nacionales del Cableado para
Telecomunicaciones y con las Normas Nacionales del Cableado Eléctrico.
Alle Schaltungen müssen den Nationalen Vorschriften für Fernmeldeschaltungen
("National Telecommunications Wiring Regulations") und den Nationalen Vorschriften für
Elektroschaltungen ("National Electrical Wiring Regulations") entsprechen.
Additional Requirements for Australia
(Requisitos Adicionales para Australia/Zusätzliche Bestimmungen für
Australien)
1.
Warning: For safety reasons, connect only ACA or AUSTEL permitted or certified
equipment to the telephone ports (RJ11) of the patch panel or the audio in/out jacks
on the AltiServ card.
2.
Warning: THIS EQUIPMENT MUST BE INSTALLED AND MAINTAINED ONLY BY
SERVICE PERSONNEL
1.
Advertencia: Por razones de seguridad, conecte solamente equipo permitido o
certificado de ACA o AUSTEL a los puertos telefónicos (RJ11) del tablero de
conexiones o a los conectores de entrada y salida de la tarjeta de sonido AltiServ.
2.
Advertencia: ÚNICAMENTE EL PERSONAL DE MANTENIMIENTO DEBERÁ INSTALAR
Y SUMINISTRAR MANTENIMIENTO A ESTE EQUIPO.
1.
Warnung: Aus Sicherheitsgründen darf nur von ACA oder AUSTEL genehmigtes
oder beglaubigtes Gerät an Telefonanschlüsse (RJ11) des Schaltplans oder die
Audio EIN/AUS Buchsen der AltiServ Karte geschaltet werden.
2.
Warnung: DIESES GERÄT DARF NUR VON WARTUNGSPERSONAL EINGEBAUT UND
GEWARTET WERDEN.
Additional Requirements for USA and Canada
(Requisitos Adicionales para Los Estados Unidos y Canadá/Zusätzliche
Bestimmungen für USA und Kanada)
1.
CAUTION: To reduce the risk of fire, use only #26 AWG or larger (for example, 24
AWG) UL listed or CSA certified telecommunication line cord.
2.
This trunk card must be fitted in host equipment with fire enclosures complying with
the flammability requirements of sub-clause UL1950/CSA C22: 1995 4.4.3. In
addition, the card must be separated from internal materials of flammability class or
lower by at least 25 mm of air Class V-1 or better. Also, the card must be separated
from openings in the top or sides of the enclosure by at least 25 mm of air or by a
barrier of flammability Class V-1 or better unless the openings comply with one of
the following:
• not exceed 5 mm in any direction, or
• not exceed 1 mm in width, regardless of length
20 Telephony Hardware Manual
Safety Guidelines
3.
Any holes in the chassis not conforming to the above should be covered with a metal
perforated screen, with holes not exceeding 5 mm diameter, fixed internally.
1.
PRECAUCIÓN: Para reducir el riesgo de incendio, utilice solamente #26 AWG o
mayor (por ejemplo, 24 AWG) UL o de la médula certificación CSA línea de
telecomunicación.
2.
El armazón del equipo principal en el que se instale esta tarjeta troncal debe estar
diseñado a prueba de incendios y cumplir con los requisitos de inflamabilidad que
dispone el Párrafo 4.4.3 del Artículo 1995 del Código 22 de la UL1950/CSA5.
Además, la tarjeta debe encontrarse alejada de materiales internos de clase
inflamable, o por debajo, de por lo menos 25 mm de aire de la Clase V-1 o superior.
También, la tarjeta debe encontrarse alejada de cualquier abertura superior o lateral
de la cubierta, por lo menos mediante 25 mm de aire o a través de una barrera de
inflamabilidad Clase V-1 o superior, salvo cuando las aberturas se apeguen a
cualesquiera de los siguientes criterios:
• No excedan de 5 mm en cualquier dirección, o
• No excedan de 1 mm de ancho sin importar su longitud.
3.
Cualquier orificio del chasis que no cumpla con las especificaciones anteriores deberá
cubrirse con una malla metálica perforada, fija por dentro, cuyas perforaciones no
deberán exceder de 5 mm de diámetro.
1.
ACHTUNG: Um die Gefahr von Feuer, verwenden Sie nur #26 AWG oder größer (zum
Beispiel 24 AWG) UL oder CSA zertifiziert Telekommunikations-Netzkabel.
2.
Der Einbau der Hauptkarte im Hauptgerät muß feuerfest sein und den
Entflammbarkeitserfordernissen des Untertitels UL1950/CSA C22: 1995 4.4.3
entsprechen. Zusätzlich muß ein Abstand von mindestens 25 mm und der Luftklasse
V-1 zwischen der Karte und internen Materialien mit mindestens
Entflammbarkeitsklasse bestehen. Weiterhin muß zwischen der Karte und
Öffnungen auf der Oberseite und an den Seiten des Gehäuses ein Luftabstand von
mindestens 25 mm oder aber eine Sperre von mindestens der
Entflammbarkeitsklasse V-1 bestehen, es sei denn, die Öffnungen entsprechen
folgenden Ansprüchen:
• in allen Richtungen nicht größer als 5 mm, oder
• nicht breiter als 1 mm, ungeachtet der Länge.
3.
Alle Öffnungen im Gehäuse, die nicht den obigen Anforderungen entsprechen, sind
mit einem perforierten Deckel zu schließen, dessen Löcher nicht größer sind als 5
mm im Durchmesser. Der Deckel muß von innen am Gehäuse angebracht
werden.The interconnecting trunk line cord should be at least size 26AWG.
Instructions for Hardwired Earth Connection
(Instrucciones para El Cableado de La Conexión a Tierra/Anleitungen für
festverdrahtete Erdanschlüsse)
1.
A supplementary equipment earthing conductor is to be installed between the
product or system and earth, that is, in addition to the equipment earthing conductor
in the power supply cord.
2.
The supplementary equipment earthing conductor may not be smaller in size (8 AWG
minimum, recommend 6 AWG) than the unearthed branch-circuit supply conductors.
The supplementary equipment earthing conductor is to be connected to the product
Telephony Hardware Manual
21
Instructions for Hardwired Earth Connection
at the terminal provided, and connected to earth in a manner that will retain the
earth connection when the power supply cord is unplugged. The connection to earth
of the supplementary earthing conductor shall be in compliance with the appropriate
rules for terminating bonding jumpers in Park K of Article 250 the National Electrical
Code, ANSI/NFPA 70, and Article 10 of Part I of the Canadian Electrical Code, Part I,
C22.1. Termination of the supplementary equipment earthing conductor is permitted
to be made to building steel, to a metal electrical raceway system or to any earthed
item that is permanently and reliably connected to the electrical service equipment
earthed.
3.
Bare, covered or insulating earthing conductors are acceptable. A covered or
insulating earth conductor must have a continuous outer finish that is either green,
or green with one or more yellow stripes.
4.
Earthing conductor shall not run through steel conduit.
1.
Deberá instalarse equipo complementario de conducción a tierra entre el producto o
sistema y la tierra misma, esto es, además del conductor a tierra que el equipo tiene
en el cordón de la fuente de alimentación.
2.
El conductor de conexión a tierra del equipo complementario no podrá ser de
dimensiones inferiores (mínimo calibre 8 AWG, se recomienda el calibre 6 AWG) a la
dimensión de los conductores de alimentación sin conexión a tierra del circuito de la
derivación. El conductor de conexión a tierra del equipo complementario deberá
conectarse a los productos en la terminal que se proporciona y, conectarse a tierra,
de tal manera en que la conexión a tierra se mantenga cuando el cordón de la fuente
de alimentación se encuentre desconectada. La aterrizada del conductor a tierra
complementario deberá cumplir con las reglas conducentes para la terminación de
los conductores de empalme de conexión a tierra que señalan el Apartado K del
Artículo 250 del Código Nacional Eléctrico; el Artículo 70 del ANSI/NFPA, y Artículo
10, apartado I del Código Eléctrico Canadiense, Apartado I, C22.1. Está permitido
que la terminación del conductor a tierra del equipo complementario se realice al
acero del edificio, a un sistema de conductos eléctricos o a cualquier artículo con
tierra que se encuentre conectado en forma permanente y confiable al equipo de
servicio eléctrico que se aterriza.
3.
Se consideran aceptables los conductores sin aislante, recubiertos o con aislante.
Los conductores revestidos o con material aislante deberán contar con un acabado
exterior continuo de color verde, o verde con una o más franjas amarillas.
4.
Los conductores de conexión a tierra no deberán tenderse a través de conductos de
acero.
1.
Sowohl Stromversorgungskabel als auch Gerät oder Anlage müssen geerdet sein.
2.
Das Zusatz-Geräteerdungskabel darf nicht dünner sein als die ungeerdete
Verzweigungsleitung (8 AWG minimum, empfohlen 6 AWG). Es ist mit dem dafür
vorgesehenen Anschluß derartig zu verbinden, daß eine Erdung auch dann weiter
besteht, wenn das Stromversorgungskabel aus dem Stecker gezogen ist. Die Erdung
des Zusatzkabels muß den geltenden Bestimmungen für den Endanschluß von
Metallbrücken im Teil K, Artikel 250 des Nationalen Elektrokodex, [in Park (?) K of
Article 250 the National Electric Code], ANSI/NFPA 70, und Artikel 10, Teil I des
Kanadischen Elektrokodex, Tei I, [and Article 10, Part I of the Canadian Electrical
Code, Part I] C22.1entsprechen. Der Endanschluß des Zusatz-Geräteerdungskabels
ist erlaubt sowohl an Baustahl, an Zuführungsbahnen oder an jedem Gegenstand,
der auf Dauer und verläßlich mit geerdetem elektrischem Gerät verbunden ist.
22 Telephony Hardware Manual
Safety Guidelines
3.
Blanke, umhüllte oder isolierte Erdungskabel sind zulässig. Ein umhülltes oder
isoliertes Erdungskabel muß eine durchgehend grüne Oberfläche, oder eine grüne
mit einem oder mehreren gelben Streifen,
4.
Erdleitungen dürfen nicht durch Stahlrohre führen.
UL Hardware Preparation
(Preparación del Equipo UL/Gerätevorbereitung gemäß UL (Underwriter's
Laboratories, Inc.))
Prepare the hardware as follows ensuring that the relevant manufacturer’s installation
instructions are complied with. If you have doubts about any of these, call your supplier.
1.
This apparatus must be professionally installed.
2.
Select a “CE” computer chassis according to the Safety Requirements above,
ensuring that it has an external marked earth point.
3.
The host machine ISA bus pins B1, B10 or B13 MUST be tested to ensure that there
is less than 0.1 Ohms to the earthing terminal.
4.
The host machine PCI bus pins complies with PCI Board specifications Rev. 2.1 (5V
32-bit).
5.
Prepare the chassis, in accordance with the PC manufacturer’s instructions, to
receive the necessary PC cards, ensuring the installation of extension cards does not
result in non-conformance to the Safety Requirements above.
6.
When installing a system using AltiGen’s cards, note that the continued compliance
to the LVD and EMC EU Directives at the system level is the responsibility of the
system supplier.
7.
Prepare above cards ensuring all jumpers are set according to the manufacturer’s
instructions.
8.
Attach suitable grounded ESD wrist strap between wrist and earth.
9.
Follow the manufacturer’s instruction and install above cards into PC.
Note: If more than three cards are using the MVIP, ensure that the board set as
board zero is installed at one end of the MVIP cable and the board at the far end of
the MVIP cable has its switch set to terminated (switch closed).
10. Replace PC outer case.
11. Connect a fixed earth from the PC to a suitable premises fixed earthing point. Note
that the earth cable must be at least the same gauge as the live wire of the main
cord and fixed to the earth terminal and the rear of the PC. (6 AWG recommended,
8 AWG minimum.)
12. Connect cable supplied with AltiServ to the “D-type sub-miniature” (25 pin)
connector on the AltiServ card and the connector to the Modular RJ-11 Patch Panel.
13. Connect the building telecommunication wiring to the RJ-11 sockets.
14. Building telecommunication wiring should be installed according to the National
Wiring Regulations for Telecommunications.
UL File No. E179719
Telephony Hardware Manual
23
UL Hardware Preparation
Preparación del Equipo UL
Prepare el equipo de la manera que se indica a continuación. Cerciórese de antemano
de que se observan todas las instrucciones aplicables del fabricante. Si tiene usted
alguna duda acerca de cualesquiera de ellas, llame a su proveedor.
1.
La instalación de este aparato la deben realizar profesionales.
2.
Seleccione el chasis "CE" de la computadora tomando en consideración los
Requisitos de Seguridad que se indican anteriormente, además, cerciórese de que
cuenta con un punto de conexión a tierra marcado en el exterior.
3.
Las clavijas ISA de los canales de distribución B1, B10 o B13 DEBEN someterse a
prueba, a fin de verificar que la corriente sea inferior de 0.1 ohmios hacia la terminal
de la conexión a tierra.
4.
Cerciórese de que las clavijas PCI de los canales de distribución cumplen con las
especificaciones de los tableros PCI, Rev. 2.1 (5 voltios 32-bit).
5.
Prepare el chasis de acuerdo con las instrucciones del fabricante de la computadora
personal, para efectos de que reciba las tarjetas de PC que necesita, y se cerciore
así de que la instalación de las tarjetas de extensión no redundará en la infracción
de los Requisitos de Seguridad que se indican con anterioridad.
6.
Observe que cuando instala un sistema que utiliza tarjetas AltiGen, el acatamiento
continuo de las Directivas LD y EMC EU a nivel sistema, son responsabilidad del
proveedor del sistema.
7.
Prepare las tarjetas mencionadas con anterioridad y cerciórese de que todos los
puentes de salto se encuentran posicionados conforme a las instrucciones del
fabricante.
8.
Coloque una pulsera antiestática ESD adecuadamente aterrizada entre la muñeca y
la tierra.
9.
Siga las instrucciones del fabricante e instale las tarjetas que se mencionan con
anterioridad en la computadora.
Nota: Cuando más de tres tarjetas utilicen el MVIP, cerciórese de que la placa de
Cuanto o de Tritón establecida como placa cero se encuentre instalada en uno de los
extremos del cable MVIP, y de que la placa en el otro extremo del cable MVIP tiene
su interruptor en la posición de terminado (interruptor cerrado).
10. Reemplace la cubierta externa de la computadora.
11. Instale una conexión a tierra fija desde la computadora hasta un punto apropiado de
conexión a tierra dentro de las instalaciones. Observe que el cable de puesta a tierra
debe de ser, por lo menos, del mismo calibre que el cable con corriente viva del
cordón principal y, que el mismo debe de encontrarse conectado a la terminal de
aterrizada y a la parte posterior de la computadora. (Se recomienda el cable calibre
6 AWG, u 8 AWG, como mínimo).
12. Conecte el cable que se le suministra con la tarjeta AltiServ al conector subminiatura tipo D (25 clavijas) de la tarjeta AltiServ y el conector al Tablero de
Conexiones del Modular RJ-11.
13. Conecte el cableado de telecomunicación del edificio a los enchufes del RJ-11.
14. El cableado de telecomunicación del edificio debe instalarse de conformidad con las
Normas Nacionales de Cableado para Telecomunicaciones.
Archivo de la Asociación de Aseguradores No. E179719
24 Telephony Hardware Manual
Safety Guidelines
Gerätevorbereitung gemäß UL (Underwriter's Laboratories,
Inc.)
Entsprechend den gegebenen Anleitungen des Herstellers ist das Gerät wie folgt
vorzubereiten. Im Zweifelsfalle ist der Lieferant zu benachrichtigen.
1.
Gerät darf nur von qualifiziertem Personal eingebaut werden.
2.
Wählen Sie ein "CE" (communication electronics) Komputergehäuse entsprechend
den oben angeführten Sicherheitsanforderungen mit einem an der Außenseite
markiertem "Erd" Punkt.
3.
Die ISA (International Standard Atmosphere) Kontaktanschlüsse B1, B10 oder B13
auf der Sammelschiene des Hauptgerätes sind zu testen um sicherszustellen, daß
weniger als 0.1 Ohms zum Erdanschluß führen.
4.
Die PCI (Program Controlled Interrupt) Kontaktanschlüsse auf der Sammelschiene
des Hauptgerätes entsprechen den PCI Steckkartenanforderungen (PCI Board
specifications) Rev. 2.1 (5V 32-bit).
5.
Vor dem Einbau der entsprechenden PC (Personal Computer) Karten in das Gehäuse
gemäß den PC Herstelleranweisungen ist sicherszustellen, daß durch den Einbau
zusätzlicher Karten die oben genannten Sicherheitsansprüche nicht verletzt werden.
6.
Beim Einbau einer Anlage mit AltiGen's Karten ist zu beachten, daß die ständige
Übereinstimmung mit den LVD (Low Voltage -DC) und EMC (Electromagnetic
Compatibility) EU Regeln auf Anlagenebene in den Verantwortungsbereich des
Anlagenherstellers fällt.
7.
Alle Drahtbrücken auf oben erwähnten Karten müssen den Anforderungen des
Herstellers entsprechen.
8.
Geeignetes geerdetes ESD (Electrostatic Device) Gelenkband zwischen Handgelenk
und Erde verwenden.
9.
Beim Einbau oben erwähnter Karten in den PC (Personal Computer) sind die
Anordnungen des Herstellers zu beachten.
10. Anmerkung: Benutzen drei oder mehr Karten den MVIP (?- manual volume...?), ist
sicher zu stellen, daß die als 0-Karte bezeichnete Karte an einem Ende des MVIP
Kabels eingebaut ist, und daß der Schalter der Karte am anderen Ende des MVIP
Kabel auf "geschlossen" (terminated-closed) steht
11. PC Gehäuse austauschen.
12. Anschluß zwischen einer festen Erdung am PC und einer geeigneten festen Erdung
in der Räumlichkeit erstellen. Zu beachten ist, daß das Erdkabel zumindest die
gleiche Stärke wie der unter Spannung stehende Draht des Hauptkabels hat und an
den Erdanschluß und an den PC angeschlossen ist. (6 AWG empfohlen, 8 AWG
minimum.)
13. Anschluß zwischen dem mit dem AltiServ gelieferten Kabel, dem "D-type subminiature" (25 pin-Kontaktanschlüsse) Stecker auf der AltiServ Karte und dem
Stecker des modularen RJ-11 Steckfeldes erstellen
14. Anschluß zwischen der Gebäudefernmeldeschaltung und den RJ-11 Buchsen
erstellen.
15. Gebäudefernmeldeschaltung gemäß National Wiring Regulations for
Telecommunications ("Nationale Vorschriften für Fernmeldeschaltungen").
UL Kartei No. E179719
Telephony Hardware Manual
25
Safety Instructions - Rack Mount Instructions
Safety Instructions - Rack Mount Instructions
(Instrucciones de Seguridad - Instrucciones de Montaje en Rack/
Sicherheitshinweise - Rack Mount Anleitung)
1.
Elevated Operating Ambient - If installed in a closed or multi-unit rack assembly,
the operating ambient temperature of the rack environment may be greater than
room ambient. Therefore, consideration should be given to installing the equipment
in an environment compatible with the maximum ambient temperature (Tma)
specified by the manufacturer.
2.
Reduce Air Flow - Installation of the equipment in a rack should be such that the
amount of air flow required for safe operation of the equipment is not compromised.
3.
Mechanical Loading - Mounting of the equipment in the rack should be such that
a hazardous condition is not achieved due to uneven mechanical loading.
4.
Circuit Overloading - Consideration should be given to the connection of the
equipment to the supply circuit and the effect that the overloading of the circuits
might have on overcurrent protection and supply wiring. Appropriate consideration
of equipment nameplate ratings should be used when addressing this concern.
5.
Reliable Earthing - Reliable earthing of rack-mounted equipment should be
maintained. Particular attention should be given to supply connections other than
direct connections to the branch circuit (for example, use of power strips).
Instrucciones de Seguridad - Instrucciones de Montaje en
Rack
1.
Elevados de funcionamiento ambiente - Si se instala en una temperatura
ambiente cerrado o conjunto de múltiples unidades de rack, el funcionamiento del
entorno de rack puede ser superior a Temperatura Ambiente. Por lo tanto, debe
considerarse la posibilidad de instalar el equipo en un entorno compatible con la
temperatura ambiente máxima (Tma) especificada por el fabricante.
2.
Reducir el flujo de aire - Instalación del equipo en un armario debe ser tal que la
cantidad de flujo de aire necesario para la operación segura del equipo no está en
peligro.
3.
Carga mecánica - El montaje del equipo en el armario debe ser tal que una
situación de peligro no es debido a una carga mecánica irregular.
4.
La sobrecarga del circuito - Deben tenerse en cuenta a la conexión del equipo al
circuito de alimentación y el efecto que la sobrecarga de los circuitos podría tener
sobre la protección de sobrecorriente y el cableado de alimentación. examen
adecuado de la placa de identificación equipo debe ser usado para referirse a esta
preocupación.
5.
Confiable puesta a tierra - Tierra fiable del equipo montado en rack debe
mantenerse. Se debe prestar especial atención a las conexiones de alimentación que
no sean las conexiones directas al circuito derivado (por ejemplo, las regletas de
distribución).
Sicherheitshinweise - Rack Mount Anleitung
1.
Erhoehte Betriebsumgebungstemperatur - Wenn das Geraete in einen
geschlossenen oder Multi-Unit-Rack-Montage installiert wird kann den
Betriebsumgebungstemperatur des Rack-Umgebung groesser sein als der
Umgebungstemperatur des Raumes. Deshalb sollten Sie der Installation des
26 Telephony Hardware Manual
Safety Guidelines
Geraetes in einer Umgebung die kompatibel mit der maximalen
Umgebungstemperatur (Tma) die vom Hersteller angegeben wird durchfuehren.
2.
Luftstrom reduzieren - Installation des Geraetes in einem Rack sollte so erfolgen
dass der Hoehe der Luftstrom fuer den sicheren Betrieb der Anlage nicht gefaehrdet
wird.
3.
Mechanische Belastung - Die Montage des Geraetes im Rack sollte so sein dass
ein gefaehrlicher Zustand nicht erreicht wird auf Grund ungleicher mechanicher
Belastung.
4.
Stromkreisüberlastung - Beachten Sie wie Sie das Geraete an die
Stromversorgung anschliessen. Ueberlastung der Schaltkreis kann ein Einfluss auf
Ueberstromschutz und Speisestromkreisverkabelung haben. Angemessene
Beruecksichtigung von der Bemessungsspannung laut den Typenschild des
Geraetes sollte beim behandeln dieses Anleigen genommen werden.
5.
Zuverlässige Erdung - Zuverlaessige Erdung der Rack-Montage-Geraete sollte
beibehalten werden. Besondere Aufmerksamkeit sollten Stromanschluesse ausser
die Direktanschluesse der Abzweigkreis gegeben werden (z.B. Verwendung von
Mehrfachsteckdosen).
Telephony Hardware Manual
27
Safety Instructions - Rack Mount Instructions
28 Telephony Hardware Manual
CHAPTER
2
Telephony Hardware Handling
Requirements
This chapter details the following:
• Proper grounding procedures
• Using an uninterruptible power supply
• Operating environment
• Proper board handling procedures
• Proper system shutdown
• On-board battery
Proper Grounding and Loop Current
Proper grounding is essential for any PBX system. Run a #6 AWG wire from the server
chassis to protection earth ground. Don’t wait for a problem to arise before taking this
step. Make sure this is one of the first things you do before turning the AltiGen system
on.
For more information on grounding and loop current issues, please refer to the
Knowledgebase at AltiGen’s dealer web site at https://dealer.altigen.com.
Uninterruptible Power Supply (UPS)
Using a UPS prevents power fluctuations and surges on power sources from utilities.
Windows files can be corrupted as a result of power failure or improper system
shutdown.
Caution! Corrupted files may not be repairable and may require re-installation of
Windows and MAX Communication Server. To protect your system from surges
and power outages, it is strongly recommended that an adequate UPS
(providing between 600VA and 1500VA) and power surge protector is used
with the system.
Telephony Hardware Manual
29
Uninterruptible Power Supply (UPS)
Operating Environment
(Condiciones Ambientales de Operación/Betriebsbedingungen)
Before you set up and use the system, consider the environment in which the system
will reside:
• Choose a work surface large enough to accommodate the entire system.
• Use a flat, stable work surface with enough space around it for proper air
circulation. For proper heat dissipation, a fan is recommended in front of the
AltiGen telephony boards to ensure sufficient airflow. Be sure the fan filter is clean
and does not block the airflow.
• Always work with grounded equipment and fixtures. The use of an ESD mat (to
dissipate static) and grounding wrist/foot straps is necessary.
In the manual assembly process, boards must be removed from the anti-static bag and
placed gently on a dissipative workstation mat, so that they become discharged safely
before being touched. The dissipative mat should have a rubber upper layer and
conductive bottom layer. Regular cleaning of the mat should be done using an anti-static
mat cleaner.
The following table contains the operating specifications for the AltiGen telephony board.
Table 1. AltiGen Board Operating Environmentals
Description
Specification
Operating Temperature
0° to + 40° C
Storage Temperature
-20° to +70° C
Relative Humidity
10% to 80% non-condensing
Condiciones Ambientales de Operación
Antes de Montar y utilizar el sistema, considere el medio ambiente en el que dicho
sistema residirá:
• Selecciones un espacio de trabajo lo suficientemente amplio para dar cabida a la
totalidad del sistema.
• Utilice una superficie de trabajo plana y estable, con suficiente espacio alrededor
para que pueda darse una adecuada circulación del aire. Se sugiere la colocación de
un ventilador frente a las tarjetas de telefonía AltiGen, con objeto de disipar el calor
adecuadamente y garantizar un flujo de aire suficiente. Cerciórese de que el filtro
del ventilador se encuentra limpio y de que no obstruye el flujo del aire.
• Trabaje siempre con equipo y aditamentos con conexión a tierra. Es necesario
utilizar un tapete ESD (para disipar la estática) y pulseras/tobilleras de aterrizada.
• Durante el proceso de ensamble manual, las tarjetas deben retirarse de la bolsa
antiestática y colocarse suavemente sobre el tapete dispersivo de la estación de
trabajo, de tal manera en que éstas se descarguen en forma segura, antes de que
las toquen. El tapete dispersor debe contar con una capa superior de caucho y una
capa inferior c. El tapete debe limpiarse en forma regular utilizando un limpiador
para tapetes antiestática.
30 Telephony Hardware Manual
Telephony Hardware Handling Requirements
La tabla siguiente contiene las especificaciones de funcionamiento para el tablero de la
telefonía de AltiGen:
Descripcion
Specification
Temperatura de
Operacion
0° a + 40° C
Temperatura de
Almacenamiento
-20° a +70° C
Humedad Relativa
10% a 80% sin condensacion
Betriebsbedingungen
Vor Aufbau und Inbetriebnahme der Anlage müssen folgende Betriebsbedingungen
berücksichtigt werden:
• Es ist eine Arbeitsfläche zu wählen, die der gesamten Anlage genügend Platz bietet.
• Die Arbeitsfläche muß flach und stabil sein und genügend Ream für eine
entsprechend ausreichende Ventilation bieten. Zum angemessenen Hitzeverlust und
ausreichender Luftzufuhr wird der Einbau eines Ventilators vor den AltiGen
Fernmeldekarten empfohlen. Der Filter des Ventilators muß sauber sein und darf die
Luftzufuhr nicht blockieren.
• Es darf nur mit geerdetem Gerät gearbeitet werden. ESD Matten (zur Vermeidung
von Statik) sowie geerdete Handgelenk- und Fußbänder sind dabei erforderlich.
• Beim Zusammenbau von Hand ist zu beachten, daß mit Karten nach der Entnahme
aus einem anti-statischen Behälter vorsichtig umyugehen ist. Karten müssen dann
zur elektrischen Entladung auf eine Dissipationsmatte am Arbeitsplatz gelegt
werden, bevor sie berührt werden dürfen. Die Dissipationsmatte muß eine
gummierte Oberseite und eine konduktive Unterseite haben. Beim regelmäßigen
Reinigen der Matte muß ein antistatisches Reinigungsmittel verwendet werden.
Die folgende Tabelle enthält die funktionierenden Spezifikationen für das AltiGen
Telephoniebret:
Beschreibung
Spezifizierung
Betriebstemperatur/
0° to + 40° C
Lagerungstemperatur
-20° to +70° C
Relative Luftfeuchtigkeit
10% bis to 80% nicht-verdichtend
Telephony Hardware Manual
31
Proper System Shutdown
Proper Board Handling Procedures
Handle boards by the edges only. Always hold the boards individually by the face plate
(with the components facing you) and pinching the edge on the right side of the board.
Do not make contact with the solder or component sides of the boards. Do not slide the
boards over any surface, including an electrostatic discharge mat. Some boards have
very sensitive ceramics that contain embedded traces. These traces are very close to the
edge of the component and are easily chipped if they are hit against a hard object or
surface.
Electrostatic Discharge (ESD) Warning
Electrostatic discharge is caused by static electricity. It can damage boards and may
result in hard failures, early life failures, or cause a system to experience intermittent,
erratic behavior. Always use an ESD kit when working on the telephony boards. The use
of a special wrist strap or foot strap (to ground the wearer to the computer's case)
reduces the risk of ESD damage.
Packaging for Shipment and Storage
• AltiGen telephony boards are packaged and shipped individually in fully closed,
static-shielding bags. The pink anti-static foam should be used only as cushioning
material — it is not static-dissipative and cannot discharge the boards.
• Always save and use the original packaging materials (foam, static-shielding bag,
and cardboard box) to transport the boards.
• AltiGen telephony boards are protected by their anti-static bags and should be
removed from their packaging for installation by a properly grounded technician.
Proper System Shutdown
Never turn off the AltiGen system without properly shutting down Windows first.
Powering off the system using the power switch without going through the proper
Windows shutdown procedure may corrupt the operating system.
On-Board Battery
The single-board computer on-board battery may need to be replaced. Make sure that
the replacement battery is of the same type as printed on the battery that is being
replaced.
Caution! There is a risk of explosion if the battery is replaced by an incorrect type.
Dispose of used batteries according to local laws.
32 Telephony Hardware Manual
CHAPTER
3
AltiGen Triton/Proton Telephony
Boards
AltiGen’s Triton/Proton family of telephony boards for the OFFICE series of servers is a
PCI telephony board family. Triton/Proton boards have a non-blocking TDM switching
matrix (256 x 64 kbps).
This chapter includes the following:
• Telephony board types and specifications
• Telephony board installation
• Power requirements table
• Station conference resources
Telephony Board Options
(Opciones de La Tarjeta AltiGen / AltiGen Kartenoptionen)
Table 1 lists the AltiGen telephony board modules. This selection allows you to optimize
your system based on the trunk/extension mix required at your site.
La Tabla No. 2 lista los módulos de la tarjeta de telefonía AltiGen. Esta selección le
permite optimizar su sistema con base en la mezcla de troncales y extensiones que
requiere su sitio.
In Tabelle 2 sind AltiGen Kartenmodule für das Fernsprechwesen aufgelistet. Diese
Auswahl erlaubt eine Optimierung ihrer Standortanlage mit der gewünschten
Kombination von Haupt- und Nebenanschlüssen.
Telephony Hardware Manual
33
Functional Specifications of Telephony Boards
Table 1. AltiGen Telephony Board Options
Board
Model Number (No.
Description
(Tarjeta/
Karte)
de Modelo/Modell
Nummer)
(Descripcion/
Beschreibung)
Triton
ALTI-TTAS-12-B
12 extensions (stations) extensiones
(estaciones)/Nebenanschlüsse (Stationen)
Triton
ALTI-TTIP
Triton
ALTI-CONF-30
30-Party MeetMe Conference
Triton
ALTI-T1E1-1
1 T1, 1 E1 or 1 PRI
Triton
ALTI-TTRS-12
Triton
ALTI-TTAT-12GS
12 trunks (troncales/Haupt), ground start/loop
start
Triton
ALTI-TTAT-12
12 trunks (troncales/Haupt), loop start only
Triton
ALTI-TTAT-8
8 trunks (troncales/Haupt), loop start only
Proton
ALTI-P0800
8 trunks (troncales/Haupt), loop start only
12 G.711/723/729 trunks (troncales/Haupt or
extensions/extensiones/Nebenanschlüsse), or 30
G.711
12 ports for supervisor monitoring/barging in/
coaching, (12 puertos para monitoreo del
supervisor/12 Stechanschlusse fur MonitorDienst), or 12x6 station conference
Functional Specifications of Telephony Boards
Following are the functional specifications of AltiGen telephony boards.
Triton Analog Extension Board
Part Number: ALTI-TTAS-12-B
Specifications
• Voice processing channels: 12
• Conversation recording channels: 12
• Message waiting signal: FSK
34 Telephony Hardware Manual
AltiGen Triton/Proton Telephony Boards
• On-Board telephony power supply:
– Input 12Vdc from power connector
– Output -24Vdc (talking battery) and 90Vac (ring voltage)
Note: When the board is configured to use an audio input port, the first port cannot be
used for an extension.
Note: This board complies with Section 508 of the Rehabilitation Act of 1973. This
includes compatibility with hearing aids, cochlear implants, assistive listening
devices, and TTYs.
LED Status
LED Indicators
LED 1B LED 1A Status
ON
ON
5V is OK; 12V is OK – normal
operation
OFF
OFF
Power cable not plugged in
ON
OFF
5V less than 4.5V but more than
3V – bad PC 5V power
OFF
ON
12V less than 9V – bad PC 12V
power
LED 2, located near the 12V connector, is a red LED
for diagnostic purposes. If it is ON, the fuse is blown.
Warning:
• Do not use a "Y" splitter to connect two sets of power cables.
• Do not chain two sets of power cable together from a single power connector.
• Do not pull the cable when unplugging the power connector. This may damage the
cable assembly. If it is too difficult to remove the plug from the power connector,
please use pliers to remove the plug.
Telephony Hardware Manual
35
Functional Specifications of Telephony Boards
Triton Analog Trunk Board
Part Numbers
ALTI-TTAT-12 (12 Ports, Loop Start)
ALTI-TTAT-8 (8 Ports, Loop Start)
ALTI-TTAT-12GS (12 Ports, Ground Start)
Specifications
• Voice processing channels: 12
• Conversation recording channels: 12
• Compliant with EIA464
• Tone detection for fax tone, modem tone, and voice
• E-911 CAMA trunk support
LED Status
LS/GS LED Indicators*
LS LED Indicators
LED 1B
LED 1A Status
LED 1B
LED 1A Status
ON
ON
Normal
ON
ON
Normal
OFF
OFF
No power to
OFF
board
OFF
No +5V or
less than
4.1V
ON
OFF
No +5V or
less than
4.1V
OFF
ON
No +12V or
less than
9.2V
*LED 2, located on the board, is a
red LED for diagnostic purposes. If
it is ON, the fuse is blown.
36 Telephony Hardware Manual
AltiGen Triton/Proton Telephony Boards
Proton Analog Trunk Board
Part Number
ALTI-P0800 (8 Ports, Loop Start)
Specifications
• Voice processing channels: 8
• Conversation recording channels: 8
• Compliant with EIA464
• Tone detection for fax tone, modem tone, and voice
• E-911 CAMA trunk support
LED Status
LS LED Indicators
LED 1B
LED 1A
Status
ON
ON
Normal
OFF
OFF
No +5V or
less than
4.1V
Telephony Hardware Manual
37
Functional Specifications of Telephony Boards
Triton T1E1/PRI Board
Part Number: ALTI-T1E1-1
Specifications
• Support T1-CAS, T1 PRI, E1-R2, E1 PRI signaling
• Voice processing channels: 24 (T1) or 30 (E1)
• Conversation recording channels: 24 (T1) or 30 (E1)
• Tone detection
LED Status
LED Indicators
Green LED
Red LED
Status
OFF
OFF
No power
ON
OFF
Normal operation
OFF
ON
No signal
ON
Flashing
Faulty signal with frame synchronization*
OFF
Flashing
Faulty signal without frame synchronization
Alternating
Alternating
Frame slips in normal operation
*Faulty signals include the following: yellow alarm, bipolar violation, or frame error.
38 Telephony Hardware Manual
AltiGen Triton/Proton Telephony Boards
Triton VoIP Board
Part Number: ALTI-TTIP
Specifications
• Codec options: Configurable 12 G.711/G.723.1/G.729 or 30 G.711
• Voice processing channels: 12 or 30 matching Codec configuration
• Conversation recording channels: 12 or 30 matching Codec configuration
• Echo cancellation
• Gain control
Triton Resource Board
Part Number: ALTI-TTRS-12
The Triton Resource board enables call center supervisors to barge in to, silently listen
to, or coach an agent’s conversations. Up to two Resource boards can be installed in one
system. Up to 12 simultaneous supervisor barge-in/listen/coach sessions are supported
for each board.
Telephony Hardware Manual
39
Telephony Board Installation
Triton 30-Party MeetMe Conference Board
Part Number: ALTI-CONF-30
Specifications
• Maximum MeetMe conference sessions: 10
• Maximum conference participants for all sessions: 30
• Echo cancellation
• Mute control
• Announce participant's name when joining or leaving conference
Telephony Board Installation
Setting Physical Board ID
Before you install a telephony board into a system, it is important you set the Board ID
correctly so that the system can recognize the board. You should not have duplicate
Board IDs for the same type of board. There are six different types of boards. Each type
of board has its own set of board IDs.
• Triton Analog board (ALTI-TTAT-12, ALTI-TTAT-8, ALTI-TTAS-12): ID range 0-15
• Proton Analog Board (ALTI-P0800): ID range 0-15
• Triton T1/PRI board: ID range 0-7
• Triton VoIP board: ID range 0-9
• Triton Resource board: ID range 0 or 1
• Triton Meet-Me Conference board: ID 0
Attaching Cables to the Telephony Boards
After all telephony boards are installed to the system, attach the 40-Pin MVIP bus ribbon
cable to the boards.
• Be careful to make sure pins in the MVIP connector on the board line up with the
sockets on the MVIP cable. Failure to do so may damage the pins and cause voice
quality issues.
• If an ALTI-TTAS-12 board is installed, you need to attach the power cable to a 4-pin
server power connector and to the board.
Terminating MVIP Bus
No matter what type of boards you have in the system, always terminate both ends of
the CT (MVIP) bus.
40 Telephony Hardware Manual
AltiGen Triton/Proton Telephony Boards
Do not have any board terminated in the middle of MVIP bus. It will cause a clocking
error and unpredictable voice quality.
Always run the CT-Bus Test Tool when you add a new board to the system.
For complete instructions on how to install telephony boards, please refer to the Quick
Installation Guide, which is provided with every AltiGen telephony board package.
Limitations
The next table shows the maximum number of each type of board that can be installed
in one system.
Table 2. Maximum Boards in One System
Max. in a
System
Total Ports
Triton VoIP configured as 12port
10
120
Triton VoIP configured as 30port
4a
120
TOTAL Triton VoIP boards
10
120 max in one system, via any
combination of boards that complies with
the system limitations shown here
Triton Conf 30-Party
1
10 conference bridges, 30 conference
members
Triton Analog Trunk
16
192
Proton Analog Trunk
16
128
Triton Analog Extension
16
192
Triton T1/E1/PRI
8
192 (T1), 240 (E1)
Triton Resource
2
24 sessions
Board Type
a. Requires 3GHz CPU w/Hyperthreading
Power Requirements
(Requisitos de Energía Eléctrica/Energiebedarf)
The power requirements are as follows for each individual board:
Los requisitos de energía eléctrica son los que se indican a continuación para cada tarjeta
individual/Die folgende Tabelle zeigt den Energiebedarf jeder einzelnen Karte an:
Telephony Hardware Manual
41
Station Conference Resource Limits
Table 3. Individual Board Power Requirements
Slot Type/Tipo
Board/Tarjeta/Karte
+3.3V
+5V
+12V
Ranura/Steckplatz
Triton Analog Extension
0
1.6A
1.4Aa
PCI
Triton Analog Trunk LS/GS
0
1.6A
0.25A
PCI
Triton Analog Trunk LS
0
1.6A
0
PCI
Proton Analog Trunk LS
1.6A
0.6A
0
PCI
Triton VoIP
0
1.6A
0
PCI
Triton T1/PRI
0
1.6A
0
PCI
Triton T1/E1 PRI
0
1.6A
0
PCI
Triton Resource
0
1.6A
0
PCI
Triton Conf 30-Party
0
1.6A
0
PCI
a. 1.4A@12V is provided by power connector.
Station Conference Resource Limits
The next table defines station conference resource limits for boards used in a MAX
Communication Server system.
Table 4. Station Conference Resource Limits
Board
Max. Number of
Conference
Sessions (Bridge)
Max. Number of
Members per
Session (Internal
Extensions and
External Parties)
Max. Number of
Total
Conferenced
Parties
Triton Analog
Extension
3
6
18
Triton Analog
Trunk
0
0
0
Proton Analog
Trunk
0
0
0
2
6
12
2
6
12
Triton VoIP
12 Port
Triton VoIP
30 Port
Triton T1/PRI
0
0
0
Triton Resource
12a
up to 6
36
Triton Conf 30Party
10b
30
30
a. The Triton Resource board can support up to 12 conference bridges with up to 6
members each. However, this does not imply that you can have a total of 72 conferenced members (external + internal) per board, as it only has 36 conference resources.
b. The Triton 30-party conference board provides conference resources for the MeetMe
conference application exclusively. It cannot be used for regular conferences.
42 Telephony Hardware Manual
CHAPTER
4
AltiGen MAX1000/MAX2000
Telephony Boards
AltiGen’s MAX1000/MAX2000 family of telephony boards for the MAX all-in-one IP PBX
solution comprises the following:
• MAX1000 system
• MAX1000-R system
• MAX2000 System
This chapter discusses the MAX1000 in detail. The information on the MAX1000 pertains
to the MAX1000-R and MAX2000 systems, as well, except where support is enhanced in
the latter two and is so noted in those sections at the end of the chapter. The
MAX1000-R is an enhanced version of the MAX1000, and the MAX2000 system is an
enhanced version of the MAX1000-R.
MAX1000 System
The AltiGen MAX1000 is a 2U, 19" rack-mount system. It is designed to be an all-in-one
IP PBX solution to provide IP media path, PSTN interface access, and signaling exchange.
The system has the following embedded components:
• Intel-based CPU board with DDR RAM, 10/100 Ethernet, USB2.0, COM/LPT, VGA,
ATA-100 HDD, and CD-ROM
• DSP processor board
• MAX backplane for access board connection
Telephony Hardware Manual
43
MAX1000 System
• Two access board slots
Figure 1.
MAX1000 system overview
The embedded DSP board provides the following resources for the system:
• 30 VoIP codec channels (G.711/G.723.1/G.729AB) for IP phone
• IP Tie-trunk, and SIP trunk service
• Dedicated voice processing (VM/AA) and voice recording resource for every trunk,
extension, VoIP channel
• 2 extension-based conference bridges (6 parties per conference)
• 2 MeetMe conference bridges (total 12 members maximum)
• 2 silent monitor/barge-in/coach channels for workgroup supervisor
• Music on hold (input source can be either a file or audio-in port)
• Paging (IP paging, audio-out port, trunk/station port paging)
MAX1000 Series Access Boards
An access board works together with the main DSP board to provide the telephony
interface such as analog extension, analog trunk, and digital trunk (T1/E1/PRI).
The MAX series of telephony access boards consists of the following options:
• ALTI-M0404-T1E1 (4 analog trunks, 4 analog extensions, 1 T1/E1/PRI port)
• ALTI-M0804 (8 analog trunks, 4 analog extensions)
• ALTI-M0408 (4 analog trunks, 8 analog extensions)
• ALTI-M0012 (0 analog trunks, 12 analog extensions)
• ALTI-M0000-T1E1 (single T1/E1/PRI) (supported in MAX Communication Server 6.0
Update 1 and above)
44 Telephony Hardware Manual
AltiGen MAX1000/MAX2000 Telephony Boards
Figure 2.
ALTI-M0404-T1E1 access board
Figure 3.
Analog trunk and extension board (ALTI-M0804, ALTI-M0408, ALTI-M0012)
Analog Trunk-to-Extension Relay
The following three access boards have an analog trunk-to-extension relay feature:
• ALTI-M0404-T1E1
• ALTI-M0804
• ALTI-M0408
The first four analog trunk ports will be connected to the first four analog extension ports
when the system is shut down for maintenance or if power is lost.
Access Board Status LEDs
The MAX1000 access board has two green LED indicators (A & B) to show the switch
software control and telephony power supply status. The LED A and B are located at the
left hand side of the Access Board.
LED A
Status
ON
The embedded DSP board is running and access board is connecting
to the DSP board properly.
Normal operation is ON.
Telephony Hardware Manual
45
MAX1000 System
LED A
Status
One of the following is true:
• The embedded DSP board is not running.
OFF
• Access board is not connected to DSP board properly.
• DSP board is too busy. Voice signal may be impacted.
LED B
Status
ON
The telephony power supply on the DSP board is supplying
telephony power to the analog extension ports properly.
Normal operation is ON.
One of the following is true:
• Switching software is not running.
OFF
• The telephony power supply fails to supply power.
T1E1 Signal Status LEDs
The ALTI-M0404-T1E1 board has two LEDs to show the T1/E1 signal status. The green
LED is labeled "C" and the red LED is labeled "D".
LED C
(Green)
LED D
(Red)
Status
ON
OFF
Normal operation
OFF
ON
No signal
Frame synchronization is okay, but one of the following
errors has occurred:
• Bi-polar violation
On
Flashing
• Line code violation
• System is receiving Yellow alarm from CO
• System is receiving Red alarm from CO
• Excessive zeros detected.
46 Telephony Hardware Manual
AltiGen MAX1000/MAX2000 Telephony Boards
LED C
(Green)
LED D
(Red)
OFF
Flashing
Status
Frame synchronization failed due to one or more of the
following conditions:
Wrong frame type
Wrong line code
Clock not matched, causing massive frame slips
Cable between CSU and T1 port is too long (within 110 feet
is recommended)
CRC checksum error (E1)
Alternating
OFF
OFF
Temporary frame slip in normal operation
No power to the board
Audio Input and Output Port
Each access board has one audio input port (3.5mm) for connecting a music-on-hold
device; and one audio output port for connecting a paging device.
Please note the following:
• Only one audio input/output source is supported per system.
• The first extension port is shared with audio input/output port (Rx/Tx). Do not wire
an analog phone to the first extension port when one of the audio ports is activated.
Installing Access Boards
To install an access board,
1.
Power off the system.
2.
Slide the access board into the slot and align it with the card guide.
3.
Push the board in completely.
4.
Tighten the thumb screws on both sides in a synchronized manner.
Figure 4.
Access board installation
Telephony Hardware Manual
47
MAX1000-R System
Removing Access Boards
To remove an access board,
1.
Shut down the AltiGen switching services (from MaxAdmin, choose Services > Shut
Down All Services).
2.
Shut down the operating system.
3.
Power off the system.
4.
Turn both thumb screws counter clockwise to disconnect from the chassis.
5.
Pull both thumb screws to move the board out.
Wiring Specification
The 50-pin Telco connector (RJ-21X) on the access board requires a standard Telco cable
(Male-to-Male) to connect to a punch down block (66 Block) or a 24-port patch panel.
Refer to the following pinout specification when wiring punch down block or patch panel
to CO trunk or phones.
System Limitation for MAX1000
• Each MAX1000 system can support only one ALTI-M0404-T1E1.
MAX1000-R System
The MAX1000-R system is similar to the MAX1000 system described above, except that
it supports two ALTI-M0404-T1E1 spans.
48 Telephony Hardware Manual
AltiGen MAX1000/MAX2000 Telephony Boards
In addition, there are differences in the system resources provided by the embedded
DSP board. In the MAX1000-R, the DSP board supports:
• Up to 96 extensions
• 6 extension-based conference bridges—6 parties per conference, with a maximum
of 24 parties at any one time
• Up to 12 G.723/G.729/G.711 IP channels and 48 G.711-only IP channels
• Extension recording but not trunk recording
Additional Hardware
The MAX1000-R hardware differs from MAX1000 hardware in the following ways:
• Supports two ALTI-M0404-T1E1 spans, instead of one
Note: When you are using two T1 or E1 spans, and one is used as a back-to-back
tie trunk and the other is a live CO line, the live T1 or E1 line must connect
to the top slot.
Note: When no T1/E1 or one T1/E1 board is installed, you can select:
• 30 G.723/G.729/G.711 IP channels, OR
• 12 G.723/G.729/G.711 IP channels plus 48 G.711-only IP channels
When two T1/E1 boards are installed, the configuration will switch to 12
G.723/G.729/G.711 IP channels and 48 G.711-only IP channels
automatically.
• SATA RAID controller
• Supports SATA RAID1 with 80GB hard disk
• 1GB RAM
System Limitation for MAX1000-R
• Trunk recording is not supported. Only extension recording is supported.
MAX2000 System
The MAX2000 system uses the same DSP board and supports all the same analog and
digital access boards as the MAX1000 and MAX1000-R.
The MAX2000 hardware differs from the MAX1000 hardware in the following ways:
• Hot swappable power supply (2x250W)
• Hot swappable RAID1 with 2x80GB hard disk
• Pentium Processor
• 1GB RAM
• Supports two ALTI-M0404-T1E1 spans, instead of one
The MAX2000 system is manufactured with two different DSP configurations, MAX2000
standalone server and MAX2000iG:
• MAX2000 Server—In standalone server mode, the MAX2000 Server supports the
same software features and uses the same firmware as the MAX1000-R.
When no T1/E1 or one T1/E1 board is installed, you can select:
Telephony Hardware Manual
49
MAX2000 System
• 30 G.723/G.729/G.711 IP channels, OR
• 12 G.723/G.729/G.711 IP channels plus 48 G.711-only IP channels
When two T1/E1 boards are installed, the configuration will switch to:
• 12 G.723/G.729/G.711 IP channels and 48 G.711-only IP channels
Note: In the event that the installation site grows beyond the supported user size
and you would like to migrate to HMCP Softswitch architecture, the MAX2000
standalone server can be configured in gateway mode. The embedded DSP
will be changed to support the codec listed in MAX2000iG.
• MAX2000iG—in gateway mode, the embedded DSP supports:
• 12 combo codec plus 56 G.711 codec
• Two T1/E1 4x4 access boards or any combination of two access boards
Note: The MAX2000iG cannot be used as a standalone server. The embedded DSP
is hard coded as gateway only.
System Limitation for MAX2000 System
• Trunk recording is not supported. Only extension recording is supported.
50 Telephony Hardware Manual
CHAPTER
5
MAX4000 Server and Vision Boards
AltiGen’s MAX4000 chassis is designed to operate either as a gateway controlled by a
Softswitch server or as a standalone IP PBX.
This chapter describes the MAX4000 in detail.
MAX4000 Server
The AltiGen MAX4000 is a 4U, rack-mount system, 7" x 17 ½" x 27". The system has
the following embedded components:
• Field-replaceable processor module
• 2.4 GHz processor
• 4GB memory
• 2 10/100/1000 Mbps Ethernet interfaces
• VGA port
• PS2 port for keyboard and mouse
• USB 2.0 port
• 8 access board slots
• 3 hot-swappable SATA hard drives used as RAID-1 with standby drive
• 2 + 1 redundant power supply
• CD-DVD ROM
• A second USB 2.0 port (located inside the front door)
Telephony Hardware Manual
51
Vision Access Boards
Power supply alarm reset
CD-DVD
ROM
Front of
MAX4000
8
7
6
5
4
3
2
1
Soft start power switch
8 access board slots
3 hard drives
Use a phillips screw driver to tighten these screws to secure the
top cover
3 power supplies
Processor module
Chassis ground terminal
Figure 1.
Back of
MAX4000
Ports: Keyboard/mouse, NIC,
video, NIC, USB
MAX4000 system overview
Vision Access Boards
The MAX4000 series of Vision access boards includes the following options:
• ALTI-V0404 (Vision 4 Trunk 4 Ext Analog Board with 8 Combo Codec)
• ALTI-VRES (Vision Resource Board)
• ALTI-VT1E1-2 (Vision T1/E1 Board with 2 T1/E1 Ports and 60 Combo Codecs)
Board Status LEDs
MAX4000 boards have a red LED at the top right and a blue LED at the bottom right to
show board status.
52 Telephony Hardware Manual
MAX4000 Server and Vision Boards
Red LED on top; blue LED on bottom
Figure 2.
Red and blue LEDs show board status
Red LED
Status
ON
Either the board is not seated properly (extractor switch is not at
the correct position), or the on-board power has a problem. When
the red LED is on, the blue LED will be off.
OFF
Normal operation is OFF.
When the red LED is OFF, the blue LED will be in one of the following states:
Blue LED
Status
The board is either:
FLASHING
• successfully plugged in and ready to be activated in MaxAdmin,
OR
• the board is deactivated and ready to be removed.
ON
The board is activated.
OFF
The board is not plugged in, or the red LED is on.
T1E1 Access Board
Figure 3.
ALTI-VT1E1-2 Board with 2 T1/E1 Ports and 60 Combo Codecs
Telephony Hardware Manual
53
Vision Access Boards
T1E1 Signal Status LEDs
The ALTI-VT1E1SM-1PT/ALTI-VT1E1-2 board has two LEDs to show the T1/E1 signal
status. They are located beside each RJ48C connector.
Signal status LEDs
Figure 4.
LEDs showing signal status
Green LED
Red LED
Status
ON
OFF
Normal operation
OFF
ON
No signal
Frame synchronization is okay, but one of the following
errors has occurred:
• Bi-polar violation
ON
Flashing
• Line code violation
• System is receiving Yellow alarm from CO
• System is receiving Red alarm from CO
• Excessive zeros detected
Frame synchronization failed due to one or more of the
following conditions:
Wrong frame type
OFF
Flashing
Wrong line code
Clock not matched, causing massive frame slips
Cable between CSU and T1 port is too long (within 110 feet
is recommended)
CRC checksum error (E1)
Alternating
OFF
OFF
54 Telephony Hardware Manual
Temporary frame slip in normal operation
No power to the board
MAX4000 Server and Vision Boards
Resource Board
Figure 5.
ALTI-VRES (resource board)
The MAX4000 resource board supports two configurations:
Configuration A
• 60 G.711 IP resource channels
• 40 Station Conference bridges with maximum 6 members in each bridge; 120
maximum total members
• 10 silent monitor/barge-in/coaching sessions
• 10 MeetMe bridges with maximum 30 members in each bridge; 30 maximum total
members
Configuration B
• 60 G.711 IP resource channels
• 20 Station Conference bridges with maximum 6 members in each bridge; 60
maximum total members
• 30 silent monitor/barge-in/coaching sessions
• 10 MeetMe bridges with maximum 30 members in each bridge; 30 maximum total
members
One system can have multiple resource boards but only one resource board can be
configured to use the MeetMe feature.
Analog Boards
The analog access boards have an analog trunk-to-extension relay feature. The first four
analog trunk ports will be connected to the first four analog extension ports when the
system is shut down for maintenance or if power is lost.
Telephony Hardware Manual
55
Vision Access Boards
Functional
status
LEDs
Board status
LEDs
Figure 6.
ALTI-V0404 (4x4 analog board)
Analog Functional Status LEDs
The analog boards have two LEDs to show functional status. Their location is shown in
Figure 6 and Figure .
LED A (Green)
Status
ON
Normal operation. The +12v fuse is okay, and the analog
telephony power is on.
LED B (Red)
Status
ON
Either the +12v fuse is blown, or the analog telephony power is
off. When the red LED is on, the green LED will be off.
OFF
Normal operation is OFF.
Audio Input and Output Ports
Each analog access board has:
• one audio input port (3.5mm) for connecting a music-on-hold device
• one audio output port for connecting a paging device
You may not use both audio ports on any single access board. You may use the audio
input port on one access board and the audio output port on another access board.
Please note the following:
• Only one audio input/output source is supported per system.
• The first extension port is shared with audio input/output port (Rx/Tx). Do not wire
an analog phone to the first extension port when one of the audio ports is activated.
56 Telephony Hardware Manual
MAX4000 Server and Vision Boards
Wiring Specification
The 25-pin DB-25 connector on the access board requires a cable (DB-25 to RJ-21x)
supplied with the access board to connect to a punch down block (66 Block) or a 24-port
patch panel. Refer to the following pinout specification when wiring punch down block or
patch panel to CO trunk or phones.
Installing Boards
Slots 1 and 2 are special in the way the system is synched to the external clock of the
incoming T1/E1 streams; this is critical to system operation.
Guidelines for installing boards:
• When adding boards, always work your way up from the bottom slot (slot 1) to the
top slot (slot 8).
• If there is only one T1/E1 board in the system, it must be inserted into slot 1.
• If there are two T1/E1 boards in the system, then they must occupy slots 1 and 2.
• If there are more than two T1/E1 boards, then two of them must occupy slots 1 and
2; the remaining ones can occupy any of the remaining 6 slots.
• If you start with a single T1/E1 board, and later acquire a second T1/E1 board, then
the first board should remain in slot 1, and the new T1/E1 board must replace whichever board originally occupied slot 2.
Telephony Hardware Manual
57
Vision Access Boards
To install a board,
1.
Power off the system.
2.
Insert the board into the slot you chose, being careful to align the bottom of the
board with the card guides in the bottom of the slot.
The extractor handles on the board should be in the unlocked, or open, position
(pointing outwards).
Push the board all the way in until the extractor handle grooves capture the side
beams of the slot, and use your thumbs to push the extractor handles in toward the
center to lock the board into place.
When the board is correctly plugged in, the blue light in the faceplate begins to
blink, and the red light is off.
Extractor handles
Figure 7.
ALTI-VT1E1-2 board
Removing Boards
1.
Shut down the AltiGen switching services (from MaxAdmin, choose Services > Shut
Down All Services).
2.
Shut down the operating system.
3.
Power off the system.
4.
Push in the gray release buttons on both side-swing extractor handles.
5.
Using your thumbs, push the extractor handles to the side (outwards from center)
and back to release the board.
6.
Then grab the handles and pull the board toward you and out.
Swapping a Power Supply
The MAX4000’s three power supplies, located in the back of the unit, are easily accessible and hot-swappable (removing or adding a power supply without shutting down the
system or MAXCS does not interfere with the operation of the system). Each power supply has its own power cord.
58 Telephony Hardware Manual
MAX4000 Server and Vision Boards
Power
supply 3
Power
supply 2
Power
supply 1
3 power supplies are located in the
back of the unit.
Figure 8.
Front door of the unit labels the
LEDs for power supplies 1, 2,
and 3 (PS1, PS2, PS3).
MAX4000 has three hot-swappable power supplies
To remove a power supply,
1.
Unplug its power cord.
A warning tone sounds, and the red “Fail” LED (located behind the front door of the
MAXCS) turns red. In addition, the corresponding green LED on the front of the unit
turns off. To turn off the warning sound, you can press the red square button
located behind the door on the front of the system.
2.
Unscrew the captive screw at the left of the power supply (the screw does not come
out, it simply loosens).
3.
Pull out the power supply, using the power supply handle.
To add a power supply,
1.
Slide the power supply into place, making sure the connector in the back is at the
bottom.
2.
Tighten the captive screw at the left of the power supply.
3.
Insert the power supply’s plug into the back of the unit in its corresponding
receptacle.
The red LED located in front of the unit turns off, and the corresponding green LED
turns on.
Swapping a Hard Drive
The MAX4000 has two redundant hard drives that mirror each other and a third drive
that takes over the job of mirroring, if one of the other two drives goes down. When a
hard drive is being used for mirroring and is working properly, its LED is green. The spare
hard drive LED is orange.
The hard drives are located behind the door at the front of the system.
Telephony Hardware Manual
59
Vision Access Boards
Figure 9.
3 hard drives behind the door at the front of the system
You can swap a hard drive without shutting the system down. To swap a hard drive,
1.
Unlatch the front handle of the hard drive tray by inserting the “pin” end of the
unlatching tool provided (or use a paper clip) into the small hole at the pointed end
of the latched handle and pushing the internal latch downward.
2.
Grasp the lever and pull out the hard drive.
If you removed an active hard drive, the standby hard drive immediately begins
copying the remaining hard drive. Its orange LED flashes between red and green,
and its blue LED turns on. The blue LED of the remaining hard drive also turns on,
indicating that the two hard drives are synchronizing.
While the drives are synchronizing, you may periodically hear a short beep.
3.
Insert a good hard drive into the slot, holding its lever up until the drive is fully
inserted. Push the lever down to lock.
The hard drive you just inserted becomes the standby hard drive, and its LED is
orange.
WARNING!
Do not pull out the master hard drive during the synching process.
60 Telephony Hardware Manual
Index
proper handling 32
system limitations 41
Triton Resource 39
A
access board, MAX4000 52
installing 57
removing 58
access boards, MAX1000
audio input/output 47
installing 47
removing 48
wiring specification 48
access boards, MAX4000
wiring specification 57
analog boards, MAX4000
audio input/output 56
audio input/output
MAX1000 47
MAX4000 56
B
board ID 40
boards
access, MAX1000 44
audio input/output 47
installing 47
removing 48
access, MAX4000 52
analog, MAX4000
audio input/output 56
attaching cables 40
functional specs
Proton analog trunk
37
Triton analog extension 34
Triton analog trunk 36
Triton MeetMe 40
Triton T1E1/PRI 38
Triton VoIP 39
installation 40
options 33
power requirements 41
Telephony Hardware Manual
61
C
conference resource limits 42
E
earthing conductor, requirements 21
electrostatic discharge
and board damage 32
F
FCC statement 5
G
grounding, proper 29
H
hardware
installation 29, 43
operating environment 30,
31
uninterruptible power
supply 29
I
ID, board 40
installation
hardware 29, 43
operating environment 31
installation requirements 23
L
limitations, number of boards
41
limitations, system 41
limits
conference resource 42
loop current measurement 29
M
MAX1000 system 43
access boards 44
system limitation 48
wiring specification 48
MAX1000-R system 48
system limitation 49
MAX2000 system 49
system limitation 50
MAX4000 system 51
analog boards 55
installing boards 57
removing boards 58
resource board 55
swapping a hard drive 59
swapping a power supply
58
T1E1 access board 53
wiring specification 57
O
operating environment 30
options,boards 33
P
power requirements 41
power supply
uninterruptible 29
Proton analog trunk board,
specs 37
R
Rehabilitation Act, Section
508 35
resource limits, conference 42
S
safety
electricity 13
Section 508, Rehabilitation
Act 35
service, obtaining 3
shutting down the system 32
system limitations 41
system shutdown, proper 32
T
Triton analog extension
board, specs 34
Triton analog trunk board,
specs 36
Triton MeetMe board, specs
40
Triton T1E1/PRI board, specs
38
Triton VoIP board, specs 39
U
uninterruptible power supply
29
V
vision access board,
MAX4000 52
W
warranty 3
Telephony Hardware Manual
62