1
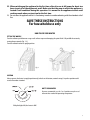
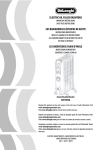
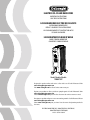
ELECTRIC OIL-FILLED RADIATORS
IMPORTANT INSTRUCTIONS
SAVE THESE INSTRUCTIONS
LOS RADIADORES ELÉCTRICOS DE ACEITE
INSTRUCIONES IMPORTANTES
REPASE Y GUARDE ESTAS INSTRUCCIONES
LEA CUIDADOSAMENTE ESTE INSTRUCTIVO ANTES
DE USAR SU APARATO
LES RADIATEURS À BAIN D’HUILE
MODE D’EMPLOI IMPORTANT
CONSERVEZ CE MODE D’EMPLOI
Model/Modelo/Modèle
TRD0715T
Register this product online and receive a free trial issue of Cook's Illustrated. Visit
www.delonghiregistration.com
Visit www.delonghi.com for a list of service centres near you.
Registre este producto en línea y reciba un ejemplar gratis de Cook's Illustrated. Visite
www.delonghiregistration.com
Visite www.delonghi.com para ver la lista de centros de servicios cercanos a usted.
Enregistrez ce produit en ligne et recevez un numéro gratuit de Cook's Illustrated. Visitez
www.delonghiregistration.com
Visitez www.delonghi.com pour y voir une liste des centres de réparation proches de
chez vous.
ELECTRIC CHARACTERISTICS/ CARACTERISTICAS ELECTRICAS/
CARACTÉRISTIQUES ÉLECTRIQUES
120 V~ 60 Hz 1 500 W
EN
IMPORTANT INSTRUCTIONS
When using electrical appliances, basic precautions should always be taken to avoid the risk of fire, electric
shock and personal injury, including the following:
1. Read all instructions before using this heater.
2. If your radiator is equipped with a polyethylene tape used as a carry handle, remove it before connecting
appliance to the outlet.
3. This heater is hot when in use. To avoid burns, do not let bare skin touch hot surfaces. Use handle when
moving this heater. Keep combustible materials, such as furniture, pillows, bedding, papers, clothes, and
curtains at least 90 cm (3 ft.) from the front and top of the heater and keep them away from the sides and
rear.
4. Extreme caution is necessary when any heater is used by or near children or invalids and whenever the
heater is left operating and unattended.
5. Always unplug heater when not in use.
6. Check that neither the appliance nor the power cable have been damaged in any way during transportation.
7. Do not operate any heater with a damaged cord or plug or after the heater malfunctions, has
been dropped or damaged in any manner. If heater has leaked any oil, discontinue using the
heater and contact the service centre as indicated in the instruction leaflet. Return heater to
authorized service facility for examination, electrical or mechanical adjustment, or repair.
8. Do not use outdoors. Household use only.
9. This heater is not intended for use in bathrooms, laundry areas and similar indoor locations. Never locate
heater where it may fall into a bathtub or other water container.
10. Do not run cord under carpeting. Do not cover cord with throw rugs, runners, or similar
coverings. Do not route cord under furniture or appliances. Arrange cord away from traffic
area and where it will not be tripped over.
11. To disconnect heater, turn controls to off, then remove plug from outlet.
12. Connect to properly polarized outlets only.
13. Do not insert or allow foreign objects to enter any ventilation or exhaust opening as this may cause an
electric shock, fire, or damage the heater.
14. To prevent a possible fire, do not block air intakes or exhaust in any manner. Do not use on soft surfaces,
like a bed, where openings may become blocked.
15. A heater has hot and arcing or sparking parts inside. Do not use in areas where gasoline,
paint, or flammable liquids are used or stored.
16. Use this heater only as described in this manual. Any other use not recommended by the manufacturer
may cause fire, electric shock, or injury to persons.
17. To prevent overload and blown fuses, be sure that no other appliance is plugged into the same outlet
(receptacle) or into another outlet (receptacle) wired into the same circuit.
18. It is normal for the heater’s plug and cord to feel warm to the touch. A plug or cord which becomes hot to
the touch or becomes distorted in shape may be the result of a worn electrical outlet.
Worn outlets or receptacles should be replaced prior to further use of the heater. Plugging heater into a
worn outlet /receptacle may result in overheating of the power cord or fire.
19. Always plug heaters directly into a wall outlet/receptacle. Never use with an extension cord or relocatable
power tap (outlet/power strip).
20. Be sure that the plug is fully inserted into an appropriate outlet. Please remember that outlets also
deteriorate due to aging and continuous use: check periodically if signs of overheating or deformations
are evidenced by the plug. Do not use the outlet and CALL your electrician.
21. Make sure that no pieces of polystyrene or other packaging material have been left between one element
of the appliance and another. It may be necessary to pass over the appliance with a vacuum cleaner.
2
22. When switching on the appliance for the first time, allow it to run at full power for about two
hours to get rid of the unpleasant smell. Make sure that the room in which the appliance is
located is well ventilated during this operation. It is normal for the appliance to emit small
cracking sounds when you turn it on for the first time.
23. Do not cover the appliance while it is functioning in order to avoid overheating with the attendant risk of
fire.
SAVE THESE INSTRUCTIONS
For household use only
HOW TO USE YOUR HEATER
FITTING THE WHEELS
Turn the radiator upside down on a rug or soft surface to prevent damaging the paint finish. Fully unfold the castors by
turning them outwards (Fig. 1-2).
Turn the radiator back to its upright position.
fig. 1
fig. 2
CAUTION
Always operate the heater in upright position only (wheels on the bottom, controls on top). Any other position could
create a hazardous situation!
WATTS ECONOMIZER
For more economical use, the 1 or 2 positions may be used
after unit has reached the operating temperature.
With pilot lights ON, the heater is ON!
3
1. LOCATION
Place heater on the floor beneath the coldest window in the room, or any other location. Your heater will reduce the effect
of cold drafts.
The heater should not be placed immediately below a power outlet.
Do not use this radiator in rooms with a floor area of less than 4 m2 (43 sq. ft. ).
2. CONNECTION
The radiator should be connected to a properly polarized A/C 110/120 V household outlet in perfect working condition.
Keep loose clothing or bedding, furniture and flammable material away from the heater’s wall outlet.
3. TURNING ON
Insert the plug into an electrical outlet, rotate the thermostat knob (if provided) to maximum and turn the unit on as follows using the power selector:
• Turn the power selector to position 1 to select minimum output (the light on the left will come on).
• Turn the power selector to position 2 to select medium output (the light on the right will come on).
• Turn the power selector to position 3 to select maximum output (the lights will come on).
4. ADJUSTING THE THERMOSTAT
When the room has reached the desired temperature, turn the thermostat knob slowly in an clockwise direction until you
get to the setting – and not beyond it. The thermostat will then adjust the set temperature automatically and keep it constant.
If your unit is a three-output version, in intermediate seasons or on days when temperatures are not particularly cold,
select minimum output to optimize savings and consumption.
ANTIFREEZE FUNCTION
Turn the thermostat dial to the position and the power selector to position 3. The appliance will maintain a minimum
room temperature of approximately 5°C (42°F), thus preventing freezing while conserving energy. In models that come
with a timer, tabs must be set in the inward position.
REMINDER
To completely shut the appliance off, turn the power selector to the OFF position and then unplug the appliance from the
main.
5. UNITS WITH TIMER
Clock setting
The program/timer, as with all clocks, must be set to the correct time. If for example the time is 9:30 a.m. (day zone),
rotate the dial clockwise (following the direction of the arrow) until 9:30 is aligned with the triangular pointer.
IMPORTANT:
DO NOT ROTATE CLOCK DIAL COUNTER-CLOCKWISE.
The timer is in effect an electric clock, and will only work when plugged into a power supply.
When unplugged, the timer stops and must be later re-set.
Your product is equipped with a 3-pole alternating current line plug (grounded). There is only one way it can be plugged
into a power supply. This is a safety feature. If you are unable to insert the plug fully into the outlet, try again by turning
it the other way. If it still does not go in, it is probably due to an obsolete outlet that should be replaced.
4
HOW TO USE THE TIMER
1
3
2
To program heating, proceed as follows:
- Look at the time on your clock or watch. If it is 10 p.m., turn the numbered timer disk clockwise until the number
10 p.m. on the disk coincides with the pointer L (2) on the timer. Set the periods of time when you want the
appliance to work by pushing the teeth (1) inwards. Each tooth (1) corresponds to a period of 15 minutes. This will
leave visible sectors which correspond to the periods of operation (3). When set, the radiator will operate automatically each day during the times programmed (important: the radiator must always be plugged into the socket).
- To change the programming, move the teeth back into the initial position and set the new periods of functioning.
- If you want to make the appliance operate without programming, push all the teeth into the centre. In this case, to
turn the appliance off completely, as well as turning the knob to the off position, you must also unplug it from the
mains to avoid continued operation of the timer.
A safety device
The appliance is fitted with a safety device that will switch it off in case of accidental overheating. To reset, disconnect the
plug from the power for 30 minutes, remove the cause of overheating, then plug the appliance in again.
6. MAINTENANCE AND SERVICE
Always unplug the heater from the power outlet and allow the radiator to cool. Wipe radiator with a soft damp cloth; do
not use detergents and abrasives.
Should the radiator not be in use over a certain length of time, roll the cable around the holder and store it in a dry place.
This appliance has been built to last for many years of trouble-free service.
In case of malfunction or doubt, do not try to repair the heater by yourself: this might increase the risk of fire and electric
shock.
Call your nearest Service Centre (see attached list of Service Centre).
5
LIMITED WARRANTY
This warranty applies to all products with De’Longhi or Kenwood brand names.
What does the warranty cover?
We warrant each appliance to be free from defects in material and workmanship. Our obligation under this warranty is limited
to repair at our factory or authorized service centre of any defective parts or part thereof, other than parts damaged in transit.
In the event of a product replacement or return, the unit must be returned transportation prepaid. The repaired or new model
will be returned at the company expense.
This warranty shall apply only if the appliance is used in accordance with the factory directions, which accompany it, and on an
alternating current ( AC ) circuit.
How long does the coverage last?
This warranty runs for one year (1) from the purchase date found on your receipt and applies only to the original purchaser for
use.
What is not covered by the warranty?
The warranty does not cover defects or damage of the appliance, which result from repairs or alterations to the appliance outside our factory or authorized service centres, nor shall it apply to any appliance, which has been subject to abuse, misuse,
negligence or accidents. Also, consequential and incidental damage resulting from the use of this product or arising out of any
breach of contract or breach of this warranty are not recoverable under this warranty. Some states do not allow the exclusion
or limitation of incidental or consequential damage, so the above limitation may not apply to you.
How do you get service?
If repairs become necessary, see contact information below:
U.S. Residents: Please contact our toll-free hotline at 1-800-322-3848 or log onto our website at www.delonghi.com
Residents of Canada: Please contact our toll-free hotline at 1-888-335-6644 or log onto our website at www.delonghi.com
Residents of Mexico: Please contact our toll-free number 01-800-711-8805 for assistance or log onto our website at
www.delonghi.com
The above warranty is in lieu of all other express warranties and representations. All implied warranties are limited to the
applicable warranty period set forth above. This limitation does not apply if you enter into an extended warranty with
De’Longhi. Some states/countries do not allow limitations on how long an implied warranty lasts, so the above exclusions may
not apply to you. De’Longhi does not authorize any other person or company to assume for it any liability in connection with
the sale or use of its appliance.
How does country law apply?
This warranty gives you specific legal rights, and you may also have other rights, which vary from state to state/country to
country.
6