1
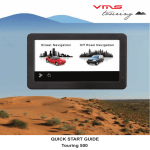
TOURING 7500 SERIES QUICK USER GUIDE
INTENTIONALLY LEFT BANK
Quick User Guide
CONTENTS
SAFETY PRECAUTIONS ............................................................................................................................................................................
4
BACK UP SD MEMORY CARD DATA ........................................................................................................................................................
5
GPS OPERATION ...........................................................................................................................................................................................
5
FRONT PANEL CONTROLS ........................................................................................................................................................................
6
POWER ON / OFF ...........................................................................................................................................................................................
7
SYSTEM MENU ..............................................................................................................................................................................................
7
INSERT / EJECT DISK .................................................................................................................................................................................
7
INSERT / EJECT MEMORY CARD .............................................................................................................................................................
7
DVD / CD OPERATION ..................................................................................................................................................................................
7
FM / AM RADIO OPERATION ......................................................................................................................................................................
8
BACK LCD / REAR SEAT ENTERTAINMENT OPERATION .................................................................................................................
8
BLUETOOTH OPERATION ...........................................................................................................................................................................
8
iPOD OPERATION ..........................................................................................................................................................................................
9
SYSTEM SETTINGS ......................................................................................................................................................................................
9
TPMS AND INFO (Not Available)...............................................................................................................................................................
10
REVERSE CAMERA OPERATION ............................................................................................................................................................... 10
HELP & SUPPORT .......................................................................................................................................................................................... 11
page 3 Quick User Guide
SAFETY PRECAUTIONS
Maintenance
If you are experiencing problems, do not attempt to repair the unit yourself. Return
it to your VMS dealer.
WARNING
Never Attempt the Following:
Do not grip or pull out the disc while it is being pulled back into the player by the
automatic reloading mechanism.
Do not attempt to insert a disc into the unit when the unit power is off.Doing
may cause damage to the DVD / CD mechism.
This symbol means important
instructions. Failure to heed them
can result in serious injury or death.
INSTALL THE PRODUCT CORRECTLY SO THAT THE DRIVER
CANNOT WATCH TV / VIDEO UNLESS THE VEHICLE HAS STOPPED
AND THE PARKING BRAKE IS APPLIED.
It is dangerous for the driver to watch the TV/Video while driving the vehicle. The
driver may be distracted from looking ahead and an accident could occur. If the
product is not installed correctly, the driver will be able to watch the TV/Video whilst
driving the vehicle and may be distracted from looking ahead causing an accident.
The driver or other people could be severely injured.
DO NOT OPERATE ANY FUNCTIONS THAT CAN CAUSE
DISTRACTIONS WHILE DRIVING.
Any function that requires your prolonged attention should only be performed
after coming to a complete stop. Always stop the vehicle in a safe location before
performing these functions. Failure to do so may result in an accident.
KEEP SMALL OBJECTS OUT OF THE REACH OF CHILDREN.
Swallowing Small objects may result in serious injury. If swallowed, consult a
physician immediately.
so
Inserting Discs
Your player accepts only one disc at a time for playback. Do not attempt to load
more than one disc.
Make sure the label side is facing up when you insert the disc.
Your player will automatically eject any disc that is inserted incorrectly. If the player
continues to eject a correctly inserted disc, push the Power button.
Playing a disc while driving on a very bumpy road may result in skips, but this will
not scratch the disc or damage the player.
Irregular Shaped Discs
Be sure to use round shaped discs only for this unit and never use any special
shaped discs. Use of special shaped discs may cause damage to the mechanism.
DO NOT DISASSEMBLE OR ALTER THE PRODUCT.
Doing so may result in an accident, fire or electric shock.
DO NOT USE THIS PRODUCT FOR MOBILE 12V APPLICATIONS.
Use of this product other than its designed application, may result in fire, electric
shock or other injury.
USE ONLY IN CARS WITH A 12 VOLT NEGATIVE GROUND. (Check
with your dealer if you are not sure.) Failure to do so may result in fire, etc.
DO NOT BLOCK VENTS OR RADIATOR PANELS. Doing so may cause
heat to build up inside and may result in fire.
New Discs
As a protective measure to prevent the Disc from jamming, the DVD player will
automatically eject discs with irregular surfaces or which have been inserted
incorrectly. When a new disc is inserted into the player and ejected after initial
loading, using your finger, feel around the inside of the centre hole and outside
edge of the disc. If you feel any small bumps or irregularities, this could inhibit
proper loading of the disc. To remove the bumps, rub the inside edge of the hole
and outside edge of the disc with a ball-point pen or other such instrument, then
insert the disc again.
MINIMISE DISPLAY VIEWING WHILE DRIVING. Viewing the display may
distract the driver from looking ahead of the vehicle and cause an accident.
DO NOT WATCH VIDEO / TV WHILE DRIVING. Watching the video may
distract the driver from looking ahead of the vehicle and cause an accident.
KEEP THE VOLUME AT A LEVEL WHERE YOU CAN STILL HEAR
OUTSIDE NOISE WHILE DRIVING.
Failure to do so may result in an accident.
HALT USE IMMEDIATELY IF A PROBLEM OCCURS.
Failure to do so may cause personal injury or damage to the product. Return it
to your authorised VMS dealer or the nearest VMS Service Centre for repairing.
Correct Handling
Do not drop the disc while handling. Hold the disc so you will not leave fingerprints
on the surface. Do not affix tape, paper, or gummed labels to the disc. Do not
write on the disc.
DO NOT PLACE HANDS, FINGERS OR FOREIGN OBJECTS IN
INSERTION SLOTS OR GAPS.
Doing so may result in personal injury or damage to the product.
DO NOT MIX NEW BATTERIES WITH OLD BATTERIES. INSERT
WITH THE CORRECT BATTERY POLARITY.
When inserting the batteries, be sure to observe proper polarity (+ and –)
as instructed. Rupture or chemical leakage from the battery may cause fire or
personal injury.
Product Cleaning
Use a soft dry cloth for periodic cleaning of the product. For more severe stains,
please dampen the cloth with water only. Anything else has the chance of
dissolving the paint or damaging the plastic.
Temperature
Be sure that the temperature inside the vehicle is between 0°C (+32°F) and +45°C
(+113°F) before turning your unit on.
Moisture Condensation
You may notice the disc playback sound wavering due to condensation. If this
happens, remove the disc from the player and wait about an hour for the moisture
to evaporate.
Damaged Disc
Do not attempt to play cracked, warped, or damaged discs. Playing a bad disc
could severely damage the playback mechanism.
Disc Cleaning
Fingerprints, dust, or soil on the surface of the disc could cause the DVD player
to skip. For routine cleaning, wipe the playing surface with a clean, soft cloth from
the centre of the disc to the outer edge. If the surface is heavily soiled, dampen
a clean, soft cloth in a solution of mild neutral detergent before cleaning the disc.
Using compact discs (CD/CD-R/CD-RW)
If you use unspecified compact discs, correct performance cannot be guaranteed.
You can play CD-Rs (CD-Recordable)/CD-RWs (CD Re Writable) which have
been recorded only on audio devices.
You can also play CD-Rs/CD-RWs containing MP3/WMA formatted audio files.
• Some of the following discs may not play on this unit:
Flawed discs, discs with fingerprints, discs exposed to extreme temperatures or
sunlight (e.g., left in the car or in unit), discs recorded under unstable conditions,
discs on which a recording failed or a re-recording was attempted, copy protected
CDs which do not conform to the audio CD industry standard.
• Use discs with MP3/WMA files written in a format compliant with this unit.
page 4 Quick User Guide
To customers using CD-R / CD-RW
• If a CD-R/CD-RW cannot be played, make sure the last recording session was
closed (finalised).
• Finalise the CD-R / CD-RW if necessary, and attempt playback again.
GPS OPERATION
The GPS console can launch both street & off road navigation software.
Installation Location
Make sure the unit will not be installed in a location subjected to:
• Direct sun and heat
• High humidity and water
• Excessive dust
• Excessive vibrations
GPS CONSOLE MENU
To access the GPS console, press [GPS] in the main menu.
BACK UP SD MEMORY CARD DATA
DATA REDUNDANCY
Memory Cards utilized in this product is of an automotive grade. However, data
corruption may still occur. To ensure data redundancy, we recommend backing up
the data onto a computer.
• Back up the original data.
• Back up your own data.
BACK UP DATA FROM MEMORY CARD TO A COMPUTER
1. Insert Micro SD card into a SD card reader on the computer.
2. In My Computer, the SD card will appear as a removable drive. For easy
identification, all VMS Touring SD cards are programed to appear with a VMS icon.
STREET NAVIGATION - Launches street nav.
OFF ROAD GPS - Launches the preset Off Road navigation software.
SETUP - Choose your default off-road navigation software to launch when the
Off Road navigation icon is pressed. Default is MudMap
OFF ROAD GPS MENU (STREET AND TOPO UNITS ONLY)
3. Select all the data on the SD card & select COPY.
4. Paste the data on to the computer.
5. If the data on the SD card becomes corrupt, the sd card can be formatted and
the backup data on the computer can be copied onto the card.
PLEASE NOTE: The data on the SD card is encrypted. Copying the data onto
a different SD card is not possible. The system will only work with the genuine
memory card.
Loss or corruption of data on the memory card is not covered
under warranty. Ensure the data is backed up onto another form of
media as soon as the possible.
If you are not sure on how to back up data contained on the
memory card, contact your VMS dealer before any attempts are
made. Backing up data is not VMS or the dealer’s responsibility.
You may also request VMS to back up the DATA onto a DVD-R disk.
A service charge of $55 (excluding postage) apply. To
access this service, contact us via email [email protected]
Business Hours: 9am to 5pm Monday to Friday, AEST.
VMS will not accept responsibility for items sent to the office that
do not contain an RA number which, is given to you over the phone.
The Off road GPS contains 3 applications, MudMap, Memory Map and Ozi
Explorer (DEMO VERSION ONLY).
Once a software has been selected, it will automatically launch the next time
GPS console starts.
To return to the GPS console when in either Street Nav or Off Road GPS, select
the exit option in either software.
NAVIGATION SOFTWARE - MORE INFORMATION
Please refer to your GPS navigation manual provided for more information
on how to use the GPS software. For further information please visit the VMS
website.
To request an RA number for warranty, please visit the VMS
website, click on support, and press the “warranty request form”
button.
Alternativly go to:
www.vms4x4.com/warranty_request or visit your VMS dealer for
assistance.
page 5 Quick User Guide
VMS Touring 7500 common interface buttons
TUNE
PWR-VOL
6
1
VMS Touring 7523
2
3
4
DIMM
Touchscreen Display
AV
OPEN
NAVI
DEST.
SEEK
>
SETUP
MENU
CARD
5
FRONT PANEL CONTROLS - 7523 (EXAMPLE)
No.
Function
Description
1
PWR-VOL
Tune knob to increase / decrease volume.
Press to MUTE.
Press and hold to power on / off.
2
DIMM
Press to increase / decrease screen brightness.
3
AV
Cycles through all AV functions.
4
SEEK + / Up or Down
Radio: Change station up or down.
CD/DVD: Change track up or down.
iPOD: Change track up or down.
5
MENU
Go to System Menu.
6
TUNE
Manually tune radio stations. Turn the knob to turn up or down in frequency.
Ejects the CD / DVD
7
OPEN /
8
NAVI
Display GPS console.
9
DEST.
In iGo street navigation, this will open the find place screen.
10
SETUP
Go to setup menu.
11
CARD
Open to insert or remove your micro SD card. (Included)
FRONT PANEL CONTROLS - OTHER COMMON FUNCTIONS (FUNCTIONS VARIE BETWEEN MODELS)
FM
Go to FM radio menu.
DVD
Go to DVD / CD menu.
CDC
Go to CD changer menu.
DEST.
NO FUNCTION (FOR FUTURE EXPENDABILITY).
LOCA.
Locks into your current location, (Function available only on Street Navigation)
INFO
Go to info menu.
SCAN + / -
Tune radio station + or Turn screen off / Mute audio
page 6 7
8
9
10
11
Quick User Guide
POWERING ON/OFF
At key ignition, the system will automatically switch on. When the ignition is
- seek back
switched off, the system will power down. To manually power the system on or off,
press and hold the [PWR/VOL] knob.
- stop SYSTEM MENU
TO SELECT A FUNCTION, TOUCH THE SCREEN
- seek forward
- Audio settings
- next track
- play / pause
- prev track
- EQ settings
CD MENU
When an audio CD is inserted, the CD menu will appear.
RETURN TO SYSTEM MENU: To return to the main menu at any time, press
the [MENU] button on the front fascia.
SYSTEM MENU FUNCTIONS
[DVD] - Play DVD/CD or connected USB flash memory. (Supported formats on
USB: mp3 & WMA).
[CDC] - CD changer can be accessed via this icon (only when CDC is
connected).
[Radio] - Operate FM or AM radio.
[iPOD] or [AUX] - Operate connected iPOD or AUX input. This icon can be
changed in “SETUP” to perform either of these functions.
[TV] - (Not Available)
[GPS] - Enters the GPS console.
[R.ENT] / [BACK LCD] - Controls for rear seat entertainment.
[BT] / [BLUETOOTH] Controls for Bluetooth phone connectivity.
[SETUP] - Configure system settings.
[INFO] - Displays TPMS & volt meter information. (No longer available)
[DARK / MIDDLE / BRIGHT] - Adjust LCD screen brightness.
[BLUE / ORANGE] - Toggles interface from Blue to Orange themes. Unit must
be restarted by turning the acc on & off.
- enable album repeat.
- enable random track selection.
- enable track scan, plays first 10 sec of every track on the cd.
TRACK LIST MENU
[TRACK LIST] - brings up a list of all available tracks on an audio CD (not mp3
CD).
INSERTING A DISC
1. Place the disc in the loader slot and the system will automatically insert the disc
into the loader.
EJECTING A DISC
1. Press the [OPEN] button
2. Press the [OPEN] or [EJECT] button (depending on model) and the disc will
automatically be ejected from the loader. Remove the disc.
MEMORY CARD
COMPATIBLE MEMORY CARDS
1GB, 2GB 4GB, 8GB class 4 micro sd cards are compatible.
All navigation software(s) and map(s) are stored on the memory card. Navigation
will not operate without the memory card.
DVD MENU
When a DVD is inserted, the DVD menu will appear.
INSERT SD CARD
PLEASE NOTE: The memory card slot is directional. Ensure the card is in the
correct orientation. Incorrect orientation can cause physical damage to the card
slot.
Insert the card into the slot and press gently until the card locks into position.
REMOVE SD CARD
Press the Memory Card gently until card unlocks.
DVD/CD playback
1. Insert disc & select DVD/CD from the main menu.
The controls below are common to both CD, DVD & USB flash memory playback.
- Return to previous menu.
- Select to play DVD or CD.
- Select to play mp3 music from USB flash memory utilising
standard DVD controls.
page 7 Quick User Guide
- Display picture in 4:3 ratio (letterbox).
MANUALLY TUNING A RADIO STATION
If the automatic scan did not find a station, you can manually adjust the station by
pressing the step up or down buttons.
- Display picture in 16:9 radio (widescreen).
BACK LCD (REAR SEAT ENTERTAINMENT)
The 7500 series is Rear Seat Entertainment ready. It has the ability to:
- Display picture full screen.
- Display DVD picture. PLEASE NOTE: This icon can only be activated while the vehicle is not in motion & the park brake is applied.
FM / AM RADIO
To access FM or AM radio, press the [RADIO] button in the Main Menu.
Send DVD video & audio to a display located at the rear of the vehicle. Rear Seat
Passengers can watch a movie with wireless headphones. At the same time,
navigation is displayed up front with either radio or iPOD playback through the
vehicle sound system. All controls for rear seat dvd are accessible via the touch
screen.
To access Rear Entertainment controls, press [BACK LCD] in the main menu.
PLEASE NOTE: Rear Entertainment option needs to be [ON] in the settings. If
its not on, the mp3 menu will be displayed instead.
BACK LCD MENU
[DVD] play DVD/CD inserted in the 7000 series.
- 6 FM presets
- Play / Pause
- Stop
- Previous track
- Next track
- 6 FM presets
BLUETOOTH PHONE CONNECTIVITY
To access the Bluetooth Phone menu, press [BLUETOOTH] in the main menu.
- 6 AM presets
To switch between FM1 / FM2 / AM, press the corresponding icons.
PAIR YOUR PHONE
1: Press the
button.
A tip menu appears. You will need to ensure the “Bluetooth On” button is enabled.
- Step up or down (manually change the radio frequency by 1 step).
- Automatically scan for radio stations.
2: On your mobile phone, enter the Bluetooth menu & search for a new device.
Follow the on screen instructions.
3: Enter the password = 0000
- Traffic Announcement (Not available in Australia)
- Alternate Frequency (Not available in Australia)
[Preset locations] 1 station can be stored in each location.
4: The phone should now be paired.
If you phone does not pair, it may not be Bluetooth V2.0 compliant. Please contact
the manufacturer of the mobile phone to obtain further information.
MAKING A PHONE CALL
A call can be made from either the handset or from the touch screen.
Dialing from the handset: Dial from the handset as usual & the call will be
connected to the hands free automatically.
Dialing from the touch screen: Enter the Phone number on the keypad using the
touchscreen and press the dial button.
Dialing from recent history: Select the Phone number to call from the
[RECENTS] menu, press the dial button on the touch screen.
Answering a phone call: Press the [DIAL] button.
- Audio settings
- EQ settings
Rejecting a phone call: Press the [REJECT] button
SCAN AND STORE RADIO STATIONS
1. Press [SCAN] until the desired station appears. Press and hold the desired
preset location and the station will be saved in this position.
2. Repeat the above for other stations.
page 8 Quick User Guide
PHONE MENU
- Delete call history
To call from these menus, select the phone number to call, then
press the [CALL] button.
- To access your mobile phones history and contacts press
Phone History
PHONE HISTORY MENU
Keypad
- Displays the MISSED calls from your mobile phone
- Displays the RECEIVED calls from your mobile phone
- Connected phone name.
- Displays the DIALLED calls from your mobile phone
- Pair phone.
- Displays your SIM CONTACTS from your mobile phone
- Handsfree mode is activated.
- Displays your PHONE CONTACTS from your mobile phone
- Switch call back to handset.
IPOD OPERATION
Ensure iPOD is connected to the iPOD cable. To access the iPOD menu, press
[iPOD] in the main menu.
- Turn Bluetooth On/Off.
IPOD MENU
- End / Reject call.
- Dial / Accept call.
- Access RECORDS / CALL HISTORY.
- Delete / Backspace.
- BT Connection status.
[RECORDS] MENU
- Current track name.
- Current artist name.
- Current album name.
- Play / pause.
- Previous Track.
- Next / Previous.
- Next Track.
- If enabled, the ipod will be fully controlled on the VMS unit
with on screen controls.
Received calls history
- If disabled, the iPOD can be controlled directly from its own
controls while connected to the system. The ipod will still
charge, and the audio will still out via your vehicles speakers.
Dialled calls history
- Press to shuffle your playlist
- Press to loop the playback of your playlist
- Press to search the ipods database of songs
page 9 Quick User Guide
- Audio settings
NEXT / PREV - press to access next / previous page of setup
- EQ settings
iPOD - Toggles iPOD integration on/off. If this option is OFF, the iPOD icon in the
main menu turns into a AUX icon. DEFAULT = ON.
REARVIEW CAMERA - If turned on and correctly wired, when you engage the
reverse gear, the vehicles reverse camera will be displayed.
iPOD SEARCH MENU
24 HOUR CLOCK - If turned on, the main menu’s clock will be displayed in 24
hour format.
STATE RADIO - Will change the radio’s frequency jump increments when
seeking a station. Country dependent. For Australia leave blank or set to China.
START VOLUME - Set to either remember the vehicles last volume setting
upon restart of the unit, or set to a preset starting volume. Volume range 10-40
SETUP MENU PAGE 3
PLAYLIST SEARCH - Search for a Playlist and play related songs.
ARTIST SEARCH - Search for an artist and play related songs.
ALBUM SEARCH - Search for an album and play related songs.
TRACK SEARCH - Search and play for a song / track.
SETUP MENU
To access the setup menu, press [SETUP] in the main menu.
SETUP MENU PAGE 1
PREVIOUS - press to access next / previous page of setup
WHEEL BUTTONS - Steering wheel code. Must be matched to vehicle to
ensure proper operation.
CONTROL PANEL LIGHTS (4-20) - Set the Front fascia backlight intensity.
= MIN / 20 = MAX.
SYSTEM TIME - Set the system time, displayed on the main menu.
SYSTEM RESET - Resets the system.
INFO MENU (TPMS) NOT AVAILABLE
TPMS (TYRE PRESSURE MONITORING SYSTEM) is not available.
NEXT - press to access next / previous page of setup
CALIBRATE TOUCH - Calibrate the touch screen panel, The touch screen
requires recalibration from time to time.
AUTO SWITCH TO GPS - If turned on, any menu option outside the GPS will
return to the GPS console automatically after 15 seconds.
REVERSE CAMERA OPERATION
When a receiver camera is connected to the 7500 series, select reverse gear &
the camera image will automatically be displayed.
BRAKE CHECK - If turned on and correctly wired, DVD Videos will not be able
to be displayed unless the handbrake is on.
When the video signal for reverse camera is not connected, the following warning
will be displayed. Check the video signal input from the camera to the system.
WHEEL CONTROL - If turned on, this will enable the steering wheel controls
for your vehicle. Steering wheel code may be required.
GPS VOICE - If turned on, the GPS Audio will be enabled while in a menu
outside the GPS.
HEADLIGHT CHECK - If turned on and correctly wired, the buttons will
illuminate if the vehicles headlights are turned on.
AUTO DISPLAY GPS SCREEN - Toggles auto display GPS screen (10 secs)
on/off. DEFAULT = OFF.
GPS AUDIO - Toggles GPS sound on/off. DEFAULT = ON.
SETUP MENU PAGE 2
page 10 Quick User Guide
IMPORTANT INFORMATION
MAP DATA INFORMATION: One of the goals of the product is to provide customers with the most complete and accurate cartography that is
available to us at a reasonable cost. Along with VMS’ extensive field work, we use a combination of governmental and private data sources, which
we identify in product literature and copyright messages displayed to the consumer. Virtually all data sources contain some inaccurate or incomplete
data. In some countries, complete and accurate map information is either not available of is prohibitively expensive.
DECLARATION OF CONFORMITY
Hereby, VMS declares that this product is in compliance with the essential requirements and other relevant provisions of Directive 1999/5/EC. FCC
Compliance This product has been tested and found to comply with Part 15 of the FCC interference limits for Class B digital devices FOR HOME
OR OFFICE USE. These limits are designed to provide reasonable protection against harmful interference in a residential installation, and are more
stringent than ‘outdoor’ requirements.
Operation of this device is subjected to the following conditions: (1) this device may not cause harmful interference, and (2) this device must accept
any interference received, including interference that may cause undesired operation. This product does not contain any user-serviceable parts.
Repairs should only be made by an authorised VMS service centre. Unauthorised repairs or modifications could result in permanent damage to the
equipment, and void your warranty and your authority to operate this device under Part 15 regulations.
WARRANTY TERMS AND CONDITIONS
Limited Warranty
1. This VMS product is warranted to be free from defects in materials or workmanship for 12 month from the date of purchase. Within this period,
VMS will, at its sole option, repair or replace any components that fail in normal use. Such repairs or replacement will be made at no charge to the
customer for parts or labour, provided that the customer shall be responsible for any transportation costs. This warranty does not cover failures due
to abuse, misuse, accident, or unauthorised alterations or repairs. Batteries included are not covered by any warranty.
2. This warranty is valid only for Products purchased new and unused in Australia or New Zealand from VMS AUSTRALIA, or an authorised dealer.
The customer must provide the original proof of purchase from one of those organisations to receive any services under this warranty.
3. This warranty only applies where a HARDWARE defect has arisen, wholly or substantially, as a result of faulty manufacture, parts or labor. The
warranty does not apply where damage is caused by other factors, including without limitation:
(a) Normal wear and tear.
(b) Abuse, mishandling, accident or failure to follow operating instructions.
(c) Incorrect installation.
(d) Exposure to liquid or infiltration of foreign particles.
(e) Servicing or modification of the product by any one other than by VMS AUSTRALIA .
(f) Use of product with other accessories, attachments, product supplies, parts or devices (including batteries, memory cards) that do not conform to
VMS specifications; or
(g) Shipment or other transit.
(h) Faulty units may only be replaced with a new unit provided the unit is returned to your authorised dealer within 7 days. After this 7 day period,
units will be repaired.
4. This warranty does not cover:
(a) 3rd party software(s) such as navigation application(s) and map data packaged with the product. For software & data warranty term and conditions, refer to the EULA contained in the software package.
(b) The replacement of any consumable such as batteries.
(c) The cost of transit of the Product to or from VMS AUSTRALIA.
(d) Repair or replacement of any Product damaged during transit to or from VMS; or
(e) Any loss or consequential damage incurred while the Product is being repaired; or
(f) installation and uninstallation labour cost
(g) Loss of data stored on the SD card or internal memory. It is the users responsibility to backup any data contained on the card and this include
navigation software applications and user’s own data.
THE WARRANTIES AND REMEDIES CONTAINED HEREIN ARE EXCLUSIVE AND IN LIEU OF ALL OTHER WARRANTIES EXPRESSED,
IMPLIED, OR STATUTORY, INCLUDING ANY LIABILITY ARISING UNDER ANY WARRANTY OF MERCHANTABILITY OR FITNESS FOR A
PARTICULAR PURPOSE, STATUTORY OR OTHERWISE. THIS WARRANTY GIVES YOU SPECIFIC LEGAL RIGHTS, WHICH MAY VARY FROM
STATE TO STATE. IN NO EVENT SHALL VMS BE LIABLE FOR ANY INCIDENTAL, SPECIAL, INDIRECT, OR CONSEQUENTIAL DAMAGES,
WHETHER RESULTING FROM THE USE, MISUSE, OR INABILITY TO USE THIS PRODUCT OR FROM DEFECTS IN THE PRODUCT.
Some states do not allow the exclusion of incidental or consequential damages, so the above limitations may not apply to you. VMS retains the
exclusive right to repair or replace the unit or software or offer a full refund of the purchase price at its sole discretion. SUCH REMEDY SHALL BE
YOUR SOLE AND EXCLUSIVE REMEDY FOR ANY BREACH OF WARRANTY. To obtain warranty service, contact your local VMS dealer or call
VMS product support to obtain a WARRANTY CLAIM report. Complete the report in full & Fax ( +61 3 9587 8040) the form to VMS for approval.
Once approved, VMS will issue a RA number & shipping instructions. Securely pack the unit and a copy of the original sales receipt, which is
required as the proof of purchase for warranty repairs. Write the RA number clearly on the outside of the package. Send the unit, freight charges
prepaid to any VMS service centre.
Online Auction Purchases: Products sold through online auctions are not eligible for rebates or other special offers from VMS. Online auction confirmations are not accepted for warranty verification. To obtain warranty service, an original or copy of the sales receipt from the original retailer is
required. VMS will not replace missing components from any package purchased through an online auction.
page 11 August 2011 / Rev 1.3
Printed in Australia
VMS © is a trademark of XIA GROUP PTY LTD, registered in Australia and other countries
and may not be used without the express permission of XIA GROUP Pty Ltd.
Copyright © 2011. All rights reserved