1
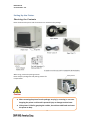
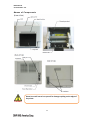
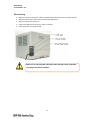
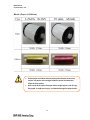
DS‐RX1 Digital Photo Printer User’s Manual Version 1.01 DSRX1 Manual Version Number: 1.01 Concerning Copyright Copyrights for this document are the property of Dai Nippon Printing Co., Ltd. Reproduction of any or all of the contents of this document without consent of the company is a violation of copyright law. However, one back‐up copy may be made for non‐commercial, personal purposes. Additionally, the contents of this document are subject to change in the future without prior notice. Concerning Safety Warnings All warnings concerning safety and use, as well as the contents of this document, conform to existing standards from the date published. Concerning Modification This printer was planned, developed, and manufactured by Dai Nippon Printing Co., Ltd., and for safety purposes any modification of the device is strictly prohibited. 2 DSRX1 Manual Version Number: 1.01 Introduction Thank you for purchasing this device. This document explains the handling and operation required to use this printer. Please read this document well before use. Be sure to read the “For Safe Operation” section carefully, and operate the printer correctly. For Safe Operation Be sure to read this document before use. After reading, keep the manual in a safe place, where it can be re‐read as needed. The warnings listed here are to ensure the proper use of the device, to prevent physical injury to the customer or other persons, and to prevent property damage. Please obey these warnings. About “Warning” and “Caution” The possible levels of injury or damage due to misuse are categorized below, and are listed as “Warning” and “Caution,” according to the degrees of danger involved. Warning Caution Accidents caused by failure to heed the warnings accompanying this symbol could lead to serious or fatal injury. Accidents caused by failure to heed the warnings accompanying this symbol could lead to physical injury or property damage. About the Symbols Symbols shown have the following meanings: This symbol calls attention to contents of warnings and cautions. Details are indicated in or near this symbol. This symbol indicated prohibited actions. Details are indicated in or near this symbol. This symbol designates necessary actions, and relevant content. Details are indicated in or near this symbol. 3 DSRX1 Manual Version Number: 1.01 Warning Use only with the designated voltage and frequency. Improper connection could cause electric shock or fire. Avoid overstressing outlets and using extension cords. The outlet could overheat and cause a fire. Do not damage, destroy, bundle, or alter the power cord. Also, placing heavy objects on, pulling on, or bending the cord excessively can damage the cord and cause a fire. Do not block the vents. Head could build up in the printer and cause a malfunction or fire. Do not stand or place heavy objects on the printer. Also, do not use excessive force on the buttons, switches, terminals, etc. This could break the printer and cause injury to the user or others. Be careful to avoid injury or damages from the edges in the printer. Do not use this printer for applications where malfunction could be life‐threatening (such as medical, space, aeronautic, or other applications that require extreme reliability). The printer weighs approximately 31 lb (14 kg). When moving the printer, lift in a way that avoids excessive physical stress. Lifting recklessly or dropping the printer could cause injury. Locate the printer as close to an outlet as possible, and allow easy access to unplug the power cord in case of problems. If there is dust on the plug, clean it off thoroughly. It could cause electric chock or a short‐out. If metal objects of liquids have fallen into the printer, and there is smoke, a strange odor, or any other apparent abnormality, immediately turn the power OFF, and unplug the power cord. Then contact a service representative. Do not continue using the printer if it is NOT operating properly. This could cause shock, short circuit, or fire. Be sure to attach the ground. Otherwise the printer could short‐circuit causing electric shock or fire. 4 DSRX1 Manual Version Number: 1.01 Do not plug or unplug the cord with wet hands. This could cause electric shock. Do not open the inside of the printer, disassemble internal parts, or modify the printer. It could cause electric shock, fire, or injury, or break the printer. For internal check‐ups, adjustments, or repair, please contact a service representative. Warning Do not set the printer up in dusty or overly humid places. This could cause fire or electric shock, or damage the printer. DO not set the printer up on an unstable surface. It could fall and cause injury to the user or others. Do not allow foreign objects to enter the printer. They could cause electric shock, short circuit, or fire, or break the printer. If something falls into the printer, immediately turn the power OFF, and call a service representative. Do not open the cover while printing. This could break the printer. Do not spill or spray liquids or chemicals into the printer. When cleaning the cover, do not use thinner, trichloroethane, benzene, ketone‐based cleaners, or chemically treated cloths. They could discolor or deteriorate the cover. At least once a year, unplug the power cord, and clean the prongs and the plug. If dust accumulates, it could cause a fire. When printing continuously for long periods of time in a small room, be sure to ventilate properly. If use is intended on a transportation vehicle (train, truck, ship, etc.), please talk to a representative in advance. When disposing of the printer, peripheral items, packaging, or media, please abide by local waste removal ordinances. For details, contact your local government offices. When unplugging the cord, grip the plug. Do not pull on the cord. It could damage the cord, and cause electric shock or fire. When moving the printer, be sure to unplug the power cord. Otherwise, the cord may be damaged, which could cause fire or electric shock. When not using the printer for extended periods of time, for the sake of safety, be sure to unplug the power cord. It could cause electric shock or fire. 5 DSRX1 Manual Version Number: 1.01 The thermal print gets very hot. Do not touch after printing. There is a danger of burns. Do not touch the gear mechanisms. There is a danger of injury if fingers get caught in the spinning gears. WEEE MARK If you want to dispose of this product, do not mix with general household waste. There is a separate collection system for used electronics products in accordance with legislation under the WEEE Directive (Directive 2002/96/EC) and is effective only within the European Union. Cautions for Setup Prior to operation, read “For Safe Operation” section carefully and observe the rules contained. Use care when moving the printer. Never try carrying the printer alone. Dropping the printer could cause injury or damage to other property. Do not use or store the printer near fire, excessive moisture, in direct sunlight, near an air conditioner or heater, or any other source of unusually high or low temperature or humidity, or excessive dust. Do not place the printer where chemical reactions occur, such as in a laboratory. Do not set up the printer where there is salinity or corrosive gas in the air. The printer must sit on a firm level surface where there is ample ventilation. Do not put anything of the top of the printer. Do not place the printer near a radio or television, and do not use the same wall outlet for the printer and radio or television. Radio or television reception could be adversely affected. Do not use a power voltage or frequency other than those specified. Do not put anything on the power cord or step on it. Do not drag or carry the printer by the power cord or USB cable. Avoid plugging the power cord into an outlet with many loads. Do not bundle the power cord. Always grip the plug housing, not the cord, to plug/unplug the power cord. Make certain the power is turned off before connecting/disconnecting the USB cable. Avoid lengthening the signal cable or connecting it to any noise‐producing device. If it is unavoidable, use a shielded cable or twisted pair for each signal. Place the printer near the outlet where the power cord can be unplugged easily to shut off power. Use an AC outlet that accepts a three pronged plug. Otherwise, there may be danger of electric shock. Use the appropriate specified cord set. Only use items that are certified safe according to the standards of the country where the printer is to be used. 6 DSRX1 Manual Version Number: 1.01 Regulatory compliance statements American Users FCC part 15 This equipment has been tested and found to comply with the limits for a Class A digital device, pursuant to Part 15 of the FCC Rules. These limits are designed to provide reasonable protection against harmful interference when the equipment is operated in a commercial environment. This equipment generates, uses, and can radiate radio frequency energy and, if not installed and used in accordance with the instruction manual, may cause harmful interference to radio communications. Operation of this equipment in a residential area is likely to cause harmful interference in which case the user will be required to correct the interference at his (or her own) expense. You are cautioned that changes or modifications not expressly approved by the party responsible for compliance could void your authority to operate the equipment. This device complies with FCC radiation exposure limits set forth for an uncontrolled environment. The antenna used for this transmitter must be installed to provide a separation distance of at least 20 cm from all persons and must not be co‐located or operating in conjunction with any other antenna or transmitter. Caution: Use shielded cables to connect the computers. Any changes or modification not expressly approved by the grantee of this device could void the user’s authority to operate the equipment. Declaration of Conformity European Users Hereby, Dai Nippon Printing Co., Ltd. declares that this digital colour printer is in compliance with the essential requirements and other relevant provisions of Directive 1999/5/EC. 7 DSRX1 Manual Version Number: 1.01 8 DSRX1 Manual Version Number: 1.01 Contents Introduction .......................................................................................................................................................3 For Safe Operation .............................................................................................................................................3 About “Warning” and “Caution”........................................................................................................................3 About the Symbols.............................................................................................................................................3 WEEE MARK .......................................................................................................................................................6 Cautions for Setup .............................................................................................................................................6 Regulatory compliance statements ...................................................................................................................7 Declaration of Conformity .................................................................................................................................7 Setting Up the Printer ......................................................................................................................................10 Checking the Contents .................................................................................................................................10 Names of Components ................................................................................................................................11 Connecting ...................................................................................................................................................12 Media (Paper & Ribbon) ..............................................................................................................................13 Setting the Media.........................................................................................................................................14 Setting up the Scrap Box ..............................................................................................................................18 Setting the Paper Tray .................................................................................................................................18 Trouble‐Shooting the printer ...........................................................................................................................19 Error Displays ...............................................................................................................................................19 Solving Media Errors ....................................................................................................................................20 Cleaning the Printer .........................................................................................................................................23 Platen Roller.................................................................................................................................................23 Thermal Print Head ......................................................................................................................................23 Specifications* ..................................................................................................................................................24 Information on servicing the printer ...............................................................................................................25 9 DSRX1 Manual Version Number: 1.01 Setting Up the Printer Checking the Contents Please check that the printer and all accessories are included in the package. When using, remove the packing material. Please keep the package box and packing material for transportation. Caution When removing the printer from its package, carrying it, or moving it—use care. Dropping the printer could result in personal injury or damage to other items. If the printer is lifted by grasping the cushion, the cushion could break and cause the printer to drop. 10 DSRX1 Manual Version Number: 1.01 Names of Components Caution Please be careful not to hurt yourself or damage anything on the edges of the printer. 11 DSRX1 Manual Version Number: 1.01 Connecting 1. 2. 3. 4. 5. Make sure that both the printer and the computer power switches are set to the OFF position. Plug the cord connector end into the printer Power Plug Socket. Plug the cord into the wall outlet. Connect the USB cable to the printer and the computer. Power the printer and computer ON. Caution Make sure to use the power cable that came with the printer, and make sure the ground wire is attached. 12 DSRX1 Manual Version Number: 1.01 Media (Paper & Ribbon) Caution Set the paper and ribbon without putting them directly on the work surface. Any dust or dirt could get inside the printer and adversely affect the print quality. With a new roll of paper, the paper holder weighs approx. 6 lb. (2.6 kg). If dropped, it could cause injury. It could also damage the paper holder. 13 DSRX1 Manual Version Number: 1.01 Setting the Media 1. Release the Open Lever, and open the front cover. 2. Place the paper in the roll holders. Make sure the paper is not sticking out, and the edge of the rolls is snug against the paper. If the end of the roll us uneven (paper is sticking out), remove it from the holder and flatten it. 14 DSRX1 Manual Version Number: 1.01 3. Set the paper into the printer 4. Remove a paper fixed tape, and insert the paper. 5. 6. Fit the paper to the proper position for each size. L and 2L paper (6”) correspond to the L line, and A5 (5”) paper corresponds to the PC line. The black form is inserted under the form guide. Insert the paper in the direction of the arrow until you hear a beep (approximately to the line shown below). When doing this, insert the paper straightly. If it is not inserted straight, the paper will be crooked, which could cause white lines on the edges of the 15 DSRX1 Manual Version Number: 1.01 print, ribbon wrinkles, and register slippage. 16 DSRX1 Manual Version Number: 1.01 7. Set the ribbon into the printer. Unite and insert as shown below. Turn the take‐up side of the ribbon in the direction indicated by the arrow to take up any slack. Wind ribbon as shown: 8. C lose the front cover. When the front cover is closed, the paper initialization process will commence, and 5 blank sheets will be fed out. I n order to facilitate media color adjustment, media type recognition, and print quality management, an IC chip is built into the ink ribbon. Media without an IC chip—which has NOT been evaluated and cleared—may not function properly. If correct data cannot be read from the IC chip, an alarm will sound, and the printer will lower the concentration for printing to protect itself. Please change the media as a set, because the IC chip for each ribbon has unique information. Failure to do this will result in errors. If media of different width (for example, L‐size paper with PC‐size ribbon) are used on the same printer, problems with the print quality could arise. Do not mix different widths of media on one printer. 17 DSRX1 Manual Version Number: 1.01 Setting up the Scrap Box Caution When the scrap box is removed, do not insert your fingers in the cutter. They could but cut or severed. As prints are cut, the scrap box fills with scrap paper. Be sure to empty it when you change the paper and ribbon. If it becomes over‐filled with scraps, it could cause problems with the printer. Exchange the paper and ribbon as a set, to avoid errors. Setting the Paper Tray 1. Attach the Paper Tray to the Scrap Box. *The tray can hold about 50 photos, but please remove them frequently. Caution Allowing too many photos to accumulate or using with paper sizes other than L or PC can cause errors or damage to the tray. Use care when attaching the paper tray, there is a possibility of damaging the tray if too much force is used. 18 DSRX1 Manual Version Number: 1.01 Trouble‐Shooting the printer Error Displays Use the chart below to check the printer status: Status LED Display Power Ribbon Paper Solution Error Paper End1 Put in a new roll of paper. Ribbon End1 Put in a new roll of ribbon. Door is Open (no paper) Set the paper in the cassette properly, and close the front cover. Door is Open Close the front cover. Paper Error Free the paper, and reset it correctly. Ribbon Error Fix the ribbon, and set it correctly System Error Reboot the printer (cycle power off/on) Head Cool Down Thermal Print Head is cooling off (auto recovery). Indicates LIT, indicates flashing, no symbol indicates NO LIGHT. 1: Exchange the paper and ribbon as a set 19 DSRX1 Manual Version Number: 1.01 Solving Media Errors 1. Release the Open Lever, and open the front cover. 2. Remove the ribbon. a. If the paper is jammed: 1. Pull out any paper remaining in the printer, and cut off any wrinkled or partially printed areas evenly with scissors. Printing over an area that has already been printed upon will make the ribbon stick, and the paper will jam again. When pulling the paper out, pull it slowly. Application of too much force can damage the printer. 2. Cutting the paper: If the paper is not cut evenly, it may cause abnormal printing and/or the paper to jam. Then follow the section on setting the media (p. 14). 20 DSRX1 Manual Version Number: 1.01 b. If the ribbon is cut or broken: 1. Remove any ribbon remaining in the printer. 2. Remove any incomplete prints. If the next image is printed over the previous image, the ribbon may stick, and cause the paper to jam. 3. Reattach the ribbon with cellophane (or similar) tape. 4. Set the ribbon into the printer 5. Rotate the take‐up side of the ribbon several times until the tape is out of sight. Then follow the section on setting the media (p. 14). 21 DSRX1 Manual Version Number: 1.01 c. If the printer is stopped in the middle of cutting: 1. Turn the power back ON. Free the jammed paper and return the cutter blade to the ready position. If the jammed paper cannot be freed, please contact a service representative. 2. Remove any partially printed material from inside the printer. 3. Follow the section on setting the media (p. 14). d. If the power is cut during printing. *If the power is cut during printing, you will not be able to open the front cover. 1. Turn the power back ON. The partial print will be cut into scrap‐size pieces and removed. After this, you will be able to open the front cover. 2. Check that there is no printed material in the printer. If the paper is jammed, refer to a. If the paper is jammed. Caution Do not turn the power OFF while printing. This can damage the printer. 22 DSRX1 Manual Version Number: 1.01 Cleaning the Printer Platen Roller If there is an indent on the pictures at a regular interval, of if the back of the picture (white side) is dirty, clean the platen roller. There may be dust, grime, adhesives, etc. from the ribbon or paper on the roller. 1. Prepare a piece of gauze or other soft cloth soaked in ethyl alcohol. Benzenes or thinners other than ethyl alcohol may permeate the resin, and should NOT be used. 2. Wipe off any grime while turning the platen roller. Thermal Print Head When dirt has contaminated the print head, the ink may adhere unevenly or adhere poorly. 1. Prepare a piece of gauze or other soft cloth soaked in ethyl alcohol. 2. Wipe the thermal print head gently, without touching the thermal print head directly. 3. When dirt cannot be removed, wipe the surface about five times back and forth with a polishing sheet (suggested polishing sheet: Japan Micro‐coating polishing film GC#10000) Caution Never use benzenes or thinners other than ethyl alcohol, as they may permeate the resin of the roller. Before cleaning, always turn OFF the printer. Otherwise, there is a possibility of becoming causes, such as an injury and/or burn. The thermal print head will be HOT just after printing. Please wait for the print head to cool off before attempting cleaning. 23 DSRX1 Manual Version Number: 1.01 Specifications * JR10‐M01 Model Manufacturer CITIZEN SYSTEMS JAPAN CO., LTD Thermal dye sublimation transfer Print type Print mode High‐Speed Mode High Quality Mode Resolution 300x300 dpi 300x600 dpi Print size Print sheet Print Time L (5x3.5) PC(6x4) 2L (5x7) A5 (6x8) L (5 x 3.5) PC (6x4) 2L (5x7) A5 (6x8) 89 x 127 mm 101 x 152 mm 157 x 178 mm 152 x 203 mm 700 sheets 700 sheets 350 sheets 350 sheets L (5x3.5) PC (6x4) 2L (5x7) A5 (6x8) Approx 13.9 sec Approx. 14.9 sec Approx. 23.9 sec Approx. 26.9 sec Approx. 17.9 sec Approx. 19.9 sec Approx. 30.9 sec Approx. 34.9 sec YMC + overcoat Ribbon type Interface USB 2.0 (Max 480Mbps) Type B connector Driver – compatible OS Dimensions Weight Power Power Consumption Noise Windows XP/ Windows Vista (32 & 64 bit)/Windows 7 (32 & 64 bit) 322 mm W x 351 mm D x 281 mm H Approx. 13.8 kg (printer ONLY) AC100 V – 240V 50/60 Hz 100V 2.9A 240V 1.2A Printing 66dB Standby 19dB (background noise: >15dB) Temp. 5 35C in natural conditions Operating Environment Humidity 35 80 with no condensation *These specifications may be changed without prior notice. 24 DSRX1 Manual Version Number: 1.01 Information on servicing the printer For information on use and repair service of the units, please contact your sales agent. 25