1
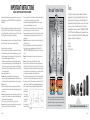
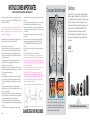
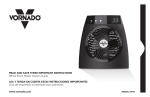
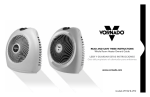
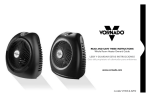
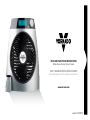
READ AND SAVE THESE INSTRUCTIONS Whole Room Heater Owner’s Guide LEER Y GUARDAR ESTAS INSTRUCCIONES Guía del propietario el calentador para ambientes www.vornado.com model iCONTROL Contents Important Instructions......................................................................... 4 Vornado Vortex Action........................................................................ 5 Designed, engineered and supported in Andover, Kansas. Pensado, diseñado y respaldado en Andover, Kansas. How To Use iControl Operating Controls............................................................ 6 Resetting Your Vornado Heater....................................................... 7 Advanced Safety Features................................................................... 7 Cleaning and Storage How To Clean................................................................................... 8 Storage............................................................................................. 8 www.vornado.com Questions or comments? ¿Prequntas o comentarios? [email protected] 800.234.0604 Troubleshooting .................................................................................. 9 Operating Tips..................................................................................... 9 Warranty............................................................................................. 10 Español p. 11 English 3 IMPORTANT INSTRUCTIONS READ ALL INSTRUCTIONS BEFORE USING THIS HEATER. Please visually inspect all internal and external components before connecting to electric current. If any damage is found, DO NOT USE THIS UNIT and contact Vornado Air LLC at 1-800-234-0604. This product is equipped with a 3-prong plug, with a grounding pin as a safety feature. To reduce the risk of electric shock, this plug is intended to connect to properly grounded outlets only. This plug will fit into a grounded outlet only one way. Do not alter the plug. Do not attempt to defeat this safety purpose of the grounding plug. When using electrical appliances, basic precautions should always be followed to reduce the risk of fire, electric shock, and injury to persons, including the following: Read all instructions before using this heater. This heater is hot when in use. To avoid burns, do not let bare skin touch hot surfaces. Use handles when moving this heater. Keep combustible materials, such as furniture, pillows, bedding, papers, clothes, and curtains at least 3 feet (0.9 m) from the front of the heater and keep them away from the sides and rear. This appliance is not intended for use by persons (including children) with reduced physical, sensory or mental capabilities, or lack of experience and knowledge, unless they have been given supervision or instruction concerning use of the appliance by a person responsible for their safety. Children should be supervised to ensure that they do not play with the appliance. Always unplug heater when not in use. Do not operate any heater with a damaged cord or plug or after the heater malfunctions, has been dropped or damaged in any manner. Discard heater, or return to authorized service facility for examination and/or repair in order to avoid a hazard. Do not use outdoors. This heater is not intended for use in bathrooms, laundry areas and similar indoor locations. Never locate heater where it may fall into a bathtub, swimming pool or other water container. Do not run cord under carpeting. Do not cover cord with throw rugs, runners, or similar coverings. Do not route cord under furniture or appliances. Arrange cord away from traffic area and where it will not be tripped over. To disconnect heater, turn controls to off, then remove plug from outlet. Do not insert or allow foreign objects to enter any ventilation or exhaust opening as this may cause an electric shock or fire, or damage the heater. 4 English To prevent a possible fire, do not block air intakes or exhaust in any manner. Do not use on soft surfaces, like a bed, where openings may become blocked. A heater has hot and arcing or sparking parts inside. Do not use it in areas where gasoline, paint, or flammable liquids are used or stored. Use this heater only as described in this manual. Any other use not recommended by the manufacturer may cause fire, electric shock, or injury to persons. Always plug heaters directly into a wall outlet/receptacle. Never use with an extension cord or relocatable power tap (outlet/power strip). Operate this heater only in its upright position. Do not operate this heater on an elevated surface such as a shelf or desktop. Use only while placed on the floor. This heater is equipped with a thermal safety shut-off system, designed to turn off the heater when an internal overheating condition is detected (see How To Use “RESETTING YOUR VORNADO HEATER,” to determine how to check and reset the heater). Do not operate this product with any electronic speed-control device on the same circuit. Do not use heater to dry human or animal hair/fur or articles of clothing. This product must be grounded. If the product malfunctions, grounding provides a path of least resistance for the electric current to reduce the risk of electric shock. The 3-prong plug must be inserted into a grounded outlet that has been properly installed in accordance with all electric codes and ordinances. If you are in doubt as to whether or not an outlet is properly grounded, contact a qualified electrician. This heater operates with an infrared remote control. Interference between this remote and other remote-control-operated electrical appliances in your home is possible. This heater is for use on 120 volts. The cord has a plug as shown at A in Figure 65.1. An adapter as shown at C is available for connecting three-blade grounding-type plugs to two-slot receptacles. The green grounding lug extending from the adapter must be connected to a permanent ground such as a properly grounded outlet box. The adapter should not be used if a three-slot grounded receptacle is available. Figure 65.1 Vornado Vortex Action ® Ordinary Heater Without Adequate Heat Circulation Vornado Whole Room Heater With Signature Vortex Heat Circulation 82º 72º 82º 72º 82º Trust. It is said that trust isn’t given, but earned. For decades Vornado has been earning the trust of our customers by offering them only the best. Vornado provides the highest level of performance, coupled with the highest level of support available. Complete satisfaction with no exceptions – this is Vornado’s promise to you. If you are not satisfied for any reason, please contact us. Knowledgeable representatives are available at 1-800-234-0604 from 8:00 AM to 5:00 PM CST. A wealth of additional support is also available online at www. vornado.com. On behalf of myself and the entire staff at our Andover, Kansas headquarters – thank you for selecting Vornado. Sincerely, Bill Phillips CEO, Vornado Air 72º 62º Ordinary heaters provide only localized heat. Heat immediately rises to the ceiling, resulting in cold and hot spots in the room. Vornado’s unique Vortex Action delivers continuous, uniform heat surrounding everyone in the room in a warm, comfortable temperature. Find our complete product line at www.vornado.com English 5 How To Use How To Use iControl Operating Controls 1 Power On/Off Front light illuminates when power is on. 2 Mode HIGH HEAT 1500 watts, LOW HEAT 750 watts, or FAN ONLY. 3 Temperature Allows you to select your desired comfort level. Use the UP arrow to raise the set temperature. Use the DOWN arrow to lower the set temperature. 4 Timer The timer can be set in hour intervals up to 9 hours. Press the TIMER button to go into timer mode. In timer mode, use the UP arrow to add hours. In timer 6 English mode, use the DOWN arrow to remove hours. 5 Remote The remote control functions the same as the unit controls. The remote requires 2 AAA batteries. To replace the batteries remove the cover located on the bottom side of the remote. 6 Sound When a setting is changed you will hear a “beep” from the unit. 7 LCD Display Dims for no-glow night operation. Getting Started Using your Vornado Heater is easy. Just follow these simple steps. 1. Position your heater so the vortex beam of warm air is directed across the room, unobstructed. Position it in a location that is representative of the room temperature. Avoid areas of temperature extremes such as cold drafts and heat registers. Please refer to IMPORTANT INSTRUCTIONS at the beginning of this owner’s guide. 2. Plug power cord into a standard grounded wall outlet. 3. Press the Power button. 4. One-Knob Operation This innovative user interface is sophisticated yet simple. Press the knob to “wake-up” or turn on the screen on the base unit, rotate the One-Knob control unit until the desired mode you want to adjust is displayed. Press the button to accept this mode, then, rotate the knob left or right to select desired setting. The unit is then set, or you may press the One-Knob again to adjust another mode, and continue to adjust additional settings in the same manor. 5. Remote Control Fully control the Heater remotely with the Remote, no more getting up to adjust the temperature. You can turn the unit On and Off switch the mode from Fan Only, to Low Heat or High Heat, adjust the desired set temperature up or down, and set the automatic-off timer. As you adjust the remote, the base unit will “beep” to indicate that it has received your signal. Resetting Your Vornado Heater Your Vornado Heater has a multi-level safety shut-off system designed to prevent overheating. Overheating may occur when the inlets or outlet are blocked, a foreign object prevents the blade from turning, or the appliance tips over. If this happens, the safety shut-off system will cut power to the heat element and you will need to manually reset the heater. 1. Set the Power switch to Off and unplug the unit. 2. Remove any obstructions. 3. Wait 5 –10 minutes, allowing the unit to cool down. 4. Plug in the unit and place in desired position. 5. Set the Power switch to On. Your Vornado Heater should now function normally. Note: If the safety shut-off system repeatedly shuts off your heater or if it will not reset after following the above procedure, DO NOT ATTEMPT TO DISASSEMBLE THE UNIT. Call Vornado Consumer Services Department toll-free at 1-800-234-0604. Advanced Safety Features Tight Grill Spirals Resists curious fingers. Cool Touch Case Safe to touch, even on high heat setting. Automatic Safety Shut Off System If airflow becomes blocked and overheating occurs, power to the heating element and fan is shut off. Tip-Over Switch Protection If tipped more than 10 degrees in any direction, heat and fan functions immediately shut down. Ideal 120°F Exit Air Temperature Warm enough to heat an entire room. Grounded Heavy-Duty Power Cord Adds durability and a more secure wall connection. English 7 Cleaning and Storage How to Clean Your heater has no user serviceable parts. Do not disassemble the unit. This will void your warranty. If service is required, return your heater to Vornado (see WARRANTY for instructions). The motor is permanently lubricated and requires no oiling. Because your heater moves a substantial amount of air, it will need regular cleaning. To clean follow these simple instructions: 1. Unplug the unit. Note: Do not use gasoline, thinners, solvents or other chemicals for cleaning. 2. Use the brush attachment on your household vacuum cleaner to vacuum any accumulated dust off the Front Grill and Side Air Inlets. Wipe down the entire surface with a soft cloth. 8 English Troubleshooting Storage During the off-season or after extended periods of non-use, you may choose to store your heater. To ensure long life of the product, it is recommended to store your heater by following these instructions: 1. Unplug power cord and bundle loosely. Problem Unit fails to power on. Unit is not plugged in. Plug Power Cord into electrical outlet. Household circuit breaker / ground fault interrupter has tripped or blown a fuse. Reset circuit breaker / ground fault interrupter, or replace fuse (See OPERATING TIPS). 2. Thoroughly clean your heater (see HOW TO CLEAN for instructions). The unit has overheated. Automatic Safety Shut-Off has initiated (See RESETTING YOUR VORNADO HEATER). 3. Cover, or place back in retail carton if available. This will prevent the unit from accumulating dust overtime. 4. Store unit in a cool and dry location. Possible Cause and Solution Unit is damaged or in need of repair. Cease usage and unplug. Contact Consumer Service for assistance. Unit is not producing sufficent amount of heat. Ensure unit is set to High Heat and thermostat is set to highest Temperature setting. Close all doors and windows to trap heat. Allow the unit to fully circulate the heat throughout the room, may take several minutes. In smaller areas, you might prefer to set the unit in LOW mode. A vortex beam of air will gently keep the air circulating in the room for even, uniform heating. In larger spaces, you might prefer to set the unit in HIGH mode. A vortex beam of air will gently keep the air circulating in the room for even, uniform heating. To use the iControl as a personal fan, set the unit to FAN mode. The iControl, like any other 1500-watt electric heater, draws up to 12.5 amps of electric current. If using your iControl on HIGH setting causes your home circuit breaker or fuse to trip, we offer the following suggestions: Try turning off other electrical appliances that run on the same circuit as your Operating Tips heater. Run your heater in LOW mode. Have your electrician add an additional circuit to your home’s electrical system. When the room temperature is higher than the set temperature it is normal and correct to have little to no heat coming out of the iControl. When the unit is first turned on there is a slight delay before heat will start to be produced. ALWAYS USE COMMON SENSE WHEN USING THIS AND/OR ANY ELECTRICAL APPLIANCE. English 9 Contenido Instrucciones Importantes................................................................. 12 Circulacion Vortice Vornado.............................................................. 13 Whole Room Heater • 5 Year Limited Warranty Vornado Air LLC (“Vornado”) warrants to the original consumer or purchaser this Vornado® Whole Room Heater (“Product”) is free from defects in material or workmanship for a period of five (5) years from the date of purchase, depending on model. If any such defect is discovered within the warranty period, Vornado, at its discretion, will repair or replace the Product at no cost. Repairs not covered by the warranty or outside the warranty period will require a fee to cover the cost of materials, labor, handling and shipping. This warranty does not apply to defects resulting from abuse of the Product, modification, alteration, repair or service of the Product by anyone other than Vornado, mishandling, improper maintenance, commercial use of the Product, damages which occur in shipment or are attributed to acts of God. REPAIR OR REPLACEMENT AS PROVIDED UNDER THIS WARRANTY IS THE EXCLUSIVE REMEDY OF THE CONSUMER. VORNADO SHALL NOT BE LIABLE FOR ANY INCIDENTAL OR CONSEQUENTIAL DAMAGES FOR BREACH OF ANY EXPRESS OR IMPLIED WARRANTY ON THIS PRODUCT. EXCEPT TO THE EXTENT PROHIBITED BY APPLICABLE LAW, ANY IMPLIED WARRANTY OF MERCHANTABILITY OR FITNESS FOR A PARTICULAR PURPOSE ON THIS PRODUCT IS LIMITED IN DURATION TO THE DURATION OF THIS WARRANTY. Some states do not allow the exclusion or limitation of incidental or consequential damages, or allow limitations on how long an implied warranty lasts, so the above limitations or exclusions may not apply to you. This warranty gives you specific legal rights, and you may have other rights that vary from state to state. For warranty or repair service, call 1-800-234-0604 or email 10 English [email protected] to obtain a Return Authorization (“RA”) form. Please have or include your Product’s model number and serial number, as well as your name, address, city, state, zip code and phone number when contacting Vornado for warranty service. After receiving the RA form, ship your Product to: Vornado Air LLC Attn: Warranty & Repair 415 East 13th Street Andover, KS 67002 Cómo Usar VH103 and AVH2 Controles.......................................................... 14 Getting Started.............................................................................. 14 Cómo Reiniciar Su Calefactor........................................................ 15 Múltiples Niveles de Seguridad......................................................... 15 Cleaning and Storage How To Clean................................................................................. 16 Storage........................................................................................... 16 For your convenience, please have your model number and serial number when contacting Vornado with service inquiries. To assure proper handling, packages must be clearly marked with the RA number. Packages not clearly marked with the RA number may be refused at the receiving dock. Resolución De Problemas.................................................................. 17 Please allow 1-2 weeks for repair and return of your Product after the Product is received. For your records: Staple or attach your original sales receipt to this Owner’s Guide. Please also write your products’s serial number below (located on product specs decal). Garantía.............................................................................................. 18 Serial No. ______________________________________ Product registration available online at www.vornado.com © 2012 Vornado Air LLC Andover, KS 67002 Patents Pending. Specifications subject to change without notice. Vornado® is a trademark owned by Vornado Air LLC. Assembled, designed and supported in the U.S.A. www.vornado.com [email protected] 800.234.0604 Consejos de Operación..................................................................... 17 INSTRUCCIONES IMPORTANTES LEA TODAS LAS INSTRUCCIONES ANTES DE USAR ESTE CALEFACTOR. Por favor revise todos los componentes internos y externos antes de conectar este aparato a la corriente eléctrica. Si detecta algún tipo de daño, NO USE ESTA UNIDAD y contacte a Vornado Air LLC llamando al 1-800-234-0604. This product is equipped with a 3-prong plug, with a grounding pin as a safety feature. To reduce the risk of electric shock, this plug is intended to connect to properly grounded outlets only. This plug will fit into a grounded outlet only one way. Do not alter the plug. Do not attempt to defeat this safety purpose of the grounding plug. Cuando utilice aparatos eléctricos, debe seguir precauciones básicas para reducir el riesgo de incendio, descarga eléctrica y lesiones a las personas, incluyído lo siguiente: Lea todas las instrucciones antes de usar este calefactor. Este calefactor calienta cuando está en funcionamiento. Para evitar quemaduras, evite el contacto de la piel con las superficies calientes. Use las manijas para mover el calefactor. Mantenga los materiales combustibles, tales como muebles, almohadas, ropa de cama, papeles y cortinas, como mínimo a 3 pies (0,9 m) de distancia del frente del calefactor y lejos de los laterales y la parte posterior. Se debe tomar extrema precaución cuando el calefactor es usado por niños o personas discapacitadas o cerca de ellos y cuando pierde de vista el calefactor encendido. Siempre desenchufe el calefactor cuando no lo use. No opere ningún calefactor con un cable o una clavija dañados, o cuando el calefactor haya fallado, se haya caído o dañado de alguna manera. Deseche el calefactor o recurra al servicio técnico autorizado para que lo revisen y/o reparen. No lo use al aire libre. No coloque el cable debajo de una alfombra. No cubra el cable con tapetes, alfombrillas o cobertores similares. No coloque el cable por debajo de muebles o electrodomésticos. Coloque el cable lejos del área de tránsito y en un lugar donde la gente no se tropiece con el cable. Este calentador no está destinado para usarse en baños, áreas de lavandería y lugares cubiertos similares. No coloque el calefactor en lugares que pueda caerse dentro de una tina de baño u otro contenedor de agua. Para desconectar el calefactor, apague los controles y luego quite el cable del tomacorriente. No inserte o permita que objetos extraños entren en la abertura de ventilación o salida ya que esto puede causar una descarga eléctrica, un incendio o daños al calefactor. Para prevenir un posible incendio, no obstruya las entradas o salidas de aire de ninguna manera. No lo use sobre superficies blandas, tal como una cama, porque se pueden bloquear las aberturas. Un calefactor tiene piezas calientes y piezas que pueden producir chispas o descargas 12 Español eléctricas. No use el calefactor en áreas donde se use o guarde gasolina, pintura o líquidos inflamables. Use este calefactor únicamente según se describe en este manual. Los usos no recomendados por el fabricante pueden provocar incendios, descargas eléctricas o daños físicos. Siempre enchufe el calefactor directamente en un tomacorriente de pared. No lo use con un cable de extensión o tomacorriente móvil (toma múltiple). Coloque el calefactor únicamente en posición vertical. No opere el calefactor en una superficie elevada como una repisa o un escritorio. Utilícelo sólo sobre el piso. Este calefactor está equipado con un sistema de apagado térmico seguro, diseñado para apagar el calefactor cuando se detecta una situación de sobrecalentamiento interno (vea la sección ‘CÓMO REINICIAR SU CALEFACTOR’ para saber como revisar y reiniciar el calefactor). No opere este producto con aparatos electrónicos de control de velocidad conectados en el mismo circuito. No use el calefactor para secar el cabello, el pelo de los animales o ropa. This product must be grounded. If the product malfunctions, grounding provides a path of least resistance for the electric current to reduce the risk of electric shock. The 3-prong plug must be inserted into a grounded outlet that has been properly installed in accordance with all electric codes and ordinances. If you are in doubt as to whether or not an outlet is properly grounded, contact a qualified electrician. This heater operates with an infrared remote control. Interference between this remote and other remote-control-operated electrical appliances in your home is possible. This heater is for use on 120 volts. The cord has a plug as shown at A in Figure 65.1. An adapter as shown at C is available for connecting three-blade grounding-type plugs to twoslot receptacles. The green grounding lug extending from the adapter must be connected to a permanent ground such as a properly grounded outlet box. The adapter should not be used if a three slot grounded receptacle is available. Figure 65.1 GUARDE ESTAS INSTRUCCIONES Circulacion Vortice Vornado ® Calefactor Tradicional Sin circulación de calor adecuada Calentador Para Ambientes Vornado Con circulación vórtice de 72º calor de diseño exclusivo 82º 82º 72º 82º Confianza. Se dice que la confianza no se regala, sino que se gana. Durante décadas Vornado se ha ganado la confianza de nuestros clientes ofreciéndoles sólo lo mejor. Vornado brinda el mayor nivel de rendimiento combinado con el mayor nivel de soporte disponible. Satisfacción total sin excepciones; esta es la promesa que le realiza Vornado. Si usted no está satisfecho por algún motivo, por favor contáctenos. En el 1-800-234-0604 de 8:00 AM a 5:00 PM CST encontrará representantes expertos. En www.vornado.com también encontrará abundante soporte adicional disponible. En nombre mío y de todo el personal de nuestra sede de Andover, Kansas le agradecemos por elegir Vornado. Cordialmente, Bill Phillips CEO, Vornado Air 72º 62º Los calefactores comunes ya que sólo proporcionan un calor localizado. El calor sube al techo en forma inmediata y ello genera focos de frío y calor en el ambiente. La exclusiva Acción Vórtice de Vornado genera un calor continuo y uniforme envolviendo a las personas que se encuentran en el ambiente en una temperatura cálida y confortable. Find our complete product line at www.vornado.com Cómo Usar Cómo Usar iControl Operating Controls 1 Power On/Off Front light illuminates when power is on. 2 Mode HIGH HEAT 1500 watts, LOW HEAT 750 watts, or FAN ONLY. 3 Temperature Allows you to select your desired comfort level. Use the UP arrow to raise the set temperature. Use the DOWN arrow to lower the set temperature. 4 Timer The timer can be set in hour intervals up to 9 hours. Press the TIMER button to go into timer mode. In timer mode, use the UP arrow to add hours. In timer 14 6 Español mode, use the DOWN arrow to remove hours. 5 Remote The remote control functions the same as the unit controls. The remote requires 2 AAA batteries. To replace the batteries remove the cover located on the bottom side of the remote. 6 Sound When a setting is changed you will hear a “beep” from the unit. 7 LCD Display Dims for no-glow night operation. Getting Started Es fácil usar su calentador de Vornado. Sólo siga estos simples pasos. 1. Coloque su calentador de manera que el haz de aire cálido esté dirigido a través de la habitación sin obstáculos. Colóquelo en un lugar representativo de la temperatura de la habitación. Las exclusivas entradas de aire en ángulo lateral permiten poner el calentador más cerca de las paredes que lo posible con otros calentadores ordinarios (pero no la coloque cerca de productos combustibles). Evite áreas de temperatures extremas tales como corrientes de aire frío y registros de calor. Por favor, refiérase a las INSTRUCCIONES IMPORTANTES al principio de esta guía del propietario. 2. Conecte la clavija a un tomacorriente de pared estándar. 3. Presione el botón de encendido. 4. One-Knob Operation This innovative user interface is sophisticated yet simple. Press the knob to “wake-up” or turn on the screen on the base unit, rotate the One-Knob control unit until the desired mode you want to adjust is displayed. Press the button to accept this mode, then, rotate the knob left or right to select desired setting. The unit is then set, or you may press the One-Knob again to adjust another mode, and continue to adjust additional settings in the same manor. 5. Remote Control Fully control the Heater remotely with the Remote, no more getting up to adjust the temperature. You can turn the unit On and Off switch the mode from Fan Only, to Low Heat or High Heat, adjust the desired set temperature up or down, and set the automatic-off timer. As you adjust the remote, the base unit will “beep” to indicate that it has received your signal. Cómo Reiniciar Su Calefactor Su Calefactor Vornado tiene un sistema de apagado seguro de múltiples niveles diseñado para prevenir el sobrecalentamiento. Éste puede ocurrir cuando la entrada o salida está bloqueada, un objeto extraño evita que el aspa gire o si el aparato se cae. Si esto sucede, el sistema de apagado seguro cortará la energía al elemento de calor y necesitará reiniciar manualmente la unidad. 1. Coloque el interruptor de energía (Power) en posición “Off”(apagado); luego desenchufe la unidad. 2. Retire cualquier obstrucción. 3. Espere 5 a 10 minutos para permitir que la unidad se enfríe. 4. Enchufe la unidad y colóquelo en el sitio deseado. 5. Ajuste el interruptor a la posición de encendido (On). Su calefactor deberá funcionar normalmente. Nota: Si el sistema de apagado seguro apaga su calentador o si éste no se reinicia después de seguir el procedimiento anterior, NO INTENTE DESARMAR LA UNIDAD. Llame gratis al Departamento de Servicio al Cliente de Vornado, 1-800-234-0604. Múltiples Niveles de Seguridad Rejilla En Forma De Espiral De Apertura Pequeña Resistente a los dedos curiosos. Carcaza Con Aislamiento Térmico Se puede tocar incluso cuando funciona a altas temperaturas. Sistema De Seguridad De Apagado Automático Si se bloquea el flujo de aire, se corta la energía hacia el elemento de calefacción para prevenir el recalentamiento. Protección En Caso De Caída En caso de caída, se reduce la energía hacia el elemento de calefacción y hacia el motor del ventilador para evitar el sobrecalentamiento. Temperatura Ideal De Salida Del Aire A 120°F Lo suficientemente cálido como para calefaccionar todo un ambiente. Grounded Heavy-Duty Power Cord Adds durability and a more secure wall connection. Español 15 Cleaning and Storage How to Clean Your heater has no user serviceable parts. Do not disassemble the unit. This will void your warranty. If service is required, return your heater to Vornado (see WARRANTY for instructions). The motor is permanently lubricated and requires no oiling. Because your heater moves a substantial amount of air, it will need regular cleaning. To clean follow these simple instructions: 1. Unplug the unit. Note: Do not use gasoline, thinners, solvents or other chemicals for cleaning. 2. Use the brush attachment on your household vacuum cleaner to vacuum any accumulated dust off the Front Grill and Side Air Inlets. Wipe down the entire surface with a soft cloth. 816 English Español Resolución De Problemas Storage During the off-season or after extended periods of non-use, you may choose to store your heater. To ensure long life of the product, it is recommended to store your heater by following these instructions: 1. Unplug power cord and bundle loosely. Problema Unit fails to power on. Unit is not plugged in. Plug Power Cord into electrical outlet. Household circuit breaker / ground fault interrupter has tripped or blown a fuse. Reset circuit breaker / ground fault interrupter, or replace fuse (See OPERATING TIPS). 2. Thoroughly clean your heater (see HOW TO CLEAN for instructions). The unit has overheated. Automatic Safety Shut-Off has initiated (See RESETTING YOUR VORNADO HEATER). 3. Cover, or place back in retail carton if available. This will prevent the unit from accumulating dust overtime. 4. Store unit in a cool and dry location. Posible Causa y Solución Unit is damaged or in need of repair. Cease usage and unplug. Contact Consumer Service for assistance. Unit is not producing sufficent amount of heat. Ensure unit is set to High Heat and thermostat is set to highest Temperature setting. Close all doors and windows to trap heat. Allow the unit to fully circulate the heat throughout the room, may take several minutes. In smaller areas, you might prefer to set the unit in LOW mode. A vortex beam of air will gently keep the air circulating in the room for even, uniform heating. In larger spaces, you might prefer to set the unit in HIGH mode. A vortex beam of air will gently keep the air circulating in the room for even, uniform heating. To use the iControl as a personal fan, set the unit to FAN mode. The iControl, like any other 1500-watt electric heater, draws up to 12.5 amps of electric current. If using your iControl on HIGH setting causes your home circuit breaker or fuse to trip, we offer the following suggestions: Try turning off other electrical appliances that run on the same circuit as your Consejos de Operación heater. Run your heater in LOW mode. Have your electrician add an additional circuit to your home’s electrical system. When the room temperature is higher than the set temperature it is normal and correct to have little to no heat coming out of the iControl. When the unit is first turned on there is a slight delay before heat will start to be produced. ALWAYS USE COMMON SENSE WHEN USING THIS AND/OR ANY ELECTRICAL APPLIANCE. Español 17 9 Notes Calentador Para Ambientes • Garantía Limitada De 5 Años Vornado Air LLC, (“Vornado”) garantiza al comprador o consumidor original que este calefactor el calentador para ambientes (“Producto”) contra defectos de material o mano de obra durante un período de cinco (5) años a partir de la fecha de compra. Si se descubriera cualquiera de estos defectos dentro del período de garantía, Vornado reparará o reemplazará el Producto, a su discreción, sin costo alguno, en tanto el Producto se remita a Vornado con los gastos de envío pagos. Las reparaciones no cubiertas por la garantía o fuera del período de garantía requerirán de un pago cubriendo el costo de materiales, manipuleo y envío. electrónico a [email protected] paraobtener el formulario de Autorización de Retorno (“RA”). Por favor, cuando contacte a Vornado por la garantía, tenga a mano o incluya en el envío los números de modelo, código de fecha y de serie de su Producto, así como su nombre, dirección, ciudad, estado, código postal y número de teléfono. Es posible que se le requiera proporcionar el recibo original de venta. Para sus registros: Abroche o adjunte su recibo original de compra a esta ‘Guía del Usuario’. Por favor, también escriba aquí abajo el número de serie de su Producto (ubicado en la calcomanía de especificaciones de su producto). Esta garantía no se aplica a defectos producidos por el abuso del Producto, por su modificación, alteración, reparación o mantenimiento por personas ajenas a Vornado, por mal manejo del mismo, mantenimiento inadecuado, uso comercial o daños producidos durante el envío o atribuibles a fuerza mayor. Numero de Serie:______________________________________ LA REPARACIÓN O REEMPLAZO QUE SE OFRECE BAJO ESTA GARANTÍA ES LA ÚNICA SOLUCIÓN PROPORCIONADA PARA EL CLIENTE. VORNADO NO SERÁ RESPONSABLE POR NINGÚN DAÑO INCIDENTAL O INDIRECTO POR EL INCUMPLIMIENTO DE CUALQUIER GARANTÍA EXPRESA O IMPLÍCITA DE ESTE PRODUCTO. EXCEPTO HASTA EL ALCANCE PROHIBIDO POR LAS LEYES VIGENTES, TODA GARANTÍA IMPLÍCITA DE APTITUD O IDONEIDAD PARA UN USO EN PARTICULAR DE ESTE PRODUCTO QUEDA LIMITADA A LA DURACIÓN DE ESTA GARANTÍA. Algunos estados no permiten limitaciones con respecto a cuánto dura una garantía implícita o la exclusión o limitación de daños imprevistos o consiguientes, por lo tanto las exclusiones o limitaciones anteriores pueden no aplicarse en su caso. Esta garantía le otorga derechos legales específicos; usted puede también tener otros derechos, los que varían de estado a estado. Por garantía o servicio de reparaciones, llame al 1-800-234-0604 o mande un correo 18 Español Después de recibir el formulario RA, despache su Producto con gastos de envío pagos a: Vornado Air LLC Attn: Warranty & Repair 415 E. 13th Street Andover, KS 67002 Para asegurar el manejo adecuado, los embalajes deben estar claramente marcados con el número de RA. Los paquetes que no estén marcados claramente con dicho número de RA podrían ser rechazados en la dársena de recepción. Por favor espere entre 1 y 2 semanas después de la recepción del Producto para dar tiempo a la reparación y devolución del mismo. Registre su producto en www.vornado.com © 2012 Vornado Air LLC • Andover, KS 67002 Especificaciones del producto sujetas a cambio sin previo aviso. Vornado® son marcas registradas de Vornado Air LLC. Montaje y diseño realizado en Andover, Kansas. Español 19 Vornado Air, LLC 415 East 13th Street, Andover, Kansas 67002 800.234.0604 │ www.vornado.com Speak your mind www.vornado.com/reviews Hable con franqueza www.vornado.com/reviews CL3-0156 RA CL7-0156 RA, V01