1
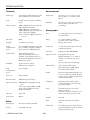
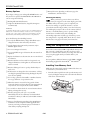
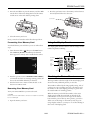
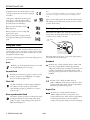
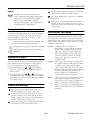
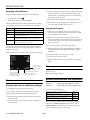
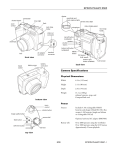
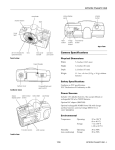
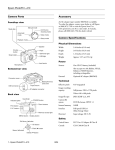
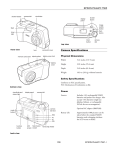
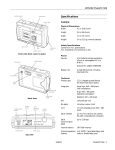
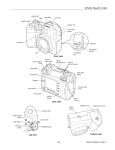
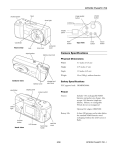
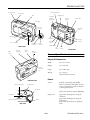
EPSON PhotoPC 800 shutter button camera status light camera dial flash display panel viewfinder and photo capture light camera dial lock camera dial timer light video out connector hand strap holder viewfinder lens cover switch lens AC adapter connector interface connector front view memory card cover tripod socket microphone + button LCD screen − button MENU button ISO button battery cover W.B. button back view battery cover lock Camera Specifications Physical Dimensions memory card cover lock Width 4.4 in (111.4 mm) Height 2.7 in (68 mm) Depth 1.6 in (40.2 mm) Weight 8.3 oz (235 g) without batteries and strap Power bottom view Sources image quality button shutter button Includes 4 AA rechargeable NiMH batteries and charger (Model EU-38). Also accepts 2 AA batteries (single-use lithium or rechargeable NiCad) camera dial Optional universal AC adapter (B867062) Battery Life flash button self timer button dial lock top view 6/99 Approximately 850 pictures using the viewfinder Approximately 100 pictures using the LCD menus Approximately 45 minutes in playback mode EPSON PhotoPC 800 - 1 EPSON PhotoPC 800 Technical Environmental Product type 2.14 megapixel CCD (charged coupled device) still frame auto focus camera CCD 0.5 inch color area CCD (2.14 million pixels) Image resolution 1600 × 1200 pixels (fine and super fine) 640 × 480 pixels (standard) 1600 × 600 pixels (panoramic fine) 1600 × 600 pixels (panoramic super fine) 1984 × 1488 pixels* (HyPict) 1984 × 744 pixels* (HyPict panorama) Temperature Operating: 41 to 95 °F (5 to 35 °C) Non-operating: –4 to 140 °F (–20 to 60 °C) Humidity Operating: 30 to 80% (non-condensing) Non-operating: 10 to 80% (noncondensing) Photographic Lens f = 7 mm (equivalent to a 38 mm lens on a 35 mm camera) Range 19.7 inches (50 cm) to infinity 5.9 inches to 19.7 inches (15 cm to 50 cm) (macro mode) LCD screen 1.8-inch active matrix TFT color LCD (110 thousand pixels) Sensitivity Equivalent to ISO 100/200/400 Exposure control Programmed auto exposure Manual adjustment: –2 to +2 EV, in half-steps (or in 0.2 EV steps in AE mode) Spot metering and matrix metering White balance TTL automatic white balance Fixed white balance (5200 °Kelvin) User-defined white balance Shutter Electric iris with mechanical shutter, 1/2 second to 1/750 second (flash off mode) 1/30 second to 1/750 second (auto flash and forced flash modes) Viewfinder Real-image optical, with centering crosshair and edge border (view range approximately 90%) Focus Automatic focus from 19.7 inches (50 cm) to infinity Automatic focus from 5.9 inches to 19.7 inches (15 to 50 cm) in macro mode Aperture f2.4, f8.0 Flash Automatic luminance control flash mode Flash modes Forced flash, automatic, flash off, slow synchronized flash mode (can be enabled through the LCD menus) * Interpolated File format JPEG Bit depth 16 million colors, 24-bit Serial communication speed Up to 230.4 Kbps with high-speed serial port (19.2 Kbps or higher), 1.8 Mbps when connected to EPSON printers Serial interface 14-pin dual line terminal, RS-232C-compatible connector to computer (9-pin DSUB connector to PC, 8-pin mini-DIN male connector (to Macintosh or printer) USB cable 14-pin connector (camera) USB connector (computer) USB communication speed Up to 12 Mbps Video out NTSC standard Internal memory 2MB flash program memory Expansion memory 8MB EPSON CompactFlash storage card Also accepts optional 4MB to 96MB storage cards (available from Lexar Media and SanDisk) Self-timer 10 seconds Tripod screw Built-in Safety United States FCC Part 15 Subpart B Class B Canada CSA C108.8 Class B 2 - EPSON PhotoPC 800 6/99 EPSON PhotoPC 800 Flash range: Sensitivity setting Normal distance 2× zoom Std. (ISO 100) 1.6 to 11.2 ft (0.5 to 3.4 m) 1.6 to 11.2 ft (0.5 to 3.4 m) Med. (ISO 200) 1.6 to 16.1 ft (0.5 to 4.9 m) 1.6 to 16.1 ft (0.5 to 4.9 m) High (ISO 400) 1.6 to 22.6 ft (0.5 to 6.9 m) 1.6 to 22.6 ft (0.5 to 6.9 m) Optional Universal AC Adapter (B867062) Physical Dimensions Width 1.7 inches (43 mm) Height 1.22 inches (31 mm) Depth 4.1 inches (104 mm) Memory Card Picture Capacity Technical Image Mode 8MB Card Standard 120 Fine/Monochrome Fine 24 SuperFine/Monochrome SuperFine 12 HyPict/Monochrome HyPict 10 Output DC 3.4 V/2.5 A Input 100 to 240 VAC, 50 to 60 Hz CompactFlash Card Physical Dimensions NiMH Battery Charger (Model EU-38) Width 1.7 inches (42.8 mm) Physical Dimensions Height 1.5 inches (36.8 mm) Width 3.0 inches (76 mm) Depth 0.13 inch (3.3 mm) Height 4.5 inches (115 mm) Depth 1.1 inch (28 mm) Box Contents Weight Approximately 4.6 oz (130 g) ❏ PhotoPC 800 camera, handstrap, and soft case (there is no separate lens cover) Technical ❏ Quick Reference and User’s Guide Input 100 to 240 V, 50 to 60 Hz Output DC 1.2 V/490 mA × 4 Charging time 2 batteries: approximately 110 minutes 4 batteries: approximately 210 minutes ❏ 4 AA NiMH rechargeable batteries and battery charger ❏ Serial cable for PC ❏ Serial cable for Macintosh® and Direct Print ❏ USB cable ❏ Video cable Power consumption Approximately 8W ❏ AC power cord Charging temperature ❏ 8MB EPSON CompactFlash card 41 to 95 °F (5 to 35 °C) ❏ Software on CD-ROM: Sierra Imaging Image Expert™, EPSON Photo!3™ application and TWAIN driver, EPSON Photo File Uploader, EPSON Photo!3 Program Uploader, Direct Print program Storage temperature −4 to 86 °F (−20 to 30 °C) 6/99 EPSON PhotoPC 800 - 3 EPSON PhotoPC 800 Minimum System Requirements Using Batteries To transfer images to your computer and edit them, make sure your system meets these minimum requirements: Your EPSON PhotoPC 800 comes with a charger (Model EU-38) and four rechargeable NiMH batteries (Model EU24) that can be recharged hundreds of times. While you use two batteries in your camera, you can keep a replacement set of batteries charged and ready to take along. Windows Systems ❏ IBM-compatible PC with 486 or higher processor ❏ Serial port with standard RS-232C interface (19200 bps or higher) if using serial connection Note New batteries need to be fully charged three times before you use them. This process takes approximately five or six hours—but you only need to do it once. When you need to recharge your batteries in the future, it takes approximately two and a half hours for a full charge. ❏ Windows 98 PC with built-in USB port, if using USB connection. Charging Batteries ❏ Microsoft Windows 98, Windows 95, or Windows NT 4.0 (Service Pack 3 or later recommended) ❏ At least 32MB RAM It’s important to fully charge your batteries, so they will last as long as possible before they need recharging. ❏ Double-speed CD-ROM drive ❏ At least 40MB free hard disk space WARNING Shock hazard. Make sure you use the charger only with EPSON rechargeable NiMH batteries (model EU-24). To avoid the danger of leakage or explosion, do not place any other batteries in the charger. Read all safety and handling instructions on page page 6 before using the charger. ❏ VGA or SVGA monitor with at least 256-color display ❏ Mouse or other pointing device ❏ 16-bit sound card and speakers (for voice annotation feature only) Follow these steps to charge your batteries for the first time: Macintosh Systems 1. Insert two or four batteries, positioning the + and – ends as shown. ❏ One of the following systems: Macintosh PowerPC™ with System Software Version 7.5 or later Power Macintosh® G3 with System Software Version 8.51 or later iMac™ with System Software Version 8.1 and iMac Update 1.0 ❏ At least 32MB RAM ❏ At least 30MB free hard disk space ❏ CD-ROM drive ❏ VGA monitor with minimum resolution of 640 × 480 2. Connect the battery charger to the battery charger power cord, as shown below. ❏ Macintosh modem/printer serial port (19200 bps or higher) or built-in USB port on an iMac or new Power Mac G3 ❏ 16-bit sound card and speakers (for voice annotation feature only) 4 - EPSON PhotoPC 800 6/99 EPSON PhotoPC 800 2. Hold the battery cover lock button down and slide the battery cover out to open it. 3. Plug the charger into an electrical outlet. The charger light turns red, indicating that the charger is working. When the batteries are charged, after about two and a half hours, the light goes off. Note The charger light flashes to indicate changes in battery temperature and voltage. If the light continues to flash for more than half an hour, the batteries may be damaged or worn out, and should be replaced. Unplug the charger if the batteries are not fully charged after four hours. battery cover lock button 4. Now charge your batteries again by unplugging the battery power cord and then plugging it in again. The second charge should take about two and a half hours. 5. Charge the batteries a third time. After the charger light goes off, unplug the charger. To avoid overcharging, don’t leave the charger plugged in for long periods of time after the light goes off. 6. Wait one hour until the batteries cool before removing them from the charger. 3. Insert two batteries into the compartment, positioning the + and − ends as shown below. 7. Before storing the charger, disconnect the power cord and remove the batteries. (For subsequent charges of your NiMH rechargeable batteries, follow steps 1 through 3, then unplug the charger and follow steps 6 and 7 above.) Be sure to charge the batteries completely to make them last as long as possible. They can be recharged hundreds of times, so do not dispose of them until they are worn out. Note Keep the charger terminals clean by wiping them with a dry cloth. Make sure you charge the batteries before you use them. If you find that your batteries run out faster after you recharge them a few times, make sure you discharge them completely before recharging. If this doesn’t help, replace the batteries. 4. Lower the battery cover and slide the battery cover in, as shown below. Installing Batteries Before you install the batteries, make sure the camera is turned off. 1. Turn the camera upside down. When the battery power is almost out, a low battery icon appears on the camera’s status display panel. Be sure to replace both batteries at the same time. 6/99 EPSON PhotoPC 800 - 5 EPSON PhotoPC 800 ❏ Battery life varies depending on the battery type, the manufacturer, and other factors. Battery Options If you forget to charge your rechargeable NiMH batteries or if they need to be replaced, the EPSON PhotoPC 800 camera can also accept the following: Checking the Battery When your battery power is almost out, the low battery icon appears on the status display panel. The icon flashes when your battery power is completely out. ❏ Rechargeable AA NiCad batteries ❏ Single-use AA lithium batteries (longer life, Energizer recommended) You need to recharge or replace the batteries or use the optional universal AC adapter when you see the low battery icon. Although you may be able to use the camera with low batteries, it needs full battery power to operate reliably. WARNING To avoid the danger of fire or explosion, do not mix different types of batteries. Do not allow the battery contacts to touch metal objects such as coins or keys, which could short out the battery’s circuits. Read all safety and handling instructions before using batteries. Several factors can affect battery life, including the surrounding temperature and the type of batteries you use. Low temperatures—especially below 50 °F (10 °C)—drain batteries faster. See page 6 for battery use instructions. Note the following when handling batteries: ❏ Use only the EPSON battery charger (Model EU-38) to charge the batteries that came with your camera. ❏ Use the batteries that came with your camera only in EPSON digital cameras. Using the CompactFlash Memory Card ❏ Do not use manganese batteries. Your camera comes with an 8MB CompactFlash memory card that you need to install before you take any photos. Since there is no internal camera memory for storage, this card will store your photographs until you transfer them to your computer. ❏ Do not mix different types of batteries; this can cause fire or explosion. ❏ Replace both batteries at the same time. Do not mix old and new batteries. You can purchase additional memory cards (4MB to 96MB) from leading suppliers like Lexar Media™ and SanDisk.® ❏ Batteries that have not been used for a long time do not charge well. However, with regular use, the batteries will return to normal. Installing Your Memory Card ❏ Batteries discharge at least 2% per day, whether they are used or not. Make sure the camera dial is turned to Off and the lens cover is closed before you install the card. ❏ If the batteries are charged in a hot environment, or if they are charged repeatedly without being discharged, they will wear out more quickly. 1. Turn the camera upside down and open the memory card cover by sliding the memory card cover lock in the direction of the arrow, as shown below. ❏ Do not drop, puncture, disassemble, or mutilate batteries. Do not get them wet or expose them to fire. memory card cover lock ❏ When the camera is not used for long periods of time, remove the batteries and store them at a low temperature in a dry location. Store away from the reach of children. ❏ To avoid fire or electric shock, do not use batteries that are leaking or damaged in any way. ❏ If battery acid gets in your eyes or on your skin, immediately rinse the area with water and seek medical treatment. If a battery is swallowed, seek medical treatment immediately. ❏ Dispose of used batteries according to the manufacturer’s instructions and in compliance with all applicable laws. Contact your local government agency for information about battery recycling and disposal. 6 - EPSON PhotoPC 800 6/99 EPSON PhotoPC 800 2. Insert the card all the way into the memory card slot. Make sure the front of the card is facing the front of the camera, and the arrow on the card’s label is pointing down. 2. Press the eject button next to the memory card and remove the card by hand. Then close the cover. eject button 3. Close the memory card cover. Next, you need to format the card. Follow the steps below. Using the Display Panel Formatting Your Memory Card You should format your card before you use it. Follow these steps: The display panel shows the camera’s current settings and the number of pictures remaining. 1. Turn the camera dial to . Then press the W.B. button (below Memory SETUP). The Memory Card Format menu appears if a memory card is installed in the camera. . image quality sensitivity white balance flash low battery icon timer exposure 2. Press the top button (next to MEMORY CARD FORMAT) to format the card. You see a message warning you that all data on the card will be deleted if you format it. pictures remaining monochrome indicator Checking the Picture Counter The large number in the lower right of the status display panel shows how many additional pictures you can take. 3. Press the button next to Yes to format the card, or the button next to No to cancel. This number is affected by the image quality setting. Also, if you have any voice recordings stored on your memory card, the number on the status display panel may be greater than the actual number of remaining pictures. Removing Your Memory Card Turn your camera Off before you remove the card. When the memory card is full, the number on the status display panel reads 0, the status light on the back of the camera flashes red, and you can no longer use the shutter button. Before you can take any more pictures, you need to delete some of the images on the memory card. If you are using a higher resolution, you may see one of the following in this corner of the display panel: CAUTION Never remove the card while the camera is on. Data in the card may be lost or damaged. 1. Open the memory card cover. 6/99 EPSON PhotoPC 800 - 7 EPSON PhotoPC 800 In quick shot mode, the number of photos taken and temporarily saved in the camera is displayed in brackets. Note Slow synchronized flash is available only in the Program or Manual user modes. See page 9 for information about changing the user mode. In Program or Manual mode, the exposure value appears on the left and the shutter speed appears on the right when you hold the shutter button down halfway. After you take a flash picture, the icon blinks until the flash is fully recharged. Your flash setting remains in effect even after you turn off the camera. When you turn the camera’s dial to Set is displayed. Setting Image Quality , When you make a voice recording, rEc appears in this space. EPSON PhotoPC 800 has four image quality (resolution) settings. Press the image quality button on top of the camera to cycle from one setting to the other. When you take photos using the interval shooting feature, Int appears in the display panel. image quality button Using the Flash The camera’s built-in flash is effective within a range of 1.6 to 11.2 feet (0.5 to 3.4 m), or 6 inches to 1.6 feet (15 to 50 cm) when using the macro feature. Press the flash button to cycle through the four flash settings. The image quality icons appear on the status display panel as shown below and on the next page. An icon for each setting appears on the status display panel, as shown below: Standard Auto Produces color or black and white images at 640 × 480 pixels. The CompactFlash card holds approximately 120 pictures without audio recordings, but the image size is smaller and includes less detail when enlarged. This setting is good for pictures that are viewed on screen or on the Web. The flash goes off automatically whenever it’s needed for adequate lighting (factory setting). Forced Flash The flash goes off with every picture you take. Use this setting to compensate for backlighting; for example, when you are facing a light source. Fine Produces color or black and white images at 1600 × 1200 pixels, with moderate compression. Your pictures include ample detail, and the CompactFlash card holds approximately 24 pictures. Flash Off The flash is disabled, even when adequate lighting is not available. Use this setting for special effects, where flash photography is prohibited, or for macro mode close-ups. Super Fine Produces color or black and white images at 1600 × 1200 pixels with low compression. Your pictures include greater detail, and the CompactFlash card holds approximately 12 pictures. With less compression, Super Fine images are better for enlarging. Slow synchronized flash The camera’s shutter speed slows to enhance the clarity of background details. Use this setting when taking pictures at night, or when taking pictures against an illuminated background. 8 - EPSON PhotoPC 800 6/99 EPSON PhotoPC 800 HyPict Use this setting to play back your photos so that you can delete them or add audio recordings to them. Produces color or black and white images at 1984 × 1488 pixels (interpolated) with moderate compression. Your pictures include excellent detail, and the CompactFlash card holds approximately 10 pictures. These images are best for enlarging for 8 × 10-inch prints. Use to print directly from your camera to an EPSON ink jet printer. Use to set up or view information about your camera on the LCD screen. You can change user mode, set the camera clock, format the memory card, and make other camera settings. Setting Sensitivity Choosing the User Mode You must be in Program or Manual user mode to adjust the sensitivity setting (see “Choosing the User Mode” below). Press the ISO button on the back of the camera to cycle through the three sensitivity settings: The standard setting is equivalent to ISO 100. This is the recommended setting for most photos. The EPSON PhotoPC 800 has three user modes to fit the needs of beginner, intermediate, and expert photographers. Each mode gives you a different amount of control over the camera settings, whether you’re using the LCD screen or the viewfinder to take photos. The high sensitivity setting is equivalent to ISO 200. Full Auto The camera chooses settings for you automatically, so you can take photos without having to make complex settings. This mode, which is the default, is recommended for the beginning photographer. You can still adjust some basic settings if you want (for example, image quality, digital zoom, and macro or panoramic mode). Program This setting is designed for the user who wants more artistic control, but still prefers the camera to eliminate some guesswork. Programmed subject settings (Normal, Sports, Portrait, and Landscape) tailor the camera’s settings to the type of picture being taken. You can also use the menus to make your own adjustments to sensitivity, white balance, and exposure. Manual This setting is for experienced photographers who want the greatest degree of control over the camera’s wide array of settings and features. In addition to changing sensitivity and white balance, you can use spot metering, adjust the shutter speed and aperture size, and set the focus manually. The super high sensitivity setting is equivalent to ISO 400. Waking the Camera If you’re using batteries, the camera automatically shuts off after a designated period of inactivity to conserve battery power. To wake the camera, do one of the following: ❏ If the camera dial is set to or , press the shutter button. Or, turn the camera dial to Off, then back to its former position. ❏ If the camera dial is set to , , or , press any button on the back of the camera (the shutter button won’t wake up the camera). Or, turn the camera dial to Off, then back to its former position. Camera Dial Settings Use for continuous or interval shooting. Lets you capture a complex motion, such as a golf swing. Lets you take pictures using the LCD screen. You can preview your photos on the screen and use the LCD menus to adjust photo settings, such as digital zoom, sensitivity, white balance, and exposure. Choose when taking photos with the viewfinder, which uses less battery power than the LCD screens. 6/99 EPSON PhotoPC 800 - 9 EPSON PhotoPC 800 2. Open the lens cover, then turn the camera dial to to see the View screen. Depending on your user mode (see page page 9), you’ll see a preview of your picture with the following photo options: Follow these steps to choose the camera mode: 1. Push the camera dial lock in and turn the dial to see the SETUP menu. . You set user mode View screen for Full Auto mode 2. Press the + button to cycle through the three modes. Using the Camera SETUP Menu You can use the Camera SETUP menu to turn audio recording on or off, set the automatic power off feature, adjust the brightness of the LCD screen, set the alert beep, and create a user-defined white balance. View screen for Program mode To go to the Camera SETUP menu, turn the camera dial to to go to the Setup menu (pictured above). Then press the MENU button (under Camera SETUP). set automatic power off set LCD brightness turn audio recording on and off set alert beep create a userdefined white balance View screen for Manual mode 3. Make any changes you want to settings on the View screen by pressing the button next to or below that setting. Taking Pictures With the LCD Screen Once you’ve made any changes to the Setup and Camera SETUP menus, you’re ready to take pictures with the LCD screen. Follow these steps: 1. Make sure you’re at least 20 inches away from your subject. (If you want to get closer, use macro mode.) 10 - EPSON PhotoPC 800 6/99 EPSON PhotoPC 800 converted, and uploaded. You can create and show a presentation without printing overhead transparencies or slides, and without a laptop computer. 4. If you’re using the Full Auto user mode, you’re ready to take your picture. Go to step 5. If you’re using the Program or Manual user modes, press the MENU button (under PRESS or HOLD) to go to the next screen, and make any changes to those settings: Projecting the Presentation You can display the uploaded images on a multimedia projector, television, or other video output device. Use the video cable that came with your EPSON PhotoPC 800. Note Using the optional AC adapter is highly recommended when you project your presentation. See page 14 for instructions and ordering information. Follow these steps: second screen for Program user mode 1. Make sure your camera and TV or video projector are turned off. 2. Open the camera’s connector cover and connect the black end of the video cable to the Video Out port, as shown below: second screen for Manual user mode 5. Center your subject on the screen, then press the shutter button halfway down to lock the auto focus. The camera status light stops flashing and you see a green circle on the screen when the lens locks in focus. While you hold the shutter button down, you can reframe your picture if you want. 3. Connect the yellow end of the video cable to the VIDEO IN port on the TV or projector, as shown below. 6. Press the shutter button the rest of the way down to take the picture. Hold the camera still until it beeps, then release the shutter button. Note You may notice a brief delay between the time you press the shutter button and when the camera beeps. To avoid blurring your images, make sure you hold the camera still until it beeps. After a few seconds you see a confirmation screen. You can press the button next to Delete if you decide you don’t want the picture. 4. Turn on the TV or video projector and switch it to video mode. Using the Camera for Presentations 5. Turn the camera dial to You can connect your camera to a multimedia projector or television and show not just photos, but also text and graphics. The EPSON Photo File Uploader3 lets you transfer images from your computer to your camera’s memory card. Anything you can display on your computer screen can be captured, . The last image that you uploaded into the camera is projected. If you are using the optional AC adapter, you can also see the image on the LCD screen. 6/99 EPSON PhotoPC 800 - 11 EPSON PhotoPC 800 You can use the camera’s slide show feature to play your images automatically, or play them one at time using the navigation buttons. You can use all of the camera’s other playback features to show your presentation. Using the USB Cable Follow these steps to connect your camera using the USB cable: 1. Plug the cable connector on the USB cable into the USB port on your computer, or into a port on a USB hub. Playing Back Pictures on TV You can display your pictures on a regular television or VCR by using the video cable that came with your PhotoPC 800. Tip You can videotape your pictures to share them without using a computer. After you connect the camera to your VCR, press the Record button on the VCR and use the camera’s slide show feature. Follow these steps: 1. Make sure the camera and TV (and VCR) are turned off. Note Although you can use a USB hub, it’s recommended that you connect the camera directly to the computer’s USB port. 2. Open the camera’s connector cover and connect the black end of the video cable to the Video Out port, as shown: 2. Open the connector cover on the side of the camera. Then insert the connector on the other end of the USB cable into the camera’s interface port. 3. Connect the yellow end of the cable to the VIDEO IN port on the television or VCR. 4. Turn on the TV (and VCR) and switch to the correct video mode. Getting Pictures into Your Computer 3. Turn on the camera by turning the camera dial to necessary, turn on your computer system. When you’re finished taking pictures, you can connect the camera to your computer and transfer the images. If you have the optional universal AC adapter, you can extend battery life by using it when you connect the camera to your computer. . If Using the Windows Serial Cable Locate the Windows serial cable that came with the camera, then turn off the camera and your computer. Connecting to a Windows PC Follow these steps to connect the camera to your computer: You can connect the camera to your PC with either the Windows serial cable or the USB cable that came with the camera. You must have a USB-enabled Windows 98 system to use the USB cable. 1. Locate a serial port on the back of your computer. You may have two serial ports labeled COM1 and COM2, or the ports may be labeled with icons. If you have two serial ports available, use COM1 (port 1) to connect your camera. Note If you have a 25-pin serial port, you can use a 9- to 25-pin adapter. 12 - EPSON PhotoPC 800 6/99 EPSON PhotoPC 800 2. Line up the serial connector on the cable with one of the serial ports on your computer, and insert the connector. Then tighten the screws. Note If you’re sharing a serial port that you use for another device, make sure AppleTalk™ is turned off. Your Macintosh may not recognize the camera if AppleTalk is on. Also, if you have problems connecting to the printer port, use the modem port instead. 3. Open the connector cover on the side of the camera. Carefully insert the connector on the other end of the cable into the camera’s interface port. . 3. Open the connector cover on the side of the camera. Carefully insert the connector on the other end of the cable into the camera’s interface port. . 4. Turn on the camera by turning the camera dial to turn on your Macintosh system. , then On a PowerPC or G3 Mac (or a Windows PC with a highspeed serial board), you may be able to transfer your pictures at the rate of 230.4kb per second. If your camera software doesn’t set this speed automatically, you can set it manually. 4. Turn on the camera by turning the camera dial to turn on your computer system. , then Printing Directly from the Camera Note If you have problems connecting to the COM port you have selected, check your computer’s COM port configuration and try again. Your PhotoPC 800 camera lets you print your pictures directly to any of several EPSON Stylus ink jet printers, without using a computer. You can choose from a number of layout options, select the type and size of paper you want to use, and print using optional filters and print modes. You can print directly from the camera to any of the following printers: Connecting to a Macintosh You can connect the camera to your PowerPC with the Macintosh serial cable that came with your camera. If you have an iMac or PowerMac G3, you can use the USB cable that came with your camera. ❏ EPSON Stylus Photo ❏ EPSON Stylus Photo 700 For instructions on using the USB cable, see “Using the USB Cable” on page 12. ❏ EPSON Stylus Photo EX Follow these steps to use the Macintosh serial cable: ❏ EPSON Stylus Photo 750 1. Turn off the camera and your Macintosh. ❏ EPSON Stylus Photo 1200 ❏ EPSON Stylus COLOR 740 2. Locate the modem port or printer port on the back of your Macintosh. You can use either port to connect the camera. Direct Print comes pre-installed on your camera. Use the Mac/Direct Print serial cable that came with your camera to connect the camera to a printer. 6/99 EPSON PhotoPC 800 - 13 EPSON PhotoPC 800 ❏ To clean the lens, first blow off any loose dust or dirt. Then breathe on the lens and wipe off all moisture with a soft, lint-free cloth or lens cleaning tissue. To avoid scratching the lens, don’t press too hard. Selecting a Print Format To go to the Direct Print main menu, do the following: 1. Turn the camera dial to . ❏ If necessary, clean the battery contacts with a dry cloth. 2. Press the top button (next to DirectPrint). ❏ If the LCD screen gets fingerprints or smudges on it, use a soft, damp cloth to lightly wipe the screen. The Direct Print main menu offers several formats in which you can print your pictures, as described in the table below. Storing the Camera Print format Description Print All Prints all the pictures stored in the camera. Print Lets you select the picture you want to print. Index Prints small thumbnail images of all the pictures in your camera on contact sheets. Album Prints up to three larger images on one sheet of paper with descriptive information next to it, if you want. Sticker Prints 16 small or 4 larger copies of the selected picture on sheets of EPSON Photo Stickers. ❏ When you’re not using the camera, keep the lens cover closed and store it in the soft case that came with it. Make sure the camera dial is set to Off. ❏ When the camera is not used for long periods of time, remove the batteries and store them at a low temperature in a dry location. This prevents camera damage from battery leaks or corrosion. Do not store the camera in the following locations: To select the print format you want, press the button next to or below the format option. Each format leads to a different submenu of settings. ❏ Where it will be exposed to direct sunlight, for example, on a car dashboard, or near bright sources of light or high humidity After you select a print format, you see a submenu of settings: ❏ Near heat sources or in a closed car or trunk ❏ In areas of excessive dirt or dust ❏ Where it will be exposed to strong vibrations or magnetic fields Press the bottom button to select the photo you want to print. Press the ISO button (under Print) to display the current print settings. Press again to print. Warranty Camera: 1 year Press the W.B. button (under the down arrow) to go to the Information and Filter menu. Batteries and charger: 90 days Related Documentation and Accessories Maintenance Cleaning the Camera and Battery Charger ❏ Unplug the battery charger before cleaning. EPSON PhotoPC 800 User’s Guide CPD-8479 EPSON PhotoPC 800 Quick Reference Accessories for the PhotoPC 800 ❏ Use a clean, dry cloth to wipe the camera free of dust. ❏ Use a damp cloth for cleaning the battery charger. ❏ Keep the battery charger terminals clean by wiping them with a dry cloth. ❏ Don’t use harsh or abrasive cleaners. Don’t use liquid or aerosol cleaners. 14 - EPSON PhotoPC 800 CPD-8478 EPSON PhotoPC 800 Universal AC Adapter B867062 NiMH Battery Pak (4 batteries) B818061 Universal NiMH Power Pak (charger and 4 batteries) B818172 EPSON Image Authentication System (IAS) PPC8-IAS You can purchase manuals and accessories from EPSON Accessories at (800) 873-7766. In Canada, please call (800) 873-7766 for dealer referral. Or, visit our website at www.epsonsupplies.com (U.S. sales only). 6/99