1
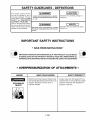
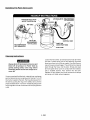
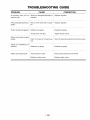
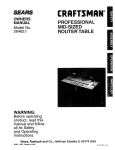
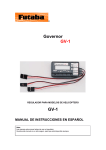
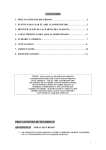
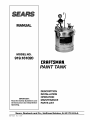
MANUAL
MODELNO.
919.161020
CRRFTSMRN,o
PAINT TANK
IMPORTANT:
Read the Safety Guidelines
and
All Instructions
Carefully Before
DESCRIPTION
INSTALLATION
OPERATION
MAINTENANCE
PARTS LIST
Operating.
Sears,
MGP-161020
Rev. 1
5/4/01
Roebuck
and Co., Hoffman
Estates,
IL 60179
U.S.A.
TABLE OF CONTENTS
Page
WARRANTY ....................................................................................................................................
2
SAFETYGUIDELINES ......................................................................................................................
3
WARNING CHART .......................................................................................................................
3-4
GENERALINFORMATION ...............................................................................................................
Description ...........................................................................................................................
Assembly Instructions ..............................................................................................................
Operating Instructions ..............................................................................................................
Instructions for Regulator ..........................................................................................................
Cleaning Instructions ................................................................................................................
5
5-6
5
5
5
6
TROUBLESHOOTING GUIDE ..........................................................................................................
7
PAINTTANK DIAGRAM ...................................................................................................................
8
PARTS REFERENCE .......................................................................................................................
9
SERVICE NOTES ......................................................................................................................
HOW TO ORDER REPAIR PARTS ........................................................................................
FULL ONE YEAR WARRANTY
ON
CRAFTSMAN
10-11
BACK COVER
PAINT TANK
If this Craftsman Paint Tank fails due to a defect in material or workmanship within one year from the date of
purchase, RETURN IT TO THE NEAREST SEARS SERVICE CENTER/DEPARTMENT
THROUGHOUT
THE
UNITED STATES AND SEARS WILL REPAIR IT, FREE OF CHARGE.
This warranty
gives you specific
legal rights and you may have other rights which vary from state to state.
Sears, Roebuck and Co., Hoffman Estates, IL 60179 U.S.A.
2- ENG
SAFETY GUIDELINESThis manual contains
informa-
tion that is important for you to
know and understand. This information relatesto protecting YOUR
SAFETY
and PREVENTING
EQUIPMENT PROBLEMS. To
help you recognize this information, we use symbols to the right.
Please read the manual and pay
attention to these sections.
I _k DANGER
DEFINITIONS
I _CAUTION
I
URGENT SAFETY INFORMATION -A HAZARD
THATWlLLCAUS E SERIOUS INJURYOR LOSS
OF LIFE
I -"LWARNING
Information
equipment.
for preventing
I
I
I
damage
NOTE
to
I
Information that you should pay special
attention to.
IM PORTANT SAFETY INFORMATION - A HAZARD
THATMIGHTCAUSE SERIOUS INJURYOR LOSS
OF LIFE.
IMPORTANT SAFETY INSTRUCTIONS
• SAVE THESE INSTRUCTIONS
IMPROPER
OPERATION OR MAINTENANCE
•
OF THIS PRODUCT
COULD RESULT
IN SERIOUS INJURY AND PROPERTY DAMAGE. READ AND UNDERSTAND ALL
WARNINGS AND OPERATING INSTRUCTIONS BEFORE USING THIS EQUIPMENT.
• OVERPRESSURIZATION
HAZARD
EXPLOSION OF
OBJECTS
WHAT COULD
OF ATTACHMENTS
HAPPEN
• Attachments whose pressure rating is lower
than the adjusted pressure in the tank could
explode, resulting in serious injury or
property damage.
3- ENG
•
HOW TO PREVENT
IT
• Always make sure that equipment connected to tank or hose outlet has a higher
pressure rating than the regulated air
pressure in the tank.
• TANK EXPLOSION
WARNINGS
•
Explosive failure of the tank, its components,
or attachements
to it, could result in
serious injury to self or others, or property damage from the following conditions:
HAZARD
WHAT COULD
HAPPEN
HOW TO PREVENT
• Modifications to its design or construction
could weaken tank.
IT
Assemble tank components in
accordance with service instructions.
Do
not drill into tank, or weld attachments,
or alterits design in any manner.
EXPLOSION OF
TANKS
• Substitution
of unauthorized
non-standard
components could weaken tank or cause
component failure.
• Damage to the tank or its components
weaken the tank.
could
• Improper cleaning or maintenance could
block air passages to the safety valve,
gauge or outlet, allowing pressure to rise
to dangerous levels, and preventing the
lowering of tank pressure.
• Tampering with the safety valve could allow
tank pressure to rise to dangerous levels.
• Use only those components furnished
with your tank, assembled in accordance
with instructions in the service literature.
• Never attempt to repair a damaged
tank. Replace it with a new one.
Following each use, clean and dry tank
and lid in accordance with maintenance
instructions. Make sure ports to safety
valve, gauge and outlet are free of hardened paint or other materials which could
prevent free movement of air.
Never attempt to adjust safety valve to
change its pressure setting, or defeat its
function in any way. Operate the valve
before each use to assure that it functions properly.
• Removal of the lid while the tank is under
pressure could result in the lid being propelled
violently from the tank.
• Use of reactive chemicals could attack the
the lid gasket and safety valve seal allowing
tank pressure to rise to dangerous levels.
Before releasing clamp force to remove
the lid, shut off the supply of tank inlet air
and turn the regulator knob counterclockwise to relieve tank pressure. Check by
pulling the safety valve ring.
• Do not use reactive chemicals in your
tank such as acids, caustic solutions,
or halogenated hydrocarbon solvents.
• Halogenated hydrocarbon solventsfor
example: 1,1,1 - trichloroethane
and
methylene chloride- can chemically react with
aluminum. If this reaction occurs within an
enclosed container such as this pressure feed
tank, the tank may explode.
• Overtightening clamps causing them to
weaken and fail could result in the lid being
propelled violently from the tank.
4- ENG
• Do not use wrenches, pliers, or other
tools to tighten tank clamps. Use only
the torque you can apply with your hands.
If the lid gasket leaks, relieve tank pressure and clean or replace the gasket.
GENERAL
INFORMATION
DESCRIPTION
The Craftsman 21/2Gallon Paint Tank can withstand air pressure to maximum of 80 PSI. This Paint Tank is
equipped with an air regulator, gauge, safety valve, and fluid outlet. It is constructed of only the finest materials for
durability, The 21/2gallon capacity enables you to handle most any size job.
_ulu
/ [o] _.I
This pressure tank is not designed for highly abrasive, corrosive, or rust including materials. If used with
such materials, frequent and thorough cleaning is advised to reduce the necessity for replacement of
parts.
Assembly
Part of the air from the compressor or airline bypasses
the pressure regulator through the "tee" fitting and is
delivered to the spray gun. An additional pressure regulator will be required between the paint tank and the
spray gun.
Instructions
1. Install the regulator assembly to the swivel adaptor
on the tank lid. Check bottom of regulator for
location of tank connection.
2. Install the lift handle in the threaded hole in center of
the tank lid. Tighten hex nut.
Operatinq
3. Connect the air supply hose to an air inlet fitting on
tank regulator. (Right or left side optional).
You are now ready to fill the tank with material. Before
doing so be sure to thoroughly mix and strain the paint
to remove skins or undissolved particles which might
otherwise impede the flow of material through the hose
and gun.
4. Attach the atomization air hose to an air outlet
fitting which is directly opposite air inlet fitting.
5. Connect material hose to the fluid outlet adaptor
located on the tank lid.
Instructions
Requlator
The Paint Tank
A one gallon can of paint can be set inside the tank
instead of pouring the paint into the tank.
Place lid assembly on tank and hand tighten tank lid
clamp screws.
for using Air Pressure
on Paint Tank
Purpose of Pressure Regulator.
The pressure regulator on the paint tank regulates the
amount of pressure applied to the paint in the paint tank.
This controls the pressure of the paint being delivered
to the spray gun.
Recommended Paint Tank Pressures:
Internal-Mix Guns - Use higher tank pressures up to
the full amount of air pressure being delivered to the
spray gun but never in excess of 50 Ibs. air pressure at
the spray gun or paint tank.
Shut off paint tank regulator by turning T-handle counterclockwise. Adjust the compressor regulator to obtain the
desired air pressure on the spray gun.
Now adjust the regulator on the paint tank to obtain the
desired pressure for the material. The higher above the
paint tank you are spraying the more pressure you will
need on the material. Normal operating pressure on
the paint tank is 25 to 30 PSI. Should you wish to reduce pressure, simply rotate the T-handle adjusting
screw counter-clockwise until the desired pressure setting is obtained. There is no need to trigger the gun in
order to bleed off excess paint pressure.
External-Mix Guns - Use lower tank pressures. Always
start with pressure in paint tank at "zero" and increase
pressure in tank gradually until proper spray pattern is
obtained.
IMPORTANT: Before turning on air pressure, screw out
the regulator T-handle adjusting screw all the way,
counter-clockwise, to shut off the air pressure. Turn on
the air, then adjust the regulator to the required pressure. (Approximately 12 Ibs. for external-mix guns.) Do
not use over 50 Ibs. working pressure in paint tank.
5- ENG
DO NOT USE OVER 80 PSI AIR PRESSURE
IN YOUR TANK.
Operatinq
The Paint Tank (cont')
PRESSURE
AIR REGULATOR (RECOMMENDED,
/
NOT INCLUDED)
REGULATOR
(DO NOT EXCEED 80 PSI)
AIR
AIR COMPRESSOR
WITH REGULATOR
AIR FILTER
(RECOMMENDED,
NOT INCLUDED)
MATERIAL
HOSE
(INSIDE PAINT TANK)
J
Cleaninq
Instructions
Always shut off air pressure at source and
bleed off all pressure in Paint Tank by
gently pulling safety valve ring before
loosening thumb screw and clamps to remove lid.
Loosen thumb screws, tip clamps back and tip tank lid to
one side. Loosen spray gun air cap retaining ring about
three turns then turn on the air supply. Cup cloth over air
cap on the gun and pull trigger. This will force the material
back through the hose, into the tank. Empty and clean
tank and parts which come in contact with the material.
Use a suitable solvent. Pour solvent into the tank.
Replace lid and tighten the thumb screws and clamps
and spray until clean solvent appears.
It is very important that the tank, material hose, and spray
gun be cleaned as soon as spray job is finished. Turn off
the main air supply to the tank. Remove all pressure from
the tank by pulling the ring on the safety valve until the
pressure bleeds down. Turn the T-handle adjusting screw
on the regulator counter-clockwise until no spring tension
is felt.
6- ENG
TROUBLESHOOTING
PROBLEM
CAUSE
GUIDE
CORRECTION
Air escaping from port on
regulator cap.
Broken or damaged diaphragm in
regulator.
Replace regulator.
Pressure dropping slowly on
gauge.
Dirty or work valve seat in regulator.
Replace regulator.
Fluid or air leak at lid gasket.
Defective lid gasket.
Replace lid gasket.
Thumb screw not tight.
Tighten thumb screws.
Paint not mixed or thinned properly.
Mix or thin paint according to instruction on paint.
Defective air gauge.
Replace air gauge.
Tank pressure to high.
Reduce tank pressure to 20-50 PSI.
Defective safety valve.
Replace safety valve.
Paint in tank tends to settle
rapidly.
Gauge not registering
pressure.
air
Safety valve popping off.
7 - ENG
PAINT TANK DIAGRAM
............
4
8_
10
........" ................... 11
7
!2
1
8- ENG
PARTS REFERENCE
KEY
NO.
1
2
3
4
5
6
7
9
10
11
12
14
15
16
17
18
PART
NO.
DESCRIPTION
PT-0001
PT-0004
PT-0005
H-2099
GA-365
PT-0003
SSP-508
TIA-6128
PT-0006
SSF-597
SSF-506
PT-0007
SSN-624
PT-0002
PT-0008
SSP-507
TANKSHELLASSEMBLY
.....................
LI D GAS KET ..........................................
LID ASSEMBLY
.....................................
ADAPTER ..............................................
GAUGE ..................................................
REGULATOR .........................................
SWIVEL ADAPTOR .............................
SAFETY
VALVE ..................................
HANDLE ................................................
HEX NUT ...............................................
STREET ELBOW ...................................
YOKE/THUMB
SCREW ASSEMBLY ....
RETAINING RING ..................................
HINGEPIN
............................................
FLUIDTUBE
..........................................
FLUID OUTLET ADAPTER ...................
9- ENG
QTY.
1
1
1
3
1
1
1
1
1
1
1
4
4
4
1
1
SERVICE NOTES
10 - ENG
SERVICE NOTES
11 -ENG
CRRFTSMRNo
PAINT TANK
PARTS
MANUAL
For the repair or replacement parts you need
MODELNO.
Call 7 am - 7 pm, 7 days a week
919.161020
1-800-366-
PA RT
(1-800-366-7278)
When requesting service or ordering
parts, always provide the following information:
For in-home major brand repair service
Call 24 hours a day, 7 days a week
° Model Number
1-800-4-
R E PA I R
• Part Number
(1-800-473-7247)
° Part Description
• Name of Item
For the location of a
Sears Parts and Repair Center in your area
FULL ONE YEAR WARRANTY
AIR COMPRESSOR
Call 24 hours a day, 7 days a week
If this air compressor fails due to a defect in
material or workmanship within one year
from the date of purchase, RETURN IT TO
THE NEAREST SEARS REPAIR CENTER
THROUGHOUT
THE UNITED STATES
AND SEARS WILL REPAIR IT, FREE OF
CHARGE.
1-800-488-1222
For information on purchasing a Sears
Maintenance Agreement or to inquire
If this air compressor is used for commercial or rental purposes, the warranty will
apply for ninety days from the date of
purchase.
This warranty gives you specific legal rights
and you may have other rights which vary
from state to state.
about an existing Agreement
call 9 am - 5 pm, Monday-Saturday
1-800-827-6655
SEARS
America's
Sears,
Roebuck
and Co.,
Hoffman
Repair
Estates,
Specialists
IL 60179
U.S.A.
E/ARS
MANUAL
DE PARTES
MODELO
N°
919.161020
CRRFTSMRNo
TANQUE
IMPORTANTE:
Lea atentamente
las Normas
de seguridad
Instrucciones
Sears,
MGP-161020
Rev. 1
y todas
las
antes de operar,
Roebuck
5/4/01
and
PARA PINTAR
DESCRIPCION
INSTALACION
OPERACION
MANTENIMIENTO
LISTA DE PIEZAS
Co.,
Hoffman
Estates,
IL 60179
U.S.A.
CONTENIDO
Pagina
GARANTiA ................................................................................................................................................
2
NORMAS DE SEGURIDAD .......................................................................................................................
3
CUADRO DE ADVERTENCIAS ..............................................................................................................
3-4
INFORMACION GENERAL .......................................................................................................................
Descripcion .....................................................................................................................................
Instrucciones para el ensamblado .....................................................................................................
Instrucciones de funcionamiento .......................................................................................................
5
5-6
5
5
Instrucciones para el regulador .........................................................................................................
Instrucciones de limpieza ..................................................................................................................
5
6
DIAGNOSTICO DE PROBLEMAS .............................................................................................................
7
DIAGRAMA DEL TANQUE DE PRESION PARA PINTAR ..........................................................................
8
REFERENCIA DE PARTES .......................................................................................................................
9
NOTAS DE SERVICIO ........................................................................................................................
COMO SOLICITAR PIEZAS DE REPARACION ....................................................................
UN ANO DE GARANTJA COMPLETA
SOBRE
EL TANQUE
10-11
CONTRATAPA
PARA PINTAR
Si este TANQUE PARA PINTAR Craftsman estuviese fallado debido a defectos en los materiales o la mano de
obra, dentro del aho a partir de la fecha de su compra, RETORNELO AL DEPARTAMENTO O CENTRO DE
SERCICIO SEARS MAS CERCANO, DENTRO DE LOS EE.UU. Y SEARS SE LO REPARARA LIBRE DE CARGO.
Esta garantia
le otorga a usted derechos
adicionales que varian entre estados.
legales
especificos,
y at_n podria
tener
usted
otros
Sears, Roebuck and Co., Hoffman Estates, IL 60179 U.S.A.
2 - SP
derechos
DEFINICIONES
DE LAS NORMAS DE SEGURIDAD
Este manual contiene informaci6n
I _PELIGRO J
importante para que usted sepa y
comprenda.
Dicha informaci6n
est&
relacionada
con
SU
SEGURIDAD y LA PREVENCION
DE PROBLEMAS
PARA SU
EQUIPO. Para ayudarlo a usted a
comprender
esta informaci6n,
usamos los dmbolos mostrados a
la derecha. Sfrvase leer el manual
y prestar
secciones.
atenci6n
a dichas
INFORMACION
DE
SEGURIDAD
APREMIANTE
- UN RIESGO QUE PUEDE
CAUSAR LESIONES SERIAS O LA PI_RDIDA
DE VIDAS.
I _ADVERTENCIAI
Informacibn importante de seguridad que
podria causar lesiones serias o la p_rdida
de vidas.
I _' PRECAUCION I
INFORMACION
EQUIPO,
I INSTRUCCIONES
• GUARDE
PARA PREVENIR DAI_IOS AL
DE SEGURIDAD
I NOTA,
I
Informacibn a la que usted debe prestar
especial atencibn.
IMPORTANTES
ESTAS INSTRUCClONES
I
•
LA OPERACION
O EL MANTENIMIENTO
INADECUADOS
DE ESTE
PRODUCTO
PUEDEN RESULTAR EN LESIONES SERIAS Y DAI_IOS A LA
PROPIEDAD.
LEA ATENTAMENTE
TODAS
LAS ADVERTENCIAS
INSTRUCCIONES
OPERATIVAS ANTES DEL USO DE ESTE EQUlPO.
• SOBREPRESlON
RIESGO
&QUI_ PUEDE
DE LOS ACCESORIOS
OCURRIR?
• Los accesorios cuyo valor nominal de
presion es menor que el de la presion
calibrada del tanque, pueden explotar,
determinando serias lesiones o dafios a
la propiedad.
3 - SP
&COMO
E
•
PREVENIRLO?
• AsegOrese siempre que el equipo
conectado al tanque o manguera tenga
una presion nominal mas alta que la de
la presion regulada del tanque.
• ADVERTENCIAS
DE EXPLOSION
DEL TANQUE •
La explosi6n
por falla del tanque,
sus componentes
o sus accesorios,
puede
determinar
serias lesiones a usted u otras personas, o bien el da#o a la propiedad
debido alas siguientes causas:
RIESGO
_.QU# PUEDE
OCURRIR?
Modificaciones
a su diseSo
pueden
al tanque.
debilitar
_COMO
o construcci6n
PREVENIRLO?
Ensamble los componentes
acuerdo
alas instrucciones
del tanque de
de servicio.
No efectue perforaciones
en el tanque, o
agregados soldados sobre el mismo, o al-
EXPLOSION DE
TANQUES
tere su diseSo
La sustituci6n
de componentes
no autorizados
o fuera del estandar pueden debilitar al tanque
o causar
Una
limpieza
o sus componentes
o mantenimiento
pueden
inadecuados
manera.
Utilice solamente
aquellos componentes
suministrados
con
su
tanque,
ensamblados
de
acuerdo
a
las
instrucciones
de la literatura de servicio.
la falla de sus componentes.
DaSo al tanque
debilitarlo.
de ninguna
•
Jambs intente reparar un tanque da_ado.
Reemplacelo por uno nuevo.
Despues
de cada uso,
limpie y seque
el
pueden bloquear
los pasajes de aire hacia la
valvula de seguridad,
man6metro
o conexi6n
de salida, permitiendo
que la presi6n se eleve
tanque
y la tapa de acuerdo
a
instrucciones
de
mantenimiento.
las
Asegurese
las
a niveles
peligrosos,
e impidiendo
presi6n del tanque se reduzca.
valvulas de seguridad, el man6metro
y la
conexi6n de salida esten libres de pintura
que
la
que
las
salidas
hacia
endurecida u otros materiales que podrian
impedir el movimiento
libre del aire.
Violar la valvula
que la presi6n
de seguridad puede determinar
del tanque se eleve a niveles
peligrosos.
de
de
presi6n, o alterando su funcionamiento
de
ninguna manera. Accione la valvula antes
de cada uso para asegurar que funciona
adecuadamente.
La tapa
del tanque
violentamente
expelida
el tanque
Jambs
intente
ajustar
la valvula
seguridad
modificando
su regulaci6n
puede
Ilegar
a ser
si se la extrae mientras
esta bajo presi6n.
Antes de aflojar el sujetador
para retirar
la tapa, cierre el suministro
de aire de la
entrada del tanque,
y gire la perilla del
regulado
en sentido antihorario
a fin de
aliviar
la presi6n
del tanque.
Verifique
tirando
El uso de reactivos quimicos puede atacar las
juntas de la tapa y la valvula de seguridad,
permitiendo
que la presi6n
niveles peligrosos.
Los solventes
- por ejemplo:
del tanque
suba a
del aro de la valvula
de seguridad.
No use reactivos quimicos en su tanque,
tales como acidos, soluciones
causticas
o
solventes
de
hidrocarburos
halogenados.
de hidrocarburos
1,1,1 tricloroetano,
halogenados
y el cloruro
de metilenopueden reaccionar quimicamente
con el aluminio. Si esta reacci6n ocurre dentro
de un contenedor
un incremento
explotar.
El sobreajuste
cerrado,
tal como
de la presi6n,
de
los
el tanque
sujetadores
si fuera
puede
puede
causarles su debilitamiento
y desprenderse,
Io
cual determinaria
que la tapa del tanque fuese
expelida violentamente.
No utilice
Ilaves de fuerza, alicates
u otras
herramientas
para ajustar los sujetadores
del tanque.
Utilice el torque que usted
pueda aplicar con sus manos. Si la junta
de la tapa pierde compresi6n,
libere la
presi6n del tanque y limpie o reemplace
la junta.
4- SP
INFORMACION
GENERAL
DESCRIPCION
El Tanque para pintar a presion Craftsman de 9,1 litros (2 galones), soportar presion hasta un maximo de 80 PSI. Este
tanque para pintar esta equipado con un regulador de aire, manometro, valvula de seguridad, y salida de fluidos. Esta
construido solamente con materiales de la mejor calidad para obtener una mayor durabilidad. Sus 9,1 litros (2 galones)
de capacidad le permiten manejar trabajos de mayor envergadura.
r!|
".,]:| :[o,7:_I[_]
[o] _ •
Este tanque a presion no esta dise_ado para materiales de alta abrasion, corrosivos, o con un contenido de
inclusiones de oxido. Si fuera usado con dichos materiales, es aconsejable la frecuente e intensa limpieza
a fin de reducir la necesidad de sustitucion de partes.
Instrucciones
de ensamblado
1.
Instale el conjunto del regulador en el adaptador pivotable
de la tapa del tanque. Verifique la base del regulador para
identificar la ubicaci6n de la conexi6n del tanque.
2.
Instale la manija de levantar, en el orificio roscado del centro
de la tapa del tanque. Ajuste la tuerca hexagonal.
3.
Conecte la manguera de suministro del aire en la conexi6n
del tanque regulador. (Optativo para el lado derecho o
izquierdo).
Parte del aire proveniente de la linea de presi6n de aire del
compresor o linea de suministro de aire, saltea la presi6n del
regulador a trav6s del una conexi6n en "T", y es entregado a
la pistola rociadora. Se requerira un regulador adicional entre
el tanque de pintura y la pistola rociadora.
Operacibn
4.
Conecte la manguera del atomizador de aire a la conexi6n
de la salida del aire que se encuentra directamente opuesta
a la conexi6n de entrada del mismo.
5.
Conecte la manguera del material al adaptador de salida
del fluido, Iocalizado sobre la tapa del tanque.
Instrucciones
para el uso del regulador
presibn del tanque para pintar.
de
Propdsito del regulador de presidn.
El regulador de presi6n del tanque para pintar, regula la
cantidad de presi6n aplicada a la pintura dentro del tanque.
Este controla la presi6n de la pintura que estA siendo entregada
a la pistola rociadora.
Presiones recomendadas para el tanque de pintura.
Pistolas de mezcla interna. Utilice la presi6n mas elevada
admitida por el tanque, hasta la cantidad total de presi6n de
aire que est& siendo entregada a la pistola rociadora, pero
nunca excediendo las 501bs de presi6n de aire tanto en la
pistola rociadora como en el tanque de pintura.
Pistolas de mezcla externa. Utilice la presi6n menor del
tanque. Comience siempre con una presi6n en el tanque de
pintura de "cero", e incremente dicha presi6n gradualmente
hasta obtener el formato de rociado que se busca.
del tanque
para pintar
Usted se encuentra ahora listo para Ilenar el tanque con material. Antes de hacerlo asegQrese de mezclarla y colarla
cuidadosamente
a fin de extraer cascaras o particulas sin
disolver, las que - de otra manera -impedirAn
el flujo del
material a trav6s de la manguera y la pistola.
Una lata de un gal6n de pintura puede ser ahora colocada
completamente entera en el tanque, en lugar de verterla dentro
del mismo.
Coloque la tapa del tanque y ajQstela a mano con su tornillos
sujetadores.
Cierre el regulador de pintura del tanque girando la manija en
T en sentido antihorario. Ajuste el regulador del compresor
para obtener la presi6n deseada de aire en la pistola rociadora.
Ajuste ahora el regulador en el tanque de pintura a fin de
obtener la presi6n deseada para el material. Cuanto mas
elevado respecto al tanque quiera usted rociar, mas necesario
ser_ elevar la presi6n sobre el material. La presibn normal
de operacibn del tanque a presibn para pintar es de 25 a
30 PSI. si usted quisiera reducir
la presi6n,
bastara
simplemente con rotar la manija "T" ajustando el tornillo en
sentido antihorario hasta obtener el valor nominal de la presi6n
deseada. No hay necesidad de presionar el gatillo disparador
de la pistola para purgar la presi6n de exceso de pintura.
IMPORTANTE: Antes de abrir la presi6n del aire, desenrosque
la manija T del regulador en toda su extensi6n en sentido
antihorario para cerrar la presi6n del aire. Abra el paso del
aire, luego ajuste el regulador
a la presi6n requerida
(aproximadamente
12 Ibs para pistolas de mezcla externa).
No use el tanque para pintar con presi6n de trabajo superior ,_ SP
las 50 Ibs.
NO USE PRESION EN SU TANQUE POR ENCIMA
DE LOS 80 PSI.
REGULADOR DEL AIRE
(RECOMENDADO, PERO NO INCLUIDO)
REGULADOR DE PRESION
/
(NO EXCEDER DE 80 PSI) _
MANGUERA
DEL AIRE
\
FILTRO DE AIRE
(RECOMENDADO
PERO NO INCLUIDO)
MANGUERA DEL MATERIAL
PINTURA
(DENTRO
DEL TANQUE PARA PINTAR)
COMPRESOR
DEL AIRE
CON REGULADOR
FLUIDO
J
Instrucciones
de limpieza
Una vez flojos los tornillos
de mariposa, golpee
suavemente los sujetadores hacia atras y la tapa hacia
un lado. Afloje unas tres vueltas el anillo reten de la tapa
de la pistola rociadora, y luego haga funcionar el
suministro del aire. Cubra con una tela las salida del
r!v_,1 =_vj=1=t/ =1_[_] r_,l
Cierre siempre la presibn del aire en su origen
y purgue toda la presibn del Tanque para pintar
tirando suavemente del anillo de la valvula
antes de aflojar el tornillo de mariposa y los
sujetadores para remover la tapa.
Es muy importante que el tanque, la manguera del
material, y la pistola rociadora sean limpiados tan pronto
como se concluya el trabajo. Cierre el paso del
suministro principal del aire al tanque. Remueva toda la
presion del mismo tirando del anillo de la valvula de
seguridad hasta que la presion termine de ser purgada.
Gire en sentido antihorario la manija "T" que ajusta los
tornillos sobre el regulador, hasta que no se perciba
tension del resorte.
aire de la tapa de la pistola, y presione el gatillo. EIIo
forzara la salida del material hacia atras a traves de la
manguera hacia adentro del tanque. Vacie y limpie el
tanque y las partes que han estado en contacto con el
material. Utilice un solvente adecuado. Vierta solvente
dentro del tanque. Reponga la tapa, ajuste los tornillos
de mariposa y sujetadores, y rocie hasta que aparezca
el solvente limpio.
6 - SP
GU|A DE DIAGNOSTICO
PROBLEMA
DE PROBLEMAS
CORRECCION
CAUSA
El aire escapa del acceso de
la tapa reguladora.
Diafragma
regulador.
roto o da_ado
La presion baja lentamente
en el manometro.
Asiento
Hay perdidas de fluido o de
aire en la junta de la tapa.
Tapa o junta defectuosa.
Reemplace la junta de la tapa.
Tomillo de mariposa sin ajustar.
Ajuste los tornillos de mariposa.
de
valvula
en el
sucio
o
Reemplace el regulador.
Reemplace el regulador.
gastado.
La pintura del tanque tiende
a asentarse rapidamente.
Pintura
sin
adecuadamente
mezclar
diluida.
El manometro no registra
presion del aire.
Manometro del aire defectuoso.
La valvula de seguridad se
dispara.
La presion
del tanque
demasiado elevada.
O
alas
Reemplace el manometro del aire.
es
Valvula de seguridad defectuosa.
7 - SP
Mezcle o diluya la pintura de acuerdo
instrucciones del producto.
Reduzca la presion del tanque a 20-50 PSI.
Reemplace la valvula de seguridad.
DIAGRAMA
DEL TANQUE
PARA PINTAR
6
8 _ ............................... 11
_4
i
7
14
15
3
17
8 - SP
REFERENCIA
O
CLAVE
1
2
3
4
5
6
7
9
10
11
12
14
15
16
17
18
PIEZA
N°
PT-0001
PT-0004
PT-0005
H-2099
GA-365
PT-0003
SSP-508
TIA-6128
PT-0006
SSF-597
SSF-506
PT-0007
SSN-624
PT-0002
PT-0008
SSP-507
DE PARTES
DESCRIPCION
CANTIDAD
CON JUNTO DE CUBIERTA DELTANQUE ............
1
JUNTA DE LA TAPA .............................................
1
CON JUNTO DE LATAPA .....................................
1
ADAPTADOR ......................................................
3
MANOMETRO .....................................................
REGULADOR ......................................................
1
1
ADAPTADOR PIVOTABLE ....................................
1
V/_LVULA DESEGURIDAD ...................................
1
MANIJA ................................................................
1
TUERCAHEXAGONAL .........................................
1
CODO ..................................................................
1
CON JUNTO BRIDA ..............................................
PERNO DE BISAGRA .........................................
4
4
4
TUBO DEL FLUIDO ............................................
1
ADAPTADOR DE SALIDA DEL FLUIDO .............
1
ANILLO DE RETENCl0N
9 - SP
......................................
NOTAS DE SERVIClO
10 - SP
NOTAS DE SERVIClO
11 - SP
CRAFTSMRNo
TANQUE PARA PINTAR
MANUAL
DE PARTES
Por piezas de reparaci6n
MODELO
Llame
N°
entre
o reemplazo
las 7 am - 7 pro, los 7 dias de la semana,
1-800-366-
919.161020
que usted necesite
al n °
PA RT
(1-800-366-7278)
AI requerir
servicio o solicitar
piezas, suministre
siempre
la
siguiente informaci6n:
• NQmero de modelo
Para obtener servicio de reparaciones domiciliarias de las
marcas m&s importantes,
Llame las 24 horas del dia, 7 dias por semana
1-800-4-
• Pieza nQmero
• Descripcion
de la pieza
R E PA I R
(1-800-473-7247)
° Nombre del item
UN AI_IO DE GARANT|A
COMPLETA
SOBRE EL TANQUE
PARA PINTAR
Si este tanque para pintar tuviera fallas
originadas en sus materiales o mano de
obra, dentro del aSo de su fecha de compra,
RESTITUYALO
AL
CENTRO
DE
REPARACIONES
SEARS
MAS
CERCANO DENTRO DE LOS EE.UU., Y
SEARS SE LO REPARARA LIBRE DE
CARGO. SI HUBIERA SIDO COMPRADO
A LA CADENA DE FERRETERJA ORCHARD, RESTITUYALO AL COMERCIO
ORCHARD
MAS CERCANO,
Y ORCHARD LO REPARARA,
LIBRE DE
CARGO.
Para saber la ubicaci6n del Centro de obtenci6n de piezas
y servicio SEARS de su zona
Llame las 24 horas del dia, 7 dias por semana
1-800-488-1222
Para obtener informaci6n acerca de la compra
del Acuerdo de mantenimiento Sears, o para
inquirir acerca de un Acuerdo existente, Ilame
entre las 9 am y las 5 pm, de lunes a s_bados:
1-800-827-6655
Si este tanque
para pintar
fuera
utilizado
para uso comercial
o con prop6sito
de
alquiler,
la garantia
tendr&
vigencia
solamente
por noventa
fecha de compra.
dias a partir
de la
Esta garantia
le otorga a usted derechos
legales
especificos,
y aun podria
tener
usted otros derechos
varian entre estados.
Sears,
adicionales
Roebuck
Los Especialistas
que
and
Co.,
Hoffman
de Reparaciones
Estates,
en Am6rica
IL 60179
U.S.A.