1
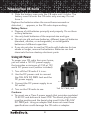
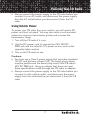
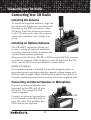
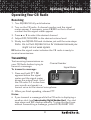
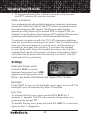
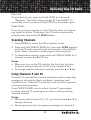
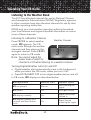
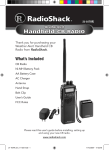
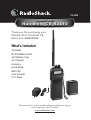
21-1679 Weather Alert Handheld CB RADIO Thank you for purchasing your Weather Alert Handheld CB Radio from RadioShack. What’s Included CB Radio Ni-MH Battery Pack AA Battery Case AC Charger Antenna Hand Strap Belt Clip User’s Guide FCC Rules Please read this user’s guide before installing, setting up and using your new CB radio. www.radioshack.com Contents Contents A Look at Your CB Radio........................................................3 Powering Your CB Radio ........................................................4 Using the Ni-MH Battery Pack...............................................4 Recycle Rechargeable Batteries....................................... 5 Using the AA Battery Case....................................................5 Using AC Power ....................................................................6 Using Vehicle Power..............................................................7 Connecting Your CB Radio.....................................................8 Installing the Antenna ...........................................................8 Installing an Optional Antenna .............................................8 Connecting an External Speaker or Microphone ..................8 Operating Your CB Radio.......................................................9 Receiving...............................................................................9 Transmitting...........................................................................9 Safety Precaution ........................................................... 10 Settings ...............................................................................10 High/Low Power Level ................................................... 10 Backlight ........................................................................ 10 Key Tone ........................................................................ 10 Key Lock ........................................................................ 11 Power Save .................................................................... 11 Scanning Channels..............................................................11 Using Channels 9 and 19 ....................................................11 Listening to the Weather Band ...........................................12 Listening to a Weather Channel .................................... 12 Turning Digital Weather Alert On and Off..................... 12 Understanding Digital Weather Alert ............................ 13 Additional Information.........................................................14 Legal Use of Your CB Radio ................................................14 Common Uses for a CB Radio.............................................14 Transmission Courtesy.........................................................14 Transmission Range.............................................................14 Common 10-Codes.............................................................15 Frequency Range ................................................................16 3PECIÚCATIONS .......................................................................17 Care .....................................................................................17 2&%MISSIONS)NFORMATION.....................................................18 Do Stuff ...............................................................................19 Limited Warranty .................................................................20 2 A Look at Your CB Radio A Look at Your CB Radio Antenna SQUELCH OFF/VOLUME Channel Selection "UTTONS Ÿ/ź CH9/19 SCAN CB/WX H/L BEEP Internal Microphone PTT 0USHTO4ALK LOCK/ALERT OFF LIGHT Internal Speaker Attaching the Belt Clip To attach the belt clip, slide it up until it locks into place. To remove the belt clip, pull the tab gently and slide the belt clip down. Hand Strap Hole Tab Belt Clip 3 Powering Your CB Radio Powering Your CB Radio You can power your CB radio from one of these four sources: • The supplied rechargeable Ni-MH battery pack • Eight AA batteries (not included) using the supplied battery case • AC power using an AC-to-DC power supply (not included) • Vehicle power using a DC power cord (not included) Using the Ni-MH Battery Pack Charge the Ni-MH battery pack (using the supplied AC charger) FORABOUTHOURSPRIORTOUSINGITFORTHEÞRSTTIMEØFTERWARD it takes 14-16 hours to charge the battery pack when it is fully discharged. You can charge the battery pack while it is installed or removed. But the CB radio does not work during charging. To charge the battery pack: Connect the AC Charger to the CHG Jack, then plug it into an AC outlet. The CHARGE Indicator lights red and charging starts. Note: The supplied AC charger is for charging only, not for directly powering the CB. 4OINSTALLTHEBATTERYPACK Slide the battery pack onto the CB radio until it clicks. The battery PACKÞTSONTOTHE#"RADIOONLY one way. Do not force it. To remove the battery pack, slide the battery pack in the arrow direction while holding up the latch. 4 Latch CHG Jack CHARGE Indicator Slide to remove battery pack Powering Your CB Radio #AUTIONS • To avoid injury, do not connect the AC charger to a ceiling outlet. After charging, disconnect the AC charger. • You must use a Class 2 power supply that provides 16V DC and delivers at least 200mA. The barrel plug’s center must BEPOSITIVEANDTHEBARRELPLUGMUSTÞTTHE#"mSCHG jack. 4HESUPPLIEDØ#CHARGERMEETSTHESESPECIÞCATIONS5SING ANADAPTERTHATDOESNOTMEETTHESESPECIÞCATIONSCOULD damage the CB radio or adapter. • Always connect the AC charger to the battery pack before you connect it to an AC outlet, and disconnect the AC charger from the AC outlet before you disconnect it from the battery pack. • Overcharging your battery pack could shorten its life. • Do not charge your battery pack at temperatures below 14°F (–10°C) or above 131°F (55°C). • You cannot recharge the Ni-MH battery pack using DC power. Recycle Rechargeable Batteries Placing rechargeable batteries in the trash can be harmful to the environment. Instead, recycle old rechargeable batteries at your local RadioShack store free of charge. RadioShack participates in the RBRC© battery recycling program, and is committed to preserving the environment and conserving natural resources. Call 1-800-THE-SHACK (1-800843-7422) for more information. Using the AA Battery Case 1. Turn off the CB radio if it is on. 2. Pull the halves of the case apart to open it. Insert eight AA batteries, matching the polarity marks (+ and –). Snap the halves of the case together to close it. 5 Powering Your CB Radio 3. Slide the battery case onto the CB radio until it clicks. The BATTERYCASEÞTSONTOTHE#"RADIOONLYONEWAY$ONOT force it. Replace the batteries when the sound becomes weak or distorted, ; appears, or the CB radio stops working. "ATTERY.OTES • Dispose of old batteries promptly and properly. Do not burn or bury batteries. • Use only fresh batteries of the required size and type. • Do not mix old and new batteries, different types of batteries (standard, alkaline, or rechargeable), or rechargeable batteries of different capacities. • If you do not plan to use the CB radio with batteries for two weeks or longer, remove the batteries. Batteries can leak chemicals that can destroy electronic parts. Using AC Power To power your CB radio from your home, you will need a 12V DC power supply that provides a minimum of 2.5A at 12V and a DC power cord (neither included). 1. Turn off the CB radio if it is on. 2. Use the DC power cord to connect the CB’s 12V DC PWR Jack and the DC power supply. 3. Connect the DC power supply to an AC outlet. 12V DC PWR Jack 4. Turn on the CB radio to use. #AUTIONS • You must use a Class 2 power supply that provides regulated 13.8V DC and delivers at least 2.5A. The barrel plug’s center MUSTBEPOSITIVEANDTHEBARRELPLUGMUSTÞTTHE#"mS12V DC PWR jack. Using an adapter that does not meet these SPECIÞCATIONSCOULDDAMAGETHE#"RADIOORADAPTER 6 Powering Your CB Radio • Always connect the power supply to the CB radio before you connect it to an AC outlet, and disconnect the power supply from the AC outlet before you disconnect it from the CB radio. Using Vehicle Power To power your CB radio from your vehicle, you will need a DC power cord (not included). You may also need a roof-mounted antenna to improve transmission quality and increase the transmission range. 1. Turn off the CB radio if it is on. 2. Use the DC power cord to connect the CB’s 12V DC PWR jack and the vehicle’s 12V power source, such as the cigarette-lighter socket. 3. Turn on the CB radio to use. #AUTIONS • You must use a Class 2 power supply that provides regulated 12V DC and delivers at least 2.5A. The barrel plug’s center MUSTBEPOSITIVEANDTHEBARRELPLUGMUSTÞTTHE#"RADIOmS 12V DC PWR jack. Using an adapter that does not meet THESESPECIÞCATIONSCOULDDAMAGETHE#"RADIOORADAPTER • Always connect the power supply to the CB radio before you connect it to the vehicle outlet, and disconnect the power supply from the outlet before you disconnect it from the CB radio. 7 Connecting Your CB Radio Connecting Your CB Radio Installing the Antenna To install the supplied antenna, align the two slots on the antenna connector with the tabs on the BNC connector of the CB radio. Push the antenna connector to the CB radio and rotate the antenna connector clockwise until it locks into place. Installing an Optional Antenna The CB’s BNC connector allows you to use a variety of optional antennas, including external mobile antennas and outdoor base station antennas. Always use the 50-ohm, RG-58, or RG-8 coaxial cable to connect an outdoor antenna. If the antenna is over 50 feet from the CB radio, use the RG-8 low-loss dielectric coaxial cable. Safety Precaution: If an outside antenna is installed, be sure the antenna system is grounded so as to provide protection against voltage surges and built-up static charges. When installing the antenna, be careful not to touch overhead power lines as contact with them might be fatal. Connecting an External Speaker or Microphone Connect an external speaker (not included) to the SPK jack of your CB radio. This mutes the CB’s internal speaker. Connect an external microphone (not included) to the MIC jack of your CB radio. This disables the CB’s internal microphone. 8 SPK MIC Operating Your CB Radio Operating Your CB Radio Receiving 1. Turn SQUELCH fully anticlockwise. 2. Turn on the CB radio. A channel number and the signal meter appear. If necessary, press CB/WX so that a channel number and the signal meter appear. 3. Press Ÿ or ź to select the desired channel. 4. Adjust OFF/VOLUME to the desired volume level. 5. Slowly turn SQUELCH back clockwise just until the noise stops. Note: Do not turn SQUELCH too far clockwise because you might cut out weak signals. RX below the signal meter indicates the CB radio is ready to receive transmissions. Transmitting Test receiving transmissions on your CB Radio before trying to transmit a message. Channel Number Signal Meter 4OTRANSMITAMESSAGE 1. Press and hold PTT. TX appears below the signal meter and the signal meter shows the output level. Hold the CB radio 2–3 inches from your mouth and speak in a normal voice to the internal microphone. 7HENYOUÞNISHSPEAKINGRELEASEPTT. .OTES • If you transmit a message while the CB radio is displaying a weather alert (see Understanding Digital Weather Alert), the alert tone stops and WX displays steadily. To stop the alert tone without transmitting a message, press LOCK/ALERT OFF. 9 Operating Your CB Radio • To avoid overheating the internal circuit, do not press and hold PTT nonstop for over two minutes. Safety Precaution Your wireless hand-held portable transceiver contains a low power transmitter. When the Push-to-Talk (PTT) button is pushed it sends out radio frequency (RF) signals. The device is authorized to operate at a duty factor not to exceed 50%. In August 1996, the Federal Communications Commissions (FCC) adopted RF exposure guidelines with safety levels for hand-held wireless devices. To maintain compliance with the FCC’s RF exposure guidelines hold the transmitter and antenna at least 1 inch (2.5 centimeters) from your face and speak in a normal voice, with the antenna pointed up and away from the face. If you wear the handset on your body while using the headset accessory, use only the supplied belt clip for this product and when transmitting, take it out of the belt to ensure that the antenna is at least 1 inch (2.5 centimeters) from your body. Settings High/Low Power Level Press H/L BEEP to switch between low power level (LOW appears) and high power level. Note: Low power level reduces the range of the CB radio. Backlight Press LIGHT to turn on the backlight; press again to turn off. The backlight turns off automatically after 10 seconds. Key Tone To activate the key tone, press and hold H/L BEEP for 2 seconds. ͈Gappears. The CB radio sounds a beep when you press any key except PTT. To disable the key tone, press and hold H/L BEEP for 2 seconds again so that ͈Gdisappears. 10 Operating Your CB Radio Key Lock To activate key lock, press and hold LOCK for 2 seconds. appears. This locks all keys except PTT and LIGHT. To unlock key control, press and hold LOCK for 2 seconds again. 6 Power Save If you do not press any key or if the CB radio does not receive any signal for about 10 seconds, the CB radio automatically enters power save mode. P. SAVE ßASHES Scanning Channels 1. Press CB/WX to select the CB or weather mode. 2. Press and hold CH9/19 SCAN for 2 seconds. SCAN appears, and the CB radio scans through all channels in the selected band. When it receives a strong signal, scanning stops. 3. To deactivate scanning, press and hold CH9/19 SCAN for 2 seconds or press the Ÿ or źkey. .OTES p 7HENYOUTURNONTHE#"RADIOFORTHEÞRSTTIMETHESCAN feature is automatically set to ON in the weather band. • To change weather channels manually, press the Ÿ or ź key. Using Channels 9 and 19 Channel 9 is reserved for motorist assistance and for reporting emergency information about accidents, hazardous road conditions, etc. Channel 19 is used by truck drivers for general communication purposes. Press CH9/19 SCAN once to select channel 9, press again to select channel 19, press again to return to the previously selected channel. .OTES • When you select channel 9 or 19, you cannot press Ÿ or ź to change channels. • Always give priority to emergency messages on channel 9. 11 Operating Your CB Radio Listening to the Weather Band The FCC has allocated channels for use by National Oceanic and Atmospheric Administration (NOAA). Regulatory agencies in other countries have also allocated channels for use by their weather reporting authorities. NOAA and your local weather reporting authority broadcast your local forecast and regional weather information on one or more of these channels. Listening to a Weather Channel Weather Channel Press CB/WX to select weather mode. WX appears. The CB radio scans through the weather channels and then stops on the strongest channel. Press CB/WX again to return to CB mode. Note: You cannot adjust the power level or switch to channel 9 or 19 while listening to a weather channel. Turning Digital Weather Alert On and Off • Digital weather alert automatically scans in the background when you select the CB mode, unless you turn it off. • Press LOCK/ALERT OFF to turn digital weather alert on and off. In CB mode, WX displays as described below. WX Appearance Weather Alert Weather Signal WX not present Not on Not scanning for signal WX flashes On No signal found WX displays steadily On Signal found and locked in WX displays steadily for 2 seconds and then flashes twice On Signal found; scanning for signal 12 Operating Your CB Radio Understanding Digital Weather Alert The weather service precedes each weather alert with a digitallyENCODED3Ø-%3PECIÞCØREA-ESSAGE%NCODING SIGNALTHEN a 1050 Hz tone. When your local weather station broadcasts a weather alert signal, the CB radio sounds an alert tone and displays a message showing the alert level. SAME Event Code Alert Tone -ESSAGE A (Watch) Watch alert 10 seconds WCH (Watch) W (Warning) TOR (Tornado) SVR (Severe) S (Statement) RWT (Test) Warning alert 10 seconds WRN (Warning) Statement alert 10 seconds ADV (Advisory) .OTES • The CB radio does not display the actual location referenced by SAME messages. It uses only the message portion of the SAME signal. • If severe weather threatens, do not wait for an alert tone; tune to the weather broadcast and monitor the weather information. • If a weather signal ends, the CB radio beeps three times (when the key tone is turned on) and only when the weather SIGNALENDSTHEÞRSTTIMETHENWXßASHESTOINDICATETHEREIS no signal. 13 Additional Information Additional Information Legal Use of Your CB Radio The CB Radio service is a private, two-way, short-distance voice communications service for personal or business activities. For rules regarding legal CB radio use, see Part 95, Subpart D: FCC Rules for Operating a Citizens Band (CB) Radio published by the FCC. Common Uses for a CB Radio p 7ARNOFTRAFÞCTIEUPSAHEAD • Help truck drivers and delivery personnel learn road and TRAFÞCCONDITIONSANDGETASSISTANCEINLOCATINGDESTINATIONS • Provide fast help in the event of emergency or breakdown. • Help construction crews coordinate the activities of different work crews. p ØSSISTCOMMUNICATIONBETWEENSECURITYOFÞCERS • Provide weather and road information. • Contact friends or other CB users on trips. p +EEPINTOUCHWITHYOUROFÞCEORHOME p "RINGMOREFUNFORCAMPINGÞSHINGANDOTHERSPORTSHELP LOCATEAFRIENDORÞNDOUTWHATmSCOOKINGBACKATCAMP Transmission Courtesy • Wait for a pause in someone else’s transmission before you ask for a break. • If you do not receive an answer to your call after a second attempt, sign off and wait several seconds before trying again. • Do not hold down PTT when you are not talking. (This is called dead keying.) • Assist callers with directions, information about road conditions, and any other reasonable requests. Transmission Range The maximum range and quality of CB transmissions vary depending on the following conditions: 14 Additional Information • Type and quality of the antenna. • Height of the antenna’s mounting location (the higher the antenna, the better the signal’s range). • Surrounding terrain (mountains and tall buildings limit the range). • Weather conditions. • Number of nearby CBs operating on the same channel. Note: Your CB radio’s transmission range is generally line-ofsight. To ensure maximum range, always keep the battery pack fully charged or use fresh batteries. Common 10-Codes Citizens Band radio operators have largely adopted the 10codes for standard questions and answers. These codes permit faster communication and better understanding in noisy areas. The following table lists some of the more common codes and their meanings: Code 10-1 10-2 10-3 10-4 10-5 10-6 10-7 10-8 10-9 10-10 10-11 10-12 10-13 10-17 10-18 10-19 10-20 10-21 Meaning Receiving poorly Receiving well Stop transmitting OK, message received Relay message Busy, stand by Out of service In service Repeat message Transmission completed, standing by Talking too rapidly Visitors present Advise Weather/Road conditions Urgent business Anything for us? Nothing for you. Return to base My location is____ Call by telephone 15 Code 10-22 10-23 10-25 10-26 10-27 10-28 10-32 10-33 10-36 Meaning Report in person to____ Stand by Can you contact____ Disregard last information I am moving to channel Identify your station I will give you a radio check %MERGENCYTRAFÚC Correct time is____ 10-37 Wrecker needed at____ 10-38 Ambulance needed at____ 10-41 Please turn to channel____ 10-42 4RAFÚCACCIDENTAT???? 10-43 10-50 10-62 10-70 4RAFÚCTIEUPAT???? Break channel Unable to copy; use telephone Fire at____ Additional Information Note: Although this table lists the meanings of the 10-codes in the form of a statement, they can also be phrased as questions (10-6: Are you busy? 10-20: What is your location?) Frequency Range Your CB radio receives and transmits on the following 40 CB channels: Channel Frequency -(Z Channel Frequency -(Z Channel Frequency -(Z 1 26.965 15 27.135 28 27.285 2 26.975 16 27.155 29 27.295 3 26.985 17 27.165 30 27.305 4 27.005 18 27.175 31 27.315 5 27.015 19 27.185 32 27.325 6 27.025 20 27.205 33 27.335 7 27.035 21 27.215 34 27.345 8 27.055 22 27.225 35 27.355 9 27.065 23 27.255 36 27.365 10 27.075 24 27.235 37 27.375 11 27.085 25 27.245 38 27.385 12 27.105 26 27.265 39 27.395 13 27.115 27 27.275 40 27.405 14 27.125 In addition, your CB radio can receive these weather service channels: Channel Frequency -(Z Channel Frequency -(Z Channel Frequency -(Z 1 162.400 4 162.475 7 162.550 2 162.425 5 162.500 3 162.450 6 162.525 16 Specifications Specifications Receiver Frequency Coverage ........ 26.965~27.405 MHz, 162.400~162.550 MHz Sensitivity...........................................................................1 μV for 10 dB Adjacent Channel Rejection ((S+N)/N) ........................................... 60 dB Squelch................................................................ Adjustable from 0.5 μV Audio Output Power (10% THD) ................................................ 400 mW Current Drain............................. 80 mA (Standby); 400 mA (Max. Audio) Transmitter Frequency Coverage ............................................... 26.965~27.405 MHz Power Output ........................................................ 3 W (High); 1 W (Low) Conducted Spurious Emission Harmonics ..................................... 60 dB Type of Modulation ............................................................................. A3 Frequency Tolerance ....................................................................0.002% Antenna Impedance ......................................................................... 50 Current Drain (@ Max. Modulation)............... 1.3 A (High); 700 mA (Low) Dimensions (H×W×D) .......... 7.4 × 2.6 × 1.8 inch (186 × 65 × 47 mm) Weight (including battery pack & antenna) ...................... 18.3 oz (520 g) 3PECIÞCATIONSARESUBJECTTOCHANGEANDIMPROVEMENTWITHOUTNOTICE Actual product may vary from the images found in this document. Care Keep the CB radio dry; if it gets wet, wipe it dry immediately. Use and store the CB radio only normal temperature environments. Handle the CB radio carefully; do not drop it. Keep the CB radio away from dust and dirt, and wipe it with a damp cloth occasionally to keep it looking new. Modifying or tampering with the CB radio’s internal components can cause a malfunction and might invalidate its warranty and avoid your FCC authorization to operate it. If your CB radio is not performing as it should, take it to your local RadioShack store for assistance. 17 RF Emissions Information RF Emissions Information This equipment has been tested and found to comply with the limits for a Class B digital device, pursuant to Part 15 of the FCC Rules. These limits are designed to provide reasonable protection against harmful interference in a residential installation. This equipment generates, uses, and can radiate radio frequency energy and, if not installed and used in accordance with the instructions, may cause harmful interference to radio communications. However, there is no guarantee that interference will not occur in a particular installation. If this equipment does cause harmful interference to radio or television reception, which can be determined by turning the equipment off and on, the user is encouraged to try to correct the interference by one or more of the following measures: • Reorient or relocate the receiving antenna. • Increase the separation between the equipment and receiver. • Connect the equipment into an outlet on a circuit different from that to which the receiver is connected. Consult your local RadioShack store or an experienced radio/TV technician for help. If you cannot eliminate the interference, the FCC REQUIRESTHATYOUSTOPUSINGYOURPRODUCT#HANGESORMODIÞCATIONS not expressly approved by RadioShack may cause interference and void the user’s authority to operate the equipment. This device complies with Part 15 of the FCC Rules. Operation is subject to the following two conditions: (1) this device may not cause harmful interference, and (2) this device must accept any interference received, including interference that may cause undesired operation. 7ARNINGS • Any adjustment to this equipment is recommended to be performed by or under the immediate supervision and responsibility OFAPERSONCERTIÞEDASTECHNICALLYQUALIÞEDTOPERFORMTRANSMITTER maintenance and repair duties in the private land mobile services ANDÞXEDSERVICESBYANORGANIZATIONORCOMMITTEEREPRESENTATIVEOF users of those services. • Replacement of any transmitter component (crystal, semiconductor, etc.) for this equipment could result in violation of FCC rules. 18 Do Stuff Do Stuff Do more with your CB radio. -INI%XTENSION3PEAKER • Clip it to your visor. • Set it on your dash. 25-watt, 39” Whip, Magnetic-mount Mobile CB Antenna • Receive more, and • Transmit farther in your car. DC Power Cord • Power up in your car. 13.8VDC 3-Amp Power Supply • Power up in your home. 7ATT(EAVYDUTY%XTENSION Speaker • Amplify at home or in the car. 7ATT!MPLIÚED-OBILE %XTENSION3PEAKER • Amplify over loud noises. 19 Limited Warranty This product is warranted by RadioShack against manufacturing defects in material and workmanship under normal use for one (1) year from the date of purchase from RadioShack company-owned stores and authorized RadioShack franchisees and dealers. EXCEPT AS PROVIDED HEREIN, RadioShack MAKES NO EXPRESS WARRANTIES AND ANY IMPLIED WARRANTIES, INCLUDING THOSE OF MERCHANTABILITY AND FITNESS FOR A PARTICULAR PURPOSE, ARE LIMITED IN DURATION TO THE DURATION OF THE WRITTEN LIMITED WARRANTIES CONTAINED HEREIN. EXCEPT AS PROVIDED HEREIN, RadioShack SHALL HAVE NO LIABILITY OR RESPONSIBILITY TO CUSTOMER OR ANY OTHER PERSON OR ENTITY WITH RESPECT TO ANY LIABILITY, LOSS OR DAMAGE CAUSED DIRECTLY OR INDIRECTLY BY USE OR PERFORMANCE OF THE PRODUCT OR ARISING OUT OF ANY BREACH OF THIS WARRANTY, INCLUDING, BUT NOT LIMITED TO, ANY DAMAGES RESULTING FROM INCONVENIENCE, LOSS OF TIME, DATA, PROPERTY, REVENUE, OR PROFIT OR ANY INDIRECT, SPECIAL, INCIDENTAL, OR CONSEQUENTIAL DAMAGES, EVEN IF RadioShack HAS BEEN ADVISED OF THE POSSIBILITY OF SUCH DAMAGES. Some states do not allow limitations on how long an implied warranty lasts or the exclusion or limitation of incidental or consequential damages, so the above limitations or exclusions may not apply to you. In the event of a product defect during the warranty period, take the product and the RadioShack sales receipt as proof of purchase date to any RadioShack store. RadioShack will, at its option, unless otherwise provided by law: (a) correct the defect by product repair without charge for parts and labor; (b) replace the product with one of the same or similar design; or (c) refund the purchase price. All replaced parts and products, and products on which a refund is made, become the property of RadioShack. New or reconditioned parts and products may be used in the performance of warranty service. Repaired or replaced parts and products are warranted for the remainder of the original warranty period. You will be charged for repair or replacement of the product made after the expiration of the warranty period. This warranty does not cover: (a) damage or failure caused by or attributable to acts of God, abuse, accident, misuse, improper or abnormal usage, failure to follow instructions, improper installation or maintenance, alteration, lightning or other incidence of excess voltage or current; (b) any repairs other than those provided by a RadioShack Authorized Service Facility; (c) consumables such as fuses or batteries; (d) cosmetic damage; (e) transportation, shipping or insurance costs; or (f) costs of product removal, installation, set-up service adjustment or reinstallation. 4HISWARRANTYGIVESYOUSPECIÞCLEGALRIGHTSANDYOUMAYALSOHAVEOTHERRIGHTSWHICH vary from state to state. RadioShack Customer Relations 300 RadioShack Circle, Fort Worth, TX 76102 12/99 Protect the environment by recycling used electronics. Go to www.ecyclingcentral.comTOÚNDARECYCLELOCATIONNEARYOU ©2008. RadioShack Corporation. All rights reserved. RadioShack and RadioShack.com are trademarks used by RadioShack Corporation. 04A08 21-1679 AO0300ABA1 Printed in China