1
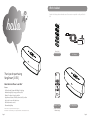
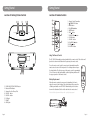
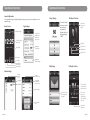
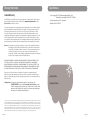
user’s manual
SongStream
model #: ID251
Music Dock for iPhone® and iPod®
What’s Included
hello.
Unpack the docking station and make sure all accessories are put aside so they will not be
lost.
A
B
C
D
E
F
iPhone/iPod
Dock Adapters
AC Adapter
Thank you for purchasing
SongStream [ ID251].
Music Dock For iPhone® and iPod®
Features
· ProTune Speaker System with RealBass Technology
· Simultaneously play & charge your iPhone/iPod
· Bluetooth® wireless technology built-in
· App enhanced features: FM radio, alarm clock, EQ, weather
· Line-In jack for use with other devices
· Full function remote control
· Blue ambient lighting
iPhone and iPod are registered trademarks of Apple Inc.
The Bluetooth® word mark and logos are registered trademarks owned by Bluetooth SIG, Inc.
Page 2
SOUND
CSPK52ii
Remote Control
Docking Station
(includes 3V CR2032
Lithium battery)
Page 3
Contents
Safety Information
Introduction
2
Warning!
What’s Included
3
TO REDUCE THE RISK OF FIRE OR ELECTRIC SHOCK, DO NOT EXPOSE THIS APPLIANCE TO
DRIPPING OR SPLASHING LIQUIDS.
Safety Information
5
CAUTION
Getting Started
Location of Docking Station Controls
Location of Remote Controls
Power Supply
Dock Adapters 8
9
10
11
Operational Instructions
Adapter Instructions
General
Docking Your iPhone/iPod
Dock Operations and Controls
Dock Operation with App
Bluetooth Operation
12
13
13
14
15
18
Troubleshooting
20
Compliance with FCC Regulations
21
Warranty Information
22
Specifications
23
Page 4
RISK OF ELECTRIC
SHOCK DO NOT OPEN
The lightning flash
and arrowhead symbol
within the triangle is a
warning sign alerting you
of “dangerous voltage”
inside the product.
WARNING: To reduce the
risk of electric shock, do not
remove cover (or back). No
user-serviceable parts inside.
Refer servicing to qualified
service personnel.
The exclamation point
within the triangle is a
warning sign alerting you
of important instructions
accompanying the
product.
NOTES: Caution symbols are printed on rear of docking station.
Please refer to user’s manual.
This device complies with Part 15 of the FCC Rules. Operation is subject to the
condition that this device does not cause harmful interference.
Page 5
Safety Information
Safety Information
Important Safety Instructions
When used in the directed manner, SongStream has been designed and manufactured to ensure your
personal safety. However, improper use can result in potential electrical shock or fire hazards. Please read all
safety and operating instructions carefully before installation and use, and keep these instructions handy for
future reference. Take special note of all warnings listed in this user’s manual and on the docking station.
1. Cleaning - Unplug the docking station from the wall outlet before cleaning. Clean the docking
station using a damp cloth; do not use liquid or aerosol cleaners.
2. Attachments - Do not use attachments not recommended by the manufacturer.
3. Antenna - Do not connect an external antenna to the docking station (other than that provided).
4. Water and Moisture - The docking station should not be used near water. For example: near a
bathtub, washbowl, kitchen sink, laundry tub, swimming pool or in a wet basement.
5. Placement - Do not place the docking station on an unstable table, stand, tripod, or bracket. This
may result in serious personal injuries and damage to the docking station.
15. Servicing - The user should not attempt to service the docking station beyond those methods
described in the user’s manual. Opening or removing covers will expose you to dangerous voltage
and other hazards. Service methods not covered in the user’s manual should be referred to qualified
service personnel.
16. Safety Check - Upon completion of any service or repair to the docking station, ask the service
technician to perform safety checks to determine that the product is in proper working condition.
6. Ventilation - The docking station should be situated so that its location or position does
not interfere with its proper ventilation. For example, it should not be situated on a bed, sofa, rug
or similar surface that may block ventilation openings. Also, it should not be placed in a built-in
installation, such as a bookcase or cabinet, which may impede the flow of air through the ventilation
openings.
7. Periods of Non-use - If the docking station is to be left unused for an extended period of
time, such as a month or longer, the power cable should be unplugged from the docking station to
prevent damage or corrosion.
8. Objects and Liquid Entry - Care should be taken so that external objects do not fall into and
liquids are not spilled onto any openings or vents located on the product.
9. Power Source - The docking station should be connected to a power supply only of the type
described in the operating instructions or as marked on the docking station. If you are not sure,
please consult the dealer or local power company.
10. Power Cord protection - Power supply cord should be routed so that they are not likely to be
walked on or pinched by items placed upon or against it. It is always better to have a clear area from
where the cable exits the docking station to where it is plugged into an AC outlet.
11. Lightning - Unplug the docking station from the wall outlet and disconnect the antenna or cable
system during a lightning storm or when it is left unattended and unused for long periods of time.
This will prevent damage to the product due to lightning and power-line surges.
12. Overloading - Do not overload wall outlets, extension cords, or integral convenience receptacles
as this can result in a risk of fire or electric shock.
13. Heat - The docking station should be situated away from heat sources such as radiators, heat
registers, stoves or other appliances (including amplifiers) that produce heat.
14. Damage Requiring Service - The docking station should be serviced by qualified service
personnel when:
A. the power supply cable or plug has been damaged.
B. objects have fallen into or liquid has been spilled onto the enclosure.
C. the docking station has been exposed to rain.
D. the docking station has been dropped or the enclosure damaged.
E. the docking station exhibits a marked change in performance or does not operate normally.
Page 6
Page 7
Getting Started
Getting Started
Location of Docking Station Controls
Location of Remote Controls
1
2
3
4
1
5
2
3
4
PLAY/PAUSE
VOLUME
10
5
11
6
7
8
12
SOUND
9
CSPK52ii
1. Remote Control Transmitter
2.
STANDBY/ON button
3. MENU button
4. iPod MENU button
5. ENTER button
6. SKIP
button
7. PLAY/PAUSE / button
8. SOUND button
9. VOLUME - button
10. iPod MENU button
11. SKIP
button
12. VOLUME + button
Using The Remote Control
The 3V CR2032 Lithium battery is already installed in the remote control. Pull out the small
plastic tab as shown in the illustration to begin using the remote control.
DC IN
6
FM ANT. AUX IN
7
8
To use the remote control, point the remote control transmitter toward the
remote control receiver on the front panel of the docking station and press
the desired button. The effective range of the remote control is approximately
20 feet. Please note that bright sunlight or artificial light may interfere with
the proper operation of the remote control.
Battery Replacement
1.
2.
3.
4.
5.
6.
7.
8.
Page 8
POWER ON/OFF/PLAY/PAUSE button
Bluetooth LED indicator
Universal dock for iPhone/iPod
VOLUME - button
VOLUME + button
DC IN jack
FM ANT.
AUX-IN jack
When the remote operation becomes weak or intermittent, it is time to
replace the remote control battery. Pull out the battery holder, remove the
old battery and install a new 3V CR2032 Lithium battery in the holder as
shown in the illustration. Slide the holder back into the remote control.
Note: Install the replacement battery with + polarity facing upward.
Page 9
Getting Started
Getting Started
Power Supply
Dock Adapters
AC Operation (External AC-DC Power Adapter)
Choose the dock adapter that fits your iPhone/iPod, insure your iPhone/iPod fits snugly
into the correct adapter.
- SongStream is equipped with a “DC jack” that should only be used with the supplied AC
adapter to operate the docking station. Use of other adapters may damage the docking
station or cause it to malfunction.
A
- Plug the tail end of the AC adapter into the DC-jack (socket) on the rear of docking
station.
- Insert the plug of the AC adapter into a wall outlet with AC power not controlled by a B
wall switch.
- Press the POWER ON/OFF/PLAY/PAUSE button to switch on the docking station.
C
D
iPhone
iPhone 3G
iPhone 3Gs
iPhone 4
B
OR
C
iPod touch
F
B
iPod classic
80GB
120GB
160GB
OR
C
iPod photo
E
A
OR
B
F
iPod
5th generation
B
OR
C
iPod
4th generation
3rd generation
mini
A
OR
B
iPod nano
6th generation
5th generation
4th generation
iPod nano
3rd generation
2nd generation
1st generation
C
OR
D
D
OR
E
The dock adapter letter
shows which iPhone/
iPod fits
Page 10
Page 11
Operational Instructions
Operational Instructions
Adapter Instructions
General
SongStream comes with 6 removable dock adapters. Using the correct adapter ensures
the proper fit for your iPhone/iPod and helps to reduce the stress on the connector when
operating the iPhone/iPod.
The main functions of this system can be operated by the controls on the top panel of the
docking station, or by the buttons on the remote control. If a specific function can only be
operated by the remote control, this will be clearly indicated in this manual.
When operating this system with the remote control, make sure that the Infrared
transmitter on the front of the remote control is pointed at the remote sensor on the front
panel of the docking station.
Installing a dock adapter
1. Refer to the compatibility table in this manual and select the correct dock adapter for
your iPhone/iPod.
2. Place the proper adapter into the dock and press it into position.
The adapter will only go in one way. The 30-Pin connector should fit through the
opening in the bottom of the adapter.
3. Carefully align and then gently
insert the iPhone/iPod into the
dock.
4. To remove/replace a dock
adapter, first remove the
iPhone/iPod, then grip the
adapter and gently pull upwards.
Note: Please note that older 3rd,
2nd and 1st generation iPods are
incompatible with SongStream.
Docking Your iPhone/iPod
Press the button and gently dock your iPhone/iPod into the 30 pin connector on the
front of the docking station. Do not force. If you have not already downloaded the free app
from the iTunes App Store, you will see the following message on your iPhone/iPod Touch
display: “This accessory requires an application that you do not have installed. Would you
like to install it from the app store?” The purpose of this message is to advise you that you
must download the app to enjoy the enhanced features of SongStream. (See page 15 for
more details.) You will have full access to all the standard features of SongStream without
installing the app.
Note: The 4G iPod, iPod Classic and 5G iPod are not supported for charging with SongStream.
To remove an adapter from the
dock, press it’s inside rear surface
and gently pull it upward.
Page 12
important!
important!
When connecting your iPhone/iPod to this dock, please ensure that the correct
adapter plate is used. Failure to do so may result in damage to the iPhone/iPod
and the dock.
Power failure: In the event of power loss during the iPod/iPhone playback,
please turn on the power of the docking station and press play on your music
device, once the power is up.
Page 13
Operational Instructions
Operational Instructions
Dock Operation and Controls
Dock Operation with App
iPhone/iPod Playback
myDock App (iPhone & iPod Touch only)
With SongStream turned on, press the PLAY/PAUSE button on the docking station to
begin playback.
SongStream is designed to work hand-in-hand with a feature
enhancing app. This app brings many new features that work
seamlessly with the dock, including:
Volume Controls
To increase or decrease the system volume, press the VOLUME + or - button on the
remote control or VOLUME + or - on the top panel of the docking station.
If the volume is less than the default level when SongStream is put into standby, it will
return to the default volume level upon powering back on. If the volume is higher than the
default level when SongStream is put into standby, it will remain at that volume level upon
powering back on.
-
Digital FM radio controls
Clock & alarm
Music equalizer
Local weather
SOUND Button (On Remote Control Only)
This button allows you to choose between the two available audio modes, standard sound
and virtual surround sound.
Play/Pause
Button
Download & Install
Press this button on the remote control to begin playback of your iPhone/iPod. Press
again to pause playback.
Skip
(Forward)/Skip
(Back) Button (On Remote Control Only)
During playback press to skip forward or backward to the next or previous track.
MENU Button (On Remote Control Only)
Press this button to access the menus on your iPod classic/nano and in the iPod app on
your iPhone/iPod touch. Pressing this button continuously will navigate you through the
different menu features on your iPhone/iPod.
Up/Down Navigation Button (On Remote Control Only)
After pressing the MENU button to access the iPhone/iPod Menu, press the
to move up or down within the Menu display.
buttons
ENTER Button (On Remote Control Only)
After highlighting your desired selection in the Menu, press the ENTER button to choose
that selection.
Option 1
- Dock your iPhone/iPod touch into the docking station.
- On your device’s screen you will see a prompt asking if you would like to download the
free app.
- Press “Yes” on your iPhone/iPod to be taken directly to the app download screen in the
Apple App Store.
- Select the app, myDock, and continue to download and install.
Option 2
- Turn on your iPhone/iPod touch and navigate to the App Store.
- Tap the “Search” icon at the bottom of your screen and search for “myDock”.
- Open the myDock app page and tap the “Free” button in the upper right side of the
screen.
- Tap “Install” and enter your App Store password to begin download and installation.
Note: Your iPhone/iPod touch must be connected to the Internet to download the free app.
POWER OFF
Press and hold the
There are 2 ways to download & install the free app:
button to power off the dock. The blue ambient light will shut off.
Note: All of these controls work the same with or without the myDock app installed.
Page 14
Page 15
Operational Instructions
Operational Instructions
Launch & Operation
Once the myDock app is installed, navigate to the app on your device and tap the icon to
launch the app.
Home Screen
Sleep Settings
Choose the length
of time you would
like the dock to
stay awake. At
that time the dock
will automatically
“SLEEP”.
App Settings
Weather widget
Clock with custom
background
App settings
iPod Music Controls
Customize the
background of
your myDock
home screen.
Click to add
songs to your
playlist.
Play/Pause
Shuffle On/Off
Manage your
clock settings
Skip Up/Down
Repeat On/Off
iPod control
EQ settings
Radio/FM tune
Sleep settings
Alarm settings
Manage your
weather settings
EQ Settings
FM Radio Controls
Alarm Settings
Return to
previous
screen
Return to
previous screen
Add alarm
Save settings
and return to
previous screen.
Edit alarm
Press to add the
correct station to
your favorites list.
Alarm settings
Scroll to select the
EQ setting that fits
your genre.
Set the alarm
time
Page 16
Press once to
tune to your
desired station.
Press and hold to
auto seek.
Your favorite
stations list
Page 17
Operational Instructions
Operational Instructions
Bluetooth Operation
Play Audio from Your Bluetooth Device
Bluetooth Device Compatibility
SongStream connects with all Bluetooth devices that support the A2DP profile including
iPad, iPhone, iPod touch, and most smartphones, laptops and tablets.
Setting Your SongStream Music Dock
1. Connect the AC power adapter cable to the DC input jack, and plug the DC adapter into
a wall power outlet not controlled by a wall switch.
2. Please remove any docked iPhone/iPod and make sure there isn’t an audio cable
connected to the auxiliary input on the back of the docking station.
3. Press the /PLAY/PAUSE button once. The blue LED light will start to flash
and you will hear a short beeping sound.
4. SongStream is now ready to be paired with your Bluetooth device.
1. Once your media device is connected to the dock, simply start playing the music, movie
or game and all the audio will automatically be played through SongStream.
2. Press to play/pause the audio.
3. Press + or - to adjust the volume level of the dock.
4. Keep in mind that SongStream has a 30-foot Bluetooth wireless range.
Note: The volume controls on your media device work separately from the volume controls
on SongStream.
Reconnecting Your Device
If you move out of range or turn off the Bluetooth feature on your device, the music dock
will disconnect from your device. To reconnect, simply access the Bluetooth Manager on
your device and select ATT-ID251. You will not be asked to enter the PIN code again.
Pairing Bluetooth Device
Out of Range or Lost Signal
1.
2.
3.
4.
5.
If the music device is out of range (beyond 30 feet) of the music dock or if there is
something blocking the Bluetooth signal, the LED light will flash slowly to indicate that the
Bluetooth connection with the music device has been lost.
Go to the Bluetooth Manager of your Bluetooth device.
Search Bluetooth devices and select ATT-ID251 to start connecting.
If your device asks for a PIN code, enter “0000”.
Once paired, SongStream will beep and the blue LED light will flash rapidly 3 times.
Although SongStream can only stream audio from one device at a time, it is capable of
being paired with up to eight devices. This means that you only have to enter the PIN
code one time for each device.
Connecting a Paired Bluetooth Device
To avoid a lost connection:
1. Move the music device back into range (within 30 feet), and/or make sure there’s a clear
line of sight between the music dock and the Bluetooth device.
2. If the connection is lost , the connection will need to be reestablished. Follow the
directions under “Reconnecting Your Device”.
1. You will only need to pair your Bluetooth device with the dock one time.
2. The next time your Bluetooth device and the dock are in range of each other, and the
Bluetooth feature is turned on, they will automatically connect.
3. The dock will only automatically connect to the last Bluetooth device it was connected
to.
4. If your paired device does not automatically connect, navigate to the Bluetooth menu
on your device and select ATT-ID251 from the list.
Note: Your SongStream can pair with and remember multiple Bluetooth devices, however it can
only connect with one device at a time.
Page 18
Page 19
Troubleshooting
Symptom
Possible cause
Compliance with FCC Regulations
Solution
SongStream does not
respond (no power)
AC adapter is not plugged into a
wall outlet or the connector is not
plugged into the DC IN jack on
the back of the docking station.
Verify the wall outlet that the
AC adapter is plugged into is not
controlled by wall switch and if it is,
confirm the wall switch is turned on.
iPhone/iPod does not
dock properly
Using no or wrong iPhone/iPod
dock adapter.
Make sure the dock adapter is the
proper fit for the iPhone/iPod.
iPhone/iPod is not installed
properly.
Remove the iPhone/iPod from the
docking station and check for obstruction
on the connections of the docking station
and of the iPhone/iPod. Then reset the
iPhone/iPod into the docking station.
iPhone/iPod is not installed
properly.
Remove the iPhone/iPod from the
docking station and check for obstruction
on the connections of the docking station
and of the iPhone/iPod. Then reset the
iPhone/iPod into the docking station.
iPhone/iPod is locked up/frozen.
Make sure your iPhone/iPod is working
properly before docking it into the
docking station. Please refer to the
iPhone/iPod manual for details.
Using first or second generation
iPod, iPod shuffle or other devices.
SongStream cannot control these
iPods or other devices.
iPhone/iPod is not installed
properly.
Remove the iPhone/iPod from the
docking station and check for obstruction
on the connections of the docking station
and of the iPhone/iPod. Then reset the
iPhone/iPod into the docking station.
iPhone/iPod is locked up/frozen.
Make sure your iPhone/iPod is working
properly before docking it into the
docking station. Please refer to the
iPhone/iPod manual for details.
iPhone/iPod does not
respond to
SongStream
iPhone/iPod is not
charging
iPhone/iPod battery has a
problem.
SongStream does not
connect to Bluetooth
Your Bluetooth device is not
paired with SongStream.
Make sure your Bluetooth device
supports the A2DP profile, and is paired
properly with SongStream.
Out of range
Move the music device back into range
(within 30 feet), and/or make sure there’s
a clear line of sight between the docking
station and the Bluetooth device.
Remarks:
If troubleshooting does not eliminate the problem, disconnect the DC IN plug from the back of the docking station and
reconnect it after a few seconds. This resets the docking station to it’s factory default settings and results in the deletion of all
previous settings. In case the problem still exists, see warranty information on page 22 to obtain service.
The equipment has been tested and found to comply with the limits for a Class B digital
device, pursuant to Part 15 of the FCC Rules. These limits are designed to provide
reasonable protection against harmful interference in a residential installation. This
equipment generates, uses, and can radiate Radio frequency energy and, if not installed
and used in accordance with the instructions, may cause harmful interference to Radio
communications.
However, there is no guarantee that interference will not occur in a particular installation.
If this equipment does cause harmful interference to Radio or television reception, which
can be determined by turning the equipment off and on, the user is encouraged to try to
correct the interference by one or more of the following measures:
- Reorient or relocate the receiving antenna.
- Increase the separation between the equipment and receiver.
- Connect the equipment into an outlet on a circuit different from that to which the
receiver is connected.
- Consult the dealer or an experienced Radio / television technician for assistance.
THE SPECIFICATION AND EXTERNAL APPEARANCE OF THE MUSIC DOCK ARE SUBJECT TO
CHANGE WITHOUT PRIOR NOTICE.
If at any time in the future you should need to dispose of this product
please note that: waste electrical products should not be disposed of
with household waste. Please recycle where facilities exist. Check with
your local authority or retailer for recycling advice.
Page 21
Warranty Information
Specifications
Limited Warranty
- Power supply: DC 8.5V, 2.2Amps through built-in DC jack
External AC power adapter 100V-240V ~ 50/60Hz
- Speaker: Impedance 6 Ω 2.0” Speaker x2
- Amplifier: 5W x 2 THD 10%
The AT&T brands are used under license. Any repair, replacement, or warranty service, and all questions
about this product should be directed to Concept 101 LLC at www.att.com/electronics or call 1
(888) 920-8680 from the USA or Canada.
Concept 101 LLC warrants to the original purchaser that the product will be free from defects in material,
parts and workmanship for the period designated for this product. The warranty commences the day
the product is purchased and covers up to a period of one (1) year (90 day Labor and 1 year Parts).
Concept 101 LLC agrees that it will, at its option, replace the defective product with either a new or
remanufactured docking station equivalent to your original purchase during the warranty period. Should
the Parts warranty period exceed the Labor warranty period, Concept 101 LLC will supply at no charge
for the remainder of the Parts warranty, any new or remanufactured replacement parts as required by the
product. During this period all labor and service charges will become the responsibility of the customer.
Exclusions: This warranty does not apply to the appearance or exterior of the product which may have
been damaged or defaced, altered or modified in design or construction. This warranty does
not apply if the serial number is altered or removed, or if there is any damage due to power
line surge, user damage to the AC power cord, connection to improper voltage source,
general misuse, accidents, or repair attempts by unauthorized service agents. Other exclusions
include ear pads, rechargeable and non-rechargeable batteries.
REPAIR OR REPLACEMENT AS PROVIDED UNDER THIS WARRANTY IS THE EXCLUSIVE REMEDY OF THE
CUSTOMER; CONCEPT 101 LLC SHALL NOT BE LIABLE FOR ANY INCIDENTAL OR CONSEQUENTIAL
DAMAGES FOR BREACH OF ANY EXPRESS OR IMPLIED WARRANTY ON THIS PRODUCT, EXCEPT TO THE
EXTENT PROHIBITED BY APPLICABLE LAW. ANY IMPLIED WARRANTY OF MERCHANTABILITY OF FITNESS
FOR A PARTICULAR PURPOSE ON THIS PRODUCT IS LIMITED TO THE DURATION OF THE WARRANTY.
Some states do not allow the exclusion or limitations of incidental or consequential damages, or
limitations on how long the warranty lasts. In these cases the above exclusions or limitations may not
apply to you. This warranty gives you specific legal rights and you may also have other rights which vary
from state to state.
Obtaining Service: To obtain service, product literature, supplies or accessories please call
1 (888) 920-8680, or visit our website, www.att.com/electronics, to create
a ticket for exchange/repair. Please make sure to provide the date of purchase, model
number and a brief description of the problem. Our customer service representative
will contact you or send detailed return instructions.
purchase date:
place of purchase:
Concept 101 LLC does not warrant that the docking station will work properly in all environmental conditions, and makes no warranty
and representation, either implied or expressed, with respect to the quality, performance, merchantability, or fitness for a particular
purpose other than the purpose identified within this user’s manual. Concept 101 LLC has made every effort to ensure that this user’s
manual is accurate and disclaims liability for any inaccuracies or omissions that may have occurred. Information in this user’s manual is
subject to change without notice and does not represent a commitment on the part of Concept 101 LLC. Concept 101 LLC reserves the
right to make improvements to this user’s manual and/or to the products described in this user’s manual at any time without notice. If
you find information in this manual that is incorrect, misleading, or incomplete, please contact us through our website.
Page 22
Page 23
www.att.com/electronics
©2012 Concept 101 LLC. All Rights Reserved. AT&T and the AT&T logo are trademarks of AT&T Intellectual Property licensed to Concept 101 LLC,
New York, New York 10018. Printed in China. Issue 9 AT&T 03/2012.