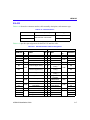
1
HSIM-W6 Installation Guide WIDE AREA1 WIDE AREA2 HSIM-W6 ASYNC LNK LNK LNK STS STS STS TELCO 9032694 CPU TELCO Only qualified personnel should perform installation procedures. Notice Cabletron Systems reserves the right to make changes in specifications and other information contained in this document without prior notice. The reader should in all cases consult Cabletron Systems to determine whether any such changes have been made. The hardware, firmware, or software described in this manual is subject to change without notice. IN NO EVENT SHALL CABLETRON SYSTEMS BE LIABLE FOR ANY INCIDENTAL, INDIRECT, SPECIAL, OR CONSEQUENTIAL DAMAGES WHATSOEVER (INCLUDING BUT NOT LIMITED TO LOST PROFITS) ARISING OUT OF OR RELATED TO THIS MANUAL OR THE INFORMATION CONTAINED IN IT, EVEN IF CABLETRON SYSTEMS HAS BEEN ADVISED OF, KNOWN, OR SHOULD HAVE KNOWN, THE POSSIBILITY OF SUCH DAMAGES. 1998 by Cabletron Systems, Inc., P.O. Box 5005, Rochester, NH 03866-5005 All Rights Reserved Printed in the United States of America Part Number: 9032694 June 1998 Cabletron Systems, LANVIEW, QuickSET, and SPECTRUM are registered trademarks, and HSIM is a trademark of Cabletron Systems, Inc. All other product names mentioned in this manual may be trademarks or registered trademarks of their respective companies. FCC Notice This device complies with Part 15 of the FCC rules. Operation is subject to the following two conditions: (1) this device may not cause harmful interference, and (2) this device must accept any interference received, including interference that may cause undesired operation. NOTE: This equipment has been tested and found to comply with the limits for a Class A digital device, pursuant to Part 15 of the FCC rules. These limits are designed to provide reasonable protection against harmful interference when the equipment is operated in a commercial environment. This equipment uses, generates, and can radiate radio frequency energy and if not installed in accordance with the operator’s manual, may cause harmful interference to radio communications. Operation of this equipment in a residential area is likely to cause interference in which case the user will be required to correct the interference at his own expense. WARNING: Changes or modifications made to this device which are not expressly approved by the party responsible for compliance could void the user’s authority to operate the equipment. HSIM-W6 Installation Guide i Notice Industry Canada Notice This digital apparatus does not exceed the Class A limits for radio noise emissions from digital apparatus set out in the Radio Interference Regulations of the Canadian Department of Communications. Le présent appareil numérique n’émet pas de bruits radioélectriques dépassant les limites applicables aux appareils numériques de la class A prescrites dans le Règlement sur le brouillage radioélectrique édicté par le ministère des Communications du Canada. VCCI Notice This is a Class A product based on the standard of the Voluntary Control Council for Interference by Information Technology Equipment (VCCI). If this equipment is used in a domestic environment, radio disturbance may arise. When such trouble occurs, the user may be required to take corrective actions. Cabletron Systems, Inc. Program License Agreement IMPORTANT: Before utilizing this product, carefully read this License Agreement. This document is an agreement between you, the end user, and Cabletron Systems, Inc. (“Cabletron”) that sets forth your rights and obligations with respect to the Cabletron software program (the “Program”) contained in this package. The Program may be contained in firmware, chips or other media. BY UTILIZING THE ENCLOSED PRODUCT, YOU ARE AGREEING TO BECOME BOUND BY THE TERMS OF THIS AGREEMENT, WHICH INCLUDES THE LICENSE AND THE LIMITATION OF WARRANTY AND DISCLAIMER OF LIABILITY. IF YOU DO NOT AGREE TO THE TERMS OF THIS AGREEMENT, PROMPTLY RETURN THE UNUSED PRODUCT TO THE PLACE OF PURCHASE FOR A FULL REFUND. Cabletron Software Program License 1. LICENSE. You have the right to use only the one (1) copy of the Program provided in this package subject to the terms and conditions of this License Agreement. You may not copy, reproduce or transmit any part of the Program except as permitted by the Copyright Act of the United States or as authorized in writing by Cabletron. 2. OTHER RESTRICTIONS. You may not reverse engineer, decompile, or disassemble the Program. 3. APPLICABLE LAW. This License Agreement shall be interpreted and governed under the laws and in the state and federal courts of New Hampshire. You accept the personal jurisdiction and venue of the New Hampshire courts. ii HSIM-W6 Installation Guide Notice Exclusion of Warranty and Disclaimer of Liability 1. EXCLUSION OF WARRANTY. Except as may be specifically provided by Cabletron in writing, Cabletron makes no warranty, expressed or implied, concerning the Program (including its documentation and media). CABLETRON DISCLAIMS ALL WARRANTIES, OTHER THAN THOSE SUPPLIED TO YOU BY CABLETRON IN WRITING, EITHER EXPRESSED OR IMPLIED, INCLUDING BUT NOT LIMITED TO IMPLIED WARRANTIES OF MERCHANTABILITY AND FITNESS FOR A PARTICULAR PURPOSE, WITH RESPECT TO THE PROGRAM, THE ACCOMPANYING WRITTEN MATERIALS, AND ANY ACCOMPANYING HARDWARE. 2. NO LIABILITY FOR CONSEQUENTIAL DAMAGES. IN NO EVENT SHALL CABLETRON OR ITS SUPPLIERS BE LIABLE FOR ANY DAMAGES WHATSOEVER (INCLUDING, WITHOUT LIMITATION, DAMAGES FOR LOSS OF BUSINESS, PROFITS, BUSINESS INTERRUPTION, LOSS OF BUSINESS INFORMATION, SPECIAL, INCIDENTAL, CONSEQUENTIAL, OR RELIANCE DAMAGES, OR OTHER LOSS) ARISING OUT OF THE USE OR INABILITY TO USE THIS CABLETRON PRODUCT, EVEN IF CABLETRON HAS BEEN ADVISED OF THE POSSIBILITY OF SUCH DAMAGES. BECAUSE SOME STATES DO NOT ALLOW THE EXCLUSION OR LIMITATION OF LIABILITY FOR CONSEQUENTIAL OR INCIDENTAL DAMAGES, OR ON THE DURATION OR LIMITATION OF IMPLIED WARRANTIES, IN SOME INSTANCES THE ABOVE LIMITATIONS AND EXCLUSIONS MAY NOT APPLY TO YOU. United States Government Restricted Rights The enclosed product (a) was developed solely at private expense; (b) contains “restricted computer software” submitted with restricted rights in accordance with Section 52227-19 (a) through (d) of the Commercial Computer Software - Restricted Rights Clause and its successors, and (c) in all respects is proprietary data belonging to Cabletron and/or its suppliers. For Department of Defense units, the product is licensed with “Restricted Rights” as defined in the DoD Supplement to the Federal Acquisition Regulations, Section 52.227-7013 (c) (1) (ii) and its successors, and use, duplication, disclosure by the Government is subject to restrictions as set forth in subparagraph (c) (1) (ii) of the Rights in Technical Data and Computer Software clause at 252.227-7013. Cabletron Systems, Inc., 35 Industrial Way, Rochester, New Hampshire 03867-0505. HSIM-W6 Installation Guide iii Notice Declaration of Conformity Application of Council Directive(s): Manufacturer’s Name: Manufacturer’s Address: European Representative Name: European Representative Address: Conformance to Directive(s)/Product Standards: Equipment Type/Environment: 89/336/EEC 73/23/EEC 91/263/EEC Cabletron Systems, Inc. 35 Industrial Way PO Box 5005 Rochester, NH 03867 Mr. J. Solari Cabletron Systems Limited Nexus House, Newbury Business Park London Road, Newbury Berkshire RG13 2PZ, England EC Directive 89/336/EEC EC Directive 73/23/EEC EC Directive 91/263/EEC EN 55022 EN 50082-1 EN 60950 Networking Equipment, for use in a Commercial or Light Industrial Environment. We the undersigned, hereby declare, under our sole responsibility, that the equipment packaged with this notice conforms to the above directives. Manufacturer Legal Representative in Europe Mr. Ronald Fotino ___________________________________ Mr. J. Solari ___________________________________ Full Name Full Name Principal Compliance Engineer ___________________________________ Title Rochester, NH, USA ___________________________________ Location iv Managing Director - E.M.E.A. ___________________________________ Title Newbury, Berkshire, England ___________________________________ Location HSIM-W6 Installation Guide Contents CHAPTER 1 INTRODUCTION Structure of this Guide.....................................................................................1-1 Related Documents ..........................................................................................1-2 Document Conventions ...................................................................................1-2 Getting Help ......................................................................................................1-3 CHAPTER 2 ABOUT THE HSIM-W6 HSIM-W6 Hardware...........................................................................................2-1 WAN Connection........................................................................................2-1 Additional Features ...................................................................................2-3 Remote Management Capabilities ..................................................................2-3 Optional Feature ...............................................................................................2-4 HSIM-W6 Firmware Support ............................................................................2-4 WAN Protocols ...........................................................................................2-4 Inverse Multiplexing ..................................................................................2-6 Firmware Data Compression ....................................................................2-6 HDLC ...........................................................................................................2-7 DHCP and NAT ...........................................................................................2-7 Frame Relay Protocol ................................................................................2-8 Point-to-Point Protocol..............................................................................2-9 PAP and CHAP Security ............................................................................2-9 LQM ...........................................................................................................2-10 Multilink Protocol .....................................................................................2-10 ISDN ..........................................................................................................2-11 ISDN Back-up ...........................................................................................2-12 The IP-OSPF Routing Protocol ...............................................................2-12 IP-OSPF Hierarchy ...................................................................................2-13 HDSL .........................................................................................................2-15 Bridging and Routing ..............................................................................2-15 Bridging and Routing Protocol Filtering................................................2-17 HSIM-W6 Installation Guide v Contents System Passwords ..................................................................................2-17 Simple Network Management Protocol (SNMP)....................................2-18 Software and Firmware Upgrades ..........................................................2-21 CHAPTER 3 INSTALLATION Unpacking the HSIM-W6 ..................................................................................3-1 Guidelines for Installations .............................................................................3-1 Installing Interface Modules ............................................................................3-2 Installing WAN Port Interface Modules (WPIMs) ...........................................3-2 CSX-COMP/ENCR Installation .........................................................................3-4 Installing an HSIM.............................................................................................3-6 Installing an HSIM in an Interface Module ...............................................3-6 Installing an HSIM in a SmartSWITCH Chassis.......................................3-9 CHAPTER 4 TROUBLESHOOTING Troubleshooting HSIM-W6 Hardware .............................................................4-5 Power (PWR) LED is OFF ..........................................................................4-5 Processor (CPU) LED is OFF ....................................................................4-5 Processor (CPU) LED is RED....................................................................4-6 ASYNC Console Connection ...........................................................................4-6 Link (LNK) LED is OFF...............................................................................4-6 Link (LNK) LED is RED or GREEN............................................................4-6 Link (LNK) LED is AMBER.........................................................................4-6 Status (STS) LED is OFF ...........................................................................4-6 Status (STS) LED is AMBER .....................................................................4-6 Status (STS) LED is GREEN or GREEN (Blinking)..................................4-6 Status (STS) LED is AMBER (Blinking)....................................................4-7 Troubleshooting the WAN ...............................................................................4-7 Link (LNK) LED is OFF...............................................................................4-7 Link (LNK) LED is RED ..............................................................................4-7 Link (LNK) LED is AMBER.........................................................................4-7 Status (STS) LED is OFF ...........................................................................4-8 vi HSIM-W6 Installation Guide Contents Status (STS) LED is RED ...........................................................................4-9 Status (STS) LED is AMBER .....................................................................4-9 Status (STS) LED is AMBER (blinking) ..................................................4-10 Status (STS) LED is GREEN....................................................................4-10 Investigating Software Configuration Problems .........................................4-11 Connection to Device Fails During Software Configuration................4-11 User Cannot Communicate with Remote Network Station ..................4-11 Troubleshooting the Frame Relay Connection .....................................4-12 APPENDIX A WPIM CABLE SPECIFICATIONS WPIM-T1 ........................................................................................................... A-1 WPIM-SY........................................................................................................... A-3 EIA-449 ....................................................................................................... A-4 V.35............................................................................................................. A-5 EIA-232 ....................................................................................................... A-7 X.21............................................................................................................. A-8 EIA-530, EIA-530 ALT A, EIA-530 A, and EIA-530 A ALT A.................... A-9 WPIM-DDS ...................................................................................................... A-11 WPIM-E1 ......................................................................................................... A-12 WPIM-DI .......................................................................................................... A-14 WPIM-HDSL.................................................................................................... A-15 WPIM-S/T ........................................................................................................ A-16 APPENDIX B SPECIFICATIONS AND STANDARDS COMPLIANCE Regulatory Compliance .................................................................................. B-1 Individual WPIM Regulatory Compliance...................................................... B-2 WPIM-TI ...................................................................................................... B-2 WPIM-SY .................................................................................................... B-2 WPIM-DDS.................................................................................................. B-3 WPIM-E1..................................................................................................... B-3 WPIM-DI...................................................................................................... B-3 WPIM-S/T.................................................................................................... B-4 WPIM-HDSL ............................................................................................... B-4 HSIM-W6 Installation Guide vii Contents APPENDIX C NETWORK INFORMATION WORKSHEETS APPENDIX D FCC PART 68 - USER’S INFORMATION FOR HSIM-W6 APPENDIX E GLOSSARY INDEX viii HSIM-W6 Installation Guide 1 Introduction Welcome to the Cabletron Systems HSIM-W6 Installation Guide. This guide provides basic configuration information, hardware specifications and troubleshooting tips for the HSIM-W6. This document also provides guidelines for routing and bridging over Wide Area Networks (WANs). Structure of this Guide This guide is organized as follows: Chapter 1, Introduction, details document conventions and provides information on getting help. Chapter 2, About the HSIM-W6, describes the hardware components and software protocols and features. Chapter 3, Installation, provides detailed installation instructions. Chapter 4, Troubleshooting, provides detailed troubleshooting tips using the LANVIEW LEDs on the HSIM-W6. Appendix A, WPIM Cable Specifications, provides part number and connector information for WPIMs. Appendix B, Specifications and Standards Compliance, provides hardware specifications and safety and compliance information. Appendix , Network Information Worksheets, provides blank network information worksheets. Appendix D, FCC Part 68 - User’s Information For HSIM-W6, provides instructions required to comply with FCC Rules, Part 68. Appendix E, Glossary, defines commonly used terms. HSIM-W6 Installation Guide 1-1 Chapter 1: Introduction Related Documents Use the READ ME FIRST! document included with the HSIM-W6 to set up a computer before beginning configuration. Use the Cabletron Systems QuickSET Configuration Guide to configure the HSIM-W6. Use the Cabletron Systems CyberMONITOR User’s Guide to monitor the WAN using the CyberMONITOR graphical user interface. Use the appropriate Cabletron Systems WPIM Local Management Guide to connect your HSIM to a WAN using a TELNET connection. Document Conventions The following conventions are used throughout this guide: NOTE Note symbol. Calls the reader’s attention to any item of information that may be of special importance. Tip symbol. Conveys helpful hints concerning procedures or actions. TIP ! Caution symbol. Contains information essential to avoid damage to the equipment. CAUTION Electrical Hazard Warning symbol. Warns against an action that could result in personal injury or death due to an electrical hazard. Warning symbol. Warns against an action that could result in personal injury or death. WARNING 1-2 HSIM-W6 Installation Guide Getting Help Getting Help If you need additional support related to this device, or if you have any questions, comments, or suggestions concerning this manual, contact the Cabletron Systems Global Call Center: Phone (603) 332-9400 Internet mail [email protected] FTP Login Password ctron.com (134.141.197.25) anonymous your email address Modem setting (603) 335-3358 8N1: 8 data bits, No parity, 1 stop bit BBS For additional information about Cabletron Systems or our products, visit our World Wide Web site: http://www.cabletron.com/ For technical support, select Service and Support. Before calling the Cabletron Systems Global Call Center, have the following information ready: • Your Cabletron Systems service contract number • A description of the failure • A description of any action(s) already taken to resolve the problem (e.g., changing mode switches, rebooting the unit, etc.) • A description of your network environment (layout, cable type, etc.) • Network load and frame size at the time of trouble (if known) • The serial and revision numbers of all involved Cabletron Systems products in the network • The device history (i.e., have you returned the device before, is this a recurring problem, etc.) • Any previous Return Material Authorization (RMA) numbers HSIM-W6 Installation Guide 1-3 Chapter 1: Introduction 1-4 HSIM-W6 Installation Guide 2 About the HSIM-W6 The HSIM-W6 (Figure 2-1) offers high-speed Wide Area Network (WAN) access to remote sites via two WAN Port Interface Modules (WPIMs) to the device into which it is installed. The HSIM-W6 supports IEEE 802.1d transparent bridging, IP routing, IPX routing between the host device and the two WAN connections, ISDN, Dynamic Host Configuration Protocol (DHCP), Network Address Translation (NAT), and Inverse Multiplexing (IMUX) between Ethernet LANs across a WAN resource. In addition, the ASYNC port connector can be used as a local console connection. WIDE AREA1 WIDE AREA2 HSIM-W6 ASYNC LNK LNK LNK STS STS STS TELCO CPU TELCO 225700 Figure 2-1 The HSIM-W6 HSIM-W6 Hardware This section details the HSIM-W6 hardware capabilities. WAN Connection The HSIM-W6 supports Point-to-Point Protocol (PPP) including: Link Control Protocol (LCP), BNCP, IPCP, IPXCP, LQM, Multilink Protocol (MP) and CHAP and PAP, ISDN-BRI and Frame Relay protocols through one of the following WAN port interface modules (WPIMs): • The WPIM-T1 provides a T1 interface through a front panel RJ45 port and includes a built-in Channel Service Unit/Digital Service Unit (CSU/DSU) for direct connection to a T1 line. The WPIM-T1 provides both Full T1 or Fractional T1 using 56 or 64 Kbps timeslots, with a total throughput of up to 1.544 Mbps. HSIM-W6 Installation Guide 2-1 Chapter 2: About the HSIM-W6 • The WPIM-SY provides a synchronous serial connection of up to 2.048 Mbps to external communications equipment (e.g., a multiplexer or CSU/DSU). The WPIM-Sync uses a subminiature 26-pin connector that supports the following electrical signal interfaces: • EIA-RS449 • V.35 • EIA-RS232D • X.21 • EIA-RS530 • EIA-530A • RS530 ALT A • RS530A ALT A • The WPIM-DDS provides a 56 Kbps or 64 Kbps Digital Data Service (DDS) connection. The WPIM-DDS supports remote CSU diagnostic or 64 Kbps clear channel loopback and non-latching remote DSU diagnostic loopback. • The WPIM-E1 provides an E1 interface through a front panel RJ45 port and includes a built-in CSU/DSU for direct connection to an E1 line. The WPIM-E1 provides both Full E1 or Fractional E1 using 56 or 64 Kbps timeslots with a total throughput of up to 2 Mbps. • The WPIM-DI provides a T1 interface through a front panel RJ45 port and includes a built-in CSU/DSU for direct connection to a T1 line. The WPIM-DI provides both Full T1 or Fractional T1 using 56 or 64 Kbps timeslots and also provides a second Drop-and-Insert interface, which allows more than one device to share a single T1 connection. • The WPIM-S/T provides an Integrated Services Digital Network (ISDN) 128 Kbps Basic Rate Interface (BRI) for the HSIM-W6. The WPIM-S/T provides an ISDN back-up link for a remote site or branch office when the main WPIM for a frame relay or leased line loses a connection or becomes disabled. An NT-1 adapter is necessary for this interface in the United States. • The WPIM-HDSL provides a connection for users in a campus environment, or have access to local subscriber loops, who want to send their data over their existing telephone lines, that may run between floors, buildings, or other physical structures, at rates of up to 1.544 Mbps. HDSL supports line lengths of up to 3, 657 meters (12,000 feet) over 24 AWG (American Wire Gauge) Unshielded Twisted Pair (UTP) cabling. 2-2 HSIM-W6 Installation Guide Remote Management Capabilities • The WPIM-T1/DDS provides both a T1 and DDS interface that allows changing between the two interfaces by switching the physical cabling and reconfiguring QuickSET for the desired interface. The WPIM-T1/DDS has the capabilities of both the WPIM-T1 and WPIM-DDS. Additional Features FLASH EEPROMs — The HSIM-W6 uses FLASH Electrically Erasable Programmable Read-Only Memory (EEPROM) that allows the downloading of new and updated firmware in conjunction with Cabletron Systems QuickSET or any device using BootP or TFTP protocols. LANVIEW LEDs — Cabletron Systems LANVIEW Status Monitoring and Diagnostics System is a troubleshooting tool that helps in the diagnosing of power failures, collisions, cable faults, and link problems. The LANVIEW LEDs are located on the HSIM-W6 front panel. Remote Management Capabilities The HSIM-W6 can be remotely managed with any SNMP network management system including the following: • Cabletron Systems SPECTRUM for Open Systems Suite of Network Management Products • Cabletron Systems QuickSET • Third Party SNMP compliant Network Management Packages HSIM-W6 Installation Guide 2-3 Chapter 2: About the HSIM-W6 Optional Feature Hardware Data Compression Module (CSX-COMP/ENCR) — The same industry standard STAC Electronics Stacker LZS Compression algorithm supported by HSIM-W6 software is made available by an optional hardware data compression module that accelerates data compression for the HSIM-W6 over Nailed-up PPP or ISDN and Frame Relay. Depending on the packet type and size, hardware data compression provides a minimum of 2:1 data compression, giving 3 Mbps throughput on each T-1 WPIM interface. To use the hardware data compression module, compatible equipment (such as the HSIM-W6, CSX200, and CSX400 or other vendors’ equipment which conforms to the applicable standards) must be in use at both ends of the WAN link. When the hardware data compression module is installed on the board, it automatically assumes the compression task from software. There is no configuration necessary to prioritize hardware over software compression. HSIM-W6 Firmware Support The HSIM-W6 firmware supports IEEE 802.1d bridging, and IP and IPX routing, and OSI Layer 2 Inverse Multiplexing (IMUX), which allows both WAN channels to be used as a single, high bandwidth, WAN channel. Wide Area Networking includes Point-to-Point Protocol (PPP), Frame Relay, and ISDN. Remote access is via Full or Fractional T1, E1, Synchronous, Digital Data Service, ISDN BRI, or HDSL connections. This device supports industry-standard protocols, security features, compression algorithms and network management tools to ensure interoperability with equipment from other vendors. WAN Protocols This device supports the following WAN protocols over the WAN port: • Point-to-Point Compression Control Protocol (CCP) as defined by RFC 1962 • Point-to-Point Protocol (LCP) as defined by RFC 1661 • Point-to-Point Protocol (BNCP) as defined by RFC 1638 • Point-to-Point Protocol (IPCP) as defined by RFC 1473 • Point-to-Point Protocol (IPXCP) as defined by RFC 1552 • Frame Relay as defined by RFC 1490 • Frame Relay Data Compression Protocol (DCP) as defined by FRF.9 2-4 HSIM-W6 Installation Guide HSIM-W6 Firmware Support • Inverse Multiplexing (IMUX) • Dynamic Host Configuration Protocol (DHCP) as defined by RFC 1541 • Network Address Translation (NAT) routing as defined by RFC 1631 • Password Authentication Protocol (PAP) and Challenge Handshake Authentication Protocol (CHAP) under PPP as defined by RFC 1994 • Point-to-Point Protocol Link Quality Monitoring (LQM) as defined by RFC 1333 • Point-to-Point Protocol Multilink Protocol (MP) as defined by RFC 1990 • Integrated Services Digital Network (ISDN) Basic Rate Interface (BRI) as defined by Q.921/ Q.931 • Frame Relay Link Management Interface (LMI) as defined by ANSI T1.617 Annex D and ITU Q.933 Annex A • Frame Relay Data Encapsulation as defined by RFC 1490 • Frame Relay Data Compression Protocol (DCP) as defined by FRF.9 PPP is a data link layer industry standard WAN protocol for transferring multi-protocol data traffic over point-to-point connections. With this protocol, options such as security, data compression, and network protocols can be negotiated over the connection. Frame Relay is a packet-switching data communications protocol that statistically multiplexes many data conversations over a single transmission link. Data compression allows Frame Relay to negotiate compression over Frame Relay permanent virtual circuits (PVCs). ISDN BRI is a switched Data Link layer control protocol which uses digital signaling to place a call into an ISDN network. Once the call is made, PPP is then used to transfer data. HSIM-W6 Installation Guide 2-5 Chapter 2: About the HSIM-W6 Inverse Multiplexing NOTE Cabletron Systems products that support Inverse Multiplexing (IMUX), such as the HSIM-W6, CSX400, and HSIM-W84, must exist on both ends of the WAN link for the IMUX function to work. Both bridging and routing functions are disabled when using the IMUX function. Cabletron Systems Inverse Multiplexing (IMUX) feature provides enhanced throughput for users by doing each of the following: • The IMUX function evenly distributes a data packet stream from the LAN interface through the two WAN interfaces on the HSIM-W6. Since the data traffic is equally shared between the two Full T1 interfaces, each with 1.5 Mbps throughput, the total throughput over the logical link is 3 Mbps, or 6 Mbps full-duplex operation with the optional hardware compression module (CSX-COMP/ENCR) installed in the HSIM-W6. • The IMUX function passes packet sequence information over the WAN using the Point-to-Point Protocol (PPP) to support data coherency on both ends of the link. • Data packet streams received by the WAN interfaces on the other end of the WAN link are then recombined, ordered, and transmitted to the LAN interface. • The IMUX function is fully configurable using QuickSET, which is discussed in the QuickSet Configuration Guide. Firmware Data Compression The STAC Electronics Stacker LZS Compression algorithm provides a minimum of 2:1 firmware data compression for the HSIM-W6 over PPP and Frame Relay. Firmware data compression is supported in software on each WAN interface for line speeds of up to 256 Kbps per WPIM, which is equivalent to four DS0 channels. To use data compression, compatible equipment, (such as the HSIM-W6, CSX400, and CSX200 or other vendors’ equipment which conforms to the applicable standards), must be in use at both ends of the WAN link. This firmware method of data compression is used as the default, if the hardware compression module is not installed. 2-6 HSIM-W6 Installation Guide HSIM-W6 Firmware Support HDLC Cabletron Systems has provided the High-level Data Link Control (HDLC) protocol which is used in conjunction with the Inverse Multiplexing (IMUX) feature and the WPIM-HDSL to conserve a user’s WAN bandwidth between two Cabletron Systems products, over a point-to-point connection. Cabletron Systems products such as the HSIM-W6, CSX200, and CSX400 must be in use on both ends of the WAN link for these functions to work. The HDLC (RAW) protocol reduces the amount of overhead information that needs to be contained within each data packet to direct it to its destination. This decreased packet overhead provides the IMUX and HDSL functions with more bandwidth to transfer user data. DHCP and NAT The Dynamic Host Configuration Protocol (DHCP) and Network Address Translation (NAT) method eliminates the expense of purchasing limited public IP addresses for each client on a local network, and the need to re-configure a client if it is moved to a different network. The HSIM-W6 acts as a DHCP server that allows individual clients (PCs, network equipment) to take turns using a range of private IP addresses (often referred to as local IP addresses), and provides optional secondary setup features for these clients on a per-port basis. The HSIM-W6 distributes these addresses dynamically, assigning a local IP address to an individual client from a range of 253 available addresses in its table on a first-come-first-served basis. This local IP address is then “leased” for an predetermined amount of time, which is configured for the particular port. The Ethernet port provides DHCP services for one Class C subnet and secondary setup features for individual clients support the use of a default gateway, domain name and WINs server. On the Wide Area Network (WAN) side, the Network Address Translation (NAT) routing method is used to enable clients assigned with local IP addresses to use the public IP address(es) of the HSIM-W6 WAN interface(s) to access the WAN. NOTE A private or “local” network is referred to as a sub network that is using private or “local” IP addresses. An “outside” network refers to a Wide Area Network (WAN) commonly known as an Internet where registered public IP addresses are required. HSIM-W6 Installation Guide 2-7 Chapter 2: About the HSIM-W6 The NAT method allows several DHCP clients on a sub network to connect to WAN clients by allowing the DHCP clients to share a single public IP address. When the HSIM-W6 uses NAT, the NAT method modifies the IP headers and addresses, and the selected fields in upper layer protocol headers. This is done to replace the hidden local IP addresses from the sub network with one or more public InterNic assigned IP addresses that can be sent over the outside network on the HSIM-W6 WAN interfaces. Once the HSIM-W6 is assigned at least one public IP address, over 250 IP clients can share this address simultaneously using NAT. This public IP address is assigned statically by the Internet Service Provider (ISP). Frame Relay Protocol Frame Relay can be defined as a “packet mode” service, organizing data into individually addressed units known as “frames”. Frame Relay eliminates all Layer 3 processing. Only a few Layer 2 functions are used, such as checking for a valid, error free frame, but not requesting retransmission if an error is found. Frame Relay uses a variable length framing structure, which, depending on user data, can range from a few to more than a thousand characters. A Frame Relay Network will often be depicted as a cloud, because the Frame Relay Network is not a single physical connection between one endpoint and another. Frame Relay protocol is based on the concept of Virtual Circuits (Vcs). Vcs are two-way, software defined data paths between two ports that take the place of private lines in the network. There are two types of Frame Relay connections; Switched Virtual Circuits (SVCs), and Permanent Virtual Circuits (PVCs). Permanent Virtual Circuits, or PVCs, are set up via a network management system, and initially defined as a connection between two sites, or endpoints. PVCs may be added as the demand arises for more bandwidth, alternate routing, or more sites. PVCs are fixed paths, not available on demand, or on a call-by-call basis. Although the actual path through the network may change from time to time, such as when automatic rerouting takes place, the beginning and end of the circuit will not change. Switched Virtual Circuits, or SVCs, are available on a call-by-call basis using the SVC signaling protocol (Q.933). The network must quickly establish the connection, and allocate bandwidth based on the user’s request. In a Frame Relay frame, user data packets are not changed in any way. A two byte header is appended to the frame. Contained in this header is a 10-bit number called the Data Link Connection Identifier (DLCI). The DLCI is the “virtual circuit” number which corresponds to a particular destination. The DLCI allows data coming into a Frame Relay switch to be sent across the network using a three-step process: Check the integrity of the frame and discard it if it is in error, look up the DLCI in a table and if not intended for this link, discard the frame. If the frame passes the previous tests, relay the frame toward its destination out the specific port specified in the table. 2-8 HSIM-W6 Installation Guide HSIM-W6 Firmware Support The ANSI standard defines a mechanism for the network to signal the existence of congestion, called Explicit Congestion Notification (ECN) bits. Frame Relay uses FECN (Forward ECN) and BECN (Backward ECN) bits to notify end user devices about network congestion. Although the Frame Relay protocol does not respond to congestion, some higher layer protocols for end user devices may respond to ECNs by recognizing that delays have increased, or that frames have been dropped. Point-to-Point Protocol PPP is a data link layer industry standard WAN protocol for transferring multi-protocol data traffic over point-to-point connections. It is suitable for both high-speed synchronous ports as well as lower speed asynchronous dial-up ports. With this protocol, options such as security and network protocols can be negotiated over the connection. This device supports synchronous PPP over the ISDN port. In Single Link Mode, PPP uses one ISDN B channel for data transmission. PPP runs over each ISDN B channel for two separate conversations (split B-channel). In Multi-Link Protocol Mode, PPP simultaneously sends and receives data over two ISDN B-channels on the same connection to optimize bandwidth usage. The STAC Electronics Stacker LZS Compression Protocol is supported over PPP providing up to 4:1 data compression. PAP and CHAP Security The HSIM-W6 supports the Password Authentication Protocol (PAP) and Challenge Handshake Authentication Protocol (CHAP) under PPP. PAP provides verification of passwords between devices using a 2-way handshake. One device (peer) sends the system name and password to the other device (authenticator). Then the authenticator checks the peer’s password against the configured remote peer’s password and returns acknowledgment. CHAP is more secure than PAP as unencrypted passwords are not sent across the network. CHAP uses a 3-way handshake and supports full or half-duplex operation. HSIM-W6 Installation Guide 2-9 Chapter 2: About the HSIM-W6 In half-duplex operation, the authenticator device challenges the peer device by generating a CHAP challenge, and the challenge contains an MD5 algorithm with a random number that has the encrypted password and system name. The peer device then applies a one-way hash algorithm to the random number and returns this encrypted information along with the system name in the CHAP response. The authenticator then runs the same algorithm and compares the result with the expected value. This authentication method depends upon a password or secret, known only to both ends locally. Full-duplex operation places an additional step to the half-duplex operation that mirrors the operation discussed above for a peer to validate the authenticator. The peer device challenges the authenticator by generating a CHAP challenge, and the authenticator returns a CHAP response. The peer device challenges the authenticator device by generating a CHAP challenge, and the challenge contains an MD5 algorithm with a random number that has the encrypted password and system name. The authenticator device then applies a one-way hash algorithm to the random number and returns this encrypted information along with the system name in the CHAP response. The peer device then runs the same algorithm and compares the result with the expected value. This authentication method depends upon a password or secret, known only to both ends locally. LQM Link Quality Monitoring (LQM) is a link control mechanism used with PPP to determine when and how often a link is dropping data in units of packets and octets. Link Quality Monitoring accomplishes this by providing Link-Quality-Reports to determine if the quality of the link is adequate for operation. Link Quality Monitoring provides separate measurements for both incoming and outgoing packets that are communicated to both ends of the link. The PPP LQM mechanism carefully defines the Link-Quality-Report packet formats, and specifies reference points for all data transmission and reception measurements. The LQM implementation maintains successfully received packet and octet counts, and periodically transmits this information to its peer using Link-Quality-Report packets. Multilink Protocol Multilink Protocol (MP) is an extension of PPP that controls the way frames are transferred across several links whenever a single link cannot handle the present traffic load. Multilink Protocol establishes several simultaneous links between two end points over switched circuits (dial-up lines) in an ISDN network, and dynamically adjusts the bandwidth demands between available links to maintain an effective data transfer. 2-10 HSIM-W6 Installation Guide HSIM-W6 Firmware Support ISDN ISDN provides an inexpensive switched digital access to remote sites. The ISDN BRI standard provides for two high speed 64 Kbps bearer (B) channels used for voice or data connections and one 16 Kbps signaling data (D) channel used for call setup, signaling and other information. ISDN allows all types of information to be transmitted including voice, data, fax and video. Multiple devices can be linked to a single ISDN connection, each having their own telephone number. Two or more channels can be combined into a single larger transmission pipe offering variable transmission speeds. The HSIM-W6 supports one ISDN BRI line and either or both of the B channels for transferring data. If the two B channels are used for separate connections, each provides up to 64 Kbps transfer rates. Both channels can be used together to provide uncompressed data transfer at up to 128 Kbps. The HSIM-W6 can also transfer compressed data at up to 512 Kbps. A Network Terminator device (NT1) provides the interface between ISDN terminal (router) equipment and the ISDN service provider. In the U.S., the NT1 is provided by the customer; outside the U.S., the NT1 is provided by the ISDN service provider. The HSIM-W6 supports the WPIM-S/T that provides an S/T interface requiring an external NT1. Telephone Switch Support The following telephone switch types are supported within the U.S.: • National ISDN 1 (NI-1) • AT&T 5ESS w/Custom Software • DMS-100 Outside of the U.S. the following switch types are supported: • NET3 (European ISDN) • NET3SW (European Swiss-variant) • NTT (Nippon Telegraph and Telephone) • KDD (Kokusai Denshin Denwa Co., Ltd.) • French Delta (VN4) switches HSIM-W6 Installation Guide 2-11 Chapter 2: About the HSIM-W6 ISDN Back-up The ISDN back-up feature provides a back-up link for a remote site or branch office when one or more primary WAN interfaces for a frame relay circuit or a nailed-up PPP connection fails. The WPIM-S/T serves as the backup medium for this primary connection. The WPIM-S/T uses the ISDN interfaces to back-up any primary interfaces which have been configured for ISDN back-up. Time to Connect, Time to Disconnect, Connect Retries, Back-up Override, Input Idle Time-out and Output Idle Time-out, are the six back-up parameters used to manage the ISDN Back-up feature on the HSIM-W6, and are described as follows: Time to Connect — Time to Connect allows the user to configure the amount of seconds the primary interface can be in a failed state, before attempting to switch over to the back-up interface. Time to Disconnect — Time to Disconnect allows the user to configure the amount of seconds the restored primary interface must remain connected, before attempting to switch over from the back-up interface. Connect Retries — Connect Retries allows the user to configure the number of tries to bring up the back-up interface, before giving up. Backup Override — Backup Override forces the back-up interface to remain connected, and does not allow the back-up interface to switch back to the primary interface, even if the primary interface is restored. Input Idle Time-out — Input Idle Time-out allows the user to determine the amount of time necessary for data packets to be received, before the interface is automatically disconnected. Output Idle Time-out — Output Idle Time-out allows the user to determine the amount of time necessary for data packets to be transmitted, before the interface is automatically disconnected. The IP-OSPF Routing Protocol Open Shortest Path First (OSPF) is a link state routing protocol developed for Internet Protocol (IP) networks. OSPF distributes routing information between routers belonging to a single autonomous system. In an autonomous system, routers exchange routing information through a common routing protocol. OSPF was designed primarily for the Internet environment and supports variable length subnet masks, Type of Service (TOS) based routing, packet authentication, and the tagging of externally derived routing information. 2-12 HSIM-W6 Installation Guide HSIM-W6 Firmware Support OSPF, based upon link-state technology, was developed by the Internet Engineering Task Force (IETF). The IETF developed OSPF based upon the shortest path first algorithm to serve large, heterogeneous networks. A key feature of OSPF is the speed in which it responds to topological changes, commonly referred to as “convergence time.” OSPF generates a minimal amount of routing protocol traffic compared to most distance vector protocols. Cabletron’s implementation of OSPF is based on RFC 1247 — OSPF Version 2 and RFC 1253 — OSPF Version 2 Management Information Base. IP-OSPF Hierarchy IP-OSPF operates within a hierarchy of entities: Autonomous System An Autonomous System (AS) is a set of routers and networks under a common administration. Routers inside an AS are called “interior gateways” and the protocol is called Interior Gateway Protocol (IGP). OSPF is an IGP. Every OSPF routing domain must have a backbone. An OSPF backbone distributes routing information between areas in an OSPF routing domain. The backbone of an OSPF routing domain system is an OSPF area possessing an area id of 0.0.0.0. Areas Areas are groups of networks and attached hosts. A router’s topology database includes area links, and summarized and external links depicting the autonomous system topology. From this database, routers calculate a route using the shortest-path tree algorithm. The Hello Protocol The Hello Protocol establishes and maintains neighbor relationships, and ensures bidirectional communications among neighboring routers. Hello packets are sent out all router ports periodically. A designated router is chosen by the Hello Protocol on multi-access networks and controls adjacencies formed over the network. Neighbors and Adjacency The OSPF routing protocol establishes adjacencies among neighboring routers which facilitate the exchange of routing information. Neighboring routers have interfaces to a common network and are discovered by OSPF’s Hello Protocol. HSIM-W6 Installation Guide 2-13 Chapter 2: About the HSIM-W6 Area Border Router Area Border Routers (ABR) connect networks together. These routers have multiple interfaces and participate in multiple areas. There must be at least one area border router in each area connecting that area to a backbone. An ABR maintains a separate link-state database per area that it is attached to. Designated Router Designated Routers (DR) are used by OSPF to reduce adjacencies. Other routers establish adjacencies and synchronize databases only with the designated router and backup designated router. These routers perform two key functions for the OSPF routing protocol: • The designated router creates a network links advertisement which lists the set of routers, including the designated router, attached to the network. • The designated router is adjacent to all routers on the network and plays a central role in the synchronization of link-state databases across adjacencies. One DR is elected for each network and is elected by using the Hello Protocol. If one or more routers have declared to be the DR in their Hello packets, the one with the highest Router Priority becomes the DR. If more than one router has identical router priority, then the router with the highest router ID becomes DR. Backup Designated Router Backup Designated Routers (BDR) are used for each multi-access network. The BDR is adjacent to all routers on the network and becomes the Designated Router if the existing Designated Router fails. The BDR does not generate network link advertisements and is also elected by the Hello Protocol. The Backup Designated Router is chosen from those routers who have not declared themselves to be the Designated Router. If a one or more routers have declared itself to be the BDR in their Hello packets, the one with the highest Router Priority becomes the BDR. If no routers have declared themselves to be BDR, then the router with the highest router ID becomes BDR. Detailed information on the OSPF protocol is documented in RFC 2178. 2-14 HSIM-W6 Installation Guide HSIM-W6 Firmware Support HDSL High-bit rate Digital Subscriber Line (HDSL) technology uses existing copper twisted pair cables designed for conventional analog voice transmission from a telephone carrier servicing area as a low-cost alternative to the quality and speed of fiber optic cables, and provides high-speed full-duplex digital transmission links of up to 1.544 Mbps. The WPIM-HDSL is easy to install in a network over existing telephone lines, and it is a portable investment if a business, or individual user plans to relocate. HDSL is a direct connection technology that allows connections to be made for distances of up to 12,000 feet over 24 American Wire Gauge (AWG) unconditioned Twisted Pair wire. To obtain the Full T1 line Rate of 1.544 Mbps, two wire pairs are necessary (four wires). If one pair of wires is used (two wires), then data rates of 772 Kbps are supported, which is equivalent to one-half of a T1 line. Bridging and Routing Bridging — Bridging connects two or more separate networks together. The bridge examines a portion of each network frame called the header. This header contains control information for the frame. The bridge compares the destination address of the frame to a table of source addresses (bridges dynamically learn the physical location of devices by logging the source addresses of each frame and the bridge port the frame was received on in the source address table). In transparent bridging, the decision to forward the frame is based on this comparison. If the address indicates that the sending station and the destination station are on the same side of the bridge, the frame is not forwarded across the bridge. If the addresses do not indicate that, the bridge forwards the broadcast frame across the bridge to the other network(s). Bridging allows frames to be sent to all destinations regardless of the network protocols used. It also allows protocols that cannot be routed (such as NETBIOS) to be forwarded, and optimizes internetwork capacity by localizing traffic on LAN segments. A bridge extends the physical reach of networks beyond the limits of each LAN segment. Filters can be used to increase network security in bridged networks, and restrict message forwarding by using user-built address tables (non-transparent bridging). HSIM-W6 Installation Guide 2-15 Chapter 2: About the HSIM-W6 Routing — Routing provides a way to transfer user data from source to destination over different LAN and WAN links using one or more network protocol formats. Routing relies on routing address tables to determine the best path for each packet. Routing tables can be seeded (i.e., addresses for remote destinations are placed in the table along with network address masks and a metric for path latency). Routing tables are also built dynamically (i.e., the location of remote stations, hosts and networks are updated through inter-router protocols). Routing helps to increase network capacity by localizing traffic on LAN segments and broadcasts that would result from bridged traffic. It also provides security by isolating traffic on segmented LANs. Routing extends the world-wide reach of networks. HSIM-W6 Bridging and Routing — The HSIM-W6 can operate as a bridge, a router, or both. The HSIM-W6 operates as a router for network protocols that are supported when routing is enabled and operates as a bridge when bridging is enabled. When both bridging and routing are enabled, routing takes precedence over bridging (i.e., the HSIM-W6 uses the protocol address information of the packet to route the packet to the correct destination, and if the protocol is not supported, the device uses the MAC address information to bridge the packet). Operation of the HSIM-W6 is influenced by routing and bridging controls and filters set during HSIM-W6 configuration. General IP routing, and routing or bridging from specific remote routers are controls set during the configuration process. IEEE 802.1d Bridging — The HSIM-W6 supports the IEEE 802.1d standard for LAN to LAN bridging. This bridging algorithm learns the low-level MAC addresses of each LAN constituent and uses this information to decide whether to transmit the packet to another LAN via a WAN connection, or keep it local. Part of the bridging standard used, called Spanning Tree Protocol, supports multiple, redundant paths for LAN to LAN bridging, yet prevents data loops and duplication. This adds fault tolerance to a system of LANs, since, if one WAN data path fails, another may be substituted automatically. IP Routing — IP routing support provides the ability to process IP frames at the network layer for routing. IP routing support includes the Routing Information Protocol (RIP) that allows the exchange of routing information on an IP network. The HSIM-W6 receives and broadcasts RIP messages to adjacent routers and workstations. IPX Routing — Internet Packet Exchange (IPX) routing support provides the ability to process Novell proprietary frames at the network layer for routing. IPX routing support includes the Routing Information Protocol (RIP) that allows the exchange of routing information on a Novell NetWare network. 2-16 HSIM-W6 Installation Guide HSIM-W6 Firmware Support Bridging and Routing Protocol Filtering Filtering is used to allow efficient usage of network resources and provide security for a network and hosts. IP Internet Firewall — The HSIM-W6 supports IP Internet Firewall filtering to prevent unauthorized access to a system and network resources from the Internet or a corporate Intranet. Security can be configured to permit or deny IP traffic. The security is established by configuring IP access filters, which are based on source IP address, source mask, destination IP address, destination mask, protocol type, and application port identifiers for both the Transmission Control Protocol (TCP) and User Datagram Protocol (UDP). These IP access filters allow individual IP source and destination pair filtering as well as IP address ranges and wild carding to match any IP address. These Firewall filters can be defined to allow inbound only, outbound only, or bi-directional IP communication up to the UDP and TCP application port level. Firewall access filters provide a lot of flexibility to establish a powerful IP security barrier. The HSIM-W6 supports the IP Access Control (from the ctip-mib) Internet Firewall Filter. Bridge Filtering — Bridge filtering allows a network administrator to control the flow of packets across the HSIM-W6. Bridge filtering can be used to “deny” or “allow” packets based on a “matched pattern” using a specified position and hexadecimal content within the packet. This enables restricting or forwarding of messages based on address, protocol, or data content. Common uses include preventing access to remote networks, controlling unauthorized access to the local network, and limiting unnecessary traffic. The HSIM-W6 supports the following Bridge Filters: • dot1d.Static Filters (IETF RFC1493) • Ethernet Special Filtering Database (from the ctbridge-mib) System Passwords System passwords allow the user to control access to the HSIM-W6 by establishing three passwords. Each password provides varying levels of access to the HSIM-W6. The default password for each access level is preset to public. The following definitions explain each of the three levels of access: read-only — This access level allows reading of device parameters not including system passwords. HSIM-W6 Installation Guide 2-17 Chapter 2: About the HSIM-W6 read-write — This access level allows editing of some device configuration parameters not including changing system passwords. super-user — This access level allows full management privileges, allowing access to QuickSET. Simple Network Management Protocol (SNMP) The HSIM-W6 provides SNMP agent support for the following: standard and Enterprise Specific Management Information Bases (MIBs), and support for standard and Enterprise Specific SNMP Traps. SNMP is also used internally for configuration of the HSIM-W6. The active SNMP agent within the HSIM-W6 accepts SNMP requests for status, statistics and configuration updates. Communication with the SNMP agent occurs over the LAN or WAN connection. Any management application using SNMP over UDP/IP has access to the local SNMP agent. SNMP MIB Support SNMP MIBs are databases of objects used for managing and determining the status and configuration of an SNMP compliant device. The following SNMP MIBs are supported by the HSIM-W6: • MIB II RFC1213 • RMON MIB RFC1271 • DS1 and E1 MIB RFC1406 (Digital Signal Level 1 [T1/E1 interface types]) • IETF Bridge MIB RFC1493 • IP Forwarding MIB RFC1354 • PPP LCP MIB RFC1471 (Point-to-Point Protocol, Link Control Protocol) • PPP IPCP MIB RFC1473 (IP Control Protocol) • PPP BNCP MIB RFC1474 (Bridge Network Control Protocol) • IPXCP MIB RFC1552 (PPP Internetworking Packet Exchange Control Protocol) • Frame Relay DTE MIB RFC2115 • Security MIB RFC1472 (CCP, PAP, and CHAP) • RS-232 MIB RFC1317 • LQM MIB RFC1989 • PPP MP RFC1990 2-18 HSIM-W6 Installation Guide HSIM-W6 Firmware Support • Frame Relay MultiProtocol Encapsulation MIB RFC1490 • OSPF V2 RFC2178 • OSPF V2 MIB RFC1850 Cabletron Enterprise MIBs Cabletron Enterprise MIBs include the following: CTWAN-MIB, CTMIB2-EXT-MIB, CTDOWNLOAD-MIB, CTBRIDGE-MIB, RREV-4-MIB, CTROUTER-MIB, CTFAULT-MIB, CTIP-MIB, CHASSIS-MIB, CTNETDIAG-MIB, IP-MIB, IPX-MIB, CTDEFAULT-MIB, CTNAT-MIB.TXT, CTDHCP-MIB.TXT, CTWAN-IMUX-MIB, CTISDN-DIALCONTROL-MIB, CTISDN-DCHANNEL-MIB, and CTISDN-REMOTEPROFILE-MIB. SNMP Trap Support SNMP Traps are notifications of network events sent by an SNMP compliant device to an SNMP management station. The following SNMP Traps are supported by the HSIM-W6: • • IETF Standard Traps: • Warm Start Trap Type Code #1 RFC1214 • Bridge New Root Trap Type Code #1 RFC1493 • Bridge Topology Change Trap Type Code #2 RFC1493 Cabletron Enterprise Traps: • Port Segmented Trap Type Code #257(0x101) rrev4-mib • Port Operational Trap Type Code #258(0x102) rrev4-mib • Port Link Up Trap Type Code #259(0x103) rrev4-mib • Port Link Down Trap Type Code #260(0x106) rrev4-mib • Environmental Temperature Hot Trap Type Code #282(0x11A) rrev4-mib • Environmental Temperature Normal Trap Type Code #284(0x11C) rrev4-mib • IP Event Log Change Trap Type Code #1280(0x500) ctip-mib HSIM-W6 Installation Guide 2-19 Chapter 2: About the HSIM-W6 The following is a list of IP Events that are logged and that create the IP Event Log Change Trap. • • IP Routing has been disabled on interface # • IP Routing has been enabled on interface # • IP Forwarding has been enabled on interface # • IP MTU size has been changed on interface # • IP Framing Type has been changed on interface # • IP has detected Link UP on interface # • IP has detected Link DOWN on interface # • IP Primary address has been changed on interface # • IP Secondary address has been changed on interface # • IP Access Control Lists have been enabled on interface # • IP Access Control Lists have been disabled on interface # • IP has detected Port UP (WAN devices only) • IP has detected Port DOWN (WAN devices only) • IP Proxy ARP has been disabled on interface # • IP Proxy ARP has been enabled on interface # • IP RIP has been enabled on interface # • IP RIP has been disabled on interface # • IPX Event Log Change Trap Type Code #1281(0x501) ctipx-mib The following is a list of IPX Events that are logged and that create the IPX Event Log Change Trap. • IPX Routing has been disabled on interface # • IPX Routing has been enabled on interface # • IPX Forwarding has been enabled on interface # • IPX MTU size has been changed on interface # • IPX Framing Type has been changed on interface # 2-20 HSIM-W6 Installation Guide HSIM-W6 Firmware Support • IPX has detected Link UP on interface # • IPX has detected Link DOWN on interface # • IPX Primary address has been changed on interface # • IPX Access Control Lists have been enabled on interface # • IPX Access Control Lists have been disabled on interface # • IPX has detected Port UP (WAN devices only) • IPX has detected Port DOWN (WAN devices only) • IPX RIP has been enabled on interface # • IPX RIP has been disabled on interface # • IPX SAP has been enabled on interface # • IPX SAP has been disabled on interface # Software and Firmware Upgrades Software and Firmware upgrades can be performed remotely through the Windows-based QuickSET utility application. Refer to the QuickSET Configuration Guide for instructions. QuickSET allows the user to retrieve or upgrade the firmware, software, and configuration files from its Firmware Upgrade menu by selecting the TFTP/BootP Services window to access a TFTP (Trivial File Transfer Protocol) server. HSIM-W6 Installation Guide 2-21 Chapter 2: About the HSIM-W6 2-22 HSIM-W6 Installation Guide 3 Installation This chapter outlines the procedure for attaching the HSIM-W6 to the network. To install the HSIM and WPIMs, you need the following items: • Antistatic wrist strap (provided with the HSIM-W6) • Phillips screwdriver Unpacking the HSIM-W6 Unpack the HSIM-W6 as follows: 1. Remove the shipping material covering the HSIM-W6 in the shipping box. 2. Carefully remove the HSIM-W6 from the shipping box. Leave the module in its non-conductive bag until you are ready to install it. 3. Attach the antistatic wrist strap (refer to the instructions on the antistatic wrist strap package). 4. After removing the module from its non-conductive bag, visually inspect the device. If there are any signs of damage, contact Cabletron Systems (refer to Chapter 1, Getting Help) immediately. Guidelines for Installations Only qualified personnel should perform installation procedures. Installation sites must be within reach of the network cabling and meet the requirements listed below: • A properly grounded power receptacle must be within seven feet of the location. • In a shelf installation, the shelf must be able to support 13.6 kg (30 lb) of static weight for each device on the shelf. HSIM-W6 Installation Guide 3-1 Chapter 3: Installation • Maintain a temperature of between 5°C (41°F) and 40°C (104°F) at the installation site with fluctuations of less than 10°C (50°F) per hour. • Maintain a two-inch clearance for each side and the back of the device for adequate ventilation. Installing Interface Modules Depending on your specific application, install Cableton Systems WAN Port Interface Modules (WPIMs) and the CSX-COMP/ENCR into the HSIM-W6 before proceeding with the installation of your HSIM-W6. Refer to the Installing WAN Port Interface Modules (WPIMs) and CSX-COMP/ENCR Installation sections within this chapter for installation instructions. ! CAUTION NOTE The WPIMs and CSX-COMP/ENCR for the HSIM-W6 are sensitive to static discharges. Use a grounding strap and observe all static precautions during installation. Failure to do so could result in damage to the WPIMs, CSXCOMP/ENCR, and the HSIM-W6. The HSIM-W6 must have at least one WPIM installed before you can begin configuring the device. Installing WAN Port Interface Modules (WPIMs) NOTE Both WAN ports can be populated. However, if only a single WPIM is used to communicate and configure your HSIM-W6, WIDE AREA 1 port must have a WPIM installed. To install a WPIM into the HSIM-W6, refer to Figure 3-1 and Figure 3-2 and complete the following steps: 1. Attach the antistatic wrist strap to your wrist (refer to the instructions on the antistatic wrist strap package). 2. Remove and save the three screws from the WPIM standoffs (see Figure 2). Remove the WPIM coverplate. 3-2 HSIM-W6 Installation Guide Installing WAN Port Interface Modules (WPIMs) Standoff Screws WPIM Coverplate HSIM Standoffs Figure 3-1 Removing the WPIM Coverplate 3. Remove and save the two HSIM faceplate screws attaching the faceplate to the HSIM printed circuit board (PCB). Remove the HSIM faceplate (see Figure 3). 4. Carefully align and gently insert the WPIM connector onto the WPIM connector pins on the HSIM-W6. 5. Press down firmly on the WPIM until the pins slide all the way into the connector. Ensure that the WPIM seats firmly on the standoffs. 6. Secure the WPIM to the three standoffs using the screws that are provided with the HSIM-W6. 7. Reattach the faceplate to the HSIM using the two screws saved in step 3. HSIM-W6 Installation Guide 3-3 Chapter 3: Installation WPIM Screws WPIM Connector LN K ST S W ID E AR EA 1 HSIM PCB TE LC O LN K ST S AS YN C WPIM Connector Pins HSIM Faceplate Screws LN K ST S W ID E AR EA TE 2 HS LC O IM -W 6 CP U Standoffs 225703 Figure 3-2 Installing a WPIM CSX-COMP/ENCR Installation This section contains instructions on how to install the COMP/ENCR into the HSIM-W6. To help eliminate any potential problems during or after installation, read and understand the following steps: 1. Attach one end of the antistatic wrist strap to your wrist and the other end to an approved electrical ground. 2. Unpack the CSX-COMP/ENCR by carefully removing it from the shipping box and then from the protective plastic bag. Do not cut the bag as the device could be damaged. If there are any signs of damage, contact the Cabletron Systems Global Call Center (refer to Chapter 1, Getting Help). 3-4 HSIM-W6 Installation Guide CSX-COMP/ENCR Installation 3. Install the CSX-COMP/ENCR in the HSIM-W6 by unlocking the top and bottom plastic locking tabs of the module faceplate. Slide out the module and place it on its side with the internal components facing up. NOTE Ensure that the CSX-COMP/ENCR is aligned such that its connector pins correctly align with the D-Type connector on the HSIM-W6. 4. Locate the D-Type connector and the standoffs on the HSIM-W6 (refer to Figure 3-3). 5. The D-Type connector pins of the CSX-COMP/ENCR only fits one way onto the HSIM-W6 D-Type connector. Lower the CSX-COMP/ENCR onto the standoffs and align the connector with the connector pins. Carefully insert the connector pins of the CSX-COMP/ENCR into the connector on the HSIM-W6. 6. Press down firmly on the CSX-COMP/ENCR until the pins fit all the way into the connector. 7. Secure the CSX-COMP/ENCR with the standoff screws supplied with the CSX-COMP/ENCR. The CSX-COMP/ENCR installation is complete. Standoff Screws D-Type Connector Pins D-Type Connector CSX-COMP/ENCR Standoff Detail 2204N01 Figure 3-3 CSX-COMP/ENCR HSIM-W6 Installation Guide 3-5 Chapter 3: Installation Installing an HSIM You can install an HSIM-W6 in any Cabletron Systems device that supports HSIM technology (e.g., SmartSWITCH 2200, SmartSWITCH 6000). Refer to the release notes for the version of firmware running on the Cabletron Systems device to ensure that the HSIM-W6 is supported. The following sections provide generic instructions for installing an HSIM-W6 in a SmartSWITCH interface module or in a SmartSWITCH chassis. Refer to your specific interface module or chassis documentation for exact HSIM slot and connector locations. Installing an HSIM in an Interface Module To install an HSIM in a module that supports HSIM technology refer to Figure 3-4 and Figure 3-5 and complete the following steps: 1. Disconnect all network cables from the interface module. Note the ports to which these cables are attached. 2. Attach the disposable antistatic wrist strap. 3. Unlock the top and bottom plastic locking tabs of the module faceplate. 4. Slide out the interface module and place it on its side with the internal components facing up. 5. Remove and save the two faceplate mounting screws securing the HSIM coverplate and remove the coverplate. See Figure 3-4. 6. Remove and save the two standoff screws. 3-6 HSIM-W6 Installation Guide Installing an HSIM Standoff Screws Coverplate Faceplate Mounting Screws 225704 Figure 3-4 Removing the HSIM Coverplate 7. Place the HSIM behind the module faceplate. See Figure 3-5. 8. Ensure that the standoffs on the interface module align with the standoff screw holes on the HSIM to prevent bending pins. Then insert the connector pins of the HSIM into the HSIM connector on the interface module. 9. Press down firmly on the back of the HSIM until the pins slide all the way into the connector holes. 10. Secure the HSIM to the faceplate using the two screws saved in step 5. 11. Secure the HSIM to the standoffs with the screws saved in step 6. 12. Reinstall the interface module in the chassis. 13. Reattach the network cabling to the module. HSIM-W6 Installation Guide 3-7 Chapter 3: Installation . Standoff Screws HSIM Connector LN K ST S WID EA RE A1 TE LC O LN K ST S AS YN C WID LN K ST S EA RE A2 TE LC O Faceplate Mounting Screws Standoffs 225705 Figure 3-5 Installing the HSIM 3-8 HSIM-W6 Installation Guide Installing an HSIM Installing an HSIM in a SmartSWITCH Chassis To install an HSIM into a SmartSWITCH chassis that supports HSIM technology refer to Figure 3-4 and Figure 3-5, and perform the following steps: 1. Power down the chassis and remove the power cord. 2. Disconnect all network cables from the chassis. Note the ports to which these cables attach. Ensure that you remove the power cord and ONLY the screws required to remove the chassis cover. Failure to comply could result in an electric shock hazard. 3. Attach the antistatic wrist strap. 4. Remove the chassis cover (refer to your specific chassis documentation for instructions on removing the chassis cover). 5. Remove and save the two faceplate mounting screws securing the HSIM coverplate and remove the coverplate. See Figure 3-4. 6. Remove and save the two standoff screws. See Figure 3-4. 7. Place the HSIM behind the chassis faceplate. See Figure 3-5. 8. Ensure that the standoffs on the chassis align with the standoff screw holes on the HSIM to prevent bending the pins and insert the connector pins of the HSIM into the HSIM connector on the chassis motherboard. 9. Press down firmly on the back of the HSIM until the pins slide all the way into the connector holes. 10. Secure the HSIM to the faceplate using the screws saved in step 5. 11. Secure the HSIM to the standoffs using the screws saved in step 6. Ensure that the chassis cover is in place before reconnecting the power cord. 12. Reattach the chassis cover to the chassis and reconnect the power cord. 13. Reconnect the chassis to your network. HSIM-W6 Installation Guide 3-9 Chapter 3: Installation 3-10 HSIM-W6 Installation Guide 4 Troubleshooting Use this chapter in conjunction with the LANVIEW status monitoring and diagnostic LEDs on the HSIM-W6 to diagnose power failures, cable faults and link problems. Figure 4-1 shows the front panel LEDs. Table 4-1 through Table 4-10 describes the LED states. If you are having difficulty installing and configuring the HSIM-W6, perform the following steps: • Check that all cables and connectors have been attached properly. • Verify that power has been applied to the HSIM-W6. WIDE AREA1 WIDE AREA2 HSIM-W6 ASYNC LNK LNK LNK STS STS STS TELCO CPU TELCO Link Status Status Link CPU 225700-LEDs Figure 4-1 HSIM-W6 Front Panel LEDs Table 4-1 HSIM-W6 Hardware LED States LED Color State OFF Power Off RED Fault condition detected AMBER Testing in progress GREEN Functional Processor (CPU) HSIM-W6 Installation Guide 4-1 Chapter 4: Troubleshooting Table 4-2 HSIM-W6 ASYNC LED States (Console Connection Only) LED Color Status (STS) State AMBER Console connection; Data Carrier Detect (DCD); No Data Set Ready (DSR) AMBER (blinking) Test mode GREEN Modem with connection; DCD; DSR GREEN (blinking) Modem, no connection; DSR; No DCD RED or GREEN Modem connection; Request To Send(RTS); No Clear To Send(CTS) AMBER (blinking) Traffic; Modem or console connection Link (LNK) Table 4-3 shows the console connection to the ASYNC port. The configuration setup for a VT100 Mode Terminal is 8 bits, No parity, 1 stop bit, and 9600 baud. Table 4-3 HSIM-W6 ASYNC Console Connection Pinout PIN 4-2 Description 1 VT Receive Data 2 VT Data Terminal Ready (DTR) 4 VT Transmit Data 5 Ground HSIM-W6 Installation Guide Troubleshooting Table 4-4 HSIM-W6 ASYNC Modem Connection Pinout PIN Description 1 Transmit Data 2 Data Carrier Detect (DCD) 3 Data Set Ready (DSR) 4 Receive Data 5 Ground 6 Data Terminal Ready (DTR) 7 Request to Send (RTS) 8 Clear to Send (CTS) Table 4-5 HSIM-W6 WAN Link (LNK) LED States LED Color OFF WAN interface not configured or not present RED No Link/Connection (Fault) on the WAN interface AMBER Transmit (TX) and/or receive (RX) traffic GREEN Link and port is active GREEN (blinking) Link and port is in standby Link (LNK) HSIM-W6 Installation Guide State 4-3 Chapter 4: Troubleshooting Table 4-6 HSIM-W6 WAN Status (STS) LED States for T1, DI, and E1 Ports LED Status (STS) Color State OFF Normal or disabled RED Red Alarm AMBER Yellow alarm AMBER (blinking) Port in test mode GREEN Request to send Table 4-7 HSIM-W6 WAN Status (STS) LED States for DDS Ports LED Status (STS) Color State OFF Normal or disabled RED Not used AMBER Out of Service AMBER(blinking) Port in test mode GREEN Not used Table 4-8 HSIM-W6 WAN Status (STS) LED States for SYNC Ports LED Status (STS) 4-4 Color State OFF Normal or disabled RED Not used AMBER Not used AMBER (blinking) Port in test mode GREEN Request to send HSIM-W6 Installation Guide Troubleshooting HSIM-W6 Hardware Table 4-9 HSIM-W6 WAN Status (STS) LED States for HDSL Ports LED Status (STS) Color State OFF Normal or disabled RED One or both loops not synchronized AMBER Not used AMBER (blinking) Port in test mode GREEN Full (both loops synchronized) Fractional (one lop synchronized) Table 4-10 HSIM-W6 WAN Status (STS) LED States for S/T Ports LED Status (STS) Color State OFF Normal or disabled RED Not used AMBER Not used AMBER (blinking) Port in test mode GREEN B1 or B2 active Troubleshooting HSIM-W6 Hardware Power (PWR) LED is OFF • Check that the power connection is firmly attached to the back panel of the HSIM-W6, and the other end to an active power source. Processor (CPU) LED is OFF If the CPU stays OFF for an extended amount of time, and the power (PWR) light remains on, the CPU is in an unknown state. • Contact Cabletron Systems Global Call Center for technical support (refer to Getting Help in Chapter 1). HSIM-W6 Installation Guide 4-5 Chapter 4: Troubleshooting Processor (CPU) LED is RED Processor has detected a fault condition. • Contact Cabletron Systems Technical Support (refer to Getting Help in Chapter 1). ASYNC Console Connection Link (LNK) LED is OFF There is normal console operation and no traffic on the interface. Link (LNK) LED is RED or GREEN The ASYNC port is connected for modem operation. • Check the cabling and console connection pinout. Link (LNK) LED is AMBER There is traffic on the interface. Status (STS) LED is OFF The ASYNC port is disconnected or Data Carrier Detect (DCD) and Data Set Ready (DSR) are inactive. Status (STS) LED is AMBER The console connection is detected. The Data Carrier Detect (DCD) is active, while the Data Set Ready (DSR) is inactive. • If the port does not function, check the cabling, console connection pinout, and VT configuration. Status (STS) LED is GREEN or GREEN (Blinking) The ASYNC port is connected for modem operation. Data Set Ready (DSR) is Active. • 4-6 Check the cabling and console connection pinout. HSIM-W6 Installation Guide Troubleshooting the WAN Status (STS) LED is AMBER (Blinking) The HSIM-W6 is in test mode. • The HSIM-W6 is running its Power-up Diagnostic Tests. • Loopback Testing is underway on the ASYNC interface. Troubleshooting the WAN Link (LNK) LED is OFF The WAN interface is not configured for operation. • Use QuickSET or Local Management to make sure that the WAN interface is configured correctly. Link (LNK) LED is RED The WAN interface is configured, but there is no signal indicating that a valid connection is present on the WAN interface. • Check that the HSIM-W6 and the device at the other end of the segment are powered up. • Use QuickSET or Local Management to make sure that both WAN interfaces, local and remote, are configured correctly. • Check to ensure that the correct cable is being used. • Check to ensure that the cable has continuity and is fully installed. • Check with the WAN Service Provider to ensure that the circuit has been configured by them and is active. Link (LNK) LED is AMBER The port is in Standby mode. • Check with the Network Administrator to see if management placed the port in Standby mode. • Ensure that the protocol that you want to run has been properly selected at both ends and the time slots have been allocated if applicable. HSIM-W6 Installation Guide 4-7 Chapter 4: Troubleshooting Status (STS) LED is OFF WPIM-T1, WPIM-E1, WPIM-DI, or WPIM-DDS Installed in HSIM-W6 The port is operating normally. If it is not, and this LED is OFF the port may be disabled. • Use QuickSET or Local Management to make sure that the WAN interface on the Local device is configured correctly. WPIM-SYNC Installed in HSIM-W6 The port is operating normally. If it is not, and this LED is OFF the port may be disabled or RTS may be inactive. • Use QuickSET or Local Management to make sure that the WAN interface on the Local device is configured correctly. WPIM-HDSL Installed in HSIM-W6 The port is disabled or has been placed into Loopback Test mode. • Use QuickSET or Local Management to make sure that the WAN interface on the Local device is configured correctly. • Use QuickSET or Local Management to make sure that the WAN interface on the Remote device is configured correctly. WPIM-S/T Installed in HSIM-W6 The port is operating normally and ISDN BRI channels B1 and B2 are not active. If it is not, and this LED is always OFF, the port may be disabled. • 4-8 Use QuickSET or Local Management to make sure that the WAN interface on the Local device is configured correctly. HSIM-W6 Installation Guide Troubleshooting the WAN Status (STS) LED is RED WPIM-T1, WPIM-E1, or WPIM-DI Installed in HSIM-W6 is in RED Alarm Mode A RED alarm indicates that the WAN connection is not receiving proper framing or has lost framing. • Verify the use of proper cabling on the WAN connection. • Check Frame Type selection on the WAN Physical Configuration and line coding. • Possible bad cabling between Telco and HSIM-W6. WPIM-HDSL Installed in HSIM-W6 WPIM-HDSL is configured for either Full or Fractional T1 and the WPIM is not able to establish synchronization with the remote HDSL circuit. • Use QuickSET or Local Management to verify that one of the WPIM-HDSLs is involved in the connection is set to Master (Local) Timing and that the other one is set to Slave (Loop) Timing. • Verify the use of proper cabling for the HDSL connections. Category 3 or Category 5 Unshielded Twisted Pair copper wiring is required. One pair (2 wires) for Fractional T1, two pair (4 wires) for Full T1. The presence of bridged taps and multiple wire segments connected together to form the loop may reduce the maximum distance usable between the Remote and Local devices. Wire gauge has an impact on the distance which can be supported as well. The maximum distance is 12,000 feet using 24 American Wire Gauge (AWG) wiring. • Verify the gauge and condition of the wire. A trained line technician may be necessary to determine this. • Verify that the distance between the Remote and Local units is less than 12,000 Feet. Status (STS) LED is AMBER WPIM-T1, WPIM-E1, or WPIM-DI Installed in HSIM-W6 The device is in Yellow alarm mode. A Yellow alarm indicates that the HSIM-W6 is receiving proper framing from the Telco, but the Telco is not receiving proper framing. • Check for faulty or incorrect cabling between Telco and HSIM-W6. • Request that the Telco verify the configuration and operation of the circuit. HSIM-W6 Installation Guide 4-9 Chapter 4: Troubleshooting WPIM-DDS Installed in HSIM-W6 The DDS circuit is Out of Service (OOS). • Contact your WAN DDS Service Provider and have them test the operation of your DDS circuit. Status (STS) LED is AMBER (blinking) • Device is in test mode. • The CSX400 is running its Power-up Diagnostic Tests. • Loopback Testing is underway on a WAN circuit. Status (STS) LED is GREEN WPIM-SYNC Installed in HSIM-W6 The Port is operating normally; Request to Send (RTS) has been activated by your WAN device. If it is not, use the following steps: • Use QuickSET or Local Management to make sure that the WAN interface on the local device is configured properly. • Verify the cabling being used between the HSIM-W6 and the CSU/DSU. WPIM-HDSL is Installed in HSIM-W6 The Port is operating normally, the WPIM is synchronized with the HDSL circuit at the remote end. WPIM-S/T is Installed in HSIM-W6 The Port is operating normally, ISDN BRI channel B1 or B2 or both are active. 4-10 HSIM-W6 Installation Guide Investigating Software Configuration Problems Investigating Software Configuration Problems Software problems usually occur when your software configuration contains incomplete or incorrect information. Connection to Device Fails During Software Configuration • For a LAN connection, verify that the IP address matches the IP address previously stored into the configuration of the router. You must have previously (through QuickSET) set the Ethernet LAN IP address and Subnet Mask, enabled IP routing, saved the Ethernet configuration changes and rebooted the router for the new IP address to take effect. • Check that your LAN cable is wired correctly and each end securely plugged in. • Make sure that an IP route exists between your local PC and the HSIM-W6. The PC and HSIM-W6 must be on the same IP subnetwork or the HSIM-W6 must be reachable through a router on your LAN. • Check Network TCP/IP properties under Windows 95 or Windows NT, as described in the Read Me First! document. User Cannot Communicate with Remote Network Station If Bridging, • Check that the Bridging Default Destination is set. • Check that bridging to/from the remote router is set on. • Be sure to reboot if you have made any bridging destination or control changes. If TCP/IP Routing, • Check that TCP/IP Routing is set on and is enabled at the remote end. • Check that the IP address of the LAN beyond the remote router is correct, as well as the associated Subnet Mask. • If the remote router WAN IP address and Subnet Mask are required, check that they have been specified correctly. • Check that, if required, the source and remote WAN IP addresses are on the subnetwork. • Check that you have seeded the routing table, if RIP is not allowed to flow on the WAN link. • Be sure to reboot if you have made any IP address, control or protocol option changes. HSIM-W6 Installation Guide 4-11 Chapter 4: Troubleshooting Troubleshooting the Frame Relay Connection There are three troubleshooting tools available. The first has always been available and is LM. The second is the FR Error MIB Table, and reflects LMI or DLCI data errors. The third is new and is available as the Mib Nav command: “fr”. Communication with the FR switch is done through one of two methods: Asynchronous Status Messages — At any time the Fr Switch can send an unsolicited (no polling from us) message to us. Each message contains information on one DLCI and one only. It has the DLCI number and the DLCI state. We don’t respond to this message, but we do adjust what we know about DLCIs based on this information. Synchronous Polling Messages — The t391 timer for the ANSI/ITU Frame Relay forms the basis for polling between the FR switch and the FR DTE (us). We transmit a STATUS ENQUIRY every t391 seconds (10 by default) to the FR switch. We expect a STATUS RESPONSE, which contains information on the DLCIs the switch has assigned to us. Every other t391 cycle we sent out a LINK INTEGRITY VERIFICATION ENQUIRYmessage (LIV). We expect to get a LINK INTEGRITY VERIFICATION RESPONSE back from the Fr switch before out t391 polling cycle expires. This is a keep alive message that does no more than let us know the link between us and the FR switch is still alive. The information provided in a FULL STATUS RESPONSE, or ASYNCHRONOUS STATUS MESSAGE basically has two parts, the FR Switch provides a DLCI number, and whether that DLCI is in the Active or Inactive state. Active State — means that both ends of the connection (this DTE and the DTE at the other end of the WAN cloud) are speaking correctly to the FR DCE Switches in the WAN cloud. The Inactive state means that either the local or far end DTE is either just starting up and has not completed its initial negotiation with the FR Switch, or there is some sort of LMI error. Data (other than LMI negotiation messages) will only be transferred when in the Active state. Invalid — the third state value is reported locally only. It is not done by polling the FR switch. This is done if the physical connection has some sort of problem. The circuit will remain in the Invalid state until negotiation with the FR DCE Switch completes successfully. 4-12 HSIM-W6 Installation Guide A NOTE WPIM Cable Specifications For all WPIM cables, there is part number information for ordering a standard 20-foot cable or a specified length of cable. The number 20 followed by the part number denotes the standard 20-foot cable. The letter “L” denotes the specified length required in feet or meters. For example: 9372095-3 denotes a 3-foot cable; 9372095-3M denotes a 3-meter cable. WPIM-T1 This section provides the Cabletron Systems part number and connector specifications for WPIM-T1 interface cables. Table A-1 provides connector type and part number information. Table A-1 T-1 Interface Cable Part Numbers Connector Type Part Number RJ48C 9372094 Table A-2 provides RJ48 connector pin assignments. Table A-2 HSIM-W6 Installation Guide T-1 Connector Pin Assignments Pin Signal 1 Receive Ring 2 Receive Tip 3 Not Used 4 Transmit Ring 5 Transmit Tip 6 Not Used 7 Shield Ground 8 Shield Ground A-1 Appendix A: WPIM Cable Specifications Table A-3 provides RJ48 DTE pin assignments. Table A-3 DTE Pin Assignments Pin Signal 1 Receive Ring 2 Receive Tip 3 Not Used 4 Transmit Ring 5 Transmit Tip 6 Not Used 7 Shield Ground 8 Shield Ground Table A-4 provides RJ48 network pin assignments. Table A-4 A-2 Network Pin Assignments Pin Signal 1 Receive Ring 2 Receive Tip 3 Not Used 4 Transmit Ring 5 Transmit Tip 6 Not Used 7 Not Used 8 Not Used HSIM-W6 Installation Guide WPIM-SY WPIM-SY This section provides the Cabletron Systems part number and connector specifications for the WPIM-SY interface cables. Table A-5 provides the cable and interface types, electrical types, and part numbers for the WPIM-SY. Table A-5 WPIM-SY Interface Cables Cable and Interface Type Electrical Type Part Number RS449 RS422 9380120 V.35 V.35 9380121 RS232 RS232 9380122 X.21 X.21 9380123 RS530 RS422 9380124 RS530 ALT A RS422 9380125 RS530A RS422 9380126 RS530A ALT A RS422 9380127 HSIM-W6 Installation Guide A-3 Appendix A: WPIM Cable Specifications EIA-449 Table A-6 shows the connector number, cable assembly description, and connector type. Table A-6 Connector Number EIA-449 Interface Cable Assembly Description 1 Connector Type Sub DB 26-pin male connector EIA-530A ALT A to EIA-449 2 DB-37 pin male connector Table A-7 provides pin assignments for the EIA-449 interface cable. Table A-7 EIA-449 Interface Cable Pin Assignment Connector 1 EIA-530A ALT A MNEMONIC BA DIRECT NAME TO DCE BB DTE CB CA DCE DTE DD A-4 PIN Transmit Data A 2 Transmit Data B 14 Receive Data A 3 Receive Data B 16 Clear to Send A 5 Clear to Send B 13 Request to Send A 4 Request to Send B 19 Transmit Signal Timing A 15 DB DA Connector 2 EIA-449 Transmit Signal Timing B 12 Receive Signal Timing A 17 Receive Signal Timing B DCE 9 Transmit Signal Timing A 24 Transmit Signal Timing B 11 PAIR A B C D E F G DIRECT MNEMONIC TO PIN NAME 4 Send Data A 22 Send Data B 6 Receive Data A 24 Receive Data B 9 Clear to Send A 27 Clear to Send B 7 Request to Send A 25 Request to Send B 5 Send Timing A 23 Send Timing B 8 Receive Timing A 26 Receive Timing B 17 Terminal Timing A 35 Terminal Timing B DCE SD RD DTE CS DCE RS ST DTE RT DCE TT HSIM-W6 Installation Guide WPIM-SY Table A-7 EIA-449 Interface Cable Pin Assignment (Continued) Connector 1 EIA-530A ALT A MNEMONIC Connector 2 EIA-449 DIRECT NAME TO CE TM DTE CC CD DCE PIN PAIR DIRECT MNEMONIC TO PIN NAME Ring Indicator 22 15 Incoming Call Test Mode 25 18 Test Mode DCE Ready 6 11 Data Mode DTE Ready 20 12 Terminal Ready IC DTE TM DM DCE TR SHIELD 1 AC Signal Common 23 20 Receive Common RC AB Signal Common 7 19 30 37 Send Common Terminal Ready B Signal Ground SG TR_B SC V.35 Table A-8 shows the connector number, cable assembly description, and connector type. Table A-8 Connector Number V.35 Interface Cable Assembly Description 1 Connector Type Sub DB 26-pin male EIA-530A ALT A to V.35 2 M Series 34-pin male Table A-9 provides pin assignments for the V.35 interface cable. Table A-9 V.35 Interface Cable Pin Assignment Connector 1 EIA-530A ALT A MNEMONIC BA BB DIRECT NAME TO DCE DTE CB CA DCE Connector 2 V.35 PIN Transmit Data A 2 Transmit Data B 14 Receive Data A 3 Receive Data B 16 Clear to Send A 5 Request to Send A 4 HSIM-W6 Installation Guide PAIR PIN NAME P Transmit Data A S Transmit Data B R Receive Data A T Receive Data B C D Ready to Send A D C Request to Send A A B DIRECT MNEMONIC TO DCE DTE 103 104 106 DCE 105 A-5 Appendix A: WPIM Cable Specifications Table A-9 V.35 Interface Cable Pin Assignment (Continued) Connector 1 EIA-530A ALT A MNEMONIC DIRECT NAME TO DB DTE DD DA DCE CE TM A-6 PIN Transmit Signal Timing A 15 Transmit Signal Timing B DIRECT MNEMONIC TO PIN NAME Y Transmitter Signal Timing A 12 AA Transmitter Signal Timing B Receive Signal Timing A 17 V Receiver Signal Timing A Receive Signal Timing B 9 X Receiver Signal Timing B Transmit Signal Timing A 24 U Transmitter Signal Timing A Transmit Signal Timing B 11 W Transmitter Signal Timing B Ring Indicator 22 J Calling Indicator E F G 114 DTE 115 DCE 113 125 Test Mode 25 NN Test Indicator CC DCE Ready 6 E Data Set Ready 107 CD DTE Ready 20 H Data Terminal Ready 108 Remote Loopback 21 N Loopback Maintenance LL Local Loopback 18 L Local Loopback SHIELD 1 AC Signal Common 23 B Signal Common 102 AB Signal Common 7 B Signal Common 102 RL DTE Connector 2 V.35 PAIR DCE DTE DCE 142 140 141 DRAIN HSIM-W6 Installation Guide WPIM-SY EIA-232 Table A-10 shows the connector number, cable assembly description, and connector type. Table A-10 Connector Number EIA-232 Interface Cable Assembly Description 1 Connector Type Sub DB 26-pin male EIA-530A ALT A to EIA-232 2 DB-25 pin male Table A-11 provides pin assignments for the EIA-232 interface cable. Table A-11 EIA-232 Interface Cable Pin Assignment Connector 1 EIA-530A ALT A MNEMONIC BA BB CB CA Connector 2 EIA-232 DIRECT NAME TO DCE DTE DCE DB PIN PIN NAME Transmit Data 2 2 Transmit Data Receive Data 3 3 Receive Data Clear to Send 5 5 Clear to Send Request to Send 4 4 Request to Send Transmit Signal Timing 15 15 Transmitter Signal Timing DTE DD Receive Signal Timing 17 17 Receiver Signal Timing DIRECT MNEMONIC TO DCE DTE DCE BA BB CB CA DB DTE DD DA DCE Transmit Signal Timing 24 24 Transmitter Signal Timing DCE DA CE DTE Ring Indicator 22 22 Ring Indicator DTE CE Remote Loopback 21 21 Loopback Maintenance DCE Local Loopback 18 18 Local Loopback RL DCE LL TM RL LL Test Mode 25 25 Test Indicator DCE Ready 6 6 DCE Ready DTE Ready 20 20 DTE Ready SHIELD 1 AC Signal Common 23 7 Signal Common AB AB Signal Common 7 7 Signal Common AB CC CD DTE DCE HSIM-W6 Installation Guide DTE TM CC DCE CD A-7 Appendix A: WPIM Cable Specifications X.21 Table A-12 shows the connector number, cable assembly description, and connector type. Table A-12 Connector Number X.21 Interface Cable Assembly Description Connector Type 1 Sub DB 26-pin male EIA-530A ALT A to X.21 2 DB-15 pin male Table A-13 provides pin assignments for the X.21 interface cable. Table A-13 X.21 Interface Cable Pin Assignment Connector 1 EIA-530A ALT A MNEMONIC DIRECT NAME TO BA DCE BB DTE CB DTE CA DCE DB Connector 2 X.21 DTE PIN Transmit Data A 2 Transmit Data B 14 Receive Data A 3 Receive Data B 16 Clear to Send A 5 Clear to Send B 13 Request to Send A 4 Request to Send B 19 Transmit Signal Timing A 17 Receive Signal Timing A 15 Transmit Signal Timing B 9 Receive Signal Timing B 12 SHIELD A-8 PAIR A B C D DIRECT MNEMONIC TO PIN NAME 2 Transmit A 9 Transmit B 4 Receive A 11 Receive B 5 Indication A 12 Indication B 3 Control A 10 Control B 6 Signal Element Timing A 13 Signal Element Timing B E 1 AC DTE Common 7 AB DCE Common 23 DCE T DTE R DTE I DCE C DTE S DRAIN 8 Signal Ground G HSIM-W6 Installation Guide WPIM-SY EIA-530, EIA-530 ALT A, EIA-530 A, and EIA-530 A ALT A Table A-14 shows the connector number, cable assembly description, and connector type for the EIA-530, EIA-530 ALT A, EIA-530A, and EIA-530A ALT A, interface cables. Table A-14 EIA-530, EIA-530 ALT A, EIA-530A, and EIA-530A ALT A Interfaces Connector Number Cable Assembly Description Connector Type 1 Sub DB 26-pin male EIA-530A ALT A to EIA-530 2 DB 25-pin male 1 Sub DB 26-pin male EIA-530A ALT A to EIA-530 ALT A 2 Sub DB26-pin male 1 Sub DB 26-pin male EIA-530A ALT A to EIA-530A 2 DB 25-pin male 1 Sub DB 26-pin male EIA-530A ALT A to EIA -530A ALT A 2 Sub DB 26-pin male Table A-15 provides the cable pin assignments for the EIA-530, EIA-530 ALT A, EIA-530A, and EIA-530A ALT A, interface cables. Table A-15 EIA-530, EIA-530 ALT A, EIA-530A, and EIA-530A ALT A Interface Cable Pin Assignments Connector 1 EIA-530A ALT A MNEMONIC BA DIRECT NAME TO DCE BB DTE CB CA DCE Connector 2 EIA-530 PIN Transmit Data A 2 Transmit Data B 14 Receive Data A 3 Receive Data B 16 Clear to Send A 5 Clear to Send B 13 Request to Send A 4 Request to Send B 19 HSIM-W6 Installation Guide PAIR A B C D PIN NAME 2 Transmit Data A 14 Transmit Data B 3 Receive Data A 16 Receive Data B 5 Clear to Send A 13 Clear to Send B 4 Request to Send A 19 Request to Send B DIRECT MNEMONIC TO DCE BA BB DTE CB DCE CA A-9 Appendix A: WPIM Cable Specifications Table A-15 EIA-530, EIA-530 ALT A, EIA-530A, and EIA-530A ALT A Interface Cable Pin Assignments (Continued) Connector 1 EIA-530A ALT A MNEMONIC DIRECT NAME TO Connector 2 EIA-530 PIN PAIR 15 Transmit Signal Timing A Transmit Signal Timing B 12 12 Transmit Signal Timing B Receive Signal Timing A 17 17 Receive Signal Timing A 9 9 Receive Signal Timing B Transmit Signal Timing A 24 24 Transmit Signal Timing A 11 Transmit Signal Timing B Transmit Signal Timing A 15 DB E DTE DD F Receive Signal Timing B DA G DCE DIRECT MNEMONIC TO PIN NAME Transmit Signal Timing B 11 DB DTE DD DA DCE RL Remote Loopback 21 21 Remote Loopback RL LL Local Loopback 18 18 LL TM CC CD DTE DCE Local Loopback Test Mode 25 25 Test Mode DCE Ready 6 6 DCE Ready DTE Ready 20 20 DTE Ready SHIELD 1 DTE DCE TM CC CD DRAIN AC Signal Common 23 7 Signal Common AC a AC Signal Common 23 23 Signal Common AC AB bCE DTE Signal Common 7 7 Signal Common Ring Indicator 22 22 Ring Indicator AB DTE CE a. This pin assignment only applies to the EIA-530A ALT A interface cable. b. This pin assignment only applies to the EIA-530A and EIA-530A ALT A interface cables. A-10 HSIM-W6 Installation Guide WPIM-DDS WPIM-DDS This section provides Cabletron Systems part number and connector specifications for the WPIM-DDS interface cable. The WPIM-DDS has one RJ45 port for a direct connection to a single Digital Data Service (DDS) circuit. Table A-16 provides cable and interface type, and part number information for the WPIM-DDS interface cable, and Table A-17 provides network Pin Assignment information for the DDS interface cable. . Table A-16 DDS Interface Cable Part Number Cable and Interface Type Part Number DDS 9360119 Table A-17 HSIM-W6 Installation Guide Network Pinout Assignments PIN SIGNAL 1 Transmit Ring 2 Transmit Tip 3 Not Used 4 Not Used 5 Not Used 6 Not Used 7 Receive Tip 8 Receive Ring A-11 Appendix A: WPIM Cable Specifications WPIM-E1 This section provides the Cabletron Systems part number and connector specifications for the WPIM-E1 interface cable. Table A-18 shows the WPIM-E1 connector number, cable and interface type, connector type and part number information. Table A-18 Connector Number WPIM-E1 Connector Information Cable and Interface Type Connector Type Part Number E1 RJ45 9372095 1 2 Table A-19 provides WPIM-E1 network interface cable pin assignments. Table A-19 A-12 Network Interface Pin Signal 1 Receive Ring 2 Receive Tip 3 Shield Ground 4 Transmit Ring 5 Transmit Tip 6 Shield Ground 7 Not Used 8 Not Used HSIM-W6 Installation Guide WPIM-E1 Table A-20 provides WPIM-E1 DTE interface cable pin assignments. Table A-20 DTE Interface Pin Signal 1 Receive Ring 2 Receive Tip 3 Shield Ground 4 Transmit Ring 5 Transmit Tip 6 Shield Ground 7 Not Used 8 Not Used Table A-21 provides WPIM-E1 RJ45 network interface cable pin assignments. Table A-21 HSIM-W6 Installation Guide Network Interface Pin Signal 1 Receive Ring 2 Receive Tip 3 Not Used 4 Transmit Ring 5 Transmit Tip 6 Not Used 7 Not Used 8 Not Used A-13 Appendix A: WPIM Cable Specifications WPIM-DI This section provides Cabletron Systems part number and connector specifications for the WPIM-DI interface cables. Table A-22 shows the connector number, cable assembly description, cable and interface type, connector type and part number information for the WPIM-DI interface. Table A-22 Connector Number WPIM-DI Connector Information Cable Assembly Description 1 Network 2 Drop and Insert Cable and Interface Type Connector Type Part Number DI RJ48 9372094 Table A-23 provides the WPIM-DI network interface cable pin assignments. Table A-23 A-14 WPIM-DI Network Pin Signal 1 Receive Ring 2 Receive Tip 3 AC Coupled Ground 4 Transmit Ring 5 Transmit Tip 6 AC Coupled Ground 7 AC Coupled Ground 8 AC Coupled Ground HSIM-W6 Installation Guide WPIM-HDSL Table A-24 provides the WPIM-DI drop and insert interface cable pin assignments. Table A-24 WPIM-DI Drop and Insert Pin Signal 1 Transmit Ring 2 Transmit Tip 3 AC Coupled Ground 4 Receive Ring 5 Receive Tip 6 AC Coupled Ground 7 AC Coupled Ground 8 AC Coupled Ground WPIM-HDSL This section provides connector specifications for the WPIM-HDSL interface cables. Table A-25 provides pin assignments for the RJ-45 network interface connector. Table A-25 HSIM-W6 Installation Guide WPIM-HDSL Network Interface Cable Pin Assignments Pin Signal 1 HDSL Loop 1 (Ring1) 2 HDSL Loop 1 (Tip1) 3 Not Used 4 HDSL Loop 2 (Ring2) 5 HDSL Loop 2 (Tip2) 6 Not Used 7 Not Used 8 Chassis Ground A-15 Appendix A: WPIM Cable Specifications WPIM-S/T This section provides connector specifications for the WPIM-S/T interface cable. Table A-26 provides pin assignments for the RJ-45 network interface connector. Table A-26 A-16 WPIM-S/T Network Interface Cable Pin Assignments Pin Signal 1 Not Used 2 Not Used 3 Transmit + 4 Receive + 5 Receive - 6 Transmit - 7 Not Used 8 Not Used HSIM-W6 Installation Guide B Specifications and Standards Compliance This chapter contains hardware specifications, and safety and compliance standards for the HSIM-W6, and for the individual WPIMs that can be configured with this device. Table B-1 Hardware Specifications WAN Interface 2 WPIM ports Processor Intel i960 66 Mhz Power Supply +5V Supplied by host device Power Consumption 30 Watts maximum Operating Temperature 5° to 40°C (41° to 104°F) Storage Temperature -30° to 73°C (-22° to 164°F) Operating Humidity 5% to 90% RH, non-condensing Regulatory Compliance Safety — This unit meets the safety requirements of UL 1950, CSA C22.2 No. 950 and EN 60950, IEC 950, and 73/23/EEC. Electromagnetic Compatibility (EMC) — This unit meets the EMC requirements of FCC Part 15, EN 55022, EN 50082-1, 89/336/EEC, AS/NZS 3548, CSA C108.8, and VCCI V-3. HSIM-W6 Installation Guide B-1 Appendix B: Specifications and Standards Compliance Individual WPIM Regulatory Compliance The following sections provide regulatory compliance standards for the WPIM-TI, WPIM-SY, WPIM-DDS, WPIM-E1, WPIM-DI, WPIM-S/T, and the WPIM-HDSL. Cabletron Systems reserves the right to change these specifications at any time without notice. WPIM-TI This section describes the environmental specifications and safety and approval requirements for the WPIM-T1. Safety — This unit meets the safety requirements of UL 1950, and CSA C22.2 No. 950. Electromagnetic Compatibility (EMC) — This unit meets the EMC requirements of FCC Part 15, VCCI V-3, and CSA C108.8. NEBS — This unit meets a minimum of Level 1 NEBS requirements in accordance with Bellcore SR 3580. TELECOM — FCC Part 68, CS-03. WPIM-SY This section describes the environmental specifications and safety and approval requirements for the WPIM-SY. Safety — This unit meets the safety requirements of UL1950, CSA C22.2 No. 950, EN 60950, IEC 950, and 73/23/EEC. EMI — This unit meets the EMI requirements of FCC Part 15, EN 55022, EN 50082-1, AS/NZS 3548, 89/336/EEC, CSA C108.8, and VCCI V-3. TELECOM — 91/263/EEC, and NET 2. B-2 HSIM-W6 Installation Guide Individual WPIM Regulatory Compliance WPIM-DDS This section describes the environmental specifications and safety and approval requirements for the WPIM-DDS. Safety — This unit meets the safety requirements of UL1950, and CSA C22.2 No. 950. (EMC) — This unit meets the EMC requirements of FCC Part 15, CSA C108.8, and VCCI V-3. NEBS — This unit meets a minimum of Level 1 NEBS requirements in accordance with Bellcore SR 3580. TELECOM — FCC Part 68, CS-03. WPIM-E1 This section describes the environmental specifications and safety and approval requirements for the WPIM-E1. Safety — This unit meets the safety requirements of EN 60950, IEC 950, 73/23/EEC and AS/NZS 3260. Electromagnetic Compatibility (EMC) — This unit meets the EMI requirements of EN 55022, EN 50082-1, AS/NZS 3548, and 89/336/EEC. TELECOM — 91/263/EEC, CTR 12, TS 001, and TS 016. WPIM-DI This section describes the environmental specifications and safety and approval requirements for the WPIM-DI. Safety — This unit meets the safety requirements of UL1950, and CSA C22.2 No. 950. Electromagnetic Compatibility (EMC) — This unit meets the EMI requirements of FCC Part 15, VCCI V-3, and CSA108.8. TELECOM — The WPIM-DI meets FCC Part 68 and CS-03. HSIM-W6 Installation Guide B-3 Appendix B: Specifications and Standards Compliance WPIM-S/T This section describes the environmental specifications and safety and approval requirements for the WPIM-S/T. Safety — This unit meets the safety requirements of UC1950, CSA 22.2 No. 950, EN 60950, IEC 950 73/23/EEC. Electromagnetic Compatibility (EMC) — This unit meets the EMC requirements of FCC Part 15, EN 55022, VCCI V-3, CSA/08.8 EN 50082-1, AS/NZS 3548, 89/336/EEC. Telcom (Future) — FCC part 68, CS-03. WPIM-HDSL This section describes the environmental specifications and safety and approval requirements for the WPIM-HDSL. Safety — This unit meets the safety requirements of UC1950, CSA 22.2 No. 950, EN 60950, IEC 950 73/23/EEC. Electromagnetic Compatibility (EMC) — This unit meets the EMC requirements of FCC Part 15, EN 55022, VCCI V-3, CSA/08.8 EN 50082-1, AS/NZS 3548, 89/336/EEC. NEBS — This unit meets a minimum of Level 1 NEBS requirements in accordance with Bellcore GR 1089. B-4 HSIM-W6 Installation Guide C Network Information Worksheets Table C-1 Configuration Section Item System Settings Router Name HSIM-W6 Setting Message System Settings Dial Authentication Password Dial Authentication Password/Secret System Settings ISDN Settings ISDN SPID #1 ISDN SPID #2 ISDN Directory Number #1 ISDN Directory Number #2 ISDN Switch Type System Settings Ethernet IP Address Ethernet IP Address and Subnet Mask System Settings Ethernet IPX Network # Ethernet IPX Network Number Table C-2 Remote Router Configuration Section Item Remote Router Database Dial Settings ISDN Phone #1 ISDN Phone #2 Disconnect Timer Value Maximum Links Minimum Links Threshold Bandwidth Direction Remote Router Database Security Minimum Authentication Remote Router’s Password/ Secret Remote Router Database Bridging Bridging On/Off Spanning Tree On/Off HSIM-W6 Installation Guide Setting C-1 Appendix C: Network Information Worksheets Table C-2 Remote Router (Continued) Configuration Section Item Remote Router Database TCP/IP Route Addresses Remote Network’s IP Addresses, Subnet Masks, and Metrics Source WAN IP Address and Subnet Maska Setting Remote WAN IP Address and Subnet Maskb Remote Router Database IPX Routes IPX Routes: Network Number, Hop Count and Ticks Remote Router Database IPX SAPs SAPs: Server Name, Server Type, Network Number, Node Number and Sockets WAN Network Number a. Used only in PPP numbered mode of addressing b. Used only in PPP numbered mode of addressing Make one chart for each remote router in the remote router database. NOTE Table C-3 Bridging and Routing Controls Configuration Section Item Bridging/ Routing Default Remote Bridging Destination Setting TCP/IP Routing On/Off Internet Firewall On/Off IPX Routing On/Off C-2 HSIM-W6 Installation Guide D FCC Part 68 - User’s Information For HSIM-W6 The following instructions are to ensure compliance with the Federal Communications Commission (FCC) Rules, Part 68: 1. All connections to the WPIM-T1, WPIM-DI and WPIM-DDS must be made using standard plugs and jacks. a. The WPIM-S/T must only be connected to the network connected behind an FCC Part 68 registered channel service unit. Direct connection is not allowed. 2. Before connecting your unit, you must inform the local telephone company of the following information: Table D-1 Port ID WPIM-DI WPIM-T1 WPIM-DI and WPIM-T1 REN/SOC FIC USOC 6.0N 04DU9-BN 04DU9-DN 04DU9-1KN 04DU9-1SN 04DU9-1ZN RJ48C RJ48X Table D-2 WPIM-DDS (Only) Port ID REN/SOC FIC USOC WPIM-DDS 6.0N 04DU5-56 04DU5-64 RJ48S Table D-3 WPIM-S/T (Only) Port ID REN/SOC FIC USOC (BR) WPIM-ST 6.0P N/A (XD) N/A (XD) HSIM-W6 Installation Guide D-1 Appendix D: FCC Part 68 - User’s Information For HSIM-W6 3. If the unit appears to be malfunctioning, it should be disconnected from the telephone lines until you learn if your equipment or the telephone line is the source of the trouble. If your equipment needs repair, it should not be reconnected until it is repaired. 4. The CSU/DSU has been designed to prevent harm to the T1 and DDS network. If the telephone company finds that the equipment is exceeding tolerable parameters, the telephone company can temporarily disconnect service, although they will attempt to give advance notice if possible. 5. Under the FCC Rules, no customer is authorized to repair this equipment. This restriction applies regardless of whether the equipment is in or out of warranty. 6. If the telephone company alters their equipment in a manner that will affect use of this device, they must give you advance warning so as to give you the opportunity for uninterrupted service. You will be advised of your right to file a complaint with the FCC. 7. The attached Affidavit on the following page must be completed by the installer. 8. In the event of equipment malfunction, all repairs should be performed by our Company or an authorized agent. It is the responsibility of the users requiring service to report the need for service to our Company or to one of our authorized agents. Refer to the Getting Help section of Chapter 1 for more information on how to get service and support. D-2 HSIM-W6 Installation Guide FCC Part 68 - User’s Information For HSIM-W6 AFFIDAVIT FOR THE CONNECTION OFCUSTOMER EQUIPMENT TO 1.544 MBPS AND/OR SUBRATE DIGITAL SERVICES For the work to be performed in the certified territory of Telco’s name: State of: Country of: I, , of (Name of Authorized Representative) (Customer Name) (Customer’s Address) (Telephone Number) , being duly sworn, state: I have responsibility for the operation and maintenance of the terminal equipment to be connected to 1.544 Mbps and/or Subrate digital services. The terminal equipment to be connected complies with Part 68 of the Commission’s rules except for the encoded analog content and billing protection specifications. With respect to encoded analog content and billing protection: • I attest that all operations associated with the establishment, maintenance and adjustment of the digital CPE with respect to encoded analog content and encoded billing information continuously complies with Part 68 of the FCC’s Rules and Regulations. • The digital CPE does not transmit digital signals containing encoded analog or billing information which is intended to be decoded within the telecommunications network. • The encoded analog and billing protection is factory set and is not under the control of the customer. HSIM-W6 Installation Guide D-3 Appendix D: FCC Part 68 - User’s Information For HSIM-W6 I attest that the operator(s) maintainer(s) of the digital CPE responsible for the establishment, maintenance and adjustment of the encoded analog content and billing information has (have) been trained to perform these functions by successfully completing one of the following: Check appropriate one(s). a. A training course provided by the manufacturer/grantee of the equipment used to encode analog signals; or b. A training course provided by the customer or authorized representative, using training materials and instructions provided by the manufacturer/grantee of the equipment used to encode analog signals; or c. An independent training course (e.g. trade school or technical institution) recognized by the manufacturer/grantee of the equipment used to encode analog signals; or d. In lieu of the proceeding training requirements, the operator(s) maintainer(s) is (are) under the control of a supervisor trained in accordance with above. I agree to provide with proper documentation (Telco’s Name) to demonstrate compliance with the information as provided in the proceeding paragraph, if so requested. (Signature) (Title) (Date) Subscribed and sworn to me this day of , 19 . (Notary Public) My commission expires: D-4 HSIM-W6 Installation Guide E Glossary 10BASE-T — IEEE 802.3 standard for the use of Ethernet LAN technology over Unshielded Twisted Pair wiring, running at 10 Mbps. ARP — Address Resolution Protocol. An Internet protocol used to bind an IP address to Ethernet/ 802.3 addresses. ASCII — American Standard Code for Information Interchange. It is an 8-bit code for character representation. AUI — Attachment Unit Interface. An IEEE 802.3 transceiver cable connecting the network device (such as a router) to the MAU (media access unit). Bandwidth on Demand — Feature providing the capability of adjusting the bandwidth (opening or closing multiple B channels) when the load in traffic increases or decreases. B Channel — In ISDN, a full-duplex, 64 Kbps channel used for sending user data. BRI — Basic Rate Interface. The ISDN interface providing two 64 Kbps B channels for voice, data and video transmission and one 16 Kbps D channel for signaling and data transmission. Bridge — A device that segments network traffic. A bridge maintains a list of each node on the segment and only traffic destined for a node on the adjacent segment is passed across the bridge. A bridge operates at Layer 2 of the OSI reference model. CHAP — Challenge Handshake Authentication Protocol. A security protocol supported under point-to-point protocol (PPP) used to prevent unauthorized access to devices and remote networks. Uses encryption of password, device names and random number generation. DCE — Data Communicating Equipment. Equipment used within a network to transfer data from source to destination such as modems. D Channel — In ISDN, a full-duplex 16 Kbps channel used for link setup. Data Compression — Techniques used to reduce the number of bits transferred across the communication links that represent the actual data bits. Compression is used to optimize use of WAN links and speed data transmission. HSIM-W6 Installation Guide E-1 Appendix E: Glossary DHCP — Dynamic Host Configuration Protocol is a protocol for automatic TCP/IP configuration that provides static and dynamic address allocation and management. Dial on Demand — Dial up WAN resources are accessed only when remote access is required and released as soon as the resource is no longer needed. DTE — Data Terminal Equipment. DTE refers to equipment used in a network as the data source and/or destination, such as computers. DTMF — Dual Tone Multi-Frequency. TOUCHTONE as opposed to Dial Pulse (DP). DTR — Data Terminal Ready. RS-232 signal used for indicating to the DCE the readiness to transmit and receive data. EtherTalk — AppleTalk protocols running on Ethernet. Filter — Feature to control the flow of data based on protocol or bridge information. Filters can be specific to allow data through or prevent transmission. Firewall — A combination of techniques used to protect one network from unknown networks and users on the outside. Firewalls can filter or block traffic and act as a management and network security point where all traffic can be scrutinized. Frame — A group of data generated by Data Link Layer operation. Frame Relay — Data Link Protocol that provides connectivity between one local and numerous remote connections. HDSL — High bit rate Digital Subscriber Line. A technology to put two-way T1 on a normal unshielded, bridged (but not loaded) twisted pair without using repeaters. IMUX (Inverse Multiplexing) — The process of splitting a single high-speed channel into multiple signals, transmitting the multiple signals over multiple facilities operating at a lower rate than the original signal, and then recombining the separately-transmitted portions into the original signal at the original rate. In-Band Signaling — Transmission within the frequency range used for data transmission; i.e., results in use of bandwidth normally reserved for data. IP — Internet Protocol. A network layer protocol which allows a packet to traverse multiple networks on the way to its final destination. E-2 HSIM-W6 Installation Guide Glossary IP Address — Internet address. A 32-bit address assigned to devices that participate in a network using TCP/IP. An IP address consists of four octets separated with periods defining network, optional subnet and host sections. IPX (Internet Packet Exchange) — A proprietary Network layer protocol developed by Novell and used in NetWare networks. ISDN — Integrated Services Digital Network. Digital transmission standard defining communication protocols permitting telephone networks to carry data, voice, fax and other streams. Leased Line — A telecommunications line between two service points leased from a communications carrier for private use, usually incurring a monthly service rate. LEDs (Light Emitting Diodes) — Type of indicator lights on the panel of the router. Local Area Network (LAN) — A network connecting computers over a relatively small geographic area (usually within a single campus or building). MAC Layer/Address — Media Access Control layer/address defined by the IEEE 802.3 specification which defines media access including framing and error detection. Part of the OSI reference model Data Link layer. Metric — An algorithm used by routers to determine the best path for transmitting packets to a remote destination based on considerations such as time, delay, cost, etc. Modem — Modulator/Demodulator. A device that converts digital signals to/from analog signals for transmission over analog communications lines. Multi-Link Protocol — A protocol, defined in RFC 1717, that defines a way to perform inverse multiplexing on the TCP/IP point-to-point protocol (PPP); i.e., the ability to use multiple serial WAN channels for transferring one datastream. With MLP, a user can send and receive data over both B channels in an ISDN basic-rate interface connection. NAT — Network Address Translation uses a unique IP address for a WAN interface. This IP address is negotiated through PPP or assigned statically by the Internet Service Provider (ISP). NAT reduces the number of unique IP addresses for all clients, using a particular WAN interface, to one. NetWare — A Network Operating System developed by Novell, Inc. providing shared access to files and other network services. HSIM-W6 Installation Guide E-3 Appendix E: Glossary Network Layer — Layer 3 of the OSI reference model that provides the protocol routing function. Node — Refers to a termination point for communication links; entity that can access a network. OSI — Open System Interconnection. An international standard developed by ITU (formally CCITT) and ISO (International Organization for Standardization) to facilitate data networking multi-vendor interoperability. The OSI Reference Model defines seven layers, each providing specific network functions. Packet — A group of data that includes a header and usually user data for transmission through a network. Ping (Packet Internet Groper) — An echo message, available within the TCP/IP protocol suite, sent to a remote node and returned; used to test the accessibility of the remote node. PPP (Point-to-Point Protocol) — A Data Link layer protocol that provides asynchronous and synchronous connectivity between computer/network nodes. Includes standardization for security and compression negotiation. Q.921 — ISDN Data Link layer specification for the user-to-network interface. Q.931 — ISDN specification for call set-up and signaling on ISDN connections. Q.933 — ITU Frame Relay Data Link Layer specification for UNI. RFC — Request for Comment. Documentation describing Internet communications specifications (e.g., TELNET, TFTP). Often these RFCs are used to achieve multi-vendor interoperability during implementation. RJ11 — Standard 4-wire connectors for telephone lines. RJ45 — Standard 8-wire connectors used for ISDN lines. RIP (Routing Information Protocol) — Protocols used in IP and IPX for broadcasting open path information between routers to keep routing tables current. Routing — A Network layer function that determines the path for transmitting packets through a network from source to destination. E-4 HSIM-W6 Installation Guide Glossary RS-232 — EIA standard specifying the physical layer interface used to connect a device to communications media. Serialization Frames — Frames sent out by servers under IPX to check whether illegal copies of NetWare are in use on the network. Service Advertising Protocol (SAP) — Protocol used by IPX for broadcasting information about services available on the network, such as file servers, CD-ROM drives and modem pools. SNAP — Sub-Network Access Protocol. An Ethernet or Token Ring frame type that adds additional information to a data packet to allow for identification of the upper layer protocol the packet is destined for. SNMP — Simple Network Management Protocol. A widely implemented Internet network management protocol that allows status monitoring, getting/setting of parameters for configuration and control of network devices, such as routers and bridges. Split B Channels — Each 64 Kbps ISDN B-channel can be used individually for a separate data connection. Spoofing — Spoofing is a technique used to remove poll and update service frames from WAN links while ensuring that the network continues to operate normally. Spoofing is employed to minimize dial-up line connection time. Subnet Address — An extension of the Internet 32-bit addressing scheme that allows the separation of physical or logical networks within the single network number assigned to an organization. TCP/IP entities outside this organization have no knowledge of the internal “subnetting.” Subnet Mask — A 32-bit internet protocol address mask used to identify a particular subnetwork. T1.617 — ANSI Frame Relay Data Link Layer specification for UNI. TCP/IP — Transmission Control Protocol/Internet Protocol. Refers to a set of internetworking protocols developed by the U.S. Department of Defense that define a two level layered approach for interoperability. TCP provides a connection-oriented Transport layer ensuring end-to-end reliability in data transmission. IP provides for Network layer connectivity using connectionless datagrams. Telco Cloud — The “cloud” of switched virtual connections. HSIM-W6 Installation Guide E-5 Appendix E: Glossary TELNET — Internet standard protocol for remote terminal emulation that allows a user to remotely log in to another device and appear as if directly connected. TFTP — Trivial File Transfer Protocol. A simplified version of the File Transfer Protocol (FTP) allowing for file transfer between computers over a network. Transparent Bridging — Bridging technique used in Ethernet networks that allows transfer of frames across intermediate nodes using tables associating end nodes with bridging addresses. Bridges are unknown to the end nodes. UDP — User Datagram Protocol. A connectionless protocol used to pass packets across an internet network, requiring no handshaking between source and destination. Watchdog Frames — Frames sent out by servers to clients, under IPX, to verify that clients are still logged on. Wide Area Network — A communications network that is geographically dispersed thus requiring links provided by communications carriers. Workstation — Computer or terminal used by the systems administration or user. E-6 HSIM-W6 Installation Guide Index B N Bridge filtering 2-17 Bridging 2-15 Bridging and routing 2-16 Network information worksheets A-1, C-1 E EMC B-2, B-3 EMI B-2, B-3 P PPP 2-4 R F Remote Network Management 2-3 Remote router worksheet C-1 Routing 2-16 Firmware Data Compression 2-6 Flash EEPROMs 2-3 S G Getting Help 1-3 H Hardware specs B-1 I IEEE 802.1d bridging 2-16 IP internet firewall 2-17 IP routing 2-16 Safety Requirements B-2 SNMP 2-18 SNMP Community Names read-only 2-17 read-write 2-18 super-user 2-18 Software and firmware upgrades 2-21 Switch support 2-11 T LAN support 2-3 Troubleshooting 4-1 bridging 4-11 power 4-5 software 4-11 TCP/IP routing 4-11 M W MIB support 2-18 Worksheets (network info) A-1, C-1 L HSIM-W6 Installation Guide Index-1 Index Index-2 HSIM-W6 Installation Guide