1
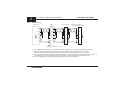
USER'S MANUAL
FX2N-485-BD COMMUNICATION BOARD
USER'S MANUAL
FX2N-485-BD COMMUNICATION BOARD
HEAD OFFICE:
HIMEJI WORKS:
JY992D66201A
(MEE 9706)
MITSUBISHI DENKI BLDG MARUNOUCHI TOKYO 100 TELEX: J24532 CABLE MELCO TOKYO
840, CHIYODA CHO, HIMEJI, JAPAN
Effective JUN. 1997
Specifications are subject
to change without notice.
FX2N-485-BD COMMUNICATION BOARD
FX2N-485-BD COMMUNICATION BOARD
Foreword
• This manual contains text, diagrams and explanations which will guide the reader in the correct installation and operation
of the FX2N-485-BD COMMUNICATION BOARD. It should be read and understood before attempting to install or use the
unit.
Further information can be found in the FX PROGRAMMING MANUAL, FX2N series hardware manuals and manual of
FX-485PC-IF USER’S MANUAL.
•
If in doubt at any stage during the installation of the FX2N-485-BD COMMUNICATION BOARD always consult a
professional electrical engineer who is qualified and trained to the local and national standards.
FX2N-485-BD COMMUNICATION BOARD
Under no circumstances will MITSUBISHI ELECTRIC be liable responsible for any consequential damage that may arise
as a result of the installation or use of this equipment.
All examples and diagrams shown in this manual are intended only as an aid to understanding the text, not to guarantee
operation. MITSUBISHI ELECTRIC will accept no responsibility for actual use of the product based on these illustrative
examples.
Owing to the very great variety in possible application of this equipment, you must satisfy yourself as to its suitability for
your specific application.
FX2N-485-BD COMMUNICATION BOARD
FX2N-485-BD COMMUNICATION BOARD
USER’S MANUAL
Manual number:
Manual revision:
Date:
JY992D66201
A
JUNE 1997
i
FX2N-485-BD COMMUNICATION BOARD
Guidelines for the safety of the user and protection of the FX2N-485-BD COMMUNICATION BOARD.
This manual provides information for the installation and use of the FX2N-485-BD COMMUNICATION BOARD. The manual
has been written to be used by trained and competent personnel. The definition of such a person or persons is as follows;
a) Any engineer who is responsible for the planning, design and construction of automatic equipment using the product
associated with this manual should be of a competent nature, (trained and qualified to the local and national standards
required to fulfill that role). These engineers should be fully aware of safety with regards to automated equipment.
b) Any commissioning or service engineer must be of a competent nature, trained and qualified to the local and national
standards required to fulfill that job. These engineers should also be trained in the use and maintenance of the
completed product. This includes being completely familiar with all associated documentation for the said product. All
maintenance should be carried out in accordance with established safety practices.
c) All operators of the compliance product should be trained to use that product in a safe and coordinated manner in
compliance to established safety practices. The operators should also be familiar with all documentation which is
connected with the actual operation of the completed equipment.
Note:
The term ‘completed equipment’ refers to a third party constructed device which contains or uses the product
associated with this manual.
ii
FX2N-485-BD COMMUNICATION BOARD
Note’s on the symbology used in this manual
At various times through out this manual certain symbols will be used to highlight points of information which are intended to
ensure the users personal safety and protect the integrity of the equipment. Whenever any of the following symbols are
encountered, its associated note must be read and understood. Each of the symbols used will now be listed with a brief
description of its meaning.
Hardware warnings
1) Indicates that the identified danger WILL cause physical and property damage.
2) Indicates that the identified danger POSSIBLY cause physical and property damage.
3) Indicates a point of further interest or further explanation.
Software warnings
4) Indicates special care must be taken when using this element of software.
5) Indicates a special point of which the user of the associate software element should be aware.
6) Indicates a point of interest or further explanation.
iii
FX2N-485-BD COMMUNICATION BOARD
CONTENTS
1.
INTRODUCTION . . . . . . . . . . . . . . . .
1.1 External Dimensions . . . . . . . . . . . . .
1.2 System Configuration . . . . . . . . . . . . .
1.2.1 When Use No Protocol or Dedicated Protocol
1.2.2 When Use Parallel Link . . . . . . . . . . .
1.2.3 When Use N:N Network . . . . . . . . . . .
2.
MOUNTING AND WIRING . . . . . . . . . . .
2.1 Mounting Procedure . . . . . . . . . . . . . .
2.2 Cable and Terminal Resistor . . . . . . . . .
2.2.1 Cable . . . . . . . . . . . . . . . . . . . . .
2.2.2 Selection of Wiring . . . . . . . . . . . . . .
2.2.3 Terminal Resistor . . . . . . . . . . . . . .
2.2.4 Two-pair Wiring . . . . . . . . . . . . . . .
2.2.5 One-pair Wiring . . . . . . . . . . . . . . .
3.
SPECIFICATION . . . . . . . . . . . . . . . .
3.1 General Specification . . . . . . . . . . . . .
3.2 Power Supply Specification . . . . . . . . . .
3.3 Specification . . . . . . . . . . . . . . . . . .
4.
COMMUNICATION FORMAT . . . . . . . . . .
4.1 Related Flag and Data Registers . . . . . . .
4.2 Communication Format D8120 . . . . . . . .
4.2.1 Example Program of Setting . . . . . . . . .
.
.
.
.
.
.
.
.
.
.
.
.
.
.
.
.
.
.
.
.
.
.
.
.
.
.
.
.
.
.
.
.
.
.
.
.
.
.
.
.
.
.
.
.
.
.
.
.
.
.
.
.
.
.
.
.
.
.
.
.
.
.
.
.
.
.
.
.
.
.
.
.
.
.
.
.
.
.
.
.
.
.
.
.
.
.
.
.
.
.
.
.
.
.
.
.
.
.
.
.
.
.
.
.
.
.
.
.
.
.
.
.
.
.
.
.
.
.
.
.
.
.
.
.
.
.
.
.
.
.
.
.
.
.
.
.
.
.
.
.
.
.
.
.
.
.
.
.
.
.
.
.
.
.
.
.
.
.
.
.
.
.
.
.
.
.
.
.
.
.
.
.
.
.
.
.
.
.
.
.
.
.
.
.
.
.
.
.
.
.
.
.
.
.
.
.
.
.
.
.
.
.
.
.
.
.
.
.
.
.
.
.
.
.
.
.
.
.
.
.
.
.
.
.
.
.
.
.
.
.
.
.
.
.
.
.
.
.
.
.
.
.
.
.
.
.
.
.
.
.
.
.
.
.
.
.
.
.
.
.
.
.
.
.
.
.
.
.
.
.
.
.
.
.
.
.
.
.
.
.
.
.
.
.
.
.
.
.
.
.
.
.
.
.
.
.
.
.
.
.
.
.
.
.
.
.
.
.
.
.
.
.
.
.
.
.
.
.
.
.
.
.
.
.
.
.
.
.
.
.
.
.
.
.
.
.
.
.
.
.
.
.
.
.
.
.
.
.
.
.
.
.
.
.
.
.
.
.
.
.
.
.
.
.
.
.
.
.
.
.
.
.
.
.
.
.
.
.
.
.
.
.
.
.
.
.
.
.
.
.
.
.
.
.
.
.
.
.
.
.
.
.
.
.
.
.
.
.
.
.
.
.
.
.
.
.
.
.
iv
.
.
.
.
.
.
.
.
.
.
.
.
.
.
.
.
.
.
.
.
.
.
.
.
.
.
.
.
.
.
.
.
.
.
.
.
.
.
.
.
.
.
.
.
1-1
1-2
1-3
1-3
1-3
1-4
2-1
2-1
2-2
2-2
2-3
2-4
2-5
2-6
3-1
3-1
3-1
3-1
4-1
4-1
4-2
4-4
FX2N-485-BD COMMUNICATION BOARD
5.
RS EXAMPLE PROGRAM . . . . . . . . . . . . . . . .
5.1 Printer . . . . . . . . . . . . . . . . . . . . . . . . . .
5.1.1 System Configuration . . . . . . . . . . . . . . . . . .
5.1.2 Communication Format . . . . . . . . . . . . . . . . .
5.1.3 Example Program (1) . . . . . . . . . . . . . . . . . .
5.2 Personal Computer . . . . . . . . . . . . . . . . . . .
5.2.1 System Configuration . . . . . . . . . . . . . . . . . .
5.2.2 Communication Format . . . . . . . . . . . . . . . . .
5.2.3 Example Program (2) . . . . . . . . . . . . . . . . . .
6.
PARALLEL LINK . . . . . . . . . . . . . . . . . . . . . .
6.1 Parallel Link . . . . . . . . . . . . . . . . . . . . . . .
6.2 Outline . . . . . . . . . . . . . . . . . . . . . . . . . .
6.2.1 Normal Mode (Special auxiliary relay M8162: OFF) . .
6.2.2 High Speed Mode (Special auxiliary relay M8162: ON)
6.3 Example Program (3) . . . . . . . . . . . . . . . . . .
6.3.1 Normal Mode . . . . . . . . . . . . . . . . . . . . . .
6.3.2 High Speed Mode . . . . . . . . . . . . . . . . . . .
7.
N:N NETWORK . . . . . . . . . . . . . . . . . . . . . .
7.1 Outline . . . . . . . . . . . . . . . . . . . . . . . . . .
7.2 Related Flags and Data Registers . . . . . . . . . . . .
7.2.1 Special Auxiliary Relays . . . . . . . . . . . . . . . .
7.2.2 Special Data Registers . . . . . . . . . . . . . . . . .
7.3 Setting . . . . . . . . . . . . . . . . . . . . . . . . . .
.
.
.
.
.
.
.
.
.
.
.
.
.
.
.
.
.
.
.
.
.
.
.
.
.
.
.
.
.
.
.
.
.
.
.
.
.
.
.
.
.
.
.
.
.
.
.
.
.
.
.
.
.
.
.
.
.
.
.
.
.
.
.
.
.
.
.
.
.
.
.
.
.
.
.
.
.
.
.
.
.
.
.
.
.
.
.
.
.
.
.
.
.
.
.
.
.
.
.
.
.
.
.
.
.
.
.
.
.
.
.
.
.
.
.
.
.
.
.
.
.
.
.
.
.
.
.
.
.
.
.
.
.
.
.
.
.
.
.
.
.
.
.
.
.
.
.
.
.
.
.
.
.
.
.
.
.
.
.
.
.
.
.
.
.
.
.
.
.
.
.
.
.
.
.
.
.
.
.
.
.
.
.
.
.
.
.
.
.
.
.
.
.
.
.
.
.
.
.
.
.
.
.
.
.
.
.
.
.
.
.
.
.
.
.
.
.
.
.
.
.
.
.
.
.
.
.
.
.
.
.
.
.
.
.
.
.
.
.
.
.
.
.
.
.
.
.
.
.
.
.
.
.
.
.
.
.
.
.
.
.
.
.
.
.
.
.
.
.
.
.
.
.
.
.
.
.
.
.
.
.
.
.
.
.
.
.
.
.
.
.
.
.
.
.
.
.
.
.
.
.
.
.
.
.
.
.
.
.
.
.
.
.
.
.
.
.
.
.
.
.
.
v
.
.
.
.
.
.
.
.
.
.
.
.
.
.
.
.
.
.
.
.
.
.
.
.
.
.
.
.
.
.
.
.
.
.
.
.
.
.
.
.
.
.
.
.
.
.
5-1
5-1
5-1
5-2
5-3
5-4
5-4
5-5
5-6
6-1
6-1
6-1
6-2
6-2
6-3
6-3
6-4
7-1
7-1
7-2
7-2
7-3
7-4
FX2N-485-BD COMMUNICATION BOARD
7.3.1 Setting the Station No. (D8176) . . . . . . . . . . .
7.3.2 Setting the Total Number of Slave Stations (D8177) .
7.3.3 Setting the Refresh Range (D8178) . . . . . . . . .
7.3.4 Setting retry count (D8178) . . . . . . . . . . . . .
7.3.5 Setting comms time-out (D8179) . . . . . . . . . .
7.3.6 Program used for setting . . . . . . . . . . . . . . .
7.4 Error Code . . . . . . . . . . . . . . . . . . . . . . .
7.5 Examples Program . . . . . . . . . . . . . . . . . .
7.5.1 System Configuration . . . . . . . . . . . . . . . .
7.5.2 Operations . . . . . . . . . . . . . . . . . . . . . .
7.5.3 Example of Set Program . . . . . . . . . . . . . . .
7.5.4 Example of Error Program . . . . . . . . . . . . . .
7.5.5 Example of Operation Program . . . . . . . . . . .
8.
DIAGNOSTICS . . . . . . . . . . . . . . . . . . . . .
8.1 Common Items . . . . . . . . . . . . . . . . . . . .
8.2 Using the No Protocol . . . . . . . . . . . . . . . . .
8.3 Using the Dedicated Protocol . . . . . . . . . . . . .
8.4 Using the Parallel Link . . . . . . . . . . . . . . . .
8.5 Using the N:N network . . . . . . . . . . . . . . . .
.
.
.
.
.
.
.
.
.
.
.
.
.
.
.
.
.
.
.
.
.
.
.
.
.
.
.
.
.
.
.
.
.
.
.
.
.
.
.
.
.
.
.
.
.
.
.
.
.
.
.
.
.
.
.
.
.
.
.
.
.
.
.
.
.
.
.
.
.
.
.
.
.
.
.
.
.
.
.
.
.
.
.
.
.
.
.
.
.
.
.
.
.
.
.
.
.
.
.
.
.
.
.
.
.
.
.
.
.
.
.
.
.
.
.
.
.
.
.
.
.
.
.
.
.
.
.
.
.
.
.
.
.
.
.
.
.
.
.
.
.
.
.
.
.
.
.
.
.
.
.
.
.
.
.
.
.
.
.
.
.
.
.
.
.
.
.
.
.
.
.
.
.
.
.
.
.
.
.
.
.
.
.
.
.
.
.
.
.
.
.
.
.
.
.
.
.
.
.
.
.
.
.
.
.
.
.
.
.
.
.
.
.
.
.
.
.
.
.
.
.
.
.
.
.
.
.
.
.
.
.
.
.
.
.
.
.
.
.
.
.
.
.
.
.
.
.
.
.
.
.
.
.
.
.
.
.
.
.
.
.
.
.
.
.
.
.
.
.
.
.
.
.
.
.
.
.
.
.
.
.
.
.
.
.
vi
.
.
.
.
.
.
.
.
.
.
.
.
.
.
.
.
.
.
.
.
.
.
.
.
.
.
.
.
.
.
.
.
.
.
.
.
.
.
7-4
7-4
7-5
7-7
7-7
7-8
7-9
7-10
7-10
7-11
7-12
7-13
7-14
8-1
8-1
8-2
8-3
8-4
8-5
FX2N-485-BD COMMUNICATION BOARD
1.
INTRODUCTION
1
INTRODUCTION
The communication board FX2N-485-BD for RS485 (hereinafter referred to as “485BD”) can be connected to the base unit of
the FX2N Series PC to be used for the following applications.
(1) Data transfer using the no protocol
Data communication with diversified RS232C units including personal computers, bar code readers and printers can
be performed via the RS485 (422) converter using the no protocol. In this application, data is sent or received using
the data registers specified by the RS instruction because the 485BD does not have a buffer memory. For the setting
and program examples, refer to Chapters 5 and 6. For the RS instruction, refer to the FX Programming Manual.
(2) Data transfer using the dedicated protocol
Data transfer with RS485 (422) units can be performed on the 1:N basis using the dedicated protocol. For the
contents of the dedicated protocol used in this application, refer to the FX-485PC-IF User’s Manual.
(3) Data transfer using the parallel link
Data transfer with an FX2N programmable controller can be performed on the 1:1 basis for 100 auxiliary relays and 10
data registers. For the setting and program examples, refer to Chapter 7.
(4) Data transfer using the N:N network
Data transfer with FX2N programmable controllers can be performed on the N:N basis. For the setting, the number of
transferred data and program examples, refer to Chapter 8.
1-1
FX2N-485-BD COMMUNICATION BOARD
1
External Dimensions
Dimensions : mm (inches)
1
2
3
Accessory : M3 self-tapping screws × 2,
Terminal resistor 330 Ω × 2 110 Ω × 1
➀ Mounting holes (2- φ4.0(0.16"))
4
➁ Connector for programmable controller
SDA
SDB
SG
RDA
39(1.54")
RDB
5
52(2.05")
RDA
46(1.81")
1.1
INTRODUCTION
RDB
SDA
RDB
➂ SD LED : Flashes at high speed during sending.
➃ RD LED : Flashes at high speed during sending.
SG
➄ Terminals to connect RS485 unit
35(1.38")
The top face of this terminal block is higher than the top face of the panel cover
of the programmable controller by approximately 7 mm.
1-2
FX2N-485-BD COMMUNICATION BOARD
INTRODUCTION
1.2
System Configuration
1.2.1
When Use No Protocol or Dedicated Protocol
1
RS422/485 Unit
FX/FX2C/
FXON
FX2N
485BD
FX(ON)-485ADP
A
C A series
P
U
A series
Porgrammable controller's
computer link unit
When use 485BD in the system, total extension distance 50m. (No use : max. 500m)
When use dedicated protocol, max. 16 stations including A series
programmable controller.
1.2.2
When Use Parallel Link
FX2N+485BD or
FX2N+FX-CNV-BD
+FX0N-485ADP
485BD FX2N
When use 485BD in the system, this distance 50m. (No use : max. 500m)
1-3
FX2N-485-BD COMMUNICATION BOARD
1
1.2.3
INTRODUCTION
When Use N:N Network
Master
FX2N
485BD
Slave
FX2N
485BD
Slave
Slave
FX2N
FX2N
485BD
Total extension distance 50m, max. 8 stations.
485BD
(
)
1-4
FX2N-485-BD COMMUNICATION BOARD
2.
MOUNTING AND WIRING
2.1
Mounting Procedure
MOUNTING AND WIRING
2
Turn off the power of the programmable controller, and mount the 485BD using the following procedure.
➀ Remove the panel cover from the top face of the base unit.
➁ Connect the connector for programmable controller provided on the 485BD to the board mounting connector
provided on the base unit.
➂ Fix the 485BD to the base unit using the M3 self-tapping screws supplied.
Tightening torque: 0.3 to 0.6 Nm (3 to 6 kgf•cm)
➃ Remove the cut out on the left of the panel cover using a tool such as nippers
or cutters so that the terminal block can. The top face of this terminal block is
higher than the top face of the panel cover of the programmable controller by
approximately 7 mm.
4
1
3
2
485BD
2-1
FX2N-485-BD COMMUNICATION BOARD
2
2.2
Cable and Terminal Resistor
2.2.1
Cable
MOUNTING AND WIRING
To connect the RS485 (422) unit, use a shielded twist-pair cable. The cable model must be the AWG 26 to 16, and the maximum
tightening torque must be 0.6 Nm (6 kgf•cm). If a cable other than the AWG 26 to 16 is used, normal communication cannot
be assured because the terminal may be imperfectly contacted. It is recommended to insert a cable integrated by the crimping
tool into the terminal.
Master
FX2N
485BD
Slave
FX2N
485BD
Slave
FX2N
485BD
Slave
FX2N
485BD
Total extension distance 50m (No use : max. 500m), max.8 stations.
2-2
FX2N-485-BD COMMUNICATION BOARD
2.2.2
MOUNTING AND WIRING
2
Selection of Wiring
(1) When two-pair wiring is required.
1) When an RS422 unit is connected.
2) When N:N network no use.
3) When the dedicated protocol is used and high speed response is equired (when the transmission sentence
wait time is required to be 70 ms or less).
For the transmission sentence wait time, refer to the users manual of the FX-485PC-IF.
4) When the on-demand function of the dedicated protocol is used.
However, the RS485/422 unit must be connected to the 485BD on the one-to-one basis.
5) When wiring is added to the system which has been already constructed using two-pair wiring.
(2) When one-pair wiring is required.
1) When wiring is added to the system which has been already constructed using one-pair wiring.
2) When N:N network use.
3) When two-pair wiring is not necessary.
2-3
2
2.2.3
FX2N-485-BD COMMUNICATION BOARD
MOUNTING AND WIRING
Terminal Resistor
Provide the terminal resistor at the both ends of the line as described in Paragraphs 2-3 and 2-4.
1) In the case of two-pair wiring, connect the terminal resistor
(330 Ω, 1/4 W) between terminals SDA and SDB as well as between terminals
RDA and RDB. Use the resistors offered as accessories of the 485BD.
Orange Orange Brown
2) In the case of one-pair wiring, connect the terminal resistor
(110 Ω, 1/2 W) between termials RDA and RDB. Use the resistors offered as
accessories of the 485BD.
Brown Brown Brown
2-4
FX2N-485-BD COMMUNICATION BOARD
2.2.4
MOUNTING AND WIRING
2
Two-pair Wiring
RS485/422 unit
R*1
R*1
A series programmable
controller's computer link unit
485BD
FX(ON)-485ADP
SDA
SDA
SDA
SDA
SDB
SDB
SDB
SDB
RDA
RDA
RDA
RDA
RDB
RDB
RDB
RDB
SG
SG
LINK
SG
*3
FG
SG
*3
FG
*2
R*1
R*1
Grounding of resistance 100 or less
*1 R is the terminating resistance. Connect the terminating resistance (330 Ω) between terminals SDA and SDB,
and terminals RDA and RDB.
*2 Shield of connect the 485BD to shielded twist-pair cable must be connected to ground (100 Ω or less).
When use parallel link, ground both side. When use no protocol or dedicated protocol, ground one side.
*3 Connect terminal FG to each terminal of the programmable controller main body grounded with resistance of
100 Ω or less. However, as for the computer link unit of the A series programmable controller, see the
manual of the computer link unit.
*4 When use RS232/485 or RS232/422 adapter, please the adapter use FX-485PC-IF.
2-5
FX2N-485-BD COMMUNICATION BOARD
2
2.2.5
MOUNTING AND WIRING
One-pair Wiring
R*1
A series programmable
controller's computer link unit
485BD
FX(ON)-485ADP
SDA
SDA
SDA
SDA
SDB
SDB
SDB
SDB
RDA
RDA
RDA
RDA
RDB
RDB
RDB
RDB
SG
SG
LINK
SG
*3
FG
SG
*3
FG
RS485 unit
*2
R*1
Grounding of resistance 100 or less
*1 R is the terminating resistance. Connect the terminating resistance (110 Ω) between terminals SDA and SDB.
*2 Shield of connect the 485BD to shielded twist-pair cable must be connected to ground (100 Ω or less).
When use parallel link, ground both side. When use no protocol or dedicated protocol, ground one side.
*3 Connect terminal FG to each terminal of the programmable controller main body grounded with resistance of 100 Ω or
less. However, as for the computer link unit of the A series PC, see the manual of the computer link unit.
*4 When use RS232/485 or RS232/422 adapter, please the adapter use FX-485PC-IF.
2-6
FX2N-485-BD COMMUNICATION BOARD
3.
SPECIFICATION
3.1
General Specification
SPECIFICATIONS
3
General specifications is same as those for the FX2N series programmable controller.
3.2
Power Supply Specification
5V DC, 60 mA is supplied as the power from the programmable controller.
3.3
Specification
Transmission standard
Conforming to RS485 and RS422
Transmission distance
Max. 50 m
LED indicators
SD, RD
Communication method
Half-duplex communication system
Protocol
Dedicated protocol (format 1 or format 4), No protocol, Parallel link, N:N network
Sported baud rate
Dedicated protocol and no protocol
Parallel link
N:N network
Isolation
No isolation
: 300 ~ 19,200 (bps)
: 19,200 (bps)
: 38,400 (bps)
3-1
3
FX2N-485-BD COMMUNICATION BOARD
SPECIFICATIONS
MEMO
3-2
FX2N-485-BD COMMUNICATION BOARD
4.
COMMUNICATION FORMAT
4
COMMUNICATION FORMAT
This chapter contains diagnostic devices (related flags and data registers) and communication format use with no protocol
and dedicated protocol communications. For details of the RS instruction, refer to the FX PROGRAMMING MANUAL. For
details of the dedicated protocol, refer to the users manual of the FX-485PC-IF.
4.1
Related Flag and Data Registers
Diagnostic
devices
Operation
Diagnostic
devices
Operation
M8121
Data transmission delayed
(RS instruction)
D8120
Communications format
(RS instruction, dedicated protocol)
M8122
Data transmission flag (RS instruction)
D8121
Local station number (dedicated protocol)
M8123
Finished receiving data (RS instruction)
D8122
M8124
Carrier detection flag (RSinstructionl)
Amount of remaining data to be
transmitted (RS instruction)
M8126
Global flag (dedicated protocol)
D8123
Amount of remaining data already
received (RS instruction)
M8127
On demand handshake flag
(dedicated protocol)
D8124
Data header <default STX (02H)>
(RS instruction)
M8128
On demand error flag
(dedicated protocol)
D8125
Data terminator <default ETX (03H)>
(RS instruction)
M8129
On demand Byte/Word flag
(dedicated protocol)
D8127
On demand head device register
(dedicated protocol)
M8161
Selection of 8 bit operations for applied
instructions ASC, RS, ASCI, HEX, CCD
(RS instruction)
D8128
On demand data length register
(dedicated protocol)
D8129
Data network ‘time-out’ timer value
(dedicated protocol)
4-1
FX2N-485-BD COMMUNICATION BOARD
4
4.2
COMMUNICATION FORMAT
Communication Format D8120
To send and receive the data between the RS485 (422) unit using the 485BD, the communication format including the
transmission speed (baud rate) and the parity must be consistent between the 485BD and the RS485 unit.
The communication format can be set using the parameters or the contents of the special data register D8120 of the FX2N
programmable controller. Make sure to set appropriately the communication format in accordance with the RS485 (422) unit
used. For the setting method using the parameters of the FX2N programmable controller, refer to the manual of the peripheral
unit used.
Make sure to turn off the power of the programmable controller and turn it on again after modifying the setting.
Bit No.
b0
Data length
b1
b2
Parity
b3
Stop bit
b4
b5
b6
b7
Contents
Meaning
Baud rate
(bps)
0 (OFF)
1 (ON)
7 bit
8 bit
b2,b1
(0, 0) : None
(0, 1) : Odd
b2,b1
(1, 1) : Even
1 bit
2 bit
b7,b6,b5,b4
(0, 0, 1, 1) : 300
(0, 1, 0, 0) : 600
(0, 1, 0, 1) : 1,200
(0, 1, 1, 0) : 2,400
b7,b6,b5,b4
(0, 1, 1, 1) : 4,800
(1, 0, 0, 0) : 9,600
(1, 0, 0, 1) : 19,200
4-2
FX2N-485-BD COMMUNICATION BOARD
Bit No.
COMMUNICATION FORMAT
4
Contents
Meaning
0 (OFF)
1 (ON)
b8
Header
character *1
None
D8124 *2
b9
Terminator
character *1
None
D8125 *3
b10
Control line
type I *4
None
H/W
b11
DTR check
(Control line)
*4
Send and Receive
Receive
b12
Control line
type II *4
None
H/W
b13
Sum check *5
Sum check code is
not added
Sum check code is
added automatically
b14
Protocol
No protocol
Dedicated protocol
b15
Transmission
control
protocol *5
Protocol format 1
Protocol format 4
*1 Make sure to set it to “0" when the dedicated protocol is used.
*2 It is effective exclusively when the no protocol (RS instruction) is selected, and the initial value is STX (02H:
Can be modified by the user).
*3 It is effective exclusively when the no protocol (RS instruction) is selected, and the initial value is ETX (03H:
Can be modified by the user).
*4 Make sure to set in to (b10, b11, b12) =(1, 1, 0) in the case of the no protocol (RS instruction), and (b10, b11,
b12) = (0, 0, 0) in the case of the dedicated protocol.
*5 Make sure to set it to “0" when the no protocol is used.
4-3
4
4.2.1
FX2N-485-BD COMMUNICATION BOARD
COMMUNICATION FORMAT
Example Program of Setting
The communication format is set by special data register D8120. Setting the communication format using D8120 is effective
only at the time the RS instruction is driven, and therefore if changed after driving, it is not actually accepted.
An example of setting D8120 is shown below.
M8002
MOV
H1B8E
D8120
H1B8E= 0001 1011 1000 1110 (binary)
The settings for the above program are as right.
Data length
7 bit
Parity
Even
Stop bit
2 bit
Baud rate
9,600 bps
Protocol
No protocol
Header
character
Use
Terminator
character
Use
DTR check
Receive
Control line
H/W of type II use
(Type I does not use)
4-4
FX2N-485-BD COMMUNICATION BOARD
5.
RS EXAMPLE PROGRAM
5
RS EXAMPLE PROGRAM
This example program use RS instruction.
5.1
Printer
When the printer having the RS232C interface is connected to the 485BD via the RS232C/485 signal converter (FX-485PC-IF),
and the data sent from the programmable controller is printed
5.1.1
System Configuration
RS232C/485
signal converter
Send
Send
FX2N
Printer having
RS232C interface
FX-485PC-IF
485BD
For communication between the printer and the FX-485PC-IF, use the cable which is consistent with the connector pin
assignment of the printer used. For wiring between the FX-485PC-IF and the 485BD, refer to Section 2.
For the FX-485PC-IF, refer to the users manual of the FX-485PC-IF.
5-1
5
5.1.2
FX2N-485-BD COMMUNICATION BOARD
RS EXAMPLE PROGRAM
Communication Format
The communication format of the serial printer is as follows.
Data length
8 bit
Parity
Even
Stop bit
2 bit
Baud rate
2,400 bps
Protocol
No protocol
Header
character
Not use
Terminator
character
Not use
DTR check
Receive
Control line
H/W of type II use
(Type I does not use)
5-2
FX2N-485-BD COMMUNICATION BOARD
5.1.3
RS EXAMPLE PROGRAM
5
Example Program (1)
M8000
M8161
Handled by 8-bit data
D8120
Setting of communication format
b15
H 182F = 0001 1000
RS instruction drive
M8002
MOV
H182F
X000
RS
D10
K11
D50
K0
PLS
M0
MOV
H0074
D10
MOV
H0065
D11
MOV
H006E
D17
MOV
H0065
D18
MOV
H000D
D19
MOV
H000A
D20
SET
M8122
0010
X001
M0
Writing of send data
Herein, "test line" is sent.
Send request
END
5-3
b0
1111
5
5.2
FX2N-485-BD COMMUNICATION BOARD
RS EXAMPLE PROGRAM
Personal Computer
When the printer having the RS232C interface is connected to the 485BD via the RS232C/485 signal converter (FX-485PC-IF),
and the data sent from the programmable controller is printed
5.2.1
System Configuration
RS232C/485
signal converter
Send
Send
FX2N
Reseive
Reseive
Personal Computer
FX-485PC-IF
485BD
For communication between the printer and the FX-485PC-IF, use the cable which is consistent with the connector pin
assignment of the printer used. For wiring between the FX-485PC-IF and the 485BD, refer to Section 2.
For the FX-485PC-IF, refer to the users manual of the FX-485PC-IF
Note : Preparation of software
Use ordinary communication software (terminal emulator) or dedicated program in the personal computer.
5-4
FX2N-485-BD COMMUNICATION BOARD
5.2.2
RS EXAMPLE PROGRAM
5
Communication Format
The communication format of the programmable controller for this example is as follows.
If the communication format of the software can not be adjusted this setting, adjusted the programmable controller and the
software to be the same.
Data length
8 bit
Parity
Even
Stop bit
2 bit
Baud rate
2,400 bps
Protocol
No protocol
Header
character
Not use
Terminator
character
Not use
DTR check
Receive
Control line
H/W of type II use
(Type I does not use)
5-5
5
5.2.3
FX2N-485-BD COMMUNICATION BOARD
RS EXAMPLE PROGRAM
Example Program (2)
M8000
M8161
Handled by 8-bit data
D8120
Setting of communication format
b15
H 182F = 0001 1000
RS instruction drive
M8002
MOV
H182F
X000
RS
D10
K11
D50
K1
PLS
M0
MOV
H0074
D10
MOV
H0065
D11
MOV
H0074
D17
MOV
H0061
D18
MOV
H000D
D19
MOV
H000A
D20
SET
M8122
D50
K4Y000
PLS
M1
RST
M8123
0010
X001
M0
M8123
X002
M1
MOV
Writing of send data
Herein, "test line" is sent.
Send request
Output of receive data
Receive completion reset
END
5-6
b0
1111
FX2N-485-BD COMMUNICATION BOARD
6.
PARALLEL LINK
6
PARALLEL LINK
This section describes how to use the parallel link when the programmable controllers are connected on the 1:1 basis.
6.1
Parallel Link
The parallel link refers to the link with which the programmable controllers are connected each other by the wiring described
in Chapter 2, and the data is automatically transferred between them using the special auxiliary relays.
6.2
Outline
Two modes, the normal mode and the high speed mode, are offered for the parallel link. The special auxiliary relay M8162
recognizes the type of mode. The master station and the slave station are set by the special auxiliary relays M8070 and M8071.
6-1
6
6.2.1
FX2N-485-BD COMMUNICATION BOARD
PARALLEL LINK
Normal Mode (Special auxiliary relay M8162: OFF)
Automatical
communication
Master
M8000
M8070
Slave
M800-M899
M900-M999
M800-M899
M900-M999
D490-D499
D500-D509
D490-D499
D500-D509
Master station to Slave station
M800 to M899 (100 points)
D490 to D499 (10 points)
M8000
M8071
Slave station to Master station
M900 to M999 (100 points)
D500 to D509 (10 points)
Time required for data transfer: 70 for reciprocation + Operation cycle of master station
+ Operation cycle of slave station (ms)
6.2.2
High Speed Mode (Special auxiliary relay M8162: ON)
Master
Slave
Automatical
communication
M8000
M8070
M8000
M8071
D490,D491
M8162
M8162
Master station to Slave station
D490,D491 (2 points)
Slave station to Master station
D500 , D501 (2 points)
D500,D501
Time required for data transfer: 20 for reciprocation + Operation cycle of master station
+ Operation cycle of slave station (ms)
6-2
FX2N-485-BD COMMUNICATION BOARD
6.3
Example Program (3)
6.3.1
Normal Mode
PARALLEL LINK
6
The ON/OFF states of the inputs X000 to X007 in the master station is output to the Y000 to the Y007 in the slave station (➀).
When the calculation result (D0 + D2) in the master station is 100 or less, the Y010 in the slave station is turned on (➁). The
ON/OFF status of the M0 to the M7 in the slave station is output to the Y000 to the Y007 in the master station (➂). The D10
value in the slave station is set to the timer (T0) in the master station (➃).
Slave atation
Master station
M8000
MOV
M8000
M8000
X010
M8000
M8070
K2X000
K2M800
1
M8000
ADD
D0
D2
D490
MOV
K2M900 K2Y000
T0
D500
END
2
M8071
MOV
K2M800
K2Y000
CMP
D490 K100 M10
M10
3
M8000
4
X010
1
2
Y010
MOV
K2M0
K2M900
3
MOV
D10
D500
4
END
6-3
6
6.3.2
FX2N-485-BD COMMUNICATION BOARD
PARALLEL LINK
High Speed Mode
When the calculation result (D0 + D2) in the master station is 100 or less, the Y010 in the slave station is turned on (➀). The
D10 value in the slave station is set to the timer (T0) in the master station (➁).
Slave atation
Master station
M8000
M8000
M8070
M8162
M8162
M8000
X010
ADD
D0
D2
M8000
D490
1
T0
2
D500
END
M8071
CMP D490 K100 M10
M10
X010
MOV D10
1
Y010
2
D500
END
6-4
FX2N-485-BD COMMUNICATION BOARD
7.
N:N NETWORK
7.1
Outline
N:N NETWORK
7
The N:N link is a network for up to eight FX2N Series programmable controllers. In the network, data transfer is automatically
performed among the programmable controllers for the devices determined in the refresh range. The devices in the refresh
range can be monitored by all the stations. However, the data writing operation and the ON/OFF operation are enabled in its
own station exclusively.
7-1
FX2N-485-BD COMMUNICATION BOARD
7
7.2
Related Flags and Data Registers
7.2.1
Special Auxiliary Relays
Attribute
Special
auxiliary relays
N:N NETWORK
Name
Description
Response
type
W
M8038
N:N network
parameter setting
Used to set N:N network parameters
M, L
R
M8063
Network parameter
error
When network parameter error is in master
station, this is ON.
M, L
R
M8183
Communication error
of Master station
When communication error is in master
station, this is ON. *1
L
R
M8184 to
M8190 *2
Communication error
of Slave station
When communication error is in slave station,
this is ON. *1
M, L
R
M8191
Data communication
When communicate to other station, this is
ON.
M, L
R : Ready only W : Write only M : Master station L : Slave station
*1 The number of communication errors occurred in its own station cannot be counted in the CPU error status, the program
error status or the stop status.
*2 No. in accordance with the slave station No.
Example: Slave station No. 1 is M8184, Slave station No. 2 is M8185,
Slave station No. 3 is M8186
7-2
FX2N-485-BD COMMUNICATION BOARD
7.2.2
N:N NETWORK
7
Special Data Registers
Attribute
Special data
registers
Name
Description
Response
type
R
D8173
Station No.
Saves its own station No.
M, L
R
D8174
Total number of slave stations
Saves total number of slave stations
M, L
R
D8175
Refresh range
Saves refresh range
M, L
W
D8176
Station number setting
Sets its own station No.
M, L
W
D8177
Total slave station number setting
Sets total number of slave stations
M
W
D8178
Refresh range setting
Sets refresh range
M
W
D8179
Retry count setting
Sets retry count
M
W
D8180
Comms time-out setting
Sets comms time-out
M
R
D8201
Current network scan time
Saves current network scan time
M, L
R
D8202
Maximum network scan time
Saves maxiomum network scan time
M, L
R
D8203
Number of communication error
at master station
Number of communication error at master
station *1
L
R
D8204 to
D8210 *2
Number of communication error
at slave station
Number of communication error at slave
station *1
M, L
R
D8211
Code of communication error at
master station
Code of communication error at master
station
L
R
D8212 to
D8218 *2
Code of communication error at
slave station
Code of communication error at slave
station
M, L
R : Ready only W : Write only M : Master station L : Slave station
*1 The number of communication errors occurred in its own station cannot be counted in the CPU error status,
the program error status or the stop status.
*2 No. in accordance with the station No.
Example: Slave station No. 1 is D8204, D8212, Slave station No. 2 is D8205, D8213, Slave station No. 3 is
D8206, D8214
7-3
7
7.3
FX2N-485-BD COMMUNICATION BOARD
N:N NETWORK
Setting
Each setting for the N:N network becomes valid when the program is run or when the power of the programmable controller
is turned on.
7.3.1
Setting the Station No. (D8176)
Set a value 0 to 7 to the special data register D8176.
Set value
0
1 to 7
7.3.2
Decryption
Master station
Salve station No.
Example : 1 is Slave station No. 1, 2 is Slave station No. 2
Setting the Total Number of Slave Stations (D8177)
Set a value 1 to 7 to the special data register D8177. (Default = 7)
This setting is not required for the slave station.
Set value
Description
1
1 slave station
2
2 slave station
:
:
7
7 slave station
7-4
FX2N-485-BD COMMUNICATION BOARD
7.3.3
N:N NETWORK
7
Setting the Refresh Range (D8178)
Set a value 0 to 2 to the special data register D8178. (Default = 0)
This setting is not requires for the slave station.
The devices used in each pattern are occupied by all the stations for the N:N network.
Communication
device
Bit device (M)
Refresh range
Pattern 0 Pattern 1
Pattern 2
0 point
32 points
64 points
4 points
8 points
Word device (D) 4 points
1) In the case of pattern 0
Device No.
Station No.
Bit device (M)
0 point
Word device (D)
4 points
No. 0
———
D0 to D3
No. 1
———
D10 to D13
No. 2
———
D20 to D23
No. 3
———
D30 to D33
No. 4
———
D40 to D43
No. 5
———
D50 to D53
No. 6
———
D60 to D63
No. 7
———
D70 to D73
7-5
7
FX2N-485-BD COMMUNICATION BOARD
N:N NETWORK
2) In the case of pattern 1
Device No.
Station No.
Bit device (M)
32 points
Word device (D)
4 points
No. 0
M1000 to M1031
D0 to D3
No. 1
M1064 to M1095
D10 to D13
No. 2
M1128 to M1159
D20 to D23
No. 3
M1192 to M1223
D30 to D33
No. 4
M1256 to M1287
D40 to D43
No. 5
M1320 to M1351
D50 to D53
No. 6
M1384 to M1415
D60 to D63
No. 7
M1448 to M1479
D70 to D73
3) In the case of pattern 2
Device No.
Station No.
Bit device (M)
0 point
Word device (D)
8 points
No. 0
M1000 to M1063
D0 to D7
No. 1
M1064 to M11127 D10 to D17
No. 2
M1128 to M1191
No. 3
M1192 to M1255
D30 to D37
No. 4
M1256 to M1319
D40 to D47
No. 5
M1320 to M1383
D50 to D57
No. 6
M1384 to M1447
D60 to D67
No. 7
M1448 to M1511
D70 to D77
D20 to D27
7-6
FX2N-485-BD COMMUNICATION BOARD
7.3.4
N:N NETWORK
7
Setting retry count (D8178)
Set a value 0 to 10 to the special data register D8178. (Default = 3)
This setting is not required for the slave station.
If master station try to communicate the slave station this retry count or over, communication error occur in the station.
7.3.5
Setting comms time-out (D8179)
Set value 5 to 255 to thespecial data register D8179. (Default = 5)
This value multiply by 10 (ms) is time of comms time-out.
Comms time-out is time-out of communication time between the master station and slave station.
7-7
FX2N-485-BD COMMUNICATION BOARD
7
7.3.6
N:N NETWORK
Program used for setting
M8038
0
FNC 12
MOV
K0
D8176
Station No. setting: Required for
master station (Set range: 0 to 7)
FNC 12
MOV
K2
D8177
Total number of slave
stations: 2
(Setting range: 1 to 7)
FNC 12
MOV
K1
D8178
Refresh range setting:
Pattern 1
(Set range: 0 to 2)
FNC 12
MOV
K3
D8179
Refry count setting:
3 (3times)
FNC 12
MOV
K6
D8180
Comms time-out setting:
6 (60ms)
Not required for
slave station
Make sure to write the program above from the 0th step as the N:N network parameter setting program.
This program is not required to be executed because it becomes effective automatically when it is programmed in this position.
Note:
Setting of the parameters for the N:N network is started at the 0th step (LD M8038), and finished when any
instruction or device other than the program above is processed.
7-8
FX2N-485-BD COMMUNICATION BOARD
7.4
Error
code
01H
02H
03H
04H
11H
14H
21H
22H
23H
31H
N:N NETWORK
7
Error Code
When station occur communication error, special auxiliary relays (M8183 to M8191) of communication error is ON in the station
And the error code put into special data registers (D8211 to 8218). This error code is following the table.
Error Check
Meaning
Description
Checking points
station station
Comms
After master station send request to slave
Check wiring, power of programmable
L
M
time-out error
station, no answer passing comms time-out.
controller, RUN/STOP state (RUN is OK)
Station No.
Station No. is not agreement between the
L
M
Check wiring
error
master station and the slave station.
Comms
Communication counter is not agreement
L
M
Check Wiring
counter error
between the master station and the slave station.
Check wiring, power of programmable
Comms format
Communication format is not right from slave
L
M, L
controller, RUN/STOP state (RUN is
error
station.
OK), station No. setting
After slave station send answer to master
Comms
Check wiring, power of programmable
M
L
station, master station do not send request to
time-out error
controller, RUN/STOP state (RUN is OK)
next slave station.
Check wiring, power of programmable
Comms format
Communication format is not right from master
M
L
controller, RUN/STOP state (RUN is
error
station.
OK), station No. setting
No slave error
L
L *1 The station No. is not in this network.
Check station No. setting.
Station No.
Station No. is not agreement between the
L
L *1
Check wiring
error
master station and the slave station.
Comms
Communication counter is not agreement
L
L *1
Check wiring
counter error
between the master station and the slave station.
Not receive
When slave station receive request from master Check wiring, power of programmable
comms
L
L *2
station before communication parameter.
controller, RUN/STOP state (RUN is OK)
parameter error
M : Master station L : Slave station
*1 Another slave station
*2 Self station
7-9
7
FX2N-485-BD COMMUNICATION BOARD
7.5
Examples Program
7.5.1
System Configuration
Master station (No.0)
N:N NETWORK
Slave station (No.1)
FX2N
Slave station (No.2)
FX2N
485BD
485BD
485BD
1) Refresh range: 32 bit devices and 4 word devices (Pattern 1)
2) Retry count : 3 times
3) comms time-out : 5 (50 ms)
7-10
FX2N-485-BD COMMUNICATION BOARD
7.5.2
N:N NETWORK
7
Operations
The following operations are performed in the system configuration above.
➀ The input points X000 to X003 (M1000 to M1003) in the master station are output to the output points Y010 to
Y013 in the stations Nos. 1 and 2.
➁ The input points X000 to X003 (M1064 to M1067) in the station No. 1 are output to the output points Y014 to
Y017 in the master station and the station No. 2.
➂ The input points X000 to X003 (M1128 to M1131) in the station No. 2 are output to the output points Y020 to
Y023 in the master station and the station No. 1.
➃ The data register D1 in the master station is specified as the set value of the counter C1 in the station No. 1.
The contact (M1070) status of the counter C1 is reflected on the output point Y005 in the master station.
➄ The data register D2 in the master station is specified as the set value of the counter C2 in the station No. 2.
The contact (M1140) status of the counter C2 is reflected on the output point Y006 in the master station.
➅ The value of the data register D10 in the station No. 1 and the value of the data register D20 in the station No.
2 are added in the master station, and saved to the data register D3.
➆ The value of the data register D0 in the master station and the value of the data register D20 in the station No.
2 are added in the station No. 1, and saved to the data register D11.
➇ The value of the data register D0 in the master station and the value of the data register D10 in the station No.
1 are added in the station No. 2, and saved to the data register D21.
7-11
7
7.5.3
FX2N-485-BD COMMUNICATION BOARD
N:N NETWORK
Example of Set Program
For the set program for the master station and the stations Nos. 1 and 2, refer to Section 7.3.6 program.
Master station
Slave station No. 1
K1
Slave station No. 2
K2
Remarks
D8176
K0
Station No.
D8177
K2
Total slave station : 2 stastions
D8178
K1
Refresh range : Pattern 1
D8179
K3
Retry count : 3 times (default)
D8180
K5
comms time-out : 50 ms (default)
7-12
FX2N-485-BD COMMUNICATION BOARD
7.5.4
N:N NETWORK
7
Example of Error Program
Master communication
error
M8183
Y000
Slave 1 communication
error
M8184
Y001
Slave 2 communication
error
M8185
Y002
Data communication
M8191
Y003
Continued to a),b) or c) in "7.5.5 Program".
7-13
7
7.5.5
FX2N-485-BD COMMUNICATION BOARD
N:N NETWORK
Example of Operation Program
a) Program of master station
Master communication
error
M8183
MOV
K1X000 K1M1000
Operation 1
MOV
K1M1064 K1Y014
Operation 2
MOV
K1M1128 K1Y020
Operation 3
Slave 1 communication
error
M8184
Slave 2 communication
error
M8185
Slave 1 communication
error
M8184
MOV
K 10
Contact of
slave 1 C1 device
M1070
D 1
Operation 4
Y005
Continued......
7-14
FX2N-485-BD COMMUNICATION BOARD
N:N NETWORK
7
Slave 2 communication
error
M8185
MOV
K 10
D 2
Contact of
slave 2 C2 device
M1140
Operation 5
Y006
Slave 1
communication
error
M8184
Slave 2
communication
error
M8185
MOV
K 10
D 3
Operation 6
MOV
K 10
D 0
Operation 7 , 8
END
7-15
7
FX2N-485-BD COMMUNICATION BOARD
N:N NETWORK
b) Program of slave station No.1
Counter reset
X001
RST
Master
communication
error
M8183
C1
Slave 1
communication
error
M8184
MOV
K1M1000 K1Y010
Operation 1
MOV
K1X000 K1M1064
Operation 2
Slave 2
communication
error
M8185
MOV
K1M1128 K1Y020
Operation 3
Counter input
X000
C 1
D1
C1
Y005
Operation 4
M1070
Continued......
7-16
FX2N-485-BD COMMUNICATION BOARD
Slave 2
communication
error
M8185
N:N NETWORK
7
Contact of
slave 2 C2
device
M1140
Operation 5
Y006
MOV
K 10
D 10
Operation 6 , 8
D 0
D 20
D 11
Operation 7
Slave 2
communication
error
M8185
ADD
END
7-17
7
FX2N-485-BD COMMUNICATION BOARD
N:N NETWORK
c) Program of slave station No.2
Counter reset
X001
RST
Master
communication
error
M8183
C2
Slave 2
communication
error
M8185
MOV
K1M1000 K1Y010
Operation 1
Slave 1
communication
error
M8184
MOV
K1M1064 K1Y014
Operation 2
MOV
K1X000 K1M1128
Operation 3
Slave 1
communication
error
M8184
Contact of
Slave 1 C1
device
M1070
Y005
Operation 4
Continued......
7-18
FX2N-485-BD COMMUNICATION BOARD
N:N NETWORK
7
Counter input
X000
C 2
D2
C2
Y006
Operation 5
M1140
Slave 1
communication
error
M8184
ADD
MOV
K 10
D 20
D 0
D 10
D 21
Operation 6 , 7
END
7-19
7
FX2N-485-BD COMMUNICATION BOARD
N:N NETWORK
MEMO
7-20
FX2N485-BD COMMUNICATION BOARD
8.
DIAGNOSTICS
8.1
Common Items
DIAGNOSTICS
8
1) Confirm the connection with the programmable controller by checking the status of the RD LED and SD LED
provided on the 485BD.
• When the these LEDs is lighted (ON), connection between the 485BD and the programmable controller is
correct.
• When the these LEDs is extinguished (OFF), connect the 485BD to the programmable controller using the
procedure described in Chapter 2.
2) Check whether the VRRD or VRSC instruction is used in the program. If it is used, delete it, turn off the power
of the programmable controller, then turn it on again.
8-1
8
8.2
FX2N485-BD COMMUNICATION BOARD
DIAGNOSTICS
Using the No Protocol
1) Check the status of the RD LED and the SD LED provided on each 485BD.
• If the RD LED is not lighted when data is received, check the wiring.
• If the SD LED is not lighted when data is sent, check the confirm the connection with the programmable controller
2) When setting for the N:N network (Section 7.3.5 program) is included in the program, delete the setting, turn off the
power of the programmable controller, then turn it on again.
3) When the special auxiliary relay M8070 or M8071 is turned on, turn if off using a peripheral unit, turn off the power of the
programmable controller, then turn it on again.
4) Make sure that the communication format is equivalent between an external unit (RS232C unit) and the programmable
controller (D8120). If it is different, correct the setting of the communication parameters in the external unit or correct
the contents of the D8120 in the programmable controller. When the D8120 is corrected, restart the RS instruction.
When the communication parameters are corrected, turn off the power of the programmable controller and turn it on
again.
5) Confirm the timing of data transmission. For example, before sending the data, make sure that the counterpart
equipment is ready for receiving the data.
6) When a terminator is not used, make sure that the data quantity to be sent is consistent with the data quantity to be
received. If they are not consistent each other, let them be consistent. (If the data quantity to be sent is changed, use
a terminator.)
7) Make sure that external units are operating correctly.
8) Make sure that the send data format is equivalent to the receive data format. If they are different, let them be equivalent.
9) When two or more RS instructions are used in the program, make sure that only one RS instruction is executed in one
operation cycle.
Make sure that the RS instruction does not become OFF (unexecuted status) while data is received or sent.
8-2
FX2N485-BD COMMUNICATION BOARD
8.3
DIAGNOSTICS
8
Using the Dedicated Protocol
1) Check the status of the RD LED and the SD LED provided on each 485 BD.
• If both of them are lighted and extinguished, nothing is wrong.
• If the RD LED is lighted/extinguished but the SD LED is not lighted/extinguished (not lighted at all), check the
setting of the station No. and the transmission rate (baud rate).
• If the RD LED is not lighted/extinguished, check the wiring and confirm the connection with the programmable
controller.
2) When setting for the N:N network (Section 7.3.5 program) is included in the program, delete the setting, turn off
the power of the programmable controller, then turn it on again.
3) Make sure that the communication format is equivalent between an external unit (RS232C unit) and the
programmable controller (D8120). If it is different, correct the setting of the communication parameters in the
external unit or correct the contents of the D8120 in the programmable controller. When the D8120 is
corrected, turn off the power of the programmable controller and turn it on again.
4) Make sure that the communication target programmable controller station No. is equivalent to the station No.
specified in the communication procedure. If they are different, let them be equivalent.
5) Make sure that the communication procedure is performed correctly. If it is not performed correctly, correct the
setting in the computer.
6) Make sure that the communication procedure is performed correctly. If it is not performed correctly, correct the
setting in the computer.
7) When the RS instruction is used in the program, delete it, turn off the power of the programmable controller,
then turn it on again.
8) When the special auxiliary relay M8070 or M8071 is turned on, turn if off using a peripheral unit, turn off the
power of the programmable controller, then turn it on again.
8-3
8
8.4
FX2N485-BD COMMUNICATION BOARD
DIAGNOSTICS
Using the Parallel Link
1) Check the status of the RD LED and the SD LED provided on each 485 BD.
• If both of them are lighted and extinguished, nothing is wrong.
• If the RD LED is lighted/extinguished but the SD LED is not lighted/extinguished (not lighted at all), check the setting
of the master station and the slave stations.
• If the RD LED is not lighted/extinguished, check the wiring.
2) When setting for the N:N network (Section 7.3.5 program) is included in the program, delete the setting, turn off the
power of the programmable controller, then turn it on again.
3) When the special data register D8120 for the communication format or the parameters for the communication setting are
used or when the value of the D8120 is not 0, perform the following.
• When the D8120 is used in the program, delete it, turn off the power of the programmable controller, then turn it on
again.
• Check the value of the D8120 using a peripheral unit. If it is not 0, set it to 0 using the peripheral unit, turn off the
power of the programmable controller, then turn it on again.
• When the parameters for the communication setting are used, initialize them using a peripheral unit.
4) When the RS instruction is used in the program, delete it, turn off the power of the programmable controller, then turn it
on again.
5) Make sure that the master station and the slave stations are set correctly. If the setting is incorrect, correct it.
6) Make sure that the devices for the master station and the slave stations are handled correctly. If they are handled
incorrectly, correct the program so that they are handled correctly.
8-4
FX2N485-BD COMMUNICATION BOARD
8.5
DIAGNOSTICS
8
Using the N:N network
1) Check the status of the RD LED and the SD LED provided on each 485 BD.
• If both of them are lighted and extinguished, nothing is wrong.
• If the RD LED is lighted/extinguished but the SD LED is not lighted/extinguished (not lighted at all), check the
setting of the station No., the transmission rate (baud rate) and the total number of slave stations.
• If the RD LED is not lighted/extinguished, check the wiring.
2) When the special auxiliary relay M8070 or M8071 is turned on, turn it off using a peripheral unit, turn off the
power of the programmable controller, then turn it on again.
3) When the RS instruction is used in the program, delete it, turn off the power of the programmable controller,
then turn it on again.
4) When the special data register D8120 for the communication format or the parameters for the communication
setting are used or when the value of the D8120 is not 0, perform the following.
• When the D8120 is used in the program, delete it, turn off the power of the programmable controller, then turn
it on again.
• Check the value of the D8120 using a peripheral unit. If it is not 0, set it to 0 using the peripheral unit, turn off
the power of the programmable controller, then turn it on again.
• When the parameters for the communication setting are used, initialize them using a peripheral unit.
5) Make sure that the sequence error (special auxiliary relays M8183 to M8190) in each slave station is not
turned on and that the special auxiliary relay M8191 is not turned off. If one of the M8183 to the M8190 is
turned on or if the M8191 is turned off, check the error code of special data registers D8211 to D8218.
Please see the following section 7.4.
8-5
8
FX2N485-BD COMMUNICATION BOARD
DIAGNOSTICS
MEMO
8-6
FX2N485-BD COMMUNICATION BOARD
DIAGNOSTICS
8
MEMO
8-7
8
FX2N485-BD COMMUNICATION BOARD
DIAGNOSTICS
MEMO
8-8