1
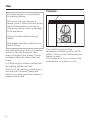
Operating instructions
Built-in Plate Warmer
EGW 4060-14
To prevent accidents and
machine damage read
these instructions
before
installation or use.
UV
M.-Nr. 06 543 300
2
Contents
IMPORTANT SAFETY INSTRUCTIONS . . . . . . . . . . . . . . . . . . . . . . . . . . . . . . . . . 4
Guide to the machine. . . . . . . . . . . . . . . . . . . . . . . . . . . . . . . . . . . . . . . . . . . . . . . 6
Before using the plate warmer . . . . . . . . . . . . . . . . . . . . . . . . . . . . . . . . . . . . . . . 7
Use . . . . . . . . . . . . . . . . . . . . . . . . . . . . . . . . . . . . . . . . . . . . . . . . . . . . . . . . . . . . . 8
Controls . . . . . . . . . . . . . . . . . . . . . . . . . . . . . . . . . . . . . . . . . . . . . . . . . . . . . . . . . . 8
Operating . . . . . . . . . . . . . . . . . . . . . . . . . . . . . . . . . . . . . . . . . . . . . . . . . . . . . . . . . 9
Selecting a temperature. . . . . . . . . . . . . . . . . . . . . . . . . . . . . . . . . . . . . . . . . . . . . . 9
Warming times . . . . . . . . . . . . . . . . . . . . . . . . . . . . . . . . . . . . . . . . . . . . . . . . . . . . 10
Capacity. . . . . . . . . . . . . . . . . . . . . . . . . . . . . . . . . . . . . . . . . . . . . . . . . . . . . . . . . 10
Cleaning and care . . . . . . . . . . . . . . . . . . . . . . . . . . . . . . . . . . . . . . . . . . . . . . . . 11
Cleaning the plate warmer. . . . . . . . . . . . . . . . . . . . . . . . . . . . . . . . . . . . . . . . . . . 11
Non-slip mat. . . . . . . . . . . . . . . . . . . . . . . . . . . . . . . . . . . . . . . . . . . . . . . . . . . . . . 11
Frequently asked questions . . . . . . . . . . . . . . . . . . . . . . . . . . . . . . . . . . . . . . . . 12
After sales service . . . . . . . . . . . . . . . . . . . . . . . . . . . . . . . . . . . . . . . . . . . . . . . . 13
Caring for our environment. . . . . . . . . . . . . . . . . . . . . . . . . . . . . . . . . . . . . . . . . 14
Installation . . . . . . . . . . . . . . . . . . . . . . . . . . . . . . . . . . . . . . . . . . . . . . . . . . . . . . 15
Installation Safety Instructions . . . . . . . . . . . . . . . . . . . . . . . . . . . . . . . . . . . . . . . . 15
Built-in measurement . . . . . . . . . . . . . . . . . . . . . . . . . . . . . . . . . . . . . . . . . . . . . . . 15
Combinations EGW 40x0 -14. . . . . . . . . . . . . . . . . . . . . . . . . . . . . . . . . . . . . . . . . 16
Installing the appliance . . . . . . . . . . . . . . . . . . . . . . . . . . . . . . . . . . . . . . . . . . . . . 18
Aligning the appliance front. . . . . . . . . . . . . . . . . . . . . . . . . . . . . . . . . . . . . . . . . . 19
Electrical connection . . . . . . . . . . . . . . . . . . . . . . . . . . . . . . . . . . . . . . . . . . . . . . . 20
3
IMPORTANT SAFETY INSTRUCTIONS
Installation
This appliance is intended for
residential use only. Only use the
appliance for its intended purpose.
Improper use of the appliance can
lead to personal injury and material
damage. The manufacturer cannot
be held responsible for damages
caused by improper use of the plate
warmer.
This appliance complies with current
safety requirements.
Read all instructions before installing
or using for the first time.
Keep these operating instructions in
a safe place and pass them on to
any future user.
Read all operating and installation
instructions for any other appliance
installed in combination with the
plate warmer.
READ ALL INSTRUCTIONS!
Before installation make sure that
the voltage and frequency listed on
the data plate correspond with the
household electrical supply. This data
must correspond in order to prevent
injury and machine damage. If in doubt,
consult a qualified technician.
The electrical safety of this
appliance can only be guaranteed
when continuity exists between the
appliance and an effective grounding
system. The grounding system must
comply with local and national safety
regulations. It is imperative that this
basic safety requirement be met. If
there is any doubt, have the electrical
system of the house checked by a
qualified electrician.
The manufacturer cannot be held
responsible for the damages caused by
an inadequate grounding system (e.g.
electric shock).
Do not connect the appliance to
the electrical supply with an
extension cord. Extension cords do not
guarantee the required safety of the
appliance.
This appliance must only be used
once it has been properly installed
into cabinetry to ensure that all
electrical components are protected.
Never open the outer casing of the
appliance.
Tampering with electrical connections
or components and mechanical parts is
dangerous and may cause machine
damage.
4
IMPORTANT SAFETY INSTRUCTIONS
Installation, repair and
maintenance work should be
performed by a Miele authorized
service technician. Work by unqualified
persons could be dangerous and may
void the warranty.
Hardwiring the appliance should
be performed by a certified
electrician in compliance with all local
and national codes and requirements.
The manufacturer cannot be held
responsible for the damages caused by
an inadequate electrical connection.
Before installation or service,
disconnect the power supply to the
work area by removing the fuse,
"tripping" the circuit breaker or
unplugging the unit. Pull the plug not
the cord.
Use
The plate warmer interior gets very
hot when in use and stays hot for a
while once turned off.
Use heat-resistant pot holders
when removing dishes. Be sure
that they are not damp or wet. Danger
of steam burns!
Pull the drawer out all the way
when removing dishes to avoid
touching hot drawer parts.
To prevent burns do not touch hot
surfaces, use handles or knobs.
Do not use the plate warmer to
reheat, cook or keep food and
drinks warm. The condensation from
food or drinks could lead to moisture
damage in the appliance.
Do not lean or sit on the warming
drawer. This will damage the
drawer which can hold a maximum of
55 lbs (25 kg).
Do not store anything in the
warming drawer. Forgotten items
could melt or catch fire when the
appliance is turned on. Flammable
liquids and materials should never be
stored in, above or under the plate
warmer.
Do not use the plate warmer to
heat the room. Due to the high
temperatures radiated, objects left near
the appliance could be damaged.
Do not use a steam cleaner to
clean this appliance. Steam could
penetrate electrical components and
cause a short circuit. Pressurized
steam may cause permanent damage
to the surface and to components of
the appliance, for which the
manufacturer cannot accept
responsibility.
To prevent injuries, do not use
accessories not recommended by
Miele.
Do not install outdoors.
Do not let children access the
appliance or its controls. Supervise
its use by the elderly or infirm.
5
Guide to the machine
a On/Off button
b Temperature selector
c Warming drawer
d Non-slip mat
e Indicators
6
Before using the plate warmer
^ Clean the plate warmer with a damp
cloth and wipe dry.
^ Heat the empty plate warmer for a
minimum of 2 hours. Turn the
temperature selector to "Maximum"
(see "Selecting a temperature").
^ Vent the room when heating the
drawer for the first time.
Metal components have a protective
coating which may give off a slight odor
the first time your new appliance is
heated. The smell will dissipate after a
short time and does not indicate a
faulty connection.
7
Use
Controls
The plate warmer is only intended
for warming dishes.
Do not use the plate warmer to
reheat, cook or keep food and drinks
warm. Condensation from food or
drinks may cause moisture damage
to the appliance.
Use pot holders when removing
dishes.
The drawer can hold a maximum of
55 lbs (25 kg).
The appliance works with a convection
system. A fan distributes the heat
evenly throughout the drawer. The air
circulation heats the dishes fast and
evenly.
A protective grill prevents contact with
the heating element and fan.
The floor of the warming drawer has a
non-slip mat to prevent plates and
dishes from sliding when the drawer is
opened and closed.
8
The controls consists of the
temperature selector and the On/Off
button. They are only visible when the
drawer is open.
The indicators at the front show if the
plate warmer is turned on or off.
Use
Operating
Selecting a temperature
^ Place the dishes in the drawer.
The temperature selector allows you to
select a temperature between 86° and
122 °F (30 and 50 °C).
^ Select a temperature.
^ Turn the appliance on (j).
The button will light.
^ Close the drawer.
The drawer may open again if closed
too forcefully.
^ Turn the appliance off (k), before
removing the warmed dishes.
Do not turn the knob
counterclockwise or clockwise past
the 9 o’clock position. Forcing it
beyond these positions will damage
the temperature selector.
When the selected temperature is
reached, the heating element turns off.
If the temperature falls below the
selected one, the heating element will
turn on again.
The temperature scale shows symbols
for the optimum temperature of the
respective dish group:
– b approx. 105 °F (40 °C)
For cups or glasses.
– r approx. 150 °F (60 °C)
For serving or eating plates.
When served in a prewarmed cup,
glass or on a plate, the drinks or food
will not cool as fast and the cup or plate
will remain cool enough to touch.
9
Use
Warming times
Capacity
Various factors will affect the warming
times:
The capacity of the appliance depends
on the dish sizes.
– type and thickness of dishes,
The maximum load is 55 lbs (25 kg).
– quantity,
The following assembly picture is an
example.
– how dishes are arranged,
– temperature setting.
As you use the plate warmer you will
learn which settings suit your needs
best.
However, the following information can
be used as a guide.
At a temperature setting of r, about
150 °F (60 °C), menu dishes for
6 people, will be evenly warmed in
approximately 30 to 35 minutes.
– Menu dishes for 6 people:
6 plates
diam. 11" (28 cm)
6 soup cups diam. 4" (10 cm)
1 bowl
diam. 8 11/16" (22 cm)
1 bowl
diam. 7 1/2" (19 cm)
1 bowl
diam. 6 11/16" (17 cm)
2 serving plates 14 3/16" (36 cm)
not pictured
– 80 Espresso cups, or
– 40 Cappuccino cups
10
Cleaning and care
Cleaning the plate warmer
Let the drawer cool before cleaning.
Never use abrasive cleaners,
scouring pads, steel wool or caustic
(oven) cleaners on the plate warmer.
They will damage the surface.
Non-slip mat
The mat can be removed to clean the
bottom of the drawer.
^ Clean the mat by hand with warm
water and liquid dish soap.
^ Dry thoroughly. Do not return the mat
until it is completely dry.
The exterior of the plate warmer can be
cleaned with warm water and liquid
dish soap applied with a soft sponge.
Wipe dry using a soft cloth.
Stainless steel
Stainless steel surfaces can be cleaned
using a non-abrasive stainless steel
cleaner.
To help prevent resoiling, a conditioner
for stainless steel can also be used.
Apply sparingly with even pressure.
11
Frequently asked questions
Repairs should only be carried out by an authorized technician in accordance
with local and national safety regulations. Unauthorized repairs could cause
injury or machine damage. The manufacturer cannot be held responsible for
unauthorized work.
Why are the dishes not warm enough?
Possible fault
Fix
The appliance is turned off.
Turn the appliance on with the On/Off
button.
The wrong temperature was selected.
Check the temperature setting.
The vents were blocked by dishes.
Reload the dishes.
The dishes need more time to warm.
Increase the timer setting.
Why dishes are not warm?
Possible fault
Check if a fan noise is heard.
- If the fan is running, the heating
element has been damaged.
- If the fan does not run, than it has
been damaged.
- The main fuse has blown.
Fix
Call Technical Service.
Call Technical Service.
Restore power.
Why are the dishes too hot?
Possible fault
Fix
The temperature control is faulty.
Call Technical Service.
Why does the On/Off button not light when turned on?
Possible fault
Fix
The indicator light for the On/Off button Call Technical Service.
is bad.
12
After sales service
In the event of a fault which you cannot
correct yourself please contact the
Miele Technical Service
Department.
U
1-800-999-1360
[email protected]
V
1-800-565-6435
[email protected]
When contacting the Technical Service
Department, please quote the model
and serial number of your appliance
both of which are shown on the
enclosed data plate.
Adhere the data plate to the box below.
Make sure the model given on the data
plate matches that of this manual.
13
14
Installation Instructions
Help protect our environment
Disposal of the packing
material
The transport and protective packing
materials are environmentally safe for
disposal and may be recycled.
Ensure that any plastic wrap is
disposed of safely and kept out of the
reach of children. Danger of
suffocation!
Please recycle.
16
Disposal of an old appliance
Old appliances contain materials which
can be recycled. Please contact your
local recycling center about potential
recycling.
Ensure that the appliance presents no
danger to children while being stored
for disposal.
Installation
Installation Safety Instructions
Before installation make sure that
the voltage and frequency listed on
the data plate correspond with the
household electrical supply. This data
must correspond in order to avoid risk
of damage to the appliance. If in doubt,
consult a qualified technician.
The electrical outlet should be
easily accessible after installing the
unit.
Only install the plate warmer in
combination with built-in
appliances recommended by the
manufacturer. When installed with other
appliances, the warranty is void since
the manufacturer cannot guarantee the
safe use of the plate warmer.
To install the combination
appliance please see the manual
supplied with that machine.
This appliance is not designed for
maritime use or for use in mobile
installations such as recreational
vehicles or aircraft. However, under
certain conditions it may be possible for
an installation in these applications.
Please contact the Miele Technical
Service Department with specific
requirements.
Built-in measurement
The appliance is available in two
heights: The opening measurement
needed is the summary of the
measurement of the plate warmer and
the combination appliance.
To install the plate warmer in
combination with another
appliance, a built-in shelf must exist in
the cabinet to support the weight of
both appliances.
When installed in combination with
another appliance, the plate
warmer must always be installed
beneath the other appliance. The
combination appliance can be set
without a base directly onto the plate
warmer. A shelf between the
appliances is not necessary.
17
Installation
Combinations EGW 40x0 -14
Oven H 4120, H 4220
18
Microwave-compact oven
Installation
Steam ovens
CVA
19
Installation
Installing the appliance
^ Set the plate warmer into the niche,
push is all the way in and align it at a
right angle.
The installation kit contains 3 metal
strips with adhesive on the back side.
Fix the metal strips on the plate warmer
so that the gap between the appliance
and the cabinet is sealed. This air
cushion acts as insulation.
^ Remove the protective foil from the
adhesive on the metal strip.
^ Align and fix the metal strips,
according to the illustration, flush with
the sides and the rear of the plate
warmer.
^ Open the drawer and fix the
appliance with the two supplied
screws at the side panels of the
cabinet.
20
^ Install the combination appliance
according to the manual supplied
with that machine.
Installation
Aligning the appliance front
After installing the combination
appliance it might be necessary to
align the appliance front and/or to even
the gap between the plate warmer and
the combination machine.
Flat washers are supplied beneath the
knurled nuts, which fix the drawer to the
telescopic runners.
^ Loosen the knurled nuts and take the
drawer out.
^ Align and even the gap with the flat
washers by changing their position
(above or below the drawer), on both
sides.
21
Installation
Electrical connection
The electrical installation instructions
for any appliance installed in
combination with the plate warmer
must be observed.
When another appliance is installed
in combination with the plate warmer
to the same circuit breaker,
operating both appliances at the
same time may cause an overload. If
in doubt consult a qualified
electrician.
All electrical work should be done
by a qualified technician, in strict
accordance with national and local
safety regulations.
Installation, repairs and other work
by unqualified persons could be
dangerous and may void the
warranty.
Make sure power is not supplied to
the appliance while installation or
repair work is being performed.
WARNING:
THIS APPLIANCE MUST BE
GROUNDED
22
Note to the installer
Please leave these instructions with
the consumer.
Power supply
This appliance is equipped with an
approx. 6 ft (approx. 1.8 m) long power
cord with plug ready for connection to a
120 V, 15 A, 60 Hz power supply.
23
All rights reserved/1605
M.-Nr. 06 543 300 / 00
en - US