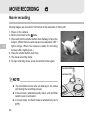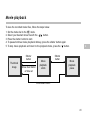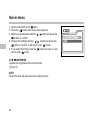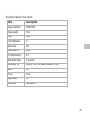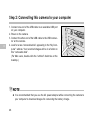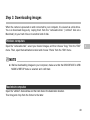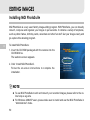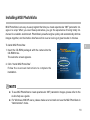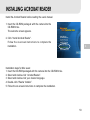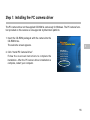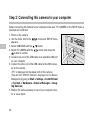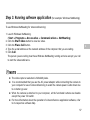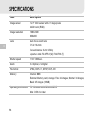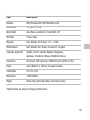
1
Vivicam 3665 User Manual
English 021009
FCC STATEMENT
This device complies with Part 15 of the FCC Rules. Operation is subject to the following two conditions:
(1) this device may not cause harmful interference, and
(2) this device must accept any interference received, including interference that may cause undesired operation
Note: This equipment has been tested and found to comply with the limits for Class B digital devices, pursuant to Part 15
of the FCC rules. These limits are designed to provide reasonable protection against harmful interference in a residential
installation. This equipment generates, uses and can radiate radio frequency energy and, if not installed and used in
accordance with the instructions, may cause harmful interference to radio communications. However, there is no guarantee that interference will not occur in a particular installation. If this equipment does cause harmful interference to radio or
television reception, which can be determined by turning the equipment off and on, the user is encouraged to try to correct
the interference by one or more of the following measures:
Reorient or relocate the receiving antenna.
Increase the separation between the equipment and receiver.
Connect the equipment into an outlet on a circuit different from that to which the receiver is connected.
Consult the dealer or an experienced radio/TV technician for help.
Use of shielded cable is required to comply with Class B limits in Subpart B of Part 15 of the FCC rules.
Do not make any changes or modifications to the equipment unless otherwise specified in the manual. If such changes or
modifications should be made, you could be required to stop operation of the equipment.
1
E
WARNINGS
Do not use this camera if it is emitting smoke, becomes unusually hot to be touched, emitting any unusual odor or
noise, or if it is in any other abnormal states. Operating the camera in any of these situations may cause a fire or an
electrical shock. Stop using the camera immediately, turn the camera off, and then disconnect the power source
(batteries or AC power adapter). (If you are using the AC power adapter, unplug the adapter from the AC power
outlet after you have disconnected the camera.) After checking that smoke is no longer being emitted, contact your
dealer or your local authorized service facility and request repairs. Never attempt to repair this camera yourself as
this is dangerous.
E
Do not use the camera if any foreign objects have entered the camera. Turn the camera off, and then disconnect the
power source (batteries or AC power adapter). (If you are using the AC power adapter, unplug the adapter from the
AC power outlet after you have disconnected the camera.) Then contact your dealer or your local authorized service
facility. Do not continue to use the camera as this may cause a fire or an electrical shock.
If the camera has been dropped or if the camera case has been damaged, turn the camera off, and then disconnect
the power source (batteries or AC power adapter). (If you are using the AC power adapter, unplug the adapter from
the AC power outlet after you have disconnected the camera.) Then contact your dealer or your local authorized
service facility. Do not continue to use the camera as this may cause a fire or an electrical shock.
Do not place the camera in any unstable locations such as on a wobbly table or sloping surface where the camera
may fall or tip over and cause injury.
Do not expose the camera to moisture and make sure that there is no water getting into the camera. Take particular
care when using the camera under extreme weather conditions such as rain or snow, or when operating the camera
at the beach on near water. Water in the camera may cause a fire or an electrical shock.
Do not attempt to modify this camera. This may cause a fire or an electrical shock.
Do not remove the camera casing. This may cause an electrical shock. Internal inspection, maintenance and repairs
should only be carried out by your dealer or local authorized service facility.
Do not touch the power plug during a thunderstorm if you are using the AC power adapter. This may cause an
electrical shock.
2
CAUTIONS
Do not place this camera in damp or dusty locations. This may cause a fire or an electrical shock.
Do not place this camera in a location affected by oil fumes or steam, such as near a cooking stove or humidifier.
This may cause a fire or an electrical shock.
Exposure to high temperatures may adversely affect the camera case and internal components and may cause a
fire.
Do not cover or wrap the camera or the AC power adapter with a cloth or quilt. This may cause heat to build up and
distort the case and cause a fire. Always use the camera and its accessories in well-ventilated locations
Handle the camera carefully and do not bump the camera into any hard object. Handling the camera roughly may
cause a malfunction.
Do not move the camera while it is switched on. (If you are using the AC power adapter, unplug the adapter from the
AC power outlet after you have switched off the camera.) Ensure that any connector cords or cables to other devices are disconnected before moving the camera. Failure to do so may damage the cords or cables and cause a
fire or an electrical shock.
When leaving the camera unused for long periods, such as during a vacation, always unplug the camera from the
power source (batteries or AC power adapter) for safety. (if you are using the AC power adapter, unplug the adapter
from the AC power outlet after you have disconnected the camera.) Failure to do so could result in a fire.
Do not use batteries other than those specified for use with your camera. The use of unsuitable batteries may result
in the batteries splitting or leaking and causing a fire, injury, or soiling of the battery compartment.
When fitting batteries into the camera, check the polarity markings on the battery (- and +) to ensure that you insert
the battery correctly. Incorrect battery polarity may result in the batteries splitting or leaking and causing a fire,
injury, or soiling of the battery compartment.
Remove the batteries if the camera will not be used for an extended period of time. The batteries may leak and
cause a fire, injury or soiling of the battery compartment. If the batteries leak, clean and wipe the battery compartment carefully and install new batteries. Wash your hands carefully if you touch the battery fluid.
3
E
TABLE OF CONTENTS
E
QUICK START ................................ 7
Using the AC power adapter (optional) . 16
Recording images/movie files ................ 7
Playing images ....................................... 8
Loading the memory card ...................... 17
Attaching the strap ................................. 17
INTRODUCTION ............................. 9
Setting the language and date/time ....... 18
Package contents .................................. 9
IMAGE RECORDING ..................... 19
Optional accessories ............................. 9
Connecting this camera to other
Auto photography .................................. 19
devices ................................................... 10
GETTING TO KNOW YOUR
CAMERA ........................................ 11
Front view ............................................... 11
Rear view ............................................... 12
Mode dial ............................................... 13
LED indicators ........................................ 14
Status LCD ............................................. 15
GETTING STARTED ...................... 16
Installing the batteries ............................ 16
4
Viewfinder photography .................................... 19
LCD monitor photography ................................ 20
Quick playback ...................................... 21
Zoom photography ................................ 22
Digital zoom photography ...................... 23
Self-timer photography .......................... 24
Macro photography ............................... 25
Flash photography ................................. 26
Setting the image resolution and quality 27
Record menu ......................................... 29
Manual photography .............................. 30
Manual record menu .............................. 31
Step 1: Installing the USB driver on
IMAGE PLAYBACK ........................ 33
Windows ................................................. 47
Installing the USB driver on Macintosh .. 47
Single-frame playback ........................... 33
Zoom playback ...................................... 34
Thumbnail display .................................. 35
Slideshow display .................................. 36
Deleting images ..................................... 37
Playback menu ...................................... 38
MOVIE RECORDING ...................... 40
Movie recording ..................................... 40
Movie playback ...................................... 41
Movie menu ............................................ 42
SETUP MODE ................................ 43
TRANSFERRING IMAGES TO
YOUR COMPUTER ........................ 46
Step 2: Connecting this camera to your
computer ................................................ 48
Step 3: Downloading images ................. 49
Windows computers .......................................... 49
Macintosh computers ........................................ 49
EDITING IMAGES .......................... 50
Installing MGI PhotoSuite ....................... 50
Installing MGI PhotoVista ....................... 51
USING USER’S MANUAL .............. 52
INSTALLING ACROBAT READER 53
USING THIS CAMERA AS A PC
CAMERA ........................................ 54
System requirements ............................. 46
5
E
System requirements for
videoconferencing ................................. 54
Step 1: Installing the PC camera driver . 55
E
Step 2: Connecting this camera to your
computer ................................................ 56
Step 3: Running software application
(for example: Windows NetMeeting) ...... 57
SPECIFICATIONS .......................... 58
6
QUICK START
Recording images/movie files
1 Set the mode dial to
record mode or
manual record mode or
movie mode.
E
To zoom in on the subject,
press the
button.
To zoom out on the subject,
press the
button.
3 Press the shutter button.
2 Power on the camera.
Press and hold the shutter button down
halfway to focus the subject.
Press the shutter button down fully.
(In movie mode, press the shutter button
down again will stop recording.)
7
Playing images
the mode dial to
mode.
1 Set
The last image will display on the LCD monitor.
E
the
buttons to select
2 Press
your desired image.
To select the next image, press the button.
To select the previous image, press the button.
Playback shortcut
You can view the last recorded image on the LCD monitor by pressing the
modes.
8
button in the
,
INTRODUCTION
Package contents
Digital camera
USB cable
Video cable
Software CD-ROM
User’s manual
Wrist strap
Lens cap with lens strap
E
Optional accessories
Memory card
AC power adapter
Camera pouch
4xAA alkaline batteries
9
Connecting this camera to other devices
USB
E
Computer
CD-RW
Downloading/Editing images
on a computer
Recording images onto CD
DPOF
Printer/Card Printer
Printing images
Camera
NTSC/PAL
TV
Viewing images on TV
10
GETTING TO KNOW YOUR CAMERA
Front view
Menu button
Quality/
Resolution button
Status LCD
Mode dial
E
Flash mode button
Flash
Shutter button
Viewfinder window
Strap eyelet
Self-timer lamp
Lens
11
Rear view
Arrow button (up)
Button/
Display button
Arrow button (left)/
Macro button
E
LED1
Arrow button (right)/
Quick playback button
Arrow button (down)/
Self-timer button
(
Telephoto button
Zoom in button)
(
Wide-angle button
Zoom out button)
Viewfinder
Diopter adjustment
dial
LED2
LCD monitor
Delete button
Power switch
Card cover
Jack cover
Battery cover
Battery cover lock
DC IN jack
VIDEO OUT jack
USB connector
12
Tripod socket
Mode dial
Setup mode
Manual record mode
Record mode
E
Movie mode
Playback mode
Mode
Description
Record mode
camera automatically sets the focusing and exposure in this mode,
is suitable for quick shooting
Manual record mode
allows you to manually adjust the white balance and exposure
compensation during photography
Playback mode
allows you to view the recorded images/movie files
Movie mode
allows you to record moving images in AVI format
Setup mode
allows you to change the preset settings
13
LED indicators
LED
E
Color
Status
Description
Sound
LED1
Orange
On
Power on
No
LED1
Orange
Blinking
When detecting the system error
Yes (3) *
LED1
Orange
On
Flash charging
No
LED1
Orange
Blinking
Image processing
(compression/Decompression)
No
LED1
Orange
Blinking
When transferring images to your
computer
No
LED2
Green
On
System ready
Yes (1) *
LED2
Green
On
Ready to record (after AF is locked)
Yes (1) *
Self-timer
Red
Blinking
Self-timer function is activated
Yes (1) *
*(3) represents the camera beeps three times
*(1) represents the camera beeps one time
14
Status LCD
Flash mode
Auto
Red-eye reduction
Forced flash
Off
Battery check
Full battery power
Medium battery power
Low battery power
No battery power
Self-timer mode
Image quality
Fine
Normal
Basic
E
Image resolution
1600x1200 pixels
800x600 pixels
Macro mode
Digital indicator
(This display varies according to the mode dial setting.)
Displays possible number of shots in Record mode
Manual record mode
/
Displays possible seconds to be recorded in Movie mode
Displays the current number of image in Playback mode
Displays "PC" when connect the camera to your computer via USB cable
15
GETTING STARTED
Choose either one of the following methods for the power supply.
Installing the batteries
E
1. Make sure the camera is off.
2. Unlock and slide the battery cover in the direction of the open
arrow.
3. Insert the batteries (Alkaline or Lithium) according to the polarity marks (+ or -) shown on the inner side of the battery
cover.
4. Close and lock the battery cover to make sure it is firmly
closed.
Using the AC power adapter (optional)
1. Make sure the camera is off.
2. Open the jack cover and connect one end of the AC power
adapter to the DC IN jack.
3. Connect the other end to a wall outlet.
16
Loading the memory card
Use the memory card to record and store images.
1.
2.
3.
4.
Make sure the camera is off.
Open the card cover.
Insert the memory card in the direction of the arrow.
Close the card cover.
E
Attaching the strap
1. Thread one end of the lens strap through the strap eyelet on
the camera and pull the other end through the loop until the
loop fits tightly against the strap eyelet.
2. Apply the same way on the wrist strap.
17
Setting the language and date/time
When this camera is first powered on, it will enter the LANGUAGE and DATE/TIME settings. Set
your desired language to display all settings on the LCD monitor and the correct time if needed.
E
To set the LANGUAGE:
1. Select your desired language with the
2. Press the
button to confirm.
/
button.
To set the DATE/TIME:
/
/ /
button. Press the
button to confirm
1. Enter the YEAR, MONTH, DAY, TIME with
whenever each item is set.
2. When the last item is set, press the
button to exit the DATE/TIME setting screen.
NOTE
The DATE/TIME settings may restore to the default settings if the camera battery or AC
power adapter have been removed. In this case, reset the settings.
The default setting for YEAR/MONTH/DAY/TIME is “2002/01/01/ 00: 00”.
18
IMAGE RECORDING
Auto photography
In this mode, exposure (combination of shutter speed and aperture) is automatically controlled.
Suitable for quick shooting, auto photography allows you to take pictures without using any manual
adjustments.
Viewfinder photography
You can extend the battery time by turning off the LCD monitor
and taking pictures using the viewfinder instead.
Power on the camera.
Set the mode dial to the
mode.
Use the viewfinder window to compose the picture.
Turn the “diopter adjustment dial” until the image appears
clearly within the viewfinder.
5. Press and hold the shutter button down halfway to focus the
subject. (When the focus and exposure are adjusted, LED 1
lights orange. When this camera is ready for recording
images, LED 2 lights green.)
6. Press the shutter button down fully.
E
1.
2.
3.
4.
Press down halfway
Press down fully
19
LCD monitor photography
LCD monitor is easier and convenient for users to compose a
picture and examine all details while photographing.
E
1.
2.
3.
4.
5.
Power on the camera.
Set the mode dial to the
mode.
Press the
button to turn on the LCD monitor.
Use the LCD monitor to compose the picture.
Press and hold the shutter button down halfway to focus the
subject. (When the focus and exposure are adjusted, LED 1
lights orange. When this camera is ready for recording
images, LED 2 lights green.)
6. Press the shutter button down fully.
Press down halfway
Press down fully
NOTE
The image in the LCD monitor darkens when in strong sunlight or bright light. This is not a
malfunction.
Long use of the LCD monitor may result in the decrease of possible number of images to
be recorded. To increase the shots to be taken and conserve the battery charge, you can
turn the LCD monitor off and use the viewfinder instead.
20
Quick playback
This camera is equipped with the
button, allowing the most recent image to be displayed on
the LCD monitor in the
/
modes. With the
button, however, you can only view the last
recorded image. For all images playback, go to the
mode.
1. Press the
button and the last recorded image displays.
2 . To re t u r n t o t h e n o r m a l re c o rd m o d e a n d c o n t i n u e
photographing, press the
button again.
E
21
Zoom photography
The lens moves during the zoom photography. Zoom photography allows you to take zoom shots
and wide-angle shots. The subject appears closer by pressing the button and appears farther
away by pressing the
button.
E
1.
2.
3.
4.
Power on the camera.
Set the mode dial to the
mode or the
mode.
Press the
button to turn on the LCD monitor.
Press the
button (
button) to enlarge the subject.
(Press the
button ( button) can take wide-angle shots.)
5. Press and hold the shutter button down halfway to focus the
subject. (When the focus and exposure are adjusted, LED 1
lights orange. When this camera is ready for recording
images, LED 2 lights green.)
6. Press the shutter button down fully.
22
Wide-angle button
Telephoto button
(Zoom out button)
(Zoom in button)
Digital zoom photography
The digital zoom is available when the LCD monitor is on and the digital zoom is set to on in the
record menu/manual record menu. This mode enlarges the subject and makes it appearing even
closer.
1.
2.
3.
4.
5.
6.
Power on the camera.
Set the mode dial to the
mode or the
mode.
Press the
button to turn on the LCD monitor.
Press the
button as far as it can go.
Press the
button again to activate 2X digital zoom function.
Press and hold the shutter button down halfway to focus the subject. (When the focus and
exposure are adjusted, LED 1 lights orange. When this camera is ready for recording images,
LED 2 lights green.)
7. Press the shutter button down fully.
NOTE
Digital zoom is only available at the resolution of 1600x1200 pixels.
The maximum zoom magnification for recording an image is 2X. However, the more the
image is enlarged, the grainier the image may become.
To cancel digital zoom photography, press the
button.
23
E
Self-timer photography
When the self-timer is used, the shutter automatically releases after 10 seconds. With this design,
you can get in the frame when taking group pictures.
E
1. Power on the camera.
2. Set the mode dial to the
mode or the
mode.
3. Press the
button. The
icon is displayed on the LCD
monitor and status LCD.
4. Compose the picture.
5. Press and hold the shutter button down halfway to focus the
subject. (When the focus and exposure are adjusted, LED 1
lights orange. When this camera is ready for recording
images, LED 2 lights green.)
6. Press the shutter button down fully. (The self-timer is
activated.)
7. After 10 seconds, the camera takes a picture automatically.
8. To cancel self-timer photography midway, press the
button again or the shutter button.
NOTE
The self-timer is designed to count down for 10 seconds. The indicator blinks at a rate
relatively slow in the first 7 seconds, and then blinks rapidly for the last 3 seconds.
24
Macro photography
Macro photography is used when the distance to the subject is between 20 and 60cm. This mode
is useful especially for recording small things, like flowers or insects.
1. Power on the camera.
2. Set the mode dial to the
mode or the
mode.
3. Press the
button. (The
icon is displayed on the LCD
monitor and the arrow points to the
icon on the status
LCD.)
4. Compose the picture.
5. Press and hold the shutter button down halfway to focus the
subject. (When the focus and exposure are adjusted, LED 1
lights orange. When this camera is ready for recording
images, LED 2 lights green.)
6. Press the shutter button down fully.
7. To cancel macro photography midway, press the button
again.
E
NOTE
Taking a picture in macro mode with the viewfinder may cause images composed to be
off-center due to the parallax phenomenon. Use the LCD monitor to compose a picture
instead in macro mode.
25
Flash photography
The flash is designed to function automatically in dark places (default setting: Auto). To suit the
different conditions, however, you can change the flash modes.
E
1. Power on the camera.
2. Set the mode dial to the
mode or the
mode.
3. Press the
button several times to select your desired
mode. (The arrow points to your selected flash mode on the
status LCD.)
4. Compose the picture.
5. Press and hold the shutter button down halfway to focus the
subject. (When the focus and exposure are adjusted, LED 1
lights orange. When this camera is ready for recording
images, LED 2 lights green.)
6. Press the shutter button down fully.
Flash mode
Description
Auto
The flash fires automatically according to the photography conditions, is suitable for
general photography.
Red-eye reduction Use this mode to avoid the red-eye effect when photographing people in low-light conditions.
26
Forced flash
The flash fires regardless of the surrounding brightness, is suitable for
recording images in artificial light (backlighting, fluorescent lighting, etc.).
Off
Use this mode in the environment that the flash use is prohibited or under the situation
that the distance to the subject is too far away for the flash to have any effect.
Setting the image resolution and quality
Set the resolution (number of pixels) and quality (compression ratio) of the image to be recorded.
You can improve the image quality by adding up the values if necessary or reduce them to save
memory space. Higher resolution and quality is ideal for printing. However, it is highly recommended to use the smaller resolution and quality for e-mail transmission. To change the resolution and quality settings, press the
button several times until your desired combination
appears on the status LCD.
Resolution & Quality Indicators:
In
/
mode: shows the resolution & quality settings for the image to be recorded
In
mode: shows the resolution & quality settings for the image that you recorded
27
E
Image Compression Ratio:
Resolution
1600x1200
800x600
1600x1200
800x600
1600x1200
800x600
E
Quality:
: Basic
: Normal
: Fine
28
Quality
Compression ratio
16:1
16:1
12:1
12:1
8:1
8:1
Estimated images Estimated images
(Internal memory) (Memory card) (4MB)
20
83
15
62
10
41
10
43
8
32
5
21
Record menu
1.
2.
3.
4.
Set the mode dial to the
mode.
Press the
button and record menu appears.
Select your desired item with the
/
button.
Change the settings with the
/
button and press the
button to confirm. It will return to the
mode.
5. If you do not want to make any changes while entering the
menu settings screen, you can press the
button again or
select EXIT and press the
button.
E
LCD BRIGHTNESS
Adjusts the brightness of the LCD monitor.
[-5] to [+5]
QUICKVIEW
This feature allows you to view the image on the LCD monitor as soon as you take the picture.
After a temporarily preview, this camera will return to the
mode.
[ON]: enable quick view, [OFF]:disable quick view
DIGITAL ZOOM
If the digital zoom is activated, you can take digital zoom shots.
[ON]: enable digital zoom, [OFF]: disable digital zoom
EXIT
Select this item will leave the menu setting screen.
29
Manual photography
You can take pictures by manually adjusting conditions such as the white balance and exposure
compensation. This is called manual photography.
E
1.
2.
3.
4.
5.
Power on the camera.
Set the mode dial to the
mode.
Press the
button and manual record menu appears.
Select WHITE BALANCE or EV COMPENSATION with the
/
button.
Change the settings with the / button and press the
button to confirm. It will return to
the
mode.
6. Compose the picture.
7. Press and hold the shutter button down halfway to focus the subject. (When the focus and
exposure are adjusted, LED 1 lights orange. When this camera is ready for recording images,
LED 2 lights green.)
8. Press the shutter button down fully.
30
Manual record menu
Users can manually set the image quality, exposure, white balance and other settings in manual
record menu.
1.
2.
3.
4.
Set the mode dial to the
mode.
Press the
button and manual record menu appears.
Select your desired item with the
/
button.
Change the settings with the
/
button and press the
button to confirm. It will return to the
mode.
5. If you do not want to make any changes while entering the
menu settings screen, you can press the
button again or
select EXIT and press the
button.
E
LCD BRIGHTNESS
Adjusts the brightness of the LCD monitor.
[-5] to [+5]
QUICKVIEW
This feature allows you to view the image on the LCD monitor
as soon as you take the picture. After a temporarily preview,
this camera will return to the
mode.
[ON]: enable quick view, [OFF]: disable quick view
31
DIGITAL ZOOM
If the digital zoom is activated, you can take digital zoom shots.
[ON]: enable digital zoom, [OFF]: disable digital zoom
E
WHITE BALANCE
When the brightness of the light changes, our eyes adapt so that the white object remains white.
For digital still cameras, they can also see the white object as white by averaging the light around
the subject. This adjustment process is called white balance.
[AUTO]: automatically adjusting the white balance
[SUN]: for recording outdoors on a bright day
[SHADE]: recording for overcast, shaded, twilight or evening skies
[FLUORESCENT]: for recording under fluorescent lighting
[TUNGSTEN]: for recording under tungsten lighting
EV COMPENSATION
When the object is too dark or too bright, the camera adjusts the brightness to make the object
looks brighter or darker. This is called EV compensation.
This camera offers EV compensation across a range of [± 1.8]EV in 1/3EV steps.
SHARPNESS
Sets the level of image sharpness.
[NORMAL]: no effect of sharpness
[SOFT]: this reduces the sharpness of image
[HARD]: this enhances the sharpness of image
EXIT
Select this item will leave the menu setting screen.
32
IMAGE PLAYBACK
Single-frame playback
Plays back one image at a time.
1. Set the mode dial to the
mode.
The last recorded image (movie file) appears on the LCD monitor.
2. Select your desired image with the / button.
button: displays the previous image
button: displays the next image
E
NOTE
You can also view the images on your TV screen via connection with the video cable. But
make sure to power off the camera and TV first.
33
Zoom playback
This mode allows you to zoom in on the selected portion of the image with 4X magnification to
check for small details.
E
1. Set the mode dial to the
mode.
2. Select the image you want to enlarge with the
/
button.
3. Enlarge the image with the
button.
4. To view the different portion of the enlarged image, press
the
/
/
/
button.
5. To return to the regular display, press the
button.
NOTE
The
The
34
button magnifies the image from 1X ➔ 2X ➔ 4X.
button reduces the image from 4X ➔ 2X ➔ 1X.
Thumbnail display
Thumbnail display allows you to simultaneously view nine small representations of images on the
LCD monitor. You can speed up your search for your desired image by employing this function.
1.
2.
3.
4.
Set the mode dial to the
mode.
Press the
button and image information appears.
Press the
button again and thumbnail display appears.
Select the image you want to play at full size with the
/ button.
5. Press the
button and the selected image will display at
full size.
E
NOTE
Pressing the
button displays the following image status in order.
image only ➔ image and the on-screen display ➔ thumbnail display
35
Slideshow display
Slideshow function is useful and convenient for checking recorded images and for presentations.
1.
2.
3.
4.
E
Set the mode dial to the
mode.
Press the
button and playback menu appears.
Select SLIDE SHOW.
Select the playback interval with the
/
button and
press the
button to confirm.
5. The slideshow starts. The image is displayed one-byone with the interval that you set.
6. To cancel the slideshow display and return to the playback mode, press the
/
/
/
button.
NOTE
The slideshow display interval can be adjusted from the range of 2sec to 10sec in 2sec
steps. For details, refer to the SLIDE SHOW described on page 38.
36
Deleting images
To delete one image at a time:
1. Set the mode dial to the
mode.
2. Select your desired image to be deleted.
3. Press the
button and the “DELETE THIS?” message
appears.
4. Select [YES] to confirm the deletion (or select [NO] to cancel).
A next image appears.
5. Repeat step 2 to continue deletion if necessary.
6. If all images are deleted, [
NO IMAGES] will show on the
LCD monitor.
E
To delete all images at a time:
1.
2.
3.
4.
Set the mode dial to the
mode.
Press the
button for over 1 second.
The “DELETE ALL?” message appears.
If you select [YES], all images will be deleted and [
[NO], it will return to the
mode.
NO IMAGES] appears. If you select
37
Playback menu
1.
2.
3.
4.
E
Set the mode dial to the
mode.
Press the
button and playback menu appears.
Select your desired item with the
/
button.
Change the settings with the
/
button and press the
button to confirm. It will return to the
mode.
5. If you do not want to make any changes while entering the
menu settings screen, you can press the
button again or
select EXIT and press the
button.
LCD BRIGHTNESS
Adjusts the brightness of the LCD monitor.
[-5] to[+5]
SLIDE SHOW
Automatically displays one image at a time in sequence with
the delay time that you set.
[2 sec], [4 sec], [6 sec], [8 sec], [10 sec]
COPY TO CARD
This mode copies the recorded images to the external memory
card.
[YES], [NO]
38
DPOF (DIGITAL PRINT ORDER FORMAT)
DPOF enables you to print the images directly from the DPOF-compatible printers by simply
inserting the memory card into the printer and do the necessary settings.
[PRINT QUANTITY]: allows you to select the image quantity from 1~9
[PRINT SIZE]: allows you to select the image size (standard, 3x5, 4x6, 5x7, 8x10)
[PRINT INDEX]: allows you to select to print the photo in index format
[PRINT ENABLE]: If you select “ENABLE” and press the
button to confirm, the camera will
save the settings and return to the playback menu. If “DISABLE” is selected and confirmed, all
the settings will be erased.
DPOF shortcut
You can use the shutter button to quickly do the DPOF setting with the memory card inserted in
the camera.
1. Set the mode dial to the
mode and the last image appears.
2. Press the shutter button to toggle the DPOF print tag setting of the selected image.
NOTE
When enabling the DPOF print tag by pressing the shutter button, the image size=standard,
and the image quantity=1. (default settings)
EXIT
Select this item will leave the menu setting screen.
39
E
MOVIE RECORDING
Movie recording
Moving images are recorded in AVI format at the resolution of 320 x 240.
E
1. Power on the camera.
2. Set the mode dial to the
mode.
3. Press and hold the shutter button down halfway to focus the
subject. (When the focus and exposure are adjusted, LED 1
lights orange. When this camera is ready for recording
movies, LED 2 lights green.)
4. Press the shutter button down fully.
5. The movie recording starts.
6. To stop recording movie, press the shutter button again.
Press down halfway
Press down fully
NOTE
The recordable movie time will display on the status
LCD during the recording process.
In movie mode, resolution/quality, macro, and self-timer
cannot be set or activated.
In movie mode, the flash mode is automatically set to
[OFF].
40
Movie playback
To view the recorded movie files, follow the steps below.
1.
2.
3.
4.
5.
Set the mode dial to the
mode.
Select your desired movie file with the
/
button.
Press the shutter button to start.
To pause/continue movie playback midway, press the shutter button again.
To stop movie playback and return to the playback mode, press the
button.
Shutter
button
Thumbnail
image
Arrow down button
or time out
Movie
playblack
starts
Shutter
button
E
Movie
playblack
pause
Arrow down button
41
Movie menu
E
1. Set the mode dial to the
mode.
2. Press the
button and movie menu appears.
3. Select your desired item with the
/
button and press the
button to confirm.
4. Change the settings with the
/
button and press the
button to confirm. It will return to the
mode.
5. If you select EXIT and press the
button on step 3, it will
return to the
mode.
LCD BRIGHTNESS
Adjusts the brightness of the LCD monitor.
[-5] to[+5]
EXIT
Select this item will leave the menu setting screen.
42
SETUP MODE
The setup menu is used to adjust the camera settings. To change the setting:
1. Set the mode dial to the
appears.
2. Select your desired item with the
3. Change the settings with the
/
button to confirm.
mode and SETUP menu
/
button.
button and press the
DATE/TIME
Sets the date and time.
E
LANGUAGE
Sets the displayed language on the LCD monitor.
[ E N G L I S H ] , [ F R A N Ç A I S ] , [ D E U T S C H ] , [ E S PA Ñ O L ] ,
[PORTUGUÊS], [ ], [ EF], [ EF]
SOUND
Enables or disables the sound function.
[ON]: sounds each time when operating the camera
[OFF]: does not sound when operating the camera
FORMAT MEDIA
This function will erase all images currently recorded on the
internal memory or external memory card.
[YES]: formats the internal memory (or memory card) and erase all images
[NO]: does not format the internal memory (or memory card)
43
VIDEO MODE
Sets the video output format for displaying recorded images on a TV.
[NTSC]: NTSC video format is used in US, CANADA, JAPAN.
[PAL]: PAL video format is used in EUROPE.
E
USB MODE
[DISK DEVICE]: This mode allows you to download camera images to your computer.
[PC CAMERA]: This mode allows you to have net-meetings with co-workers around the world and
hold face-to-face conversations with friends and family.
AUTO POWER OFF
If no operation is carried out for 90 seconds, the camera will stay idle to prevent battery consumption (stand by). To bring the camera power back, press any button or switch the mode dial.
If no operation is carried out for 3 minutes (when using the batteries as the power supply; for AC
power adapter, the duration is 30 minutes), the system power will be off and you will need to
power on the camera again.
[3 min], [5 min], [10 min], [30 min]
RESET TO DEFAULT
Chooses this function will restore all settings to their default values.
[YES]: restore all settings to their default values.
[NO]: does not restore all settings to their default values.
44
The default values for this camera:
Item
Description
Image resolution
1600x1200
Image quality
Fine
Flash
Auto
LCD brightness
0
Quick view
Off
White balance
Auto
EV compensation
0.0
Slide show delay
4 seconds
Auto power off
Battery: 3 min; AC power adapter: 30 min
Sound
On
Focus
Auto
Digital zoom
Off
USB mode
Disk device
E
45
TRANSFERRING IMAGES TO YOUR COMPUTER
Images can be transferred to a computer via the USB cable. When this camera is connected to a
computer via the USB cable, the “PC” indicator shows on the status LCD.
To transfer images to a computer, follow the steps below:
Step 1: Installing the USB driver
Step 2: Connecting this camera to your computer
Step 3: Downloading images
E
System requirements
46
Pentium 166 MHz processor or higher
Windows 98/ME/2000/XP
PowerPC G3/G4
MAC OS 8.6 or higher
An available USB port
At least 32MB RAM
80 MB available hard disk space
A CD-ROM drive
Color monitor (800x600 24-bit or higher recommended)
Step 1: Installing the USB driver on Windows
The USB driver on the supplied CD-ROM is exclusively for Windows 98. Installing the USB driver
on computers running Windows 2000/ME/XP is not necessary.
1. Insert the CD-ROM packaged with the camera into the CDROM drive.
The welcome screen appears.
2. Click “Install USB Driver”.
Follow the on-screen instructions to complete the installation.
After the USB driver installation is complete, restart your
computer.
E
Installing the USB driver on Macintosh
For Mac OS 9.0 or higher users, the computer will automatically recognize the camera and load
its own USB drivers. Installing anything separately is not necessary. For Mac OS 8.6 users, however,
make sure to install USB driver first.
1.
2.
3.
4.
Insert the CD-ROM packaged with the camera into the CD-ROM drive.
Select and double-click “Digital Camera Driver Installer “.
Select “Install Location” and click “Install”.
Follow the on-screen instructions to complete the installation and restart your computer.
47
Step 2: Connecting this camera to your computer
E
1. Connect one end of the USB cable to an available USB port
on your computer.
2. Power on the camera.
3. Connect the other end of the USB cable to the USB connector on the camera.
4. Look for a new “removable disk” appearing in the “My Computer” window. Your recorded images will be in a folder on
this “removable disk”.
(For Mac users, double-click the “untitled” disk drive on the
desktop.)
NOTE
It is recommended that you use the AC power adapter while connecting the camera to
your computer to download images for conserving the battery charge.
48
Step 3: Downloading images
When the camera is powered on and connected to your computer, it is viewed as a disk drive.
You can download images by coping them from the “removable disk” (“untitled” disk on a
Macintosh) to your hard drive or to another kind of disk.
Windows computers
Open the “removable disk”, select your desired images, and then choose “Copy” from the “Edit”
menu. Then, open the destination location and choose “Paste” from the “Edit” menu.
NOTE
Before downloading images to your computer, make sure that the DISK DEVICE in USB
MODE of SETUP menu is selected and confirmed.
Macintosh computers
Open the “untitled” disk window and the hard disk or the destination location.
Then drag and drop from the former to the latter.
49
E
EDITING IMAGES
Installing MGI PhotoSuite
MGI PhotoSuite is a very user-friendly image-editing program. With PhotoSuite, you can breezily
retouch, compose and organize your images in just seconds. It contains a variety of templates,
such as photo frames, birthday cards, calendars and other fun stuff. Get your images ready and
go explore this amazing program.
E
To install MGI PhotoSuite:
1. Insert the CD-ROM packaged with the camera into the
CD-ROM drive.
The welcome screen appears.
2. Click “Install MGI PhotoSuite”.
Follow the on-screen instructions to complete the
installation.
NOTE
To use MGI PhotoSuite to edit and retouch your recorded images, please refer to the online help as a guide.
For Windows 2000/XP users, please make sure to install and use the MGI PhotoSuite in
“Administrator” mode.
50
Installing MGI PhotoVista
MGI PhotoVista is an easy-to-use program that lets you create spectacular 360 O panoramic images in a snap. When you view these panoramas, you get the experience of being totally immersed in a realistic environment. PhotoVista’s powerful engine quickly and automatically stitches
images together, and its intuitive interface will let even a novice get great results in minutes.
To install MGI PhotoVista:
E
1. Insert the CD-ROM packaged with the camera into the
CD-ROM drive.
The welcome screen appears.
2. Click “Install MGI PhotoVista”.
Follow the on-screen instructions to complete the
installation.
NOTE
To use MGI PhotoVista to create spectacular 360 O panoramic images, please refer to the
on-line help as a guide.
For Windows 2000/XP users, please make sure to install and use the MGI PhotoVista in
“Administrator” mode.
51
USING USER’S MANUAL
The user’s manual on the supplied CD-ROM is a comprehensive instruction document that guides
users to operate this camera easily. It’s also very helpful in case your paper-based user’s manual
is missing. To view, navigate and print the electronic file, however, you’ll have to install the Acrobat Reader first. Once the Acrobat Reader is installed in your system, you can view the user’s
manual just as its original looks no matter what application or systems you have installed.
E
1. Insert the CD-ROM packaged with the camera into the
CD-ROM drive.
The welcome screen appears.
2. Click “Install User’s Manual”.
Follow the on-screen instructions to complete the
installation.
Installation steps for Mac users:
1. Insert the CD-ROM packaged with the camera into the CD-ROM drive.
2. Select and double-click “Manual”.
3. Select and double-click your desired language.
4. Double-click the PDF file to open the user’s manual. Copy the user’s manual to your computer
if necessary.
52
INSTALLING ACROBAT READER
Install the Acrobat Reader before reading the user’s manual.
1. Insert the CD-ROM packaged with the camera into the
CD-ROM drive.
The welcome screen appears.
2. Click “Install Acrobat Reader”.
Follow the on-screen instructions to complete the
installation.
E
Installation steps for Mac users:
1. Insert the CD-ROM packaged with the camera into the CD-ROM drive.
2. Select and double-click “Acrobat Reader”.
3. Select and double-click your desired language.
4. Double-click “Reader Installer”.
5. Follow the on-screen instructions to complete the installation.
53
USING THIS CAMERA AS A PC CAMERA
This camera can act as a PC camera, allowing you to hold a videoconference and talk to business associates over the Internet or corporate Intranet, or conduct real-time conversation with
friends or family.
To use this camera as a PC camera, follow the steps below:
Step 1: Installing the PC camera driver
Step 2: Connecting this camera to your computer
Step 3: Running software application (for example: Windows NetMeeting)
E
System requirements for videoconferencing
To use this camera for videoconferencing, your computer must contain the following components:
54
Microphone
Sound card
Speakers or headphones
Network connection
Step 1: Installing the PC camera driver
The PC camera driver on the supplied CD-ROM is exclusively for Windows. The PC camera function provided on this camera is not supported by Macintosh platform.
1. Insert the CD-ROM packaged with the camera into the
CD-ROM drive.
The welcome screen appears.
E
2. Click “Install PC Camera Driver”.
Follow the on-screen instructions to complete the
installation. After the PC camera driver installation is
complete, restart your computer.
55
Step 2: Connecting this camera to your computer
Before connecting this camera to your computer, make sure “PC CAMERA” in the SETUP menu is
selected and confirmed.
E
1. Power on the camera.
2. Set the mode dial to the
mode and SETUP menu
appears.
3. Select USB MODE with the
/
button.
4. Select PC CAMERA with the
/
button and press the
button to confirm.
5. Connect one end of the USB cable to an available USB port
on your computer.
6. Connect the other end of the USB cable to the USB connector on the camera.
(“PC” is displayed on the status LCD of this camera.)
(You will find “USB PC Camera” displayed on the Device
Manager list by going to Start ➔ Settings ➔ Control Panel
➔ System ➔ Hardware ➔ Device Manager ➔ Imaging devices)
7. Position the camera steadily on top of your computer monitor or use a tripod.
56
Step 3: Running software application
(for example: Windows NetMeeting)
To use Windows NetMeeting for videoconferencing:
1. Launch Windows NetMeeting.
(Start ➔ Programs ➔ Accessories ➔ Communications ➔ NetMeeting)
2. Click the Start video button to view live video.
3. Click the Place Call button.
4. Type the e-mail address or the network address of the computer that you are calling.
5. Click Call.
The person you are calling must have Windows NetMeeting running and also accept your call
to start the videoconference.
NOTE
The video capture resolution is 320x240 pixels.
It is recommended that you use the AC power adapter while connecting the camera to
your computer for use of videoconferencing to avoid the camera power is shut down due
to no battery power.
When the camera is attached to your computer, all the functional buttons are disable
except the power I/O switch.
For more information about the operation of videoconference application software, refer
to its respective software help.
57
E
SPECIFICATIONS
Item
Description
Image sensor
1/2.7" CCD sensor with 2.1 mega pixels
24-Bit color (RGB)
Image resolution
1600x1200
800x600
Lens
Auto focus zoom lens
-f:5.4~16.2mm
-focus distance: 0.2m~infinity
-Aperture ratio: F2.8/F5.6 (W), F4.4/F8.6 (T)
Shutter speed
1/10~1/800 sec.
Zoom
3 x Optical, 2 x Digital
File format
JPEG, EXIF 2.1, DPOF, DCF, AVI
Memory
Internal: 8MB
External: Memory card, storage: Fine: 22 images; Normal: 34 images;
Basic: 45 images (16MB)
Operating environment
PC: Windows 98/98SE/2000/ME/XP
Mac: OS 8.6 or later
E
58
Item
Description
Software
MGI PhotoSuite SE, MGI PhotoVista V2.02
LCD monitor
1.6" color TFT LCD
Built-in flash
Auto, Red-eye reduction, Forced flash, Off
Self-timer
10 sec. delay
Exposure
Auto; Manual: 0.3 EV step, -1.8 ~ +1.8EV
White balance
Auto; Manual: Sun, Shade, Fluorescent, Tungsten
Language supported
English, French, German, Spanish, Portuguese,
Japanese, Traditional Chinese, Simplified Chinese
Connectors
DC IN jack, USB connector, VIDEO OUT jack (NTSC or PAL)
Power
AAx4 (Alkaline, or Lithium); AC power adapter
Certification
CE, FCC, VCCI
Dimensions
110x51x68mm
Weight
About 230g (excluding battery and memory card)
E
*Specifications are subject to change without notice.
59