1
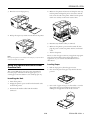
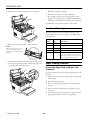
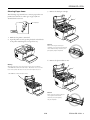
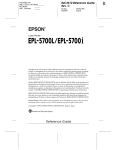
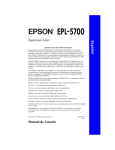
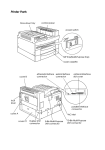
EPSON EPL-5700i
printer cover
latch
ready light
(green)
error light
(red)
Paper output:
Face down or face up optional selection
Paper output
capacity:
Face down 100 sheets
Face up 20 sheets with the optional
face-up tray
Paper
output tray
extension
Type
Weight
Size*
Plain paper
16 to 24 lb,
60 to 90 g/m2
Letter (8.5 × 11 inches)
Legal (8.5 × 14 inches)
Executive (7.25 × 10.5 inches)
A5 (148 × 210 mm)
A4 (210 × 297 mm)
B4 (257 × 364 mm)
B5 (182 × 257 mm)
Half-Letter (5.5 × 8.5 inches)
Government Letter (8.0 × 10.5 inches)
Government Legal (8.5 × 13 inches)
F4 (210 × 330 mm)
Custom (3.0 × 5.0 inches to 8.5 × 14
inches)
Thick paper
28 to 58.5 lb,
105 to 220 g/m2
3.5 × 5.5 inches to 13 × 19 inches
Envelopes
16 to 28 lb,
60 to 105 g/m2
Monarch (3.875 × 7.5 inches)
Commercial 10 (4.125 × 9.5 inches)
DL (110 × 220 mm)
C5 (162 × 229 mm)
C6 (114 × 162 mm)
International B5 (176 × 250 mm)
paper tray
power switch
manual feed slot
paper path selector
USB
interface
connector
* The minimum margin for all paper sizes is 0.16 inch (4 mm) for all
sides.
AC inlet
parallel interface connector
Environmental
Printer Specifications
Printing
Printing method: Laser beam scanning and dry
electrophotographic process
Resolution:
600 dpi × 600 dpi, 300 dpi × 300 dpi
Printing speed:
Up to 8 pages per minute, depending on
the font and print quality
Specification
Operation
Storage
Temperature
50 to 95 °F (10 to 35 °C)
32 to 95 °F (0 to 35 °C)
Humidity
15 to 85% RH
30 to 85% RH
Altitude
8200 feet (2500 meters) maximum
Mechanical
Height
9.9 inches (251 mm)
First print:
Less than 19 seconds with letter/A4
Width
15.6 inches (397 mm)
Warm-up time:
About 20 seconds at normal temperature
Depth
18.2 inches (463 mm)
Weight
Approx. 14.5 lb (7.5 kg), excluding developer cartridge,
photoconductor unit, and options
Durability
5 years or 180,000 sheets, whichever comes first
Paper feed:
Automatic feed
Paper feed
alignment:
Center alignment for all sizes
RAM:
2MB, expandable up to 13MB
Input paper
supply
([20 lb] 75 g/m 2
paper):
Up to 150 sheets in the tray
Up to 500 sheets per optional
500-sheet lower cassette unit
Up to 10 envelopes
9/99
EPSON EPL-5700i - 1
EPSON EPL-5700i
Electrical
Paper types:
Plain paper, such as copier paper, and
recycled paper
Power supply:
5 Vdc supplied by the printer
Height:
4.7 inches (120 mm)
Width:
15.4 inches (397 mm)
Specification
110 V model
230 V model
Voltage
90 to 132 V
198 to 264 V
Rated frequency
50 to 60 Hz ± 3 Hz
50 to 60 Hz ± 3 Hz
Rated current
5.3 A
3A
Power consumption
Less than 580 W
Depth:
18.6 inches (472 mm ) including the tray
Power consumption in
standby mode (no options
installed)
Less than 30 W
Weight:
9.3 lb (4.2 kg) including the tray
Face-up Tray (C812861)
Dimensions include printer
Interfaces
Parallel interface:
IEEE 1284-B compliant
USB interface:
Universal Serial Bus 1.0 compliant.
Only Macintosh® and Windows® 98 preinstalled PCs support the USB interface.
Consumables Specifications
Part
Shelf life
Developer
cartridge
18 months
after
production
Photoconductor unit
Approximate
life*
Storage
Storage
temperature humidity
Up to 6,000
pages
32 to 95 °F
(0 to 35 °C)
Height:
17.0 inches (433 mm)
Width:
15.4 inches (397 mm)
Depth:
22.8 inches (580 mm)
Weight:
0.7 lb (0.3 kg)
Paper output
capacity:
20 sheets (20 lb or 75 g/m² paper)
Loading Paper in the Standard Tray
30 to 85%
RH
1. Insert the paper tray into the slots at the front of the printer,
then push it all the way into the printer.
Up to 20,000
pages
* Under the following conditions: Letter or A4 size paper,
continuous printing, and 5% print ratio
The number of pages you can print with a developer cartridge or a
photoconductor unit varies depending on the type of printing. If
you print a few pages at a time or print dense text exceeding the
5% print ratio, the unit may print fewer pages. The 5% print ratio
is equivalent to printing double-spaced standard text.
Option Specifications
2. Fan a stack of paper (up to 150 sheets), then align the edges
by tapping the stack on a flat surface. With the paper’s
printable side facing up, place the stack into the tray. Slide
the paper guides against the paper stack.
500-Sheet Lower Cassette Unit
Paper size:
Letter (C812881)
A4 (C812871)
Paper weight:
16 to 24 lb (60 to 90 g/m ²)
Paper feed:
Automatic feed
Tray capacity up to 500 sheets (20 lb or
75 g/m ² paper)
Paper feed speed:
For the first sheet, 21 seconds or less;
subsequent sheets, 8 pages per minute
2 - EPSON EPL-5700i
2
1
9/99
EPSON EPL-5700i
3. Place the cover on the paper tray.
4. Make sure the printer and cassette are facing the same way.
Lift the printer and align the pins on the cassette with the
holes on the bottom of the printer. Then lower the printer
until it rests securely on the Lower Cassette Unit.
4. Pull up the output tray extension on the front of the printer.
5. Reconnect any interface cables you removed.
6. Make sure the printer’s power switch is turned off, then
plug the power cord into the printer and into an electrical
outlet.
7. Turn on the printer.
Be sure to select the paper source in your application program.
Since the selection method varies from application to
application, see your software documentation for more
information.
Note:
Before printing, make sure the Paper Size setting in your printer driver
matches the paper you loaded.
Loading Paper
Using the Optional 500-Sheet Lower
Cassette Unit
1. Pull out the paper tray from the paper cassette.
2. Press down the plate in the paper tray until it locks into
position.
The optional 500-sheet lower cassette unit (C812881 for
letter size paper, C812871 for A4 size paper) gives you a
second paper source in addition to the standard paper tray.
Installing the Unit
1. Turn off the printer.
2. Unplug the printer’s power cord from the electrical outlet
and from the printer.
3. Fan a stack of paper and tap it on a flat surface to even the
edges. Insert the paper printable side up into the tray,
making sure the paper fits under the tab as shown.
3. Disconnect all interface cables from the interface
connectors.
9/99
EPSON EPL-5700i - 3
EPSON EPL-5700i
4. Insert the paper tray in the paper cassette.
The printer is factory set for face-down output. To switch the
paper path from face-down to face-up, use the selector located
on the right side of the printer near the back.
Using the Optional Face-up Tray
Using an Optional Memory Module
The printer normally outputs paper face down on top of the
printer. If you want face-up output, you can install the
optional face-up tray (C812861). This tray gives you
immediate viewing of your printed output and is
recommended for printing on media such as labels and
transparencies that require a straight-through paper path.
1. Turn off the printer.
By installing a Single In-line Memory Module (SIMM), you
can increase printer memory up to 13MB. You may want to
add additional memory if you are having difficulty printing
complex graphics or if you regularly use numerous
downloaded fonts.
2. Install the face-up tray by inserting the mounting pins into
the corresponding holes, one at a time. Do not force both
sides in at once.
Note:
The maximum amount of memory is 13MB. Even if a 16MB SIMM is
installed, only 13MB is accessible.
You can purchase SIMMs from many vendors. Be sure that
the SIMM you purchase meets the following requirements:
❏ 72-pin, EDO or FPM type
❏ Capacity of 4, 8, or 16MB
❏ Access speed of 60 ns (nanoseconds) or less
❏ Dimensions within 4.25 inches (108 mm) × 1.5 inches
(38 mm), with a thickness of 0.4 inch (10 mm)
Follow these steps to install a memory module:
1. Turn off the printer.
Warning:
To avoid electrical shock, do not attempt to install a SIMM unless
the printer is turned off.
2. Unplug the power cord from the electrical outlet.
3. Turn the printer so that its right side faces you.
4. Open the printer cover by pressing the latch on the left side
of the printer.
4 - EPSON EPL-5700i
9/99
EPSON EPL-5700i
5. Remove the printer’s side cover by lifting the clip and
sliding the side cover backward. Then lift the side cover
away from the printer.
8. Press the module forward until it clicks into place at a right
angle to the board. Do not apply too much force.
1
9. Replace the shield cover and tighten its screws.
2
3
2
6. Loosen the retaining screws securing the shield cover, and
remove the cover.
1
10. Replace the printer’s side cover by inserting the side cover’s
hooks into the case’s slots and sliding the side cover
forward.
1
2
2
Caution:
Before you install the module, be sure to discharge any static
electricity by touching the printer’s shield cover while it’s still
attached to the printer (or touch any other part of the shield plate).
Otherwise, you may damage static-sensitive components.
1
7. Insert the SIMM module into the RAM slot at an angle,
making sure the pin numbers (either 1 or 72) of the slot and
the SIMM match.
11. Gently close the printer cover.
12. Plug the power cord back in and turn on the printer.
If an incorrect amount of memory is shown on the status
sheet, turn off the printer and review the steps above to make
sure you correctly installed the SIMM. If the amount of
memory is still incorrect, contact your dealer or a qualified
service person for assistance.
Note:
The maximum amount of memory is 13MB. Even if a 16MB SIMM is
installed, only 13MB is accessible.
9/99
EPSON EPL-5700i - 5
EPSON EPL-5700i
3. Hold the cartridge by the handle and pull it straight up and
out of the printer.
Replacing Consumable Products
Your printer uses two consumable components, which are
listed below along with their approximate life expectancies.
❏ Developer cartridge (S050010)
Up to 6,000 pages, depending on the complexity of your
print jobs
❏ Photoconductor unit (S051055)
Up to 20,000 pages, depending on the complexity of your
print jobs
Replace the developer cartridge if you notice a decline in print
quality. Replace the photoconductor unit only if print quality
problems remain after replacing the developer cartridge.
Replacing the Developer Cartridge
Follow these steps to replace the developer cartridge.
Caution:
1. Make sure the printer is turned off.
When removing the developer
cartridge, never touch the developing
roller under the flap; otherwise, the
print quality may be impaired.
2. Open the printer cover by pressing the latch on the left side
of the printer and lifting the cover up all the way.
2
1
4. Dispose of the used developer cartridge properly.
Caution:
Do not turn the developer cartridge upside down or tilt it from side to
side.
5. Remove the new developer cartridge from its bag. While
holding the cartridge horizontally, gently shake it a few
times from side to side and then from front to back to
distribute the toner evenly.
Caution:
You must completely open the printer cover when replacing the
developer cartridge; otherwise, you may damage the printer.
Warning:
Opening the printer cover exposes the fuser, which is marked
“CAUTION Hot Surface Avoid Contact.” Be careful not to touch the
fuser. If the printer has been in use, the fuser may be very hot.
6 - EPSON EPL-5700i
9/99
EPSON EPL-5700i
6. Remove the protective tape seal from the cover of the
developer cartridge.
8. Gently press down on the printer cover until it clicks shut.
Caution:
Never touch the developing roller under
the flap. Otherwise, the print quality may
be impaired.
9. After turning on the printer, access the printer settings
dialog box in the printer driver, and click the Toner Level
Clear button. The Toner level clear dialog box is displayed.
7. Hold the cartridge by its handle and lower it into the
printer, making sure that the pins on each side of the
cartridge fit into the grooves inside the printer. Slide the
cartridge gently into the opening until it locks into place.
10. Click OK to reset the toner level counter.
Whenever you replace the developer cartridge, you should
clean the paper roller as described in “Cleaning the Inside of
the Printer” on page 11.
Replacing the Photoconductor Unit
1. Make sure the printer is turned off.
2. Open the printer cover by pressing the latch on the left side
of the printer and lifting the cover up all the way.
Caution:
You must completely open the printer cover to replace the
photoconductor unit; otherwise, you may damage the printer.
3. Remove the developer cartridge (see the previous section for
instructions).
Caution:
Do not turn the developer cartridge upside down or tilt it from side to
side.
Warning:
Opening the printer cover exposes the fuser, which is marked
“CAUTION Hot Surface Avoid Contact.” Be careful not to touch the
fuser. If the printer has been in use, the fuser may be very hot.
9/99
EPSON EPL-5700i - 7
EPSON EPL-5700i
4. Slide the photoconductor unit gently out of the printer.
7. Reinstall the developer cartridge.
8. Press down the printer cover until it clicks shut.
9. After turning on the printer, access the printer settings
dialog box in the printer driver, and click the OPC Level
Clear button. The OPC level clear dialog box is displayed.
10. Click OK to reset the Photoconductor level counter.
Ready and Error Lights
The ready (green) and error (red) lights on the top of the
printer indicate the status of the printer, as described in the
following table:
5. Remove the new photoconductor unit from its bag.
Caution:
Never touch the photoconductor
unit’s light-sensitive drum;
otherwise, print quality may be
impaired.
6. Insert the pins on each side of the new photoconductor unit
into the grooves inside the printer. Slide the unit gently into
the opening until it locks into place.
Ready light Error light
(green)
(red)
Printer status
Off
Off
Printer is off.
On
Off
Printer is ready.
Flashing
Off
Printer is warming up or receiving data.
Off
Flashing
Printer is out of paper or has a paper jam.
Off
On
Printer may require a service call. Try turning
off the printer and then turning it back on. If
this does not remedy the error, contact your
dealer or a qualified service person.
Paper Feeding Problems
Preventing Paper Feed and Paper Jam
Problems
If you have frequent paper feed or paper jam problems, try the
following:
❏ Fan the stack of paper and then tap its edges to align them
before loading.
❏ Don’t overfill the paper tray.
❏ Be sure to adjust the paper guides so that the paper feeds
correctly.
❏ Never allow more than 100 sheets to accumulate on the
output tray.
❏ Try turning over the stack of paper in the paper tray. Most
paper packages indicate the best side for printing.
8 - EPSON EPL-5700i
9/99
EPSON EPL-5700i
3. Remove the developer cartridge.
Clearing Paper Jams
The following steps describe how to remove paper when it is
jammed as shown below. Other types of paper jams are
described in later sections.
jammed paper
1. Make sure the printer is turned off.
2. Open the printer cover by pressing the latch on the left side
of the printer and lifting the cover up all the way.
Caution:
When removing the developer
cartridge, never touch the developing
roller under the flap; otherwise, the
print quality may be impaired.
2
1
4. Remove the photoconductor unit.
Warning:
Opening the printer cover exposes the fuser, which is marked
“CAUTION Hot Surface Avoid Contact.” Be careful not to touch the
fuser. If the printer has been in use, the fuser may be very hot.
CAUTION Hot Surface Avoid Contact
Caution:
Never touch the photoconductor
unit’s light-sensitive drum;
otherwise, the print quality
may be impaired.
9/99
EPSON EPL-5700i - 9
EPSON EPL-5700i
5. Remove any paper from the paper path.
Clearing Feed Jams
Paper may jam when feeding from the standard or optional
paper tray, as shown below.
jammed paper
jammed paper
1. Remove the paper tray cover and all the paper from the
paper tray.
Note:
If paper is jammed at the fuser, grasp the bottom of the paper and
pull it out.
2. Carefully remove any sheets that have fed partway into the
printer.
6. Reinstall the photoconductor unit, then the developer
cartridge.
7. Close the printer cover.
Printing automatically restarts from the page that jammed.
If the error light (red) continues flashing after removing all
jammed paper, open and close the printer cover to clear the
error.
3. Open the printer cover. Remove any pieces of paper that
may have torn off or are remaining in the printer.
If necessary, remove the developer cartridge and
photoconductor unit, and any paper left in the paper feed
path. Then reinsert the cartridge and the unit.
4. Tap the edges of the paper stack on a flat surface and
carefully reload it into the paper tray. (Do not reload curled
or wrinkled sheets.) Then reinstall the paper tray cover.
5. Close the printer cover. The jammed page is automatically
reprinted.
10 - EPSON EPL-5700i
9/99
EPSON EPL-5700i
Clearing a Feed Jam in the Optional
500-Sheet Lower Cassette Unit
4. Tap the edge of the stack of paper, then replace it in the
cassette, making sure the paper is evenly aligned and the top
sheet is below the maximum paper mark. Make sure you are
using the correct paper size and that the paper meets the
printer specifications.
Paper may jam when feeding from the lower casette unit, as
shown below.
5. Reinstall the casette in the 500-sheet lower cassette unit.
6. Open then close the printer cover. The jammed page is
automatically reprinted.
Cleaning the Printer
jammed paper
The printer needs only minimal cleaning. If you notice a
decline in print quality or when you’ve replaced the developer
cartridge, clean the inside of the printer as described in this
section.
1. Remove the cassette from the 500-sheet lower cassette unit.
You should also clean the printer cover every few months, as
described later in this section.
Cleaning the Inside of the Printer
Fine dust particles can collect inside the printer. Follow these
steps to clean the inside of the printer and the paper feeder:
1. Make sure the printer is turned off.
2. Open the printer cover.
Warning:
Opening the printer cover exposes the fuser, which is marked
“CAUTION Hot Surface Avoid Contact.” Be careful not to touch the
fuser. If the printer has been in use, the fuser may be very hot.
3. Remove the developer cartridge and the photoconductor
unit as described on page 6 and page 7.
2. Remove any jammed paper and discard any curled or
wrinkled sheets.
4. Remove any dirt inside the printer with a clean, dry, lintfree cloth. Do not use compressed air. If you have paper
feed problems, clean the paper feed rollers by opening the
roller cover and wiping the rollers with a clean, dry, lint-free
cloth.
3. Remove all paper from the cassette and press down the plate
in the cassette until it locks into position.
paper feed rollers
9/99
EPSON EPL-5700i - 11
EPSON EPL-5700i
5. Replace the photoconductor unit, then replace the
developer cartridge.
Transporting the Printer
6. Close the printer cover.
If you need to transport your printer, carefully repack it using
the original box and packing materials as follows:
7. Remove all the paper from the paper tray and clean the tray
with a clean, dry, lint-free cloth.
1. Turn off the printer.
2. Lift off the paper tray cover. Remove all paper from the
paper tray.
Removing Spilled Toner
If toner spills inside the printer, do not use the printer until
you remove all the spilled toner.
3. Grasp the base of the paper tray with both hands, press
inward on the top edges, and pull it out of the printer.
If only a small amount of toner is present, carefully wipe out
the inside of the printer with a clean, dry, lint-free cloth.
X
If a large amount of toner is present, use a small vacuum
cleaner (available from computer supply stores) to remove it.
Then carefully wipe with a clean, dry, lint-free cloth.
Caution:
Toner and other fine powders can damage some vacuum cleaners.
Be sure to read the instructions for your vacuum cleaner before you
use it on spilled toner.
Note:
If you spill toner on your clothing, rinse it off with cold water. Do not
use hot water as it may cause the toner to leave a permanent stain.
4. Unplug the power cord from the electrical outlet; then
disconnect the interface cable from the printer.
Cleaning the Printer Case
5. Remove the optional 500-sheet lower cassette unit, if
installed.
If the printer’s outer case is dirty or dusty, turn off the printer
and clean it with a clean, lint-free cloth, dampened with a
mild detergent.
6. Replace the printer’s protective materials, then repack the
printer in its original box.
Related Documentation
Caution:
Never use alcohol or thinner to clean the printer cover; these
chemicals can damage the components and the case. Be careful not
to get water on the printer mechanism or any electronic components.
12 - EPSON EPL-5700i
9/99
TM-EPL5700I
EPSON EPL-5700i Service Manual
PL-EPL5700I
EPSON EPL-5700i Parts Price List
CPD 9246
EPSON EPL-5700i Setup Guide (Getting
Ready)
CPD 9291
EPSON EPL-5700i User’s Guide