1
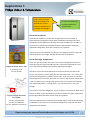
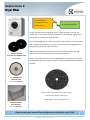
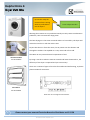
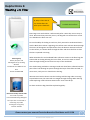
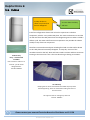
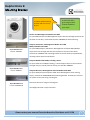
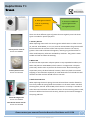
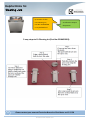
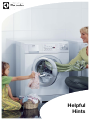
Food Service Helpful Equipment Hints Contents Helpful Hint 1: Fridge Odour & Temperature ……….. P1 Helpful Hint 2: De‐Scaler …………………………...….…….. P2 Helpful Hint 3: Dryer Filter …………………..……..……….. P3 Helpful Hint 4: Dryer Vent Kits …………………….……….. P4 Helpful Hint 5: Washing Lint Filter ……………...……….. P5 Helpful Hint 6: Ice Cubes …………………………..………….. P6 Helpful Hint 7: Inlet Valves ………………….…..….……….. P7 Helpful Hint 8: Dishwasher Hoses ………………..………. P8 Helpful Hint 9: Mounting Bracket …………………..….... P9 Helpful Hint 10: Extending Hoses ……………..………….. P10 Helpful Hint 11: Grease …………….………………...……….. P11 Helpful Hint 12: Stainless Steel Cleaning …………..….. P12 Helpful Hint 13: Dishwashing Detergent …………..….. P13 Helpful Hint 14: Dishwasher & Front Loader www.electrolux.com.au Washer Block …………………………………………...……...….. P14 Helpful Hint 15: Air Conditioner Remote Control …..P15 Service: 13 13 49 Spare Parts: 13 13 50 Helpful Hint 16: Cleaning Jets ………….…………….…….. P16 Helpful Hint 17: Fridge Gaskets …………………..……….. P17 Customer Care: 1300 363 640 [email protected] AEG 1st Klasse Care: 1300 363 664 [email protected] Helpful Hint 18: Front Loaders ……….…………...……….. P18 Helpful Hint 19: Dishwashers …………….………..……….. P19 Helpful Hint 20: Oven Thermometers ……………...….. P20 Please contact your nearest Electrolux Branch or Distributor on 13 13 50 © Electrolux Home Products 2012 Helpful Hints 1: Fridge Odour & Temperature Q: Why does my fridge smell when the door is A: Check the deodoriser opened? Is it time to and the temperature renew the deodoriser? Is of the freezer. my fridge cold enough? Check The Deodoriser A deodoriser absorbs the smells that strong foods create. A number of Electrolux brand refrigerators come with a deodoriser situated in the food compartment (see diagram on the left), this works to reduce the air odour. A customer once said that the deodoriser did not work because when they opened the fridge door, there was no smell. This is perfect! A quick and easy fix to address any odours in the fridge is to place a cup of Bi‐ Carbonate Soda in the fridge. This will absorb some of the odours. Check The Fridge Temperature There are two ways to test this. One is to purchase a fridge thermometer or electronic tag. The freezer should read ‐18°C. The food compartment 2°C to Fridge Dial Thermo ‐30C to +30C Temperature Check. Part No. ACC036 5°C. Temperature readings near the door will always be higher. The other way to test the temperature is to place a tub of ice cream in the freezer. The next day, push a spoon into the tub of ice cream – if it is firm, then the freezer temperature is perfect, around ‐18°C. If the ice cream is soft, then the temperature is too warm, but if the ice cream is hard, then the temperature is too cold. Adjust your settings until the ice cream is firm. Don’t be fooled by your meat being frozen, as it only needs ‐ 2°C to freeze, which is not cold enough. If you have a frost‐free refrigerator, try not to place ice cream at the back of the freezer, as when it goes into defrost cycle the ice cream may warm up and then A variety of fridge deodorizers are available: freeze again which will cause the ice cream to crystallise. Part No. PFIL‐A047CBEZ The food compartment is cooled by the freezing cold air from the freezer being Part No. PFIL‐A050CBEZ circulated by a fan motor. So if the freezer temperature is OK, then the food Part No. 1441644 ‐Limited stock! compartment should be! Please contact your nearest Electrolux Branch or Distributor on 13 13 50 © Electrolux Home Products 2012 1 Helpful Hints 2: De-Scaler Q: What is the best way to clean my machine? A: Use a de‐scaler! The liner and moving parts of washers can become coated with a calcium build up. This is normal because of the alkaline effect of the detergents. The trouble is De‐Scaler Dishwasher & Kettle 350G that the calcium, if not treated, can become difficult to remove and may lead to other problems within the appliance. Specifically designed to reduce scaling and oil buildups which The level of the water in an appliance is determined by a pressure switch, which can cause drains to block. operates on air pressure. If a cleaner is not used in an appliance, eventually the Part No. ACC103 calcium and fats will block the air passage to the pressure switch. This can be a most upsetting event – resulting in water throughout the entire house or apartment. Electrolux de‐scaler comes in a bottle that will de‐scale the dishwasher five (5) times if used as recommended. Great in dishwashers, washing machines or kettles, it will stop the calcium build up and keep the stainless steel bright and Scalex Plus De‐Scaler (Single Sachet) Same as above. For single use. Part No. ACC017 shiny. Sprinkle a cap full onto the bottom of the dishwasher liner and two capfuls into the soap dispenser. Turn the machine on to normal and that’s it. Repeat every month if the Dishwasher is used once a day. Three capfuls into the bowl of a washing machine and fill it with hot water, allow it to wash and then pause the machine, leave it stand with the water left in. After a few hours turn the machine back on and allow it to finish the cycle. Scalex Plus De‐Scaler (Pack of 3) Non‐toxic, citric acid based and The difference is outstanding! biodegradable ‐ cleans, de‐scales and deodorises. Suitable for top and front load washing machines and dishwashers. Part No. ACC034 2 Please contact your nearest Electrolux Branch or Distributor on 13 13 50 © Electrolux Home Products 2012 Helpful Hints 3: Dryer Filter Q: Why is there a burning smell in my A: Check the lint filter. clothes dryer? If a few minutes after turning the dryer on, a burning smell is noticed, it is usually due to the lint filter being damaged, full, or not cleaned regularly and now the lint is touching the drying element. It is recommended that you clean the lint filter after every use to avoid build up and to replace the lint filter once a year. It is so important in stopping the lint from gathering around the dryer element. Regular cleaning of your dryer filter ensures your clothes are lint free and For Older Models: Foam Lint Filter MMX (2 Pack) Part No.D036 reduces the fire hazard which can be caused by built up lint. If the dryer has been left with the filter damaged or not cleaned, it is strongly recommended that you contact a repairer to come and dismantle the dryer for cleaning. For Older Models: Mesh Lint Filter Part No. 0144300001 If the lint filter looks like this, then replace it with a new filter for optimal performance. If you require a service call 13 13 49. For Newer Models: Filter Assembly Part No. 014430021 Please contact your nearest Electrolux Branch or Distributor on 13 13 50 © Electrolux Home Products 2012 3 Helpful Hints 4: Dryer Vent Kits Q: How do I stop the moisture from running down my walls when I A: Fit a dryer vent kit! use the dryer? Allowing the moisture to stay inside the laundry not only causes condensation problems, it also increases the drying time! The best drying air is the same as outside when it is hot and dry. The dryer will make the room hot. It will also make it wet. Dryers take the air in from the room; this air passes over the element and through the clothes. The expelled air is very moist and at first cold. The Moist air may cause electrical components to fuse! Vent Kit Flexi Duct Part No.DVK006 By using a vent kit to take the moist air outside and leave the warmth in, the efficiency of the dryer is improved and you save money! There are a number of types of vent kits for window and wall venting, so please phone 131350 for assistance. Vent Wall 4’ Part No.DVK003 Illustration of a through the wall Vent Kit. 4 Please contact your nearest Electrolux Branch or Distributor on 13 13 50 © Electrolux Home Products 2012 Helpful Hints 5: Washing Lint Filter Q: Why is there lint on my clothes after the wash cycle is finished? A: Check the lint filter! Filter bags catch and hold lint. Unfortunately after a time they are not easy to clean. No matter how particular you are, the bag will not catch the lint as well as it did when the filter was new. To test the ability of the bag to catch lint, firstly we need to understand how it works. While the machine is agitating, the surface water is drawn down through the centre of the agitator and passed out from the bottom. Because lint floats on the surface, it is drawn down through the filter and when the filter is clean the lint is captured in the bag. Filter Bag Assy Hoover, Simpson and Westinghouse Top Loading Washers introduced since 2000 use the filter Part No. 0564257398 When unbroken fats and undiluted fabric softeners remain in the filter bag, the water holds in the bag allowing the lint to float, in turn less water is drawn down through the bag and so more lint stays in the wash bowl. The clothes being washed are moving around with their fabric softened and the pile is lifted. The floating lint passes through the loops of the fabric and will, in most cases, catch just as it should in the lint bag. We now come back to how to test the lint bag. Hold the bag under a running tap and when new, the water will run straight through the bag. When the bag needs replacing it will hold some water and in some cases fill up. For best results the bag should be replaced regularly. Electrolux Laundry Powder 1KG Front and Top loader concentrated washing detergent for super clean. Comes with a measuring cup inside. A little goes a long way! Part No. ACC104 Please contact your nearest Electrolux Branch or Distributor on 13 13 50 © Electrolux Home Products 2012 5 Helpful Hints 6: Ice- Cubes Q: Why do the ice cubes in my frost‐free A: Cover them and they freezer disappear? will last! Frost‐free refrigerators draw moist air back to a part that is called an evaporator, which is a very cold metal plate. This moist air becomes ice and the ice will melt from the cold plate when the refrigerator goes into what is called a defrost cycle. The water will flow into an evaporation tray outside the cabinet usually on top of the hot compressor. Therefore uncovered moist objects including food and ice cubes will be drawn to this cold plate and eventually disappear. To stop this, use one of the icemakers listed on the left, which will store made ice cubes and have new ones Ice Brick Assy forming at the same time. This is the next best thing to having an icemaker. Hurry – Limited stock available! Use to make ice cubes or an ice brick ‐ just fill to the designated line. Part No 1445518 Ice Cube Assy Keeping the ice cubes covered with this lid will help stop them from disappearing. Store ice cubes while making new ones at the same time! This type has two ice making trays and a lid. Part No. 1445907 6 Please contact your nearest Electrolux Branch or Distributor on 13 13 50 © Electrolux Home Products 2012 Helpful Hints 7: Inlet Valves Q: Why does my washer overflow A: Check the inlet when it is filling up? valve! When a machine is filling with water it should need the power to be on and a fill type selected. When the power supply is stopped and the water keeps running. It is not your tap as a lot of people think; it is a part called an inlet water valve. The valve has a solenoid coil that when activated pulls a plunger away from a diaphragm, allowing the water to fill the machine. Once the machine is turned off the plunger returns and the water will stop immediately. If the water still drips trickles or runs the inlet valve needs to be replaced. There are various inlet valves available: As this is an electrical component we strongly recommend Valve Assy Inlet 90Deg Valve Inlet 240v 180 you phone for a 10mm ID Deg 10mm service call to safely fit Part No. 360313 Part No. 0136200083 this part. If you need to book a service call please phone 13 13 49. Valve Double Inlet Valve Inlet 3.7LT/ Valve Inlet 12mm Mixing Min90 Part No. 0136400026 Part No. 0136200002 Part No. 0136400041 Please contact your nearest Electrolux Branch or Distributor on 13 13 50 © Electrolux Home Products 2012 7 Helpful Hints 8: Dishwasher Hoses Q: How do I extend the A: Use a drain hose length of my fill and extension kit or drain hose on my purchase a longer inlet dishwasher? hose! Drain Hose The drain Hose Drain Extension Kit, Part No. 7801894, which includes the joiner and clamps, will extend the length of your drain hose, when added to the existing drain hose – adding up to 2 metres. The length of the drain or outlet hose should not exceed (4) metres. This is because if the hose is too long, the pump out time will be increased ‐ which may lead to unnecessary service calls. Inlet Hose It is strongly recommended that the inlet water hose never be joined, either Detergent Dishwasher 1KG 2 teaspoons for normal wash Part No. ACC100 purchase a longer inlet hose or call a plumber to bring the tap to the dishwasher. Use the following parts for a longer complete inlet hose: Part No. W072, is 2.5 metres long Part No. W073, is 4.0 metres long On later models the inlet hose cannot be extended due to the anti‐flood inlet water valve being part of the inlet hose. On these machines the plumber will have to bring the water pipes to the product. The Model number is very important in order to know what type of inlet hose comes with the dishwasher! Rinse Aid Additive 500ML All in one ‐ dishwasher rinse aid for drying and cleaning liner. Part No. ACC102 8 Please contact your nearest Electrolux Branch or Distributor on 13 13 50 © Electrolux Home Products 2012 Helpful Hints 9: Mounting Bracket Q: Which wall‐mounting bracket will I use on my dryer? A: Electrolux has a great range of wall mounts suitable to your dryer! Hoover and Westinghouse Models Pre 2005 For (Pre 2005) Hoover and Westinghouse dryers that vent through and have the lint filter on the door, use bracket Part No. 34628402 for wall mounting. Simpson, Kelvinator, Westinghouse Models Pre 1998 Malleys Models Post 1981 Dryer Wall Bkt 1 Pce Part No. 34628402 For (Pre 1998) Simpson, Kelvinator, Westinghouse and (Post 1981) Malleys dryers that vent through and have the lint filter in the rear of the drum, use Part No. DWB001 wall mounting bracket to mount the dryer upside down, meaning control panel at the bottom. Simpson Models 1997‐2006, including J Series For (Post 1997 to Pre 2006) including, J series Simpson dryers to be mounted the right way up, control panel at the top, use Part No. DWB001. Dryer Wall Bkt 1 Pce Part No. DWB001 Simpson M Series, Westinghouse B Series Models Post 2005 For (Post 2005) M series Simpson and B series Westinghouse front venting dryers, use Part No. 0030300200 wall mounting bracket. These dryers come as an option to rear vent using a venting kit. Dryer Wall Bkt 1 Pce Part No. 0030300200 Please ask about our range of venting kits. See Helpful Hints No 4: Dryer Vent Kits. Please contact your nearest Electrolux Branch or Distributor on 13 13 50 © Electrolux Home Products 2012 9 Helpful Hints 10: Extending Hoses Q: What hose will I use A: Electrolux has a great to increase the length range of hose of my washing machine extensions suitable to hoses? your washing machine! Extending the drain hose on all Top Loading Washing Machines Use the drain hose Part No. 43445408, which have a straight rubber cuff at each end and is 1.8 metres long. This drain hose will fit over the existing hose and unless stretched shouldn’t need a clamp. The drain hose should have one rise no higher than the top level of the control panel. If the extension is then going to drop away, the syphoning effect must be prevented. To extend the drain hose further Use Part No. 43445408 plus 2 clamps, Part No. 7550001022 and a joiner Part No. 1060306000. Warning! If the drain hose is extended more than 4 metres without a break, then the drain pump will be working beyond the manufactures recommendations. Extending the drain hose on all Front‐Loading Washing Machines Use the drain hose kit Part No. 7801894. This comes with a copper joiner and 3 clamps. Hose EXT 1.8m DBLE Cuff STRT Part No. 43445408 The same warning applies as with top loading drain extensions. To increase the length of the hot and cold inlet water hose on Top and Front‐ Loading Washing Machines: a complete hoses should be fitted. Use Part No. W072, which is 2.5 metres long, or Part No. W073, which is 4.0 metres long. To extend the inlet hoses on the new Simpson front‐loading machine model number 45S651D: cut the wings off the nut on the extension inlet hose Part No. W072 or Part No. W073, otherwise they will not fit into the recessed rear panel. 10 Please contact your nearest Electrolux Branch or Distributor on 13 13 50 © Electrolux Home Products 2012 Helpful Hints 11: Grease Q: What grease should A: There are 3 different I use on my washing types of grease that machine? are regularly used. There are three different types of greases that are regularly used. The three types are made for specific purposes. 1‐Cannery Grease When replacing water seals use cannery grease which comes in either a 75ml jar, Part No. 0211200011, or a 1L can, Part No. 0211277001. The grease should Cannery Grease 75ml Jar Part No. 0211200011 be smeared onto the surfaces of the seal to prevent friction. The cannery grease is also used to lubricate the agitator, retaining ring and base felts on older model Simpson, Kelvinator and Malleys machines. The grease is water‐ soluble and will not affect the washing. 2‐Nulon L90 To lubricate the suspension rod pivot points on top suspended machines, use Nulon L90, Part No. 0211200021, which comes in a 125gm tube. The pivot points only need a smear to prevent the friction noise. After lubricating the Cannery Grease 1L Can Part No. 0211277001 suspension pivots, the bowl orbit will increase, which may lead to increased stopping on out of balance especially on small loads. After a few loads this will decrease and the machine should return to normal! 3‐Shell Alvania Grease When replacing the clutch spring, the internal metal boss must be allowed to turn freely inside the spring while the machine is in the wash mode. Use Shell Alvania grease, Part No. 0211277009, which comes in a 75ml jar. A number of other lubricants have been tried without success. If the incorrect grease is used, the clutch will bind and not wash correctly, which may also lead to damage to the spring and boss. Nulon L90 125gm Tube Part No. 0211200021 Shell Alvania Grease 75ml Jar Part No. 0211277009 Please contact your nearest Electrolux Branch or Distributor on 13 13 50 © Electrolux Home Products 2012 11 Helpful Hints 12: Stainless Steel Cleaning Cutback Solutions Stainless Steel Remove grime build up on stainless steel. Part No. ACC027 Q: What cleaner will I A: Use the Electrolux use on my stainless Euro‐Cloth & Cutback steel appliance? Solution! With the advent of new types of stainless finishes, it sometimes becomes more and more difficult to know how to clean these new surfaces, especially if you have lost the original care and use guide for the appliance. If you have been using a cleaner and you are happy with the performance then do not read anymore, just keep on using it! If you would like a safe and inexpensive alternative, then the Micro Hand Cloth, Part No. ACC101, is the way to go! The cloth only needs to be rinsed in cold water to clean your surfaces and will last for years. There may be a build up of old cleaners on some older surfaces, so for the initial Micro Hand Cloth Universal microfibre cloth. Part No. ACC101 clean use the Cutback Solutions Stainless Steel, Part No. ACC027. Follow the instructions on the bottle. Once this is done it will simply require a wipe over with the Electrolux Euro‐Cloth to keep the surface looking bright and shiny. Cleaning your home can become expensive if you use all the different cleaning products for every surface. The Micro Hand Cloth will move from one surface to another and will only require rinsing between each surface. To clean the Micro Hand Cloth, just throw it in the washing machine with your next load of hot water washing. Microfibre Cloth and Cutback Solution Great for water conservation – clean windows and glass with just a damp Euro‐ Cloth. Suitable for use on all stainless steel surfaces, including finger proof resistant stainless steel, windows, mirrors, Formica table tops, and car and boat windscreens. Part No. ACC030 12 Please contact your nearest Electrolux Branch or Distributor on 13 13 50 © Electrolux Home Products 2012 Helpful Hints 13: Dishwashing Detergent Q: Why is their detergent left in my A: Check for blockages! dishwasher dispenser at the end of the cycle? When the detergent dispenser door opens it rests on the underneath side of the top dishwasher basket and relies on the water from the water driven rotating spray‐arms to flush the detergent out. If the water jet is restricted through the spray arms the whole wash performance is affected. Clear any blockages in the spray‐arm holes especially the ones at each end. Use De‐scaler Dishwasher, Part No. ACC103, or try the single use Scalex Plus De‐ Descaler Dishwasher 350G scaler Sachet, Part No. ACC017, to make sure the holes are clear of any calcium When using the necessary build up. detergents in your dishwasher, a natural build up of alkaline will When loading the lower basket do not place any articles in front of the occur. Excessive alkaline can cause dispenser. In fact it is best to always place bread and butter plates in this area. scaling, a white discoloration. This This will make sure there is plenty of room for the door to activate, as it should. de‐scaler is specifically designed to reduce scaling and oil buildups which can cause drains to block. Suitable for use in dishwashers as If the detergent door has remained shut and does not flick up as the dishwasher door is opened, a technician will need to be called. well as kettles and coffee It is best not to have rinse aid in the dispenser when using a detergent with a machines. built in rinse aid. This can cause a frothing problem, which will slow the spray Part No.ACC103 arms and may lead to a water leak. Why not try: + Scalex Plus De‐scaler Sachet A single‐use, non‐toxic, and biodegradable cleaner for dishwashers, washing machines and kettles. Part No. ACC017 Detergent Dishwasher 1KG Rinse Aid Additive 500ML 2 teaspoons for normal All in one ‐ dishwasher rinse aid wash for drying and cleaning liner. Part No. ACC100 Part No. ACC102 Please contact your nearest Electrolux Branch or Distributor on 13 13 50 © Electrolux Home Products 2012 13 Helpful Hints 14: Dishwasher & Front Loader Water Block Q: I like to leave my dishwasher on when I A: No! Unless you fit a go to work. Is this Water Block! safe? Any appliance inlet or fill hose is at risk of failure in its life span. Most people leave their tap turned on even though the dishwasher or front‐loading washer is not in use. This is mainly because the tap is usually difficult to reach. On T.V. there is an advertisement showing where the homeowner comes home to find the house full of water. This does happen and is usually caused by the appliance not cutting the water off after it has filled to the correct height. If no one is home to turn the water off, the tap will run all day. Or if the fill hose that has been left on for years under constant pressure, de‐ cides it cannot hold back the build up any longer and bursts. Once again unless someone is home to turn it off, the water is going to go through the home….HELP! RELAX fit a device called a WATER BLOC between the tap and the fill hose. A water block comes with easy fitting instructions and can be set to cut the water off. It works with any appliance that takes less than 50 litres per fill. This will include all DISHWASHERS and MOST OLD an ALL NEW FRONT LOADERS. It works by setting an internal adjustable valve to block any water flow after the Water Block setting has been surpassed. Once trigged it is simply a matter of undoing the Please see your nearest hose from the water block and resetting the device. Oh and of cause calling a distributor to order this part. 14 serviceman to repair the fault. Please contact your nearest Electrolux Branch or Distributor on 13 13 50 © Electrolux Home Products 2012 Helpful Hints 15: Air Conditioner Remote Control Q: My air conditioner will not work. How do I A: Use a radio or know if the remote mobile phone camera. control is OK? Your remote, when working correctly sends out a signal that can be picked up by your radio. To test your remote it is as simple as tuning into a new channel. 1. On your radio, select an AM frequency between 770 – 800Hz. 2. Turn the volume up so that you are able to pick up the signal. 3. Point the remote at the radio as you would at the air‐conditioner. 4. Push the on button first. You should hear a low beep noise each time you press the on button. 5. You are able to then test all buttons; sometimes the beep is slightly delayed. Some radios need to have the remote pointing at the internal aerial, so if you do not hear the beep, try pointing the remote at another positions on the radio or try another set. If the radio beeps you now know that the fault is not with the remote. A mobile phone camera is another way of checking a remote: 1. Turn the camera on and point the remote at the screen. 2. When you push the button on the remote, you should see a flash from the bulb on the remote through the camera screen. If the remote is working, then you will need to call a technician. If you have a “Forced Operation” button on your appliance press this. If the air conditioner works then this will help your repairer to identify what part is required. Please contact your nearest Electrolux Branch or Distributor on 13 13 50 © Electrolux Home Products 2012 15 Helpful Hints 16: Cleaning Jets Q: How do I fit this new Cleaning Jet, A: Follow the steps in Part No. 0216450002 the picture! to my dishwasher? 5 easy steps to fit Cleaning Jet (Part No.0216450002): 16 Please contact your nearest Electrolux Branch or Distributor on 13 13 50 © Electrolux Home Products 2012 Helpful Hints 17: Fridge Gaskets Q: How do fridge A: Keep the gasket gaskets tear? How clean to stop it from are they replaced? sticking and tearing! Fridge and freezer door gaskets rarely wear out. They may discolour or stick and tear on dirty or sticky surfaces. The main culprit is spilt sugary substances like soft drink. If cleaned off and dusted with powder, the gasket will survive. There are four ways our gaskets are fitted. The first gaskets had screw holes in them. Then a rib held under steel trims. Next came foamed in gaskets and then If you are not able to successfully fit the gasket call 13 13 49 for service. lastly pushed in gaskets. To know how each are fitted, just lift the gasket and check. To know what type fit your refrigerator, you must have a model number! The model number is usually on the left hand wall of the food compartment. To fit the rib under trims type gasket, remove the old gasket by loosening the screws. Tuck the new gasket in the top, then sides and bottom. Firm some screws up onto the gasket in even spacing. Close the door making sure the metal door skin is square. Using your fingers under the door skin on the side of the door, gently open the door and tighten the screws. When you close the door it should be square. Make sure all screws are tight. If the door is warped loosen all screws and twist the skin square. To fit the foamed in gasket, pull the old gasket out of the cavity. Look at the new gasket rib and clean out any foam that may prevent the gasket rib from being forced in. It is best to use a flat bladed plastic ice scraper. It is made easier if you wedge the plastic liner open with a few small wooden wedges. Start from the top, push the rib in all the way around, being careful not to stretch the gasket. To replace the push in type in the later series, just pull out the old one, push in the new one once again trying not to stretch the gasket. If there is a bulge in the gasket it has been stretched, remove it and start again. Please contact your nearest Electrolux Branch or Distributor on 13 13 50 © Electrolux Home Products 2012 17 Helpful Hints 18: Front Loaders Q: Why does my front load washing machine A: Because it used less take so long to do a water to do every cycle? wash! Most people who own front loading machines will be comparing the amount of time they take to go through a cycle to their old top loading machines. The difference can be as much as 90 minutes. Don’t worry though this is very Advantages of a front‐loading normal! machine are: On a normal cycle an 8kg The large amount of water used in a top‐loading machine allows manufacturers machine will use 112 litres to clean material at a certain rate within the preset time for each program. All less water. manufacturers have to abide by the set regulations. Our top loaders do not There is less lint because there is less wear. The clothes will be easier to heat the water, so therefore the program does not have to wait to reach the set temperature. iron less creasing. So let’s now relate this to a front‐loading machine. For Electrolux to pass the A smaller amount of test of cleaning ability, the machine needs to rotate the clothes through the detergent used. small amount of water for a much longer period. Which depending on the wash No fabric softener staining. selection can take up to 90 min. longer. The program will hold until the selected Will not stop on out of water temperature has been reached. balance Saves room, sit the dryer on Eco or economy wash will not speed up the time because the program needs the water to reach a set temperature to clean. The only saving is in the amount top. of water used! By doing a load that finishes by the time you have packed the dishwasher and set the delayed start to do a load before you rise in the morning and the time will seem much less important Electrolux Laundry Powder 2KG Front and Top loader concentrated washing detergent for super clean. Comes with a measuring cup inside. compared to the water bill! A little goes a long way! Part No. ACC104 Oh if you can, make sure the bloke hangs them out! 18 Please contact your nearest Electrolux Branch or Distributor on 13 13 50 © Electrolux Home Products 2012 Helpful Hints 19: Dishwashers Q: Why do the plastic parts in my dishwasher A: Use a de‐scaler! break? Dishwashers in their normal everyday operation need to have a detergent that contains chemicals that include alkaline and a silicate. After a period of time the plastic parts gradually become coated with calcium and pitted from the constant bombardment of the silicate or (sand). Combine this with the continual heating and cooling of the water, add the effect of the constantly changing load weights and the pushing and pulling of the basket. It is no wonder something has to give. Electrolux recommend the following: Every month set the program for a normal cycle with a dose of our de‐scaler in the detergent dispenser. Pictured is the one made for us. Available in a sachet, Scalex Plus Descaler Bottle 375G Refreshes, descales and deodorizes—is non‐caustic and sold under Part No. ACC023. Or in a bottle, Part No. ACC017. Also because a tablet cannot adjust to the differing loads and soiled utensils, we recommend the use of our 1kg bucket of especially formulated powdered detergent, Part bio‐degradable. No. ACC100. The powder can be adjusted for the load unlike a tablet! Part No. ACC025 As well as removing the calcium, the de‐scaler helps rejuvenate the stainless steel liner! Scalex Plus Descaler Sachet 75G A single‐use, non‐toxic, and biodegradable cleaner for dishwashers, washing machines Detergent Dishwasher 1KG and kettles. 2 teaspoons for normal wash Part No. ACC017 Part No. ACC100 Please contact your nearest Electrolux Branch or Distributor on 13 13 50 © Electrolux Home Products 2012 19 Helpful Hints 20: Oven Thermometers Q: How do I check the A: Use an Oven Dial temperature of my Thermo, Part No. oven? ACC037! 1. Place the thermometer in the centre of the oven cavity, usually on the middle shelf position, with the thermometer face pointing to the oven door. 2. Turn the oven temperature selector to 200°C. 3. Make sure the oven door is closed and turn the oven light on. 4. Preheat the oven by watching the temperature indicator neon, it should be allowed to cycle at least three times. 5. After 30min. take a reading, try to do this without opening the door. 6. At 45min. take a second reading. 7. If the oven door needs to be opened when reading the thermometer, take a third reading at 60min. 8. The oven thermostat difference may read plus or minus 25°C. Before you phone for service, remember that once you know what your oven Oven Dial Thermo +10C +250°C Temperature Check Part No. ACC037 temperature actually is, unless the temperature is out by + or ‐ 25°C. Just set the oven thermostat to the plus or minus position and cook like a professional. It is always advisable to preheat the oven first! All ovens cook better after they have been on for over 60min. This allows the complete oven area to reach the set temperature. Have you ever cooked one fruit cake after the other? If so you would notice the second one is better! 20 Please contact your nearest Electrolux Branch or Distributor on 13 13 50 © Electrolux Home Products 2012 Useful Websites www.electrolux.com.au www.aegaustralia.com.au www.westinghouse.com.au www.simpson.com.au www.hooverfloorcare.com.au www.kelvinator.com.au www.dishlex.com.au VICTORIA Coburg Geelong Kingsville Mildura Morwell Murrumbeena Noble Park Ringwood Shepparton 10 Nicholson St 51 Mercer St 176B Sommerville Rd 2-4 Tenth St 7/1 Alexander Rd 73 Muurrumbeena Rd 2/403 Princess Hwy 12 Olive Grove 6 Smythe St Save On Spares Geelong Appliance Spares Save On Spares Jack Abell Save On Spares Appliance Spares Warehouse Appliance Spares Warehouse Save On Spares Central Spares 37 Perry St 101 McLeod St 1/58 Pilkington St 236 Alfred St PO Box 1005 8/11 Kayleigh Dr 2/58 Wecker Rd 4/88 Spencer Rd 2/8 Finsbury St Shed 6 Parrott Street 123 Musgrave St 13 Murray St 49 Stephen St 233 Ruthven St Digger Thiele Electrical Kennedys Electrical Townsville Appliance Spares & Repairs NQ Appliance Spares Suncoast Appliance Spares & Repairs Queensland Appliance Spares Wholesale Appliance Supplies Northside Spare Parts Wholesale Appliance Supplies Ipswich JJ Kerrs Refrigeration Leenders Electrical Mercer & Luck The Element Shop 1070 South Rd 11-13 Port Rd Flagstaff Electrical Cookson Controls 93 Eldrige St 5/8 Abdon Cl 118 Bronte Rd 105 Bourke St 48 York St 1/28 Martha St 1/71 A Rhodes St 419 The Boulevarde 67 Grandview St 116 Hammond Avenue 82 Swan St Appliance Spares Wholesale Appliance Supplies Newcastle Oxford Appliance Parts Doug Smith Spares Wholesale Appliance Supplies Doug Smith Spares The Stove Connection Bunneys Appliance Centre Doug Smith Spares Country Appliance Spares Southcoast Appliance Spares QUEENSLAND Bundaberg Cairns Garbutt Mackay Maroochydore Mansfield Nerang Newmarket Raceview N. Rockhampton Rockhampton Toowoomba Toowoomba SOUTH AUSTRALIA Edwardstown Queenstown NEW SOUTH WALES Bankstown Bennetts Green Bondi Junction Dubbo East Gosford Granville Hillsdale Kirrawee Pymble Wagga Wagga Wollongong AUSTRALIAN CAPITAL TERRITORY Fyshwick 1/86 Townsville St Mayner & Cochran 438 Stuart Highway Electrolux Home Products 30 Margaret St 190 Argyle St Appliance Spares Tasmania Tasmanian Appliance Spares 357 Sevenoaks St 1/27 Hampton St 4/209 Winton Rd 3/135 Russell St 1/9 Blaikie St Dacaps Dacaps WA Appliance Parts WA Appliance Parts WA Appliance Parts NORTHERN TERRITORY Winnellie TASMANIA Launceston Hobart WESTERN AUSTRALIA Cannington Greenfields Joondalup Morley Myaree