1
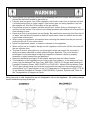
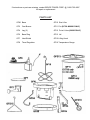
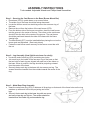
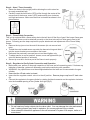
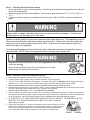
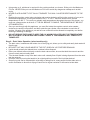
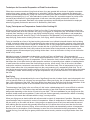
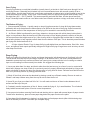
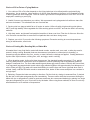
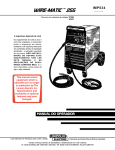
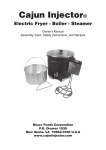
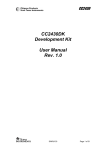
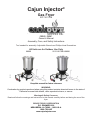
® Cajun Injector Gas Fryer 22174.01708 ® - 09060, 09061 Owner’s Manual Assembly, Care, and Safety Instructions Tool needed for assembly: Adjustable Wrench and Phillips Head Screwdriver All Units are for Outdoor Use Only 22174.01708 & 09061 091311 09060 Keep this manual for future reference WARNING: Combustion by-products produced when using this product contains chemical known to the state of California to cause birth defects, other reproductive harm, or cancer. Warnings & Safety Concerns: Read and follow the warnings and instructions in this manual carefully before and during the use of the fryer. BRUCE FOODS CORPORATION P.O. DRAWER 1030 NEW IBERIA, LA 70562 – 1030 U.S.A. 1-866-752-6497 www.cajuninjector.com If you smell gas: Turn off gas flow to the appliance Extinguish any open flame with a fire extinguisher. Open lid. If odor continues, do not approach the appliance and immediately phone your Fire Department. Never operate this appliance unattended. Never operate this appliance within 10 feet (3.0 meters) of any structure, combustible material or other gas cylinder. Never use this appliance within 25 feet (7.5 m) of any flammable liquids. Never overfill cooking container above maximum fill line. Never allow the oil to surpass 400˚F (200˚C). If the temperature rises above 400˚F (200˚C) or if oil begins to smoke heavily, immediately shut off the burner or gas supply. Hot cooking oil (and many other cooking liquids) can remain dangerously hot for extended periods of time. Do not handle the cooking appliance until the cooking liquid has cooled below 115˚F (45˚C). If a fire should occur, keep away from the appliance and immediately contact the local fire department. Do not attempt to extinguish an oil/grease fire with water. Be cautious when in close proximity to any gas appliance. Falling or tripping near the gas fryer or over an appliance hose may result in the spilling or igniting of oil or splashing of boiling water, potentially causing personal injury and property damage. FAILURE TO PROPERLY FOLLOW THESE INSTRUCTIONS OR WARNINGS MAY CAUSE FIRE OR EXPLOSION, WHICH COULD CAUSE PROPERTY DAMAGE, PERSONAL INJURY, OR DEATH. This instruction manual contains important information necessary for the proper assembly and safe use of the appliance. Read and follow all warnings and instructions before assembling and using the appliance. Follow all warnings and instructions when using the appliance. Keep this manual for future reference. COOKING WITH OIL OR GREASE: DO NOT overfill the cooking pot with oil/grease or water. Follow instructions in the manual for establishing proper oil/grease or water levels. DO NOT allow the oil to exceed 400˚F (200˚C); if this happens; adjust the regulator control knob in order to drop temperature. If oil temperature continues to rise or begins to smoke, IMMEDIATELY turn the burner OFF. Allow temperature to cool to 350˚F (177˚C) and then relight the burner, regulating the flame to maintain temperature. DO NOT leave appliance unattended while heating oil/grease or water, or while cooking food. Do Not allow other people or pets near a gas appliance while still hot after its use. High temperatures will remain long after appliance is turned off. Allow cooling below 115˚F (45˚C) before cleaning and storing. Unthawed and soggy foods may cause oil or grease to overflow. Always completely thaw and towel dry all foods before frying. If ice is present on the food, the thawing process is not complete and may cause liquid to boil over and splatter; possibly causing a fire. Use the thermometer provided for proper temperature control when cooking with hot oil or grease. Use caution when placing food in the cooking vessel while the appliance is in operation. Carefully, watch for splashing or overflow of hot oil during immersion of product to be fried when placing in the gas fryer. When cooking with oil/grease, have an inspected, ready-to-use fire extinguisher readily accessible. IF A GREASE OR OIL FIRE OCCURS: In the event of an oil/grease fire, do not attempt to extinguish with water. A Type BC or ABC dry chemical fire extinguisher may in some cases contain the fire. If possible: 1. Turn off gas supply. 2. Wearing a protective glove, cover the pot with a lid. If a fire occurs (outside the pot) follow these steps. 1. Call the Fire Department if property damage is possible. 2. Attempt to extinguish using chemical fire extinguisher specified. 3. Turn off the gas supply if possible. In the event of rain, snow, hail, sleet or other form of precipitation while cooking with oil, cover the cooking vessel & immediately turn off the burner(s) and gas supply. DO NOT MOVE cooker stand or pot. DO NOT operate this appliance ON or UNDER any overhead roof covering (car port), as well on or under any awning, overhang, apartment or condominium balcony, or deck. NEVER turn gas on indoors; only ignite this gas appliance outdoors. The gas fryer is not to be used in a building, garage or any other enclosed area. Never place an empty cooking vessel on the gas appliance while in operation. DO NOT use IN or ON recreational vehicles and/or boats. This product is NOT designed for use as a heater and should never be used as one. Keep fuel supply hose away from the hot gas appliance while in operation. This product should always be a minimum 10 feet away from overhead construction, walls, or rails. Keep the cooking area adjacent to the gas fryer clear of debris and free of anything flammable or combustible. Use this appliance only on a level, stable, non-combustible surface like brick, concrete or dirt. Do not use appliance on or around any surface that will burn or melt such as wood decks, dry grass, leaves, wood rails, vinyl, or plastic. Asphalt surfaces may not be acceptable since they could be fire hazards. Accessory attachments and cookware not manufactured or supplied by Bruce Foods Corporation for this gas fryer are not recommended for use with this appliance. Never use this product for anything other than its intended purposes. This appliance is not designed nor intended for commercial use. Keep children and pets away from the appliance at all times. Never leave the appliance unattended. DO NOT move the appliance when it is in use. Allow the appliance to cool below 115˚F (45˚C) before moving or storing. Closed toed shoes should always be worn during operation of this appliance. DO NOT touch hot surfaces. Always wear protective Gloves or mitts when removing the lid or basket from the cooking vessel. Prior to lighting the burner, check the wind direction and placement of the cylinder UPWIND and upright at least 20” away from the cooker stand. Use only a 20 pound cylinder or smaller with a protective collar. Always place the Cajun Injector® Gas Fryer in an open area with at least a 12 foot radius. Do not allow the hose to come in contact with any part of this appliance while in it is in use. Execute the gas leak test to detect gas leaks along hose or connection points prior to every use of this gas appliance. Avoid bumping of the appliance to prevent spillage or splashing. Always separate and detach your gas cylinder from burner apparatus when not in use. Keep your hands, hair and face away from the burner flame. DO NOT lean over the cooker when lighting the burner. This appliance has an open flame. Be careful of loose hair and clothing during operation. Never attach, detach or change out a gas cylinder; nor move or alter fittings while the cooker is hot or in use. Never use a gas cylinder if it shows dents, gouges, bulges, fire damage, erosion, leakage, excessive rust, or other forms of visible external damage. The cylinder may be hazardous and should be checked before use by a propane supplier. When lighting your gas fryer, remove all unnecessary parts from cooker and its stand to prevent an explosion caused by gas build up. If burner does not ignite, turn off the regulator control valve, then close at cylinder and wait 5 minutes before trying to ignite it again. If the burner goes out during operation, first turn the regulator off, then shut off the valve at the gas cylinder. Do not allow anyone to conduct activities around your cooker during or following its use until the unit has cooled. The cooker is hot during operation and remains hot for a period of time following its use. Never drop food or accessories into hot liquids. Be careful when removing food from the oil or water; rest and allow the basket to drain all liquids since it and its contents are hot and could cause severe burns. When using your appliance, use caution when removing the basket from the pot to avoid pulling the pot off of your cooker stand. Never use glassware, plastic, or ceramic cookware on the appliance. When cooker use is complete, always turn the regulator control valve off first, then shut off the gas cylinder valve. The use of alcohol, prescription or non prescription drugs may impair the consumer’s ability to properly assemble or safely operate this gas appliance. The use of alcohol, prescription or non prescription drugs may impair the consumer’s ability to properly assemble or safely operate this gas appliance. Keep the ventilation opening(s) of the cylinder enclosure free and clear of debris. The installation of this appliance must conform with local codes or, in the absence of local codes, with the National Fuel Gas Code, ANSI Z223.1/NFPA 54, Storage and Handling of Liquefied Petroleum Gases, ANSI 58/NFPA or CSA B149.1, Natural Gas Installation Code. The LP-gas cylinder being used must be constructed and marked in accordance with the specifications for LP-gas cylinders of the U.S. Department of Transportation (DOT) CFR 49 or the National Standards of Canada, CAN/CSA-B339, Cylinders, Spheres and Tubes for the Transportation of Dangerous Goods. Never use pots or other vessels that are not designed for use on this appliance. All cooking vessels must fit inside the top ring of the fryer. Gas Cylinder Storage, Placement and Filling: Do not store a spare LP-gas cylinder under or near appliance. Never fill the cylinder beyond 80 percent full. Over-filled cylinders can release gas. The gas cylinder safety relief valve may overheat, allowing gas to release causing an intense fire with risk of death or serious injury. If you smell, hear, or see gas escaping immediately move away from the gas cylinder and call the Fire Department for assistance. A fire causing death or serious injury may occur. Place a dust cap on cylinder valve outlet whenever the cylinder is not in use. The included dust cap should be the only dust cap applied to the cylinder valve outlet. Other caps or plugs may cause leaks. Gas Cylinder Storage and Appliance Check: Cylinders must be stored outdoors, out of reach of children, and must not be stored in a building, garage, or any other enclosed area. Before each use check all nuts and bolts to be sure that they are tight and secure. Before each use inspect gas hose for any signs of damage. Before each use perform a soapy water test. LP Tank Removal, Transport and Storage: Turn off all control knobs and LP tank valve. Turn coupling nut counterclockwise by hand only – do not use tools to disconnect. Install safety cap onto LP tank valve. Failure to use safety cap as directed may result in serious personal injury and/or property damage. A disconnected LP tank in storage must have a safety cap installed (as shown). Do not store an LP tank in enclosed spaces such as a carport, garage, porch, covered patio or other building. Never leave an LP tank inside a vehicle which may become overheated by the sun. Do not store LP tanks in an area where children play. The tank used with your appliance must meet the following requirements: Purchase LP tanks only with these required measurements: 12” (30.5cm) (diameter) x 18” (45.7 cm)(tall) with 20 lb (9 kg) capacity maximum. The LP tank must be constructed and marked in accordance with specifications for LP tank of the U.S. Department of Transportation (DOT). See LP tank for marking. LP tank must have: Type 1 outlet compatible with regulator or appliance. Safety Relief Valve. UL listed Overfill Protection Device (OPD). This OPD safety feature is identified by a unique triangular hand wheel. Use only tanks equipped with this type of valve. LP tank must be arranged for vapor withdrawal and include collar to protect LP tank valve. LP (Liquefied Petroleum Gas) LP gas is non toxic, odorless and colorless when produced. For your safety LP gas has been given an odor (similar to rotten cabbage) so that it can be smelled. LP gas is highly flammable and may ignite unexpectedly when mixed with air. LP Tank Leak Test FOR YOUR SAFETY Leak test must be repeated each time LP tank is exchanged or refilled. Do not smoke during leak test. Do not use open flame to check for gas leaks. Appliance must be leak checked outdoors in a well ventilated area, away from ignition sources such as gas fired or electrical appliances. During leak test, keep appliance away from open flames or sparks. Use a clean paint brush and 50/50 solution of dishwashing soap and water. Do not use household cleaning agents. Damage to gas train components can result. Brush soapy solution onto all weld seams and entire valve area. LP Tank Leak Test Only propane gas is intended for use with this burner. Never use natural gas; the burner will not operate properly. Every time your burner is attached to a gas cylinder, the Gas Leak Test must be executed. Anything that can easily ignite, such as matches, lighters, sparks and lit cigarettes must be kept away from burner when performing the Gas Leak Test. Never use a flame to test for gas leaks. Never perform Gas Leak Test indoors. It must always take place outdoors in a well-ventilated area. All cookware must be removed from the cooker top before you perform the Gas Leak Test. PROCEDURE: Remove all cookware from the cooker top. After connecting the regulator to the gas cylinder, make sure gas cylinder valve and regulator are off. Rotate the gas cylinder valve clockwise to the off position. Rotate the regulator counter-control valve counter-clockwise to the off position. Combine 2 parts water with 1 part liquid dish soap. Mix well. Apply the mixed solution to the gas cylinder valve and the regulator control valve. Monitor the entire area of the gas cylinder valve and the regulator for bubbles (A). If “growing” bubbles appear, there is a leak. Close LP tank immediately and retighten all connections. NEVER LEAVE GAS CYLINDER VALVE IN THE ON POSITION FOR MORE THAN 12 SECONDS. If the soap solution makes the area too slippery for a firm grip, clean the area with a damp cloth to eliminate the soap. Once corrected, reapply the soap solution and repeat the test. When the gas cylinder valve has passed the Gas Leak Test, rotate the regulator control valve clockwise to the on position and examine the area of the regulator control valve, down the entire length of the hose and up to the burner for soap bubbles (B). NEVER LEAVE GAS CYLINDER VALVE IN THE ON POSITION FOR MORE THAN 12 SECONDS. If soap bubbles appear, there is a gas leak in the area. If there is a leak in the area of a connection, it can be repaired by retightening the fitting. If there is a leak in the hose, the hose must be replaced before you can continue with operation. DO NOT ATTEMPT TO PATCH THE HOSE. Once the test is completed without any leaks, you can continue with use of your burner but you must wait a minimum of five minutes before igniting the burner. Cylinder is not included with appliance. Never use a gas cylinder without a protective collar or larger than 20 lbs. If growing soap bubbles persist throughout any portion of the Gas Leak Test, terminate use immediately. For assistance with this malfunction, contact your propane dealer or Bruce Foods Corporation at 1-866-752-6497. If instructions or parts are missing, contact BRUCE FOODS CORP. @ 1-866-752-6497 for repair or replacement PARTS LIST GFK1 Base GF10 Star Lifter GF2 Cast Burner GF11 Pot (01708 &09061 ONLY) GF4 Leg (3) GF12 Pot w/ Valve (09060 ONLY) GF6 Base Ring GF13 Lid GF7 Heat Shield GF15 Lifting Hook GF8 Timer/Regulator GF16 Temperature Gauge ASSEMBLY INSTRUCTIONS Tools needed: Adjustable Wrench and Phillips Head Screwdriver Step 1 – Securing the Cast Burner to the Base (Burner Mount Bar) Place base (GFK1) upside down on an even surface. The wider ring of the base should be facing downward. Locate the burner mount bar stretching across the narrower ring of the base. Remove the nut from the bottom of the cast burner (GF2). From the bottom side of the burner mount bar, place the cast burner into the groove in the center of the bar. The screw on the cast burner should fit into the hole in the center of the groove. The cast burner should be positioned towards the side of the base with the flame viewing hole. The Heat Shield (GF7) must be installed before placing the nut on the burner post and tightened. (See inset picture) Fasten the cast burner screw securely to the burner mount bar with the nut. Step 2 – Leg Assembly (Heat Shield not shown for clarity) Locate the end of each leg (GF4) containing two holes. Join each leg to the inside of the narrower ring of the base so that the two holes of each leg are aligned with each set of two holes on the base. When in position, the legs should be projecting outward from the center of the base. Securely fasten each leg to the base with two screws per leg. The screws should be inserted from the outside towards the center of the ring. Step 3 – Metal Base Ring Assembly Insert the metal base ring (GF6) in between all three legs so that each of the three holes on the ring matches up with each hole at the projecting end of the legs. Securely fasten each leg to the lower ring with one screw and one nut per leg and tighten. The screws should be inserted from the inside ring out towards the leg. Step 4 – Hose / Timer Assembly Return the base to the upright position allowing the unit to stand on its newly assembled legs. Carefully insert the timer/valve (GF8) orifice through the center of the narrow end of the burner venturi (GF2) and carefully turn clockwise until tight and secure. Make sure the timer is oriented as shown in the picture below. Step 5 – Flame Safety Connection This unit is equipped with a flame safety device that will shut off the flow of gas if the burner flame goes out. The flame sensor must be attached correctly or the timer/valve will not allow gas to flow to the burner. Following are the steps required for proper attachment and adjustment of the Flame Safety Sensor: Remove the top jam nut on the end of the sensor (do not remove both nuts). Thread the metal coated sensor up under the base wind ring and slide it into the sensor bracket pre-mounted on the burner. Re-thread the previously removed jam nut and hand tighten only. To adjust sensor to correct position, loosen, move and tighten both jam nuts until desired position is achieved. Sensor tip must be in the blue part of the flame to work properly. Step 6 – Regulator to Gas Cylinder Connection and Operation Before each use, perform a thorough inspection of the hose and all connecting parts. If it shows any indication of damage, replace all necessary parts before continuing with operation. WARNING: Any open flames must be extinguished before the hose can be connected to the gas cylinder. • Insure that the LP tank valve is closed. Insure that the regulator control valve is in the off position. Remove plug or cap from LP tank valve (A). Connect the regulator to the gas cylinder by rotating the black connector on the regulator clockwise onto the threaded opening of the cylinder until tight (B)(C). Do not insert any foreign objects into the valve outlet. You may damage the valve and cause a leak. Leaking propane may result in explosion, fire, severe personal injury or death. Never attempt to attach this appliance to the self contained LP system of a camper, trailer or a motor home. Step 7 – Checking the Temperature Gauge Heat a pot or pan of water to the boiling point. Insert the tip of the temperature gauge that came with your fryer into the boiling water. Watch the gauge until the needle stabilizes. That should be approximately 212o F (+/- 20o F) (100oC +/10o C). If it does not perform properly, contact Bruce Foods Corp @ 1-(866) 752-6497 to obtain a replacement gauge. Spiders nests or wasps’ mud inside the burner may cause fire at the air damper. If a fire occurs, immediately turn off gas supply at LP tank valve. Spiders and small insects can spin webs and build nests inside the burner. This especially occurs in late summer and fall before frost when spiders are most active. These nests can obstruct gas flow and cause a fire in and around the burner and orifice. Such a fire can cause operator injury and serious damage to the appliance. To help prevent blockage and insure full heat output, clean and inspect burner tube often (once or twice a month). NOTE: Water or air pressure will not normally clear a spider web. Regulator hose when attached to tank and appliance can be a tripping and a tip over hazard. Keep children and pets away from the appliance at all times. Never leave the appliance unattended. Step 8 – Using the Timer and Lighting the Burner Insure that the regulator control valve is in the off position. Slowly rotate the gas cylinder valve counter-clockwise to the on position. Turn the Timer Knob Clockwise until it stops. The timer will run for 12 minutes before shutting the gas to the burner off. Once the timer has shut the flow of gas off, follow Step 8 procedures to relight. Depress and hold down the button on top of the brass valve at the top of the timer box. Using a special grill match or grill lighter for safety, insert a flame underneath the wind shield to the burner. DO NOT stand with head or arms over fryer or burner when lighting. Hold the valve button down for 5 – 10 seconds before releasing. Slowly rotate the regulator control valve to the on position until the burner ignites. If it takes more than five seconds for the burner to ignite, rotate the regulator control valve to the off position, then the cylinder valve to the off position, wait 15 seconds for gas fumes to dissipate then repeat the lighting process. IN THE EVENT THAT THE FLAME IS EXTINGUISHED, DO NOT RELIGHT THE BURNER FOR FIVE MINUTES; THIS ALLOWS REMAINING FUMES TO CLEAR. Repeat all steps above to relight. As soon as the flame is lit, rotate the regulator control valve clockwise until the flame rises. Rotate the air shutter, allowing more or less air to enter the cast burner until the flame becomes blue. Once the flame reaches appropriate color, adjust the flame with the regulator control valve to desired level. Correct Incorrect Using water or oil, whichever is required for the cooking method you choose; fill the pot to the Maximum Fill Line. NEVER fill the pot over the Maximum Fill Line to avoid any dangerous mishaps such as boilover’s. NEVER PLACE AN EMPTY POT ON A LIT BURNER. THIS WILL CAUSE SEVERE DAMAGE TO THE POT. Rotating the regulator control valve clockwise and counter-clockwise will bring the contents of your pot to the desired temperature. Oil will ignite between 500° F to 700° F therefore should never exceed temperatures of 400° F. To insure you maintain safe temperatures throughout the use of this burner, you must use a thermometer at all times. IF THE OIL BEGINS TO SMOKE, THE BURNER MUST BE SHUT OFF IMMEDIATELY. Once you are through with this appliance, you must first rotate the regulator control valve counterclockwise to reach the off position, and then rotate the gas cylinder valve clockwise to reach the off position. All parts of the appliance, pot and left over contents must be allowed to completely cool before touching or handling for storage. DO NOT REDUCE THE FLAME TO KEEP THE OIL WARM FOR LATER USE. THE TEMPERATURE WILL CONTINUE TO INCREASE AND POSSIBLY IGNITE IF THE BURNER IS NOT COMPLETELY TURNED OFF. Step 9 – Drain Valve Operation (select models only) The drain valve, located near the bottom rim of the frying pot, allows you to safely and easily drain water/oil from the pot. BE SURE THAT ANY LIQUID INSIDE OF THE POT IS BELOW 100°F BEFORE DRAINING. Liquid should primarily be drained into a container before disposal. Place your desired reservoir directly under the drain valve nozzle; be sure that both the reservoir and the fryer are sturdy and not easily tilted. Turn the drain handle on top of the drain valve until a steady flow of liquid is being dispersed from the valve into the reservoir. Close the valve by turning the handle to its original position once all of the liquid has drained. Some frying oils can be reused within a few days of being fried in; many people find the drain valve a useful mechanism to direct their frying oil back into its original container to be used at a later date. Techniques for Successful Preparation of Fried Foods at Homes Often when someone mentions frying foods at home, they are greeted with a chorus of negative comments ranging from messy, greasy, and dangerous to unhealthy. Utilizing the proper equipment and learning the correct methods and procedures, frying can overcome virtually all of these comments. No doubt, breading or battering foods and frying “in oil,” does add caloric content to foods. But, a sensible respect for portion sizes consumed and utilization of non-hydrogenated oil with zero trans fats greatly reduces the concern of “unhealthy” often expressed. Education in the proper procedures and techniques that should be employed when frying greatly reduces the amount of oil absorbed by fried foods. Frying Techniques and Temperature Control of the Cooking Oil All forms of frying involve the cooking of food in oils or fats. Frying techniques vary depending on the frying vessel utilized (such as a wok utilized in stir-frying, a frying pan, or a deep fat fryer); the amount of fats or oils required (from sautéing or stir frying to pan frying to deep fat frying); cooking temperature; and preparation methods employed with foods for frying. For the purposes of this pamphlet, we’ll concentrate on pan frying, deep fat frying, and mention a baking misnomer, oven frying, which is actually a form of baking. Frying is classified as a form of dry-heat cooking since water is not utilized to transfer heat to the food being cooked. Instead, the heat in the oil is transferred to the water in the food so that the moisture in the food turns to steam to cook the food from the inside out. Whatever form of frying employed balances the realities of time, temperature, and the surface area of food in contact with the oil, plus the food’s structure and moisture. Often this means assuring that the food is fully cooked in the interior before being burned on the exterior. As an example experts recommend pan-frying nothing thicker than 1-inch as the exterior is likely to burn before the inside is fully cooked. Maintaining proper oil temperature is absolutely crucial to all forms of fried foods. Recommended oil temperature ranges from 350˚F – 375˚F with a target temperature of 365˚F. And virtually all frying tips seek to assist you in maintaining correct oil temperature. Hot oil causes the food’s internal moisture to turn into steam that keeps the oil out while the hot oil also keeps the moisture in (especially when a batter or breading barrier is used around the surface area of the food forming a crunchy, brown crust). If the oil is too hot, the steam reduces the moisture content and overcooks the food. On the other hand, if the oil temperature is too low, a lack of steam allows the oil to penetrate deep into the crust producing oily, unappetizing fried food. The oil must be hot enough to quickly seal the surface of the food, but not too hot to burn the outside before the inside is completely cooked. Done correctly at a proper temperature, only a minimal amount of oil is absorbed into the food. Pan Frying This form of frying is characterized by the use of significantly less hot oil where food is semi-submerged in hot oil in an electric skillet or in a fry pan over an open flame. When pan-frying, the oil’s depth should be no more than 1/2 the thickness of the food. Pan frying differs from deep frying since the food touches the bottom of the pan and the exposed top side of the food allows some loss of moisture in the food as it cooks. The advantage of pan frying is the use of less oil; this is also a disadvantage as it is more difficult to maintain temperature of the oil. The moisture loss and faster browning of pan fried foods can be advantageous or detrimental depending on the choice of foods to be pan fried. The best candidates for pan frying include fish, shellfish, tender meats and vegetables. Foods to be pan fried are generally covered with a batter or breading and have a rich texture that contrasts with the crispy, crunchy outside. When pan-frying use an electric skillet with a thermostat to control oil temperature if possible. Otherwise, some experimentation may be required to control oil temperature. When oil temperature is reached, add the food to the pan; and fry on one side until brown. Using tongs or a spatula (never a fork) turn and brown the second side realizing that the second side generally takes less time (it’s hotter when turned over than the first side was) to cook. As with all forms of frying, never crowd the pan as this can dramatically reduce oil temperature. Recovery time is the duration of time necessary to return the oil to the desired cooking temperature. When cooked too long, food will likely be greasy without the seared crunchy exterior most people desire from fried foods. Oven Frying Oven frying produces a result that is healthier (usually less oil yet similar to fried foods even though it isn’t a real frying process. Generally food is baked in a hot oven and basted once with a small quantity of fat or cooking spray. As with deep-fried foods, most foods are breaded or battered prior to being baked to seal in the juices and produce a crunchy, crispy crust. Food normally does not require turning and cooks quickly using this high heat (450˚ – 500˚F) method. This works especially well with fish fillets, chicken pieces and pork chops. Generally bread crumbs or corn flake crumbs are utilized to produce a crispy crust when oven-frying. The Basics of Frying: 1. Recommended Products: A quality candy or deep-frying thermometer. A deep fat frying thermometer, preferably with a clip that allows the thermometer to be affixed to the side of the frying vessel is essential, since accurate control of the temperature of the frying oil is essential to successfully fried foods. 2. An Electric Skillet is preferred for pan frying; otherwise, choose a pan with a thick heavy bottom that is larger in circumference than the heat source (this will prevent oil from dripping down the exterior of the pan into an open flame that might cause a fire.) Use a heavy skillet or frying pan that is wider than it is deep and has a heavy bottom to help regulate uniform heat from the bottom of the pan. This is absolutely essential when pan frying with limited amounts of oil. 3. A Cajun Injector Electric Fryer for deep fat frying with digital timer and thermometer, Star Lifter, clear cover, and petcock drain spout specifically designed for high heat frying of large items such as turkey as well other deep fried foods. Deep Frying Foods to be deep-fried should be of a size and shape that permits individual pieces to float freely in the fat. The fat should surround the food and begin cooking it on all sides at once. The food is usually battered or breaded to protect the food’s surface moisture from coming into contact with the hot oil creating an exterior layer or crust sealing food flavors and juices inside. We suggest the following tips: 1. Use a pan wider than it is deep, and that is wider than the heat source (so oil won’t come in contact with direct heat.) Always use clean, fresh oil or previously used oil, properly filtered and refreshed by frying a raw potato or handful of parsley for about five minutes prior to frying food for dinner. Delicate foods should not be fried in oil previously used to fry strongly flavored foods. 2. Much of fried food odors can be absorbed by placing a small cup of bleach nearby. Be sure to mark as “Bleach” and keep children away from the cup as well as from the hot oil. 3. Never fill your fryer more than half full of oil. You will need a minimum of three inches between the oil surface and the top of the pot. 4. Constantly monitor temperature of the oil. Never crowd the frying oil, fry in small batches. The oil should freely bubble around each piece of food at correct temperature. 5. Use proper tools when removing fried foods and draining oils to a plate with several layers of paper towels. To add more absorbency, place a brown paper bag below the paper towels on the plate. 6. Keep deep-fried foods warm by placing in a single layer on fresh paper towels (after initial draining step above is finished) in a 250˚F oven while you complete frying. Choice of Oil or Fat as a Frying Medium: 1. Your choice of Oil or Fat often depends on the frying technique to be utilized and the projected frying temperature. As an example, when sautéing, oil choice often depends on the flavor to be imparted as butter or bacon grease are often employed. Olive oil is also a good choice if temperatures not over 300˚F are to be employed in sautéing or pan-frying. 2. Health Concerns can determine your choice. We recommend non-hydrogenated oils with zero trans fats and zero cholesterol. This eliminates the use of animal fats. 3. Smoke point is a stage at which fat or oil begins to smoke. Utilize oils with a high smoking point (above 400˚F) and high stability. Most vegetable oils have smoking points over 400˚F and can be used in all cooking methods. 4. High heat, water, and burned food particles break the oil down over time. Filter the oil after use. Allow the oil to cool after use and filter to remove all food particles that could burn during reuse. 5. Replace your old oil if you notice the following symptoms: Excessive smoking at normal temperatures; strong oil discoloration; rancid odor. Choice of Coating Mix, Breading Mix, or Batter Mix: A breaded item is any food that is coated with bread crumbs, cracker meal, corn meal, or other dry meal to protect it during cooking. Breaded foods can be seasoned, marinated, or rubbed prior to breading, or seasonings may be added to the flour, crumbs, or meal, before the coatings are applied. Coating batters are liquid or semi liquid mixtures, utilizing flour, milk, and eggs, used in cooking. 1. When breading meats, chefs call a three-step process “the standard breading procedure.” First, pat the food dry (always reduce moisture as much as possible to reduce splattering and oil degradation) and then dredge in seasoned flour. The flour adds seasoning and allows egg wash to adhere. Next dip the floured food in an egg wash (egg wash should contain whole eggs whisked together with approximately one tablespoon of milk or water per egg.) Egg wash will cause the breading to coat the item and form a tight seal when food is cooked. Lastly, coat the food with crumbs or seasoned meal, shake off the excess and place in a container in a single layer. 2. Battering. Prepare the batter according to directions. Pat the food dry, dredge in seasoned flour, if desired. Dip the item in the batter and generally cook immediately. There are some chefs that recommend chilling the batter with ice or refrigeration to obtain a great sear and those who recommend battering by placing in a single layer and refrigerating for up to 30 minutes to dry the batter. When using these methods, be sure to cook very small batches so as to maintain oil temperature. For Gulf Coast Style Seafood Boil 5 lbs. Shrimp * 8 Medium Crabs * 4 lbs. Crawfish * Vegetables 1. Wash Shrimp or seafood in cold water. Confirm crabs and crawfish are alive prior to boiling (crabs and crawfish should be alive at time of cooking). Purge Crawfish in salted water. 2. Place products to be boiled inside the basket. Be sure that water displacement does not exceed the capacity of the boiling pot. This can be checked by placing all the ingredients in the pot and placing the basket in the cold water (prior to heating) to be sure that the boiler will not overflow the pot. 3. Measure out water (not to exceed 3-gallons) following the instructions on your favorite seafood boil package. For a spicier boil, add 1 12-oz. bottle of The “Original” Louisiana Brand Hot Sauce per package of spice mix used. Bring to a boil. Add boil mix contents, for mildly seasoned, non-messy food or for spicy, hot cooked seafood or vegetables, reserve 2 Tbsp. spice mix per package for sprinkling over seafood or vegetables (after draining and prior to eating). 4. First add favorite selected vegetables (optional step) such as small white or red potatoes, mushrooms, corn, garlic pods, lemon slices and small onions to the boiling mixture. Hard simmer in boiling solution for 10 minutes or until vegetables are cooked. Cut heat and allow to soak in mixture for 10 minutes. Remove vegetables. Return solution to a boil. Add Seafood; return to boil, timing shrimp 3-minutes; Crabs or Crawfish 8-10 minutes depending on size. 5. Remove from heat. Add ice to stop cook (being sure not to overflow the boiling pot) and allow to soak for 10-15 minutes prior to draining and pouring out of container. Sprinkle reserved spicy boil mix over boiled seafood prior to eating. 6. To double the amount being boiled: Add an additional 1-1/2 gallons Water (Total 3-Gallons) along with an additional 1/3 cup of Salt; 1/2 cup of Red Cayenne Pepper, and an additional 12-oz. bottle “Original” Louisiana Brand Hot Sauce to the directions given above. Chesapeake Style Steamed Crabs or Seafood Crabs * Crawfish * Fish * Vegetables 1. Utilize a boiling pot with a raised rack a minimum of 2-3 inches above the bottom of the boiling pot. Add equal amounts of water and vinegar to a water level just below the rack. Optional: Add a bottle of 12-oz. “Original” Louisiana Brand Hot Sauce to the water-vinegar mixture. 2. Layer Crabs or other foods to be steamed. Sprinkle your favorite spice mix lightly, or until partially covered, and steam in covered pot until crabs turn red, or other foods are fully steam cooked. Injectable Marinade Concepts and Utilization Techniques Injectable marinades and brines possess the same characteristics as their counterparts except that they do not require product soaking in order to impart flavor; moisturize, and tenderize. Unlike marinade soaking methodologies that only penetrate about a 1/4 inch into meat surfaces, require long soak times, and contaminate expensive marinades, flavor injection infuses blended flavors deep inside the meat. Conceptually the flavor injection concept makes good sense: instant flavor, yet no waiting, no waste as marinade is injected, and no fats are required in the marinades to protect the meat surface during soaking time. Rubs, seasonings, and sauces are used to flavor the surface of the meat. As with many culinary skills, proper technique when “flavor injecting” will result in superior results. The flavoring should be spread uniformly throughout the meat with as few punctures of the meat as possible. The flavor injector is a syringe with a needle attached to a plunger which allows the user to inject the flavoring deep into the meat. Injecting Tips for poultry start with limiting the puncture holes and when possible separating the skin from the meat and puncturing directly into the geometric center of the meat. Carefully and slowly inject along the grain of the meat aiming the injector into the middle of the meat and reduce plunger pressure on liquid as the needle comes nearer the surface of the meat (so meat can close up behind the needle.) Do not pull the needle completely out of the puncture hole unless to reload with liquid. Use the same hole to angle into the other areas of the meat, slowing infusing flavor as the needle moves back toward the meat surface. Remember the object is to spread your injection pattern so as to get small amounts of flavor in as many places as possible. Occasionally, some of the liquid is likely to spurt out on the meat surface. Rub the flavoring over the surface of the meat and then rub and season the surface of the meat as desired. Injecting Techniques 1. Attach injector needle by turning clock-wise until snug. Do not over tighten. Hint: Be sure rubber plunger is lightly coated with oil prior to using. Determine amount of marinade required (1.5 to 2 ounces per pound of meat) and measure out contents into a clean container to prevent contamination of unused marinade. 2. Pull plunger to draw marinade into injector. Hint: Both slots in needle should be immersed in liquid to prevent air from entering injector chamber. 3. For best results, a geometrically centered injection point should include one deep and straight needle track as well as two additional tracks at approximately 45 degree angles branching out from the original injection point. (See illustration 1A) 4. Once inserted deep into meat, press plunger down while slowly pulling injector needle out of meat to ensure even distribution of marinade. Follow same procedure with each needle track at each insertion point. 5. See illustration 1B for suggested insertion points for turkey. 6. See illustration 2 for suggested insertion points for roast. Cajun Injector® Deep Fried Turkey Prep Time: 20 minutes Cook Time: 35-45 Minutes Yield: 8 servings Ingredients: 1 Cajun Injector® Propane Fryer 3 Gallons Cajun Injector® Cottonseed Oil 1 10 - 12 Pound Whole Turkey 2 16 oz. jars Cajun Injector® Creole Butter Recipe Marinade 1 8 oz. canister Cajun Injector® Quick Shake® Cajun Shake® Method: Place the outdoor gas burner on level dirt or grassy area. Never fry a turkey indoors, in a garage, or in any structure attached to a building. Do not fry on wood decks, which could catch fire, or concrete, which could be stained by the oil, (have a fire extinguisher nearby for added safety). Add oil to a 7 to 10 gallon pot with a basket. At medium-high setting, heat the oil to 350°F (depending on the amount of oil, outside temperature and wind conditions, this should take about 20 to 40 minutes). Remove the giblets and neck from the turkey. Cut off the wing tips and plump little tail as they may get caught in the fryer basket. Rinse the turkey well with cold water, and pat dry thoroughly with paper towels. Take care to dry inside the cavity. Place in a large pan and inject with 2 ounce per pound of Cajun Injector Creole Butter Recipe Marinade. Season liberally inside and out with Cajun Injector Quick Shake Cajun Shake. To allow for good oil circulation through the cavity, do not truss or tie legs together. Place the turkey in basket, neck down. When the deep-fry thermometer reaches 350°F slowly lower the turkey into the hot oil. The level of the oil will rise due to the frothing caused by the moisture from the turkey but will stabilize in about 1 minute, (to prevent burns from the splattering oil wear oven mitts/gloves, long sleeves, heavy shoes, and even glasses. It is wise to have 2 people lowering and raising the turkey). Immediately check the oil temperature, and increase the flame so the oil temperature is maintained at 350°F. If the temperature drops to 340°F or below, oil will begin to seep into turkey. Fry about 3-1/2 minutes per pound, or about 35 to 45 minutes for a 10 to 12 pound turkey. Stay with the cooker at all times, as the heat must be regulated. When cooked to 170°F in the breast or 180°F in the thigh, carefully remove the turkey for the hot oil. Allow the turkey to drain for a few minutes. Remove the turkey to a cutting board and cover with foil. Let it rest for 20 minutes. Slice the turkey and serve hot. Original Louisiana Habanero Fried Chicken Prep time: 20 minutes Marinate time: 4 hours Cook time: 30 minutes Yield: 8 servings Ingredients: Cajun Injector® Cottonseed oil, for deep-frying 1 Quart Buttermilk, Plus 2 Cups 2 tbsps. Cajun Injector® Quick Shake® Cajun Shake® seasoning 2 tbsps. Louisiana Brand Hot Sauce 2 tsps. Louisiana Brand Habanero Sauce 2 Chicken (3 to 4 pounds each), Each Cut up into 8 Pieces 4 cups All-Purpose Flour 1 tbsp. Garlic Powder 1 tbsp. Onion Powder 1 tbsp. Sweet Paprika 2 tsps. Cayenne Pepper Method: In a large bowl or baking dish, whisk together 1 quart of the buttermilk, Cajun Injector® Quick Shake® Cajun Shake® seasoning, and 2 Tablespoons Louisiana Brand Hot Sauce. Add the chicken pieces, turn to coat, cover, and refrigerate for at least 4 hours or overnight. Preheat oil to 400˚F in electric fryer, or 350˚F in propane fryer. Place the remaining 2 cups of buttermilk and 2 teaspoons Louisiana Brand Hot Sauce in a bowl. Stir together the flour, garlic and onion powders, paprika, and 2 teaspoons cayenne pepper in a large bowl. Divide flour mixture among 2 shallow platters and season generously Cajun Injector Quick Shake Cajun Shake. Drain the chicken in a colander and pat it dry. Dredge the pieces a few at a time in the flour mixture and pat off excess, then dip in the buttermilk and allow excess to drain off. Dredge in the second plate of flour, and pat off the excess. Put the chicken pieces on a piece of waxed paper or on a clean platter while you heat the oil. Working in batches, add the chicken pieces to the hot oil, 4 or 8 at a time and fry, turning the pieces occasionally, until evenly golden brown and cooked through, about 20 minutes. Remove from the oil with a slotted spoon and transfer to a rack to drain. Repeat to cook the remaining pieces. Serve hot. Beer Batter Shrimp Prep time: 10 minutes Cook time: 5 minutes Yield: N/A Ingredients: 3 Eggs 3 cups Flour 1 tsp. Baking Powder 12 oz. Favorite Beer Cajun Injector® Quick Shake® Cajun Shake® Method: Preheat oil for deep frying to 350°F. In mixing bowl beat eggs gently. Add flour and beer gradually until batter is a little thicker than pancake batter. Mix in baking powder. Dredge shrimp, fish, or vegetables through batter. Shake off excess, and fry at 350°F until golden brown. Cajun Injector® Fried Catfish Prep time: 10-15 minutes Cook time: 3-5 minutes Yield: 3-4 lbs. of fish Ingredients: Cajun Injector® Cottonseed Oil 1 package Cajun Injector® Seasoned Fish Fry Mix Method: Preheat oil to 350˚F. Dip Fish into a bowl of cold water. Shake off excess water. Roll Fish in 10 ounces of the Cajun Injector Seasoned Fish Fry Mix. Deep fry at 350˚F until golden brown. Cajun Injector® Hushpuppies Prep time: 10-15 minutes Cook time: 3-5 minutes Yield: 16-18 hushpuppies Ingredients: Cajun Injector® Cottonseed Oil 1 package Cajun Injector® Hushpuppy Cornbread Mix 1 egg 1/4 cup of milk Method: Preheat oil to 350˚F. Combine 8 ounces of the Cajun Injector Hushpuppy Cornbread Mix, 1 egg and 1/4 cup of milk in bowl. Mix until smooth. Let batter stand for 30 minutes to thicken. Drop batter by tablespoon or scoop into hot oil. Deep fry at 350˚F until golden brown. Chicken Fried Venison Steak Prep Time: 10 minutes Cook Time: 15 Minutes Marinade Time: 1-2 hours Yield: 4 servings Ingredients: Cajun Injector® Cottonseed Oil 1 - 10 oz. Packet of Cajun Injector® Chicken Fry Mix 4 - 4 oz. Venison Cubed Steaks Method: Preheat oil to 400˚F in electric fryer, or 350˚F in propane fryer. Heat enough oil for deep frying to 350°F. Mix 6 tablespoons of Cajun Injector Chicken Fry Mix with 3/4 cup of water and mix until smooth. Dip steaks into batter then roll in remaining dry chicken mix until coated. Deep fry the coated steaks at 350°F until golden brown. Louisiana Wildly Wicked Buffalo Catfish Wrap Prep Time: 10 minutes Cook Time: 7 minutes Yield: 5 wraps Ingredients: 1 lb. Catfish Fillets (USA raised) 1 (8 oz.) bag Cajun Injector® Chicken Fry Mix 1 Diced Tomato 1/2 cup Louisiana Brand Wildly Wicked Wing Sauce 1 Package (8 inch) Flour Tortillas 1 lb. Cole Slaw (recipe follows) 2 cups Cottonseed Oil, for Frying Method: Preheat oil to 400˚F in electric fryer, or 350˚F in propane fryer. Cut catfish fillets chicken into strips about 1/2”- 3/4” wide and batter according to the directions on the chicken fry bag. Fry until golden brown, remove, and drain on paper towels. Toss catfish strip in wing sauce to coat evenly. Heat tortillas in an oven or microwave until warm and pliable. Assemble the wrap by adding coleslaw, catfish strips, and diced tomatoes. Louisiana Wildly Wicked Turkey Tenders Prep Time: 10 minutes Cook Time: 10 Minutes Yield: 4-6 servings Ingredients: 1 10 oz. packet of Cajun Injector® Chicken Fry Mix 2 Turkey Breast Boneless Skinless Cut into Strips 1/2 cup Louisiana Brand Wildly Wicked Wing Sauce 1/4 cup Melted butter 2 tbsps. Original Louisiana Brand Hot Sauce Cajun Injector® Cottonseed Oil Method: Preheat oil to 400˚F in electric fryer, or 350˚F in propane fryer. Heat enough oil for deep frying to 350°F. Mix 6 tablespoons of Fry mix with 3/4 cup of water and mix until smooth. Dip turkey strips into batter then roll in remaining dry chicken mix until coated. Deep fry the coated tenders at 350°F until golden brown. While turkey is cooking melt butter and mix with wing sauce. When turkey is cooked remove from oil place in bowl and cover with wing sauce and butter mixture, toss to coat well. Bruce’s® Tempura Battered Smoked Soft-shell Crab Prep time: 10 minutes Cook time: 35 minutes Yield: 6 crabs Ingredients: 6 Soft-shell Crabs 2 Packages Bruce’s® Sweet Potato Pancake Mix 1 cup Seltzer Water Cajun Injector® Quick Shake® Cajun Shake® 1 qt. Cottonseed Oil for Frying Method: Smoke the soft-shell crab for 30 minutes at 165°F degrees with pecan wood pellets. In a mixing bowl, combine pancake mix and seltzer water to make a batter. Carefully dip the crab into the batter and fry at 350°F or until golden brown. Drain on paper towels and serve with Cajun cole slaw. Cajun King® Country Fried Quail Prep Time: 10 minutes Cook Time: 15 Minutes Yield: 4 servings Ingredients: 3 1/4 cup 1 tbsp. 1 bag 2 tbsp. 4 Cajun Injector® Cottonseed Oil Large Eggs Milk “Original” Louisiana Brand Hot Sauce Cajun Injector® Chicken Fry Mix Cajun King® Blended Spice Mix Quail, cleaned and cut in half Method: Preheat oil to 400˚F in electric fryer, or 350˚F in propane fryer. Heat enough cottonseed oil for deep frying to 350°F. Beat eggs and milk together, and add hot sauce. Combine fry mix and blended spice mix. Dredge the quail in the egg mixture then in the fry mix; knock off excess coating and deep fry until golden brown. Cajun Injector® Chicken Fried Caribou Steak Prep Time: 10 minutes Cook Time: 15 Minutes Marinade Time: 1-2 hours Yield: 4 servings Ingredients: 4 1 1 1 tbsp. 2 tbsps. (4 oz.) Caribou Cubed Steaks (16 oz.) jar Cajun Injector® Creole Butter Recipe Marinade (10 oz.) packet of Cajun Injector® Chicken Fry Mix Cajun Injector® Quick Shake® Cajun Shake® “Original” Louisiana Brand Hot Sauce Cajun Injector® Cottonseed Oil Method: Preheat oil to 400˚F in electric fryer, or 350˚F in propane fryer. Heat enough oil for deep frying to 350° F. Mix 6 tablespoons of Fry mix with 3/4 cup of water and mix until smooth. Dip steaks into batter then roll in remaining dry chicken mix until coated. Deep fry the coated steaks at 350° F until golden brown. Louisiana Wildly Wicked Buffalo Wings Prep Time: 10 minutes Cook Time: 10-15 minutes Yield: 1 lb. Ingredients: 1 lb. 3 tbsps. 1 bag 1 cup 2 cups 2 cups 10 Cajun Injector® Cottonseed Oil Chicken Wings Separated & Tips Removed Louisiana Brand Chicken Wing Seasoning Cajun Injector® Chicken Fry Mix Louisiana Brand Wildly Wicked Wing Sauce Ranch Dressing Blue Cheese Dressing Celery Sticks Method: Preheat oil to 400˚F in electric fryer, or 350˚F in propane fryer. While oil heats up, season chicken pieces with wing seasoning. Once oil is hot, batter the wing pieces according to the directions on the bag. Fry at 350°F 10-15 minutes until golden brown, remove, and drain on paper towels. Toss chicken in wing sauce to coat evenly, for a less spicy wing cut the sauce with some melted butter. Serve with ranch and blue cheese dressing and celery sticks. The wings can also be grilled on charcoal or gas grill instead of frying cook for about 20-30 minutes. Louisiana Wildly Wicked Boneless Buffalo Wings Prep Time: 10 minutes Cook Time: 7 minutes Yield: 1 lb. Ingredients: 1 lb. 1 bag 1/2 cup 1/2 cup 1/2 cup 10 Cajun Injector® Cottonseed Oil Boneless, Skinless Chicken Breast Cajun Injector® Chicken Fry Mix Louisiana Brand Wildly Wicked Wing Sauce Ranch dressing Blue Cheese dressing Celery Stalks Method: Preheat oil to 400˚F in electric fryer, or 350˚F in propane fryer. Cut chicken breasts into chunks about 1”squares and batter according to the directions on the bag. Fry until golden brown, remove, and drain on paper towels. Toss chicken in wing sauce and coat evenly. Serve with ranch and blue cheese dressing and celery sticks. Incredible Corn Dogs Prep Time: 15 minutes Cook Time: 3 minutes Yield: 16 servings Ingredients: 1-1/2 cups 1 cup 1/2 cup 2 tsps. 1-1/2 tsps. 3/4 tsps. 2 1/4 cup 3/4 cup 2 16 Cajun Injector® Cottonseed Oil Cornmeal All-purpose flour Sugar Baking powder Salt Black pepper Large eggs Cajun Injector® Creole Butter Recipe Marinade Half-and-half (12 oz.) Package hot dogs (regular size) (10 oz.) wooden skewers Creole mustard for dipping Method: Preheat oil to 400˚F in electric fryer, or 350˚F in propane fryer. Combine cornmeal, flour, sugar, baking powder, salt, and pepper; stir well with a whisk. In another bowl combine eggs, marinade, and half-andhalf. Stir well. Combine cornmeal mixture and egg mixture. Mix until dry ingredients are moistened. Pat hot dogs dry with paper towels. Secure hot dogs onto wooden skewers. Dip into batter, coating all sides well. Fry a few hot dogs at a time for 3 minutes or until golden. Remove from hot oil and drain on paper towels. Serve warm with Creole mustard. Copyright © 2003 The Ultimate Turkey Fryer Cookbook, Meredith Books Fried Cornish Hens Prep time: 15 minutes Cook time: 16-20 minutes Yield: 4 servings Ingredients: 2 6 oz. Cajun Injector® Cottonseed Oil Whole Cornish Hens Cajun Injector® Creole Butter Recipe Marinade Cajun Injector® Quick Shake® Cajun Shake® seasoning Method: Preheat oil to 400˚F in electric fryer, or 350˚F in propane fryer. Prepare Cornish hens while oil is heating. Remove giblets and rinse Cornish hens with warm water. Drain cavity completely. While oil is heating, inject Cornish hens using 1/2 ounce of marinade in each breast, 1/4 ounce into each leg and thigh.* Rub Cajun Injector Quick Shake Cajun Shake seasoning on the outside and inside of Cornish hens. Place Cornish hens in basket and lower slowly into oil. Fry for 10 minutes per pound of meat. Remove basket and place in a pan to drain excess oil. Bite Size Crab Cakes Prep Time: 20 minutes Cook Time: 3-5 minutes Yield: 24 1 inch patties Ingredients: Cajun Injector® Cottonseed Oil 1 lb. Fresh lump crab meat 1/2 cup Breadcrumbs 1 tbsp. Minced parsley 1/2 tsp. Salt 1/2 tsp. Pepper 1/4 cup Mayonnaise 1 cup Egg, lightly beaten 2 tsps. Worcestershire Sauce 1 tsp. Prepared mustard Method: Preheat oil to 400˚F in electric fryer, or 350˚F in propane fryer. Remove any shell pieces from crab meat. Lightly squeeze to drain excess moisture, transfer to dish, cover and chill until needed. Combine breadcrumbs, parsley, salt, and pepper; stir well with a whisk. Add mayonnaise, egg, Worcestershire sauce and mustard; stir well. Gently stir in crab meat. Shape mixture into 24 (1-inch) patties. Fry in 2 batches for 2 minutes or until golden. Remove from hot oil and drain on paper towels. Serve with cocktail sauce if desired. Copyright © 2003 The Ultimate Turkey Fryer Cookbook, Meredith Books LIMITED WARRANTY The manufacturer warrants its products to be free from defects in material and workmanship under proper assembly, normal use and care for a period of 90 days from the date of original retail purchase. This warranty does not cover loss of paint finishes due to normal wear and tear or burn off during normal use. This warranty does not cover physical or cosmetic damage due to rust on the unit. Reasonable proof of purchase is required for warranty claims. Original receipt should be retained. Upon the expiration of such warranty, all such liability shall terminate. Within the stated warranty period, the manufacturer, at its discretion, shall repair or replace defective components free of charge with owner being responsible for shipping. Should the manufacturer require return of component(s) in question for inspection the manufacturer will be responsible for shipping charges to return requested item. This warranty excludes property damage sustained due to misuse, abuse, accident, damage arising out of transportation, or damage incurred by commercial use of this product. This expressed warranty is the sole warranty given by the manufacturer and is in lieu of all other warranties, expressed or implied including implied warranty, merchantability, or fitness for a particular purpose. Neither the manufacturer nor the retail establishment selling this product has authority to make any warranties or to promise remedies in addition to or inconsistent with those stated above. In any event, liability of manufacturer shall not exceed the purchase price of the product paid by the original consumer/ purchaser. Some states do not allow the exclusion or limitation of incidental or consequential damages. In such a case, the above limitations or exclusions may not be applicable. California residents only: Not withstanding this limitation of warranty, the following specific restrictions apply; if service, repair, or replacement of the product is not commercially practical, the retailer selling the product or the manufacturer will refund the purchase price paid for the product, less the amount directly attributable to use by the original buyer prior to the discovery of the nonconformity. Owner may take the product to the retail establishment selling this product in order to obtain performance under warranty. This expressed warranty gives you specific legal rights, and you may also have other rights which vary from state to state. COMPLETE & RETURN TO ATTN: WARRANTY REGISTRATION Bruce Foods Corp. P.O. Drawer 1030, New Iberia, LA., 70562-1030 1-866-752-6497 Name:________________________________________________________________ Address:______________________________________________________________ City, State/Province, Postal Code:__________________________________________ Phone Number:_________________ E-Mail Address:__________________________ Model Name:__________________________ Model Number:____________________ Purchase Date:_____________ Place of Purchase:____________________________