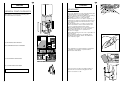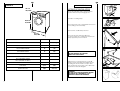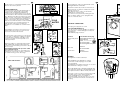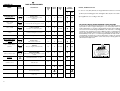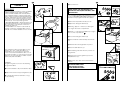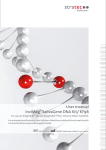
1
EN
User instructions
1
Aquamatic 10 T
UK
1
UK
OUR COMPLIMENTS
INDEX
Thank you for choosing a Candy appliance.
Quality washing machines which guarantee
high performance and reliability.
Introduction
Candy is also able to offer a comprehensive
range of other household appliances:
dishwashers, washer-dryers, cookers,
microwave ovens. Traditional ovens and
hobs, refrigerators and freezers.
Ask your local retailer for the complete
catalogue of Candy products.
Please read this booklet carefully as it
provides important guide lines for safe
installation, use and maintenance and
some useful advice for best results when
using your washing machine.
CHAPTER
General points on delivery
1
Guarantee
2
Safety Measures
3
Technical Data
4
Setting up and Installation
5
Control Description
6
Detergent drawer
7
Programme Selection Advise
8
The Product
9
Table of Programmes
10
Computing a wash
11
Cleaning and routine maintenance
12
Faults Search
13
Keep this booklet in a safe place for further
consultation.
“When contacting a Candy Service Centre
always quote the Model Number and Serial
Number of Your Appliance”.
2
2
3
UK
UK
CHAPTER1
CHAPTER 2
GUARANTEE
GENERAL POINT ON DELIVERY
Your new appliance is fully guaranteed by the
manufacturer for 12 months against
electrical/mechanical breakdown excluding:
A. Any faults which occur due to bad
installation or misuse of the machine.
B. Any faults which occur due to repair of, or
interference with, the machine by any person
not authorised by the manufacturer to carry
out service.
C. Any faults which occur due to any parts
which are fitted to the machine which are
not the original manufacturers parts.
D. Any faults arising from non-domestic use or
unusual or abnormal use of the machine.
E. Any faults arising from operation at
incorrect voltage.
F. Any faults arising from incorrect operation of
the machine.
The guarantee applies to Gt. Britain and
Northern Ireland only, and is an addition to
your statutory rights.
On delivery, check that the following are
included with the machine:
EUROPE
A) AN INSTRUCTION MANUAL
B) CUSTOMER SERVICE ADDRESSES
Dovunque
tu sia.
A
SPEDIRE
B
TRATTENERE
Your appliance is supplied with a registration
card which should be completed and
returned as indicated.
C
C) GUARANTEE CERTIFICATES
D) CLAMP FOR OUTLET HOSE
Your purchase receipt should be retained
and shown to the Service Engineer in the
event of a Service call.
KEEP THEM IN A SAFE PLACE
D
4
5
UK
UK
● Do not use adaptors or multiple plugs.
CHAPTER 3
SAFETY MEASURES
● Do not allow the appliance to be used by
children without due supervision.
IMPORTANT:
FOR ALL CLEANING AND MAINTENANCE
WORK ENSURE THE APPLIANCE IS
DISCONNECTED FROM THE ELECTRICAL
SUPPLY
● Remove the plug
● Do not pull the mains lead or the appliance
itself to remove the plug from the socket.
● Turn off the water inlet tap.
● All Candy appliances must be earthed.
Ensure that the main electricity circuit is
earthed. Contact a qualified electrician if
this is not the case.
● Do not leave the appliance exposed to the
natural elements (rain, sun etc.)
1
This appliance complies with Directives
89/336/EEC, 73/23/EEC and following
changes.
● Important!
When the appliance location is on a carpeted
floor, attention must be paid to ensure that
there is no obstruction to the bottom vents.
● Do not touch the appliance with wet or
damp hands or feet.
● During transport do not lean the load door
against the trolley.
● Do not use the appliance when barefooted.
WARNING: DURING THE WASHING
CYCLE, THE WATER CAN REACH A
TEMPERATURE OF 90°C.
● Before opening the washing machine
door, ensure that there is no water in the
drum.
IMPORTANT WARNING:
THIS APPLIANCE MUST BE SECURELY
EARTHED
6
● Lift the appliance in pairs as illustrated in the
diagram.
90° C
● In case of failure
and/or incorrect operation, turn the washing
machine off, disconnect the electrical supply,
close the water inlet tap and do not tamper
with the appliance. Only contact a Candy
Technical Assistance Centre for any eventual
repairs and ask for original Candy spare parts.
● Should the supply cord (mains cable) be
demaged, this is to be replaced by a specific
cable available from the after sales service
centre.
7
UK
CHAPTER 4
UK
CHAPTER 5
4
43 cm
16,9 INC
SETTING UP INSTALLATION
Move the machine near to its permanent
position without the packaging base.
Cut tube - Holding straps
69,5 cm
27,5 INC
5
Unscrew the two top screws A and remove the
cover, sliding it off horizontally
Remove the cardboard protection.
51 cm
20,1 INC
Unscrews the two tie braces B on the
crosspiece(with a H. 19 spanner) and remove
the polystyrene spacers under it.
A
WASHING
MAXIMUM DRY LOAD
Ibs
6,6 (3 kg)
WATER LEVEL
Gall
2,3 (10 l)
WASH MOTOR POWER
W
150
SPIN MOTOR POWER
W
250
ELECTROPUMP POWER
W
30
POWER RESISTANCE
W
1100
MAX ABSORBED POWER
220 V (240 FOR U.K. ONLY)
W
1250
FUSE
A
13
SPIN SPEED
r.p.m.
1000
WATER PRESSURE
Mpa
min. 0,05
max. 0,8
6
C
B
IMPORTANT:
DO NOT REMOVE THE SPACERS
ABOVE THE CROSSPIECE.
Replace the cover with the two screws A .
Please ensure when fitting the table top the
locating pins are inserted correctly in their
slots, positioned on the side of the cabinet as
shown in the relevant diagram.
WARNING:
DO NOT LEAVE THE PACKAGING WITHIN
THE REACH OF CHILDREN AS IT IS A
POTENTIAL SOURCE OF DANGER.
8
9
UK
UK
Fix the sheet of corrugated material on the
bottom as shown in picture.
Level the machine by means of the front foot.
a) Turn the nut clockwise to release the screw
adjuster of the foot.
b) Rotate the foot to raise or lower until it
stands firmly on the ground.
c) Lock the foot in position by turning the nut
anti-clockwise until it comes up against the
bottom of the machine.
E
COLD
WATER
HOT
WATER
ELECTRICAL CONNECTIONS
If the plug we supply does not fit
CUT IT OFF AND DESTROY IT!
You can’t use it on other appliances, and the
exposed wires could be dangerous if anyone
plugged it in.
Fit a suitable plug, as follows:
The appliance must be connected to the
water mains using new hose-sets. The old
hose-sets should not be reused.
Hook the end of the outlet hose over the rim
of the sink or outlet pipe, making sure that it
is not kinked. For better positioning of the
outlet hose make use of the plastic hose
clamp provided.
Where possible, use a fixed discharge pipe
with a diameter greater than that of the
outlet hose of the washing machine to allow
air to escape.
The minimum height of the top of the outlet
hose should be 50 cm.
Extending the outlet hose, especially if the
extension is more than 1 metre, could lead
to malfunctioning of the discharge.
8
▲
WATER CONNECTION
Your machine may either be plumbed in or
connected to existing taps, using a tap
adaptor with a 3/4 B.S.P. threaded end
connection. The water supply hoses can be
found inside the drum and are terminated in
two different ways. One end which has a 90°
elbow is to be connected to the appliance
water connection E while the straight end is
to be connected to the domestic supply
tap. The hose with the white collar should be
connected to the cold tap, and the hose
with the red collar to the hot tap. The
appliance is not suitable for use with mixer
taps.
7
The programme chart is located inside of the
detergent drawer as indicate.
=
NO
50 cm.
Connect
to the terminal in the plug
green and yellow
wire
marked withe the letter E, OR
marked with the
symbol,
OR coloured green,
OR coloured green and yellow.
blue wire
marked N
OR coloured black.
brown wire
marked L
OR coloured red.
A
.............
B
C
NO
WARNING
This appliance must be earthed
After installation, the appliance must be
positioned so that the plug is accessible.
Fuses and plugs
This appliance should be used only on a socket
with a minimum rating of 13 Amps.
Our ready-fitted plug is already equipped with
a 13 amp fuse which is BS 1362 ASTA approved.
Any replacement should be exactly the same.
If the fuse cover is lost, do not use the plug until
it is replaced. A correct replacement fuse
cover (obtainable from your dealer or
Electricity Board) must be the same colour as
shown or named on the insert on the base of
the plug.
10
11
UK
UK
DESCRIPTION OF CONTROLS
AVSNITT 6
9
DOOR OPENING BUTTON
IMPORTANT:
A SPECIAL SAFETY DEVICE PREVENTS THE
DOOR FROM OPENING AT THE END OF THE
WASH/SPIN CYCLE.
WE RECOMMEND THAT YOU ALLOW TWO
MINUTES TO ELAPSE BEFORE OPENING THE
DOOR AT THE END
OF THE FINAL SPIN CYCLE.
A
F
E DCB
I
L
OFF/ON BUTTON
NO SPIN BUTTON
CONTROLS
12
Detergent drawer
A
Door open button
B
Off/On button
C
No spin button
D
Slow spin button
E
Wash control temperature knob
I
Timer knob for wash programmes
L
B
OPEN
DOOR
C
ON
OFF
D
NO
SPIN
2 min.
By pressing this button it is possible to eliminate
the spin-drying on all programmes. This
operation is suitable for programmes at 90°C
and at 60°C in case of special treated fabrics
(cottonova or permanent press) or for mixed
delicate fabrics.
13
14
UK
UK
SLOW SPIN BUTTON
E
The programmes for resistant fabrics operate
at high spin speed.
In special circumstances, when the high
speed spin is not required, the slow spin key
may be pressed thus eliminating the high spin.
In the delicate programmes the drum always
spins at 400 r.p.m.
WASH TEMPERATURE CONTROL KNOB
SLOW
SPIN
CHAPTER 7
DETERGENT DRAWER
The detergent drawer is divided into 2
compartments:
11
- Main wash detergent
- Softener
I
ROTATES IN BOTH DIRECTIONS
When washing with bleach,
use the compartment cl for softener.
With this device it is possible to reduce, but no
increase washing cycle temperature.
The table of programmes indicate the
maximum temperature advised for each type
of wash.
When pre-washing, put the detergent directly
inside the drum.
WARNING: THIS TEMPERATURE MUST
NEVER BE EXCEEDED
TIMER CONTROL FOR WASH
PROGRAMMES
12
L
IMPORTANT:
ALWAYS TURN THE CONTROL IN A
CLOCKWISE DIRECTION, NEVER IN AN
ANTI-CLOCKWISE DIRECTION. DO NOT
PRESS THE “ON” BUTTON (C) BEFORE
SELECTING THE PROGRAMME
The tables describe the wash programmes on
the basis of the numbers or symbols chosen.
IMPORTANT:
MOST DETERGENT MANUFACTURERS WILL
PROVIDE A CONTAINER FOR DETERGENTS
TO BE PLACED DIRECTLY INTO THE DRUM.
IMPORTANT:
ONLY INTRODUCE LIQUID DETERGENTS
INTO THE SECOND COMPARTMENT.
13
OK
14
15
UK
UK
CHAPTER 8
PROGRAMME SELECTION
ADVICE
For the various types of fabrics and levels of
soiling the washing machine has 2 different
programme bands. Wash cycle, temperature
and length of cycle (see table of washing cycle
programmes).
There is also a pre-wash cycle which can be
used with especially dirty laundry.
CHAPTER 9
THE PRODUCT
IMPORTANT:
When washing heavy rugs, bed spreads and
other heavy articles, it is advisable not to spin
them as damage may occur.
To be machine-washed, woollen garments
must bear the machine washable label.
1 Resistants Fabrics (heavy cottons)
The programmes have been designed for a
maximum wash and rinses, with spin intervals,
which ensure perfect rinsing. The gradual
reduction of the water temperature ensures less
fabrics creasing and the final spin gives a more
efficient water extraction.
2 Wool and mixed or Delicate Fibres
This is a wash cycle which alternates washing
and soaking and is particularly recommended
for very delicate fabrics such as machine
washable wool. The wash cycle and rinses are
carried out with high water levels to ensure the
best results.
16
IMPORTANT:
When sorting articles ensure that:
- there are no metal objects in the washing
(e.g. brooches, safety pins, pins, coins etc.).
- cushion covers are buttoned, zips and hooks
are closed, loose belts and long tapes on
dressing gowns are knotted.
- runners from curtains are removed.
- attention is paid to garment labels.
- when sorting, any tough stains should be
removed prior to washing using only those
stain removers recommended on label.
17
UK
TABLE OF PROGRAMMES
CHAPTER 10
FABRIC
SYMBOL
ON LABEL
WEIGHT
MAX
kg
PROGRAM FOR
SELECT.
PROG.
SELECT.
TEMP.
CHARGE
DETERGENT
°C
Please, read these notes
In case of very dirty articles, a 2 kg maximum load is recommended.
❙
❀
1) When pre-washing, put the detergent directly into the drum.
2)
Resistants fabrics
Cotton, linen
95°
Cotton, mixed
resistant
60°
Cotton, mixed
40°
Heavily soiled
Colour fast table cloths, towels,
underwear
3
1
40°/90°
●
●
Normally soiled
Coloured, shirts dressing gowns, sheets
3
2
30°/60°
●
●
Cottons colour fast
Non fast coloureds, blue jeans
2
3
30°/40°
Cotton
Energetic rinsing
Conditioner, fragrance, softener
3
4
-
Cotton, linen
Energetic spin
3
5
-
60°
Heavily soiled
Shirts, sheets, underwear
1,5
6
40°/60°
●
●
Cotton, mixed fabrics,
synthetics
50°
Universal
All types of lightly stained laundry
1,5
7
30°/50°
●
●
Synthetics (nylon,
perlon), mixed cotton
40°
RAPID PROGRAMME
Shirts, blouses, skirts with resistants colours,
curtains
1,5
8
40°
●
●
Woollens
“MACHINE WASHABLE” woollens
1
9
40°
●
●
Mixed, delicate
synthetics, wool
Delicate spin
1,5
10
-
Pre-wash1)
3
A
40°
Mixed and delicate
fabrics
Pre-wash bleaching
18
●
●
GET THE BEST RESULTS FROM YOUR NEW CANDY MACHINE
To ensure you get the best results from your new Candy machine it is
important to use the right detergent in your everyday wash. There are
many detergents on today’s supermarket shelves and making a
choice from the wide range available can often be confusing.
At Candy we regularly test many different types of detergent to assess
which give the best wash results in our machines. We found only one
brand always lives up to our exacting standards and provides
outstanding cleaning across a broad range of stains, as well as
providing high levels of fabric care. That’s why Candy gave Ariel their
official seal of approval.
2)
Mixed, resistants
No spin fabrics
●
2) Programmes according to IEC 456.
Drain only
3
-
-
Z
-
19
17
● Close the door.
CHAPTER 11
IMPORTANT:
WHEN SETTING THE PROGRAMME DIAL
ENSURE THAT THE ON/OFF BUTTON IS NOT
SWITCHED ON.
WASHING
Assuming that the washing consists of HEAVILY
SOILED COTTON (tough stains should be
removed with suitable stain removal). When
only a limited number of articles have stains
which require treatment with liquid bleaching
agents, preliminary removal of stains can be
carried out in the washing machine. Pour the
bleach into the special compartment and set
the knob (L) on the special programme
“PRE-WASH BLEACHING”. When this phase has
terminated add the rest of the washing and
proceed with a normal wash on the most
suitable programme.
It is advisable not to wash a load made up
entirely of articles in towelling fabric which
absorb a lot of water and become too heavy.
18
UK
UK
Select programme 1:
Choose the programme by rotating the control
(L) in a CLOCKWISE DIRECTION and align the
number of the programme with the symbol.
● Move the temperature knob (I) to 60°.
11
20
60 g
15
60°
21
● Open the detergent drawer (A).
● Put 60 g, approx. 1 measure, of detergent
(for 3 kg) in the wash compartment.
~50 cc
● Put 50 cc of the desired additive (for 3 kg) in
the second compartment ✿ .
● Close the detergent drawer (A).
● Ensure that the water inlet taps are turned
on.
18
● And that the discharge tube is in place.
▲
● Press the “ON” button (C).
The maximum load for heavy fabrics is 3 kg,
while, in the case of delicate fabrics, it is
advisable not to exceed 2 kg (1 kg in the
case of machine washable woollens so as to
avoid the formation of creases which may be
difficult to iron). A net bag should be used for
particularly delicate fabrics.
● The washing machine will carry out the set
programme.
● At the end of the programme, press the
On/Off button (C).
● Open the door and remove the washed
articles.
EXAMPLE:
Programme guide is set out in the washing
programme table:
23
FOR ALL TYPES OF WASH CONSULT
THE PROGRAMME TABLE
AND FOLLOW THE STEPS
IN THE ORDER INDICATED.
● Ensure that labels carry the indication 60°C
● Open the load door by pressing button (B).
● Load the drum with a maximum of 3 kg.
of dry washing.
20
3 kg max
21
UK
CHAPTER 12
CLEANING AND ROUTINE
MAINTENANCE
UK
CHAPTER 13
1
ALCOOL
FAULT
1. Does not function
on any
programme
Do not use abrasives, spirits and/or diluents on
the exterior of the washing machine. It is
sufficient to use a damp cloth.
Mains plug not plugged in
Insert plug
Mains switch not on
Turn on mains switch
No power
Check
Electric circuit fuses failure
Check
Load door open
Close load door
See cause 1
Check
Inlet tap turned off
Turn on water inlet tap
Timer not set correctly
Set timer on correct position
3. Does not discharge
water
Discharge tube bent
Straighten discharge tube
4. Water on floor
around washing
machine
Leak from the washer between the tap
and inlet tube
Replace washer and tighten the tube
on the tap
5. Does not spin
The washing machine has not
discharged water
Wait a few minutes until the machine
discharges water
“No spin” setting (some models only)
Turn the programme dial onto spin
setting
Washing machine not perfectly level
Adjust special feet
Tie braces not removed
Remove tie braces
Washing load not evenly distributed
Distribute the washing evenly
The washing machine requires very little
customer maintenance:
● Cleaning detergent drawer compartments.
● Moving house or long periods when the
machine is left standing.
2. Does not load
water
25
CLEANING THE DRAWER COMPARTMENTS
Although not strictly necessary, it is advisable to
clean the detergent, and additive
compartments occasionally.
Clean with water.
MOVING HOUSE OR DURING LONG
PERIODS WHEN THE MACHINE IS LEFT
STANDING
After moving house or when the machine is left
standing for long periods in an unheated room,
the drain hose should be emptied of all of the
remaining water.
The appliance must be switched off and
unplugged. A bowl is needed. Detach the
drainage hose and lower it over the bowl until
all the water is removed.
Repeat the same operation with the water inlet
hose.
22
REMEDY
CAUSE
6. Strong vibrations
during spin
If the fault should persist, contact a Candy Technical Assistance Centre. For prompt servicing, give the model of
the washing machine, to be found on the label placed on the cabinet inside of the porthole or on the
guarantee certificate.
Important
1 The use of environment friendly detersives without phosphates may produce the following effects:
- The discharge rinse water may result cloudier due to the presence of zeolites in suspension. This does not
compromise the efficiency of the rinses.
- The presence of white powder (zeolites) on the washing at the end of the washing cycle. This does not
remain incorporated in the fabric and does not alter the colour.
- The presence of foam in the last rinse water which is not necessarily a sign of inadequate rinsing.
- The non-ionic surface-active agents present in the composition of washing machine detersives are often
difficult to remove from the washing itself and, even in small quantities, may produce visible signs of the
formation of foam.
- Carrying out further rinses, in cases such as this, is not useful.
2 If your washing machine fails to function, carry out the above-mentioned checks before calling the Candy
Technical Assistance Service.
23
02.05 - 90489178.A - Printed in Italy - Imprimé en Italie
GB