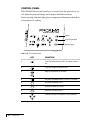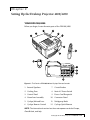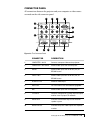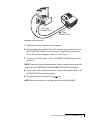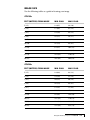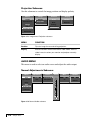
1
Proxima
Desktop Projector 4100/4200
User’s Guide
(not actual cover)
Warranty
Proxima Corporation warrants that the Proxima® Desktop Projector™ product manufactured by Proxima
is free from defects in materials and workmanship under normal use during the Warranty Period. The
Warranty Period commences on the day of purchase by the end-user. The Warranty Period is one year. The
projector lamp is not covered by this Warranty.
Each Proxima product is manufactured from new parts, or new and some used parts. In some cases, the
product may have been delivered to another end-user and then returned. In all cases, the product has
undergone testing and quality inspection, and Proxima's full warranty terms apply.
The end-user’s sales receipt or invoice showing the date of purchase of the product and the name of the
Reseller is proof of date of purchase. The Warranty extends only to the original purchaser and is not
transferable.
During the Warranty Period, Proxima will, at no additional charge, repair or replace defective parts or at
the option of Proxima, replace the entire unit.
This limited Warranty does not extend to any Proxima product that has been damaged or been rendered
defective (a) as a result of accident, misuse or other abuse; (b) by the use of parts not manufactured or sold
by Proxima; (c) by modification of the product; or (d) as a result of servicing by non-authorized
personnel.
Limitation of Warranties
The foregoing Warranty is expressly in lieu of any other expressed or implied, warranties, including,
without limitation, warranties of merchantability or fitness for a particular purpose. To the extent not
prohibited by law, all statutory warranties are hereby waived and excluded from this Warranty. Proxima
expressly disclaims all warranties not stated in this Limited Warranty.
FCC Statement
Warning: This equipment generates, uses and can radiate radio frequency energy and, if not installed and
used in accordance with the instruction manual, may cause interference to radio communications. It has
been tested and found to comply with limits for a Class “A” computing device pursuant to Subpart B of
Part 15 of the FCC Rules, which are designed to provide reasonable protection against such interference
when operated in a commercial environment. Operation of this equipment in a residential area is likely to
cause interference in which case the user, at his own expense, will be required to take whatever measures
may be necessary to correct the interference.
Trademarks, Patents, and Copyrights
Proxima and Cyclops are registered trademarks of Proxima Corporation. MediaExpress, LightBoard,
Desktop Projector, Desktop Projection, and Fit-to-View are trademarks of Proxima Corporation. Digital
Light Processing is a trademark of Texas Instruments. Macintosh is a registered trademark of Apple
Computer, Inc. Other trademarks are the property of their respective owners. This product is covered by
one or more of the following U.S. and foreign patent numbers: 5,062,001, 5,137,484, 5,153,568,
5,177,629, 5,181,015, 5,225,875, 5,264,835, 5,276,436, 5,298,892, 5,299,039, 5,300,944, 5,302,946,
5,321,450, 5,400,095, 5,453,803, 5,459,484, 5,483,382, 5,489,923, 5,499,036, 5,502,459, 5,504,501,
5,510,861, 5,512,967, 5,515,079, and DES. 360,426. Foreign patent numbers Canada Registered Design
No.74980 D Proxima Corporation 1994, British Registered Design No.2 038 977, Germany Registered
Design No. M 94 03 987.9 geschutztes Muster, Under Geschmacksmusterschutz, China Patent for
Design No.94303399.3, Japan Registered Design No.948294, South Korea Registered Design
No.174628, Australia Pat. Nos. 644 852, 668 823. Other US and foreign patents applied for.
© 1996 Proxima Corporation. All rights reserved. Specifications are subject to change without notice.
Contents
Chapter 1
Your Proxima Desktop Projector™ 4100/4200
What’s in the Box? ............................................................... 1-2
Quick Start ........................................................................... 1-3
Connector Panel .................................................................. 1-5
Control Panel ....................................................................... 1-6
Options and Accessories ..................................................... 1-7
Chapter 2
Setting Up the Desktop Projector™ 4100/4200
Your DP4100/4200 .............................................................. 2-1
Getting Started ..................................................................... 2-2
Connector Panel .................................................................. 2-5
Connecting Power to the Projector .................................... 2-6
Connecting Computer Video .............................................. 2-6
Connecting Computer Audio ........................................... 2-10
Connecting Composite Video .......................................... 2-11
Connecting an S-Video Source ......................................... 2-11
Connecting Non-Computer Audio...................................2-12
Chapter 3
Using the Desktop Projector™ 4100/4200
Turning on the Projector and Lamp ................................... 3-1
Focusing the Image .............................................................. 3-2
Image Size ............................................................................ 3-3
Turning off the Projector ..................................................... 3-4
Control Panel Keys .............................................................. 3-4
Control Panel Indicators ..................................................... 3-9
Using the Cyclops Remote Control .................................. 3-10
Operating the Projector .....................................................3-12
The Graphical User Interface ............................................3-14
Using the Main Menu .......................................................3-15
Selecting a Tool ................................................................. 3-16
Input Source Menu ............................................................ 3-20
Image Menu ....................................................................... 3-21
Audio Menu .......................................................................3-24
Using the Audio Menus ....................................................3-26
Preferences Menu ..............................................................3-27
Advanced Menu .................................................................3-28
Chapter 4
Cyclops F/X
Installing Cyclops F/X .........................................................4-2
Starting Cyclops F/X ............................................................ 4-2
Assignments Area ................................................................ 4-3
Customizing Effects ............................................................. 4-4
Using the Cyclops Interactive Pointer System ................... 4-5
See-it/Show-it ....................................................................... 4-7
Freeze ................................................................................... 4-8
Starting an Effect .................................................................. 4-9
The Presentation Effects ...................................................... 4-9
Menu Commands.............................................................. 4-11
Chapter 5
Maintenance
Replacing the Lamp ............................................................. 5-1
Cleaning the Lens ................................................................ 5-3
Changing Remote Control Batteries ................................... 5-3
Changing Batteries—Cyclops Quick Remote ..................... 5-4
Cleaning and Replacing the Noise Filter ............................5-4
Chapter 6
Troubleshooting
Where to Get Help............................................................... 6-1
Returning Your DP4100/4200 for Repair ........................... 6-5
Ordering Parts ...................................................................... 6-5
Appendix A
Specifications
DP4100/4200 Specifications .............................................. A-1
Appendix B
Accessories and Parts
Replacement Parts ............................................................... B-1
Index
Chapter 1
Your Proxima Desktop Projector™ 4100/4200
The Proxima® Desktop Projector™ family consists of portable, color data and
video LCD and Digital Light Processing™ (DLP) Desktop Projection™
products that make sharing data and presenting information as easy as
connecting your computer to your monitor.
800
600
400
200
0
800
APR MAY
JUN
600
400
200
0
APR MAY
JUN
JUL
JUL
Figure 1-1 The Proxima DP4100/4200 in use
This manual covers the Desktop Projector™ 4100 and 4200, which both use
Digital Light Processing technology to provide images of unrivaled clarity
and color accuracy.
Your Proxima Desktop Projector™ 4100/4200
1-1
WHAT’S IN THE BOX?
After you’ve opened the box and removed the DP4100/4200 and accessory
packs, make sure you have all of the items shown in Figure 1-2.
CAUTION! The DP4100/4200 should be treated like any other precision
optical instrument. Handle it carefully.
MUTE
–VOLUME+
/O
MENU
SOURCE
PROG 1
Computer
Audio Cable
MAC
MAC
S-Video Cable
Remote Control
Mac – VGA
Cable Adapter
Power Cord
Audio/Video
(AV) Cable
VGA Video Cable
Mini Jack to
RCA Adapter
Serial Cable
ADB Cable
VGA
Proxima
Desktop Projector
SETUP
PROG 2/
VGA – Mac
Monitor Adapter
Also included but not shown:
preview
select
source
Cyclops Quick
Remote Control
A85
• (2) AAA Alkaline Batteries
• User's Guide
• Product Registration Card
Figure 1-2 Items included with the DP4100/4200
All models also include power cords for Europe, Great Britain, and Italy.
1-2
Chapter One
QUICK START
Place the DP4100/4200 on a solid flat surface at a right angle
(perpendicular) to the projection screen, parallel to the floor. Follow the
appropriate section below for the type of system that you have.
NOTE: The DP4100/4200 has two sets of computer video and audio inputs.
The following examples describe the use of input 1.
Desktop PCs
1 Unplug the monitor cable from the computer.
2 Plug the end of the supplied VGA cable with the large round collar into
the COMPUTER 1 IN port on the projector. Plug the other end into the
computer Monitor Out port.
3 Connect your audio source to the COMPUTER 1 AUDIO inputs on the
projector.
4 You can project without using the PC monitor. To use the monitor, plug
the monitor cable into the MONITOR OUT port on the projector.
5 Turn the projector on and press the
key.
Desktop Macintosh Computers
1 Unplug the monitor cable from the computer.
2 Plug the end of the supplied VGA video cable with the large round collar
into the COMPUTER 1 IN port on the projector. Attach the VGA end of
the Mac - VGA cable adapter to the other end of the VGA video cable.
3 Plug the Mac end of the Mac - VGA cable adapter into your computer's
video port.
4 Connect your audio source to the COMPUTER 1 AUDIO inputs on the
projector.
5 To project and view the monitor at the same time, plug the monitor cable
into the Mac end of the VGA - Mac monitor adapter.
NOTE: The DP4100/4200 only supports the Multi-Sync standard as separate
monitors for Macintosh desktop computers.
6 Plug the VGA end of the VGA -Mac monitor adapter into the MONITOR
OUT port on the projector.
7 Turn the projector on and press the
key.
Your Proxima Desktop Projector™ 4100/4200
1-3
NOTE: If you turn the projector off while the computer is running, the
external monitor will go blank. This is normal. Just turn the projector on
again and the monitor display will return.
Notebooks
NOTE: If you are connecting to an Apple PowerBook, attach the Mac - VGA
cable adapter to the computer’s Video Out port (or video adapter cable).
1 Plug the COMPUTER end of the VGA Video cable into the notebook’s
VGA Out port or into the Mac - VGA cable adapter (Macintosh only).
2 Plug the end of the VGA Video cable with the large round collar into the
COMPUTER 1 IN port on the projector.
3 Connect your audio source to the COMPUTER 1 AUDIO inputs on the
projector.
4 Turn on the projector and press the
key.
Special Configurations
If your computer has an internal monitor but no external video capability
(such as the Macintosh Performa 575, PowerMac 5200, and certain
PowerBooks), you need a video adapter card in order to attach the DP4100/
4200.
Setup for a third-party adapter is identical to the procedures outlined in the
Quick Start section above. Contact your dealer, Proxima Customer Service, or
a third-party supplier for more information about an appropriate video
adapter.
1-4
Chapter One
CONNECTOR PANEL
All connections between the DP4100/4200 and computer or video source
are made on the side connector panel.
4
Video 1
5
4
5
6
S-Video1
Video 2
S-Video 2
Aux Port
7
3
Audio
Audio
Cyclops
Mic
8
3
9
Computer 1 Audio
Computer 2 Audio
Computer 1 In
2
1
Audio Out
Computer 2 In
Monitor Out
1
10
2
Figure 1-3 The Connector Panel
CONNECTOR
DESCRIPTION
1
COMPUTER 1 & 2 IN
Connects computer video to the projector.
2
COMPUTER 1 & 2 AUDIO
Allows stereo/mono audio input from the computer.
3
AUDIO
Allows stereo/mono audio input from an NTSC,
PAL, or SECAM source.
4
VIDEO 1 & 2
Allows video input from an NTSC, PAL, or SECAM
source.
5
S-VIDEO 1 & 2
Allows S-Video video input.
6
AUX PORT
For serial mouse use and software upgrades.
7
MIC
Allows audio input from a microphone.
8
CYCLOPS
Connects your computer for Cyclops input or output
and for use of Cyclops F/X software.
9
AUDIO OUT
10
MONITOR OUT
Provides audio output to an external stereo system.
Provides computer video output to a separate
monitor.
Your Proxima Desktop Projector™ 4100/4200
1-5
CONTROL PANEL
The DP4100/4200's control panel keys are used to turn the projector on or
off, adjust the projected image, and to display and hide the menu.
Power, warning, and alert lights give you important information about how
your projector is working.
Desktop Projector™ 4200
4
6
Setup
Menu
Power
7
Source
5
Over-Temperature
3
1
3
8
Replace Lamp
2
Figure 1-4 The Control Panel
KEY
1
FUNCTION
Turns the projector on or off if AC power switch is
on.
2
Turns the image to a black screen.
3
Adjusts the volume up or down.
4
Activates the MediaExpress system (if installed).
5
Setup
Activates the Setup menu.
6
Menu
Displays or hides the menu.
7
Source
8
1-6
Chapter One
Switches the video inputs.
Controls the menu and adjusts screen position.
LIGHT
FUNCTION
Glows green if AC input and projector power supplies are okay.
Glows red if not.
Glows red to warn of an over-temperature condition.
Glows red if the projection lamp burns out.
OPTIONS AND ACCESSORIES
The MediaExpress System
The MediaExpress™ system is a hybrid, next-generation product that brings
the functionality of computers and projectors much closer together.
The MediaExpress system eliminates the need to hook up a computer to the
DP4100/4200. Just print your presentation from whatever application you're
using to a special kind of file (called a .PDF file), copy or store the file on a
disk, then place the disk in the MediaExpress disk drive and start the show.
Cyclops
The Proxima Cyclops® interactive pointer system uses a built-in camera to
function like a cordless mouse. With Cyclops, you can control your
computer's cursor by moving the hand-held wand or pointing with an
optional hand-held laser.
Wireless Audio
Proxima’s exclusive wireless audio system operates in the 900 MHz RF band.
A user-installable transmitter sends stereo audio to speakers that decode the
signal for room-filling stereo sound.
The speakers have built-in RF receivers and can be switched to receive left,
right, or monaural signals. The user can power the speakers with either AC
or battery power.
NOTE: Check your local regulations to make sure that the 900 MHz frequency
is available for use.
Your Proxima Desktop Projector™ 4100/4200
1-7
Chapter 2
Setting Up the Desktop Projector 4100/4200
YOUR DP4100/4200
Before you begin, locate the main parts of the DP4100/4200.
1
2
3
2
11
1
MUTE
–VOLUME+
4
A
IM
OX
PR
/O
MENU
SOURCE
PROG 1
SETUP
PROG 2/
6
5
12
preview
select
7
source
Video 1
S-Video 1
Audio
Computer 1 Audio
Computer 1 In
Video 2
S-Video 2
Audio
Aux Port
Mic
Computer 2 Audio
Computer 2 In
Cyclops
Audio Out
8
9
Video Out
10
Figure 2-1 The Proxima DP4100/4200 and Cyclops Remote Controls
1. Internal Speakers
7. Circuit Breaker
2. Cooling Fans
8. Main AC Power Switch
3. Control Panel
9. Power Cord Receptacle
4. Zoom Lens Assembly
10. Connector Panel
5. Cyclops/Infrared Lens
11. Workgroup Knob
6. Cyclops Remote Control
12. Cyclops Quick Remote
NOTE: The international version has three extra power cords for Europe,
Great Britain, and Italy.
Setting Up the Desktop Projector™ 4100/4200
2-1
GETTING STARTED
Positioning the Projector
Place the projector on a solid, flat surface at a right angle (perpendicular) to
the projection screen and parallel to the floor. If you’re using a media cart,
make sure the wheels are locked to prevent it from moving.
Projection Screen
Top View
Perpendicular to the
projection screen
12 to 17.7°
Depending on zoom setting
Side View
Parallel to the floor
Figure 2-2 Positioning the projector
2-2
Chapter Two
Transporting and Moving the Projector
The projector has a recessed handle located in one of the side panels. Always
use the handle to transport the projector. The projector has protective feet
on the side opposite the handle, as well as on the bottom.
Figure 2-3 Transporting the projector
If you are moving the projector a short distance, grasp it securely at the sides
by the lower parts of the housing to support the weight of the unit.
®
Figure 2-4 Moving the projector
Setting Up the Desktop Projector™ 4100/4200
2-3
Projector Cooling and Airflow
Locate the air intake grills on the front and rear of the projector, and the air
exhaust grill on the top cover.
CAUTION! Never operate the projector if these grills are clogged or
obstructed, or if the electric fans are not running.
A
IM
OX
PR
Figure 2-5 Allow for proper air flow
2-4
Chapter Two
CONNECTOR PANEL
All connections between the projector and your computer or video source
are made on the side connector panel.
4
Video 1
5
4
5
6
S-Video 1
Video 2
S-Video 2
Aux Port
7
3
Audio
Audio
Cyclops
Mic
8
3
9
Computer 1 Audio
Computer 2 Audio
Computer 1 In
2
1
2
Audio Out
Computer 2 In
Monitor Out
1
10
Figure 2-6 The Connector Panel
CONNECTOR
DESCRIPTION
1
COMPUTER 1 & 2 IN
Connects computer video to the projector.
2
COMPUTER 1 & 2 AUDIO
Allows audio input from the computer.
3
AUDIO
Allows audio input from an NTSC, PAL, or
SECAM source.
4
VIDEO 1 & 2
Allows video input from an NTSC, PAL, or
SECAM source.
5
S-VIDEO 1 & 2
Allows S-Video input.
6
AUX PORT
For serial mouse use and software upgrades.
7
MIC
Allows audio input from a microphone.
8
CYCLOPS
Connects computer for Cyclops input or output
and for use of Cyclops F/X software.
9
AUDIO OUT
Provides stereo audio output to an external
speaker system.
10
MONITOR OUT
Provides computer video output to a separate
monitor.
Setting Up the Desktop Projector™ 4100/4200
2-5
CONNECTING POWER TO THE PROJECTOR
The power cord receptacle, AC POWER switch, and circuit breaker are
located next to the connector panel of the projector.
Circuit Breaker
Video 1
S-Video 1
Video 2
Audio
Aux Port
S-Video 2
Audio
AC Power Switch
Mic
Cyclops
Power Receptacle
Computer 1 Audio
Computer 2 Audio
Computer 1 In
Computer 2 In
Audio Out
Video Out
Figure 2-7 Power receptacle, AC Power switch, and circuit breaker reset switch
1 Plug the appropriate power cord into the power receptacle on the side of
the projector.
2 Connect the power cord to a properly-grounded wall outlet.
CONNECTING COMPUTER VIDEO
Connecting a PC
VGA
VGA
Use the included VGA video cable to connect your PC to the projector. Use
your existing monitor cable to connect the projector to a separate monitor,
so that you can use your monitor and DP4100/4200 at the same time.
VGA Connector Cable
Figure 2-8 VGA Video cable
2-6
Chapter Two
VGA Cable
To COMPUTER IN
From
MONITOR OUT
Figure 2-9 VGA connections
1 Unplug the monitor cable from the computer.
2 Plug the end of the supplied VGA cable with the large round collar into
the COMPUTER 1 IN port on the projector. Plug the other end of the
VGA cable into the computer's Video Out (VGA) port.
3 Connect your audio source to the COMPUTER 1 AUDIO inputs on the
projector.
NOTE: If you are using a second computer video or audio source, plug their
outputs into the COMPUTER 2 IN and COMPUTER 2 AUDIO connectors.
4 If you want to use an external monitor, connect the monitor cable to the
MONITOR OUT port of the projector.
5 Turn the projector on and press the
key.
NOTE: An external monitor is not required to use the DP4100/4200.
Setting Up the Desktop Projector™ 4100/4200
2-7
Connecting Macintosh Computers
MAC
The video adapters shown below are used to connect a Macintosh computer
and monitor to the DP4100/4200.
From
Mac CPU
To VGA
Cable
MAC
Mac – VGA Cable Adapter
To Mac
Monitor Cable
From Projector
MONITOR OUT
VGA– Mac Monitor Adapter
Figure 2-10 The Macintosh adapters
Use the cable adapters and supplied VGA video cable to connect the
projector to your Macintosh computer.
MAC II
CPU
VGA Cable
to
COMPUTER 1
IN Port
Mac - VGA
Cable Adapter
Macintosh
Monitor Cable
To MONITOR OUT Port
Figure 2-11 Macintosh connections
2-8
Chapter Two
VGA - Mac
Monitor Adapter
1 Unplug the Macintosh monitor cable from the computer.
2 Plug the end of the supplied VGA video cable with the large round collar
into the COMPUTER 1 IN port on the projector. Attach the VGA end of
the Mac - VGA cable adapter to the other end of the VGA video cable.
3 Plug the Mac end of the Mac - VGA cable adapter into the Macintosh
video port.
4 Connect the audio source to the projector's COMPUTER AUDIO 1 ports.
NOTE: If you are using a second computer video or audio source, plug their
outputs into the COMPUTER 2 IN and COMPUTER 2 AUDIO connectors.
Use the VGA - Mac monitor adapter and your existing monitor cable to
connect the projector to a separate computer monitor, so you can view
computer video on the projector screen and the monitor at the same time.
NOTE: The DP4100/4200 only supports the Multi-Sync standard as separate
monitors for Macintosh desktop computers.
5 To project and view the monitor at the same time, plug the monitor cable
into the Mac end of the VGA - Mac monitor adapter.
6 Plug the VGA end of the VGA - Mac monitor adapter into the MONITOR
OUT port on the projector.
7 Turn the projector on and press the
key.
NOTE: An external monitor is not required to use the DP4100/4200.
Connecting Notebook Computers
Use the appropriate cable and adapter to connect your portable computer to
the projector.
MA
CP C II
U
To VIDEO
OUT Port
MAC - VGA
Adapter
VGA Cable
To COMPUTER 1
IN Port
Figure 2-12 Laptop connections
Setting Up the Desktop Projector™ 4100/4200
2-9
NOTE: If you are connecting to an Apple PowerBook, attach the Mac - VGA
cable adapter to the computer’s VIDEO OUTPUT port (or video adapter cable).
1 Plug the COMPUTER end of the VGA cable into the computer’s VGA or
Video Out port or into the Mac - VGA cable adapter (Macintosh only).
2 Plug the end of the supplied VGA cable with the large round collar into
the COMPUTER 1 IN port on the projector.
3 Connect your audio source to the COMPUTER AUDIO 1 ports on the
projector.
4 Turn the projector on and press the
key.
NOTE: If your projector is unable to project an image at the same time your
laptop monitor displays an image, refer to your laptop documentation for
information on switching between the internal screen and the video port.
Special Configurations
If your computer has an internal monitor but no external video capability
(Macintosh Performa 575, PowerMac 5200, and certain PowerBooks), you
need a video adapter card in order to attach the DP4100/4200.
Setup for a third-party adapter is identical to the procedures outlined in the
Quick Start section in Chapter 1. Contact your dealer, Proxima Customer
Service, or a third-party supplier for more information about an appropriate
video adapter.
CONNECTING COMPUTER AUDIO
Connect audio inputs from a computer to the COMPUTER 1 & 2 AUDIO
ports with the supplied audio cable.
Computer 1 Audio
Computer 2 Audio
Computer 1 In
Computer 2 In
Figure 2-13 Computer 1 & 2 Audio ports
1 Insert the mini-jack end of the computer audio cable into the AUDIO
OUT port of a Macintosh or the sound card of a PC.
2-10
Chapter Two
2 Insert the RCA jacks on the other end of the computer audio cable into
the projector’s left and right COMPUTER 1 AUDIO ports. If you are using
two audio sources, connect the second one to the projector's COMPUTER
2 AUDIO ports.
If your audio source is monaural, your projector will provide a simulated
stereo output. Connect your source to the left COMPUTER 1 AUDIO port.
NOTE: Although both COMPUTER AUDIO and AUDIO may be connected
simultaneously, only one can be active. If computer video is selected,
COMPUTER AUDIO is active. If NTSC/PAL/SECAM/S-Video video is being
viewed, AUDIO is active.
CONNECTING COMPOSITE VIDEO
You can display composite video (NTSC, PAL or SECAM) on the DP4100/
4200.
Video 1
S-Video 1
Video 2
S-Video 2
Figure 2-14 Video 1 & 2 ports
Use the supplied AV cable (see page 1-2) to connect an NTSC, PAL, or
SECAM source to your projector.
1 Find the RCA connector on your video source marked VIDEO OUT or
something similar. This connector is usually yellow. Insert one of the AV
cable’s yellow connectors into the VIDEO OUT jack of the video source.
2 Insert the other yellow connector into the projector’s VIDEO 1 port.
CONNECTING AN S-VIDEO SOURCE
To connect an S-Video source, use the supplied S-Video cable (see page 1-2)
instead of an RCA cable connection. The S-Video cable has identical, round,
4-pin mini-DIN connectors on both ends.
Video 1
S-Video 1
Video 2
S-Video 2
Figure 2-15 The S-VIDEO port
Setting Up the Desktop Projector™ 4100/4200
2-11
To connect an S-video source:
1 Insert one end of the S-VIDEO cable into the mini-DIN Video Out port of
the video source device.
2 Insert the other end of the S-VIDEO cable into the projector’s S-VIDEO
port.
CONNECTING NON-COMPUTER AUDIO
The AUDIO ports allow the projector to receive stereo or monaural audio
inputs from a composite video source.
Audio
Audio
Figure 2-16 Audio Input ports
For stereo audio, use the supplied AV cable.
1 Insert the red (right) and white (left) ends of the cable into the AUDIO
OUT ports of a composite video's audio source.
2 Connect the other end of each cable to the projector’s AUDIO ports.
NOTE: Although both COMPUTER AUDIO and AUDIO may be connected
simultaneously, only one can be active. If computer video is selected,
COMPUTER AUDIO is active. If NTSC/PAL/SECAM/S-Video video is being
viewed, AUDIO is active.
If your TV audio source outputs only monaural audio, your Desktop
Projector will provide simulated stereo audio. Connect the audio source to
the left AUDIO port.
2-12
Chapter Two
Connecting a Mouse to the AUX Port (Serial)
A Microsoft®-compatible mouse can be connected to the AUX PORT to
control many of the projector’s built-in features. You can use your mouse to
navigate the projector’s menus in Local Mode or to function as the
computer's system mouse in Host Mode (see Chapter 3).
Aux Port
Figure 2-17 The Aux port
Connecting a Microphone
When you need to address a larger audience while projecting an image, plug
an amplified or wireless microphone equipped with a line level output
(maximum level of 1 volt, peak-to-peak) into the MIC port.
Mic
Cyclops
Audio Out
Figure 2-18 Microphone input
Connecting Cyclops
Use the CYCLOPS port to connect the projector and optional Cyclops
interactive pointer system to the computer.
Mic
Cyclops
Audio Out
Figure 2-19 The Cyclops port
Setting Up the Desktop Projector™ 4100/4200
2-13
The optional Cyclops interactive pointer system is shipped with its own
Installation and User’s Guides. The Cyclops kit also includes extra cables to
connect the projector and the computer.
1 Connect one end of the appropriate serial cable to the projector’s
CYCLOPS port.
2 Connect the other end of the cable to the computer:
• On a PC, connect the computer end to a serial port.
• On a Macintosh, connect the computer end to an ADB connector.
Projector Audio Out
The projector contains an internal stereo system consisting of an amplifier
and two speakers. Although this system provides high-quality stereo output,
a multimedia presentation may require independently powered speakers or
an external sound system.
NOTE: The projector’s internal speakers can be turned on or off using the
Audio menu (see page 3-24).
Audio Out
Video Out
Figure 2-20 The Audio Out port
To connect your projector to an external stereo system:
1 Insert the RCA jacks of the stereo system speaker composite video/audio
cable into the projector’s AUDIO OUT ports.
2 Insert the RCA jacks at the other ends into the external amplifier or
powered speaker system’s left and right AUDIO IN ports.
NOTE: A mini-jack to RCA adapter is provided (see page 1-2) in case your
external speaker system has a mini-jack plug.
2-14
Chapter Two
Chapter 3
Using the Desktop Projector 4100/4200
TURNING ON THE PROJECTOR AND LAMP
Power the DP4100/4200 up before the computer. This allows the computer
to sense the projector during its startup sequence.
Move the AC POWER switch to the ON position. The
indicator on the
projector control panel turns green and the
key turns orange to
indicate a successful self-test.
The lamp is off when you first turn on the projector. Press the
key on the
operator panel for one second to turn the lamp on. The key blinks for a few
seconds while the lamp warms up, and then turns to a steady green color.
Next, turn on your computer. If you turn the projector off while the rest of
your computer system is running, your external monitor will go blank. This
is normal. Just turn the projector on again and your monitor display will
return.
CAUTION! Never operate the projector if the air intake or exhaust grills
are clogged or obstructed, or if the electric fan is not running.
Desktop Projector™ 4200
Source
Power Indicator
7
Menu
Setup
Power Key
Figure 3-1 Projector power key
Using the Desktop Projector™ 4100/4200
3-1
FOCUSING THE IMAGE
1 Use the Setup menu (see page 3-6) to adjust the focus. Press the
and use the right and left arrow keys to adjust the focus.
Setup
2 You can also use the [Prog 1] or [Prog 2] key on the Cyclops remote
control to set the focus. These keys can be (and may have been)
reprogrammed for other functions (see Advanced menu, page 3-28).
3-2
Chapter Three
key
IMAGE SIZE
Use the following tables as a guide in focusing your image.
DP4100z
FEET (METERS) FROM IMAGE
MIN. DIAG.
MAX. DIAG.
5 (1.5)
2.3 (0.7)
3.4 (1.0)
6 (1.8)
2.7 (0.8)
4.1 (1.2)
7 (2.1)
3.2 (1.0)
4.8 (1.5)
8 (2.4)
3.6 (1.1)
5.4 (1.7)
9 (2.7)
4.1 (1.2)
6.1 (1.9)
10 (3.0)
4.5 (1.4)
6.8 (2.1)
15 (4.6)
6.8 (2.1)
10.2 (3.1)
20 (6.1)
9.1 (2.8)
13.6 (4.1)
25 (7.6)
11.4 (3.5)
17.0 (5.2)
30 (9.1)
13.6 (4.2)
20.4 (6.2)
FEET (METERS) FROM IMAGE
MIN. DIAG.
MAX. DIAG.
5 (1.5)
2.9 (0.9)
4.3 (1.3)
6 (1.8)
3.4 (1.0)
5.1 (1.6)
7 (2.1)
4.0 (1.2)
6.0 (1.8)
8 (2.4)
4.6 (1.4)
6.8 (2.1)
9 (2.7)
5.2 (1.6)
7.7 (2.3)
10 (3.0)
5.7 (1.7)
8.5 (2.6)
15 (4.6)
8.6 (2.6)
12.8 (3.9)
20 (6.1)
11.5 (3.5)
17.0 (5.2)
25 (7.6)
14.4 (4.4)
21.3 (6.5)
30 (9.1)
17.2 (5.2)
25.5 (7.8)
DP4200z
Using the Desktop Projector™ 4100/4200
3-3
TURNING OFF THE PROJECTOR
1 Press and hold the
key for one second to turn the projector off. The
key glows orange. When using the Cyclops remote control, press and hold
the
key for two seconds. The projector will beep twice to
acknowledge the command.
2 When the fan stops, the projector is cool and you can turn the AC
POWER Switch off.
NOTE: Turning the lamp off does not turn the projector power off. The fan
will still operate for 30 seconds. You must move the AC POWER switch to the
OFF position to completely power down the projector.
CONTROL PANEL KEYS
The DP4100/4200’s control panel keys are used to turn the projector on or
off, adjust the projected image, and to display and hide the menu.
Desktop Projector™ 4200
4
7
Source
7
5
6
Setup
Menu
9
3
1
3
2
Figure 3-2 Control Panel keys
3-4
Chapter Three
8
KEY(S)
FUNCTION
1
Turns the lamp on or off if AC power switch is on.
2
Turns the image to a black screen.
3
Increases or decreases the volume.
4
Activates the MediaExpress system (if installed).
5
Setup
Activates the Setup menu.
6
Menu
Displays or hides the menu.
7
Source
Switches through the video inputs.
8
Controls the menu and adjusts screen position.
9
Workgroup knob. Switches to Workgroup mode.
Power
The
key is used to turn the lamp on or off. To turn the projector lamp
off, press the
key for at least one second. On the Cyclops remote
control, press the
key for at least two seconds. The projector will beep
twice to acknowledge the command. The projector will shut off in 30
seconds.
Hide
The
key is used to switch the image to a black screen. Use this key
when you want to present information without displaying the computer or
video image.
Arrows
The
keys allow you to:
• Make small adjustments in the position of the projected image. Press the
arrow keys to shift the images in the direction indicated by the arrow, or
• Modify settings in the Menus.
Using the Desktop Projector™ 4100/4200
3-5
Menu
Menu
Press the Menu key to display the menu options in the upper portion of the
projected image. If a menu selection is not made within five seconds, the
menu will disappear. Menu settings are automatically stored when you exit
the menus.
Source
The
Source
Source
key allows you to switch between active connected sources.
Volume
The
keys display a slide bar to adjust the audio output levels of the
projector. Press the
key to increase or the
key to decrease the
audio output levels. These keys control both internal and external audio
levels.
Setup
Setup
Press the Setup key to display the Setup menu. The projector will display a set
of slide bars to help you adjust the image. These include the adjustments on
the Image menu (see page 3-21), as well as Horizontal and Vertical position
controls to move the image on the screen.
NOTE: The Setup adjustment choices will be different for each type of input
source.
3-6
Chapter Three
Bright
Contrast
Sync
Dot Clk.
Horz. Pos.
Vert. Pos.
Figure 3-3 Computer Source Setup slide bars
Use the ▲ and ▼ keys to select the item you want to adjust. The gray box
and slide bars will appear. Press or to adjust the selected item. Press
again to accept the new setting. The display disappears after five
seconds if no actions are taken.
Setup
SETTING
PURPOSE
AVAILABLE ON
Focus
Adjust focus
All Sources
Zoom
Zoom in or out
All Sources
Bright
Increase/decrease brightness
All Sources
Contrast
Increase/decrease the contrast level of
the image
All Sources
Sync
Fine tune the dot clock phase
Computer Video
Dot Clk.
Adjust pixels per line
Computer Video
Horz. Pos
Move the image left or right
Computer Video
Vert. Pos
Move the image up or down
Computer Video
Tint
Increase/decrease red/green colors
Composite Video
Saturation
Increase/decrease color saturation
Composite Video
Using the Desktop Projector™ 4100/4200
3-7
The MediaExpress™ system
Press the
key to activate the MediaExpress system (if installed). The
MediaExpress system is an optional, next-generation product that brings the
functionality of computers and projectors closer together. A diskette with a
.PDF file is placed into the DP4100/4200’s optional MediaExpress disk drive,
and a slide show can be run without connecting a computer to the projector.
Workgroup Mode
The Workgroup knob switches the projector to an extra bright (1050 lumen
for DP4100z and 1400 lumen for DP4200z) monochrome mode for
displaying spreadsheets and other text-based information. Pull the knob up
for Workgroup mode. Push it down for full color.
®
Figure 3-4 Workgroup knob
3-8
Chapter Three
CONTROL PANEL INDICATORS
Power, warning, and alert indicators give you important information about
how your projector is working.
Desktop Projector™ 4200
Source
3
Power
7
Setup
Over-Temperature
Menu
Replace Lamp
Figure 3-5 DP4100/4200’s Control Panel indicators
INDICATOR
FUNCTION
Glows green if AC input and projector power supplies are okay.
Glows red if not.
Glows red to warn of an over-temperature condition.
Glows red if the projection lamp burns out.
Power
The power indicator glows green after you turn on the AC power switch and
the projector completes a self check.
Over Temperature
The
indicator illuminates if the projector overheats.
An over-temperature condition automatically turns off the power to the
lamp until the projector cools.
If an over-temperature condition occurs, perform the following checks while
you allow the projector to cool:
• Verify that the room temperature is below 104° F (40° C) when projecting
in color or 95° F ( 35° C) when projecting in Workgroup (monochrome)
mode.
• Check the intake and exhaust vents. Clear any obstruction to the air flow.
Using the Desktop Projector™ 4100/4200
3-9
• Make sure that the fans are working. If the projector has reached an
over-temperature condition and the fans are working, you should feel a
strong flow of hot air from the top vent and a strong rush of air directly
into the front and rear of the projector. If either fan is not working, the
projector needs service.
After the projector returns to its normal operating temperature, you must
turn the main power switch off and back on to clear the over temperature
indicator. Press the
key on the control panel to relight the lamp.
NOTE: The Cyclops remote control’s /O key will not function after an over
temperature condition until the main power switch is turned off and on and
the lamp is turned on from the control panel.
Replace Lamp
The
indicator will illuminate if the projection lamp burns out. If the
lamp has burned out, you cannot continue your presentation until you
replace the lamp assembly.
CAUTION! If the lamp fails during a presentation, make sure that the
projector cools for at least five minutes with the projector off before
attempting to change the lamp. See page 5-1 to change lamps. The lamp
assembly gets very hot. Use appropriate care when changing it.
USING THE CYCLOPS REMOTE CONTROLS
The Cyclops remote control contains all the key functions available on the
DP4100/4200 control panel as well as several additional features. The
Cyclops Quick Remote allows you to control several of the projector's most
popular features.
For best results, aim the remote control at the projection screen or at the
projector’s front panel. Do not obstruct the red infrared eye located on the
front of the projector.
3-10
Chapter Three
MUTE
–VOLUME+
/O
SOURCE
PROG 1
MENU
SETUP
PROG 2/
D LP™
preview
select
source
Infrared Eye
Figure 3-6 Remote Controls and Infrared Eye
Cyclops Remote Control
KEY
FUNCTION
MUTE
Turns audio on or off.
– VOLUME +
Decreases or increases the volume of internal and/or external
speakers.
/O
Hides or shows the image. Press and hold the button for two
seconds to power down the projector. The projector will beep
twice when the command is acknowledged.
MENU
Displays or hides the menu.
SOURCE
Switches between connected sources.
SETUP
Displays the Setup menu (see page 3-6).
PROG1
Programmable key (see page 3-27).
PROG2/
This is a programmable key. If the MediaExpress system is
installed and selected as the source, this becomes the
MediaExpress key.
Using the Desktop Projector™ 4100/4200
3-11
KEY
FUNCTION
Pressing the center of the large round button sends a mouse click
signal. Press the edges up, down, left or right to move the cursor
around the screen. To drag an object, position the cursor over it,
then press the center button for one second. Move the cursor to
the new location, and press the center button again to release it.
Pressing the right side of the button moves a MediaExpress
presentation forward one slide.
Pressing the left side of the button moves a MediaExpress
presentation back one slide.
Pressing the bottom of the button pauses a presentation. Press the
bottom of the button again to restart the presentation.
Cyclops Quick Remote
The Cyclops Quick Remote allows you to control the most often used
projector functions.
NOTE: Several of the remote control functions require the installation of
Proxima’s Cyclops F/X software (see Chapter 4).
KEY
FUNCTION
Moves a presentation (PowerPoint, Freehand, etc.) forward or
back one frame. This function can only be used if Cyclops F/X is
installed.
Preview
Allows you to preview an image from a presentation (PowerPoint,
Persuasion, etc.) if Cyclops F/X and a separate monitor are installed.
Refer to the See It/Show It feature in Chapter 4 for more information.
Select
Selects a pre-programmed projector feature that you can choose
from the Preferences menu (see page 3-27).
Source
Switches between connected sources.
OPERATING THE PROJECTOR
The DP4100/4200 is simple to control using the control panel, Cyclops
remotes or pointer, or your computer mouse.
3-12
Chapter Three
Using the Control Panel and Cyclops Remote Controls
The control panel and Cyclops remote controls provide access to all of the
projector’s features. Simply press a key to select a function or to navigate
through the menus. The remote controls can also be used to control the
Cyclops F/X software (see Chapter 4).
Using a Microsoft-Compatible Mouse
You can use a Microsoft-compatible mouse to control the menus and the
LightBoard® tool in Local Mode. In Host Mode, use it as a system mouse.
The mouse must be connected to the AUX port on the projector before
powering up the projector (see page 2-13).
Operating Modes
The DP4100/4200 can operate in Local or Host Mode.
Local Mode
Any time you activate the projector’s menus or the LightBoard tool, the
projector is in Local Mode. In Local Mode, the mouse or Cyclops remotes
can be used for projector menu and LightBoard functions only; they do not
communicate with the computer.
In Local Mode, the projector mouse, Cyclops remotes or Cyclops pointer can
be used to:
• Move through the projector menus.
• Select items in the projector menus.
• Control the LightBoard cursor.
Host Mode
If a data cable is connected between the projector and the computer, the
projector can operate in Host Mode. In Host Mode, a mouse connected to
the projector functions as the system mouse. It communicates with the
computer or the MediaExpress system and controls the screen cursor for all
computer and MediaExpress functions. Host Mode can only be used when
the projector’s menu and the LightBoard tool are not active.
Please refer to the Cyclops User's Guide for more information on using a
mouse with Cyclops.
Using the Desktop Projector™ 4100/4200
3-13
THE GRAPHICAL USER INTERFACE
Your DP4100/4200 features a graphical user interface that makes it easy to
control all of the projector’s functions. Menu selections can be made with
the control panel, Cyclops remotes or pointer, or your computer mouse.
NOTE: Menus will change based on the type of video source you have
connected.
Using the Menus with the Control Panel or
Cyclops Remote
1 Press the MENU key to display the on-screen menus.
2 Press the ▲ and ▼ arrow keys to select the desired menu item. An item is
highlighted when it is selected.
3 Use the
and
arrow keys to move across the menus.
4 Use the ▲ and ▼ arrow keys to move down a menu column or to change
a menu value.
5 Press the MENU key again to close the menu or wait five seconds and
they will automatically disappear. Settings are automatically saved when
you exit the menus.
Menu Selection Using a Mouse
If a Microsoft-compatible mouse is connected to the projector’s AUX port,
menu selections are even easier. When the menus are open, simply point to
the desired item and click to select or change it.
Using the Menus with the Cyclops Interactive
Pointer System
For the ultimate in ease-of-use, you can use the optional Cyclops interactive
pointer system to control the menus and the LightBoard tool in Local Mode,
and the attached computer in Host Mode.
NOTE: You must first calibrate the Cyclops interactive pointer system.
• To open or close the menus, simply point the Cyclops wand or laser
pointer just to the left or right of the projected image and hold the button
down until the menus appear or disappear. As with a Microsoft-compatible
mouse, you can control the menus with a point and click.
3-14
Chapter Three
• To open or close the LightBoard tool, simply point the Cyclops wand or
laser pointer just above the projected image and hold the button down
until the LightBoard tool bar appears or disappears.
Click here with Cyclops for LightBoard
Click on either side of display
for menus to be displayed
Figure 3-7 Using Cyclops to activate the menus and LightBoard
USING THE MAIN MENU
When the MENU key is pressed or when the Cyclops pointer or a mouse are
used to open the menus, the Main menu appears at the top of the screen.
Menus
Tools
Input Source
Image
Audio
Preferences
Advanced
Figure 3-8 Main menu
To turn the menu off, press the MENU key again or click on the Menu title
bar with the Cyclops pointer or the mouse.
The menu displays only those items that are relevant to the selected input
source (computer, video, or S-Video). The following table lists the main
menu options that you can select:
Using the Desktop Projector™ 4100/4200
3-15
MENU
ACTIONS
Tools
Selects a projector tool for use.
Input Source
Selects a video source and adjusts the settings of an incoming signal.
Image
Adjusts the display settings, selects the option for rear or ceiling
projection.
Audio
Controls the audio (volume, balance, etc.).
Preferences
Programs a custom key on the Cyclops remote control or changes the
language of the menu display.
Advanced
Provides advanced projector functions.
SELECTING A TOOL
The Tools menu is used to set up and activate:
• The LightBoard tool
• The Cyclops interactive pointer
• The Timer
Menus
Tool Select
Tools
LightBoard
Input Source
Cyclops
Image
Timer
Audio
Preferences
Advanced
Figure 3-9 Tool Select menu
Using the LightBoard Tool
The LightBoard tool allows you to highlight text or other objects on the
screen and draw on a white or black background with the Cyclops remote
control or pointer, or a mouse.
3-16
Chapter Three
1 From the Tool Select menu, select the LightBoard tool.
Menus
Tool Select
Mode
LightBoard
Tools
LightBoard
Overlay
Off
Input Source
Cyclops
WhiteBoard
On
Image
Timer
BlackBoard
Audio
Preferences
Advanced
Figure 3-10 LightBoard Tool menu Using the LightBoard
2 Select a LightBoard mode.
Overlay
Uses the Draw tool to highlight or annotate the displayed image.
WhiteBoard
Clears the screen and provides a white background for the
Draw tool.
BlackBoard
Clears the screen and provides a dark background for the
Draw tool.
3 Select ON on the LightBoard menu. The Draw toolbar appears in the
upper left of the display.
Figure 3-11 Toolbox
4 The currently selected tool (Draw or Erase) is highlighted and a cursor
appears. Use the Cyclops wand, optional laser pointer, remote control, or
a Microsoft-compatible mouse to draw on the screen.
Using the Desktop Projector™ 4100/4200
3-17
Draw Tool Bar
The Draw tool bar has four options:
Pencil
Click to select the Drawing tool.
Eraser
Click to select the Eraser. You can erase portions of your highlights.
Clear All
Click to erase all previous highlighting.
New Color
Click to select a new color. This button also shows the currently selected
color.
Choosing a Color
1 Click the top color box or the down arrow in the upper right corner of the
Draw tool bar to display the color palette.
Figure 3-12 Toolbox Color palette
2 Click the color you want to use. The Color box takes on the selected color,
and the color palette remains on the screen.
3 Click the Color box or the down arrow in the upper right corner again to
turn the color selection boxes off.
3-18
Chapter Three
4 To draw, click and hold down the Cyclops wand or laser pointer button,
mouse button, or remote control mouse disc at the desired starting point.
Draw with the cursor and release the mouse or wand button to end a
draw motion.
5 To exit Draw, click the small box in the upper left corner of the Draw
tool bar.
The Draw tool bar can be moved to another location on the screen. With the
mouse, Cyclops wand, or remote control, click and hold on the top of the
tool bar. Drag the bar to the new location and release the mouse or wand
button.
Using the Cyclops Menu
The Cyclops menu allows you to calibrate and adjust the Cyclops interactive
pointer system. For more information, refer to the Cyclops User’s Guide.
NOTE: The Cyclops menu will only be active if the Cyclops camera is
installed.
Menus
Tool Select
Calibrate
Button
Tools
LightBoard
No Calibrate
Left
Input Source
Cyclops
Calibrate
Right
Image
Timer
Audio
Center
None
Preferences
Advanced
Figure 3-13 Cyclops Tool menu
MENUS
SETTING
Calibrate
Calibrates the Cyclops system for image size and ambient lighting
conditions. Follow the on-screen instructions displayed when
Calibrate is selected or refer to the Cyclops User's Guide.
Button
Select a mouse button action (Left, Right, Center or None) to send
to the computer when the wand is clicked.
Using the Desktop Projector™ 4100/4200
3-19
Setting the Timer
Use this tool to start and reset the on-screen digital timer. Set the Timer to
count down for breaks, class activities, and other presentation requirements.
Menus
Tool Select
Time
Timer
Tools
LightBoard
Off
Input Source
Cyclops
On
Image
Timer
25
Audio
Preferences
Advanced
Figure 3-14 Timer Tool menu
1 From Tool Select, choose Timer and press the right arrow key.
2 When the Timer menu appears, use the ▲ and ▼ keys on the control
panel, the mouse disc on the remote control, or a mouse to set the time.
3 From Timer (on the top menu bar), select On and the clock will begin to
count down.
When the timer reaches zero, a series of beeps will be heard.
INPUT SOURCE MENU
This menu provides a two-step method of selecting the video source.
• When a video input is connected, the Source Mode box indicates which
video source has been detected by the projector.
•
The Source Select box then allows the selection of other video input sources.
Menus
Source Select
Tools
Computer #1
Input Source
Computer #2
Image
Video #1
Audio
Video #2
Preferences
MediaExpress
Advanced
SourceMode
Sync
Cancel Select
HF:31.4 Khz
VF:59 Hz
Pol: – –
VGA
640 x 480
VGA
640 x 480 (67Hz)
VGA/ThinkPad
640 x 480
Current Mode
VGA
640 x 480
Figure 3-15 Input Source menu
3-20
Chapter Three
MENUS
SETTING
Source Select
Selects the desired video and audio source.
Source Mode
Changes to an input source that matches or is close to the
current source.
Sync Status
Displays the Horizontal and Vertical frequency and polarity
of the currently selected video source.
Changing the Input Video Source
To change the input video source, use the right arrow key to move to the
Source Select box and use the ▲ and ▼ keys to select Computer #1,
Computer #2, Video #1, or Video #2.
NOTE: There will be a 2.5 second delay before the source changes.
Changing the Source Mode
The Source Mode box lists all of the input source settings that match or are
close to the type of source the projector sensed.
1 To change the Source Mode setting, use the arrow keys to move to the
Source Mode box and use the ▲ and ▼ keys, mouse, or Cyclops pointer
to select a different input source.
2 Use the arrow keys to Cancel (
) or Select (
) the new source entry.
The input measurements of the current settings are displayed on the Sync
menu.
IMAGE MENU
This menu is used to adjust the projected video image and select how the
projector will display.
Menus
Image
Tools
Adjust
Input Source
Projection
Image
Audio
Preferences
Advanced
Figure 3-16 Image menu
Using the Desktop Projector™ 4100/4200
3-21
Adjust Submenu
The Adjust Submenu displays a series of video adjustment slide bars with
the current settings. Use the ▲ and ▼ keys to move the bars up or down to
adjust the individual settings for the best picture. The menus vary according
to the currently selected input source.
Computer Source
Menus
Image
Tools
Adjust
Input Source
Projection
Bright
Contrast
Sync
Bright
Contrast
Tint
DotClk.
Image
Audio
Preferences
Advanced
Video Source
Menus
Image
Tools
Adjust
Input Source
Projection
R
Image
Audio
Preferences
Advanced
G
Figure 3-17 Image menu, Adjust submenu
3-22
Chapter Three
Saturation
The following table lists all of the available settings for the Image Adjust
Submenu. Use the ▲ and ▼ keys to change them.
ADJUSTMENT
FUNCTION
SOURCE
Bright
Makes the screen image brighter or darker.
Computer, Video,
MediaExpress
Contrast
Sync
Increases or decreases the contrast level
Computer, Video,
of the image.
MediaExpress
Helps reduce uneven horizontal
Computer
features, such as lines of text,
streaks or shimmering in the image.
Dot Clk
Adjusts the Dot Clock if vertical black lines
Computer
appear on the screen. Do not adjust the
Dot Clock until you have tried to fine tune
the picture with the Sync setting.
Tint
Makes the screen image more red (up)
Video
or green (down).
Saturation
Increases or decreases the saturation of
Video
the image colors.
Normal Video
Allows panning around the image if it
PAL/SECAM
(DP4100 only)
is wider than the screen. See page 3-6
Video only
for more information about horizontal
and vertical position. This option is not
available on SVGA models.
Fit-to-View™
Compresses the image to fit on
PAL/SECAM
(DP4100 only)
the display. This option is not
video only
available on SVGA models.
Using the Desktop Projector™ 4100/4200
3-23
Projection Submenu
Use this submenu to control the image position and display polarity.
Image
Position
Tools
Adjust
Front
Normal
Input Source
Projection
Rear
Reverse
Menus
Image
Display
Ceiling
Rear-Ceiling
Audio
Preferences
Advanced
Figure 3-18 Image menu: Projection submenu
MENU
FUNCTION
Position
Flips the image for rear and ceiling projection.
Display
Switches between normal and reverse video modes. Reverse
video inverts the colors your monitor and projector normally
display.
AUDIO MENU
This menu is used to select an audio source and adjust the audio output.
Normal Adjustments Submenu
Menus
Adjustments
Source
Tools
Normal
Computer #1
Off
All
Input Source
Fine
Microphone
On
External
Image
Audio
Preferences
Advanced
Figure 3-19 Normal Audio submenu
3-24
Chapter Three
Volume
Mute
Speakers
MENU ITEM
SETTING
Source
Selects either Computer/Video or Microphone as the audio source.
Volume
Raises or lowers the speaker volume for the selected source.
Mute
Mutes the speaker sound.
Speakers
Selects internal and external (All), or external speakers only.
Fine Adjustments Submenu
Menus
Adjustments
Stereo
Balance
Tools
Normal
Stereo
L
Input Source
Fine
Mono
Treble
Bass
Image
Audio
Preferences
Advanced
R
Figure 3-20 Fine Adjustments submenu
MENU ITEM
SETTING
Stereo
Selects stereo when playing a stereo source from both left and
right audio inputs. Select Mono when using a monaural source for
simulated stereo output.
Balance
Adjusts the balance between the left and right speakers.
Treble
Adjusts the speaker treble tone.
Bass
Adjusts the speaker bass tone.
Using the Desktop Projector™ 4100/4200
3-25
USING THE AUDIO MENUS
You can incorporate audio into your presentation in a variety of ways. If you
will be using a video source (e.g. Computer), but want to use another audio
source, connect the alternate audio source to the COMPUTER AUDIO IN
port(s).
Selecting Stereo Audio
1 Open the Audio menu.
2 Choose the source (e.g. Video) if microphone is selected.
3 Open the Audio Adjustment menu, and select Fine.
4 Select the Stereo menu and choose Stereo.
5 Adjust balance, treble and bass, if necessary.
6 Press the Menu key to exit and save your changes.
Muting Audio
1 Choose the source (e.g. Computer) you will be using without any audio.
2 Return to the Audio menu and select Source.
3 Select Adjustments, then select Normal.
4 Select Mute, then select ON.
5 Press the Menu key to exit and save your changes.
Simulating Stereo While Using a Monaural Source
1 Connect the monaural source to the left AUDIO or COMPUTER AUDIO
port.
2 Open the Audio menu and select Source.
3 Choose the source (e.g. Video).
4 Select Adjustments, and then select Fine.
5 Select the Stereo menu, and then select Mono.
6 Press the Menu key to exit and save your changes.
When you close the menus, the settings will be saved. In the above example,
the projector will activate simulated stereo audio when you select your
Video source.
3-26
Chapter Three
PREFERENCES MENU
This menu is used to tailor the DP4100/4200 to your personal presentation
style.
Menus
Language
Prog. Key1
Prog. Key2
Tools
English
LightBoard
LightBoard
Input Source
Deutsch
WhiteBoard
WhiteBoard
Image
Francais
BlackBoard
BlackBoard
Audio
Español
Timer
Timer
Preferences
Italiano
Rev. Video
Rev. Video
Advanced
Freeze
Freeze
Zoom In
Zoom Out
Focus Near
Focus Far
Host
Host
MediaExpress
MediaExpress
Figure 3-21 Preferences menu
MENU ITEM
SETTING
Language
Displays menus in any of five languages.
Prog Key 1 and 2 Assigns a specific projector function to one of the PROG keys on
the Remote Control as a short cut:
LightBoard - Draws on a clear background
WhiteBoard - Draw on a white background
BlackBoard- Draw on a black background
Timer - Starts or resets the Timer
Rev. Video - Switches between normal and reverse video
Freeze- Freezes the image on the screen
Zoom In - Controls zoom lens
Zoom Out - Controls zoom lens
Focus Near - Controls zoom lens
Focus Far - Controls zoom lens
Host - Enables a special effect selected in Cyclops F/X
MediaExpress - selects MediaExpress as the input source
To set the Prog 1 or 2 keys, use the arrow keys to select the function that you
want to assign to each key.
Using the Desktop Projector™ 4100/4200
3-27
ADVANCED MENU
Use the Advanced menu to adjust the projector settings to suit a particular
presenter’s style and taste. You may customize and save video mode
adjustments and image settings for up to three users.
Menus
User
Mode
Tools
User A
Off
Input Source
User B
Reset
Image
User C
IR Accel.
Lamp Reset
Cancel Reset
LampTime: 00.00
Audio
Preferences
Advanced
Figure 3-22 Advanced menu
MENU ITEM
SETTING
User
Selects one of three user sets of stored settings.
Mode
Selects Reset to return the Dot Clock and customized settings for
the current image source to the factory defaults.
IR Accel.
Sets the speed of the mouse when using the mouse disc on the
remote control.
Lamp Reset
Indicates the amount of time (hours) on the lamp. Reset this to
zero when you replace the lamp.
Saving Custom Settings
A set of customized values for every video mode can be stored for User A,
User B, and User C.
1 From the User menu, select User A, User B, or User C.
2 Make any desired projector adjustments. These changes only affect the
currently selected display mode (video or computer).
3 Close the menus to save your changes.
3-28
Chapter Three
Recalling Custom User Settings
1 The adjustments are recalled simply by selecting the desired User.
2 From the Advanced main menu access User, select User A, User B, or User C.
3 The projector recognizes the video input and recalls the custom settings.
Using the Desktop Projector™ 4100/4200
3-29
3-30
Chapter Three
Chapter 4
Cyclops F/X
Your projector comes with Cyclops F/X—software effects that you can use to
make your presentations more interesting and effective. For example, you
can use the Spotlight to call attention to specific areas on the image, use the
Zoom or Magnify effects to focus on important information in the image, or
use See-it/Show-it to preview images on your computer without distracting
your audience.
You can use Cyclops F/X with either the remote that came with your
projector or the optional Cyclops interactive pointer system, or both at the
same time.
Note: Cyclops F/X is not available for UNIX systems.
Note: You cannot use Cyclops F/X with the MediaExpress system.
To use Cyclops F/X, follow these steps (details are covered throughout this
chapter):
1 Use the serial cable appropriate for your system (PCs: C936-6 or Macs:
C470-6) to connect the serial port on your computer to the CYCLOPS
port on the projector.
C Cyclops
Figure 4-1 Cyclops port on the projector
2 Install the Cyclops F/X software.
3 Start Cyclops F/X, customize the effects, and assign them to specific keys
on the keyboard or buttons on the remote control.
4 Minimize the Cyclops F/X main screen.
Then, just press the assigned key or button during your presentation to start
an effect.
This chapter is designed to give you a brief introduction to the
Cyclops F/X software.
Note: Updates to the Cyclops F/X software are available for download from
the World Wide Web at http://www.prxm.com.
Cyclops F/X
4-1
INSTALLING CYCLOPS F/X
Follow these steps to install the Cyclops F/X software:
1 Insert the disk labeled Proxima Cyclops F/X into your computer's floppy
drive.
2 Do one of the following:
•
In Windows 95, choose Start, Run, then type a:\setup.exe
(or the drive letter for your floppy drive).
•
In Windows 3.x, choose File, Run, then type a:\setup.exe
(or the drive letter for your floppy drive).
•
On a Macintosh, double-click the disk icon, then double-click the
Cyclops F/X Installer icon in the disk window. Drag the Cyclops F/X
icon onto the hard disk icon.
3 Follow the instructions that appear on your screen.
STARTING CYCLOPS F/X
Once you’re finished with the installation, do one of the following:
• In Windows 3.x or Windows 95, double-click the Cyclops F/X icon to
start the program.
• For Macintosh users, the software will automatically load each time you
start your computer.
Windows users
The first time you start the software, Cyclops F/X displays a Projector Setup
Tutorial (Wizard). Follow the instructions that appear on your screen. When
you have finished configuring your system, restart Windows.
4-2
Chapter Four
The main screen of the F/X program appears:
Figure 4-2 Cyclops F/X special effects
On the left side of this window is a list of the special effects. The
Assignments area in the middle of the window provides options that allow
you to customize your remote and software.
Note: If you open a menu, or if you're using the LightBoard tool, Cyclops
F/X will be suspended.
ASSIGNMENTS AREA
The Assignments area displays the custom remote keys and their current
assignments. To modify the custom remote keys:
1 Highlight the effect you want to assign.
2 Double-click the box next to the custom remote key in the Assignments
area.
Cyclops F/X
4-3
The Assignments area also contains five buttons:
BUTTON
FUNCTION
Setup Remote
Lets you switch the assignments display between the included
Cyclops remote control and the optional Cyclops wand or laser
pointer.
Put Away
Minimizes the F/X screen.
Edit Effect
Allows you to assign a shortcut key to the effect. You can also use
this option to customize an effect.
Projector Setting Allows you to adjust image, audio, and general settings on your
projector.
Connect
Allows you to choose the COM port to which you will connect
your projector.
In addition, the Assignments area allows you to control the MouseDisk
speed on your remote, and gives you checkboxes to turn on audible and
visual feedback.
CUSTOMIZING EFFECTS
Most effects have options that you can tailor to both the presentation and
your own presentation style.
For example, you can customize the Spotlight effect to specify the shape and
size of the spotlight. You can also change the name of each effect (for
example, you can change the name from “Spotlight” to “Headlight”).
You can assign each effect to a key on the keyboard or a button on the
remote control. The key or button you choose starts that effect.
To customize an effect:
1 Right-click the name of the effect and choose Edit from the menu. You
can also select the desired effect and click the Edit Effect button to make
your changes.
2 Adjust the settings in the appropriate dialog box and click OK.
3 When you’re finished customizing the effect, choose File and Save to save
your settings.
4 Click the control box in the upper right corner to minimize the Cyclops
F/X main screen.
4-4
Chapter Four
Note: To access effects that are assigned to the Prog 1 and Prog 2 keys,
assign the settings for those keys (in the projector's Preferences menu) to
Host.
USING THE CYCLOPS INTERACTIVE POINTER SYSTEM
You can use the Cyclops interactive pointer system with Cyclops F/X. To set
up the software, click Setup Wand/Laser in the Assignments area of the main
screen. The following screen appears:
Figure 4-3 Cyclops interactive pointer screen
Click the Show Navigation Bar checkbox to enable the navigation bar. This
will provide you with a quick way to scroll through your slide show with the
Cyclops wand or laser pointer.
Click on the Edit Navigation Bar button. The following screen appears:
Cyclops F/X
4-5
Figure 4-4 Edit Cyclops Navigation screen
Use this screen to assign different options to the navigation bar. To assign a
new function to the navigation bar, click the Next or Previous areas and
assign a function using the list boxes to the right.
You can also use this screen to define where the navigation bar will appear
on your display. The default is Lower Left.
4-6
Chapter Four
SEE-IT/SHOW-IT
See-it/Show-it is a feature of Cyclops F/X that previews the next slide in your
presentation on your computer monitor—without switching from the slide
your audience sees. The See-it/Show-it feature displays the image, along with
a timer that counts down on your computer monitor until See-it/Show-it
displays the next slide. You can use See-it/Show-it to preview slides so that
you can interact with your audience, while preparing for the message on the
next slide.
To use See-it/Show-it:
1 Click Edit Navigation Keys in the Assignments area of the Cyclops F/X
main screen. The following screen appears:
Figure 4-5 Edit Navigation Keys screen
2 Select a countdown time for the Forward or Reverse keys, or both. When
you select a countdown time, See-it/Show-it is automatically enabled.
3 To disable See-it/Show-it, select None from the Forward and Reverse key
list boxes.
To switch to See-it/Show-it, press the Forward or Reverse key once quickly.
To end See-it/Show-it, press the Forward or Reverse key a second time. The
counter disappears and the next slide immediately displays.
Cyclops F/X
4-7
FREEZE
The Freeze option freezes the image on your projector so you can use your
remote to control your computer. This might be handy when you want to
perform functions on your computer without distracting your audience
from your presentation. To edit the Freeze key settings, click the Edit Freeze
Key option in the Assignments area. The following screen appears:
Figure 4-6 Edit Freeze Key screen
To use Freeze:
1 Press Pause on your Cyclops remote.
2 Use any of the remote keys to control your computer.
3 Press Pause again when you're ready to return to your presentation.
Once you freeze your screen, all of the other keys on your remote are
available to control your computer. This means you can edit your current
presentation, display slides from another presentation, or even open
another application — all without distracting your audience.
Note: If you adjust the projector settings from your computer while you're
in Freeze mode, your changes will not display until you exit .
4-8
Chapter Four
STARTING AN EFFECT
Once you’ve customized an effect, you’re ready to use it.
1 Before the presentation, start Cyclops F/X, then minimize the main
screen.
2 During your presentation, press the key or button that you assigned to
each effect to start the desired effect.
THE PRESENTATION EFFECTS
The following are the Presentation Effects. To end any of the effects, press
the Esc key on your keyboard or the key on remote that you assigned for
that effect.
Break Timer is a digital timer that counts down from a duration you set.
Once you start the timer, click the MouseDisk once to lengthen the
duration.
You can also use Break Timer to play a sound or select a background color
or picture. If your computer is equipped with a sound card, you can select a
.WAV file and play it continuously while the timer is running, or use it as an
alarm that sounds when the timer expires.
To set a transparent background, uncheck Color and Picture. To display a
picture, check Picture, click File, then select the desired .BMP file.
Center Cursor centers the mouse pointer on the screen. This helps prevent
“losing” the cursor.
Custom Cursor changes the appearance of the mouse pointer to one of 30
images. Only the standard arrow pointer changes. The other standard icons
(such as the hourglass) are not affected.
Detail Cursor magnifies the area around the pointer in a small rectangle.
Effects Menu displays a list of effects. Use this feature to start effects that
you haven’t assigned to a button or key. To start an effect, double-click its
name. Press Esc on the keyboard to close the list without starting an effect.
Highlight Bar draws a horizontal bar across the screen. Move the bar up or
down to draw attention to different areas on the screen . You can also
change the color and width of the bar.
Highlighter works like a highlighter pen on your computer screen, by
overlaying a semitransparent color on your screen. You can change the color
and width of the “pen.”
Cyclops F/X
4-9
Magnify enlarges a rectangular area around the mouse pointer. You can
choose from three levels of magnification (200 percent, 400 percent, or
800 percent).
Note: To enlarge the entire screen, use the Zoom effect.
Next/Previous advances to the next or previous slide.
Object allows you to draw rectangles, squares, ellipses, and circles. You can
change the color and width of each shape.
Refresh repaints the projected image. Use this feature to erase “remnants”
of Stamp and Telestrator effects.
Reveal hides the image, then lets you incrementally reveal more and more
of the image. You can specify a color for the hidden area, a horizontal or
vertical effect, and the size of the Reveal window.
Run Program starts a program that you choose.
Screen Blank blanks the screen to a color that you choose.
Sound plays a .WAV file when you press a button. You can play the sound
repeatedly or just once.
Note: You must have a sound card to use this effect.
Spotlight dims all of the image except for the area around the mouse
pointer. You specify the shape and size of the spotlight (circular, square, or
bar). Once you’ve started Spotlight, press the MouseDisk to change its size.
Another setting makes the Spotlight visible against a black background.
Stamp allows you to choose from 15 different bitmaps to “stamp,” or paste,
over the projected image. You can also choose to play a sound each time you
stamp.
Switch to F/X switches to the Cyclops F/X main screen.
Telestrator turns the mouse into a freehand drawing tool. You can
customize the color and width of the line and “constrain” the drawing to
only horizontal or vertical lines.
Ticker Tape displays a scrolling text message across the image. Just specify
the text of that you want to appear, the typeface, and the point size. You can
play a sound file each time the message runs across the image, and
customize the background color and picture.
4-10
Chapter Four
Title Screen projects an image from a .BMP file. You can use this effect to
show a predefined image with transition effects during a presentation. You
can also play an associated sound. Just specify which file to play and
indicate whether to play it when the image appears or continuously.
Zoom enlarges the entire image to 200, 400, or 800 percent of its original
size. You choose whether to show the mouse pointer during a Zoom and
indicate the level of magnification. If you check the Show Cursor During
Zoom checkbox, left-click to manually cancel the zoom. If you uncheck the
Show Cursor During Zoom checkbox, left-click to change the zoom factor.
Note: Most effects have an option that lets you rename the command itself.
MENU COMMANDS
File menu
The File menu offers the following commands for working with profiles of
effects.
MENU ITEM
FUNCTION
Reset to defaults Resets the F/X options to the factory defaults.
Open
Opens a previously saved profile of settings.
Save
Saves recent changes to the current profile.
Save As
Saves the profile settings under a name and location you specify.
Exit
Quits the F/X program.
Effects menu
The Effects menu lets you change the items in the effects list.
MENU ITEM
FUNCTION
Edit
Allows you to edit F/X options.
Test
Tests the current effect.
Add
Allows you to add an effect.
Duplicate
Allows you to copy an effect.
Delete
Allows you to delete an effect.
Cyclops F/X
4-11
Options menu
The Options menu offers commands that allow you to set up assignments
on the remote, wand, or laser pointer, change the look and feel of the cursor,
and change the COM port settings.
MENU ITEM
FUNCTION
Setup Remote
Allows you to display the assignments area for the Cyclops
remote control or the optional Cyclops wand or laser pointer.
Cursor Options
Changes the look and feel of the cursor. Also includes an option
that allows you to apply one of the Cyclops F/X custom cursor
options to Windows.
Connect
4-12
Chapter Four
Allows you to edit the COM port settings for your computer.
Chapter 5
Maintenance
REPLACING THE LAMP
Follow these steps to remove the lamp and install a new one:
1 Press the
key to turn the lamp off. This allows the fans to cool the
lamp assembly for 30 seconds.
2 After the fan stops, turn off the projector and remove the power cord from
the projector’s power receptacle.
CAUTION! You must lower the projector's foot before you remove the
front cover. Removing the cover with the foot extended may cause the foot to
collapse.
CAUTION! Exercise care when detaching the front cover in the next step.
A ribbon cable connects the cover to the projector.
3 Remove the two screws on the lower front panel. Snap the front panel off.
The lamp is now accessible.
Remove
Screw
Remove
Screw
Figure 5-1 Removing the front panel
4 Unplug the cable from the board attached to the inside front panel. Set
the front panel aside on a soft surface.
Maintenance
5-1
5 Rotate the lamp latch screw to release the lamp. Use your hand or a
flat-tipped screwdriver.
CAUTION! The lamp and surrounding areas get very hot; be careful
when you remove the lamp. Make sure that the projector has cooled for at
least five minutes.
Figure 5-2 Removing the lamp screw
6 Grasp the handle on the front of the lamp chamber and pull it out of the
projector. Do not use excessive force.
Figure 5-3 Removing the lamp
7 Slide a replacement lamp into the projector, seating it firmly.
5-2
Chapter Five
8 Rotate the lamp latch screw clockwise to lock it in place.
9 Carefully attach the ribbon cable to the board on the inside front panel.
10 Slide the front panel over the zoom lens.
11 Align the foot button with the hole in the front panel.
12 Continue to seat the front panel first on the lower left corner until you
hear a click.
13 Snap the top corners into place and reinstall the lower screws.
CLEANING THE LENS
From time to time, you’ll need to clean the lens.
1 Form a piece of lens tissue into a loose swab. Wet it with lens cleaning
fluid or denatured alcohol, and gently move it over the lens surface.
2 Take a part of the lens tissue that you haven’t touched, and repeat the
process, going over the lens in another direction.
CAUTION! Your projector contains electric circuitry and sensitive optics.
Protect it from potential fluid spills.
CHANGING REMOTE CONTROL BATTERIES
To install or change the two AAA alkaline batteries in the remote control unit:
1 Locate the battery compartment at the lower rear of the case. Slide the
cover off the battery compartment.
2 Remove the old batteries and replace them with new ones. Make sure to
align the batteries in the proper orientation (see Figure 5-4).
3 Replace the cover on the battery compartment.
Figure 5-4 Installing batteries
Maintenance
5-3
CHANGING BATTERIES – CYCLOPS QUICK REMOTE
The Cyclops Quick Remote uses two 357A alkaline batteries.
1 Locate the battery compartment at the lower rear of the case. Press the
corner down and slide it off.
2 Remove the old batteries and replace them with new ones. Make sure to
align the batteries in the proper orientation.
3 Replace the battery cover.
Figure 5-5
Installing batteries in the Cyclops Quick Remote
CLEANING AND REPLACING THE NOISE FILTER
The noise filter is found only on early models of the DP4100. Follow the
instructions below to determine if your projector contains a noise filter. The
DP4200 does not use a noise filter.
You should rinse off the noise filter after every 100 hours of use. If you are
using the projector in dusty areas, clean it more frequently. If you are
experiencing a high number of over-temperature problems, you may need to
clean the filter more often.
CAUTION! Be sure to turn off the main AC power before opening the
projector.
1 Remove the two screws on the lower front panel and snap the front panel
off (see Figure 5-1). Remove it carefully, as it is attached to the projector
with a ribbon cable.
2 Press in on the tabs on the upper front sides of the projector and pull up
gently on the top panel to remove it. Remove it carefully, as it is attached
to the projector with a ribbon cable.
5-4
Chapter Five
Push
Tab
Push
Tab
Figure 5-6 Removing the top panel
3 Pull the noise filter out.
Figure 5-7 Removing the noise filter
4 Rinse the filter, dry it, and replace it.
5 Replace the top cover (starting at the rear of the projector engaging the
two tabs at the rear first, then working forward) and front panels to
complete the installation. Be sure to reattach the ribbon cable on the
front panel and tighten the two Phillips (crosspoint) screws that hold the
front panel in place.
Maintenance
5-5
Chapter 6
Troubleshooting
WHERE TO GET HELP
If you need help:
1 Check the Troubleshooting Chart.
2 Call your dealer’s technical support line and explain your problem.
3 Call Proxima at:
USA. and Canada:
(619) 457-5500
(619) 457-8542 (Fax)
Outside USA and Canada:
(619) 457-5500
(619) 622-0173 (Fax)
Europe:
+31 -43-358 5200
+31-43-358 5201 (Fax)
Internet (World Wide Web)
http:\\www.prxm.com (Click on Customer Service)
Troubleshooting
6-1
Projector
PROBLEM
LIKELY CAUSE
POSSIBLE SOLUTION(S)
No image projected
No power to projector
Turn power ON
Check AC cord
Check power to electrical outlet
Lamp not on
Turn lamp ON
Lamp burned out
Replace lamp assembly
Circuit breaker tripped
Correct overload situation; press
circuit breaker reset button
Over-temperature indication
Allow projector to cool; turn
projector OFF and then ON
No computer image
Loose cable
projected
Check and secure cable
connections
No power to computer
Incompatible video system
Turn on computer
If possible, check computer with
another monitor
No video image
Video source(s)
Check video source(s)
projected
Loose/improper cabling
Check and secure cabling
between video source(s) and
projector
REPLACE LAMP
Burned-out lamp
Replace lamp
Displayed image
Projector not placed at a
Adjust position of the
not square
proper angle to projection
projector and the screen
(keystoning)
screen
Projected image
Projection lens not focused
indication
Adjust the focus
out of focus
Projected image
Projector too far from screen
Move projector closer to screen
larger than screen
Zoom not set correctly on
Adjust power zoom
zoom model
6-2
Chapter Six
PROBLEM
LIKELY CAUSE
POSSIBLE SOLUTION(S)
Projected image
Projector too close to screen
Move projector away from
smaller than screen
screen
Zoom not set correctly on
Adjust zoom
zoom model
No image on the
Power switch off or
Computer must be on for
monitor
projector not running
computer monitor to display
Turn on projector and light the
lamp
Streaks on monitor
Cable not connected
Connect cable
Video cable for monitor
Check and reset cable
plugged into projector is
connection
upside-down
Faint screen
Jittery, fuzzy text
Low CONTRAST or
Adjust CONTRAST and/or
BRIGHTNESS settings
BRIGHTNESS
Out of sync
Adjust SYNC
Adjust Dot Clock
Image off-center
Position controls (arrow keys) Adjust position controls
Compatibility problem
Make sure the projector is
compatible with one of the
standards listed in Appendix A
Misalignment or damage to
Projector requires service
optical elements
Cannot get entire
Compatibility problems
Make sure projector is
image on screen;
compatible with one of the
scrambled image
standards listed in Appendix A
Wrong video resolution
Set video resolution on
computer to 640 x 480
“Shimmering” colors SYNC out of adjustment
Colors weak
Weak video signal
Adjust SYNC
Check for faulty video source,
bad connection, or frayed cable
Getting excessive
CONTRAST and/or
Adjust CONTRAST and/or
white or washout
BRIGHTNESS too high
BRIGHTNESS
Troubleshooting
6-3
PROBLEM
LIKELY CAUSE
POSSIBLE SOLUTION(S)
Black and white
Video signal ambiguous
Select the correct video source
image from color
mode
SECAM input
No audio
Audio source(s)
Make sure that the audio source
is turned on and functioning
properly
Loose/improper cabling
Check and secure cabling
between audio source(s) and
projector
Over-Temperature
Air vent(s) clogged
indication
Allow projector to cool; clear
obstructions from vents
Fan malfunction
Allow projector to cool;
check for fan operation, service
if necessary
Noise filter dirty
Allow projector to cool; clean
noise filter
Remote control
Batteries upside-down or old Check battery placement or
doesn’t work
Cyclops pointer and
Cyclops F/X
Software don’t work
at the same time
6-4
Chapter Six
replace with new batteries
Projector IR receiver window
Remove object obstructing red
blocked
IR receiver on front of projector
Compatibility problem
Disable Cyclops pointer
RETURNING YOUR DESKTOP PROJECTOR
FOR REPAIR
If the Desktop Projector or any of its accessories are determined to be
defective:
1 Contact Proxima Customer Service to request a Return Material
Authorization (RMA) number.
2 Send the defective unit, including any accessories, cables, and the remote
controls, with the RMA number clearly marked on the outside of the
shipping box, freight prepaid, to:
USA and Canada:
Proxima Corporation
RMA #
9440 Carroll Park Drive
San Diego, CA 92121
Europe:
Proxima Corporation
RMA #
Horsterweg 24
6191 RX Beek
The Netherlands
3 Pack the projector in its original box for safe shipment (include all
accessories, cables, and the remote controls). If you no longer have the
original shipping materials, contact Proxima Customer Service for
packaging.
ORDERING PARTS
Please order replacement and accessory parts through your local reseller, or
call Proxima at:
USA and Canada:
(800) 447-7694 or
(619) 457-5500
Fax: (619) 457-8542
Europe:
+44 (0) 1628 481555
Fax: +44 (0) 1628 487744
Outside USA and Canada:
(619) 457-5500
Fax: (619) 622-0173
Troubleshooting
6-5
Appendix A
DP4100/4200 SPECIFICATIONS
Color
16.7 Million Colors
Display Technology
Digital Light Processing (DLP)
Resolution
VGA: 640 (H) x 480 (V) pixels; SVGA: 800 (H) x 600 (V)
Contrast Ratio
125:1 Typical
Aspect Ratio
4:3
Projection Lamp
270 Watt Metal Halide
Brightness
Color (typ. ANSI lumens): DP4100z - 315; DP4200z - 400
Grayscale (typical): DP4100z - 1050; DP4200z - 1400
Optics
High Definition Lens with Variable Focus or Zoom Lens
Keystone Correction
12.0 - 17.7 degrees depending on zoom lens adjustment;
17.7 degrees fixed lens
Audio System
Digital Stereo Sound, two built-in 3 Watt Speakers
Inputs
2 Computer Video
2 Composite Video (NTSC, PAL, SECAM, S-VIDEO)
2 Computer Stereo Audio
2 Composite Video Stereo Audio
1 Microphone
RS-232 Aux Port
Cyclops
Outputs
Stereo Audio (2 RCAs)
1 Monitor
Power Source
90-260 VAC, 47-63 Hertz
Dimensions
7.9” (H) x 13” (W) x 16” (D)
Weight
28 lbs.
Throw Ratio
1.5:1 Fixed Lens; 1.5 - 2.2:1 Zoom Lens
Compatibility
PC (VGA, SVGA),
Apple Macintosh & PowerBook Series
Quadra, Centris
NTSC/PAL/SECAM/S-VIDEO
Specifications
A-1
A-2
Appendix A
Screen Size (Diagonal)
2.9 ft. (0.9m) to 25.5 ft. (7.8m)
Projection Distance
5 ft. (1.5m) to 30 ft. (9.1m) from screen
Lamp
270 watt metal Halide
Replaceable lamp indicator light
Lamp life 400 hours
Appendix B
Accessories and Parts
REPLACEMENT PARTS
PART
PART NUMBER
Lamp Assembly
L80
Cyclops Remote Control
A95
Cyclops Quick Remote
A85
Power Cord - US
C1002-10
Power Cord - Germany
C1001-10
Power Cord - Great Britain
C1004-10
Power Cord - Italy
C1003-10
VGA Video Cable
C951-6
Mac - VGA Cable Adapter
C922
VGA - Mac Monitor Adapter
C924
S-Video Cable
C466-6
Computer Audio Cable
C498-6
Serial Cable
C936-6
Mini-jack TO RCA Audio Adapter
C5105
Macintosh ADB Cable
C470-6
Noise Filter
140-01305-1
Cyclops F/X Driver Kit
A50F/X
Composite A/V Cable
C497-6
User's Guide, Multilingual
710-00496-1
Accessories and Parts
B-1
Optional Accessories
B-2
Appendix B
OPTION
MODEL / PART NUMBER
MediaExpress with Floppy Drive
ME40F
MediaExpress with Floppy Drive and Hard Drive
ME40H
Rolling Hard Case
A300
Rolling Soft Case
A298
Cyclops
A2074
Wireless Audio
A56 or A57
Index
A
AC Power switch 2-6
Accessories B-2
Advanced Menu 3-28
Arrow Keys 1-6, 3-5
AUDIO 1-5, 2-5
Audio Menu
Fine Adjustments Submenu
3-25
Normal Audio Submenu 3-24
AUDIO OUT 1-5, 2-5
Audio Out Ports 2-14
External Speaker System
Connection 2-14
External Stereo System
Connection 2-14
Audio Ports
Monaural Source 2-12
Stereo Source 2-12
AUX PORT 1-5, 2-5
Aux Port (Serial) 2-13
B
Batteries
Changing Quick Remote 5-4
Changing Remote Control
Batteries 5-3
Bright 3-3, 3-7, 3-23
C
Circuit Breaker Reset switch 2-6
Color Pallette 3-18
COMPUTER 1 & 2 AUDIO 15, 2-5
COMPUTER 1 & 2 IN 1-5, 2-5
Computer Audio Port
Connecting a Monaural
Source 2-10
Connecting a Stereo Source 210
Computer Video Connection
Macintosh Computers 2-8
Notebook Computers 2-9
PC 2-6
Special Configurations 2-10
Connector Panel 1-5, 2-5
Connector Table 1-5, 2-5
Contents of Box
Accessories 1-2
Contrast 3-3, 3-7, 3-23
Control Panel
Keys Table 1-6
Control Panel Keys 3-4
Control Panel Lights 1-7, 3-9
Custom Settings
Recalling 3-28
Saving 3-28
CYCLOPS 1-5, 2-5
Cyclops 1-7
Cyclops Connection 2-13
Cyclops Remote Control 3-10
Cyclops Tool Menu
Button 3-19
Calibrate 3-19
D
Desktop Projector
Powering Up 3-1
Turning Off 3-4
Dot Clk 3-7, 3-23
DP4100 Specifications A-1
Draw Tool Bar
Clear All 3-18
Eraser 3-18
New Color 3-18
Pencil 3-18
F
Fit to View 3-23
Focus 3-3, 3-7
Focusing the Image
Non-Zoom Models 3-2, 3-3
Zoom Lens Models 3-2, 3-3
Frame Advance
Quick Remote 3-12
G
Getting Started 2-2
Graphical User Interface 3-14
H
Hide Key 1-6, 3-5
Horz. Pos 3-7
I
Image Adjust Submenu 3-23
Image Menu
Adjust Submenu 3-21
Projection Submenu 3-24
Infrared Eye 3-11
Input Source Menu
Source Mode 3-20
Source Select 3-20
Sync Status 3-20
Input Video Source
Changing 3-21
IR Speed 3-28
L
Lamp Assembly Replacement 5-1
Lamp Reset 3-28
Laptop Connections 2-9
Lens Cleaning 5-3
LightBoard Tools
BlackBoard 3-16
Overlay 3-16
WhiteBoard 3-16
M
Macintosh Adapters 2-8
Macintosh Connections 2-8
Main Menu 3-15
Maintenance
Changing Remote Control
Batteries 5-3
Lamp Assembly Replacement
5-1
Lens Cleaning 5-3
MediaExpress 1-7, 3-8
MediaExpress Key 1-6
MENU 3-11
Menu Key 1-6, 3-6
Menu Selection
Using a Cyclops Interactive
Pointer System 3-14
Using a Mouse 3-14
Using Control panel or
Cyclops Remote 3-14
MIC 1-5, 2-5
Microphone Connection 2-13
Mode 3-28
Monaural Audio 3-26
MONITOR OUT 1-5, 2-5
MUTE 3-11
Muting Audio 3-26
N
Noise Filter 5-4
Normal Video 3-23
Notebooks 1-4
O
Operating Modes
Host Mode 3-13
Local Mode 3-13
Ordering Parts 6-5
Over-Temperature 3-9
P
Parts
Optional Accessories B-2
Replacement B-1
Power 3-9
Power Key 1-6, 3-5
Power Key and Light 3-1
Power receptacle 2-6
Power to the Projector 2-6
Powering Up Projector 3-1
Preferences Menu 3-27
Language 3-27
Prog Key 1 and 2 3-27
Preview Key
Quick Remote 3-12
PROG1 3-11
PROG2 3-11
Projection Submenu 3-24
Display 3-24
Mode 3-24
Position 3-24
Projector
Moving 2-3
Positioning 2-2
Transporting 2-3
Troubleshooting 6-2
Projector Cooling and Airflow 2-4
Projector Operation
Using a Mouse 3-12
Using Control Panel and
Remote 3-12
Q
Quick Remote Batteries 5-4
Quick Remote Keys 3-12
Quick Start
Desktop Macintosh computers
1-3
Desktop PCs 1-3
Notebooks 1-4
R
Remote Control Batteries 5-3
Remote Control Keys 3-11
Remote Control Unit 3-11
Repair of your Desktop Projector
6-5
Replace Lamp 3-10
Replacement Parts B-1
Returning your Desktop Projector
for repair 6-5
S
S-VHS 1 & 2 1-5, 2-5
Saturation 3-7, 3-23
See-it/Show-it 4-7
Select Key
Quick Remote 3-12
Settings Table 3-3, 3-7
SETUP 3-11
Setup Key 3-6
Setup Menu Key 1-6
SOURCE 3-11
Source Key 1-6, 3-6
Quick Remote 3-12
Source Mode
Changing 3-21
Special Configurations 1-4
Specifications A-1
Stereo Audio 3-26
Submenu Adjustment
Computer Source 3-22
Video Source 3-22
Sync 3-7, 3-23
T
Tint 3-7, 3-23
Tool Selection
Choosing a Color 3-18
Draw Tool Bar 3-18
Tool Selection Menu
Cyclops 3-19
LightBoard 3-16
Timer 3-20
Troubleshooting
Projector 6-2
Where to Call 6-1
U
User 3-28
V
Vert. Pos 3-7
VGA Connections 2-7
VGA Video Cable 2-6
VIDEO 1 & 2 1-5, 2-5
Video Imput Ports
Composite Video Connections
2-11
S-VHS Connections 2-11
VOLUME 3-11
Volume Key 1-6, 3-6
W
Wireless Audio 1-7
Workgroup
knob 3-8
mode 3-8
Z
Zoom 3-7