1
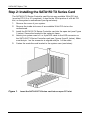
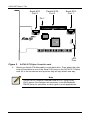
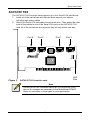
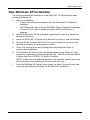
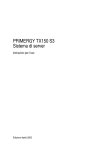
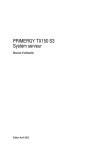
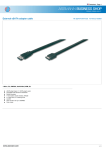
SATA150
TX2PLUS, TX4
QUICK START GUIDE
Version 1.2
SATA150 TX2plus, TX4
Copyright
© 2002 Promise Technology, Inc.
Copyright by Promise Technology, Inc. (Promise Technology). No part of this
manual may be reproduced or transmitted in any form without the expressed,
written permission of Promise Technology.
Trademarks
Promise, and the Promise logo are registered in U.S. Patent and Trademark
Office.
All other product names mentioned herein may be trademarks or registered
trademarks of their respective companies.
Important Data Protection Information
You should back up all data before installing any drive controller or storage
peripheral. Promise Technology is not responsible for any loss of data resulting
from the use, disuse or misuse of this or any other Promise Technology product.
Notice
Although Promise Technology has attempted to ensure the accuracy of the
content of this manual, it is possible that this document may contain technical
inaccuracies, typographical, or other errors. Promise Technology assumes no
liability for any error in this publication, and for damages, whether direct, indirect,
incidental, consequential or otherwise, that may result from such error, including,
but not limited to loss of data or profits.
Promise Technology provides this publication “as is” without warranty of any
kind, either express or implied, including, but not limited to implied warranties of
merchantability or fitness for a particular purpose.
The published information in the manual is subject to change without notice.
Promise Technology reserves the right to make changes in the product design,
layout, and driver revisions without notification to its users.
Contents
Step 1: Unpacking Your SATA150 TX Series Card ............................................................3
Step 2: Installing the SATA150 TX Series Card .................................................................4
Step 3: Installing the Hard Drives.......................................................................................5
Step 4: Installing Software Drivers .....................................................................................8
2
Quick Start Guide
Step 1: Unpacking Your SATA150 TX Series Card
When you receive the SATA150 TX Series Controller Card, the package should
contain the items listed below:
•
SATA150 TX2plus Serial/Parallel ATA Controller Card
or SATA150 TX4 Serial ATA Controller Card
•
Quick Start Guide
•
SATA150 TX Series driver diskette
•
One internal Serial ATA hard drive data cable
•
One internal Parallel ATA cable (SATA150 TX2plus only)
•
CD with drivers SATA150 TX2plus/TX4 User Manual
If ANY of the contents are missing or appear to be damaged, please contact
your dealer or distributor immediately.
Warning
Before installing the adapter into an existing system, backup any
important or useful data. Failure to follow this accepted PC
practice could result in data loss.
Warning
The SATA150 TX Series Controller card, like other parts of your
system, is subject to damage by static electricity. Be sure that
you’re properly grounded (Promise recommends that you wear
an anti-static strap or touch a grounded object) and that you
unplug your system before installing your SATA150 TX Series
Controller card.
3
SATA150 TX2plus, TX4
Step 2: Installing the SATA150 TX Series Card
The SATA150 TX Series Controller card fits into any available 32-bit PCI slot
(must be PCI 2.2 or 2.3 compliant). It also fits the 32-bit portion of a 64-bit PCI
slot, on the system’s motherboard (see figure below).
1. Remove the cover of your system.
2. Remove the inside slot cover of an available 32-bit PCI slot on the
motherboard.
3. Install the SATA150 TX Series Controller card into the open slot (see Figure
1 below). Secure the bracket to the system’s frame.
4. Attach your system case’s 2- or 4-pin LED cable to the LED connector on
the SATA150 TX Series Controller card (see Figures 2 and 3, below). Make
sure that pin 1 on the connector is aligned with pin 1 of the cable.
5. Fasten the controller card bracket to the system case (see below).
Figure 1.
Insert the SATA150 TX Series card into an open PCI slot.
4
Quick Start Guide
Step 3: Installing the Hard Drives
Important
If you wish to include your current bootable Serial or Parallel
ATA drive using the Windows NT4.x, Windows 2000, or
Windows XP operating system on your SATA150 TX Series
Controller card, do NOT connect the hard drive to the card yet.
You MUST install the Windows NT4, 2000, or XP driver software
first onto this drive while it is still attached to your existing hard
drive controller.
SATA150 TX2plus
The SATA150 TX2plus Controller card supports up to two Serial ATA hard
drives and two Parallel ATA hard drives.
1. Configure the jumpers of the Parallel ATA hard drive you’re preparing to
connect to the SATA150 TX2plus card using the proper Master, Slave, or
Cable-Select settings. For more information, refer to the manual that came
with your hard drive.
2. Install all of the hard drives into the hard drive bays of your system,
including their power cables.
3. Attach the Parallel ATA cable to the hard drive(s) and to the Parallel ATA
Port connector on the SATA150 TX2plus controller card. The colored edge
of the cable indicates pin 1 (see Figure 2 below). The blue cable connector
attaches to the SATA150 TX2plus card.
5
SATA150 TX2plus, TX4
Serial ATA
Port 2
Parallel ATA
Port 3
Serial ATA
Port 1
Pin 1
LED
Pins
Figure 2.
4.
SATA150 TX2plus Controller card.
Attach one Serial ATA data cable to each hard drive. Then attach the other
ends of the cables to one of the Serial ATA ports on the SATA150 TX2plus
card. All of the connectors are keyed so they will only attach one way.
Note
The SATA150 TX2plus Controller card is a PCI Plug-n-Play
(PnP) device. No changes are necessary in the Motherboard
CMOS Setup for resources or drive types in most applications.
6
Quick Start Guide
SATA150 TX4
The SATA150 TX4 Controller card supports up to four Serial ATA hard drives.
1. Install all of the hard drives into the hard drive bays of your system,
including their power cables.
2. Attach one Serial ATA data cable to each hard drive. Then attach the other
ends of the cables to one of the Serial ATA ports on the SATA150 TX4
card. All of the connectors are keyed so they will only attach one way.
Port 4
Figure 3.
Port 2
Port 1
Port 3
LED
Pins
SATA150 TX4 Controller card.
Note
The SATA150 TX4 Controller card is a PCI Plug-n-Play (PnP)
device. No changes are necessary in the Motherboard CMOS
Setup for resources or drive types in most applications.
7
SATA150 TX2plus, TX4
Step 4: Installing Software Drivers
Following are driver installation procedures for the Windows operating systems
that support the Promise SATA150 TX Series Controller. The SATA150 software
drivers for Windows are included on the driver diskette.
Drivers and installation instructions for Linux and Novell operating systems are
downloadable from the Promise website at www.promise.com.
Important
If you wish to include your current bootable ATA drive using the
Windows NT4.x, Windows 2000, or Windows XP operating
system on your SATA150 TX Series Controller card, you MUST
install the Windows NT4, 2000, or XP driver software first onto
this drive while it is still attached to your existing hard drive
controller.
Procedure
Page Number
New Windows XP Installation.......................................................... 9
Existing Windows XP Installation .................................................. 10
Confirming Windows XP Driver Installation................................... 10
New Windows 2000 Installation .................................................... 11
Existing Windows 2000 Installation ............................................... 12
Confirming Windows 2000 Driver Installation................................ 12
New Windows ME Installation ....................................................... 13
Existing Windows ME Installation.................................................. 14
Confirming Widows ME Driver Installation .................................... 14
New Windows NT4.x Installation................................................... 15
Existing Windows NT4.x Installation ............................................. 16
Removing Driver from Windows NT4.x ......................................... 16
New Windows 98 Installation ........................................................ 17
Existing Windows 98 Installation ................................................... 18
Confirming Windows 98 Driver Installation.................................... 18
8
Quick Start Guide
New Windows XP Installation
The following details the installation of the SATA150 TX Series drivers while
installing Windows XP.
1. Start the installation:
• Floppy Install: Boot the computer with the Windows XP installation
diskettes.
•
CD-ROM Install: Boot from the CD-ROM. Press F6 when the message
“Press F6 if you need to install third party SCSI or RAID driver”
appears.
2. When the Windows XP Setup window is generated, press S to specify an
Additional Device(s).
3. Insert the SATA150 TX Series driver diskette into drive A: and press Enter.
4. Choose WinXP Promise SATA150 TX Series Controller from the list that
appears on screen, and then press the Enter.
5. Press S to use the driver on the floppy disk and then press Enter to
continue with installation.
6. The Windows XP Setup screen will appear again saying “Setup will load
support for the following mass storage devices:” The list will include WinXP
Promise FastTrak SATA150 TX Series Controller.
NOTE: If there are any additional devices to be installed, specify them now.
When all devices are specified, continue to the next step.
7. From the Windows XP Setup screen, press the Enter. Setup will now load
all device files and then continue the Windows XP installation.
9
SATA150 TX2plus, TX4
Existing Windows XP Installation
After installing the SATA150 TX Series card and rebooting your system,
Windows XP setup will show a “Found New Hardware” dialog box. Under
Windows XP, “RAID Controller” will be displayed.
1. Insert the SATA150 TX Series driver diskette into the A:\ drive.
2. Choose Install the software automatically and press the Enter key.
3. Choose WinXP Promise SATA150 TX Series Controller from the list that
appears on screen, and then press the Enter key.
4. If using a driver that has not been digitally signed by Microsoft, you will be
asked if you want to continue the installation. Click Continue.
5. When the New Hardware Wizard has finished installing the SATA150 TX
Series software, click Finish.
Confirming Windows XP Driver Installation
1. Right-click the My Computer icon and select Manage from the popup menu.
2. Click Device Manager in the menu tree.
3. Click the “+” in front of SCSI controllers. WinXP Promise SATA150 TX
Series Controller should appear.
10
Quick Start Guide
New Windows 2000 Installation
The following details the installation of the SATA150 TX Series drivers while
installing Windows 2000.
1. Start the installation:
• Floppy Install: Boot the computer with the Windows 2000 installation
diskettes.
•
CD-ROM Install: Boot from the CD-ROM. Press F6 when the message
“Press F6 if you need to install third party SCSI or RAID driver”
appears.
2. When the Windows 2000 Setup window is generated, press S to specify an
Additional Device(s).
3. Insert the SATA150 TX Series driver diskette into drive A: and press Enter.
4. Choose Win2000 Promise SATA150 TX Series Controller from the list that
appears on screen then press Enter.
5. The Windows 2000 Setup screen will appear again saying “Setup will load
support for the following mass storage devices:” The list will include
Win2000 Promise SATA150 TX Series Controller.
NOTE: If there are any additional devices to be installed, specify them now.
When all devices are specified, continue to the next step.
6. From the Windows 2000 Setup screen, press Enter. Setup will now load all
device files and then continue the Windows 2000 installation.
11
SATA150 TX2plus, TX4
Existing Windows 2000
After installing the SATA150 TX Series card and rebooting your system,
Windows 2000 setup will show a “New Hardware Found” dialog box. Under
Windows 2000, “RAID Controller” will be displayed.
1. Insert the SATA150 TX Series driver diskette in drive A:\.
2. Choose Search for a suitable driver for my device (Recommended) from the
list, then click Next.
3. Choose Floppy disk drives from the list, then click Next. The Hardware
Wizard will search the diskette for updates and return the following
message:
“Windows found a driver for this device. A:\Win2000\fasttx2k.inf. To install
the driver Windows found, click Next.”
4. Click Next. The Found New Hardware Wizard appears when the installation
is complete.
5. Remove the diskette and click Finish to restart the system. Windows 2000
will then restart for the driver installation to take effect.
Confirming Windows 2000 Driver Installation
1. Right-click the My Computer icon and select from the popup menu.
2. Click Device Manager in the menu tree.
3. Click the “+” in front of SCSI controllers. Win2000 Promise SATA150 TX
Series Controller should appear.
12
Quick Start Guide
New Windows ME Installation
The following details the installation of the SATA150 TX Series drivers while
installing Windows ME.
1. Install the SATA150 TX Series controller card into your system.
2. Install Windows ME fully.
3. After installation, right-click on My Computer and select Properties from the
popup menu.
4. In the System window, choose the Device Manager tab.
5. In the hierarchical display under Other Devices is a listing for PCI RAID
Controller. Click PCI RAID Controller then click the Properties button.
6. In the Properties window, choose the Driver tab then choose Update Driver
and click Next.
7. Choose Search for a better driver than the one your device is using now
(recommended) then click Next.
8. Choose Specify Location then type A:\WIN98-ME in the text box.
9. Insert the SATA150 TX Series driver diskette into the A: drive.
10. Click the Next button. A message informing you that Win98-ME Promise
SATA150 TX Series Controller should appear.
11. Click Next, then click Finish.
12. When asked if you want to restart your computer, click Yes. Immediately
remove the diskette from drive A:.
13
SATA150 TX2plus, TX4
Existing Windows ME Installation
The following section details the installation of SATA150 TX Series drivers
on a system that has Windows ME already installed and running.
1. After installing the SATA150 TX Series controller card and configuring the
hard drives, power up the system and boot.
2. The Add New Hardware Wizard will appear, informing you that it has found
a PCI Mass Storage Controller.
3. Click Next, then from the generated list box, choose Specify the location of
the driver (Advanced).
4.
5.
6.
7.
Click Next, then from the generated choices, choose Specify a location.
Insert the SATA150 TX Series driver diskette in drive A:.
Type A:\WIN98-ME in the text box that appears.
Click Next. A message informing you that Windows Me has found Win98ME Promise SATA150 TX Series Controller should appear.
8. Click Next, then click Finish. When asked if you want to restart your
computer, click Yes. Immediately remove the diskette from drive A:.
Confirming Driver Installation in Windows ME
To confirm that the driver has been properly loaded in Me, perform the following
steps:
1. Right-click the My Computer icon and select Properties from the popup
menu.
2. Select the Device Manager tab.
3. Click the “+” in front of SCSI & RAID controllers. Win98-ME Promise
SATA150 TX Series Controller should appear.
14
Quick Start Guide
New Windows NT4.x Installation
The following details the installation of the SATA150 TX Series drivers while
installing Windows NT4.x.
1. Start the system installation by booting from the Windows NT disk:
• Floppy install: boot the system with the Windows NT installation
diskettes.
•
CD-ROM disk install: boot from the CD-ROM disk and press F6 when
the message “Setup is inspecting your computer’s hardware
configuration…” appears.
2. When the Windows NT Setup window is generated, press S to Specify an
Additional Device(s).
3. Press O to select Other then press Enter.
4. Insert the SATA150 TX Series driver diskette into drive A: and press Enter.
5. Choose WinNT Promise SATA150 TX Series Controller from the list that
appears on screen then press Enter.
6. The Windows NT Setup screen will appear again saying “Setup will load
support for the following mass storage devices:” The list will include WinNT
Promise SATA150 TX Series Controller.
NOTE: If there are any additional devices to be installed, specify them now.
When all devices are specified, continue to the next step.
7. From the Windows NT Setup screen, press Enter. Setup will now load all
device files and then continue the Windows NT installation.
8. After a successful installation, the SCSI Adapter Setup box will show that
the WinNT Promise SATA150 TX Series Controller driver has been
installed.
15
SATA150 TX2plus, TX4
Existing Windows NT4.x Installation
The following section details the installation of SATA150 TX Series drivers on a
system that has Windows NT4.x already installed and running.
NOTE: Do not attach the boot drive or any other hard drive to the SATA150 TX
Series controller card before completing this step.
1. From the Start menu, choose Settings.
2. From the Settings menu, choose Control Panel.
3. Double-click the SCSI Adapters icon. The SCSI Adapters dialog box
appears.
4. Choose Drivers then click Add.
5. In the Install Drivers dialog box, click Have Disk…
6. When Install From Disk appears, insert the SATA150 TX Series driver
diskette in drive A:.
7. Type A:\NT4 in the text box window then click OK.
8. When the Install Driver dialog box appears, select WinNT Promise
SATA150 TX Series Controller then click OK.
9. When the Select SCSI Adapter Option dialog box appears, click Install.
10. After a successful installation, the SCSI Adapter Setup box will show that
the WinNT Promise SATA150 TX Series Controller has been installed.
11. Power off your system.
12. If you plan to move the boot drive to the FastTrak card, connect the boot
drive to the FastTrak card now. Power on your system.
Removing the Driver from Windows NT4.x
1.
2.
3.
4.
From Start, choose Setup then choose Control Panel.
In Control Panel, choose SCSI Adapter then choose Drivers.
Click the Remove button.
After successful removal, the SCSI Adapter Setup box will show that WinNT
Promise SATA150 TX Series Controller has been removed.
16
Quick Start Guide
New Windows 98 Installation
The following section details the installation of the SATA150 TX Series drivers
while installing Windows 98.
1. Install the SATA150 TX Series controller card and configure the hard
drive(s), partition and format your hard drive(s), if necessary.
2.
3.
4.
5.
6.
7.
Install Windows 98 normally.
After installation, go the Start menu and choose Settings.
From the Settings menu, choose Control Panel.
In the Control Panel window, double-click the System icon.
In the System window, choose the Device Manager tab.
In the hierarchical display under Other Device is a listing for PCI RAID
Controller. Select it then click the Properties button.
8. Choose the Driver tab in the Properties window, choose Update Driver then
click Next.
9. Choose Search for a better driver than the one your device is using now
(recommended), then click Next.
10. Choose Specify Location then type A:\WIN98 in the text box.
11. Insert the SATA150 TX Series driver diskette into the A: drive.
12. Click the Next button. A message informing you that “Windows 98 has
found Win98 Promise SATA150 TX Series Controller” should appear.
13. Click Next, then Finish.
14. When asked if you want to restart your computer, click Yes. Immediately
remove the diskette from drive A:.
17
SATA150 TX2plus, TX4
Existing Windows 98 Installation
The following section details the installation of SATA150 TX Series drivers
on a system that has Windows 98 already installed and running.
1. After installing the SATA150 TX Series controller card and configuring the
hard drives, power up the system and boot Windows.
2. The “Add New Hardware Wizard” will appear, informing you that it has
found a “PCI Mass Storage Controller.”
3. Click Next. From the generated list box, choose Search for best driver for
your device (Recommended).
4.
5.
6.
7.
Insert the SATA150 TX Series driver diskette in drive A:.
Click Next. From the generated choices, choose Specify a location.
Type A:\WIN98 in the text box that appears.
Click Next. A message informing you that Windows has found “Win98
Promise SATA150 TX Series Controller” should appear.
8. Click Next, then click Finish.
9. Click Yes when asked if you want to restart your computer. Be sure to eject
the diskette from drive A:.
Confirming Driver Installation in Windows 98
To confirm that the driver has been properly loaded in Windows 98, perform the
following steps:
1. Choose Settings from the Start menu.
2. Choose Control Panel, then double-click the System icon.
3. Choose the Device Manager tab, then click the “+” in front of SCSI
controllers. Win98 Promise SATA150 TX Series Controller should appear.
18