1
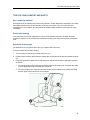
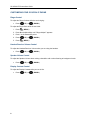
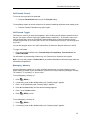
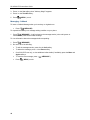
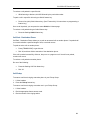
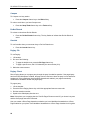
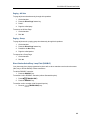
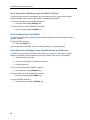
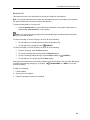
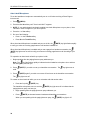
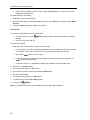
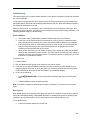
MITEL
SX-200 IP Communications
Platform
5312 IP and 5324 IP Phones
User Guide
5312/5324 IP Phones User Guide
NOTICE
The information contained in this document is believed to be accurate in all respects but is not
warranted by Mitel Networks™ Corporation (MITEL®). The information is subject to change without
notice and should not be construed in any way as a commitment by Mitel or any of its affiliates or
subsidiaries. Mitel and its affiliates and subsidiaries assume no responsibility for any errors or
omissions in this document. Revisions of this document or new editions of it may be issued to
incorporate such changes.
No part of this document can be reproduced or transmitted in any form or by any means - electronic
or mechanical - for any purpose without written permission from Mitel Networks Corporation.
TRADEMARKS
Mitel is a registered trademark of Mitel Networks Corporation.
Other product names mentioned in this document may be trademarks of their respective companies
and are hereby acknowledged.
Mitel 5312 IP and 5324 IP Phones
User Guide
October 2008
®,™ Trademark of Mitel Networks Corporation
© Copyright 2008, Mitel Networks Corporation
All rights reserved
ii
Table of Contents
ABOUT YOUR PHONE ............................................................................................. 1
Ring/Message indicators ..................................................................................................... 4
Selecting Menu Options....................................................................................................... 4
About Feature Access Codes .............................................................................................. 4
Line Interface Module .......................................................................................................... 4
TIPS FOR YOUR COMFORT AND SAFETY ............................................................ 5
Don't cradle the handset! ..................................................................................................... 5
Protect your hearing ............................................................................................................ 5
Adjust the viewing angle ...................................................................................................... 5
CUSTOMIZING YOUR 5312/5324 IP PHONE .......................................................... 6
Ringer Control...................................................................................................................... 6
Handset Receiver Volume Control ...................................................................................... 6
Speaker Volume Control...................................................................................................... 6
Display Contrast Control ...................................................................................................... 6
Feature Keys ....................................................................................................................... 7
Language Change ............................................................................................................... 7
MAKING AND ANSWERING CALLS ....................................................................... 8
Make a Call - PBX ............................................................................................................... 8
Make an External Call - KTS ............................................................................................... 8
Make an Intercom Call - KTS............................................................................................... 8
Answer a call ....................................................................................................................... 8
Redial................................................................................................................................... 9
Speed Call Keys .................................................................................................................. 9
Speed Call – Personal ....................................................................................................... 10
Handsfree Operation ......................................................................................................... 10
Auto–Answer ..................................................................................................................... 11
Group Listen ...................................................................................................................... 12
CALL HANDLING ................................................................................................... 13
Hold ................................................................................................................................... 13
Hold and Page ................................................................................................................... 13
Mute................................................................................................................................... 13
Handset Mute .................................................................................................................... 13
iii
5312/5324 IP Phones User Guide
Transfer ............................................................................................................................. 14
Conference ........................................................................................................................ 14
Conference Split (5324 IP Phone only) ............................................................................. 14
Add Held (5324 IP Phone only) ......................................................................................... 14
Swap.................................................................................................................................. 15
Call Forward ...................................................................................................................... 15
Call Forward - Remote (I am Here) ................................................................................... 16
Call Forward - Forced ........................................................................................................ 17
Call Forward - Toggle ........................................................................................................ 17
Messaging - Advisory ........................................................................................................ 17
Messaging - Callback ........................................................................................................ 18
USING ADVANCED FEATURES ............................................................................ 19
Account Codes .................................................................................................................. 19
Callback ............................................................................................................................. 19
Call Park ............................................................................................................................ 19
Call Park - System ............................................................................................................. 20
Call Park - Specific Orbit.................................................................................................... 20
Call Park - Destination Phone............................................................................................ 21
Call Pickup......................................................................................................................... 21
Campon ............................................................................................................................. 22
Do Not Disturb ................................................................................................................... 22
Override ............................................................................................................................. 22
Paging - PA........................................................................................................................ 22
Paging - Direct ................................................................................................................... 22
Handsfree Answerback to a Direct Page........................................................................... 23
Paging - All Sets ................................................................................................................ 25
Paging - Group .................................................................................................................. 25
Direct Station Select/Busy Lamp Field (DSS/BLF) ............................................................ 25
Direct Station Select (DSS)/Busy Lamp Field (BLF)/Call Pickup....................................... 26
Direct Page/Busy Lamp Field (DP/BLF) ............................................................................ 26
Direct Station Select (DSS)/Busy Lamp Field (BLF)/Direct Page/Call Pickup................... 26
Headset Operation............................................................................................................. 27
Music ................................................................................................................................. 27
Park and Page ................................................................................................................... 28
iv
5312/5324 IP Phones User Guide
Record a Call ..................................................................................................................... 29
Auto-Latch Microphone...................................................................................................... 30
Reminder ........................................................................................................................... 31
Reminder - Multiple............................................................................................................ 32
Call Logging (5324 IP Phone only) .................................................................................... 33
Phonebook......................................................................................................................... 34
Call Monitoring................................................................................................................... 35
Door Opener ...................................................................................................................... 35
Night Answer ..................................................................................................................... 36
Date and Time Setup......................................................................................................... 37
Release.............................................................................................................................. 37
Secure Hot Swap............................................................................................................... 37
Mobile Extension ............................................................................................................... 38
USING YOUR 5324 IP PHONE WITH THE 5310 IP CONFERENCE UNIT ............ 39
USING THE 5310 CONFERENCE UNIT WITH A MOUSE ..................................... 39
Turn the conference unit on and off................................................................................... 39
Adjust the conference unit volume..................................................................................... 39
Place the conference unit in Presentation mode ............................................................... 40
Exit the conference ............................................................................................................ 40
Mute the conference unit ................................................................................................... 40
USING THE 5310 CONFERENCE UNIT WITHOUT A MOUSE.............................. 40
To start a Conference ........................................................................................................ 40
Adjust the conference unit volume..................................................................................... 40
Mute the conference unit ................................................................................................... 40
Exit the conference ............................................................................................................ 40
USING THE LINE INTERFACE MODULE (5324 IP PHONE ONLY) ...................... 41
LINE INTERFACE MODULE MODE ................................................................................. 41
FAILOVER MODE ............................................................................................................. 42
EMERGENCY CALLS ....................................................................................................... 42
USING THE MITEL IP PROGRAMMABLE KEY MODULES (5324 IP PHONE
ONLY)...................................................................................................................... 43
FEATURE ACCESS CODES ............................................................................................ 44
v
5312/5324 IP Phones User Guide
ABOUT YOUR PHONE
The Mitel 5312 and 5324 IP Phones are full-feature, dual port, dual mode telephones that provide
voice communication over an IP network. Each features a back-lit liquid crystal display (LCD) screen,
display-assisted access to features, on-hook dialing and off-hook voice announce with handsfree
answerback, and a large ringing/message indicator.
The 5312 IP Phone offers 12 programmable keys, and the 5324 IP Phone offers 24 programmable
keys for one-touch feature access. Both phones provide ten fixed feature keys for convenient access
to features such as Conferencing, Redial, and many customizable user settings. The 5312 and 5324
IP Phones support Mitel Call Control (MiNet) protocol and Session Initiated Protocol (SIP).
The 5324 IP Phone also supports modules such as the Line Interface Module, 5310 IP Conference
Unit, and the 12- and 48-Button Programmable Key Modules. The 5324 IP Phone can be used as an
ACD Agent Phone, Sub-Attendant Phone, or a Teleworker phone.
The personal key on the bottom right (5324) or bottom left (5312) is always your Prime Line; the
remaining personal keys can be programmed as:
•
Feature keys (for example, Do Not Disturb). You can program feature keys from your phone
(5324 only), or using the Desktop Tool. Your administrator can also program feature keys.
•
Speed Call keys. You can program speed call keys from your phone, or using the Desktop Tool.
•
Line Appearances. Only the administrator can program line appearances.
1
5312/5324 IP Phones User Guide
5312 IP Phone
5324 IP Phone
2
5312/5324 IP Phones User Guide
Elements of Your Phone
Feature
Function
1) Display
Provides a two–line, 20–character liquid crystal display (LCD) viewing area that
assists you in selecting and using phone features, accessing your voice mail,
and identifying callers. When you access the Menu key, prompts and feature
information appear on the display screen. For information on selecting menu
options, see "Selecting Menu Options" elsewhere in this guide.
2) Softkeys (5324 IP
Phone only)
Context-sensitive keys change depending on the modes of the operation and the
menu currently displayed. Softkeys enable you to easily view and select a
variety of features.
3) Ring/Message
Indicator
Flashes to signal an incoming call and to indicate a message waiting in your
voice mailbox.
4) Volume, Speaker
and Mute Controls
Provide the following audio control capability:
(UP) and
(DOWN) provide volume control for the ringer, handset, and
handsfree speakers.
(SPEAKER) enables and disables Handsfree mode.
(MUTE) enables Mute, which allows you to temporarily turn your phone's
handset, headset or handsfree microphone off during a call.
5) Fixed Function
Keys
Give you access to the following phone functions:
(MENU) : provides access to menus for your phone's additional features.
Note : When navigating through Menu options, press
(MENU) to back up one menu level.
(CANCEL) or
(CANCEL) : ends a call when pressed during the call, and, when you are
programming the phone, eliminates any input and returns to the previous menu
level.
(REDIAL) : calls the last number dialed.
(HOLD) : places the current call on hold.
(TRANS/CONF) : initiates a call transfer or establishes a three–party
conference call.
(MESSAGE) : provides access to your voice mailbox and flashes to notify
you of messages waiting in your voice mailbox. Note : The Ring/Message
indicator also flashes when messages are waiting.
6) Keypad
Use to dial.
7) Programmable
Personal Keys and
Designation Card
Provides 12 or 24 keys that can be programmed as speed call keys, feature
keys, or line appearance keys, according to your communication needs.
Personal keys have status indicators. On a 5324 IP Phone, the bottom right
personal key is always your Prime Line key. On the 5312 IP Phone, the bottom
left personal keys is always your Prime Line key. Write the name (speed call,
feature or line appearance) of the Personal keys that you program on the
designation card (use the side of the card with the textboxes provided). Use the
slot behind the plastic cover at the bottom of the phone to remove/insert the
designation card.
8) Handsfree
Speaker
Provides sound for Handsfree calls and background music.
9) Handset
Use for handset calls. If you are in headset or handsfree mode, you do not need
to use the handset.
3
5312/5324 IP Phones User Guide
Ring/Message indicators
When indicator is
it means that
Flashing rapidly
Your phone is ringing
Flashing slowly
A message or callback message is waiting at your phone
On
Your phone is ringing another phone
Off
Your phone is idle, or you are on a call
Selecting Menu Options
Because the 5324 IP Phone offers softkeys, feature availability and menu options for the 5312 and
5324 IP Phones may differ.
To select menu items on the display:
1. On a 5324 IP Phone, press the softkeys.
2. On a 5312 IP Phone, press *, 0 and # on the keypad. For example, if options *=YES 0=DEFAULT
#=NO appear and you want to select YES, press *.
Procedures in this guide show all menu selection options, where applicable—for example, "Press the
* or Yes softkey". Procedures in this guide also specify when a menu option is available on only one
of the phones—for example, "On a 5324 IP Phone only, press the Save softkey".
About Feature Access Codes
Use of some features requires dialing access codes. The codes are flexible and may be different than
those in this guide. Ask your Administrator for a list of codes you should use.
Line Interface Module
The Line Interface Module is an optional device that adds an analog phone line (POTS) capability to
your 5324 IP phone only. If Emergency Call Routing is not programmed on your SX-200 ICP, you
must use the Line Interface Module to dial emergency calls. For more information on emergency
number dialing, refer to Emergency Calls.
If you have a Line Interface Module connected to your 5324 IP Phone, all programming of the Line
Interface Module, except the Analog Key, is done by the Installer when your phone is installed. For
more information, refer to "Using the Line Interface Module" elsewhere in this guide.
Note: The 5312 IP Phone does not support the Line Interface Module.
4
5312/5324 IP Phones User Guide
TIPS FOR YOUR COMFORT AND SAFETY
Don't cradle the handset!
Prolonged use of the handset can lead to neck, shoulder, or back discomfort, especially if you cradle
the handset between your ear and shoulder. If you use your phone a lot, you may find it more
comfortable to use a headset. See the section on headset usage elsewhere in this guide for more
information.
Protect your hearing
Your phone has a control for adjusting the volume of the handset receiver or headset. Because
continuous exposure to loud sounds can contribute to hearing loss, keep the volume at a moderate
level.
Adjust the viewing angle
The stand built into your phone tilts to give you a better view of the keys.
To tilt your telephone for better viewing:
1. Turn the phone so that the front faces away from you.
2. Hold the base unit firmly and press the release tabs on the sides of the stand to detach the base
unit.
3. Hinge the hooks of the base unit into the notches on the back of the phone and snap into place
as follows:
•
For a high–angle mount, hinge the two lower hooks into the bottom set of notches and snap
the two upper hooks into the middle set of notches.
•
For a low–angle mount, hinge the two lower hooks into the middle set of notches and snap
the two upper hooks into the top set of notches.
5
5312/5324 IP Phones User Guide
CUSTOMIZING YOUR 5312/5324 IP PHONE
Ringer Control
To adjust the Ringer Volume while the set is ringing:
•
Press
( UP ) or
( DOWN ).
To adjust the Ringer Pitch while the set is idle:
1. Press
( MENU ).
2. Press # or the No softkey until "Ringer Adjust?" appears.
3. Press * or the Yes softkey twice.
4. Press
( UP ) or
5. Press
( MENU ).
( DOWN ).
Handset Receiver Volume Control
To adjust the Handset Receiver Volume when you are using the handset:
•
Press
( UP ) or
( DOWN ).
Speaker Volume Control
To adjust the Speaker Volume when making a handsfree call or when listening to background music:
•
Press
( UP ) or
( DOWN ).
Display Contrast Control
To adjust the Display Contrast while your set is idle:
•
6
Press
( UP ) or
( DOWN ).
5312/5324 IP Phones User Guide
Feature Keys
To program some features to a personal key, you must dial a feature access code. A list of access
codes is provided elsewhere in this guide; however, the codes are flexible and may be different than
those in this guide. Ask your Administrator for a list of codes you can use.
Note: You can only program Speed Call keys using the
Phone. See Speed Call Keys for details.
( MENU ) key on the 5312 IP
To display information about a key:
1. Press
( MENU ).
2. Press a personal key that isn't a line key.
3. Press
( MENU ).
To program a feature key using a Feature Access Code:
1. Dial *47.
2. Press an unused personal key.
3. Dial the feature code for the desired feature key.
4. Press (CANCEL).
5. Write the feature name on the key label.
To program a personal key:
1. Press
( MENU ).
2. Press # or the No softkey until "Personal Keys?" appears.
3. Press * or the Yes softkey.
4. Press a personal key that isn't a line key.
5. Press * or the Change softkey.
6. Press # or the No softkey until the desired feature appears.
7. Press * or the Yes softkey.
8. On a 5312 IP Phone only, press # to save the feature under the chosen key.
9. Press
( MENU ), or press another personal key and proceed to program another feature.
10. Write the feature name on the key label.
Language Change
To change the display language:
1. Press
( MENU ).
2. Press # or the No softkey until "Language?" appears.
3. Press * or the Yes softkey.
4. Press * or the Change softkey.
5. Press # or the No softkey until the desired language appears.
6. Press * or the Yes softkey.
7
5312/5324 IP Phones User Guide
MAKING AND ANSWERING CALLS
If your telephone system operates as a private branch exchange (PBX), the Prime Line can be used
for both incoming and outgoing calls. Outgoing calls on a PBX system require dialing a line access
code (usually 9) followed by the telephone number. In a key telephone system (KTS), the Prime Line
is used for internal (Intercom) calls only. Outgoing calls require the use of Line keys.
Make a Call - PBX
1. Lift the handset.
2. Do one of the following:
•
Dial the extension number or a line access code (usually 9) and the telephone number for an
outside call.
•
Press a Speed Call key.
Make an External Call - KTS
1. Lift the handset.
2. Press a Line key.
3. Do one of the following:
•
Dial the telephone number.
•
Press a Speed Call key.
•
Press
(REDIAL).
Make an Intercom Call - KTS
An Intercom call is a call between two extensions which either pages or rings the called extension.
To switch between a ringing intercom call to a paged intercom call:
1. Make a call.
2. Do one of the following while listening to ringback tone:
•
Press the Direct Page feature key.
•
Dial *48.
Answer a call
Do one of the following:
8
•
Lift the handset.
•
Press
•
Press the flashing Line appearance key and lift the handset.
•
Press the flashing Line appearance.
•
Note: The Auto-Latch Microphone feature described elsewhere in this guide allows you to
answer and respond to internal calls handsfree.
( SPEAKER ).
5312/5324 IP Phones User Guide
Redial
To redial the last number that you manually dialed:
1. Lift the handset (optional).
2. Press
( REDIAL ).
Speed Call Keys
You may use Speed Call Keys to make a call or to send a string of digits during a call (press a Speed
Call Key during a call to send a multi–digit password, for instance).
To dial a stored Speed Call number:
1. Lift the handset (optional).
2. Press a Speed Call key.
To store a Speed Call number:
1. Press
( MENU ).
2. Press # or the No softkey until "Personal Keys?" appears.
3. Press * or the Yes softkey.
4. Press a personal key that isn't a line key.
5. Press * or the Change softkey
6. On a 5324 IP Phone only, press the Yes softkey.
7. Do one of the following:
•
To enter a new number, dial the number (press
( HOLD ) between digits to create a
( HOLD ) more than once to lengthen the
one–second pause during dialing; press
pause.)
•
To enter a trunk flash, press
( TRANS/CONF ). (See "Trunk Flash" for more
information about the use of this feature.)
•
To enter the last number dialed, press
( REDIAL ).
8. On a 5312 IP Phone only, press the personal key again.
9. Do one of the following:
•
To make the number private, press * or the Priv softkey
•
To keep the number visible, press # or the Save softkey.
10. Press
( MENU ).
9
5312/5324 IP Phones User Guide
Speed Call – Personal
To dial a stored personal Speed Call number:
1. Lift the handset.
2. Dial *52.
3. Enter an index number between 1 and 5.
To store a personal Speed Call number:
1. Lift the handset.
2. Dial the appropriate feature access code.
3. Enter an index number between 1 and 5.
4. Dial the number to be stored (press
( HOLD ) between digits to create a one–second
( HOLD ) more than once to lengthen the pause.)
pause during dialing; press
5. Hang up.
Handsfree Operation
To use Handsfree to make a call:
1. If you want to use a Non–Prime Line, press a Line Appearance key.
Note: Your administrator must program Line Appearances to your phone.
2. Dial the number.
3. Begin speaking when the called party answers. Your phone's Handsfree microphone and
Handsfree speaker transmit and receive audio.
To use Handsfree operation to answer calls:
1. Press the flashing line key.
2. Begin speaking. Your phone's Handsfree microphone and Handsfree speaker transmit and
receive audio.
To hang up while using Handsfree operation:
•
Press
( SPEAKER ).
To turn Mute on during Handsfree operation:
•
Press
( MUTE ).The Mute key light turns ON.
To turn Mute off and return to conversation:
•
Press
( MUTE ).The Mute key light turns OFF.
To disable Handsfree operation:
•
10
Lift the handset.
5312/5324 IP Phones User Guide
To return to Handsfree operation:
1. Press
( SPEAKER ).
2. Hang up the handset.
Auto–Answer
To enable or disable Auto–Answer:
•
Press the programmed Auto-Answer feature key.
Note: When Auto-Answer is enabled, the (MUTE) key light flashes rapidly to notify you of an
incoming handsfree call.
To enable or disable Auto-Answer on a 5324 IP Phone only:
1. Press
( MENU ).
2. Press the No softkey until "Auto Answer?" appears.
3. Do one of the following:
•
To enable Auto-Answer, press the TurnOn softkey.
•
To disable Auto-Answer, press the TurnOff softkey.
To answer a call when you hear ringback:
•
Begin speaking. Your phone's Handsfree microphone and Handsfree speaker transmit and
receive audio.
To temporarily mute the Handsfree microphone:
•
Press
(MUTE). The
(MUTE) key light turns ON solid.
To turn Mute off and return to the conversation:
•
Press
(MUTE). The
(MUTE) key light turns OFF.
To end a call, do one of the following:
•
On a 5324 IP Phone only, press the Hang up softkey.
•
Press
•
Wait for the caller to hang up.
( CANCEL ).
11
5312/5324 IP Phones User Guide
Group Listen
With Group Listen you can carry on a conversation using the handset or headset while allowing
others nearby to listen to the person at the far end over the handsfree speaker in your phone. While
Group Listen is active, the handsfree microphone in your phone is turned off.
To allow others in the room to listen to the far end of your call:
•
Press the programmed Group Listen feature key.
To return to a private two-way call from Group Listen:
•
Press the programmed Group Listen feature key.
To change a Group Listen call into a Handsfree call so that others in the room can join the
conversation:
1. Press
(SPEAKER).
2. Hang up the handset.
12
5312/5324 IP Phones User Guide
CALL HANDLING
Hold
To place a call on Hold:
•
( HOLD ).
Press
To retrieve a call from Hold:
1. Lift the handset.
2. Press the flashing line key.
To retrieve a call from Hold at another phone, do one of the following:
•
Press the flashing line key.
•
Dial the appropriate feature access code and the number of the station that placed the call on
Hold.
Hold and Page
The Hold and Page feature allows you to put a call on hold and page without having to use a feature
key or code. You can also page after parking a call; see Call Park - Specific Orbit.
To place a call on hold and page:
1. Press the red
(HOLD) key twice.
2. Make the page.
To place a call on hold and not page:
1. Press the red
(HOLD) key.
Mute
Mute lets you temporarily turn your phone's handset, headset or handsfree microphone off during a
call.
To turn Mute on during a call:
•
Press
( MUTE ). The
( MUTE ) light turns ON.
To turn Mute off and return to the conversation:
•
Press
( MUTE ). The
( MUTE ) light turns OFF.
Handset Mute (does not work?)
To mute your handset's microphone during a call:
•
Press the Handset Mute feature key.
To restore handset microphone operation:
•
Press the Handset Mute feature key again.
13
5312/5324 IP Phones User Guide
Transfer
To Transfer an active call:
1. Press
( TRANS/CONF ).
2. Dial the number of the third party.
3. Do one of the following:
•
To complete the Transfer, hang up.
•
To announce the Transfer, wait for an answer, consult, and hang up.
•
To cancel the Transfer, press
( CANCEL ).
To transfer an active call during headset operation:
1. Press
( TRANS/CONF ).
2. Dial the number of the third party.
3. To complete the Transfer, press the Release feature key.
Conference
To form a Conference when a two–party call is already in place, or to add another party to an existing
Conference:
1. Press
( TRANS/CONF ).
2. Dial the number of the next party.
3. Wait for an answer.
4. Press
( TRANS/CONF ).
To leave a Conference:
•
Hang up or press
( CANCEL ).
Conference Split (5324 IP Phone only)
To Split a Conference and speak privately with the original party:
•
Press the Split softkey.
Add Held (5324 IP Phone only)
To move a call on hold to another line appearance:
1. Press an available line key.
2. Press the AddHeld softkey.
3. Press the flashing line key.
To add a call on Hold to an existing conversation or conference:
1. Press the AddHeld softkey.
2. Press the flashing line key.
14
5312/5324 IP Phones User Guide
Swap
To call another party when you are in an established two–party call:
1. Press
( TRANS/CONF ).
2. Dial the number.
To alternate between the two parties:
•
Press the Swap/Trade feature key or the Trade softkey.
Call Forward
Call Forward lets you redirect incoming calls to an alternate number.
"External Calls?" redirects your incoming external calls only; "Internal Calls?" redirects your incoming
internal calls only. If you want to redirect both external and internal calls, you must program each
separately.
"Always?" redirects all incoming calls regardless of the state of your telephone. "No Ans?" redirects
calls after several rings if you don't answer. "If Busy?" redirects calls when your telephone is busy.
"Busy/No Ans?" redirects calls when your telephone is busy or when you don't answer.
Note: For information about "I'm Here?", see Call Forward – Remote.
To program Call Forward:
1. Press
( MENU ).
2. Press # or the No softkey until "Call Forwarding?" appears.
3. Press * or the Yes softkey .
4. Press # or the No softkey or the Next softkey until the type of Call Forward that you want to set
up appears.
An asterisk next to the Call Forward option indicates that call forwarding is turned on.
5. On a 5324 IP Phone only, press * or the Review softkey.
6. If a number is already programmed, press * or the Change softkey .
7. Press * or the Program softkey .
8. Dial the destination number.
If you make an error while dialing, press * or the <— softkey to correct errors.
9. Press
( DOWN ) or the Save softkey.
10. Press
( MENU ) to exit.
15
5312/5324 IP Phones User Guide
To turn Call Forward on and off (once it has been programmed):
1. Press
( MENU ).
2. Press # or the No softkey until "Call Forwarding?" appears.
3. Press * or the Yes softkey .
4. Press # or the No softkey or the Next softkey until the type of Call Forward appears.
5. Do one of the following:
•
On a 5312 IP Phone, press *.
•
On a 5324 IP Phone, press the Change softkey, and then the TurnOn or TurnOff softkey.
To turn off Call Forwarding and delete the destination number, press the Del softkey.
6. Press
( MENU ) to exit.
Call Forward - Remote (I am Here)
To forward calls from a remote station to your current location:
1. Press
( MENU ).
2. Press # or the No softkey until "Call Forwarding?" appears.
3. Press * or the Yes softkey.
4. Press # or the No/Next softkey until "I Am Here" appears.
5. Press * or the Yes softkey.
6. Dial the extension of the remote station.
If you make an error while dialing, use the # or the <— softkey to backspace and correct the
number.
7. Press
( DOWN ) or the Save softkey.
To cancel Call Forward – I’m Here from the station that set it:
1. Lift the handset.
2. Dial appropriate feature access code.
3. Dial the extension of the remote station.
4. Hang up.
To cancel Call Forward – I’m Here from the phone that was forwarded:
1. Press
( MENU ).
2. Press # or the No softkey until "Call Forwarding?" appears.
3. Press * or the Yes softkey.
4.
“Always?” *, press * or the Change softkey, then press # or the Del softkey.
5. Press
16
( MENU ) to exit.
5312/5324 IP Phones User Guide
Call Forward - Forced
To force an incoming call to be forwarded:
•
Press the Forward Call feature key or the Forward softkey.
To immediately transfer to another extension's No Answer forwarding destination when making a call:
•
Press the Forward Call feature key when it lights.
Call Forward - Toggle
This feature is useful if you want call forwarding in effect for Busy and No Answer conditions most of
the time, but need to override it with Call Forward Always occasionally — for example, when you're
using a second phone such as a SUPERSET 4090 cordless phone. Instead of changing the call
forward programming on your main phone to turn Call Forward Always on and off, you can program a
key to do it.
You can also program keys to turn Call Forward Busy, No Answer or Busy/No Answer on and off.
To toggle call forward:
•
Press the programmed feature key: Forward Always, Forward Busy, Forward No Ans, or
Forward Busy/NA.
For information on programming a feature key, see "Feature Keys" elsewhere in this guide.
Note: You may also program a Forward All key to enable and disable all call forward types that have
a destination programmed.
Messaging - Advisory
Advisory Messaging enables you to select a notice that appears on your phone display to inform
people visiting your desk of your whereabouts. Select from a variety of advisory messages, including
"On vacation", "In a meeting", or "Out to Lunch".
To turn Messaging - Advisory on:
1. Press
( MENU ).
2. If necessary, press the # or the No softkey until "Advisory Msgs?" appears.
3. Press * or the Yes softkey when "Advisory Msgs?" appears.
4. Press # or the Next softkey until the desired message appears.
5. Press * or the TurnOn softkey.
6. Press
( MENU ) to exit.
To turn Messaging - Advisory off:
1. Press
( MENU ).
2. If necessary, press the # or the No softkey until "Advisory Msgs?" appears. .
17
5312/5324 IP Phones User Guide
3. Press * or the Yes softkey when "Advisory Msgs?" appears.
4. Press * or the TurnOff softkey .
5. Press
( MENU ) to exit.
Messaging - Callback
To leave a Callback Message when you hear busy or ringback tone:
•
Press
( MESSAGE).
To respond immediately to a message waiting condition on your phone:
1. Press
( MESSAGE ). A call is placed to the message sender (voice mail system or
extension user) that left the oldest message.
To view information about the messages before responding:
1. Press
( MESSAGE ).
2. Do one or all of the following:
18
•
To call the message sender, press # or the Call softkey.
•
To delete the message, press * or the Erase softkey.
•
On a 5324 IP Phone only, to view additional caller details (if available), press the More and
Again softkeys.
•
To view the next message, press
•
Press
( MENU ) to exit.
( MESSAGE ).
5312/5324 IP Phones User Guide
USING ADVANCED FEATURES
Account Codes
To use Forced Account Codes:
1. Lift the handset.
2. Dial the Account Code digits.
3. Press #.
To enter an Account Code during a call on a 5324 IP Phone:
1. Press
( MENU ).
2. Press the No softkey until “Account Code?” appears.
3. Press the Yes softkey.
4. Dial the Account Code digits.
5. Press the Save softkey.
Callback
To request a Callback when you reach a busy or unanswered telephone:
•
Press the Callback feature key.
To answer a Callback:
•
Lift the handset.
Call Park
To park a call that is on your prime line (Line 1 key), do one of the following:
•
Press the Call Park feature key.
OR
•
Press TRANS/CONF and then dial *33.
The call is parked and you receive dial tone on your prime line.
To retrieve a parked call from your phone while your phone is idle, or while you are off-hook and
hearing dial tone, do one of the following:
•
Press the Call Park feature key.
OR
•
Dial *22.
19
5312/5324 IP Phones User Guide
To retrieve a parked call while you are on a call on your prime line, do one of the following:
•
Press the Call Park feature key.
OR
•
Press TRANS/CONF and then dial *22.
You are connected to the parked call and the caller that was on your prime line is parked.
To retrieve a parked call from another phone:
1. Lift the handset.
2. Dial *23.
3. Dial the prime line number (extension number) of the phone that parked the call.
Note: If the phone has both a parked call and a call on hold, dialing the Remote Hold Retrieve access
code will retrieve the parked call.
Call Park - System
This feature allows you to park a call from any line on your telephone not just the prime line. The
number of calls you can park is limited only by the number available system park "orbits."
To park a call in system orbit:
1. Press the lit System Park feature key.
2. Do either of the following:
•
Hang up
•
Press a line key to answer a call, retrieve a call or hold, or get dialtone.
To return to the caller if all the system orbits are busy:
•
Press (CANCEL) to return to the caller.
To retrieve a call parked on a system orbit from any extension:
•
While listening to dial tone, dial *57 followed by the park orbit number.
Call Park - Specific Orbit
This feature allows you to park a call in a specific orbit by entering a two digit orbit number or by
pressing a feature key assigned to a specific orbit number.
To park a call in a specific orbit:
1. Press the System Park feature key.
2. Enter a two-digit Orbit Number (01-25).
If the selected orbit already has a parked call, press (CANCEL) to return to the caller, and then repeat
steps 1 and 2 but select a different orbit.
20
5312/5324 IP Phones User Guide
To retrieve a call parked in a specific orbit:
•
While listening to dial tone, dial *57 followed by the park orbit number.
To park a call in a specific orbit using an Orbit # feature key:
•
Press a free (unlit) Orbit # feature key. (See "Feature Key" for instructions on programming a
feature key.)
Once a call is parked, you can press the same Orbit # to initiate a page.
To retrieve a call parked using an Orbit # feature key:
•
Press the flashing Orbit # feature key.
Call Park - Destination Phone
Call Park - Destination Phone allows you to park an answered call on another phone. If a parked call
is not retrieved after a specified length of time, a reminder occurs.
To park an active call on another phone:
•
Press (TRANS/CONF) to get dial tone.
•
Dial *62, and then dial the extension of the destination phone.
If the call is parked successfully, dial tone, busy tone or a page occurs. If the call is not parked,
reorder tone occurs.
To retrieve a call parked on another phone:
Do one of the following:
•
Press the flashing Call Park feature key.
•
Dial *22.
Call Pickup
To answer a call that is ringing at another phone in your Pickup Group:
1. Lift the handset.
2. Press the Pickup feature key.
To answer a call that is ringing at a station not in your Pickup Group:
1. Lift the handset.
2. Dial the appropriate feature access code.
3. Dial the number of the ringing station.
21
5312/5324 IP Phones User Guide
Campon
To Campon to a busy station:
•
Press the Campon feature key or the Wait softkey.
To retrieve a call when you hear Campon tone:
•
Press the Swap/Trade feature key or the Trade softkey.
Do Not Disturb
To activate or deactivate Do Not Disturb:
•
Press the Do Not Disturb feature key. The key flashes to indicate that Do Not Disturb is
active.
Override
To use Override when you encounter busy or Do Not Disturb tone:
•
Press the Intrude feature key.
Paging - PA
To use Paging:
1. Lift handset.
2. Do one of the following:
•
To page the default zone, press the PA Page feature key.
•
To page a specific zone, dial *13 followed by the zone number (0-9).
3. Make the announcement.
Paging - Direct
Direct Paging allows you to page a party through the party’s handsfree speaker. If the paged party
has Auto-Latch Microphone enabled, the page can be heard even when the party is on a handset or
headset call. If the paged party has Handsfree Answerback enabled, your page automatically
establishes a handsfree call with the paged party.
To page a party:
1. Lift the handset.
2. Press the Direct Paging feature key or dial the appropriate feature access code.
3. Dial the extension number.
4. Speak to the dialed party after the tone.
Note: If the phone you are paging has the "Can Be Paged" feature turned off, you hear a busy tone
and the direct page cannot be connected.
How you answer a Direct Page depends on whether you have Handsfree Answerback to a Direct
Page enabled on your phone. See Handsfree Answerback to a Direct Page elsewhere in this guide.
22
5312/5324 IP Phones User Guide
Note: You can also answer and respond to a Direct Page by enabling the Auto-Latch Microphone
feature described elsewhere in this guide.
To allow or disallow Direct Pages to your phone:
1. Press
( MENU ).
2. Press # or the No softkey until "Can Be Paged?" appears.
3. Do one of the following:
•
Press * or the TurnOn softkey if you want to receive Direct Pages.
•
Press # or the TurnOff softkey if you do not want to receive Direct Pages.
Handsfree Answerback to a Direct Page
When you receive a Direct Page, Handsfree Answerback automatically establishes a Handsfree call
on your phone. Your administrator enables or disables Handsfree Answerback on your phone. After
your administrator enables Handsfree Answerback, you can choose to turn it on or off directly from
your phone.
Note: By default, Handsfree Answerback is OFF at your phone. If the
when your set is idle, Handsfree Answerback is OFF.
(MUTE) key light is OFF
To turn Handsfree Answerback on:
•
(MUTE) once. The MUTE key light flashes slowly to
When your phone is idle, press
indicate that Handsfree Answerback is ON.
•
When a Direct Page arrives, the
automatically established.
MUTE key light turns OFF and a Handsfree call is
To turn Handsfree Answerback off:
•
Press the flashing
(MUTE) key once. The MUTE key light turns OFF.
You will still receive Direct Page calls, but a Handsfree call is not automatically established.
Note: By default, Handsfree Answerback is OFF at your phone. If the
when your set is idle, Handsfree Answerback is OFF.
(MUTE) key light is OFF
To answer a call when Handsfree Answerback is ON, refer to the following table:
Phone state before the Direct
Page arrives
To answer the Direct Page
Phone is idle, and MUTE is
flashing slowly
1. Check that MUTE is flashing rapidly.
2. Listen for the paging party.
3. Begin speaking.
4. Lift the handset if you wish to switch from a Handsfree
call to a handset call.
23
5312/5324 IP Phones User Guide
You are on a handset call, and
MUTE is flashing slowly
1. Check that MUTE is ON solid.
2. Press MUTE.
The light turns OFF and the Handsfree microphone turns
ON.
3. Speak to the paging party.
Note: Your handset microphone is still enabled.
You are on a MUTED handset
call, OR, you are on a
Handsfree call
The party paging you receives a busy tone.
Handsfree Answerback does not interrupt your call.
To answer a Direct Page when Handsfree Answerback is OFF on your phone, refer to the following
table:
Phone state before the Direct
Page arrives
Phone is idle, or you are on a
handset call, and MUTE is OFF
To answer the Direct Page (indicated by a single burst of tone)
1. Check that MUTE is ON solid.
2. Lift the handset.
or
Press MUTE key to answer in Handsfree mode.
(The light turns OFF.)
3. Begin speaking.
Note: If you were on a handset call, your handset microphone is still
enabled.
1. You are on a MUTED
handset call, OR, you are
on a Handsfree call
The party paging you receives a busy tone.
Handsfree Answerback does not interrupt your call.
To end a Handsfree Answerback call, do one of the following:
•
Hang up the handset to end a handset call.
•
Press
•
Press
(SPEAKER) to end a handsfree call.
(CANCEL).
Note: When the Handsfree Direct Page call ends, the
in before the call was established.
24
(MUTE) key light returns to the state it was
5312/5324 IP Phones User Guide
Paging - All Sets
To page all phones simultaneously through their speakers:
1. Lift the handset.
2. Press the Direct Page feature key.
3. Press *.
4. Page the called party.
To answer an All-Sets Page:
1. Lift the handset.
2. Dial *49.
Paging - Group
To page all phones in a paging group simultaneously through their speakers:
1. Lift the handset.
2. Press the Direct Page feature key.
3. Press # or the No softkey.
4. Page the called parties.
To respond to a Group Page:
1. Lift the handset.
2. Dial *49.
Direct Station Select/Busy Lamp Field (DSS/BLF)
Your phone may have keys programmed to place calls to other extensions and to show the status
(idle, busy or Do Not Disturb) of those extensions.
To call the DSS/BLF extension:
1. Press the DSS/BLF key.
To transfer a call to DSS/BLF extension (without Secretarial option):
1. Press
(TRANS/CONF).
2. Press the DSS/BLF key.
To transfer a call to a station (with Secretarial option):
•
Press the
(TRANS/CONF) key.
25
5312/5324 IP Phones User Guide
Direct Station Select (DSS)/Busy Lamp Field (BLF)/Call Pickup
Your phone may have keys programmed to show the status (idle, busy, ringing, call on hold) of
another destination and to retrieve calls ringing or on hold at the destination.
To retrieve a call ringing at the DSS/BLF destination:
•
Press the slowly flashing DSS/BLF key.
To retrieve a call on hold at the DSS/BLF destination:
•
Press the rapidly flashing DSS/BLF key.
Direct Page/Busy Lamp Field (DP/BLF)
Your phone may have keys programmed to show the busy/idle status of another extension and to
page the extension.
To page a DP/BLF extension:
•
Press the DP/BLF key.
You can page when the DP/BLF extension is idle (key dark) or busy (key steadily lit).
Direct Station Select (DSS)/Busy Lamp Field (BLF)/Direct Page/Call Pickup
Your phone may have keys that show the status (idle, busy, ringing, or call on hold) of another
extension. Depending on the programming of the key, pressing it will do one of the following:
•
Call the extension if it is idle
•
Retrieve a call ringing or on hold at the extension
•
Page the extension.
To pick up a call ringing at the DSS/BLF extension:
•
Press the slowly flashing DSS/BLF key.
To retrieve a call on hold at the DSS/BLF extension:
•
Press the rapidly flashing DSS/BLF key.
To page a DSS/BLF extension:
•
26
Press the dark or steadily lit DSS/BLF key.
5312/5324 IP Phones User Guide
Headset Operation
To use a headset with your phone, ensure that the headset is connected to the dedicated jack on the
back of the phone.
To enable Headset Operation on telephones that are not programmed for full-time headset mode:
•
Press the Headset feature key.
To answer a call (when Auto-Answer is disabled):
•
Press the flashing line key.
To switch between headset and handset operation while in a call (see Note 2):
•
Press
(MUTE).
You can talk using the headset when the
is not lit.
key is lit and with the handset when the
key
To hang up:
•
Press
(CANCEL).
Notes:
1. Lifting the handset on some 5324 IP phones while it is in headset mode also answers the
call.
2. This feature is available on some versions of the 5324 IP phone only.
3. Disconnecting the headset while in a call puts your phone in speaker-phone, mute mode.
You can hear the other party but they cannot hear you. To talk to the other party, press
(MUTE). To hang up, press
(SPEAKER).
Music
To turn Music on and off when the phone is idle:
•
Press the Music feature key.
To turn Music on and off on a 5324 IP Phone when the phone is idle:
1. Press
( MENU ).
2. Press the No softkey until "Music?" appears.
3. Do one of the following:
•
To turn the music on, press the TurnOn softkey.
•
To turn the music off, press the TurnOff softkey.
4. Press
( MENU ).
27
5312/5324 IP Phones User Guide
Park and Page
With Park and Page, you can park a call and initiate a page all in one step. Park and Page options
include
•
Park and Page Set: After a call is parked, the system performs an all-set page.
•
Park and Page Group: After a call is parked, the system pages your Paging Group.
•
Park and Page: After a call is parked, you must enter the extension or Page Group number.
•
Park and PA Page: After a call is parked, you must enter a Paging Zone number (0-9).
See "Programming a Feature Key" for information on assigning this feature to a Personal Key.
To park a call and page a call:
1. Answer or make a call.
2. Perform one of the following:
•
To page all phones and the PA, press Park & Page Sets
Or
(TRANS/CONF), dial *63 and dial *.
Press
•
To page all phones in a group and the PA, press Park & Page Grp
Or
(TRANS/CONF), dial *63 and press #.
Press
•
To page an extension number, press Park & Page and dial the extension
Or
Press
(TRANS/CONF), dial *63 and dial the extension.
•
To page all phones in a specified group and the PA, press Park & Page and dial the two-digit
Page Group Number
Or
(TRANS/CONF), dial *63 and dial the two-digit Page Group Number, then #.
Press
•
To park a call in orbit and perform a PA Page to any or all nine Paging Zones, press Park &
PA Page and dial the Paging Zone number (0 for all zones, 1-9 for a specific zone).
Or
(TRANS/CONF), dial *64 and dial the Paging Zone number (0 for all zones, 1-9
Press
for a specific zone).
(TRANS/CONF) to get dial tone.
Note: To Park and Page a call using speed call keys, press
Then press a speed call key that is programmed with the Park and Page access codes plus the digits
for the required paging option (For example, the digits for the required paging option could be an
extension number to page a single phone or * to page all phones plus PA paging).
28
5312/5324 IP Phones User Guide
Record a Call
This feature uses your voice mail system to record your telephone conversations.
Note: You may be required by law to inform the other party that you are recording the conversation.
For specific instructions, consult your system administrator.
To start recording while on a 2–party call:
•
Press the Record Call key. (See Feature Keys elsewhere in this guide for instructions on
programming a Record Call key to your phone.)
Note: Your system may be programmed to automatically begin recording external calls when
you or the other answers.
To control recording on a 5312 IP Phone, do one or all of the following:
•
To stop and save a recording, press the Record Call feature key.
•
To stop and erase a recording, press
(CANCEL).
To control recording on a 5324 IP Phone, do one or all of the following:
•
To pause recording, press the Pause softkey.
•
To resume recording after pausing, press the Resume softkey.
•
To stop a recording without saving it, press the Erase softkey or
•
To stop and save a recording, press the Save softkey.
(CANCEL).
Putting the call on hold saves the recording; taking the call off hold starts a new recording. Depending
on system programming, hanging up, or pressing
(TRANS/CONF) or a DSS key, may also
save the recording.
To listen to a recording:
1. Lift the handset.
2. Access your voice mailbox.
3. Follow the prompts to retrieve the recording.
29
5312/5324 IP Phones User Guide
Auto-Latch Microphone
To set the handsfree microphone to automatically turn on or off when receiving a Direct Page or
Intercom call:
(MENU).
1. Press
2. Press the # or No softkey until ""Auto Latch Mic?"" appears.
3. NOTE: If your administrator has already enabled Auto-Latch Microphone on your phone, “Auto
Latch Mic?” does not appear in your list of options.
4. Press the * or Yes softkey.
5. Do one of the following:
•
Press * or the TurnOn softkey
•
Press # or the TurnOff softkey.
When Auto-Latch Microphone is enabled and your set is idle, the
(MUTE) key light flashes rapidly
to notify you when an incoming page/intercom call has been established.
When Auto-Latch Microphone is enabled and you are engaged in a handset conversation, the
(MUTE) key light turns on solid to notify you when an incoming page/intercom call is waiting at your
phone.
To respond to an Auto-Latch call while your phone is idle:
1. Begin speaking after the paging/intercom party addresses you.
key light flashes rapidly to indicate that the Handsfree microphone is on and that
Note: The
the calling party can hear you.
2. Press
solid.
(MUTE) if you wish to mute your handsfree conversation. The
3. Press
(MUTE) again if you wish to turn mute off and return to the handsfree conversation.
The
key light turns on
key light turns off.
To answer an Auto-Latch call while you are on a handset call with another caller:
•
Press the lit (solid)
(MUTE) key.
The handsfree microphone turns on and the
paging/intercom party can hear you.
(MUTE) key light turns off to indicate that the
•
Begin speaking after the paging/intercom party addresses you.
•
Press
(MUTE) to alternate between handset and handsfree conversations.
When you are speaking with the paging/intercom party, the
30
(MUTE) key light is off.
5312/5324 IP Phones User Guide
Reminder
To program a Reminder on a 5312 IP Phone:
1. Lift the handset.
2. Dial *32.
3. Set a time by entering the hour and minutes in 24-hour format. For example, entering 1415 sets a
reminder for 2:15 PM. You hear dial tone if the time is valid; reorder tone if it is invalid.
To cancel a timed reminder on a 5312 IP Phone (only):
1. Lift the handset.
2. Dial *32 followed by 9999.
3. Hang up.
The reminder is cancelled.
To program a Reminder on a 5324 IP Phone:
1. Press
(MENU).
2. Press the No softkey until "Timed Reminder?" appears.
3. Press the Yes softkey.
4. Enter the time in 12-hour format--for example, 01:45.
5. Press either the AM or PM softkey.
6. Press the Save softkey.
To view, change, and/or cancel a pending Reminder on a 5324 IP Phone:
1. Press
(MENU).
2. Press the No softkey until "Timed Reminder?" appears.
3. Press the Yes softkey.
4. Do one of the following:
•
To change the Reminder, press the Change softkey, enter the new time, and press the Save
softkey.
•
To cancel the Reminder, press the Del softkey.
•
To exit without canceling the Reminder, press
(MENU).
To acknowledge a Reminder when your phone rings once, do one of the following:
•
Lift the handset.
•
Press the Confirm softkey (if available).
31
5312/5324 IP Phones User Guide
Reminder - Multiple
Note: The Reminder feature will not operate if Auto-Answer is enabled on your phone.
To set multiple reminders (up to three) on a 5312 IP Phone (only):
1. Lift the handset.
2. Dial *32.
3. Dial # followed by the number of the timer (#1, #2, or #3). To repeat the timer daily, dial *.
4. Set a time by entering the hour and minutes in 24-hour format. For example, entering 1415 sets a
reminder for 2:15 PM.
You hear dial tone if the time is valid; you hear reorder tone if it is invalid.
5. Repeat for each additional timer.
To cancel one or multiple reminders on a 5312 IP Phone (only):
1. Lift the handset.
2. Dial *32.
3. Do one of the following:
•
Dial 9999 to cancel Timed Reminder #1
•
Dial # followed by the timer number (2 or 3) and 9999 to cancel a reminder other than #1.
4. Replace the handset.
To set multiple reminders (up to three) on a 5324 IP Phone (only):
1. Press
(MENU).
2. Press the No softkey until "Timed Reminder?" appears.
3. Press the Yes softkey.
4. Enter the time for Timer 1 in 12-hour format--for example, 01:45.
5. Press either the AM or PM softkey.
6. Press the Save softkey.
7. Press the Yes or No softkey depending on whether you want the reminder to repeat daily.
8. Repeat the first three steps, and then press the Next softkey to set Timer 2.
9. Repeat the procedure for Timer 3.
To view, change, and/or cancel a pending Reminder:
1. Press
(MENU).
2. Press the No softkey until "Timed Reminder?" appears.
3. Press the Yes softkey.
4. The reminder time for TIMER 1 appears (an asterisk beside the time indicates that the timer
repeats daily, HH:MM indicates that the timer has not been programmed).
5. Press the Next softkey to display the other timers.
6. Do one of the following:
32
5312/5324 IP Phones User Guide
•
To change the time, press the Change softkey, enter the new time, press the Save softkey
and then press the Yes or No softkey depending on whether you want the reminder to repeat
daily.
•
To cancel the Reminder, press the Del softkey.
•
To exit without canceling the Reminder, press
(MENU).
To acknowledge a Reminder when your phone rings once, do one of the following:
•
Lift the handset.
•
Press the Confirm softkey (if available).
Call Logging (5324 IP Phone only)
Call Logging keeps track of the names (if available) and telephone numbers of all your incoming calls
or only those you missed.
To program your phone to log your incoming calls:
1. Press
(MENU).
2. Press the No softkey until "Call Logging" appears.
3. Press the Yes softkey.
4. Press the Missed softkey to log missed calls only or the All softkey to log all calls.
5. Press one softkey as follows:
•
Press Intl to log calls from other extensions only
•
Press Extl to log outside calls only
•
Press Both to log internal and external calls.
To turn off call logging:
1. Press
(MENU).
2. Press the No softkey until "Call Logging" appears.
3. Press the Yes softkey.
4. Press the Off softkey.
To display the call log:
Press the Callers feature key.
1. Press the New softkey to display details for newly logged calls only, or the Old softkey to display
details for previously logged calls. The display shows the caller's number. Press the Name or
Num softkey to display the caller's name or number.
2. If more than one call is logged, use the Next and Previous softkeys to display the others.
To return a call in the call log:
1. Display the call you want to return.
2. Do one of the following:
•
If the call is internal, press the Call softkey.
•
If the call is external, dial 9 and then press the Call softkey.
33
5312/5324 IP Phones User Guide
•
If the call is long distance, dial 91 and then press the Call softkey. You can dial up to three
digits before pressing Call.
To delete calls from the call log:
1. Display the call you want to delete.
2. Press the Yes softkey to delete the displayed call only or the All softkey to delete all other New or
Old calls.
3. Press the Confirm softkey to validate your request.
Phonebook
To access the Phonebook, do one of the following:
•
On a 5324 IP Phone, press
appears.
•
On a 5312 IP Phone, dial *65.
(MENU) and then press the Yes softkey when Phonebook?
To use the Phonebook:
1. Enter the name of the person you wish to call, as follows:
•
For each letter in the name, press the appropriate key on the keypad until the letter is shown
in the display. For example, if the letter C is required, press the digit 2 three times.
•
Use the # or <−−− softkey to correct errors.
•
If the next letter in the name is on the same digit key as the previous letter, press the * or
−−−> softkey before proceeding.
•
If required, use the * or −−−> softkey to add a space between the first and last name.
2. Press the * or Lookup softkey.
3. If no match exists, edit the original entry.
4. If more than one match is found, press the # or Next softkey.
5. Do one of the following:
6. To make the call, press the * or Call softkey.
7. To edit the entry, press the # or Retry softkey.
8. To exit, press
(MENU).
Note: Only extensions that have a voice mailbox can be dialed using Phonebook.
34
5312/5324 IP Phones User Guide
Call Monitoring
This feature allows you to monitor another extension user's phone conversation, either with or without
the user's knowledge.
If your system is programmed to notify users that they are being monitored, they hear a beep when
monitoring begins. Users that have a display telephone also see your name and extension number in
the display for the duration of the call.
When monitoring a call, you can listen to the conversation but you can’t speak to either party, and
they can't hear you. However, you can join the conversation by forming a three-party conference. The
following conditions apply to Call Monitoring:
A few conditions
•
The system may be programmed to disallow monitoring of any or all extensions.
•
A user can only be monitored from one extension at a time. If you try to monitor someone
who is already being monitored, you receive busy tone and BUSY appears in your display.
•
If the user puts the caller on hold, transfers the call, or ends the call, you are disconnected
and your monitoring session ends. Note that the system can be programmed to allow
monitoring to continue while the call is on hold.
•
While you are monitoring, you can’t make or receive calls. Anyone who calls your telephone
while you are monitoring receives busy tone. The caller can leave a callback, but is unable to
camp on or override your monitoring session. If you want to place an outgoing call, you must
first cancel your monitoring session.
To monitor a call:
1. Lift the handset.
2. Dial *45 followed by the number of the extension you wish to monitor.
3. If the user is on a call, INTRUDING followed by the user’s extension number appears in your
telephone display. If the user is not on the phone, you hear busy tone and the user's extension
number followed by the words IS IDLE are shown in your telephone display.
4. Do one of the following:
•
Press
party.
•
Press # or Exit to end the monitoring session.
(TRANS/CONF) to form a three-party conference with the user and the other
Note: If you wish to continue monitoring after exiting the conference, you must set up the monitor
again.
Door Opener
Door Opener allows you to operate a third-party door opener. For example, when someone requires
entry into a third-party building, a designated extension (or extensions) rings and on answering, the
extension user can press a feature key or dial a feature access code to open the door.
To use Door Opener:
•
Press Door Opener feature key or press *66.
35
5312/5324 IP Phones User Guide
Night Answer
Office telephone systems are often placed into Night Answer after regular hours. Calls then ring
alternate answer points—either designated extensions or a night bell. You can dial the Trunk Answer
From Any Station (TAFAS) code to answer calls ringing the night bell. If permitted by system
programming, you can put your phone into one of two night answer modes, Night1 or Night2.
To switch your 5312 IP Phone to Night Answer or back to Day service:
1. Lift the handset.
2. Press the Night Answer feature key. (See "Feature Key" for instructions on programming a
feature key.)
3. Do one of the following:
•
Press 0 for Day Service.
•
Press 1 for Night1.
•
Press 2 for Night2.
4. Hang up.
The Night Answer feature key light flashes slowly for Night1, and rapidly for Night2. The Night
Answer feature key light is off for when your phone is in Day service.
To switch your 5324 IP Phone to Night Answer or Day service, or to view which service your 5324 IP
Phone is currently in:
1. Press
( MENU ).
2. Press the No softkey until “Night Answer?" appears.
3. Press the Yes softkey
4. Do one of the following:
36
•
To exit without making any changes, press
•
To change the mode of service, press the Change softkey, followed by No until the desired
alternative appears, and then press Yes.
(MENU).
5312/5324 IP Phones User Guide
Date and Time Setup
This feature is available on the 5324 IP Phone only.
You can change the time and date that appears on the displays. The time can be displayed in either a
12- or 24-hour format, depending on system programming.
To set the time:
1. Press
(MENU).
2. Press the No softkey repeatedly until Time? appears on the display.
3. Enter the time in the correct format.
4. Press the AM or PM softkeys (if necessary).
5. Press the Save softkey.
To set the date:
1. Press
(MENU).
2. Press the No softkey repeatedly until Date? appears on the display.
3. Press the Yes softkey.
4. Enter the date in the indicated format.
5. Press the Save softkey.
Release
Release lets you disconnect from an attempted Call Transfer or Conference Call without hanging up
the handset. Release is useful when you encounter a busy or unavailable party.
To release from an attempted transfer or conference call, do one of the following:
•
Press the Release feature key or the Release softkey.
37
5312/5324 IP Phones User Guide
Secure Hot Swap
Secure Hot Swap allows you to “swap” your own phone programming when you are using any other
IP phone that is enabled to support the feature. When you dial your phone’s extension number and
your assigned Hot Swap Personal Identification Number, the “swapped” phone immediately assumes
most of your phone settings, including key programming. Any changes you make to the phone while
you are logged in—for example, adding a speed dial—are saved to your personal profile.
To Hot Swap a phone (the phone must be idle):
1. Dial *68 or the appropriate feature access code.
2. Dial the extension number of the phone you wish to swap.
3. Enter your four-digit Hot Swap Personal Identification Number (PIN).
To verify that the phone has been swapped:
1. Press
(MENU).
2. Press the Prime Line key.
If the phone is successfully swapped, the display shows the extension of the phone whose
settings you wished to swap.
To log out of the Swapped phone (the phone must be idle):
•
Dial *68 on the phone on which you initiated the Hot Swap.
Note: Your profile can only be active on one phone at a time. You must “unswap” from the current
swapped phone before you can initiate a Hot Swap of another phone.
Mobile Extension
Mitel Mobile Extension is a software solution that enables you to twin your desk phone with an
external PSTN-connected phone (your cell phone, for example). Calls arriving at the desk phone ring
the cell phone simultaneously, until one or the other is answered, or if unanswered, are forwarded to
voice mail. For information about configuring Mobile Extension on your Mitel IP device, refer to the
Mobile Extension Quick Reference Guide available at www. mitel.com or contact your Administrator.
38
5312/5324 IP Phones User Guide
USING YOUR 5324 IP PHONE WITH THE 5310 IP CONFERENCE UNIT
The 5324 IP Phone supports the 5310 Conference Unit. Your phone may use the 5310 IP
Conference Unit for conferencing. An optional mouse connected directly to the conference unit is
used to control the conference unit on or off, to adjust the volume, mute the conference call, or to put
the conference unit into Presentation mode.
If a mouse is not installed, the conference unit acts as the phone’s speaker for all operations, except
ringing. For example, when the SPEAKER key
audio path is directed to the Conference Unit.
is pressed during a headset or handset call, the
The 5324 IP Phone will activate the 5310 Conference Saucer when it detects that the Conference
Module has been installed in the back of the phone.
You can only run one Conference session at a time. If the 5310 Conference Unit is not connected to
your phone, the Conference application is not available.
Using the 5310 Conference Unit with a Mouse
Use the procedures below if you 5310 Conference Unit has a mouse attached.
Turn the conference unit on and off
1. Verify that the conference unit is connected to your phone.
2. Press the Power (On) key on the mouse to turn the unit on.
3. Press the Power key again to turn the conference unit off.
Adjust the conference unit volume
•
Press Volume Up or Volume Down key on the mouse.
39
5312/5324 IP Phones User Guide
Place the conference unit in Presentation mode
Presentation Mode is used when only one individual is speaking to a group. If another member in the
group wishes to speak, you must disable Presentation Mode. Presentation Mode minimizes
extraneous noise.
To place the conference unit in Presentation mode
•
Press Presentation Mode key on the mouse.
Mute the Conference Unit
To mute the conference unit so that conversation in the meeting room cannot be heard by individuals
being conferenced:
•
Press
(Mute key) on the mouse.
Exit the conference
•
Press Power key on the mouse.
Using the 5310 Conference Unit without a Mouse
Use the procedures below if you 5310 Conference Unit does not have a mouse attached. The 5324
IP Phone will activate the 5310 Conference Saucer when it detects that the Conference Module has
been installed in the back of the phone.
To start a Conference
•
Press SPEAKER key
or just start dialing.
Adjust the conference unit volume
•
Press Volume Up or Volume Down.
Mute the conference unit
To mute the conference unit so that conversation in the meeting room cannot be heard by individuals
being conferenced:
•
Press
(Mute key).
Exit the conference
•
40
Hang up.
5312/5324 IP Phones User Guide
USING THE LINE INTERFACE MODULE (5324 IP PHONE ONLY)
5324 IP Phones support the Mitel Line Interface Module. The Line Interface Module allows you to
make and receive calls over an analog line (referred to as the Line Interface Module line) connected
to your phone, and operates in either of the following two modes (as determined by your System
Administrator):
•
Line Interface Module mode: your phone allows you to use the Line Interface Module line at any
time.
•
Failover Mode: you can use the Line Interface Module line only when the IP connection has
failed.
Note: Handsfree and on-hook dialing are not supported on the Line Interface Module line.
LINE INTERFACE MODULE MODE
Make a Call
To make a call using the Line Interface Module line:
1. Lift the handset.
2. Press the Line Interface Module key. ANALOG CALL appears on the display.
3. Dial the number to make the call.
Notes:
•
When making external calls over the Line Interface Module line, a prefix (e.g. 9) is not
required.
•
If your phone's Line Interface Module key has the Privacy option enabled and another phone
is on a call using the Line Interface Module line (that is, the Line Interface Module key is solid
orange), you cannot access the Line Interface Module line. The user of the other phone must
first hang up before you can access the Line Interface Module line.
•
To determine whether the Privacy option is enabled, contact your System Administrator.
Answer a Call
To answer a call using the Line Interface Module line:
1. Lift the handset.
2. Press the flashing Line Interface Module key. ANALOG CALL appears on the display.
Answer a Waiting Call on the Line Interface Module Line
If you have subscribed to an analog call waiting service, you may use the hookswitch or press
(CANCEL) to answer a waiting Line Interface Module call. When you are on a Line Interface Module
call and a waiting Line Interface Module call arrives, you will hear a beep.
Note: This feature may not be supported in all regions.
41
5312/5324 IP Phones User Guide
To answer a waiting Line Interface Module call, or to return to the original Line Interface Module call,
do one of the following:
•
Press and release the hookswitch.
•
Press
•
Press the Line Interface Module key.
( CANCEL ).
Hold a Call
To put a current call on hold to answer an incoming Line Interface Module call:
•
Press the flashing Line Interface Module key. The current call is put on hold.
To switch between the current call and the held call when one of the calls is using the Line Interface
Module line, do one of the following:
•
If your current call is using the Line Interface Module line, press the flashing Line key of the
held call. The Line Interface Module call is automatically put on hold.
•
If your current call is using an IP line, press the flashing Line Interface Module key. The IP
line is automatically put on hold.
End a Call
To end a current call when an incoming Line Interface Module call arrives:
•
(CANCEL), and then press the flashing Line Interface Module key. The current call
Press
ends, and you are connected to the caller on the Line Interface Module line.
To end the current Line Interface Module call when an incoming call arrives:
•
Press
(CANCEL). The current Line Interface Module call ends, and you are connected to
the new caller.
FAILOVER MODE
Make A Call
To make a call using the Line Interface Module line during an IP connection failure:
1. Lift the handset. IP FAIL: ANALOG CALL appears on the display.
2. Dial the number to make the call.
Answer A Call
To answer a call using the Line Interface Module line during an IP connection failure:
•
Lift the handset. IP FAIL: ANALOG CALL appears on the display, and the call is answered.
EMERGENCY CALLS
WARNING FOR EMERGENCY NUMBER DIALING: Consult your local authorities for Emergency
Numbers and 911 or equivalent service availability in your area. Emergency Number dialing should
only be performed by picking up the handset and selecting the Line Interface Module key. If Privacy
Mode is enabled and the Line Interface Module key local line is busy, dialing will not occur on the Line
Interface Module line. Emergency dialing using an IP connection may not be supported due to ICP
system configuration and country location. For more information, contact your System Administrator.
You can make an Emergency Call to your Local Emergency Service using the Line Interface Module
line when the IP connection has failed.
42
5312/5324 IP Phones User Guide
To make an Emergency Call using the Line Interface Module line:
1. Lift the handset.
2. Press the Line Interface Module key.
3. Dial your Local Emergency Number. ANALOG CALL appears on the display.
USING THE MITEL IP PROGRAMMABLE KEY MODULES (5324 IP PHONE
ONLY)
IP Programmable Key Modules (PKM) add programmable keys to the 5324 IP phones. An IP PKM
Interface Module installs in the back of the 5324 IP Phone to allow the 12 or 48-button IP PKM to
connect to the IP phone without using an additional LAN port.
PKM keys can be programmed as feature keys, speed call keys, Direct Station Select keys, or line
appearance keys. Each key has a Line Status Indicator that works the same way as those on the
associated telephone. The keys can be programmed through the telephone.
Note: Up to two 48-button PKMs can be attached for 96 additional keys.
43
5312/5324 IP Phones User Guide
FEATURE ACCESS CODES
Program Feature Key
*47
Direct Paging
*48
Retrieve Personal Speed Call
*52
Store Personal Speed Call
*51
Call Hold Retrieve (Remote)
*23
Call Forwarding - Cancel I'm Here
*07
Call Park
*33
Call Hold Retrieve (Local)
*22
Call Park Orbit Retrieve
*57
Call Park Remote
*62
Directed Call Pickup
*09
Paging Access To Specific Zones
*13
Group Page Meet-Me-Answer
*49
Call Park and Page - Telephone
*63
Call Park and Page - PA
*64
Automatic Wakeup/Reminder
*32
Phonebook
*65
Silent Monitoring
*45
Open Door
*66
Secure Hot Swap
*68
44