1
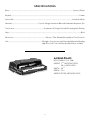
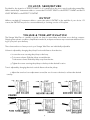
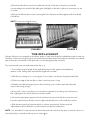
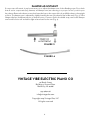
TINE BASS PIANO
Vintage Vibe
El ectric P ian o Co.
OWNER’S MANUAL
REVISED March 2015
Pag e i n t e n t i o n a l ly l e f t
blank
I ntroduction
Decades ago, electric pianos presented musicians with many advantages over traditional acoustic pianos. In
addition to being easily amplified and providing improved tuning stability, the electric piano was smaller and
lighter, thereby offering portability. The electric alternative also created a new sound in music. Just as a traditional piano cannot truly be duplicated synthetically in terms of sound and feel, the electric piano has made its
place in the musician’s arsenal.
While the weight of these pianos was an enormous improvement over moving an acoustic piano, such weight is
not a viable option for many of today’s musicians. The Vintage Vibe Tine Piano has been thoroughly designed
to provide classic tone and a naturally weighted feel, with superior ease of portability.
Thank you for your purchase of the Vintage Vibe Tine Piano.
Sincerely,
The Vintage Vibe Team
1
Specifications
Base.................................................................................................................................................................................... Spruce / Poplar
Keybed................................................................................................................................................................................................ Linden
Action Rail.......................................................................................................................................................................Hardrock Maple
Hammers..........................................................................Cycolac Flange, Hardwood Butt and Graduated Neoprene Tips
Tone Source....................................................................................Asymmetrical Tuning Fork with Electromagnetic Pickups
Harp......................................................................................................................................................................................................... Birch
Electronics...........................................................................................Passive / Tube Preamplifier (12AU7) w/ Tone Controls
Lid.................................................................................................Fiberglass Construction with Extruded Aluminum Banding
High Gloss Gel Coat Solid and Sparkle finishes available
44 BASS PIANO
Key Compass: C4 - G46
Height: 7 7/8” (without legs)
34 1/8” (with legs)
Width: 28 1/2”
Depth: 21 5/8”
Weight: 37 lbs (without legs)
2
Legs
The included chrome-plated steel legs provide a classic appearance and solidly support the piano at the approximate height of a conventional acoustic piano. To install, carefully lay the piano on its back and screw the
legs clockwise into the leg flanges.
Aftermarket Stand
Any Platform, Z or X-Stand is suitable to support a Vintage Vibe Piano. When selecting a stand, care should be
taken to ensure that it provides solid footing and does not interfere with access to the jack plate nor proper
function of the sustain pedal.
Vintage Vibe 44 BASS Piano Controls
Bass piano controls include Volume, Bass and Treble potentiometers.
The volume potentiometer also acts as a power switch for the tube preamplifier. When the knob is turned fully
counter-clockwise the power is off. When you turn the knob clockwise from this position you will feel a slight
click; this indicates that the power is on.
A push button switch located on the left underside of the piano toggles the output between passive and the
tube preamplifier. The volume and tone controls will work in either case.
VINTAGE VIBE 44 BASS PIANO JACK PLATE
24VDC: TUBE PREAMPLIFER POWER JACK
The 44 Bass model’s tube preamplifer requires, and is supplied with, a 24VDC power supply. If an alternate
power supply is to be used, the barrel plug MUST be center positive and feature a 2.1mm ID / 5.5mm OD. We
recommend a supply with a minimum current output rating of 400mA.
Use of an incorrect power supply may result in damage to the preamplifier and as such is not covered by any
type of warantee.
3
FX LOOP: SEND/RETURN
Provided for the insertion of EFFECTS UNITS. It is located before the tone controls and tube preamplifier.
Utilize standard 1/4” instrument cables to connect the FX LOOP “SEND” to the EFFECT’S INPUT and the FX
LOOP “RETURN” to the EFFECT’S OUTPUT.
OUTPUT
Utilize a standard 1/4” instrument cable to connect the piano’s OUTPUT to the amplifier of your choice. Of
course, the OUTPUT may also be connected directly to a mixing console or PA system.
VOLUME & TONE ARTICULATION
The Vintage Vibe Piano is carefully voiced in our shop for even timbre and volume across the key compass.
Shipping, atmospheric conditions, amplification methods, and personal tastes may necessitate additional voicing of your piano upon delivery.
The volume and tone of every note in your Vintage Vibe Piano are individually adjustable.
Volume is adjusted by changing the pickup’s horizontal distance from the tine.
1. Loosen the screw securing the pickup to the harp.
2. To increase volume: Slide the pickup toward the tine.
To decrease volume: Slide the pickup away from the tine.
3. Tighten the screw securing the pickup to the harp in the desired location.
Tone is adjusted by changing the tine’s vertical distance from the pickup.
1. Adjust the tone bar’s tone adjustment screw (the one closest to the tine) to achieve the desired tonality.
VOLUME
TIMBRE
4
4
Amplification
The Vintage Vibe Piano is voiced for a strong fundamental tone under a light touch, with overtones present upon heavier playing. These characteristics may be more pronounced by a tube amplifier as opposed to
a solid state model. The technicians at Vintage Vibe prefer and voice all pianos with tube amplification and
reccomend the Fender Hot Rod series amplifiers. However, as each player has individual tastes, it is recommended to try your piano through a variety of amplifiers to arrive at your desired tone.
Always try to plug both the bass piano’s power supply and the amplier of choice into the same outlet.
Tuning
The Vintage Vibe Piano will rarely require tuning. When it becomes necessary to tune a note:
1. Remove the three screws found under the front lip of the piano that secure the lid to the base.
NOTE: Do not use a power drill as this may strip the screws.
2. Lift the lid upward and remove it from the base.
For Single Note / Spot Tuning:
3. Strike the key in question and utilize the tuning tool (it fits easily in-between the tone bars and provides access to the springs) to slide the spring forward or backward along the tine in order to achieve proper pitch.
To raise the pitch: Slide the spring toward the keys.
To lower the pitch: Slide the spring away from the keys.
For Extensive / Full Piano Tuning:
4. Remove the screws securing the harp to the harp supports. There are two on the left side of the harp and one on the right side.
5. Lift and raise the harp so that it is standing vertically and seated on the harp supports. (Fig. 1)
NOTE: It is advisable to hold the harp with one hand during the tuning process in order to prevent mishaps.
6. Pluck the tine by hand and utilize the tuning tool or your fingers (Fig. 2), to move the spring forward or backward along the tine in order to achieve proper pitch.
When tuning is completed:
1. If the harp has been raised, lower it and reinstall the screws to secure it to the harp supports.
2. Place the lid back onto the base of the piano. To replace lid, Place the lid back onto the base of the piano. Align the breakaway hinges on the rear of the lid to those on the base. carefully lower the front of the lid and be sure no wires or cables are pinched between the lid and base. Ensure the lid is seated properly behind the name rail (it may be necessary to pull the name rail forward to allow the lid to be lowered properly).
5
3. Ensure that the three screw holes under the front lip of the piano’s base line up with the corresponding holes in the lid. By shifting the lid slightly to the left or right you can ensure you are on center.
4. By hand, install the three screws securing the lid to the base and then tighten with a hand held screwdriver.
NOTE: Do not cross-thread screws.
Figure 1
Figure 2
TINE REPLACEMENT
Vintage Vibe tines are swaged from the finest quality of steel and should last indefinitely under normal use.
However, continuous heavy playing can stress the tines past their elastic limit and may eventually cause breakage. In the event a tine needs to be replaced, it can be changed quickly and easily.
*If you purchased a pre-cut replacement tine, skip to 5.
1. To ensure the proper length of the replacement tine, hold it against the needed tine
number on the cutting chart and mark the length with a marker.
2. With the tine cutting tool or a strong pair of wire cutters cut the tine along the marked line.
3. File the cut edge of the tine flat in order to ensure proper voicing.
4. Slide the included tuning spring onto the tine (using a pair of pliers may help relieve the crimp in the tuning spring.)
5. Use a 5/16” socket or nut driver to loosen the tone generator mounting screw and remove the original generator block and tine from the tone bar.
6. Mount the replacement generator block and tine to the tone bar with the screw removed from the original. Ensure that the screw is tight and that the tine is in-line with the tone bar.
7. Slide the tuning spring forward and back to achieve proper pitch. Volume and tone adjustments may be needed to voice the new tine to the rest of the piano.
NOTE: It is advisable to locate and remove the broken end of the tine from the piano to ensure it does not
short the pickups or interfere with any action components.
6
troubleshooting
ELECTRONIC S
If the piano is not producing any sound, ensure that a functional instrument cable is connected between the
piano’s OUTPUT jack and the input of a properly functioning amplifier. Try both positions of the passive /
tube preamplifier pushbutton switch.
If the piano is working in the passive setting but not in the tube preamplifier setting, ensure that the preamp
is receiving power. A quick indicator is that the LED on the front rail is illuminated. If the LED is not illuminated, ensure that an appropriate power supply is plugged into the DC jack at the rear of the piano and that
the volume switch is turned in the clockwise direction past the “OFF” position.
If the piano is not outputting any sound in either the passive or tube preamplifier positions of the pushbutton switch, remove the instrument cable from the piano’s OUTPUT jack and insert it into the SEND jack (with
the opposite end of the cable still connected to a properly functioning amplifier). This will bypass all of the
piano’s internal wiring and take the signal directly off of the harp. Should you still not have output, check that
the harp is not at fault by plugging a 1/4” cable with RCA adapter between the harp itself and an amplifier. If
the piano can be heard through the amplifier, the harp is not the issue.
Should you need further assitance, the information you have obtained from these troubleshooting steps will
help us to further assess your issue.
Sticking Keys
If a key becomes sluggish or remains in a depressed position, one or more of the key bushings may have
swelled due to changing atmospheric conditions. First, check for left to right movement of the offending key.
A very slight amount of side-to-side movement should be present. If the front of the key feels tight, rock the
key back and forth over the key pin to free it.
If the key still sticks, the pin hole or balance rail bushings may be at fault, or the front key bushing may need
further spreading. Disconnect the piano from AC and all amplification. Remove the lid. On active models,
disconnect all jacks connecting the pre-amp to the jack plate. Remove two screws to unfasten the name rail
assembly and lift it out of the piano.
Lift the offending key out of the piano. Use a wedge such as a flat head screwdriver to spread the key bushings
located under the key front, and on top of the key at the balance point. Do not twist the wedge, as splitting of
the key may result. Use an awl to slightly spread the balance rail pin hole on the underside of the key. Lift the
hammer assembly to replace the key in the piano.
Figure 3
7
DAMPER ADJUSTMENT
If some notes still sustain, it may be necessary to re-adjust the damper arm of the offending notes. First, check
that all action components (key, hammer, and damper arm) are returning to a proper “at rest” position upon
key release. Remove the three screws that fasten the harp to the support blocks and lift the harp to the upright
position. The damper arm is adjusted by slightly bending the arm just ahead of the bridle strap (Fig. 3). If the
damper displays insufficient tension to damp the note, or excess slack in the bridle strap, remove the damper
arm from the action rail and add a slight reverse bend to the arm (Fig. 4).
Figure 3
Figure 4
VINTAGE VIBE ELECTRIC PIANO CO
114 Beach Street
Building 5, Ground Floor
Rockaway, NJ 07866
973-989-2178
[email protected]
Copyright 2015 Vintage Vibe, LLC
All rights reserved
8