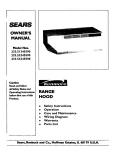
1
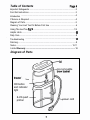
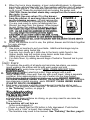
OPERATING INSTRUCTIONS
FOR
@
THE ICED TEA POTTM BY MR. COFFEE
SERIES TMWTMlO
MR. COFFEE
REPLACEMENT
PITCHER
MODEL
TP5
FOR HOUSEHOLD USE ONLY
FOR SERVICE, REPLACEMENT PARTS
OR QUESTIONS,
CALL I-8004lR COFFEE
(140043724333)
MONDAY THROUGH FRIDAY,
8:3OAM-5:00PM EASTERN STANDARD TIME
IMPORTANT SAFEGUARDS
When using electrical appliances, basic precautions should always be fol
lowed to reduce the risk of fire, electric shock and/or injury to persons, including
the following:
1. Readall instructions before using the machine.
2. Do not touch hot surfaces. Use handles or knobs.
3. To protect against electric shock, do not immerse or rinse cord, plugs,
Qt-pfbrewerinwaternratherliauid.
4. Close adult supervision is necessary when this appliance is used by or
near children.
5. Unplug from outlet when not in use and before cleaning. Allow to
cool before cleaning or handling.
6. Do not operate any appliance with a damaged cord or plug or after
the appliance malfunctions, or has been damaged in any manner.
Return this appliance only to the nearest authorized service center
for repair.
7. The use of accessory attachments not recommended by Mr.
Coffee may cause hazards or injuries.
6. Do not use outdoors.
9. Do n& let cord hang over edge of table or counter, or touch hot surfaceS.
10.
11.
12.
13.
14.
Do not place this appliance on or near a hot gas or electric burner or
in a heated oven.
Do not use appliance for other than intended use.
WARNUSG:Toreducetheriskofnreorelectricalshock,donot
remove any service covers. No user serviceable parts inside.
Repair should be done by authorized personnel only.
To avoid the risk of scalding and burns:
a.DonotopWounltwlthoutHdinplaw.
b. Do not separate brewer from pitcher during the brewing cycle.
NO PARTS are dishwasher safe.
SAVE THESE INSTRUCTIONS
SPECIAL CORD SET INSTRUCTIONS
1. A short power supply cord is provided to reduce the hazards resulting
from becoming entangled in or tripping over a longer cord.
2. An extension cord may be purchased and used if care is exercised in
its use.
3.
If an extension cord is used, the marked electrical rating of the extension cord must be at least 10 amps and 120 volts. The resulting
extended cord must be arranged so that it will not drape over the
counter top or table top where it can be pulled on by children or
tripped over accidentally.
Note:
This appliance has a polarized plug (one blade is wider than the
other). To reduce the risk of electric shock, this plug will fit In a
polarized outlet only one way. If the plug does not fit fully in the
outlet, reverse the plug. If it still does not fit, contact a qualified
electrician. Do not modify the plug in any way.
Do not remove any service covers or shields
within the brewer. No serviceable parts Inside.
Repairs must be done by an authorized Mr. Coffee
Service Center only.
I
Introduction
Congratulations! You are the owner of The Iced Tea Potw by Mr. Coffee’ Series
TM!VTMlO, 2-l/2 quart iced tea maker. This unique appliance has been
designed to provide you with excellent tasting iced tea quickly and conveniently.
Our specially designed brewer heats water and steeps tea to extract the full flavor from your tea. Afterbreuuma.
and d&nses &a
. .
the r&&&j with tee to &L
’ As a result, you get consistently great tasting, fresh brewed iced tea every time.
The Iced Tea Potm SeriesTMSTTMl 0, will automatically shut off when the brewing is completed. When not in use. the pitcher, brewer, and lid stack together for
convenient storage.
To ensure the long life of this appliance and its trouble-free operation, please
read carefully all of the instructions in this booklet before you begin to use The
Iced Tea PotfM. Save these instructions and refer back to them often for cleaning and care tips...and. happy brewing!
If Service Is Required, Do Not Return to Your Store
For service, call l-800-MR COFFEE (l-900-672-9333)
8:30 a.m. to 5:00 p.m. Eastern Standard Time, Monday through Friday.
To assist us in serving you, please have the model number (TMUf’MlO)
and date of purchase available.
All repairs must be made by Mr. Coffee or an authorized Mr. Coffee Service
Center. Please call us for the authorized service center in your area.
Please do not return this appliance to your store.
We welcome your questions, comments or suggestions. Please include
your complete name, address and telephone number in all communications.
Consumer Affairs Department
MR. COFFEE
24700 MilesRoad
Bedford Heights, Ohio 44149-l 399
A Dhflslon of Hdth o motor, Inc.
Table of Contents
.
Important Safeguards .....................................................................................2
Cord Set Instructions ......................................................................................3
Introduction ....................................................................................................4
If Service is Required .....................................................................................4
Diagram of Parts .............................................................................................5
Cleaning Your Iced Tea Pot Before First Use ................................................6
Using The Iced Tea PotTY ...........................................................................7-8
Helpful Hints ............................... ....................................................................0
Daily Care .......................................................................................................8
Troubleshooting .............................................................................................0
Deliming ..........................................................................................................9
Notes ....................................................................................................... 10-11
Limited Warranty .......................................................................................... 12
Diagram of Parts
non-removable
ON button
and indicator
light
2-l/2 quart
pitcher
power cord
C/eaning Your Iced Tea Pot Before First Use
Please clean your unit prior to first use (or when unit has not been used for
some time).
1. First unplug unit from electrical outlet. Wash the pitcher and lid with warm
water and mild detergent. Rinse thoroughly. Wipe exterior and brewer with
a soft, damp cloth, then dry with a soft towel. DO NOT use abrasive cbarr
ers or metal scouring pads. Do NOT IMMERSE OR RINSE UNDERSIDE
OF BREWER IN WATER. NO PARTS ARE DISHWASHER SAFE.
2. Fill pitcher with water to the water level line marked on the pitcher and
pour into the brewer - approximately 32 ounces. The water will not leak
from the brewer.
3. Place the brewer, with lid, onto the pitcher. Make sure the brewer and
pitcher fit together snugly.
CAUTION: Do not operate the machine unless the pitcher and brewer
with Iid fit snugly together; otherwise, hot water-and steam could
escape. DO NOT OPERATE WlTHOUT LID TO AVOID RISK OF
SCALDING AND BURNS FROM HOT WATER AND STEAM.
4. Plug the cord into an electrical outlet and push the ON button to turn the
machine on. The indicator light will illuminate to tell you that the machine
is on. PLEASE NOTE: The first time the machine is used, it may not be
necessary to depress the ON button to turn fhe machine on; simply plugging the machine into an outlet may start the brew cycle. Also, If the
ON button is depressed before the machine is plugged into an outlet,
plugging the machine into an outlet will start the brewing process.
Note: if you wish to turn the machine OFF during the brew cycle, grasp
the molded plug and unplug the power cord
5. When the water has cycled through, the machine will shut off automatically. The indicator light will turn off to let you know the cycle is over.
Grasp the molded plug and unplug the power cord. CAUTION: Some
residual steam may escape from the brewer when the cycle is
over.
CAUTION: The liquid in this brewer Is very hot and can cause burns.
Handle with caution.
6. CAUTION: Use care when Iifting the brewer from the pitcher.
A seal may have formed during the brewing process. Lift and
remove the brewer from the pitcher using the brewer handle, and
discard the water in the pitcher. (as referred to on page 9 &I).
Using The Iced Tea Pot TM
To brew lced Tea:
1. Prior to first use, clean unit according to instructions in section “Cleaning
Your iced Tea Pot Before First Use’, on page 6.
2’ k!RZkii~~~nV Do not attempt to heat any
3.
4.
5.
6.
7.
Place 5-7 regular size tea bags, or 2-4 level tablespoons of loose tea
in a tea ball, and place into the brewer. Do not place sugar in the brewer
along with the tea It will clog the brew lever.
Fill pitcher with water to the water level line marked on the pitcher and
pour into the brewer - approximately 32 ounces. The water will not leak
from the brewer. See Figure 1.
Fill the pitcher with ice to the ice marking line on the pitcher - approximately 3-4 full large cube tray s. See Figure 2.
Place the brewer, with lid, into the pitcher. Make sure the brewer and
ggki&$tvther snugly.
o not operate the machine unless the pitcher and
brewer with lid fit snugIy. Otherwise hot water and steam could
escape. DO NOT OPERATE WlTHOUT LID TO AVOID THE RISK
OF SCALDING AND BURN FROM HOT WATER AND STEAM.
To turn the machine on,plug the cord into an electri
cal outlet and push the ON button firmly until a" c l i c k "
IS heard, The indicator light will come on when the
button is released after a click” is heard. See Figure
3. NOTE: If the Iight does not turn on the first
time, push the ON button again firmly and release
PLEASE NOTE: The first time the machine is used,
it may not be necessary to depress the ON button to
turn the machine on;simply plugging the machine
into an outlet may start the brewing cycle. A/so, if th
ON button is depressed before the machine is plugged into an outlet,
plugging the machine into an out/et will start the brewing cyc/e.
Note: If you wish to turn the machine OFF during the brew cycle,
grasp the molded plug and unplug the power cord.
7
8. When the tea is done steeping, a lever automatically opens to dispense
tea into the pitcher filled with ice. The machine will then shut off automatically. See !figure 4. The indicator light will turn off to let you know the
cy cle is over. Grasp the molded plug and unplug the power cord.
CAUTION: Some residual steam may escape from the brewer when
the cycle is over
9. CAUTION: Use care when lifting the brewer
1
FIGURE 4
from the pitcher. A seal may have formed dur
ing the brewing process. Lift and remove the
brewer and place the lid properly on the pitcher.
You are now ready to serve refreshing iced tea.
10. Discard tea bags from the brewer. All ow brewer
to cool. Rinse the inside of the brewer and Iid
11.
12. When the machine is not in use, the pitcher, brewer and lid stack together
for easy- storage.
Help f uI Hin ts
1.
Use more or less tea to suit your taste. Additional tea bags may be
needed when using herbal tea.
2. Tea may turn cloudy as it chills due to the tannic acids found in tea.
Higher quality teas will contain more tannic acids than others.
Using less tea will reduce the cloudiness.
3. For extra flavor, try adding several bags of herbal or flavored tea to your
brew.
Daily Care
1. To maintain the quality of all parts and minimize tea stains, we recommend washing the pitcher and lid with warm water and mild
after every brew cycle.THESE ITEMS ARE NOT DISHrom electrical outlet. Wipe exterior with a soft,
damp, soapy cloth, rinse well, then dry with a soft towel. Using a separate
container, pour approximately one cup of water into the brew baskettilt the brewer back and forth and drain over a sink. DO NOT IMMERSE
OR RINSE BREWER UNDER FAUCET OR IN WATER. DO NOT use abrasive cleaners or metal scouring pads. DO NOT CLEAN UNDER SHIELD
(PLASTIC GRATE) IN BREWER.
3. Hard water can leave a whitish mineral deposit inside the pitcher and
brewer. Tea discolors these deposits. To remove, follow the instructions
in the “Deliming” section, on page 9.
Add more tea.
Herbal tea does not brew as strong, so you may need to use more tea.
The tea is too strong:
l Use less tea.
The machine will not turn on.
Is the cord plugged in?
l Check to ensure that the ON button is fully depressed. Push button
firmly until a “click” is heard, then release button.
l The machine may need to be cleaned. See “Deliming” Section, page 9.
l
l
8
Deliming
The Iced Tea PotTM must be delimed when you begin to notice an increase in
heating time of the water in the brewer. This condition may be caused by a
buildup of lime and mineral deposits from your water.
The frequency of cleaning depends upon the hardness of the water used. The
following table gives the suggested cleaning intervals.
SUGGESTED CLEANING INTERVAL
Type of Water
Cleaning Frequency
Soft Water
every 60 brew cycles
Hard Water
every 30 brew cycles
Your Iced Tea PotTM may be cleaned using MR. COFFEE CLEANER or a mixture of vinegar and water. For best results use MR. COFFEE CLEANER. It is
superior to vinegar and has no unpleasant odor. You may order MR. COFFEE
CLEANER by calling 1-80O-MR COFFEE (l-800-672-6333).
Using MR. COFFEE CLEANER:
(Read caution statement on the back of MR. COFFEE CLEANER packets
before use). Please follow these directions.
1., Fill the pitcher with warm water to the water level line marked on the
pitcher 1 approximately 32 ounces.
2. Empty contents of one packet of MR. COFFEE CLEANER into the pitcher and stir with a plastic spoon until the cleaner Is completely dissolved.
This will make a clear blue solution.
3. Pour the blue solution onto the brewer. Let sit for 15 minutes. Place the
brewer, with lid, into the pitcher. Make sure the brewer, lid and pitcher fit
together snugly.
4. Follow steps 4-6 under “Cleaning Your Iced Tea Pot Before First
Use”, on page 6.
5. Thoroughly rinse the pitcher, brewer and lid.
6. Repeat steps l-5 ti m hrcuar m with clean water only (no
blue solution). Continue to rinse out the unit until fl m nf m
!2!4m9iQ!uth~Ilone.
7. If a normal brewing time is not achieved and tea stains remain, repeat
steps l-6.
Using Vinegar
1. Unplug the machine before cleaning.
2. Add a mixture of half water and half white distilled vinegar (16 fluid
ounces of each) to the brewer. Do not turn the unit on. Let sit for 30
minutes or longer until the deposits are removed, or repeat process until
the deposits are removed. DO NOT HEAT THE VINEGAR MIXTURE.
Pour out and discard the vinegar mixture.
3. Run one or two brew cycles using only fresh water to remove any
residual vinegar mixture.
9
Notes
31
Notes
31
Limited Warranty
Mr. Coffee warrants to the purchaser that the Series TM5/TM10 by Mr.
Coffee’ (except for cord set and pitcher) is free from manufacturer defects in
material and workmanship for a period of one year from the date of. original
purchase when used and compliance with directions as outlined the manufacturer’s instructions, which will constitute reasonable and necessary maintenance by the purchaser.
In case of manufacturer defects in material or workmanship, Mr. Coffee
agrees to repair (remedy) a defective iced tea pot without charge. The purchaser’s exclusive remedy against Mr. Coffee shall be for the repair or
replacement of a defective Mr. Coffee product
All repairs must be made at an authorized Mr. Coffee Service Center. To
locate a Mr. Coffee Service Center, call l-800-MR COFFEE (1-800-672-8333).
Mr. Coffee shall not be responsible for any repairs performed at any facility
which is not an authorized Mr. Coffee Service Center.
This warranty gives you specific legal rights, and you may also have other
rights which vary from state to state. Any implied warranty is limited in duration
to the one year provided in this, the only, expressed warranty. Some states do
not allow limitations on how long an implied warranty lasts, so the above limitation may not apply to you.
k,noe~~lMr.~kr#pondbhforinddsndrlor~~
q~tkl &rum nor damage due to misuse or the use of any unauthorized
attachment; nor damage caused by use of an electrical circuit not specified on
the Mr. Coffee product. Some states do not allow the exclusion or limitation of
incidental or consequential damages, so the above limitation or exclusion may
not apply to you.
Mr. come
24700 Miloa Road, Bedford Heights, Ohio 14146-1399
ADMstondHssHhomstar,lnc.
FORM.6074
REV.0
PRINTED IN U.S.A.