1
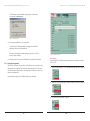
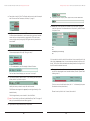
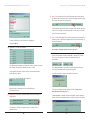
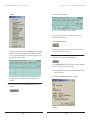
ne
Manager and User Guide
DTS Pro Series
network
encoder
The Ideal DTS Encoder for Multi-User Facilities
Confidential
Contains confidential proprietary information owned by Digital Theater Systems, Inc., including
but not limited to trade secrets, know-how, technical and business information. Not for
disclosure except under terms of a Non-Disclosure Agreement accepted by recipient and by an
actually authorized agent of Digital Theater Systems, Inc. Unauthorized disclosure is a violation
of State, Federal, and International laws.
NOT FOR USE EXCEPT UNDER TERMS OF A VALIDLY EXECUTED
WRITTEN LICENSE AGREEMENT BETWEEN INTENDED USER AND
DIGITAL THEATER SYSTEMS, INC.
Contents
1.
TERMINOLOGY
2
2.
DTS PRO SERIES NETWORK ENCODER
3
MANAGER’S GUIDE
Protected by one or more of the following U.S. Patents numbers 6,487,535; 5,451,942;
5,956,674; 5,974,380; 5,978,762; 6,226,616 and other international patents both pending and
issued. Use of the software is at User’s sole risk. The software and related documentation are
provided “as is” and without warranty of any kind, and DTS expressly disclaims all warranties,
express and implied, including but not limited to, the implied warranties of merchantability and
fitness for a particular purpose. DTS does not warrant that the functions contained in the
software will meet User’s requirements, or that the operation of the software will be
uninterrupted or error-free, or that defects in the software will be corrected. Under no
circumstances, including negligence, shall DTS, or its Directors, Officers, Employees or Agents
be liable to User for any incidental, indirect, special or consequential damages (including
damages for loss of business profits, business interruption, loss of business information, and
the like) arising out of the use, misuse or inability to use the software or related documentation.
Copyright Info
DTS Pro Series Network Encoder, Manager and User Guide
Do Not Duplicate. Copyright © 2004 Digital Theater Systems, Inc. Unauthorized
duplication is a violation of State, Federal, and International laws.
3.
This publication is copyrighted and all rights are reserved by Digital Theater Systems, Inc.
No part of this publication may be reproduced, photocopied, stored on a retrieval system,
translated, or transmitted in any form or by any means, electronic or otherwise, without the
express prior written permission of Digital Theater Systems, Inc.
The content of this publication is subject to change without notice and does not represent a
commitment on the part of Digital Theater Systems, Inc. Every effort has been made to ensure
the accuracy of this publication. However, due to ongoing improvements and revisions, Digital
Theater Systems, Inc. cannot guarantee the accuracy of printed material after date of
publication nor can it accept responsibility for errors or omissions. Digital Theater Systems, Inc.
will publish updates and revisions to this publication as needed.
DTS and the DTS Digital Surround logo are trademarks of Digital Theater Systems, Inc.
Neo:6 is a trademark of Digital Theater Systems, Inc.
Document No. 9301E904001.0
September, 2004
2.1.
Introduction
3
2.2.
A Policy on Disk Usage
3
2.3.
User File Management via FTP
4
2.4.
Setting the Root Directory
4
2.5.
Configuring Email Notification (optional)
6
2.6.
Adding Users
7
2.7.
Deleting Users
8
2.7.
Deleting Users
8
2.9.
Library Handling for Local Packing
9
NETWORK ENCODER USER’S GUIDE
10
3.1.
Log On
10
3.2.
Download your personalized Packer
11
3.3.
Using the File Packer
12
3.4.
Encoding Immediately after Packing
19
3.4.1.
Listing Packed Files
25
3.4.2.
Displaying Pending Jobs
25
3.5.
Uploading Packed Files
25
3.6.
Using the Encoder after Packing Locally
26
4.
DVD AUTHORING FOR DTS
28
5.
DIALOG NORMALIZATION
29
1
DTS Pro Series Network Encoder for MAC OSX – Manager and User Guide
1.
Terminology
Several terms used throughout this guide need identification.
Manager and User Guide – DTS Pro Series Network Encoder for MAC OSX
2. DTS Pro Series Network
Encoder Manager’s Guide
2.1.
Types of users
Encoding Service Manager:
Introduction
The user in charge of the day-to-day
administration of the encoding service. This is a regular user, as seen by the OS.
The DTS Pro Series Network Encoder system requires periodic attention from a
particular user - the Encoding Service Manager, or the “Manager”.
A user of the encoding and related services offered over the
network. This kind of user has no OS-level user account.
The Manager is responsible for the administration of resources and Encoder
Users. The Manager’s tasks include periodic maintenance to the DTS Pro
Series Network Encoder database as well as enforcement of policies regarding
disk space usage. The Encoding Service Administrator program
(XencodeAdmin.jar) assists the Manager with the maintenance of the database.
Policy enforcement should be dictated and regulated by the organization that is
using the DTS Pro Series Network Encoder.
Encoder User:
SysAdmin:
The OS X System Administrator. An OS-level privileged user.
Types of accounts
Administrative account:
The OS X account of the SysAdmin.
Encoding Service Manager’s account: A regular OS X user’s account. The
Encoding service resources will be actively managed through this account.
Encoder User’s account: An internal abstraction within the DTS Pro Series
Network Encoder, to provide encoding services to physical users. These users
do not require an OS X user account on the encoding machine. These users and
their accounts are administered through the DTS Pro Series Network
Encoder system.
2.2. A policy on disk usage
The hard disk where the DTS Pro Series Network Encoder is installed should not
be used as long-term storage for source material and/or subsequent encodings.
While it may contain the base directory for sources and encodings, this space is
not intended to hold these files for extended periods of time. The allowance of
storage for these files should be regarded as strictly temporary. To ensure that
enough free disk space is available at all times; source and encoded files should
be removed from the disk as soon as possible, and properly stored elsewhere.
There is a way to allow the Encoder Users to manage their own files (see the next
topic, User File Management via FTP). If the Encoder Users are managing their
own files, then the Encoding Service Manager’s responsibility in this area is only
to monitor the remaining free disk space, and to encourage the Network Encoder
Users to move their files out of the disk as soon as practical. If the FTP capability
is not used by the Encoder Users then the responsibility for administering the
stored files belongs to the Manager. In either case, database and file
maintenance must be periodically performed by the Encoding Service Manager
using the Encoding Service Administrator program and OS tools.
2
3
DTS Pro Series Network Encoder for MAC OSX – Manager and User Guide
2.3. User file management via FTP
Microsoft’s Internet Explorer web browser running on Windows has the ability to
function as a regular file manager over FTP connections. In other words, it is
possible to copy local and remote files into or out of local or remote directories,
and relocate files and directories in a remote location; all using the built-in native
capabilities of the browser. The key requirement is a constant FTP connection to
the remote location using the browser.
Manager and User Guide – DTS Pro Series Network Encoder for MAC OSX
To change root directories:
1.
Start the Administrator program. A screen similar to the following will display.
Keep in mind that this is a capability of the browser itself. A different browser may
not work.
Please refer to Uploading Packed Files (page 25) for connection details.
2.4. Setting the Root Directory
The DTS Pro Series Network Encoder requires a disk location where the Encoder
User’s files will be stored. In the context of the DTS Pro Series Network Encoder,
this location is called its Root Directory. During installation, the DTS Pro Series
Network Encoder will create a default Root Directory under
/Applications/dts/Facility_Xencode/, and call it DTS_ROOT. Alternatively, you,
the Manager, can create a Root Directory in your OS X user account, and later
notify the Administrator program about which existing directory to use as its
Root Directory.
c
a
c
a
Note: You can only specify a new Root Directory if there are no users
registered in the Administrator program. If you are changing the set Root
Directory from one directory to a different one, you will need to delete all
users before the system will allow the change. Deleting a user erases all
information related to that user from the database. See topic Deleting
Users, page 5, for more information on deleting users.
Figure 1. Facility administrator initial screen
2.
From the Setup menu, choose Set root directory...
Figure 2. Choose “Set root directory”
3.
In the dialog box, select the directory you created to designate
it as the Root Directory.
Note: When setting the Root Directory, avoid folders that have spaces in
their names. The FTP server cannot work with folder names containing
spaces.
Browse to select root directory
c
a
Note: Only an account for which the software was installed has direct
access to the /Applications/dts/Facility_Xencode/ folder and its contents.
If you are specifying a Root Directory other than the default one, it is your
responsibility to set the proper access permissions accordingly.
Then Click Select
Figure 3. Designate the Root Directory
4
5
DTS Pro Series Network Encoder for MAC OSX – Manager and User Guide
The Root Directory is also the storage place for encoding log files. Every time a
user completes an encoding job, a log file with details and outcome of the job
is generated in their folder. A copy is also kept in the Root Directory so that
the Manager has an audit record of all encodings, even if a user deletes their
own copy.
Manager and User Guide – DTS Pro Series Network Encoder for MAC OSX
2.6. Adding users
1.
Under the User menu, choose Add
2.5. Configuring email notification (optional)
If you want, you can configure the Network Encoder to send email notification to
users when each of their encoding jobs is submitted and done.
c
a
You will need to have access to an outgoing email SMPT server. Your
network administrator will know this information. If you use Outlook Express
with a POP3 connection, you can find your SMPT server by looking at the
“Server” tab on the account properties page.
Note:
Figure 6. Choose “Add”
2.
In the dialog box, specify a unique user name and password.
3.
(Optional) You may also specify an email address so that the user
can be notified when their jobs are submitted and completed.
Figure 4. Choose “Set email address”
1.
Under the Setup menu, choose “Set email address”
Figure 7. Add user dialog
4.
c
a
Figure 5. Email setup dialog
2.
c
a
Enter the SMPT server in the top field and enter an Encoder email address
in the bottom field.
Note: This does not have to be a valid address – the message sent to the
user states that the email is automatically generated and that they should not
reply to it.
c
a
Press OK. A directory will be created for the new user under the Root
Directory.
Note: The maximum number of users is governed by the Network Encoder
adapter key (dongle). When the maximum number has been reached, no
further accounts may be added. Currently, an adapter key for the Network
Encoder permits 99 users maximum.
Note: User names that include spaces will prevent those users from
accessing their files via FTP.
You may also need to allow SMPT traffic on the server. Consult with your
System Administrator and refer to Help for OS X.
6
7
DTS Pro Series Network Encoder for MAC OSX – Manager and User Guide
2.7. Deleting users
1.
Manager and User Guide – DTS Pro Series Network Encoder for MAC OSX
3.
Under the User menu, first choose Refresh audio files to ensure that no
packed audio files are present in the user’s space. You will not be able to
remove the user if there are packed audio files in the user’s directory. Make
sure that the files in the user’s directory are properly archived elsewhere
before removing them and the user from the system.
c
a
!
p
Figure 8. Choose “Refresh” then “Remove”
2.
Under the User menu, choose Remove.
3.
In the confirmation prompt, confirm that the user should be removed.
Note: This procedure only removes the completed job from the database. It
is still the Manager’s responsibility to manually remove the duplicate log files
from the Root Directory after removing them from the database, to maintain
disk space available in the system.
Caution: Jobs can only be deleted one-by-one to avoid accidental deletions,
and to enable the Manager to retain a detailed record (elsewhere) of the jobs
that were removed.
2.9. Library handling for local packing
If a user wants to pack a file locally, the user will need to manually obtain a copy
of a necessary library for their platform (Mac or PC) and keep it alongside their
downloaded customized packer. Otherwise the downloaded packer will not be
able to pack the file locally, because it is missing the “Disk Checker”
(DiskChecker.dll for PC, libDiskChecker.jnilib for Mac).
The installer copies both versions of the library (PC and Mac) to the application’s
location (/Applications/dts/Facility_Xencode). The Encoding Service Manager will
need to manually distribute a copy of the appropriate library to each user who
needs it. The user will need to keep the copy of the library and their downloaded
packer together (in the same directory) in order to pack locally.
Figure 9. Delete user confirmation prompt
c
a
Under the Job menu, choose Delete.
Note: This procedure does not remove the user’s duplicate log files, or the
user’s folder and its contents from the Root Directory. The Manager should
remove them manually as part of the necessary routine maintenance.
There are several ways the library file can be manually distributed:
1.
Copy the library onto removable media (diskette, CD, tape, etc.) and give it
to the users.
2.
The Encoding Service manager can manmually copy the libraries to a
shared location in their local network, where the user may obtain a copy
for their platform.
3.
The Encoding Service manager can manually copy the library into a user’s
Encoder account (/Applications/dts/Facility_Xencode/DTS_ROOT/username).
From there, the user can use FTP to copy it to their local machine.
2.8. Deleting Jobs
This is the only way to delete a selected job from the “Completed Jobs” list.
This action removes completed jobs from the database only. Users are not
allowed to delete their own jobs from the database. This ensures that a record of
the encoding job is kept as long as the administrator wants, even if the output
encoded file and log files are removed from the user’s directory and duplicates
are removed from the Root Directory.
1.
From the User’s pane, select a username.
2.
From the Completed Jobs pane, select a job to delete.
8
After packing locally, the resulting packed file still must be transferred into the
user’s account at the server before it can be encoded. The user can use FTP
to transfer the file.
9
DTS Pro Series Network Encoder for MAC OSX – Manager and User Guide
Manager and User Guide – DTS Pro Series Network Encoder for MAC OSX
2.
3. Network Encoder User’s Guide
3.1.
Enter your User name and Password. Then click Log In. The Home
Page will display.
Log on
The Network Encoder is a web browser-based service. You will use it in the
same manner from a web browser on any platform.
c
a
1.
Note: In order to get the full service, your web browser must have
JavaScript installed and running. This is automatically set, if you are using MS
Internet Explorer, on the default web settings level.
Access the service. Type the following address into the address bar of your
browser, then send the request:
http://[localhost]:9006/Xencode/main (the address is case-sensitive)
When browsing from a remote host, substitute the IP address of the
for [localhost] in the above URL.
Figure 12. Home Page
Network Encoder host
c
a
For example, if the Network Encoder’s IP address is 172.16.0.1, then the
access URL for all clients is:
http://172.16.0.1:9006/Xencode/main
n
Figure 11. Facility Network Encoder login screen
c
a
Note:
It is a good idea to bookmark this address or save it in your Favorites.
Note: Once logged in, you will remain so until the Log Out button is
pressed, as long as you are using the service. However, you will be
automatically logged out if you do not interact with the server for a period of
five minutes.
From this page, you can do these tasks
Download Packer - allows you to download your own personalized Packer.
It will allow you to pack your audio files across the network directly onto the
Xserve machine.
n
Download Java
n
Download JRE 1.4.1 (Java Runtime Environment) – required to run the Packer,
you can get the latest version from the Internet site http://java/sun/com/getjava
n
Update your email address for job submission and completion notifications.
n
Update your password for the DTS Pro Series Network Encoder.
3.2. Download your personalized Packer
This is mandatory.
1.
10
Click on the Download Packer button.
11
DTS Pro Series Network Encoder for MAC OSX – Manager and User Guide
Manager and User Guide – DTS Pro Series Network Encoder for MAC OSX
A File Download screen will appear, prompting you to choose how
to handle the file dtsPacker.jar.
Figure 13. File Download screen
2.
Save the downloaded file to your local system.
A typical “Save As” dialog will display, prompting you to identify the
destination folder for the downloaded file.
3.
After saving, a Download Complete dialog may prompt you to Open
the file (or open the folder).
Figure 14. File Packer, initial screen
Activate the .jar file that you just downloaded. (This starts the File Packer.)
Our example
3.3. Using the file packer
Start with the File Packer. The purpose of the File Packer is to bring all the source
files together into a single file. The File Packer checks the length of the files and
their sample rates, to ensure that you are supplying the encoder with source files
that are compatible with it.
In this example, 48 kHz files are being packed and then encoded to produce a
DTS 5.1 DVD.
1.
Select channel mapping L C R for the front channels. See Table 1, page 18.
2.
Select Ls Rs channel mapping for the back channels. See Table 1, page 18.
3.
LFE is set to ON. See Table 1, page 18.
Upon starting the program, the File Packer initial screen will display.
12
13
DTS Pro Series Network Encoder for MAC OSX – Manager and User Guide
4.
Sample rate is set to 48 kHz. The Sample rate here must match the sample
rate of the source files. See note 1, after step 12, page 16.
Manager and User Guide – DTS Pro Series Network Encoder for MAC OSX
9.
(Optional) Add your company name, project name, or other details here.
If the audio track is intended to sync with video, be sure to
match its frame rate. If the video reference is “drop frame”, you MUST select
“drop frame” here.
10. Frame rate:
5.
6.
3 dB Rear channel attenuation is left OFF.
3 dB rear channel attenuation is used in cases where you have a theatrical
master that has not been remixed or repurposed for DVD, and the rear
surrounds (right and left) are typically 3 dB higher than they should be for
home theater.
24
25
29.97 (drop or non-drop)
30
Determine the location for the output files.
Choose Local to pack a file locally. Then go to step 7.
or Choose Network to pack files straight to Network Encoder.
If it is important to match the start of the audio track to some specific point in the
video, enter the Start time here, in hours:minutes:seconds:frames (hh:mm:ss:ff)
format. The End time will be calculated automatically, based on the length of the
Input Files and the selected frame rate.
11.
The User Name field will display your user name. Go to step 8.
7.
c
a
8.
The Input Files section of the screen is where you select the individual
source file to be assigned to each encoded channel. (See the “Special Case”
following step 12.)
This field only displays if Mode is set to “Local” meaning that the output file
will be placed on your local computer.
Identify the directory where the output files will be located.
Click the cursor on the left-hand column (the “L…” in this example) to open a
file selection window (shown below).
Click Browse and navigate to the parent (the next higher directory) of the
desired directory.
Browse for an input file for the L channel, then select it.
Click the target directory name to select it, then click Select.
Note: To pack locally you will need an additional library. See 2.9 on page 9.
Keep your personalized packer and library together.
Type a name for the packed file that you will produce.
14
15
DTS Pro Series Network Encoder for MAC OSX – Manager and User Guide
Manager and User Guide – DTS Pro Series Network Encoder for MAC OSX
c
a
Note 1: If the sample rate of the input file does not match the sample rate
you have chosen for the output file, a red outline will appear around the input
file’s sample rate, as shown in this example.
Input file sample rate does not match the selected output sample rate. In this
case, you must change the output sample rate to match (step 4) or provide
inputs of the proper sample rate.
c
a
To select, double-click on the file in the list or highlight the
file and click Open.
12.
Note 2: If the duration (length) of an input file does not match the duration of
another input file, a red outline will appear around the input file’s duration, as
shown in this example.
Repeat step 11 for the other channels.
The duration of all input audio files must be the same.
13.
Input files have been selected for all channels. For each input file, the sample
rate, bit depth, and duration is identified. See note 1, below.
Use the duration information to check that the input files are identical in
length. See note 2, below.
Next, choose Pack remote file or choose Pack local file (if you are going
to pack the file now but it will be encoded later – see page 20). Choose
Close, if you do not want to continue. (Your selections so far will
be discarded.)
or
Click “Pack remote file” to generate the packed .agm file at the server.
(If the output file already exists, packing will be aborted.)
You will be prompted to re-enter your password at this time.
At bottom left, the estimated file size is displayed.
Make sure there is enough space in your output directory to
store a file of this size.
c
a
Special Case:
This packer will accept a stereo source file to assign to a
single channel.
This prompt will display when the packing is finished. (See Encoding
page 19).
Immediately after Packing,
If “Pack local file” is selected, this prompt will display when the packing is
finished. (If the output file already exists, you will be prompted to overwrite it.)
The pulldown on the right is to select channel 1 or channel 2 from a
stereo source file.
16
17
DTS Pro Series Network Encoder for MAC OSX – Manager and User Guide
Manager and User Guide – DTS Pro Series Network Encoder for MAC OSX
At this point, the packed file (.agm extension) will be found in the output
directory. All packed files have the .agm extension. Next, see Uploading
Packed Files, page 25.
c
a
Note 3: The Packer GUI drop-down lists define the input channel
configuration. This information will carry over to the Encoder GUI, which will
then present other formatting choices based on the configuration of the
packed files.
Table 1:
Channel Configuration Combinations
Front
Channels
Back
Channels
LFE
On/Off
Input fields in
pull-down selection
(steps 1, 2, 3 pg 5)
Brief description
of format
Lt/Rt
Grayed out
Grayed out
Lt, Rt
L/R matrix
Stereo
Grayed out
Grayed out
L, R
Stereo
Dual Mono
Grayed out
Grayed out
Ch 1, Ch 2
2-ch. mono
On, Off
L, R
Surr
Ls, Rs
Stereo front with
either mono or
stereo surround
L, C, R
L, C, R with
no surround,
mono surround,
stereo surround, or
DTS 5.1
DTS 5.1ES
DTS 6.1ES
Figure 15. Network Encoder Job Specifier screen
LR
Mono Surr
Ls, Rs
LCR
On, Off
No Surr
Mono Surr
Ls Rs
Ls Cs Rs 5.1 ES
Ls Cs Rs 6.1 ES
Surr
Ls, Rs
Cs
c
a
Note: The information about our example packed file is already loaded on
this screen because it was the only packed file available for encoding. If you
upload more packed files to your user directory, you will be able to select
which packed file to use for the encoding job you are about to specify.
1.
Select the packed .agm file to encode, from the pull-down listing. The other
fields are automatically completed based on the characteristics of the
selected .agm file.
2.
Enter a Job name and an Output file name. (Output file names should NOT
have spaces.)
3.4. Encoding Immediately after Packing
The job name is arbitrary, and is only used to identify submitted encoding
jobs. It is possible to submit more than one encoding job using the same
packed file. The job name must be different among jobs so they can be
properly identified in the system.
Since we chose “Pack remote file” in our example, the packed file was stored
in your user directory on the server where the Network Encoder
program resides.
From your Network Encoder Home Page, click the Job Specifier button.
Set the Priority (High, Normal, or Low). The Encoding Service will encode
pending jobs based on the order they were received and their
requested priorities.
The Job Specifier screen will display.
3.
18
If Encode whole source file is checked, the time fields are read-only
19
DTS Pro Series Network Encoder for MAC OSX – Manager and User Guide
Manager and User Guide – DTS Pro Series Network Encoder for MAC OSX
the Packer. (See step 5 on page 13 for definition.)
Matrix ES into standard surround channels – (read-only flag) specifies
mixing of Center Surround into Left and Right Surround. This is dependent
on the channel configuration selected when packing, and is only relevant for
ES encodings.
If unchecked, both the Output start time and Output end time are
editable. Use output start and end times if you want to encode a portion (not
all) of the source file. For example, this is where you would trim the pre-roll
and post-roll of the project.
The Frame rate cannot be edited (it is read-only). It simple provides
information for the user about the packed file.
4.
Format
and Bitrate fields are selectable based on the choice of source file.
Phase shift ES channels – Works only with ES source files, where it allows
for phase shifting of Left and Right Surround by ±45° prior to addition of
Center Surround channel.
c
a
Note: DTS strongly recommends Phase shift be set ON during 6.1 ES
encoding for film. For music, you may wish to experiment with both settings.
For more information, see the topic DVD Authoring for DTS on page 28.
If you want to erase the changes you have made and start over, click Reset
defaults.
For 44.1 kHz and 88.2 kHz source files, only one bit rate (1234800) and
output type (.wav) are possible.
With 48 kHz source files for DVD encoding, Bit rate is selectable: 1509750
bits (1.5 Mbps) or 754500 (754 kbps). With 96 kHz files, only 1.5 Mbps bit
rate is possible.
With 48 and 96 kHz source files, Format is also selectable:
DTS wave format .wav (Intel byte order, wav header)
n
n
DTS padded format .dts (raw file, no wave header, Motorola format, and zero
padding to fill frames)
n
DTS compacted format .cpt (Motorola byte order, zero padding is removed,
timecode is removed but a start time is present). This is the output type
needed for the Apple DVD Studio Pro V3.0.
This will reload the values from the packed source file.
5.
Click the Print button to print the form before submitting it.
Click the Submit Job button to schedule the job for encoding.
All fields are checked for validity before the job is added to the database. A
confirmation screen will display, prompting you to review the encoder settings
and confirm.
The .wav format is used for music where there is no picture to lock to. Wav is
typically for 5.1 or 6.1 music surround discs. The .cpt and .dts formats are
used in DVD authoring. Please refer to the topic DVD Authoring for DTS on
page 28 to determine the correct bitstream to use. Typically, a .cpt file is
used, because the .DTS format is a padded file that is used in older DVD
authoring systems.
Dialog Normalization, click the arrows to change the setting, if necessary.
For more information, see Dialog Normalization, page 29.
Attenuate rear channels 3 dB
is display-only here. This parameter is set in
20
21
DTS Pro Series Network Encoder for MAC OSX – Manager and User Guide
Manager and User Guide – DTS Pro Series Network Encoder for MAC OSX
Click OK.
A list of completed jobs will display.
To sort the list, click on any of the red column headings.
To view the log file (text file) for a job, first select the job by clicking
in the Select checkbox to the left.
Then click the Display log button.
If the job was accepted for processing, the Pending jobs screen will display
during the encoding process. A progress indicator will appear in the Status
column, showing the percentage of the job that has been completed. This
page will refresh by itself periodically.
Depending on your browser, you may be able to view the log file on your
screen or download it to your computer.
7.
To Download the finished encoded file to your local machine, first Select the
encoding job you want, then click the Download button.
A typical File Download window may prompt you to choose the appropriate
action for the log file: Save it to your local machine.
A typical Save As dialog may prompt you to identify the destination directory
on your local machine.
This screen will become empty once all the user’s submitted jobs are
completed.
6.
When finished, a Download Complete prompt may display.
When encoding is finished, click the Completed jobs button to view
its record.
Click Close.
22
23
DTS Pro Series Network Encoder for MAC OSX – Manager and User Guide
3.4.1. Listing Packed Files
To view a list of your currently stored packed files, click the Source audio button.
Manager and User Guide – DTS Pro Series Network Encoder for MAC OSX
c
a
Note:
This method works only with Internet Explorer under Windows.
The (case-sensitive) syntax for the ftp location is:
ftp://<name>:<password>@<Network Encoder IP address>:2121/<name>
The Source audio screen will display.
For example, if the Network Encoder has an IP address of 10.0.0.1, the user’s
name is “User1” and their password is “password”, then this is their FTP location:
ftp://User1:[email protected]:2121/User1
If you are concerned about privacy (for example, you are at a location where
people can view your password over your shoulder), simply omit the password
from the URL and wait for the browser to prompt you for it. When you type it, it
will be obscured by asterisks. Going back to our example, the more private URL
would look like: ftp://[email protected]:2121/User1
Figure 16. Source audio screen
You can sort the list by clicking on a column heading (red color).
To delete a packed file, click the Select checkbox at the left, then click Delete.
3.4.2.Displaying Pending Jobs
To view your currently pending encoding jobs, click the Pending jobs button.
3.5. Uploading Packed Files
3.6. Using the Encoder after Packing Locally
The Encoder is always used separately from the Packer. The input file to the
Encoder must already have been packed and uploaded to the server where the
Network Encoder software can locate it. See Uploading Packed Files, page 25.
1.
This option is necessary if you selected “Pack local file” when using the Packer.
(If you selected “Pack remote file” the file was packed directly to the Network
Encoder.) You should also use one of these access methods to manage your files
at the server. Consult with your Encoding Service Manager on disk space and
other usage policies.
You must be able to access your user directory at the server, so that you can
place or remove your packed and other files onto or from the Network Encoder
server.
c
a
This address can be typed into the MS Internet Explorer web browser to display
the contents of a user’s directory. The .agm files can then be dropped into this
directory. Encoded files and logs can also be copied out of the directory by
dragging them to the desktop. The browser also allows files under the directory
to be erased.
In the Packer, you may choose Pack local file when you do not wish to
encode the file immediately (see topic 2.9 on page 9).
Click “Pack local file” to generate the output file. (If the output file already
exists, the Packer will prompt you to overwrite it.)
Note to System Administrator: You can grant privileges to your users
directly by setting up shares on the Xserve so that the user can see them in
a program such as Windows Network Neighborhood. This will involve
setting up user accounts and proper privileges.
Another method is to use the FTP server built into the Network Encoder.
Each user can access their own user directory by providing their user name
and password.
24
This prompt will display when the packing is finished.
In the selected output directory, you will see an additional file –
the .agm packed file.
25
DTS Pro Series Network Encoder for MAC OSX – Manager and User Guide
2.
Use the FTP server (built into the Network Encoder administrator) to upload
your .agm file to your user directory on the server. See Uploading Packed
Files, page 25.
Or ask your Encoder Service Manger to store it in your user’s space by other
transfer means.
3.
Manager and User Guide – DTS Pro Series Network Encoder for MAC OSX
4. DVD Authoring for DTS
A complete discussion of audio encoding for DTS can be found in DVD-Video
document number E818,
which can be downloaded from the DTS website at:
Production with DTS Coherent Acoustics Audio,
http://www.dtsonline.com/media/uploads/pdfs/DVD_Authoring.pdf
Using the Network Encoder from this point is the same as the earlier
sequence (go to step 1, page 19).
26
27
DTS Pro Series Network Encoder for MAC OSX – Manager and User Guide
Manager and User Guide – DTS Pro Series Network Encoder for MAC OSX
5. Dialog Normalization
Dialog Normalization is the use of metadata to control playback level. It has no
effect on encoding or decoding. It is an instruction to playback equipment to
adjust the level of all channels, post-decoding.
A single DIALNORM value is applied to a given program: level is not adjusted
within a program. There is no compression involved. All channels are affected
equally. DIALNORM can only attenuate.
The DIALNORM value entered into the encoder is the subjective average dialog
level of the program, not the amount of playback attenuation. The subjective
average dialog level is typically approximated by LeqA measurement. The
correspondence between DIALNORM value and attenuation is given in the
following table.
DIALNORM value
(dialogue level, dBFS LeqA)
Attenuation
DIALNORM value
(dB)
For music, which contains no dialog, DIALNORM may be used to set playback
loudness at a level appropriate in the context of other program material,
determined subjectively.
Attenuation
(dialogue level, dBFS LeqA)
(dB)
-31
0
-15
16
-30
1
-14
17
-29
2
-13
18
-28
3
-12
19
-27
4
-11
20
-26
5
-10
21
-25
6
-9
22
-24
7
-8
23
-23
8
-7
24
-22
9
-6
25
-21
10
-5
26
-20
11
-4
27
-19
12
-3
28
-18
13
-2
29
-17
14
-1
30
-16
15
28
The purpose of DIALNORM is to achieve a consistent level of dialog from one
program or program source to the next. End-users set volume to achieve a
pleasing and intelligible level of dialog. However, dialog level varies considerably
across different program types. For example, in a feature motion picture, dialog
typically averages -27 dBFS LeqA in order to allow sufficient headroom for
explosions and other effects. In contrast, in a news broadcast the announcer’s
voice may average -15 dB, closer to full scale. Various other programs will have
other dialog levels appropriate to their headroom needs. If there is no
compensation, the end-user will have to turn up the feature film, turn down
the news broadcast, etc. With dialog normalization, a DIALNORM value of
-27 is assigned to the movie, and a value of -15 is assigned to the newscast.
The dialog levels then match on playback and no user adjustment should
be necessary.
A DIALNORM value of -31 results in no DIALNORM attenuation.
For broadcast or disc authoring of a feature motion picture, if direct measurement
has not indicated a different level, set the DIALNORM value to -27. This has
been widely accepted as typical for features, and THX-certified playback
equipment assumes a value of -27 in aligning levels between the home and the
dubbing stage.
If more than one codec is being used for the same audio track (for example,
on DVD), DIALNORM value should be set the same on all codecs for a
given program.
For further information on DIALNORM, including typical values for different types
of programs and music, see:
Tomlinson Holman, 5.1 Surround Sound Up and Running. Boston: Focal Press,
2000. 163-167.
29
DTS Pro Series Network Encoder for MAC OSX – Manager and User Guide
30
Manager and User Guide – DTS Pro Series Network Encoder for MAC OSX
31
DTS Pro Series
network encoder
The Ideal DTS Encoder for Multi-User Facilities
The DTS Pro Series Network Encoder for multi-user facilities delivers seamless
integration with Apple’s Xserve.
DTS technologies deliver the highest quality audio available on the market today.
With more than 280 million DTS-licensed consumer electronics products available
worldwide, there’s a compelling reason for content owners and producers to be
releasing DTS-encoded software for movies, music and more.
Refer questions to
DTS Customer Service
Tel: (818) 706-3525
(800) 959-4109 (USA only)
Fax: (818) 879-2746
Email: [email protected]
32