1
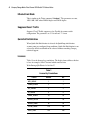
EK-P28FR-AA. C01
Fibre Channel SAN Switch 16 Release Notes
These release notes contain late-breaking and supplemental information for the
TM
Compaq StorageWorks Fibre Channel SAN Switch.
Be sure to read these notes before installing a Fibre Channel SAN Switch. This
information is periodically updated and available on the World Wide Web at
www.compaq.com/products/storageworks/storage.
Firmware Version 2.1.7 Features
The following are features of firmware version 2.1.7:
■
Provides the new user interface for managing switches. Features include
user interface pages for fabric discovery, zoning, name server, port
enables, firmware downloads, switch administration, user
administration, software readable serial number, SNMP administration,
license administration, QuickLoop, and other features for managing up
to 239 switches in a fabric. Management of optionally licensed features
is also included for managing remote switches.
■
Updated Java Machine usage requires Java Plug-In 1.2.2 (Microsoft
Windows) or 1.2 (Solaris).
■
Better browser (Netscape Navigator and Microsoft Internet Explorer)
and platform.
2 Compaq StorageWorks Fibre Channel SAN Switch 16 Release Notes
■
All commands are now case insensitive. For example, instead of
entering “fabricShow,” you can enter “fabricshow”.
The new Fibre Channel SAN Switches may include the latest version of the
firmware. A copy of the latest version of the firmware, v2.1.7 as of this date, is
also contained on the Fibre Channel SAN Switch Software v2.1.7 CD. The
required loaders and instructions for downloading the firmware are also
contained on the CD. The v2.1.7 firmware is also available on the Compaq
website at
www.compaq.com/products/storageworks/hubs-and-bridges/firmwareupdate.html
This firmware is for the Fibre Channel SAN Switch only and will not work if
loaded into older Fibre Channel Storage Switches.
Compatibility
The Fibre Channel SAN Switch software (version 2.1.7 and above) is
compatible with the Fibre Channel Switch software (versions 1.6d), allowing
both types of switches to operate in the same fabric. To accomplish this
compatibility, the Fibre Channel SAN Switch must be configured to use a
specific addressing mode. This mode is designated “VC Encoded Address
Mode.”
Invoke this mode using the configure command, as described in Appendix A of
TM
the Compaq StorageWorks Fibre Channel SAN Switch Management Guide.
When using compatibility mode, the maximum switch count in a fabric is
reduced from 239 to 32, and the maximum number of multicast groups is
reduced from 256 to 31.
If the compatibility mode is not set, the following error message displays when
interconnecting a Fibre Channel SAN Switch and a Fibre Channel Storage
Switch:
FABRIC, SEGMENTED, LOG_WARNING
Description: Fabric segmented.
Probable Cause: Incompatible fabric parameters/switches or conflict zones.
Action: Reconfigure fabric or zones. See configure command.
Compaq StorageWorks Fibre Channel SAN Switch 16 Release Notes 3
Cascading
Cascading of switches is supported for up to 239 with firmware v2.1.7. Up to
7 hops are supported where a hop is defined as a connection from one switch
to another. Connections should be made such that traffic from an NL_Port will
not transverse more than 7 hops when traveling through the cascaded switches.
When cascading switches, sequentially assign domain addresses to the
switches prior to connecting them to other switches in a Storage Area Network
(SAN). When connecting a powered down switch to a SAN that is running, the
SAN will automatically assign a domain number to the switch when it is
powered up. When connecting a SAN to a switch that is already powered up,
the switch will not join the SAN if there are duplicate domain numbers. Refer
to the Compaq StorageWorks Fibre Channel SAN Switch Management Guide
for more information on compatibility mode and zoning that can also prevent
switches from connecting to a SAN.
CD Directory Structure
The Fibre Channel SAN Switch Software CD v2.1.7 contains the following
items, including the names and descriptions of the files that contain release
TM
notes for the Compaq StorageWorks Command Console (SWCC) client and
agent for managing the Fibre Channel SAN Switches.
-Dsggb
-Docs
-readme.txt (CPQ SWK RELEASE NOTES; late-breaking doc changes)
-aa-rmmha-te.pdf(CPQ SWK SAN Switch 8-EL Installation and Hardware Guide)
-ek-bcp24-ia.pdf (CPQ SWK SAN Switch 8 Installation and Hardware Guide)
-ek-bcp28-ia.pdf (CPQ SWK SAN Switch 16 Installation and Hardware Guide)
-aa-rmmja-te.pdf (CPQ SWK SAN Switch Management Guide)
-aa-sanrs-aa.pdf (CPQ SWK SAN Switch Remote Switch Services Installation Guide)
-ek-ssrsr-aa.pdf (CPQ SWK SAN Switch Remote Release Notes)
-ek-p24fr-aa.pdf (CPQ SWK SAN Switch 8 Remote Release Notes)
-ek-p28fr-aa.pdf (CPQ SWK SAN Switch 16 Remote Release Notes)
-ek-rmmga-te.pdf(CPQ SWK SAN Switch 8-EL Release Notes)
-Firmware (Compaq StorageWorks Fibre Channel Firmware and updates)
-firmwareupdate.txt (instructions for updating firmware)
-v2.1.7 (switch firmware)
-femib.smiv1 (Management Information Base for fabric)
-swmib.smiv1 (Management Information Base for switch)
-swtrap.smiv1 (Management Information Base for traps)
-NTAlpha
-Cat.exe (mover for upgrading firmware from an Alpha)
-Rshd.exe (small server for upgrading firmware from an Alpha)
-NTIntel
-Cat.exe (mover for downloading firmware from a PC)
4 Compaq StorageWorks Fibre Channel SAN Switch 16 Release Notes
-Rshd.exe (small server for upgrading firmware from PC)
-SWCC(SWCC software for managing the Compaq StorageWorks SAN Switch and the
Compaq StorageWorks Fibre Channel Switch)
-ccclient.txt (SWCC Command Console release notes)
-fcinter.txt (Switch Agent & Client release notes)
-readme.txt (SWCC late breaking changes)
-Getting Started Guide.pdf (CPQ SWK Command Console for the SAN Switch Installation
Guide)
-setup.exe (SWCC Installation file)
-Agent (contains the installSHIELD kit)
-Client (contains the installSHIELD kit for AppMgr)-NTAlpha
-Acrobat
-Ar32e301.exe
-other acrobat files
Compaq StorageWorks Fibre Channel SAN Switch 16 Release Notes 5
Using the Java Plug-In
The proper execution of the Web Management Tools v2.1 application requires
that Java Plug-In is installed on your workstation. Web Management Tools
v2.1 requires the Java Plug-In version based on Java 1.2 (also known as Java
2) to operate correctly. The Java Plug-In is similar to other plug-ins used on
your browser such as Real Audio, Adobe Acrobat, and Macromedia Director.
Once Java Plug-In is installed its use is invisible.
Release Files
V2.1.7 dated 6/1/00
The release files for the Fibre Channel SAN Switch firmware, dated 6/1/00,
include:
■
MIB Files for BFOS v2.1.7 are the same as v2.1
q
q
q
femib.smiv1 4/16/99 is now v2_1FE.mib
swmib.smiv1 4/16/99 is now v2_1SW.mib
swtrap.smiv1 4/16/99 is now v2_1TRP.mib
New Front Panel Commands and
Changes
Four new options have been added to the front panel commands:
■
Disable Read Link Status (RLS) Probing
■
Ethernet Link Mode
■
Suppress Class F Traffic
■
Quick Soft Initialization
Disable RLS Probing
When RLS Probing is not selected (enabled or “0”), the switch port will issue
RLS Extended Link Service to the attached devices every four seconds to
collect link status data. Otherwise, RLS will not be sent to the devices. RLS
Probing is selected by default (disabled or “1”.)
6 Compaq StorageWorks Fibre Channel SAN Switch 16 Release Notes
Ethernet Link Mode
This is similar to the Telnet command “ifmodeset.” The parameters are auto,
10H, 100H, 100F where H=Half duplex and F=Full duplex.
Suppress Class F Traffic
Suppress Class F Traffic suppresses class F traffic for remote switch
configuration. The parameters are “0” for off and “1” for on.
Quick Soft Initialization
When Quick Soft Initialization is selected, the QuickLoop initialization
assumes some pre-configured loop conditions. Quick Soft Initialization is not
selected by default and should not be selected without consulting Compaq
technical support.
Licenses
Table 1 lists the licenses key translations. The display format follows this but
is hex, for example, 01B=27 decimal which translates into
Web+Zoning+QL+Fabric=1+2+8+16=27.
Table 1
License Key Translations
License
Decimal
Hex
WEB_LICENSE
1
1
ZONING_LICENSE
2
2
SES_LICENSE
4
4
QL_LICENSE
8
8
FABRIC_LICENSE
16
10
REMOTE_SWITCH
32
20
REMOTE_FABRIC
64
40
EXTEND_FABRIC
128
80
ENTRY_FARIC
256
100
Compaq StorageWorks Fibre Channel SAN Switch 16 Release Notes 7
configUpload Telnet Command
An FTP server must be installed and running when performing the Telnet
command configUpload on a Windows NT system. If you do not have a
Microsoft Windows NT FTP server previously installed on your system, you
need to install it.
Perform the following steps to install and configure a Windows NT FTP
server.
1. Create a folder to put the switch firmware and configuration files in.
2. Install the Windows NT FTP server on your system from your
Windows NT installation CD.
If you only use the FTP server for the firmware and configuration loads,
you can specify the folder created in Step 1 as the FTP Publish
Directory.
3. Open the Internet Service Manager Tool found in the Start menu under
Internet Information Service or Peer Web Service.
4. Double-click the FTP service.
5. Clear “Allow Anonymous Connections” if the password-restricted
access is desired.
6. Select the Directories tab then select the folder you created in Step 1. If
this folder was not selected as the root folder add it to the list.
7. Highlight the folder and make sure the read and write boxes are
selected.
8. Close the Internet Service Manager Tool.
9. Perform a configuration save by using the Telnet command configUpload.
In the instructions, the source files that are referred to are the standard
Windows NT server or Workstation CD.
FTP Service uses the standard users defined under Windows NT, so a valid
local user and password is required. A user can be created using the
Windows NT administrative tools.
Appropriate permissions for the created folder (NTFS volumes only) must be
setup to allow the user to have read and write privileges.
Another link that may be used to create a specific directory structure for use of
firmware downloads explains how to create a directory structure for a specific
login, but this is not necessary if FTP is only being used for switch use.
8 Compaq StorageWorks Fibre Channel SAN Switch 16 Release Notes
Telnet Command
qlPortShowAll
The qlPortShowAll command displays the following QuickLoop port
information for each port:
QuickLoop Mode
Enabled—QuickLoop mode enabled
Disabled—QuickLoop mode disabled
Looplet State
Online—Completed loop initialization
Lipped—NL_port lipped
Lipping—FL_port lipped
Initializing—Loop initialization in progress
Bypassed—Looplet being bypassed
Error—Error found in this looplet
Offline—Looplet offline
Fabric—OLD_PORT state
Not in QuickLoop Mode—Port is not in QuickLoop mode
ssn
The Fibre Channel SAN Switch has a software readable serial number that can
be accessed by using the Telnet command “ssn.” Switches that have been
upgraded to firmware v2.1.7 will not display the software readable serial
number when this command is given, instead the switch World Wide Name
(WWN) will display. If you have a switch with firmware v2.1.7 preinstalled
and the switch displays the WWN instead of the software readable serial
number, contact customer service.
Compaq StorageWorks Fibre Channel SAN Switch 16 Release Notes 9
Known Issues
This section describes the known issues and problems related to the Fibre
Channel SAN Switches, as of 6/1/00.
Fibre Channel SAN Switch
Only eight E-ports per switch are supported.
QuickLoop
QuickLoop, with large numbers of looplets (16), can cause some adapters to
time out during initialization, resulting in repetitive initializations. A new
Telnet command has been added that can speed up initialization:
qlUnmaskLipa [ 0 | 1 ]
The parameter can be set to “0” or “1”. When set to “0”, initializing a looplet
is off. When set to “1” (the default for new switches), initializing a looplet is
on. When the parameter is set to initializing a looplet, the v2.1.7 QuickLoop
masks the Arbitrated Loop Physical Address (AL_PA) bits in the Loop
Initialization Procedure (LIPA) frame using the LIPA bitmaps of those
looplets that stay online. Setting this option on disables the LIPA bitmap
masking and opens AL_PAs for taking by devices in the looplet being
initialized in the LIPA phase, thus allowing the Primary to claim the same
AL_PA in the case of fail-back in Compaq's HA environment.
Make sure that this parameter is set to “1.”
Web Management Tools
■
Netscape 4.6 (IRIX) fails to load SwitchManager.html (core dump of
Netscape or SwitchApplet cannot start error).
10 Compaq StorageWorks Fibre Channel SAN Switch 16 Release Notes
SWCC
SWCC has the capability to log SNMP trap information (error and status
events) occurring on the switch into the Windows NT application Event log.
To enable this capability the following parameters must be set on the switch:
■
swEventTrapLevel: (0..5)—must be set for a severity level from 0 to 5
q
q
q
q
q
q
0 – none
1 – critical
2 – error
3 – warning
4 – informational
5 – debug
NOTE: Additional information is provided in the Compaq StorageWorks Fibre Channel SAN
Switch Management Guide.
■
authTrapsEnabled: (true, t, false, f)—must be set to “true” or “t” to
enable sending of traps
NOTE: This parameter is set to “true” or “t” by default.
These parameters can be set by using the switch telnet interface along with the
agtcfgSet Telnet command.
Compaq StorageWorks Fibre Channel SAN Switch 16 Release Notes 11
Switch Operating System
■
When connected to some Ethernet switches, the Fibre Channel SAN
Switches with 100BaseT sometimes fail to connect through Telnet and
the user interface. Firmware v2.1.7 improves network reliability on
networks that have many collisions, but you have to load the firmware
into the switch to take advantage of it. If you have problems
downloading firmware into the switch, try rebooting the switch
immediately prior to using the firmwaredownload Telnet command. If this
does not work, use a crossover cable directly from the host, that you are
loading the firmware from, to the switch.
■
With firmware 2.03a, during a Telnet session with a Fibre Channel SAN
Switch from a Compaq Tru64 UNIX or OpenVMS machine, the
Backspace, Delete, and Left Arrow keys do not work properly. The
keyboards shipped with these machines produce a “question mark”
character instead of deleting characters when using the Backspace key.
It is necessary to type Control + H to delete characters. The Delete key
changes the case of the letter at the cursor and prevents you from adding
anything to the line. The Left Arrow key deletes the character to its left
and prevents you from adding anything to the line.
Firmware v2.1.7 provides a Telnet command called backSpace.
backSpace without any parameters, returns the current state of the
parameter. backSpace 1 sets the backspace character in the switch to the
Delete character. backSpace 0 sets the Backspace character to Backspace
(Control +H). This makes the delete key work on Tru64 UNIX and
OpenVMS machines.
■
The Fibre Channel SAN Switches are configured with a default IP
address 10.77.77.77. This IP address may not be compatible with your
configuration. The IP address can be changed by two different methods.
One method is using the serial connection. When connecting to the
switch using this method, the switch’s IP address is not used. Once the
serial line is connected, use the command ipAddrSet to change the default
IP address to an IP address that is suitable for your configuration. The
other method to change the IP address is to use the default IP address
and an Ethernet connection to the switch. Once the Ethernet is
connected to the switch, use the same ipAddrSet command to change the
IP address.
NOTE: When using the serial port connection, the flow control must be set to None.
12 Compaq StorageWorks Fibre Channel SAN Switch 16 Release Notes
Supported Configurations
This release supports cascading of switches. Only eight E-ports per switch are
supported. See Compaq Solutions Kits for supported configurations
involving cascading of switches.
Cables
Optical cables for the Fibre Channel SAN Switches must be ordered
separately. 500 meters or less cables should be multi-mode Fibre Channel
cables. Cables that are longer than 500 meters should be single-mode.
Multi-mode optical cables are connected to shortwave GBIC modules in Fibre
Channel SAN Switches. Single-mode optical cables are connected to
longwave GBIC modules in the Fibre Channel SAN Switches. Multi-mode
cables should use 50/125 optical fibers, SC Duplex connectors with a PC
finish. Use of 62.5/125 should be restricted to situations where 62.5/125
optical fiber was previously installed and the link lengths are to be kept shorter
than 200 meters. Single-mode cables typically use 9/125 optical fibers for
distances up to 10 km.
GBIC Modules
Giga-Bit Interface Converter (GBIC) modules for the Fibre Channel SAN
Switches must be ordered separately. The Compaq part number for the
shortwave optical GBIC module for multi-mode cable is 380561-B21. Two
longwave GBIC modules and a short single-mode test cable can be ordered in
a kit (part number 340412-B21).
In the Switch Management Application page of the Web Management Tools,
the GBICs are identified differently depending on the type of GBIC and the
supplier. Some examples of the displays include “ID” for VIXEL shortwave
GBICs and “SW” for IBM shortwave GBICs.
NOTICE
The information in this document is subject to change without notice. COMPAQ COMPUTER
CORPORATION SHALL NOT BE LIABLE FOR TECHNICAL OR EDITORIAL ERRORS
OR OMISSIONS CONTAINED HEREIN; NOR FOR THE INCIDENTAL OR CONSEQENTIAL
DAMAGES RESULTING FROM THE FURNISHING, PERFORMANCE, OR USE OF THIS
MATERIAL.
This document contains information protected by copyright. No part of this document may be
photocopied or reproduced in any form without prior written consent from Compaq Computer
Corporation. Product names mentioned herein are trademarks and/or registered trademarks of
their respective companies.
© 2000 Compaq Computer Corporation. All rights reserved.
Third Edition (June 2000)
Part Number EK-P28FR-AA. C01