1
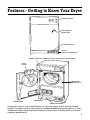
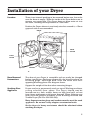
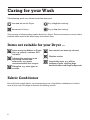
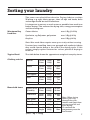
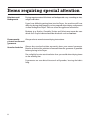
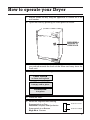
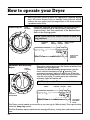
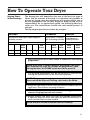
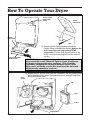
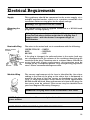
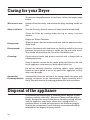
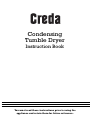
Condensing
Tumble Dryer
Instruction Book
You must read these instructions prior to using the
appliance and retain them for future reference.
Contents
Getting to know your Dryer
Important Safety Points
Installation of your Dryer
Caring for your Wash
Sorting your laundry
Items requiring special attention
How to operate your Dryer
Electrical Requirements
Caring for your Dryer
Something Wrong?
Service – Creda Tumble Dryers
3
4
5
6
7
8
9
13
14
Inside Back Cover
Back Cover
EEC Standards
This appliance conforms to the following EEC Directives:
Low Voltage Equipment
73/23/EEC
93/68/EEC
Electromagnetic Compatibility
89/336/EEC
92/31/EEC
93/68/EEC
Retention of this Instruction Book
This Instruction Book should be kept at hand, as it contains important details on the safe
and correct use of the appliance.
If you sell or pass the appliance to someone else, or move house and leave it behind,
make sure this Book is also provided so the new owner can become familiar with the
appliance and safety aspects.
2
Features - Getting to Know Your Dryer
CONTROL PANEL
PUSH HERE TO
OPEN DOOR
AIR INTAKE GRILLE
PLINTH
(NOT ON ALL MODELS)
SERIAL/MODEL No. (RECORD DETAILS ON SERVICE PAGE AT REAR.)
FLUFF
FILTER
REVERSIBLE
DOOR CATCH
CONDENSER
DOOR CATCH
WATER CONTAINER
Using your Dryer is easy. Nevertheless, for your own safety and to achieve the best
results, it is important to read through this handbook before using the appliance. Your
Condenser Dryer requires specific attention, more so than a vented dryer to maintain
optimum performance.
3
Important Safety Points
Note: This Dryer is only suitable for Domestic use.
Never ...
✘
Never allow children to play with
the Dryer.
✘
Never use liquid conditioner in the
Dryer.
✘
Never switch the machine off
leaving a hot load in the drum.
✘
Do not dry articles that have not been
washed, rinsed and spun.
✘
Never tumble dry without the
filter, condenser and water
container in position.
✘
Never attempt to stand on top of your
Dryer.
✘
Never exceed maximum
recommended load capacity.
✘
Never dry fabrics that have been
chemically cleaned or have become
contaminated with solvents.
✘
Never place dripping wet
items in the drum.
✘
Never obstruct or drape anything over
the dryer which may block the rear
vents.
✘
Never allow lint to collect around
the Dryer.
✔
Always finish every programme with
the cool cycle.
✔
✔
Always clean the filter of fluff after use.
✔
Always buy genuine Manufacturer’s
Spares and accessories.
Always ...
✔
Always switch off at the Wall,
remove plug and close the
Door when not in use.
✔
Always comply with the
specified electrical
requirements.
✔
Ensure that your Dryer is
installed correctly and has
adequate ventilation.
✔
Ensure air intake grille is
never obstructed or blocked.
4
Always empty Water Container after
every programme.
Installation of your Dryer
Location
There is no internal packing to be removed before use, but make
sure the drum is empty. Wipe the inside of the Drum before use to
remove any transit dust. Your Dryer does not blow moist air into
the room, avoiding the requirement of a vent hose.
Position the Dryer where air can freely circulate around it, a 15mm
gap each side is recommended.
HINGE
DOOR
CATCH
DOOR
LATCH
HINGE
Door Reversal
Instructions
The door of your Dryer is reversible and can easily be changed
before installation. Exchange diagonally the hinge brackets for
blanking plugs. Exchange door latch and catch with their
opposing blanking plates. See diagram above.
Support the weight of the door when removing hinges.
Stacking Your
Appliance
Dryers can be to permanently stack on top of Washing machines,
saving valuable floor space. The Dryer should not be
located next to a hob, cooker, heater or high level grill, as heat
from these appliances could cause damage. When ordering you
must state the product numbers of the Washing machine and
Tumble Dryer (Tel. No. 0541 530 530).
Note: Separate mains plugs and sockets must be used for each
appliance. Do not use 2-way adaptors or extension leads.
As the dryer is heavy assistance should be obtained when
stacking the dryer.
5
Caring for your Wash
The following wash-care labels should be observed.
Item can be used in Dryer.
Dry at high heat setting.
Do not use in Dryer.
Dry on low heat setting.
The majority of fabrics today can be dried in a Dryer. There are however certain fabric
finishes which need to be dried away from direct heat.
Items not suitable for your Dryer ...
Items containing Rubber or Plastic
film, e.g. pillows, cushions, PVC
rainwear.
Items which have been dry cleaned.
Woollen articles.
Inflammable articles or items
containing inflammable
substances, e.g. towels
contaminated with hair lacquer.
Large bulky items, e.g. pillows,
continental quilts, sleeping bags,
double blankets and large bedspreads.
Fibreglass, e.g. some types of
curtains.
Fabric Conditioner
For really fresh and soft fabrics, we recommend you use a liquid fabric conditioner in the final
rinse of your wash. This helps to eliminate the build up of static.
6
Sorting your laundry
The same care should be taken for Drying fabrics as when
Washing, e.g. split fabric groups, close all zips and hooks, belts
and strings should be tied in loose bow.
It is important to extract as much water as possible from each item
before drying. This reduces the drying time, energy consumption
and the running cost.
Maximum Dry
Load Size
Cotton fabrics
max. 6 Kg (13.2 lb)
Synthetics, eg Polyester, polycotton
max. 3 Kg (6.6 lb)
Acrylics
max. 2 Kg (4.4 lb)
Note: Man-made fibres require more space to dry without creasing.
If cotton/terry towelling items are grouped with synthetic fabrics
they could remain damp at the end of the drying cycle. If this
occurs, simply replace cottons for a short period of drying to
finish off.
Typical Load
Clothing articles
The table below shows the approximate weight of everyday items.
Blouse
Cotton
Other
150g
100g
Dress
Cotton
Other
500g 1 lb 2oz
350g
12oz
Jeans
700g 1 lb 6oz
10 Nappies
Shirt
1000g 2 lb 3oz
Cotton
Other
T-shirt
Household items
Duvet cover Cotton
(Double)
Other
Tablecloth
5oz
4oz
Large
Small
Tea Towel
300g
200g
10.5oz
7oz
150g
5oz
1500g 3 lb 5oz
1000g 2 lb 4oz
700g 1 lb 6oz
250g
9oz
100g
4oz
Bath Towel
700g 1 lb 8oz
Hand Towel
350g
Sheets
Double
Single
(Note: 1 Kg = 1000g)
12oz
500g 1 lb 2oz
350g
12oz
Note: When drying
sheets, part way
through the cycle,
remove and open them
out to ensure full and
even drying.
To continue the
programme press the
start button.
7
Items requiring special attention
Blankets and
Bedspreads
Drying requirements of blankets and bedspreads vary according to size,
weight and fabric.
If you have difficulty getting them into the Dryer, the machine will have
difficulty drying them properly as they expand when drying and prevent
air flow through the Dryer. This can cause the appliance to overheat.
Blankets (e.g. Acrilan, Courtelle, Dralon and Orlon) must never be over
dried. Such acrylic fabrics should be dried with care on low heat.
Always refer to manufacturers drying instructions.
Permanently
pleated or creased
garments
Starched articles
Always dry starched articles separately from your normal garments.
Ensure as much of the solution is removed from the garments as possible
before placing in the Dryer.
Use a slightly heavier starch solution than you would when drying items
on the washing line.
If garments are over dried the starch will powder, leaving the fabric
limp.
8
How to operate your Dryer
1. Ensure hands are dry. Plug the appliance in. Switch on at the
wall socket.
2. Open the Door by pressing the Front panel as shown.
PUSH HERE &
RELEASE TO
OPEN DOOR
3. Place the selected fabrics into the Dryer. Ensure the fabrics
are pushed towards the back of the Drum and away from the
Door seal.
4. Always check the following:
FLUFF FILTER
is clean and in place
WATER CONTAINER
is empty and in place
CONDENSER
is in place
5. Close the Door.
6. Select the required heat setting.
Press switch in at Top
Low Heat Acrylics and Synthetics
Press here for Low
Press switch in at Bottom
High Heat Cottons
Press here for High
9
How to operate your Dryer
7. Rotate the Timer control to select the appropriate required drying
time. All of our Dryers have an energy saving feature which
reduces the heat input when the temperature in the drum reaches
a predetermined level.
Timed Dryers:
TIMER
CONTROL
l0
20
0
12
10 coo
Select the required Drying time by rotating the Timer
control clockwise (up to 120 minutes) just past the
required time, then anti-clockwise to the desired time.
Refer to the Drying guide.
30
110
NOTE: Never force the Timer control beyond the
stop positions.
100
40
CONTROL
PANEL
HEAT
SWITCH
START
BUTTON
EMPTY WATER
LIGHT
50
90
80
60
70
FILTER CARE
(NOT ALL
MODELS)
Automatic Eco/Economy
Dryer:
TIMER
CONTROL
om
a
0
NOTE: Only turn the Timer control clockwise.
40
t i m e d d r yi ng
30
a ut
co
ol 1
tic
100
0
0 co
20
ol
E
The timer control gives you the choice of either Eco/
Economy or timed drying.
To select the Eco/Economy programme turn the
timer control clockwise to the E position. The
ecosense/economy light will switch on. When the
load is dry this programme automatically advances
into the cool cycle, at which point the ecosense/
economy light will switch off.
HEAT
SWITCH
START
BUTTON
EMPTY WATER
LIGHT
90
50
CONTROL
PANEL
60
70
80
ECO/
ECONOMY
PROGRAMME
ECOSENSE/
ECONOMY
LIGHT
The Timer control can be set manually to any time (up to 100 minutes). This is particularly
useful for damp dry results.
The Eco/Economy option optimises the energy efficiency, saving time and money for the
user.
10
How To Operate Your Dryer
Drying Times
& Heat Settings
The drying time will depend on the size of the load, the type of
fabric and the wetness of the load. It is therefore not possible to
give exact drying times but experience will quickly enable you to
set the appropriate time for fully drying or damp drying to your
requirements. As an approximate guide, the following table may
assist you. The times shown include the cool tumble period, in
minutes.
The Kg weights specified are fabric dry weights.
COTTONS
SYNTHETICS
Drying times when spun at 800-1100rpm in
washing machine
times –
Drying times – reduced Drying
spin in
spin in washing machine reduced
washing machine
High heat
Low heat
Half
Load
Full
Load
ACRYLICS
Low heat
Half
Load
Full
Load
Half
Load
Full
Load
1 Kg
2 Kg
3 Kg
4 Kg
5 Kg
1 Kg
2 Kg
3 Kg
1 Kg
2 Kg
30-40
40-55
55-70
70-80
80-90 95-120 40-50
50-70
70-90
40-60
55-75
6 Kg
8. Press and release the START switch to commence the Drying
programme.
NOTE: If the Door is opened during a programme, the Dryer
will automatically stop. To continue the programme, upon
closing the Door, the START switch must be re-pressed.
9. The Heating programme can be terminated at any time by
turning the Timer control to the Cool cycle position.
NOTE: Always complete a programme with the Cool cycle.
Never switch the Dryer off, leaving a hot load in the Drum.
10. Allow the Cool cycle to finish then remove the laundry from the
appliance. This reduces creasing of fabrics.
11. Ensuring hands are dry, switch off the Appliance and
remove and plug from the wall socket.
12. Always remove and clean the Filter after EVERY programme.
A light will come on when you open the door to remind you to
clean the fluff filter on some models.
NOTE: Wash or vacuum clean the filter occasionally.
11
How To Operate Your Dryer
EMPTY WATER
CONTAINER
LIGHT
WATER
CONTAINER
WATER
CONTAINER
SINK
13. Remove plinth moulding (where fitted) by
slightly lifting and sliding to the left. Remove the
water container and empty after EVERY
programme. Failure to do this will result in the
water container becoming full and the load will
not dry.
PLINTH MOULDING
WHEN FITTED
NOTE: The light on the control panel only comes on when the
water container is full. When the light is on you should stop
the dryer and empty the water container. This should be
avoided by emptying the container between cycles. If the
light comes on during a cycle (Eco machines) the timer will
automatically advance to ‘cool run’.
FLUFF
FILTER
14. EVERY month, remove and clean the Condenser unit by pouring cold
water through all the tubes. This prevents the air passage ways from
being blocked by fluff.
TAP
REAR
FRONT
CONDENSER
12
Electrical Requirements
This appliance should be connected to the mains supply via a
suitable switched socket, which is in a position accessible after
installation. Refer to rating plate for the supply voltage.
Supply
Warning: This appliance must be earthed.
Changing the
Plug
The flexible mains lead is supplied connected to a BS1363 fused
plug with a 13 amp capacity.
If this plug is removed or cut off, it should be properly disposed
of and not left where children might find it and plug into a
supply socket – with the obvious consequent danger of
electrocution.
Rewirable Plug
GREEN & YELLOW
TO EARTH
GREEN/YELLOW – EARTH
BLUE
– NEUTRAL
BROWN
– LIVE
13
AMP
FUSE
BLUE
TO
NEUTRAL
CORD
CLAMP
The wires in the mains lead are in accordance with the following:
BROWN
TO
LIVE
Moulded Plug
If the plug is changed, the coloured wires in the mains lead may
not correspond with the colours of the markings identifying the
terminals in the plug. Therefore wire is as shown above. Should the
mains lead ever require replacement, this operation must be
carried out by a competent person. Only use specially prepared 3
core 1.50mm2 recommended spares cable.
The correct replacement of the fuse is identified by the colour
coding in the base of the plug or the colour that is embossed in
words in the base of the fuse recess, or elsewhere on the plug.
Only 13 amp replacement fuses which are ASTA approved to
BS1362 should be fitted. After replacement of a fuse in the plug, the
fuse cover must be refitted. Fuse covers may be obtained from
your local Regional Electricity Company.
WARNING: The plug must not be used without a fuse cover.
NOTE: Replacement mains cables must only be obtained from our recommended
Spares stockist.
NOTE: IF IN DOUBT CONSULT A QUALIFIED ELECTRICIAN.
13
Caring for your Dryer
To maintain the performance of the Dryer, follow the simple steps
below:
When not in use:
Switch off the electricity and remove the plug, ensuring hands are
dry.
After each load:
Turn the Drum by hand to ensure all items have been removed.
Clean the Filter by rinsing under the tap or using a vacuum
cleaner.
Empty the Water Container.
Every week:
Wipe the drum, the front of the condenser and the door seal with a
damp cloth.
Every month:
Remove Condenser unit and clean any build up of fluff or lint from
between the plates by rinsing it under the tap with cold water.
This should be done from the rear of the Condenser unit.
Cleaning:
Clean exterior metal and plastic surfaces with a damp cloth or
silicon polish only.
Every 6 months vacuum the Air intake grille and Vents at the rear
of the appliance, to remove any build up of fluff or lint.
Do not use abrasive cleaners, scouring agents, acids, chlorine
bleach or metal polish to clean any part of the appliance as they
may cause damage.
Automatic/
Economy Models
Occasionally clean the surface of the sensor inside the drum with
vinegar to remove water contaminants. Apply carefully with a
cloth. This will maintain the drying performance of the machine.
Disposal of the appliance
To minimise the risk of injury to children please dispose of your
product carefully and safely. Remove all doors and lids (where
fitted). Remove the mains cable (where fitted) by cutting off flush
with the appliance and always ensure that no plug is left in a
condition where it could be connected to the electricity supply.
To help the environment, Local Authority instructions should be
followed for the disposal of your product.
14
Something Wrong?
Before calling a Service Engineer, please check through the following list.
THERE MAY BE NOTHING WRONG
DRYER WILL NOT START
LOAD IS NOT DRY OR TAKES
LONGER THAN NORMAL TO DRY
CHECK THE POWER SUPPLY
CHECK THE FOLLOWING
Has the fuse blown in the plug or the
main fuse box?
(Try plugging in another appliance to
check)
Does the fluff filter need cleaning?
(It should be cleaned after every load)
If the fuse has blown in the plug
top, refer to Electrical Requirements.
Does the water container need
emptying?
(It should be emptied after every load)
Does the Condenser unit need
cleaning?
(It should be cleaned every month)
Are you using an extension lead?
(Many extension leads are not
suitable. Try plugging the Dryer
directly into a socket to check.)
Have the Air intake grille or rear
Vents of the Dryer been obstructed?
CHECK THE SETTINGS
CHECK THE SETTINGS
Is the Door fully closed?
(Try opening and closing the door again)
Has the Empty water light come on?
(Empty the Water bottle after every load)
Has the Timer control been set?
(Try resetting the timer and pressing the
start button again)
Has the Start button been pressed
hard enough? (Try pressing Start again)
IMPORTANT NOTICE: The Start
button must be pressed every time the
door is opened to re-start the
programme.
Have you selected the correct heat
setting? (Refer to Drying Guide and
check the heat setting switch)
Have you selected the correct time
for the load? (Refer to Drying Guide –
this can vary according to Washing
machine spin speeds, load size and
fabrics being dried).
Have you mixed cottons with
synthetics? (See page 7)
If you have been through the above and there is still a problem, you should identify your
Service Agent using the list on the next page and contact your Local Service Office.
Service
Please carry out the checks detailed on the Something Wrong page. If there is a
problem with your appliance then contact your Service Centre by using the table below to
identify the appropriate phone number.
Please have the following information available when you call :
1. (a) Your name.
(b) Your address and postcode.
(c) Your telephone number.
2. The date and the name of the shop/retailer where the appliance was purchased.
Shop / Retailer :
Date :
3. The Model number and Serial number of your appliance (See Features page for
Rating plate location).
Model Number :
Serial Number :
4. Clear and concise details of the fault.
5. Details of any Extended Warranty or Service Insurance Schemes.
Your In-Guarantee Service Telephone Number
UK
Republic of Ireland
0541 500 500
1850 302 200
If you have any other queries regarding Service or Parts, our Parts and Service division will be
pleased to help. You should write to :
Creda Service, Customer Service Department, Blythe Bridge, Stoke-On-Trent. ST11 9LN.
For Parts and Accessories, please telephone our Parts Order Hotline on
0541 530 530 (UK) or 01 842 6836 (Republic of Ireland).
Note 1 :
If under guarantee, our Engineers will need to see a copy of your purchase
receipt when they call.
Note 2 :
Our Engineers will use every effort to avoid damage to floor coverings and
adjacent units when carrying out repair/service work, but in locations where
the Engineer advises you that it will be impossible to move the appliance
without risk of damage, he will only proceed with your approval that no
liability will be accepted.
PRINTED BY SIMLEX . FOUR ASHES, WOLVERHAMPTON.
August 1998 Part No. 377400003-02