1
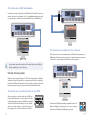
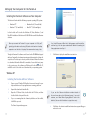
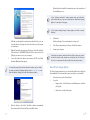
Workshop ®ÂØÒňΠ® Fantom-G Workstation Keyboard Using the Fantom-G with a Computer © 2010 Roland Corporation U.S. Windows XP™, Windows Vista™, Windows 7™, and Windows Media Player™ are trademarks of Microsoft Corporation. Mac OS X™ and iTunes™ are trademarks of Apple Inc. All rights reserved. No part of this publication may be reproduced in any form without the written permission of Roland Corporation U.S. FGWS15 1 About the Workshop Booklets Roland’s Fantom G6, G7, and G8—the Fantom-G family—set a new standard for excellence in workstation keyboards, with spectacular sounds and incredible built-in effect-processing muscle. A beautiful full-color LCD display and innovative performance features make getting around a pleasure and make the G6, G7, and G8 a dream to play. For recording, the Fantom-G contains a powerful 152 MIDI/audio track sequencer. Each Fantom-G can also host two Roland ARX SuperNATURAL™ cards whose breakthrough modeling technology provides sounds with amazing sonic detail, expressive possibilities, and sound-design opportunities. Clicking or Pressing As explained in the Power User Control Fantom-G Workshop booklet, you can perform most operations on the Fantom-G using either a connected mouse—sold separately—or the Fantom-G’s own front-panel controls. If you’re using a mouse: If you’re using the Fantom-G’s controls: Value dial Left click Right click Each Fantom-G Workshop Series booklet focuses on one Fantom-G topic, and is intended as a companion to the Fantom G6/G7/G8 Owner’s Manual. This booklet requires Fantom-G Operating System v1.30 or higher. You can download the latest Fantom-G O.S. for free from www.RolandUS.com. About This Booklet The Fantom-G’s many USB capabilities make it an awesome companion for a computer. You can easily exchange files, communicate via MIDI over USB, and even exchange audio, allowing the Fantom-G to serve as the audio interface for most DAWs. You can even sample audio with ease from your computer via USB. We’ll discuss all this in this booklet. Understanding the Symbols in This Booklet Throughout this booklet, you’ll come across information that deserves special attention—that’s the reason it’s labeled with one of the following symbols. Scroll wheel You select parameters and objects with a left click. You change the selected parameter’s value by turning the scroll wheel. You can often display a menu by right-clicking an object. You select parameters and objects with the 3, 4, 5, and 6 buttons. Change a selected parameter’s setting by turning the Value dial or by pressing DEC and INC. In any situation, the best method to use is always simply the one that feels most natural to you. Going forward, when we want you to click an onscreen button or its physical counterpart—your choice, of course—we’ll simply tell you to “click” the button. The same mouse-centric logic will apply to any other virtual versus physical control issues we encounter. If there’s only one way to do something, we’ll tell you so. Beyond that, remember that whether you use a mouse or the Fantom-G’s built-in controls is entirely up to you. A note is something that adds information about the topic at hand. Hot Links A tip offers suggestions for using the feature being discussed. Each Workshop booklet is meant to be read in order from beginning to end. However, if we mention an upcoming section—and you see this arrow—you can click the arrow to jump there immediately. Warnings contain important information that can help you avoid possible damage to your equipment, your data, or yourself. 2 The Things You Can Do with USB and the Fantom-G Current settings... In this booklet, we’re going to assume you know how to operate your computer. If you don’t, consult its documentation before proceeding. To allow your Fantom-G to do all it can do with your computer, you’ll need to install its driver on your computer. We’ll provide instructions for doing this starting on Page 5. ...go back to the Fantom-G. U S B U S B ...are sent to the software. Your edited settings... USB and Storage Most people know USB as a storage-device protocol, and the Fantom-G uses USB this way, too. If you’ve connected a USB cable between the Fantom-G and your computer and installed the Fantom-G driver on your computer, the moment you select a memory area on the USB Storage screen, the area you select appears as a removable drive on your computer. We’ll discuss this further on Page 13. USB and MIDI MIDI’s the language with which musical instruments and devices communicate, and you can pass MIDI data back and forth between the Fantom-G and your computer via USB. This lets you do some important things. The Fantom-G Editor and Librarian Software While it’s easy to create and tweak sounds on the Fantom-G, it’s even easier on a computer—the same holds true for setting up live sets and studio sets. The Fantom-G Editor and Librarian software that come with your Fantom-G help you take advantage of your computer’s power and large screen to create, edit, and keep track of Fantom-G sounds, live sets, and studio sets. The Fantom-G as a DAW Controller While the Fantom-G, of course, has its own built-in sequencer and recorder, you may prefer to use a computer-based DAW (“Digital Audio Workstation”). With its great-feeling keyboard, powerful performance features, and full complement of realtime controls, the Fantom-G makes an excellent MIDI controller for a DAW. MIDI notes... U S B ...are captured in the DAW. The Editor and Librarian come with their own documentation, so we’re just going to discuss their installation in this booklet. 3 The Fantom-G as a DAW Sound Module No matter how many soft synths your DAW has, the Fantom-G’s sounds can make a crucial sonic contribution. As a 16-part multitimbral sound module, you can play up to 16 Fantom-G sounds via MIDI from your DAW’s tracks. Live audio... U S B ...where they play notes. ...is recorded in the DAW. U S B Notes are sent to Fantom-G... The Fantom-G as a Sampler for Your Computer The Fantom-G can receive streaming audio via USB, and it can sample it, too. Whatever you’re hearing on your computer—how about audio you encounter on the web?—can be captured on the Fantom-G as a sample. You can even stream the sound of the Fantom-G back into a DAW via USB for recording if you like. Read on... ...where it’s sampled. USB and Streaming Audio U S B Maybe the most powerful aspect of USB on the Fantom-G is its ability to stream audio from the Fantom-G to a computer, and from the computer to the Fantom-G. When the Fantom-G is selected on the computer as its audio input and output, it’s easy to get audio back and forth between them. Audio is sent to Fantom-G... The Fantom-G as an Audio Interface for Your DAW When you want to record live audio into a DAW, you need an audio interface to receive audio from a mic or instrument and get it into your DAW for recording. The Fantom-G’s live inputs allows you to do just that, sparing you from having to buy another piece of pricey gear just to record live audio into your DAW. The Fantom-G’s Skip Back sampling can grab this audio, too! When something interesting goes by on your computer, the Fantom-G’s Skip Back sampling has your back. 4 Setting Up Your Computer for the Fantom-G Installing the Fantom-G Software on Your Computer The Fantom-G works with the following computer operating (OS) systems: • Windows XP™ • Windows Vista™ (32- and 64-bit) • Windows 7™ (32- and 64-bit) • Mac OS X™ (10.3.9 and higher) In this booklet we’ll describe the Windows XP, Vista, Windows 7, and Mac OS X installation of the Fantom-G’s USB MIDI driver and Editor/Librarian software. When you connect the Fantom-G to your computer via USB, you’ll typically get the best results using USB jacks on the back of a desktop computer or on the side of a laptop. We recommend not using a hub. Though the Fantom-G’s software can be found on the CD-ROM that shipped with your Fantom-G, we’re always improving and enhancing the software for our products. The best way to ensure you have the latest Fantom-G software is to download it from the RolandUS.com website. You can click here to jump to the correct page—the software you’ll find works for the Fantom G6, G7, and G8. Be sure to select the correct download for your operating system. If an “Install Program as Other User” dialog appears, quit the installer, and then log in as the system administrator before re-launching the Setup application from Step 3. 5 Click Next to display the installation start window: Windows XP Installing the Fantom-G Driver Software 1 Power up your PC with all USB cables disconnected except for your keyboard and mouse. If any applications are running, quit them. 2 Expand the downloaded installer file. 3 Open the XP Drivers folder, double-click the XP folder, and then double-click the Setup.exe file inside. 4 If you see a warning that the software’s publisher can’t be verified, click RUN to proceed. The Driver Setup window appears: If you see the Software Installation window instead of the one shown above, click Continue Anyway. If you can’t continue, see “About Driver Signing Options” later in this booklet. (You can click this button to jump there now.) 6 Click Next—the driver is installed and instructions appear telling you what to do next. 5 When the driver’s installed, the wizard announces the completion of the installation process. If the “Software installation” window appears after you click Next, click Continue Anyway. If you can’t continue, see “About Driver Signing Options” to the right of this page. If the “System Settings Change” window appears, click Yes to restart Windows. 10 We’ll take you through these instructions in this booklet, so you can close this window, or drag it over to the side of the screen if you want to keep it open. 7 8 With the Fantom-G’s power turned off, plug one end of the included USB cable into its USB COMPUTER jack, and the other end into the USB jack you want to use on your computer. Turn on the Fantom-G—after a few moments, the PC’s Found New Hardware Wizard window appears. If, instead of seeing the Found New Hardware window, you’re asked if you want to connect to Windows Update, select No, not this time, and then click Next to display the Found New Hardware window. Click Finish. Windows displays, “Your new hardware is ready to use.” 11 If the Driver Setup window’s still open, click its Close button. 12 Restart your computer. Should you ever need to remove the Fantom-G driver from your system, the driver installer folder contains an uninstaller. You can hold onto this file, or re-download the driver folder later should you need it. About Driver-Signing Options The Driver Signing window lets you select whether Windows should block the installation of an unknown driver, warn you about it, or just install it. 1 In the Start menu, select Control Panel. 2 If you’re in • Category View—click Performance and Maintenance, and then click System. • Classic View—double-click System. 9 Click the button to the left of “Install the software automatically (Recommended),” and then click Next to install the driver. 6 3 Click the Hardware tab, and then click Driver Signing. 4 Set “What action do you want Windows to take?” to Warn. 5 Click OK to close the Driver Signing window. 6 Click OK to close the System Properties window. 7 Return to the driver installation instructions earlier in this booklet. 2 Click Next. 3 Read the License Agreement, and if you’d like to proceed with the installation, click Yes. 4 Highlight the Custom installation, and then click Next. 5 Checkmark the Fantom-G Editor, Editor VSTi plug-in, and the Fantom-G Librarian software—if they’re not already checked—and then click Next. Installing the Editor/Librarian Software You install both the Fantom-G Editor and Librarian software in a single operation. Here’s how to do this. 1 Double-click the Fantom-G Editor Setup executable file. The installer opens. 7 If you want to install only one of the Fantom-G programs, make sure it’s the only one that’s checked in this window. 6 3 The Driver Setup window appears: 4 Click Next to display the Driver Setup instructions window: 5 Click Next. 6 If Windows Security asks if you’d like to install this device software— as shown above—click Install. In the Choose Destination Location window, you can select a location on your hard drive for the Fantom-G software—if you don’t have a specific reason to choose a different location, leave the default location as is—and then click Next to display the Setup Type window. 7 The installer displays your installation selections and tells you it’s now ready to install the Fantom-G software. Click Next to proceed—the files are installed. 8 Click Finish to exit the installer. Windows Vista Installing the Fantom-G USB Driver Software 1 Power up your PC with all USB cables disconnected except for your keyboard and mouse. If any applications are running, quit them. 2 Double-click the Setup application in the Vista Drivers folder you’ve downloaded and unzipped to start the installer. If Vista tells you a program needs your permission to continue, click Continue. If you plan to install other Roland drivers in the future, you can check Always trust software from “Roland Corporation” to save time later. The driver’s installed, and a window opens with instructions. 8 We’ll take you through these instructions in this booklet, so you can close this window, or move it off to the side if you like. 7 With the Fantom-G’s power turned off, plug one end of the included USB cable into its USB COMPUTER jack, and the other end into the USB jack you want to use on your computer. 8 Turn on the Fantom-G—after a few moments, “Installing device driver software” appears in the lower right corner of the screen. 9 When the PC’s finished installing the driver, it displays a message telling you so. 10 3 Click Next, read the License Agreement, and if you’d like to proceed, click Yes. 4 Enter your name and decide whether to install the driver only for the current user of your computer, or for all users, and then click Next. 5 Highlight the Custom installation, and then click Next. 6 Checkmark all of the files in the Select Features window—if they’re not already checked—and then click Next. Restart your computer. Installing the Editor/Librarian Software Here’s how to install the Fantom-G Editor and Librarian software. A single installation can install them both. 1 Double-click the Fantom-G Editor Setup executable file. The installer opens. If Vista tells you a program needs your permission to continue, click Continue. 2 Choose English as your setup language and click OK to display the InstallShield Wizard window. If you want to install only one of the Fantom-G programs, make sure its files are all that’s checked in this window. 7 Unless you have a reason to choose a different location, leave the Choose Destination Location window set as it is and click Next. 8 When the installer displays your installation selections, click Next to proceed—in a few moments, the files are installed. 9 Click Finish to exit the installer. 9 Windows 7 5 Click Next, and the driver’s installed, and a window opens with instructions. Installing the Fantom-G USB Driver Software 1 Power up your PC with all USB cables disconnected except for your keyboard and mouse. If any applications are running, quit them. 2 Open the downloaded driver‘s folder, and double-click Setup inside. If Windows 7 tells you a program needs your permission to continue, click Continue. 3 The Driver Setup window appears: We’ll take you through these instructions in this booklet, so you can close this window, or drag it over to the side of the screen if you want to keep it open. 4 Click Next to display the Driver Setup instructions window: 6 With the Fantom-G’s power turned off, plug one end of the included USB cable into its USB COMPUTER jack, and the other end into the USB jack you want to use on your computer. 7 Turn on the Fantom-G—after a few moments, “Installing device driver software” appears in the lower right corner of the screen. 8 When the PC’s finished installing the driver, it displays a message telling you so. 9 Restart your computer. Installing the Editor/Librarian Software You can install both the Fantom-G Editor/Librarian software and the Playlist Editor software in a single operation. Here’s how to do this. 1 Double-click the Fantom-G Editor Setup executable file. The installer opens. If Windows 7 tells you a program needs your permission to continue, click Continue. 10 Mac OS X Installing the Fantom-G USB Driver Software 2 Click Next, read the License Agreement, and if you’d like to proceed with the installation, click Yes. 3 In the Choose Destination Location window, you can select a location on your hard drive for the Fantom-G software—unless you have a reason to choose a different location, leave the default location as is—and then click Next to display the Setup Type window. 4 Highlight the Custom installation, and then click Next. 5 Checkmark that all three items in the custom-installation list are checked—and then click Next. 6 When the installer displays your installation selections, click Next to proceed—in a few moments, the files are installed. 7 Click Finish to exit the installer. 1 Disconnect all USB cables from your computer except for your keyboard and mouse. 2 Locate the downloaded driver folder and double-click the FantomG_ USBDriver.pkg file to launch its installer. 3 If the installer says it needs to run a program to determine if the driver can be installed, click Continue. The Roland driver installer window appears. 4 Click Continue to display the Installation Type window, shown on the next page. 11 If your Mac displays a message about reboot caches, click OK. If your Mac has more than a single hard drive or volume, you may be asked to select the drive on which you want to install the driver before seeing the screen above. Select the drive with your active operating system on it, and then click Continue. 5 Click Install to display the password authentication window. Most likely, your user name will already be filled in. When the Mac’s restarted, make sure the Fantom-G’s power is turned off. Then plug one end of your USB cable into the Fantom-G’s rearpanel USB COMPUTER jack, plug the other end into the USB jack you want to use on your computer, and turn on the Fantom-G. Whenever you perform Mac OS X system updates, please disconnect the Fantom-G during the process to avoid having to reinstall the Fantom-G USB MIDI driver. In the same folder as the FantomG_USBDriver.pkg file you’ll find the FantomG_Uninstaller. You can hold onto this file, or re-download the driver folder later should you need it. 6 Type an administrator password for your computer. 7 Click OK—the installer informs you that a restart of your computer will be required after the driver’s installed. Installing the Editor/Librarian Software When you install the Fantom-G’s Editor software, its Librarian is installed as well. 1 8 Click Continue Installation to install the Fantom-G USB MIDI driver. 9 When you see the Install Succeeded window below, click Restart. After downloading, the Fantom-G Editor installer launches automatically. (If this doesn’t happen for you, double-click the downloaded file to mount its disk image, and then double-click the Fantom-G Editor installer.pkg file.) 12 Exchanging Files With Your Computer You can use USB to move the following types of files over to the Fantom-G for importing: • Audio files—16-bit .WAV and AIFF-format samples that use a 44.1 kHz sample rate can be imported as the Fantom-G as samples. • SMF files—You can import SMFs (“Standard MIDI Files”) as songs or phrases on the Fantom-G. 2 Click Continue to display the Software License Agreement window. 3 After reading the license agreement, click Continue—if you want to print the agreement for your reference, click Print—and then click Agree. The Installation Type window appears. To learn more about SMFs, check out our An Introduction to MIDI InFocus booklet, which you can download for free from here. • BMP files—You can import bitmap images for use as background pictures on the Fantom-G. • .txt files—The Favorite Play screen can display text files you import from your computer. While you’re in USB Storage mode, the USB Storage screen remains onscreen. Turning On the USB File-Exchange Connection To connect the Fantom-G to your computer for exchanging files: 1 If it’s not already connected from driver installation, turn off the Fantom-G and connect one end of a standard USB cable to the Fantom-G’s COMPUTER jack and the other to the USB port on your computer you used when you installed the Fantom-G USB driver. 2 Turn on the Fantom-G. 3 Press the Fantom-G’s MENU button. 4 Click F3 (USB Storage) to display the USB Storage screen. We recommend leaving the installer set to Standard Install, and the Change Install Location setting as it is unless you have some specific reason to change either setting. 4 Click Install—the Editor software is installed. 5 When the installation’s complete, click Quit to exit the installer. The programs you’ve installed can be found in the Roland folder within your Applications folder, presuming you didn’t change their destination location during installation. 13 5 Click: • F1 (Internal)—to exchange files between the Fantom-G internal memory and your computer. • F2 (USB Memory)—to exchange files between your Fantom-G’s USB stick, presuming one is currently installed and formatted, and your computer. The USB Storage screen is displayed for as long as your USB connection remains active. When you make your selection in Step 5, the selected Fantom-G memory area appears on your computer. If your computer’s running: • XP, Vista, and Windows 7—the Fantom-G memory area appears in My Computer (XP) or Computer (Vista and Windows 7) as a removable drive called “FANTOM G.” • Mac OS X—the Fantom-G memory area appears on your desktop as a removable drive called “FANTOM G.” Shutting Down the USB File-Exchange Connection 1 When you’re ready to disconnect the Fantom-G’s memory area from your computer, unmount the drive as you would any removable drive. On: • XP—use the Safely Remove Hardware button on your taskbar. • Vista or Windows 7—right-click on the FANTOM G drive and select Eject. • Mac OS X—select the FANTOM G drive and either press your keyboard’s Eject button, or drag the drive onto your Trash icon, which will turn into an Eject icon for the drive. 2 On the Fantom-G, click F8 (Exit) twice. 3 You can physically disconnect your USB cable whenever you want at this point, or leave it attached. While You’re Connected Double-click the FANTOM G removable drive on your computer to open it and view its contents. What you’ll see is: • an IMPORT folder—for moving certain files to the Fantom-G. We’ll discuss what to do with this folder in “Using the IMPORT Folder” on Page 15. • a folder for each project—you’ve stored in this area of memory. Each project folder has “.prj.” at the end of its name. If you’re working with a USB stick you’ve used for updating your Fantom-G, you may see a .bin file—this is an updater file you should delete from the USB stick while it’s installed in your computer. If you’ve performed a Backup Project operation, you may also see a .bak file. A Project Folder—What’s In It? Double-click a project folder to see the folder it contains: FantomG.prj PNL SEQ PHS RHY SMF SNG SMPL SND We’ll explain what’s in the folders on the next page. 14 Here’s what’s in each of the folders in a project folder: This folder: Contains: PNL .txt files the Fantom-G has imported for use on the Favorite screens; and a file containing the project’s Favorites SEQ Using the IMPORT Folder The IMPORT folder acts as a temporary holding place for files you’ll be importing into the Fantom-G. Importing Audio Files the PHS, RHY, SMF, and SNG folders PHS the project’s phrases RHY the project’s rhythm pattern sets RPS the project’s RPS sets SMF SMF (.mid) files you intend to play or import into the Fantom-G as a phrase or song SNG the project’s songs SMPL the project’s samples SND one .SVD file for the project’s patches, rhythm sets, live sets, and studio sets; one .SVD file for the project’s system settings; and an .SVD file for each installed ARX board’s patches, rhythm sets, live sets, and studio sets Be sure not to alter the files or folders in a project folder—other than by adding SMFs to the SMF folder, as we’ll discuss in a moment—to avoid causing problems using the project in the Fantom-G later on. You can make a backup copy of an entire project folder by dragging the entire .prj folder to your computer’s hard drive to copy it. If you need to restore the project later, drag it back to the FANTOM G removable drive and replace the older copy there. You can import 16-bit .WAV- or AIFF-format audio files with a sample rate of 44.1 kHz into the Fantom-G. It’s critical that you don’t use Windows Media Player for playing any audio files you intend to import into the Fantom-G. Windows Media Player may add data to the files that can make them unusable, or hazardous to your other project data. (You can safely play the files in iTunes if you need to audition the files before importing them.) To import an audio file into the Fantom-G: 1 Drag-copy the file from your computer into the FANTOM G removable drive’s IMPORT folder. 2 Disconnect the Fantom-G from your computer following the instructions in “Shutting Down the USB File-Exchange Connection “ on Page 14. 3 Press the Fantom-G’s MENU button. 4 Click F4 (Import Audio) and select the memory area that contains the IMPORT folder by clicking F1 (Internal) or F2 (USB Memory). Audio files in the IMPORT folder appear in a list at the right of the screen. 5 Select the audio file you want to import. To import multiple files, use F4 (Mark √) and/or F5 (Mark All √) as necessary. 6 Click F8 (Import Audio), and F7 (OK) to confirm your intentions—the file is imported and appears in the sample list. 7 To store the sample in the project—so it’s there the next time you load the project—press WRITE and name and save the sample. 15 Importing Images Preparing SMFs for Importing into the Fantom-G Before you can import an SMF into a project as a phrase or a song, drag the SMF—making sure it has a “.mid” file extension at the end of its name—into the SMF folder for the project. It’s here: You can import a 24-bit, 800 x 480 resolution .BMP (bitmap) image into the Fantom-G for use as a background wallpaper. To do this: 1 Drag-copy the .bmp file from the computer into the FANTOM G removable drive’s IMPORT folder. 2 Disconnect the Fantom-G from your computer following the instructions in “Shutting Down the USB File-Exchange Connection “ on Page 14. 3 Follow Steps 3-10 on Page 299 in the Owner’s Manual. You’ll also find instructions on this page that explain how to select the imported image as your wallpaper. Importing Text As we noted in the Power User Control Workshop booklet, you can display text in the text area of the Favorite Play and Edit screens. You’re free to use this feature any way you like, displaying anything from lyrics to set lists to the names of a club owner and his or her staff. It starts with a text file—with .txt extension at the end of its name—you create on your computer. Once you’ve created it: 1 Drag-copy the .txt file from the computer into the FANTOM G removable drive’s IMPORT folder. 2 Disconnect the Fantom-G from your computer following the instructions in “Shutting Down the USB File-Exchange Connection “ on Page 14. 3 Follow the steps in “Importing a Text File (Import Text)” on Page 56 of the Owner’s Manual, beginning with Step 2 to import your text to the desired Favorite Play or Edit screen. FantomG.prj PNL SEQ PHS RHY SMF SNG SMPL SND Once you’ve done that and disconnected from the computer, you can import the SMF—see Page 22 of the Sequencing and Recording Workshop booklet. Using the Fantom-G with a DAW The MIDI Side of Things Once the driver’s been installed, the Fantom-G makes a great MIDI partner for a computer-based DAW. It can act as: • a MIDI keyboard controller—for sequencing in a DAW. In Single mode, the Fantom-G provides MIDI note and controller data that plays the DAW’s soft synths/samplers, and that the DAW’s MIDI tracks capture. • a MIDI keyboard controller and a multi-timbral MIDI sound module—that provides up to 16 independent sounds for the DAW’s MIDI tracks. Studio mode allows you to control the DAW from the Fantom-G’s keyboard while taking advantage of the Fantom-G’s sounds and effects. You can also access the Fantom-G Editor/Librarian software by inserting it as a virtual instrument on a VST-supporting DAW’s channel strip. 16 With this patch, the Fantom-G’s keyboard and realtime controls send MIDI data to a receiving MIDI device such as a DAW, and not to the Fantom-G’s own sound engine. Setting Up Your DAW to Work with the Fantom-G Receiving Fantom-G MIDI Data in the DAW To get your DAW to receive MIDI data from the Fantom-G, select the Fantom-G as a MIDI input within the DAW, or set the DAW to receive all MIDI data coming into the computer. If your DAW can accept MIDI data on all MIDI channels— often referred to as “omni” mode—enable this option. Otherwise, you’ll need to match its receiving channel to the Fantom-G’s transmission channel, as we’ll describe in “Using the Fantom-G as a Controller and a MIDI Sound Module” below. If you want, you can just set your DAW to receive on MIDI Channel 1 now, which is what we’ll set the Fantom-G to use for transmission in the following sections. Sending Data from DAW Tracks to the Fantom-G All DAWs provide a way to direct sequenced MIDI data from individual MIDI tracks to the desired external devices such as the parts—and sounds—in a Fantom-G studio set. Consult your DAW’s documentation to learn how to direct data from the DAW’s MIDI tracks to the desired Fantom-G parts. By default, MIDI Channel 1 is selected as the channel the Fantom-G uses to send data to your DAW. This channel is usually fine, but if you need to change it for some reason, set the Part Number parameter on the Single Play screen to the desired MIDI channel. Using the Fantom-G as a Controller and a MIDI Sound Module You can use the Fantom-G’s sounds with a computer-based DAW, with or without also using it as the DAW’s keyboard controller. The Fantom-G is “multitimbral,” which means that each of its parts act as an independent sound module you can play from one of your DAW’s MIDI tracks. Here’s how get set up: 1 Press the MENU button and click F2 (System). 2 Press F2 (Group/Down) to select the Sound tab of parameters, and then set Local Switch to OFF. 3 Press F2 (Group/Down) to select the MIDI parameters, and then set: • Transmit Program Change—to OFF. • Transmit Bank Select—to OFF. Setting Up the Fantom-G for MIDI • Soft Through—to OFF. Using the Fantom-G as a DAW MIDI Controller Only Setting up your Fantom-G simply for use as a MIDI keyboard controller with a computer-based DAW is quick and easy: 1 Press the Fantom-G’s SINGLE MODE button to display the Single Play screen. 2 Select the Part Group parameter and set it to External—when you do this, the ---: (No Send) External patch is selected. • Remote Keyboard Switch—to OFF. Advanced users may want to dig into these parameters to learn about they options they offer for more adventurous uses of the Fantom-G as a MIDI controller. See the Owner’s Manual to learn more. 4 Press the STUDIO MODE button and select the studio set you want to use. (The style-based factory preset studio sets are a good place to start.) 5 Press the PAD MODE button, and then hit Pad 10 to select the MIDI TX SW pad mode, as shown on the next page. 17 As you select sounds for your studio set, you’ll move from part to part. Regardless of the part you currently have selected, though, you’ll still be using the MIDI channel you selected in Step 6 above. It’s up to the DAW to send each MIDI track’s data back to the correct part on the Fantom-G so that the correct sound plays. 6 Strike Pad 1 so it’s lit to enable the transmission of MIDI data on MIDI Channel 1 to your DAW. As you play the Fantom-G’s sounds from the DAW’s MIDI tracks, you can send the Fantom-G’s output digitally into the DAW for recording as audio tracks if you like. We’ll get into this in the next section. Exchanging Audio with Your Computer Streaming Fantom-G Audio Via USB Into a DAW You can stream audio digitally from the Fantom-G via USB into your computer-based DAW in order to capture and record it on DAW audio tracks. You may want to stream: • live audio—coming into the Fantom-G inputs so the Fantom-G acts as your DAW’s audio interface. If your DAW isn’t set to Omni mode—as we noted on Page 17—you’ll need to set your DAW to receive on the channel the Fantom-G’s transmitting on, which is Channel 1 right now. 7 8 Press STUDIO again to return to the Studio Play screen. To use Internal Fantom-G sounds with your DAW, make sure you’re looking at the Internal parts’ Studio Play screen. Select the first part whose track you want to sequence in your DAW, and choose the sound you want it to use. By default, each of the 16 studio set parts receives MIDI data on its own MIDI channel. 9 Create a new track in your DAW, and set it to transmit to the Fantom-G on the same-numbered MIDI channel as the part you selected in Step 8. 10 After sequencing your first track in the DAW, you can Repeat Steps 8 and 9 as desired to build up your arrangement, track-by-track. You can learn all about bringing live audio into the Fantom-G in the Adding Live Audio to the Fantom-G Workshop booklet. • Fantom-G sounds being played by parts—in Studio mode when you’re using it as a multitimbral sound module. You can stream audio tracks from the Fantom-G for re-recording onto audio tracks in your DAW if you’d like to centralize a song’s raw materials within the DAW. Since all of this audio is streamed digitally, it arrives in pristine form in the DAW with no loss in quality from the way it sounds on the Fantom-G itself. 18 Setting Up the Fantom-G to Stream Audio Via USB Once you’ve installed the Fantom-G’s driver on the computer, there’s not much on the Fantom-G side of things to set up for audio—whether it’s live sound or the Fantom-G’s sounds—to stream via USB from the Fantom-G to your computer. The Fantom-G’s main mix is automatically sent out digitally over the USB connection. Just make sure that anything you want to stream is routed to the main mix. Depending on your DAW, you may be able to use different audio interfaces for your input and output—if this is the case, you can listen to your DAW through another audio interface if you have one and prefer to listen this way. If you can’t do this with your DAW—or if you’d rather listen through the Fantom-G—set both the input and output to Fantom 6 44.1kHz. See “Receiving Audio From Your Computer In the Fantom-G” on Page 21 for more details. This is the default routing, so it’ll just work unless you’ve changed it. If your audio isn’t making it over to the computer, make sure the Fantom-G’s MIX IN button is lit and then double-check your settings. If you’re dealing with: • Select the recording sample rate and bit depth for the DAW—Set the DAW • live audio—make sure the Mix In Output Assign parameter on the Input Select a DAW Track’s Audio Input Setting screen is set to A or MFX 1 in Single and Live mode, or A, MFX 1, or MFX 2 in Studio mode. • a patch, rhythm set, and sample set in Single or Live mode—make sure the part’s Output Assgn in the Part View screen Output/EFX tab is set to A. • a patch, rhythm set, sample set, or audio track in Studio mode—make sure the part’s Output Assign parameter is set to A, MFX 1, or MFX 2. If it’s set to either MFX option, make sure the selected MFX processor’s Output Assign parameter is also set to A. (You’ll find this parameter on the Effects Routing screen that’s displayed when you press the LIST/EDIT EFFECTS (ROUTING) button. to record 16-bit audio with a 44.1 kHz sample rate from the Fantom-G. Each audio track in a DAW can record from the available input(s) belonging to the currently selected audio input interface. To record the main mix from the Fantom-G, select Inputs 1 and 2. If you’ve sequenced MIDI tracks in the DAW using multiple Fantom-G sounds, and would like to record them as audio tracks in your DAW, record them one at a time. Mute all parts in the Fantom-G other than one you want to record. Once you’ve got it in the DAW, repeat the process for your other Fantom-G parts, one-by-one. Setting Up Your DAW to Receive Audio Via USB The Fantom-G Driver Settings Configure the DAW’s Audio Input Hardware The Fantom-G driver installer adds a Fantom-G control panel to Windows, and a Preferences pane to Mac OS X. In these windows, you’ll find controls you may need as you work with your DAW. Though each DAW has its own way of doing things, the setup steps are basically the same from DAW to DAW. To learn about the specifics menus and settings for your DAW, you’ll have to consult its documentation. But these are the tasks you’ll have to perform: • Select the Fantom-G as your audio input hardware—With the Fantom-G powered up and connected to your computer via USB, locate the setting in your DAW that selects the audio interface it’s to use as its input, and choose Fantom G 44.1kHz. Windows XP Mac OS X 19 The Audio Buffer size parameter can be helpful if you’re having trouble successfully record or playing back in your DAW. Larger buffer settings can get rid of clicks and pops, though they also increase lag, or “latency,” in the DAW. Vista 1 Click the Start menu and select Control Panel. 2 If you’re: • seeing Control Panel Home—click Hardware and Sound, and then Streaming Audio From Your Computer Via USB Since it allows you to stream audio via USB, consider using the Fantom-G as your everyday audio interface for your computer’s sounds. While the USB digital connection ensures the highest-quality sound for your computer when you listen to it through the Fantom-G, there’s another, even more interesting, benefit: You’re always already set up to capture anything you hear on your computer as a sample on the Fantom-G. This includes any music or any other kind of audio you encounter on any web page, in any email, in chats, through VoIP, or anywhere else. Manage Audio Devices. • using Classic view—double-click the Sound control panel. 3 Select the Playback tab if it’s not visible already. 4 Select OUT Roland Fantom G and then click the Set Default button— the checkmark moves to the Fantom-G, as shown here. 5 Click OK to close the window. Sending Audio From Your Computer to the Fantom-G Here’s how to send your computer’s audio output to the Fantom-G, operating system by operating system. Windows XP 1 Click the Start menu and select Control Panel. 2 If you’re using: • Classic view—double-click the Sound and Devices control panel. • Category View—double-click the Sounds, Speech, and Audio Devices control panel. 3 4 Click the Sound playback Default Device popup and select 1:Roland Fantom G. Click Apply, and then click OK to close the control panel. Windows 7 1 Click the Start menu and select Control Panel. 2 Click Hardware and Sound. 3 Click Manage Audio Devices. 4 Select the Playback tab if it’s not visible already. 5 Select OUT Roland Fantom G and then click the Set Default button— the checkmark moves to the Fantom-G, as shown here. 20 Receiving Audio From Your Computer In the Fantom-G To prepare the Fantom-G to receive streaming audio from your computer: 1 Set up a way to listen to the Fantom-G by powering it down, and then: • connecting headphones—to the Fantom-G’s rear-panel PHONES jack, or • connecting the Fantom-G’s 1/L/MONO and 2/R OUTPUT jacks—to a mixer/speaker system, or directly to powered speakers. 6 Click OK to close the window. 2 Connect the Fantom-G to your computer via USB. 3 Turn on the Fantom-G. 4 Hold down SHIFT and press the MIX IN button to display the Input Setting screen. Mac OS X 1 From the Apple Menu, select System Preferences. 5 Set Input Select to USB Audio. 2 Open the Sound control panel. 6 Press the MIX IN button to light it if it isn’t already lit. 3 Click on the Output tab. 4 Select Fantom G 44.1kHz, as shown here. If you’ll always want to listen to your computer through the Fantom-G, store your input setup. In Studio mode, save the current studio set. In Live or Single mode, click F7 (Sys Write) on the Input Setting screen. Sampling Computer Audio with the Fantom-G With your system set up as described above—and MIX IN is lit—there’s nothing you need to do to sample something you’re hearing on the computer, other than to hit the SAMPLING button, F1 (Sampling), and you’re ready to sample. To learn more about sampling on the Fantom-G, see its Owner’s Manual, starting on Page 257. 5 Close the Sound control panel. Maybe the most interesting thing about always running your computer’s audio output through the Fantom-G is that Skip Back sampling is available for capturing audio from the computer, too. Hear something you want to grab? Hit the Fantom-G SKIPBACK SAMPLING button and you’ve sampled it. 21 The End We hope you’ve found this workshop helpful. Keep an eye out for other Fantom-G Workshop booklets available for downloading at www.RolandUS. com. 22