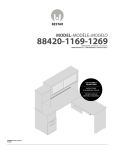
1
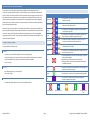
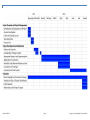
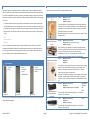
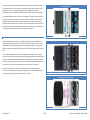
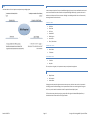
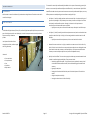
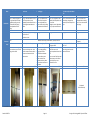
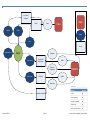
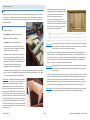
CONTENTS
Project Proposal and Project Management ............................................................................................. 3
Consideration of Design Factors ..................................................................................................................... 15
Criteria to Evaluate Success ............................................................................................................................. 3
Appropriateness of the Design Solution ...................................................................................................... 15
Function........................................................................................................................................................ 3
Needs .......................................................................................................................................................... 15
Aesthetics ..................................................................................................................................................... 3
Function ...................................................................................................................................................... 15
Obsolescence ................................................................................................................................................ 3
Aesthetics.................................................................................................................................................... 15
Areas of Investigation ...................................................................................................................................... 3
Finance........................................................................................................................................................ 15
Action, Time and Finance Plans and their Application ...................................................................................... 4
Ergonomics.................................................................................................................................................. 15
Finance Plan.................................................................................................................................................. 4
Occupational Health and Safety .................................................................................................................. 15
Time Management Plan ................................................................................................................................ 5
Quality......................................................................................................................................................... 15
Project Development and Realisation ..................................................................................................... 6
Short-term and Long-term Environmental Consequences ........................................................................... 15
Research, Experimentation and Applications of Conclusions ........................................................................... 6
Obsolescence .............................................................................................................................................. 15
Cajón Design ................................................................................................................................................. 6
Life Cycle Analysis ....................................................................................................................................... 16
Frame ........................................................................................................................................................... 6
Prototypes and Tests ...................................................................................................................................... 17
Types of Wood .............................................................................................................................................. 6
Cajón ........................................................................................................................................................... 17
Finishes ......................................................................................................................................................... 8
Laser Engraver Test ..................................................................................................................................... 19
Cushion/Pad ................................................................................................................................................. 8
Joints Test ................................................................................................................................................... 20
Logo .............................................................................................................................................................. 8
Staining Test ................................................................................................................................................ 20
Snares and Strings......................................................................................................................................... 9
Final Construction .......................................................................................................................................... 21
Microphones............................................................................................................................................... 10
Construction................................................................................................................................................ 21
Effects ......................................................................................................................................................... 11
Completed Product ..................................................................................................................................... 36
Skills ............................................................................................................................................................ 12
Evaluation............................................................................................................................................ 37
Safety.......................................................................................................................................................... 12
Recording and Application of Evaluation Procedures throughout the Design Project ..................................... 37
Evidence of Creativity .................................................................................................................................... 13
Analysis and Evaluation of Functional and Aesthetic Aspects of Design ......................................................... 37
Idea Generation .......................................................................................................................................... 13
Final Evaluation with Respect to the Project’s Impact on the Individual, Society and the Environment ......... 37
Degree of Difference................................................................................................................................... 13
Relationship of the Final Product to the Project Proposal............................................................................... 37
Exploration of Existing Ideas ....................................................................................................................... 15
Bibliography ........................................................................................................................................ 38
Identification and Justification of Ideas and Resources Used ......................................................................... 15
Student 23974754
Page 2
Design and Technology MDP: Cajón with Effects
PROJECT PROPOSAL AND PROJECT MANAGEMENT
As a percussionist, I am interested in experimenting with different sounds produced by percussion
instruments. The Cajón (pronounced ‘Ka-hon’) is a box-shaped Peruvian instrument that is played with the
hands. The player sits on the drum and hits the front face, called the tapa, by slapping it with his/her fingers.
Many Cajónes have snares, which allow the drum to produce both a heavy bass sound and a higher snare
sound. I am particularly interested in the Cajón because of the many different sounds which it is capable of
producing. I also have an affinity for electronics, and so had a desire to combine the electronic audio effects
with the sound produced by the Cajón.
AREAS OF INVESTIGATION
However, there are currently no Cajónes on the market which have both an inbuilt pickup and effects. Some
players carry effects pedals with them to produce these effects, but it would be easier if they only had to carry
the one box. I plan to build a Cajón with inbuilt effects and a direct output jack, so that it can be plugged
straight into an amplifier or mixer. This way, the Cajón could be played with effects and amplification, or just
acoustically without amplification.
What
How
Why
Cajón Design
• To determine the most effective design to achieve the desired
sound from the Cajón.
Types of Wood
• To determine the most effective type of wood to build the Cajón in
order to achieve the desired sound.
Snares and
Strings
• To determine the most effective method to achieve the desired
snare sound from the Cajón.
Finishes
• To determine the most effective finish that both looks good, and
does not reduce the quality of sound from the Cajón.
Cushions/Pads
• To determine whether a pad to place on the top of the Cajón is
necessary, and determine the best material to use.
For my product to be successful it must:
Microphones
• To determine the most appropriate solution to the issue of adding
a direct output from the Cajón.
FUNCTION
Effects
• To determine the most appropriate effects to add to the Cajón, as
well as the best brand to use.
Skills
• Computer-aided design skills will be required to design my product
before production begins.
• Woodworking skills will be required to build the Cajón.
• Audio and electronic skills will be required to add an output jack
and effects to the Cajón.
Safety
• Safety will need to be taken into consideration when working with
power tools to construct the Cajón.
Finance
• To determine the amount of money required to build the product.
Time
• To determine the amount of time that I have to design and
develop a prototype of the product.
CRITERIA TO EVALUATE SUCCESS
•
•
•
•
Have an easy-to-use method to adjust the snares while playing the Cajón
Produce a snare-drum-like sound when hit at the top, and a bass-drum sound when hit lower down
Have inbuilt effects that can improve or modify the sound when manipulated
Feel nice to play
AESTHETICS
•
•
Be aesthetically pleasing – it must look good
Be unique in design
OBSOLESCENCE
•
Not physically degrade faster than a commercially manufactured Cajón
Internet Research
Student 23974754
Page 3
Observation Survey
Interviews
Finance Plan
Time Management
Plan
Design and Technology MDP: Cajón with Effects
ACTION, TIME AND FINANCE PLANS AND THEIR APPLICATION
FINANCE PLAN
Item
Wood
Adjustable snare
Purpose
Back, sides, top and bottom
Est. Price
$100
Price
$174.17
$50
$168.61
Delivery Charge
$0
$26.82
Bolt
$5
$7.79
Nut (for inside knob)
$5
$3.23
$10
$10.74
Tapa
Screws
Attaching tapa
Snares
Snare sound (Different snares will be tested in prototype)
$150
$130
Pickup/Mic and Preamp
Direct output
$200
$200
$20
$18
$5
$3.48
Feet
Effects
To isolate the Cajón from the surface it is sitting on
Screws for feet
Delay
$100
Reverb
$100
$65
Miscellaneous Wires and Components
Adding direct output, effects and pedal
$50
$88.79
Finishes/Stains & Sandpaper for Finishing
Change the colour of the wood, Add uniqueness to the Cajón
$50
$24.20
$845
$920.83
TOTAL
Student 23974754
Page 4
Design and Technology MDP: Cajón with Effects
TIME MANAGEMENT PLAN
Student 23974754
Page 5
Design and Technology MDP: Cajón with Effects
PROJECT DEVELOPMENT AND REALISATION
RESEARCH, EXPERIMENTATION AND APPLICATIONS OF CONCLUSIONS
FRAME
CAJÓN DESIGN
After research, I found two ways to build and connect
the frame. These were:
FEET
I researched the feet for the Cajón. I found that although most Cajónes either use screw in or adhesive feet,
very few have adjustable feet that allow the Cajón to sit in the preferred playing position – with the front
slightly off the ground and the back on the ground. I decided to test the angle at which I sit when I play the
Cajón to determine if it would be useful to have adjustable feet. I determined that adjustable feet would not
work, as the thread length was not long enough to support the Cajón high enough off the ground. For this
reason I have chosen not to use adjustable feet, and to instead use rubber feet. These will be tested in the
prototype of the Cajón.
•
•
•
Although I have not seen any Cajónes with finger
joints, I like the look of them, and so plan to test them
out to see if it would be possible to use them.
I found that while the sides should be glued together,
it is important that the tapa is screwed – it can either
be countersunk or the screw heads can sit on the
Two types of screw placement of professionally
surface. This is because, as can be seen in my first
made Cajónes
prototype, with a lot of playing, a glued front will
come unstuck. This also allows the player to adjust
the screws, modifying the sound, as well as remove the tapa if adjustment inside is necessary. However, it is
also important that the screws are positioned in precise places. I have identified two arrangements of screws,
and will need to test to determine the best one.
I conducted some research on buying adjustable feet. These are two products available from
levelingfeet.com.au. On the left is the adjustable foot, on the right is the insert.
TLFS-5008
TDMi-4006
Thread: M8
Thread Length: 80
Base Diameter: 40
Base Height: 20
Base Material: Nylon
Maximum Static Load: 350
Thread Material: Stainless Steel
Thread: M8
Height: 17mm
Sleeve O/D: 9.9mm
Flange: 22mm
Height of Prongs: 9.5mm
Price: $7.95 each
Price: $0.65 each
DIMENSIONS
I researched the dimensions of Cajónes, and found three standard sizes: 18” x 13” x 13”, 18” x 12” x 12” and
19” x 12” x 12”. Through research at allans billy hyde, I found that although generally the size of the Cajón
does not greatly affect the sound, larger ones generally sound more wholesome. I decided to use metric
measurements as Australia uses the metric system, and it will make it easier to design and cut the pieces of
wood. I decided to round off the 19” x 12” x 12” dimensions to the size of 480mm x 300mm x 300mm.
Conveniently this size will fit into production Cajón bags.
I also conducted research on rubber feet. In my opinion, the most appropriate rubber feet to use are:
Speaker Cabinet Rubber Feet - Large
Diameter: 38mm
Height: 20mm
Price:
A$10.90 + $5.50
Shipping
(Pack of 4)
Rubber Feet Set of Four
Diameter: 36mm
Height: 20mm
TYPES OF WOOD
Price:
A$7.20 + $11.38
Shipping
(Pack of 4)
My research showed that 12mm plywood is standard for the top, sides and back of the Cajón. This wood
should be heavy and strong. For the tapa, 3-4mm plywood is the most common. However, in some designs the
back is also made from 3-4mm plywood. For this reason I plan to experiment using different thicknesses of
back.
Both sets of feet include a metal washer to ensure that the screw or bolt will not pull through the rubber.
In terms of picking wood to test for the tapa, my research has found that a bendable wood is best – if the
wood is too solid it will not vibrate and create a good sound. It should be light but strong. My research has also
found that for the plywood that I use, A grade will be necessary for the outside surface – while the smoothness
of the inside surfaces does affect the sound produced, the difference will only be noticed with poor grade
wood.
I decided to use the second set of feet, as they looked more versatile, strong and less likely to break.
Student 23974754
Using rebate joints
Using butt joints with internal corner braces
Using dovetail joints
Page 6
Design and Technology MDP: Cajón with Effects
In trying to find materials for my final design, I came into contact with a man who designs and builds Cajónes
called RockBoxes. He gave me some useful advice to improve my Cajón’s sound, primarily that I should use
2.5mm birch aircraft plywood for the tapa, and 19mm plywood for the rest of the drum. He told me that this
would improve and brighten the sound of my Cajón.
I contacted Mr Ply & Wood for a quote for this wood. The aircraft ply came in sheets of 1220 x 1220, however
the minimum sheet size for the 19mm plywood was 2400 x 1200. The quote came to $400 not including
delivery, and although it was expensive, I believed that it was worth it and so I ordered it. It arrived, and I
asked Mr Ply & Wood to cut the larger sheet in half so that I could fit it in my car. Then when I went to pick it
up, they tested if it would fit using a different piece of wood, and unfortunately it would not. Luckily they had
not cut it in half, and offered to deliver it to my school for an extra charge of $29.
The final price of the wood including delivery was $406.56.
I was uncertain exactly how what I had ordered would look, and once seeing it, was very
happy. The 2.5mm plywood was very light and had very nice grain in it which I would be able
to highlight with lacquer, and the 19mm was a great pinky-brown colour, also with very nice grain.
EVALUATION:
Student 23974754
Page 7
Design and Technology MDP: Cajón with Effects
FINISHES
LOGO
I have found that other than the tapa, the finish on the Cajón will not affect the sound of the Cajón. I plan to
use a stain to change the wood colour of the box. I will then use a polypropylene lacquer and wax to finish it to
a semi-glossy or satin finish. For the tapa on the other hand, as it is supposed to vibrate, putting a hard finish
on it is a bad idea. According to my research, the only safe way to finish the tapa is using oil such as Tung Oil.
This will protect the wood while not affecting the sound. Using a prototype, I plan to determine the best finish
to use.
I have decided to include a logo on the front face of the tapa, similar to many other brands of Cajónes. I will
use a laser engraver to engrave the logo on the wood. I decided to use a lowercase jw for my logo. After
looking through many fonts, I decided to use the font aaaiight! as I like the look of it. The logo will look like
this:
jW
I decided to test the logo design on a spare piece of plywood that I had from a prototype. This can be seen in
the Laser Engraving prototype on page 19.
CUSHION/PAD
After research, I found a number of cheap Cajón pads for sale, ranging from $4 to $10. I plan to conduct an
observation survey on a number of these, firstly to determine if they add any advantage to the Cajón, and
secondly to determine the optimal size and material. If they do add an advantage, I will then recreate one
myself, using the laser cutter to cut the edges. I will possibly use an adhesive to attach the pad to the top of
the Cajón.
Two Cajón pads I found:
Schlagwerk Cajón Pad
Meinl CAJPAD Cajón Pad - Black
Price: $9.95
Price: £4.20
I have seen some bad reviews about the Meinl Cajón pad. One reviewer said:
I bought this for my Cajón but was disappointed when it finally arrived. As described in the title of this
review, this is nothing more than a slightly bigger mousepad. It doesn't really provide that much cushion.
Don't waste your money on this item.
-- caseyrebel "caveat emptor"
This review leads me to believe that it may not be necessary to make a pad for my Cajón. I tested this by sitting
on several Cajónes with pads, and comparing them to Cajónes without. I found that the pad did not improve
the sound of the Cajón, nor how comfortable it was. For this reason, I have chosen not to make one.
Student 23974754
Page 8
Design and Technology MDP: Cajón with Effects
SNARES AND STRINGS
Using these different ways as guidelines, I plan to devise my own way to make an adjustable snare.
There are two ways to add the buzz sound to the Cajón:
SNARE MECHANISM
STRINGS
I based my snare mechanism on the moving wing nut design above. I
modified this design to allow the player to adjust the snares while
playing – by having the slot horizontal rather than vertical; it removes
gravity from the equation, and so is changeable from ‘snares on’ to
‘snares off’ without actually tightening the wing nut. Using this lever
mechanism means that pulling the bolt back (right) turns the dowel
clockwise, releasing the snares, and pushing it forward (left) turns the
dowel anti-clockwise, engaging the snares.
A ‘strings’ Cajón uses guitar strings, either tensioned from the centre top to the bottom corners, or the centre
top to the centre sides of the frame inside the tapa. By using multiple strings, a vibrating snare sound can be
created.
To allow the snare to be adjustable, there is only really one way using strings. This involves connecting the
strings to a ‘floating bar’, which is pulled to the base of the Cajón with either strings or bolts – to adjust the
tension on the Cajón. This is not a good design, as it cannot be adjusted while playing the Cajón. For this
reason, I am unable to use strings, as this means that the Cajón will not comply with the design brief.
The outside of the Cajón will remain with a slit in it, in which the bolt
is able to move back and forth. A knob needs to be installed on the
outside of the Cajón to tighten the bolt. Although there are plenty of
threaded knobs available for purchase, I wish to use a wooden knob,
and so will have to make it using a lathe. I plan to knock-in and glue a
threaded insert into the knob, so that it is able to tighten the bolt.
SNARES
A snares Cajón uses snare drum snares mounted on a piece of wood or dowel, which rest against the tapa to
generate the buzz sound. Generally, a standard snare drum snare is cut in half, and the two pieces are used
together to maximize the area of the snare. Snare Cajónes are much more flexible and allow for an adjustable
snare. There are three ways to do this:
Foot Pedal
Small (Stationary) Knob
Moving Wing Nut or Knob
I have found that using the above design, when the snare is off, it still
vibrates inside the drum. For this reason, I need to staple a piece of
felt behind the snares, so that when they are off, they will rest on the
felt and will not vibrate.
During the construction of the Cajón, I decided to modify the share mechanism. By changing it from a linear
motion to a rotational motion, I was able to reduce moving parts, and thus reduce rattling. This process is
further described in the construction section.
This allows the player to adjust
the snare while they are playing
without moving their hands. A
pedal means, however, that the
drum is an odd size. If this were to
be used, the pedal would need to
be easily removable when storing
the Cajón.
Student 23974754
This allows the player to adjust
the snare while they are playing
using only one hand – to twist the
knob. This setup does however
mean that the Cajón can be
stored without having to remove
anything.
This is a very easy method to
adjust and tighten, but is more
difficult to use while playing. This
setup does mean that the Cajón
can be stored without having to
remove anything.
Page 9
Design and Technology MDP: Cajón with Effects
BUYING SNARES
MICROPHONES
After researching snares, I found that there were many different types – what was the difference between
them all? I couldn’t tell. I needed to talk to an expert about them to find out which ones would sound the best
in my Cajón. I emailed Optimum Percussion, a percussion shop based in Burwood, to query some information
about snares in Cajónes. In my email, I asked what the difference between different snares was. The following
is their reply.
There are five main ways to pick up the sound generated by the Cajón.
Name
B-BAND UKKO Cajón A1.2CDST
On a snare drum, better snares like the pure sound or black swamp spiral snares are better sounding then
the sub$10 standard snares... but this is different to a Cajón. The snare drum is all about the evenness of the
tension and the number of points in surface contact with the head as well as the material used- none of this
applies to a Cajón. I am afraid you will have to try a few to find out. We have a number of different options
in stock.
Kopf Internal Microphone
System
Dynamic
Mount: Internal Wall
Preamp: Yes, 1.2A
Output: Embedded TS
$199.95 (AUS)
Unknown
Mount: Floating Gooseneck
Preamp: Unknown – has battery for power
Output: Embedded TS
I decided not to use this, as it is only powered by one AA battery, and so
would likely not have the output gain required to use guitar pedals.
Schlagwerk Cajomic CMIC 90
• 20 strands
• 14 Inch
• High Carbon Steel
• Straps
Dynamic
Mount: Internal Wall
Preamp: No
Output: XLR
Price: $59.95
As the system is capable of going through an amp, it appears that it may work
with effects, but would require an XLR to 6.35mm adaptor, and possibly an
impedance switcher. I would have to test that this would work before buying
one.
LP Cajón Mic System with
either Shure Beta 91A or
Audix ADX60
Price: $14.99
From my research I decided to test these three different types of snares and experiment to find my preferred
sound. Please see (Prototype 1).
Page 10
$268 (ADX60)
$265 (Beta
91A)
(USD)
This system does not comply with the design brief – it is not internal.
Therefore, it will not be used.
Varies
Any microphone
Student 23974754
$179 (AUS)
The microphone is freely suspended in the centre of the sound hole, stopping
vibrations. Can be connected to a low-frequency amp or through a mixer.
Requires the back panel thickness to be less than 5.5mm. It is a passive
system, meaning it requires no power to work.
Condenser Mount: External Rear Wall
Preamp: No
Output: XLR (Beta 91A)or Mini XLR (ADX60)
Price: $54.99
$99 (USD)
As the microphone is on a gooseneck, it is possible to change the direction
that it is facing, affecting the sound. Powered by a single AA battery. The jack
acts as a switch to turn the system on when a plug is inserted.
Pearl Drums Snare Wire - S022
• 42 strands
• 14 inch
• Ultra-Sound
• I –type
• W/strap & cord
Price
Powered by a 9v battery. The jack acts as a switch to turn the system on when
a plug is inserted.
From this, I decided that it would be necessary to test a few different snares to determine the one which
sounded best. I decided that I would buy three ‘different types’ and test them to see which performed the
best. The range at Optimum Percussion appeared to be rather small, so I looked at another store that sells
percussion, allans billy hyde. I found three different snares to test:
Pearl Drums Snare Wire - SN1442I
Description
This system appears to be the most appropriate as the preamp should allow
for the signal to be sent straight to the effects unit. A low impedance to high
impedance converter may be necessary however, as the effects are built for
guitar pickups and not for microphones.
Allan
Optimum Percussion
19/12/2011
Puresound T1420 14" Twisted
Series Snare Wires
• 40 strands twisted
in 20 sets
• 14 inch
Type
Mount: Microphone Stand
Preamp: No
Output: XLR (probably)
Varies
This system does not comply with the design brief – it is not internal.
Therefore, it will not be used.
Design and Technology MDP: Cajón with Effects
From this research I decided to test the B-BAND UKKO Cajón A1.2C-DST microphone, and decide on whether I
was happy with the sound. I chose this because it fits into the Cajón internally, and so looks the best. If I was
not happy with the sound, then I would have proceeded to test the Schlagwerk Cajomic CMIC 90.
Unfortunately, due to the unavailability of the B-BAND microphone in retail in Australia, I had to buy to test it.
Boss Digital Delay DD-3
I was directed by B-BAND, the maker of the Internal DST microphone, to a distributor in Australia. I called the
distributor, Dominant Music, from whom I received a quote of $197.95. I decided to email many retailers in
attempt to find one that would sell the microphone for cheaper than that – the quote was very expensive
compared to some international online prices. However, I did not find any retailers who were able to ship it to
Australia for less than that price. I decided to buy it through Optimum Percussion, a percussion retailer based
in Burwood, Sydney, as this would be easier and faster. The final price was $199.95.
Price: $155
EFFECTS
I visited Turramurra Music, a local music shop, to test effects pedals with my Cajón. I tested effects such as
distortion, overdrive, phaser, compression, chorus, reverb, tremolo, wah-wah and delay. I found that reverb
and delay were the only two that sounded good, and they sounded very good together. In the shop, the two
pedals I was using were the Boss Digital Delay DD-3 (priced at $155) and the Boss Digital Reverb RV-5 (priced at
$175).
Boss Digital Reverb RV-5
These two pedals combined were very expensive, and I thought there must be a better solution. I did some
research on the internet, and found the Behringer Digital Reverb/Delay DR-400 pedal (priced at $65).This pedal
is suitable, as it compactly combines both delay and reverb, using only four knobs for both effects. This means
that it has a small footprint on the inside of the Cajón, and will be easier to disassemble and desolder. Due to
the very low price of this pedal, I decided I would buy it to test and if I didn’t like it, I could resell it.
When it arrived, I tested it, and in my opinion it sounded as good as the more expensive Boss pedals
combined. I then started the process of removing the components from the circuit board so that I was able to
use them on my Cajón. This process can be followed in the Cajón prototype.
Price: $175
Behringer Digital Reverb/Delay DR400
Price: $65
Student 23974754
Page 11
Design and Technology MDP: Cajón with Effects
SKILLS
SAFETY
I brainstormed the skills I will require to complete the major design project.
It was necessary to be trained in any tools used before beginning the work. I was not allowed to use the track
saw as it was banned for students to use due to its potential danger. Additionally, my teacher does not let
students use the drop saw for the same reason. Although I was already practised in the use of some tools, I
was taught how to use the other tools.
PRACTISED TOOLS
•
•
•
•
•
•
•
Scroll Saw
Tenon Saw
Drill Press
Portable Drill
Soldering Iron
Laser Cutter
Pliers / Wire Cutters
UNPRACTISED TOOLS
•
•
Drum Sander
Trim Router
DISALLOWED TOOLS
•
•
Track Saw
Drop Saw
Of course, when using tools, it is important to wear personal protective equipment.
PERSONAL PROTECTIVE EQUIPMENT
•
•
•
Safety Glasses
Ear Protection
Leather Shoes
Although personal protective equipment was not necessary to use the laser cutter as there is a protective
shielding to prevent accidental damage, it was important that I left the room containing the laser engraver
while it cut, so that I would not be able to inhale fine particles of wood and/or plastic.
PPE was also necessary when lacquering my project. After referring to the Material Safety Data Sheet, I
decided to use both a dust mask as well as eye protection.
Student 23974754
Page 12
Design and Technology MDP: Cajón with Effects
EVIDENCE OF CREATIVITY
This research of commercially manufactured Cajónes aided me in the process of constructing my own Cajón.
As there are no commercially manufactured Cajónes with effects built in, I was unable to test ‘Cajón effects’.
IDEA GENERATION
It was difficult to determine the processes used to construct commercially manufactured Cajónes, as so many
different processes are used depending on the manufacturer and type of Cajón.
Idea Generation is covered in the Research, Experimentation and Applications of Conclusions section which
can be found on Page 6.
•
On Cajónes 1, 3 and 4 (see table), wood was used to construct the Cajón. It is unknown which type of
joints was used, although it is likely that butt joints or rebate joints were used. Cajónes 2 and 5 were
both primarily manufactured from plastic. Although it is unknown in which way these were
constructed, one could assume that they were moulded.
o My Cajón uses mitre joints to connect all sides but the tapa. A butt joint is used for the tapa.
•
On Cajónes 2,3, 4 and 5 (see table), standard screw placement was used, and a round sound hole was
placed in the back of the Cajón. On Cajón 1, the front was glued and the sound hole was in the left
hand side.
o My Cajón uses standard screw placement, and has a round sound hole in the back.
•
Because of the snare mechanism in my Cajón, I needed to use a router to cut a slit in the side of my
Cajón, drill holes in each side and insert a rotary mechanism to adjust the snares. Although this exact
process would not have been necessary on the tested Cajónes, a similar process would have been
necessary to create the ability to adjust the snare (on those with adjustable snares).
•
My Cajón has inbuilt effects. This means that my project involved many processes that would not be
involved in manufacturing the tested Cajónes. These processes include:
o Desoldering a guitar effects pedal - if my Cajón was to be mass produced, a custom printed
circuit board would be created to be used, and thus this desoldering process would not be
necessary
o Engraving the back plate
o Routing the inside and outside of the back panel to fit the back plate so it is flush with the
outside
o Gluing the back plate to the Cajón
o Screwing the electronics to the inside of the Cajón
DEGREE OF DIFFERENCE
TESTING OF CAJÓNES AT ALLANS BILLY HYDE
I visited allans billy hyde Drumcraft in Surry Hills, an allans billy hyde store specifically for drums, to test various
parts of the Cajónes they had in stock. By doing this, I was able to compare several commercially available
Cajónes to the Cajón intended to
produce.
I took photos of the insides of them
through the sound hole, and then merged
them using Photoshop.
I observed:
•
•
•
•
•
Snare mechanism
Screw placement
Feet
Sound hole
Body material
Student 23974754
Page 13
Design and Technology MDP: Cajón with Effects
Name
1. Pratley CJ02 Cajón Performer
Pickup Yes
Snares – mounted long ways on
the right hand side of the tapa.
Adjustable by pulling on rope –
Mechanism
difficult to do while playing.
Easily adjustable while not
playing.
Sound Hole Round on Left
Feet 4 x Rubber
Screw
Glued
Placement
Wooden
Body
3. Meinl Headliner Cajón
Natural Bigger
No
Strings – two attached from corners
of the frame at the top to an
adjustable (from bottom with drum
key) sliding block attached to the
bottom.
No
Strings – four attached from
corners of the frame at the
top to an adjustable (from
bottom with drum key) sliding
block attached to the bottom.
2 x Adjustable length (non-levelling)
feet on the front
2 x rubber on back
4 x Large rubber
4. Meinl Bass Pedal Cajón
No
Snares – One large set of snares
adjustable via a foot pedal on the
left hand side.
Although the snare is adjustable,
it is only really controllable on or
off.
Round on Rear
4 x Large rubber
5. Latin Percussion LPA1332DWS
Aspire Accent Cajón Dark Wood
Stain
No
Snares – three half-sets of snares
screwed into a triangular bar
mounted 1/3 from the top of the
Cajón.
Plastic body with wooden tapa.
$449
Wooden - hard glossy finish
Minimal difference between the
bass note and the top note – both
had a fair amount of snare and the
resonance and tone was similar
between them.
Good sound but strings too
tight – probably adjusting
strings would fix that.
Good difference between
base note and top note –
higher sound with less
resonance at the top, lower
note and more resonance on
the bottom.
$259
$249.99
Wooden - hard gloss finish – nice
looking tapa wood
Good high note but lots of snare
on the bass note as well.
Bigger size produced a lower bass
tone.
There was a small 3mm foam pad
glued to the top, which did not
make the Cajón any more
comfortable to sit on.
$499.99
My Cajón
Yes
Snares – half of a full size
snare attached to a rotating
dowel. This can be controlled
while playing.
Round on Rear
4 x Large rubber
4 x Large rubber
Standard: 5 at the top, 4 at the bottom, 3 (lower) each side
Notes Placement of snares on right
means sound was uneven whilst
playing in the middle.
Price
Picture
2. Latin Percussion LP1432 Cajón
Exotic Drum
Plastic body with “Dark Wood
Stain” on it
Good difference between bass
note and high note due to the
placement of snares.
$249
Modified standard (with 5 at
the bottom)
Cedar/Birch with clear finish
$Unknown
(Completed
Snare Mechanism)
* LP stands for Latin Percussion
Student 23974754
**Standard screw placement: 5 at the top, 3 (lower) each side and 4 on bottom.
Page 14
Design and Technology MDP: Cajón with Effects
EXPLORATION OF EXISTING IDEAS
FINANCE
Exploration of existing ideas is covered in the Research, Experimentation and Applications of Conclusions
section which can be found on Page 6.
•
IDENTIFICATION AND JUSTIFICATION OF IDEAS AND RESOURCES USED
If the Cajón were to be commercially manufactured, it would be significantly cheaper than the cost of
this project. This is because:
o The materials would be bought in bulk at wholesale prices
o The effects circuit board could be custom designed to specifically fit inside the Cajón
Identification and Justification of Ideas and Resources used is covered in the Research, Experimentation and
Applications of Conclusions section which can be found on Page6.
This would drastically decrease the price of the product.
ERGONOMICS
CONSIDERATION OF DESIGN FACTORS
Ergonomics need to be considered when deciding on the height of the Cajón. Although for my project, the
height was dictated by the standard size of Cajónes and Cajón bags, it is also important to ensure that both the
high and the bass note can be hit without strain to the player.
APPROPRIATENESS OF THE DESIGN SOLUTION
The product must be suitable for the environment in which it will be used.
•
•
Large rubber feet are used to isolate the sound of the Cajón from the surface it is sitting on, to stop it
from moving while playing, and to prevent damage. This is important, as the Cajón would often be used
at outdoor events where the ground could be damaging without feet.
A waterproof finish is used on the Cajón to protect it from water, and allow dirt to be washed off.
Again, this is necessary as the Cajón will likely be played outside.
NEEDS
•
The product must fulfil the needs for a Cajón with digital effects that are identified in the Criteria to
Evaluate Success section, which can be found on Page 3.
FUNCTION
•
The product will need to be played and sound similar to commercially available Cajónes.
o It should produce a high note when hit at the top of the tapa, and a low note when hit closer to
the bottom of the tapa.
o There needs to be a snare mechanism which allows the player to turn snares on and off while
they are playing.
•
•
The effects must be integrated into the product.
They must modify the sound produced by the Cajón
•
The Cajón must be of similar size to commercially available Cajónes. This is necessary to allow it to fit in
commercially manufactured Cajón bags.
AESTHETICS
•
•
OCCUPATIONAL HEALTH AND SAFETY
When constructing the Cajón, occupational health and safety was important to ensure that I was not injured
by machinery or chemicals. This is further explored in the Safety section on Page 12.
QUALITY
The Cajón needed to be constructed to a standard – all processes needed to be done carefully to ensure that
the product was as high quality as possible, without any defects or flaws.
SHORT-TERM AND LONG-TERM ENVIRONMENTAL CONSEQUENCES
As the project uses timber, several different trees have been used to produce the different types of plywood
and the wood used for the snare mechanism. However, it is likely that the non-veneered plies of the plywood
were plantation grown, and the project used a minute amount of wood itself in comparison to several whole
trees. Although the veneers, Birch and Cedar, are likely to have been removed from non-plantation trees, they
are so thin that thousands of metres of timber could have been veneered from one tree, and so remain a very
minimal environmental impact. For this reason, I believe that, although there may be short term
environmental consequences, i.e. the loss of several trees, there are very minimal long term consequences.
OBSOLESCENCE
Although I did not want the product to become obsolete faster than a commercially manufactured and
purchased Cajón, I believe that the electronics will limit the product’s lifespan. It is likely that commercially
bought Cajónes could last up to 20 years if treated well, and the acoustic Cajón should last this time too. I do
not think that the effects will last more than several years, as they were cheap, and thus likely to be low
quality.
The completed product needs to look appealing, and be aesthetically pleasing, with little to no
aesthetic flaws
The Cajón must be unique in design. It must look different to mass-produced Cajónes, and have unique
aesthetic features that cannot be found on any other Cajón.
Student 23974754
Page 15
Design and Technology MDP: Cajón with Effects
LIFE CYCLE ANALYSIS
Key
Cut, Pressed,
Veneered
Turned
Plywood
Input
Trees
Timber
Dowel
Output
Knob
Process
Aluminium Knob
Cajon
Fibreglass
Circuit Board
Circuit Board
Manufacture
Solder
Electronic
Components
Rubber Feet
Moulding
Elements
Rubber
Aluminium
RECYCLING
Moulded, Anodized
Student 23974754
Page 16
Material
Recyclable
Timber
Yes
Aluminium Knob
Yes
Printed Circuit Board
No
Rubber Feet
Yes
Metal Screws and Snares
Yes
Design and Technology MDP: Cajón with Effects
PROTOTYPES AND TESTS
CAJÓN
I decided to build a preliminary prototype so that I was able to evaluate the design of the Cajón, and conduct
some testing on it. I decided to use butt joints as they were quick and easy. I also decided to screw the back
on, and glue the front, as I intend to use the prototype to test the snare mechanism, and a removable back
would make this easier.
STEPS FOR CONSTRUCTION
1. I began by marking out:
2. I drilled a 19mm hole in each side of the Cajón and
a cut piece of dowel similar to the diagram below.
This allowed me to screw the snares onto the
dowel. I then designed and made a lever
mechanism to allow the dowel to be turned
through a linear push-pull of a bolt mounted in the
side of the Cajón. I had to drill both sides a second
time higher and closer to the tapa, as I found that
the first holes were not close enough.
Top and Bottom: 2 x 300 x 300 (12mm Plywood)
Sides: 2 x 480 x 300 (12mm Plywood)
Front and Back: 2 x 505 x 300 (3mm Plywood)
My teacher then used a track saw to cut these pieces. I
was not allowed to use the track saw because of the ban
of student use of portable circular saws.
Unfortunately however, due to the size of the pieces of
wood I had purchased and the width of the saw blade,
top, front, bottom and back ended up being 5mm smaller
width-ways. In addition to this, although I had intended
my prototype to be 480 x 300 x 300, due to my
miscalculation, it ended up being 500mm high.
I drilled the sound hole using a 92mm hole saw, as it was the largest hole saw available to me. I then drilled
holes for screws in the top, bottom and back, and glued and screwed these pieces together. Finally, I glued
the front onto the Cajón and lightly sanded the edges.
Although the Cajón worked well and made a
good sound, there were many things which I
needed to change for the final construction. The screws
connecting the sides and front were not all countersunk
evenly, and some were not straight, causing breaks in the
outer layer of the plywood. The sound hole was not centred,
nor was it as big as I had originally intended it to be (120mm).
Because of miscalculation, I ended up with far too many holes
for screws (which I did not use) in the bottom and top pieces.
After some playing, the tapa started to come off – the liquid
nails were not strong enough. Then, once re-glued with wood
glue, this continued to happen until I made the choice to also
screw on the front.
EVALUATION:
Student 23974754
EVALUATION:
This method proved successful and I intend to use a method similar to this for my final Cajón.
In the final design, I plan to only cut the holes 6mm into the 12mm pieces of ply, so that the
dowel is able to swivel, but is not viewable from the outside.
3. After some playing, I was unhappy with the different quality of sound that the Cajón produced when on
different surfaces – it sounded amazing when played on the linoleum in my school’s woodwork room, but
bad when played on carpet. This meant that it needed feet, and although I had not purchased any for the
purpose, I had some very small plastic feet that I was able to add to each corner on the bottom of the
Cajón. This improved the sound when playing on different surfaces.
EVALUATION:
Although these feet mildly improved the sound, there was still a big difference when playing
on different surfaces. I decided that I needed to buy large rubber feet such as the ones used
on other Cajónes.
4. I was also unhappy with the different sounds of the Cajón – the top ‘slap’ sound was too similar to the bass
sound. I did some research, to find that many people had solved this problem by using a thicker piece of
wood for the back. I quickly made a 12mm plywood back to test this, and found that it sounded much
better with the thicker back. Once again, I did not have access to a large enough hole saw nor access to a
track or table saw, and so I attempted to use a scroll saw to cut the hole and the sides for the back.
EVALUATION:
Page 17
Using a scroll saw to cut the hole and sides meant that the hole was not even, and the sides
were not straight. However, this is unimportant as it proved that the idea worked.
Design and Technology MDP: Cajón with Effects
5. In mid-February 2012, I was contacted by Optimum Percussion, who had imported the Cajón pickup that I
wished to use. This meant that I was able to install it. Installation was fairly simple, with a small page of
instructions, which said to place the
microphone on the left side of the Cajón
fairly close to the top and the tapa. The
microphone and battery cable simply
pushed into some pin headers on the
inside of the main casing. I drilled two
holes into the back of my Cajón for the TS
output and volume control to be
mounted, and attached these.
EVALUATION:
9. Having purchased an effects pedal, I began to disassemble it, de-soldering components and extending
their reach using wires. This desoldering process involved heating up the solder joints, and once the
solder became molten, pulling the components pins out of their holes. This was a fairly laborious task,
but was necessary to allow the use of larger and better looking components.
At first I was unimpressed by the sound quality from the microphone, but after using a proper
amplifier instead of my computer to play the sound, the quality increased.
6. I decided to test the different snares that I had bought – the 40 Strand Pearl Drums Snare Wire and the
Puresound Twisted Series Snare against the cheap 20 Strand Pearl Drums Snare Wire. I found that the 40
Strand Pearl Drums Snare Wire sounded the best, I believe because of its larger coverage on the top of the
tapa face.
7. The glue holding the tapa to the front was not working under the pressure, having come apart twice. Not
only this, but it was causing vibrations that reduced the sound quality of the Cajón. I decided to use screws
to attach the tapa to the front, and by doing so, I improved the quality.
EVALUATION:
For the final design, I need to find out how to better screw in screws. Because of the placement
of the screws, very close to the edge, some screws removed pieces of the ply when being
installed, and so reduced the aesthetic quality of the design.
8. I purchased large rubber feet, and screwed them into my Cajón using metal washers so that the screws
would not pull through. This isolated the Cajón from the material it was sitting on, and improved the sound.
Student 23974754
Page 18
Design and Technology MDP: Cajón with Effects
LASER ENGRAVER TEST
A friend of mine owns an EPILOG laser cutter and engraver and was kind
enough to let me use it for this project. I decided to test the laser
engraver, both for the logo and for the back plate, using a spare piece of
plywood.
EVALUATION
Plus
Minus
The logo engraving was a success, and allowed me to
decide how it should be engraved.
The result of engraving the back plate in wood was
disappointing. It is difficult to see the text properly due
to the grain of the wood. For this reason I have
decided not to engrave the wood for the back plate,
and to instead use a two tone plastic panel as the back
plate.
Interesting
The process allowed me to see how laser engraving and cutting worked, and determine that it was appropriate
for the task of the logo on the front of the Cajón.
After this prototype, I conducted some investigation into laser cutting anodized aluminium. Unfortunately this
was not possible using the laser cutter/engraver available to me. I have decided to use two layer plastic, as
used in one of my prototypes for the final Cajón as it was easy to engrave and cut, as well as looking good.
Student 23974754
Page 19
Design and Technology MDP: Cajón with Effects
JOINTS TEST
STAINING TEST
Using an offcut when cutting the sides of my final Cajón, I marked out and tested finger joints. I decided to test
both 17.625mm fingers and 35.25mm fingers. Although I found that the 35.25mm fingers would look much
better, the finger joint cutter owned by the school was unable to cut fingers this big, and so I tested using a
scroll saw and a sharp chisel to cut the fingers straight. This however proved unsuccessful as I was unable to
cut the fingers perfectly straight, as can be seen in the photos below.
I decided to test different stains so I could determine how I wished my final Cajón to look. I tested nine
different stains and compared them to the original wood:
I then had the idea of using mitre joints, which would mean that it was possible for no end grain to be showing
at all. I tested these by asking my teacher to cut some scrap pieces of my 19mm plywood using the track saw.
This was fairly easy, but still looked good and so appeared to be the best choice.
EVALUATION:
EVALUATION:
The 35.25mm fingers were totally unsuccessful – they were not straight and although they did
fit together, it was not neat enough. I decided after this test that any finger joints would be
very difficult and would not look good enough to use.
Student 23974754
Page 20
I was unhappy with the result of the staining test. I did not like any of the stains enough to use
them, and so decided to just use the natural colour of the wood. However, because I ended up
using birch and cedar, they were still coloured and so staining would not have even been
necessary.
Design and Technology MDP: Cajón with Effects
2. Once I had completed this, my teacher cut the wood using a track saw, which is banned for students to
use. Although we could have used a table saw, moving such a heavy sheet through it would have
proved difficult and may not have been as accurate. We began by sawing the long piece, before sawing
each side and top from that. When sawing the long piece, it was important to clamp the track of the
track saw to the wood, to prevent it from moving during the long 2.4m cut.
FINAL CONSTRUCTION
The final Cajón needed to be made exactly how I want it to be. This meant that I needed to learn from the
prototype regarding various issues that arose. For the final Cajón, I planned to:
•
•
•
•
•
•
Use finger joints for the side edges, and butt joints to attach the tapa and back
Glue all joints except for the tapa which will be screwed to the box
Use half-width holes in each side for the snare-dowel to sit into
Countersink the tapa screws evenly
Make a larger and more centred sound hole
Include the components in the rear
CONSTRUCTION
1. Having purchased 2.5mm and 19mm plywood, I was able to begin the final construction by marking out
the wood. I began by marking out a 300 x 480 piece of the 2.5mm ply for the tapa, followed by the rest
of the pieces using the 19mm ply. After marking out however, I realized that I could have marked it out
better, so that the grain almost perfectly followed around the sides, the top and bottom. For this
reason, I erased what I had done and marked out again.
EVALUATION:
EVALUATION:
Although marking out the wood took almost three hours, I was happy with the result. I’m glad
that I realized about how the grain should run before cutting it.
Student 23974754
Page 21
After cutting each part, I re-measured the dimensions to find that one end was about 2mm
wider than the other. This means that there must have been a taper while cutting. Due to
the small size of it, we kept going and hoped that it would not matter for the construction.
Design and Technology MDP: Cajón with Effects
3. I then tested joints, as can be seen above in my joints prototype. This was necessary to determine if I
was skilled enough to use finger joints, so that I would not ruin large pieces of my wood. From this I
determined that mitre joints on all sides except for the tapa would be the best way to do it, meaning
that there would be no end grain showing.
4. I then used a drill press with a 20mm Forstner bit to cut a 9mm deep hole in each side of the drum
approximately 65mm from the front and 175mm from the top so that I could mount the 19mm dowel
for the snare mechanism.
8. I used a trim router, with a small piece of dowel screwed to the flat plate so as to route an arc in the
left side of the Cajón for the snare mechanism bolt to sit in.
By using masking tape on the underside of the cut, I ensured that I would not chip the wood when cutting the
arc. However, as seen in the photo below, somehow the trimmer did not completely cut the
EVALUATION: veneer from the plywood. Using a scalpel, I carefully cut the uncut pieces off, and lightly
sanded the inside of the arch to remove some swarf.
5. Using a tenon saw, I cut a piece of dowel to the correct length, and I used a drum sander to make one
side of the dowel flat, to aid in mounting the snares on the dowel. Finally, I used a sanding block to
ensure that this was totally flat.
6. I began building a linear slot system like I used in my prototype, when my teacher suggested that I use
a rotary mechanism. This meant there would be less parts of wood inside my Cajón, reducing vibration,
as well as being more aesthetically pleasing on the exterior of the drum.
7. Using a tenon saw, I cut a piece of scrap pine timber so that I could make the rotary swing part of the
snare mechanism. I used a 19mm spade bit to cut a hole for the dowel.
Student 23974754
Page 22
Design and Technology MDP: Cajón with Effects
9. I used a biscuit cutter to cut holes for biscuits, to improve the stability of the drum.
10. My teacher and I then used strap clamps, as well as standard clamps to glue my Cajón together.
EVALUATION:
Unfortunately, for unknown reasons, the biscuit holes were not cut in the same place of the
end grain – some were too high and some were too low. For this reason, we were only able
to use two biscuits out of a total 18. Although this was annoying and meant that the box
would not be as strong, I decided to rectify this issue by gluing the 90 degree offcuts from
the mitres.
I let the glue set overnight.
Student 23974754
Page 23
Design and Technology MDP: Cajón with Effects
11. I measured the final height and width of the box so that I could mark out the wood for the tapa. I then
marked out the wood and my teacher cut it with the track saw.
Once I was happy with the design, I transferred the design into Corel Draw, which is a vector graphics
software that the laser cutter is intended to be used with. This transfer was fairly simple, as Corel was
able to import the file that was saved by TurboCad. In Corel, I checked all line widths and holes to
ensure that they remained correctly scaled and would look good in the final product.
12. I used several processes to design a plastic back plate which would have the correct positions and
labels for the controls of the effects. I began by drawing the back plate how I imagined it, and then
translated the design into TurboCad with the correct scale.
For the logo on the front, I had tested the various font sizes earlier in the project, and so I was able to
use only Corel Draw for the logo.
EVALUATION:
Student 23974754
Page 24
There were several other designs that I had made earlier that were discounted because of
the number of controls that the effects used. An earlier design included an on/off button on
the rear, which I found was unnecessary because of the ability to use the output jack as a
switch.
Design and Technology MDP: Cajón with Effects
13. To perform the laser cutting, I travelled to my friend’s business. He owns an Epilog laser cutter that is
capable of engraving and cutting both wood and plastic. Using the pre-cut 2.5mm wood for the tapa, I
engraved my chosen logo centred and close to the bottom. I cut two tapas, just in case something went
wrong with one of them in the finishing process. I used a piece of two-tone plastic to engrave a back
plate for the electronics.
Student 23974754
Page 25
Design and Technology MDP: Cajón with Effects
14. I used a trimmer to cut a 1.5mm deep hole in the rear of the Cajón where I wanted to mount the back
plate. This was necessary to ensure that the back plate sat flush with the wood.
15. Using a sharp knife made from a power-hacksaw blade, I trimmed the edges of the hole to make them
perfectly straight and smooth. I then marked on where the holes for each component need to be
drilled.
16. I used the triangular offcuts from cutting the mitres to reinforce the inside of the box. Because I was
unable to biscuit the joints properly, these offcuts will ensure that the box will not break if a large
amount of weight is placed on the top of it. To clamp these offcuts into place while they were gluing, I
used pieces of 6mm dowel and wedged them into the box as seen in the picture.
Student 23974754
Page 26
Design and Technology MDP: Cajón with Effects
17. Using a drill and various sized drill bits, I drilled holes in the previously routed position so as to allow
the electronic components to pass through. Because of the thickness of the wood, it was necessary that
I countersunk the components on the inside of the Cajón, which required the use of a Forstner bit.
Although I was left with only about 3mm of wood between the inside of the drum and the outside, not
including the back plate, I believe this is enough clearance for the back plate to sit and the mounting to
remain strong.
Again, the plywood was cut, and I drilled holes for the switch mechanism and the LED. I also used a
Forstner bit to hollow out the inside of the plywood to allow for the wire connections to the switch and
LED. I then lacquered the pedal with six coats of polyurethane satin spray-on lacquer.
I drilled a 6.5mm hole for the cable to pass through, before installing all of the electronics.
18. I decided that because of the effects in the Cajón, it was necessary that I make a foot switch to turn
them off and off. I purchased a set of four momentary foot switches for $13.50, and then began looking
at how I should construct the pedal itself. I decided to use two offcut pieces sized 60mm x 110mm of
the 19mm plywood from my drum glued together. I glued these together, and my teacher used the
drop saw with a 30 degree angle to cut the edges.
This ended with a very high, pyramid shaped pedal which I was not happy with and so I rethought the
design. Conveniently, the switch that I purchased fit within one sheet of the plywood; therefore I tested
the design to see if I preferred it.
Student 23974754
Page 27
Design and Technology MDP: Cajón with Effects
19. I drilled a hole in the rear bottom of my Cajón to mount the socket for the foot switch. This allowed the
foot switch to be removable for storage. To do this, I marked out where I wanted the hole. I then drilled
using a 3mm bit, followed by a 12mm Forstner bit for a countersink. I then drilled through the centre to
allow the chassis of the socket to fit through. I also needed to drill using a large Forstner bit on the
inside, as the jack needed a small clearance for it to fit together.
I used a 102mm hole saw to drill the sound hole in my Cajón. I then sanded down the inside of the drum to
remove the harsh texture from the cut.
20. I perfected the length of wire between the components for the effects, using a template that I
made that is the same size as the final product. This means that I was able to get the length of wire
perfectly right. To do this, I used a soldering iron with coloured hookup wire. To perfect the length, I
desoldered the wires from the components, shortened their length, and resoldered them.
I could have saved time and resources had I waited until this step to remove
EVALUATION: components from the printed circuit board. I wasted wire and solder by lengthening
and then shortening the wires. Although this took time, I still believe that it was best
way to do it, as it allowed me to test the effects with my prototype.
Student 23974754
Page 28
Design and Technology MDP: Cajón with Effects
20. I then sanded down the whole Cajón using 180grit, and then 400grit sandpaper to make it smooth.
Using clear polyurethane lacquer, I sprayed the Cajón to give it a clear plastic-feeling coating that
protects it from water and dirt. I repeated the process five times, sanding with 400grit between each
coat.
SAFETY:
It was important to ensure that I lacquered in an area that was not enclosed, as the spray can be
harmful when inhaled. Although I was working outside, I still used eye protection with a face mask
to ensure that I did not come in contact with any of the lacquer.
I decided to try lacquering the tapa of my Cajón with the same clear satin polyurethane. The lacquer takes 8
hours before it can be recoated, and so I sprayed the job once per day. Although I feared that the lacquer
could make the tapa too hard, I wanted to try it anyway to determine if this was true.
EVALUATION:
During the spraying process of the tapa, the weather became bad and there were several days
of rain. This meant that I was unable to continue lacquering my project, as I needed to lacquer
outside.
When the lacquering was finished, I examined the drum and found several large imperfections in the lacquer.
EVALUATION:
Student 23974754
Page 29
I was very disappointed with how the lacquering turned out. As can be seen above, there
were lots of lighter parts of the wood, I believe due to un-sanded glue residue. Although this
seriously affects the aesthetics of the drum, it will not affect the sound quality, and so is not
too much of an issue.
Design and Technology MDP: Cajón with Effects
21. I was then able to install the electronics into the lacquered Cajón. To mount the circuit board, I used three
small nylon standoffs. I drilled through the middle of these to increase the size of the hole, and allow easier
installation.
Student 23974754
Page 30
Design and Technology MDP: Cajón with Effects
22. After installing the electronics, I realized that I had not yet removed the excess metal from the ends of
all the potentiometers. I removed the electronics and used a hacksaw to trim them.
23. I inserted, and attached the plastic back plate which I had laser cut. This plate is attached by the nuts of
the potentiometers and jacks.
After reattaching the electronics, the knobs would fit much more easily.
Student 23974754
Page 31
Design and Technology MDP: Cajón with Effects
24. Next, I installed the feet onto the Cajón. I used 12 Gauge 18mm screws to screw the feet into the
corners of the Cajón.
25. I drilled and countersunk the holes for the tapa of the Cajón. I chose to use the screw placement
common to Meinl Cajónes as I believe that the larger gap in the side screws at the top of the Cajón
allows for a greater reverberation of the ‘high’ sound.
I began by marking out all of the holes. I then tested using a 4mm drill bit to drill each hole, but it
appeared that the bit available was not quite straight. For this reason I used a 3.5mm bit for every hole
first, and then the 4mm bit.
Student 23974754
Page 32
Design and Technology MDP: Cajón with Effects
I then used a countersink bit to countersink every hole to fit the screws that I had bought. I ensured
that they would be below the surface of the tapa so that the player’s hands would not be injured by
screws that were poking out.
26. I then used the tapa as a template to predrill the holes in the box. This predrilling was necessary to
ensure that the wood wouldn’t split as the tapa is screwed in.
EVALUATION:
I wasn’t totally happy with the predrilling into the chassis of the drum. Although most of these
holes were centred, there were several that were a fair bit off. However, none of the holes
were so crooked that the screws protruded on the inside or outside of the drum as was seen
in the prototype, and although some of the screws were not quite straight, this is not obvious.
27. I used a screwdriver to attach the snares to the snare mechanism and to fix the arc piece to the dowel.
EVALUATION:
Student 23974754
Page 33
When I first installed the snares and screwed the tapa on, when the snares were fully
engaged, they could hardly be heard. This varied drastically from my prototype because of the
strength of the 5ply 2.5mm plywood with lacquer. I moved the screw position of the rotary
piece, and so altered the maximum engaged position of the snares. This improved their sound.
Design and Technology MDP: Cajón with Effects
28. I used a portable drill with a screw bit to install the tapa onto the drum.
EVALUATION:
29. Using a square piece of wood and a lathe, I turned a knob to use to turn the snares on and off.
When screwing the tapa on, I found that it did not perfectly fit the rest of the box. Whatever
way that I screwed it, at least one edge was not covered. Although this reduced the
aesthetics of the design, I was unable to fix it. In future, I would have to ensure that all edges
were perfectly square, and this would have been avoided.
I tried playing the Cajón, and was very happy with the sound. I found that using
polyurethane lacquer on the tapa has not negatively affected the sound, as it had the deep
bass sound as well as the high snare sound that I desired.
Student 23974754
Page 34
Design and Technology MDP: Cajón with Effects
30. I was unhappy with the difficulty of turning the snares on and off. To remedy this issue, I removed the
snare mechanism, and added a nut and washers to ensure that there was no movement in the
mechanism itself other than the intended rotation. After doing this, however, it was still hard to rotate,
and so I filed down the thread of the bolt where it was moving through the slot.
EVALUATION:
32. I then tested that everything worked as I thought it should. I began by testing the snares, which worked
much better than they had before, then testing the effects. I found that the effects were
malfunctioning – the feedback time potentiometer was not acting correctly, and the sound of the drum
could only be delayed by two beats. I removed the front and spent several hours testing each
component until I found the malfunctioning potentiometer. I replaced it and the effects worked again.
33. I screwed black anodized knobs onto each potentiometer to allow the player to more easily change
effects. However, I found that some of the knobs that I had purchased did not fit properly.
I was happy with the improved feel of the snares after modifying them. This greatly
improved the functionality of the Cajón.
I had purchased five smaller knobs and one large knob, as I intended to use the large knob for the
mode potentiometer. I found that the smaller knobs were actually made for smaller potentiometers, as
they did not conceal the bolt the same way that the larger one did. I decided to purchase four more
large knobs so that all of the bolts would be covered.
31. I screwed the tapa onto the Cajón again, and sanded the overhanging edges of the drum. By doing this,
I ensured that the player’s hands would not be injured by unsmooth edges when hitting the top of the
front face.
Student 23974754
Page 35
Design and Technology MDP: Cajón with Effects
COMPLETED PRODUCT
Student 23974754
Page 36
Design and Technology MDP: Cajón with Effects
EVALUATION
RECORDING AND APPLICATION OF EVALUATION PROCEDURES THROUGHOUT THE DESIGN PROJECT
These evaluations can be seen throughout the folio, and are identified by the EVALUATION: label.
ANALYSIS AND EVALUATION OF FUNCTIONAL AND AESTHETIC ASPECTS OF DESIGN
The final product successfully fulfilled all the criteria the evaluate success.
FUNCTION
•
Have an easy to use method to adjust the snares while playing the Cajón
The Cajón uses a large knob on the left hand side to engage and disengage the snares. When
disengaged, the snares rest on a piece of felt, so that they will not rattle
•
Produce a snare-drum-like sound when hit at the top, and a bass-drum sound when hit lower down
The Cajón produces a prominent snare sound when hit close to the top, and a lower bass sound when
hit near the lower down.
•
Have inbuilt effects that can improve or modify the sound when manipulated
The Cajón has inbuilt delay and reverb effects that modify the digital output sound. The Cajón has 5
knobs on the rear: tone and feedback, relay time and delay time, mode, balance and volume
•
Feel nice to play
The Cajón feels nice to play because of the smooth finish on the tapa.
AESTHETICS
•
Be aesthetically pleasing – it must look good
The clear satin finish, as well as the colour of the wood itself, makes the Cajon aesthetically pleasing.
The logo on the tapa is centred, as is the sound hole on the rear. The effect backplate is not quite level,
however I believe that this is hardly noticeable and so only minimally affects the aesthetics of the
Cajon.
•
Be unique in design
The logo and back plate of the Cajon allow it to be unique in design. No other Cajon ever produced has
displayed the jw logo on the tapa. I also believe that the colours of the wood I have used are fairly
unique, but although I have never seen another Cajon with similar wood colours, one would assume
that one has been produced.
Student 23974754
FINAL EVALUATION WITH RESPECT TO THE PROJECT’S IMPACT ON THE INDIVIDUAL, SOCIETY AND THE
ENVIRONMENT
INDIVIDUAL
The completed project will allow me to improve my Cajón playing. I can also use it to experiment with different
percussion sounds, and to play with other people. Not only this, but the project as a whole has provided me
with an amazing opportunity to increase my knowledge and skills, particularly in woodworking.
It has been interesting to learn about different types of wood and the different types of sound they produce,
as well as taking apart an effects pedal, and allowing me to see a lot of its inner workings.
SOCIETY
The project has had a minimal impact on society. Many people have helped me to make the project through
the process of giving advice. Additionally, I will no longer need to purchase a commercially manufactured
Cajón if and when I wish to improve my skills or play with other people.
The completed product will positively impact on society through the opportunity it gives others to learn more
about unusual percussion instruments, and their background cultures, as well as to simply enjoy the sounds
that they make.
ENVIRONMENT
As described in Consideration of Design factors on Page 15, there has been a minimal impact on the
environment due to the small amount of resources used for the project.
RELATIONSHIP OF THE FINAL PRODUCT TO THE PROJECT PROPOSAL
I have successfully produced a working Cajón which has an inbuilt pickup and effects. Although I will still be
required to carry a pedal with me when I wish to play the Cajón, the pedal is much smaller and lighter than the
original effects pedal, and will be easier to use, as it only has one button.
Although the method of modifying the effects is somewhat difficult and could be confusing to some, I still
believe that it was my best option, and is the simplest that it could be. However, if the Cajón was to be
commercially produced, an in-depth instruction manual would need to be shipped with the product.
The Cajón can also be played without the effects, and even completely acoustically. Whilst being played like
this, the Cajón still sounds very good and so can be played anywhere – with or without power.
Overall, I am very happy with the completed product – the information and skills that I have gained throughout
the process will benefit me in the years to come, and I have had fun.
Page 37
Design and Technology MDP: Cajón with Effects
BIBLIOGRAPHY
Allans Billy Hyde. (n.d.). Pearl Drums Snare Wire - S032N. Retrieved December 21, 2011, from http://www.allansbillyhyde.com.au/prod/PES032N/Pearl_Drums_Snare_Wire_-_S032N.aspx
Allans Billy Hyde. (n.d.). Pearl Drums Snare Wire - SN1442I. Retrieved December 20, 2011, from http://www.allansbillyhyde.com.au/prod/PESN1442I/Pearl_Drums_Snare_Wire_-_SN1442I.aspx
Allans Billy Hyde. (n.d.). Puresound T1420 14" Twisted Series Snare Wires. Retrieved December 20, 2011, from http://www.allansbillyhyde.com.au/prod/PUT1420/Puresound_T1420_14_Twisted_Series_Snare_Wires.aspx
Amazon. (n.d.). Amazon. Retrieved May 22, 2012, from Amazon.com: Customer Reviews: Meinl Percussion CAJ-PAD Cajon: http://www.amazon.com/Meinl-Percussion-CAJ-PAD-Cajon/product-reviews/B004ML428O
Essential Audio. (n.d.). Speaker Cabinet Rubber Feet - Large. Retrieved April 1, 2012, from http://www.essentialaudio.com.au/contents/en-us/p1031_Cabinet_Feet.html
Gig Gear Australia. (n.d.). Rubber Feet - Set of 4. Retrieved April 1, 2012, from http://www.giggear.com.au/Rubber-Feet-Set-of-4.html
Meinl Percussion. (n.d.). Picture of Foot Pedal Snare Mechanism. Retrieved December 30, 2011, from http://meinlpercussion.com/typo3temp/fl_eshop/@186_bf2c415e525ddf518990b6701cd02bce-700m-600m.png
Meinl. (n.d.). Picture of Meinl Cajon Pad. Retrieved May 22, 2012, from Amazon: http://www.amazon.co.uk/Meinl-CAJPAD-Cajon-Pad-Black/dp/B004ML428O
Roland US. (n.d.). Picture of Boss DD-3. Retrieved December 30, 2012, from http://cms.rolandus.com/assets/images/products/gallery/dd3_gal.jpg
Roland US. (n.d.). Picture of Boss RV-5. Retrieved April 23, 2012, from http://cms.rolandus.com/assets/images/products/gallery/rv5_gal.jpg
Rugged Reviews. (n.d.). Picture of Knob Snare Mechanism. Retrieved December 30, 2011, from http://www.ruggedreviews.com/image/meinl-cajon-5.gif
Schlagwerk. (n.d.). Picture of Schlagwerk Cajon Pad. Retrieved May 22, 2012, from Schlagwerk: http://www.schlagwerk.com/products/cajon-add-ons/cajon-pad/
Youtube User: TheGospelMegaphone. (n.d.). Screenshots from Video: How I made my cajon and adjustable snare . Retrieved December 30, 2011, from http://www.youtube.com/watch?v=z_xoGUGLJ7g
ZZSounds. (n.d.). Picture of Knob Snare Mechanism. Retrieved December 30, 2011, from http://cachepe.zzounds.com/media/quality,85/54439M_2-5-2009-7bdbda717f6f1207de5b90887204a9f2.jpg
Student 23974754
Page 38
Design and Technology MDP: Cajón with Effects