1
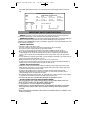
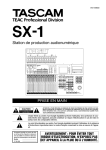
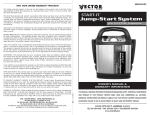
JS450CP ManualEN 062807.qxp
9/26/08
12:42 PM
Page i
JUMP-STARTER WITH INFLATOR
INSTRUCTION MANUAL
Catalog Number JS450CP
Thank you for choosing Black & Decker!
Go to www.BlackandDecker.com/NewOwner
to register your new product
BEFORE RETURNING THIS PRODUCT
FOR ANY REASON PLEASE CALL
1-800-544-6986
BEFORE YOU CALL, HAVE THE CATALOG No, AND DATE CODE
AVAILABLE. IN MOST CASES, A BLACK & DECKER REPRESENTATIVE
CAN RESOLVE THE PROBLEM OVER THE PHONE. IF YOU HAVE A
SUGGESTION OR COMMENT, GIVE US A CALL. YOUR FEEDBACK IS
VITAL TO BLACK & DECKER.
SAVE THIS MANUAL FOR FUTURE REFERENCE.
Cat. # JS450CP
Form # 90519276
June 2007
Copyright © 2007 Black & Decker
Printed in China
JS450CP ManualEN 062807.qxp
9/26/08
12:42 PM
Page 1
SAFETY GUIDELINES / DEFINITIONS
DANGER: Indicates an imminently hazardous situation which, if not avoided, will result in death or serious injury.
WARNING: Indicates a potentially hazardous situation which, if not avoided, could result in death or serious injury.
CAUTION: Indicates a potentially hazardous situation which, if not avoided, may result in minor or moderate injury.
CAUTION: Used without the safety alert symbol indicates potentially hazardous situation which, if not avoided, may result in
property damage.
RISK OF UNSAFE OPERATION. When using tools or equipment, basic safety precautions should always be followed to
reduce the risk of personal injury. Improper operation, maintenance or modification of tools or equipment could result in
serious injury and property damage. There are certain applications for which tools and equipment are designed. Black &
Decker strongly recommends that this product NOT be modified and/or used for any application other than for which it
was designed. Read and understand all warnings and operating instructions before using any tool or equipment.
GENERAL SAFETY WARNINGS AND INSTRUCTIONS FOR ALL APPLIANCES READ ALL INSTRUCTIONS
READ ALL INSTRUCTIONS
WARNING: Read all instructions before operating product. Failure to follow all instructions listed below may
result in electric shock, fire and/or serious injury.
• AVOID DANGEROUS ENVIRONMENTS: Don’t use appliances in damp or wet locations. Don’t use appliances in the rain.
• KEEP CHILDREN AWAY. All visitors should be kept at a distance from work area.
• STORE IDLE APPLIANCES INDOORS. When not in use, appliances should be stored indoors in dry, and high or
locked-up place – out of reach of children.
• DON’T FORCE APPLIANCE. It will do the job better and with less likelihood of a risk of injury at the rate for which it
was designed.
• USE RIGHT APPLIANCE. Do not use the appliance for any job except that for which it is intended.
• DRESS PROPERLY. Do not wear loose clothing or jewelry. They can be caught in moving parts. Rubber gloves
and substantial, non-skid footwear are recommended when working outdoors. Wear protective hair covering to
contain long hair.
• USE SAFETY GLASSES AND OTHER SAFETY EQUIPMENT. Use safety goggles or safety glasses with side shields,
complying with applicable safety standards and, when needed, a face shield. Also use face or dust mask if
operation is dusty. This applies to all persons in the work area. Also use a hard hat, hearing protection, gloves,
safety shoes and dust collection systems when specified or required. Safety glasses or the like are available at
extra cost at your local dealer or Black & Decker Service Center.
• DON’T ABUSE CORD. Never carry appliance by cord or yank it to disconnect from receptacle. Keep cord from heat, oil,
and sharp edges.
• DON’T OVERREACH. Keep proper footing and balance at all times.
• DISCONNECT APPLIANCES. Disconnect the appliance from the power supply when not in use, before servicing,
and when changing accessories such as blades and the like.
• AVOID UNINTENTIONAL STARTING. Don’t carry plugged-in appliance with finger on switch. Be sure switch is off
when plugging in.
• GROUND FAULT CIRCUIT INTERRUPTER (GFCI) protection should be provided on the circuits or outlets to be
used. Receptacles are available having built in GFCI protection and may be used for this measure of safety.
• USE OF ACCESSORIES AND ATTACHMENTS. The use of any accessory or attachment not recommended for use
with this appliance could be hazardous. Note: Refer to the accessory section of this manual for further details.
• S TAY ALERT. Watch what you are doing. Use common sense. Do not operate tool when you are tired.
• CHECK DAMAGED PARTS. Before further use of the tool, a guard or other part that is damaged should be
carefully checked to determine that it will operate properly and perform its intended function. Check for alignment
of moving parts, binding of moving parts, breakage of parts, mounting, and any other conditions that may affect
its operation. A guard or other part that is damaged should be properly repaired or replaced by an authorized
s e rvice center unless otherwise indicated elsewhere in this instruction manual. Have defective switches replaced
by authorized service center. Do not use tool if switch does not turn it on and off.
• DO NOT OPERATE portable electric tools near flammable liquids or in gaseous or explosive atmospheres.
Motors in these tools normally spark, and the sparks might ignite fumes.
• OUTDOOR USE EXTENSION CORDS. When tool is used outdoors, use only extension cords intended for use outdoors
and so marked.
• EXTENSION CORDS. Make sure your extension cord is in good condition. When using an extension cord, be sure to
use one heavy enough to carry the current your product will draw. An undersized cord will cause a drop in line voltage
resulting in loss of power and overheating. The following table shows the correct size to use depending on cord length
1
JS450CP ManualEN 062807.qxp
9/26/08
12:42 PM
Page 2
and nameplate ampere rating. If in doubt, use the next heavier gage. The smaller the gage number, the heavier the
cord.
Minimum Gage for Cord Sets
Total Length of Cord in Feet
Volts
120V
0-25
(0-7,6m)
26-50
(7,6-15,2m)
240V
0-50
51-100
(0-15,2m) (15,2-30,4m)
51-100
(15,2-30,4m)
101-150
(30,4-45,7m)
101-200
(30,4-60,9m)
201-300
(60,9-91,4m)
Ampere Rating
More
Than
0 6 10 12 -
Not more
Than
6
10
12
16
American Wire Gage
18
18
16
14
16
16
16
12
16
14
14
12
14
12
Not Recommended
IMPORTANT SAFETY INSTRUCTIONS
WARNING: This product or its power cord contains lead, a chemical known to the State of California to
cause cancer and birth defect or other reproductive harm. Wash hands after handling.
WARNING: BURST HAZARD: Do not use the unit for charging dry-cell batteries that are commonly used with home
appliances. These batteries may burst and cause injury to persons and damage property. Use the unit for
charging/boosting a LEAD-ACID battery only. It is not intended to supply power to a low-voltage electrical system other
than in a starter-motor application.
WARNING: SHOCK HAZARD:
• If an extension cord is used, make sure that:
a) the pins of extension cord are the same number, size and shape as those in the charger,
b) the extension cord is properly wired and in good electrical condition,
c) the wire size is large enough for the AC rating of the charger as indicated in the table on page 1.
• Do not operate unit with damaged cord or plug; or if the unit has received a sharp blow, been dropped, or
o t h e rwise damaged in any way. Do not disassemble the unit; take it to a qualified service technician when
s e rvice or repair is required. Incorrect reassembly may result in a risk of electric shock or fire, and will void
warranty.
• Use of an attachment not supplied, recommended or sold by manufacturer specifically for use with this unit may
result in a risk of electrical shock and injury to persons.
• NEVER submerge this unit in water; do not expose it to rain, snow or use when wet.
• To reduce risk of electric shock, disconnect the unit from any power source before attempting maintenance or
cleaning. Turning off controls without disconnecting will not reduce this risk.
WARNING: RISK OF EXPLOSIVE GASES
• Working in the vicinity of a lead acid battery is dangerous. Batteries generate explosive gases during normal
battery operation. For this reason, it is of the utmost importance that each time before using the jump-starter
you read this manual and follow instructions exactly.
• To reduce the risk of battery explosion, follow these instructions and those published by the battery
manufacturer and manufacturer of any equipment you intend to use in the vicinity of the battery. Review
cautionary markings on these products and on the engine.
• This equipment employs parts (switches, relays, etc.) that produce arcs or sparks. Therefore, if used in a garage
or enclosed area, the unit MUST be placed not less than 18 inches above the floor.
• THIS UNIT IS NOT FOR USE BY CHILDREN AND SHOULD ONLY BE OPERATED BY ADULTS.
CAUTION: TO REDUCE THE RISK OF INJURY OR PROPERTY DAMAGE:
• Pull cord by plug rather than cord when disconnecting the 120V AC Charging Adapter from the unit.
• NEVER ATTEMPT TO JUMP-START OR CHARGE A FROZEN BATTERY.
• To recharge this unit, use only the supplied AC Charging Adapter.
• Vehicles that have on-board computerized systems may be damaged if vehicle battery is jump-started.
Before jump-starting, read the vehicle’s owner’s manual to confirm that external-starting assistance
is suitable.
• When working with lead acid batteries, always make sure immediate assistance is available in case of
accident or emergency.
2
JS450CP ManualEN 062807.qxp
9/26/08
12:42 PM
Page 3
• Always have protective eyewear when using this product: contact with battery acid may cause
blindness and/or severe burns. Be aware of first aid procedures in case of accidental contact with
b a t t e ry acid.
• Have plenty of fresh water and soap nearby in case battery acid contacts skin.
• If battery acid contacts skin or clothing, wash immediately with soap and water for at least 10
minutes and get medical attention immediately.
• Never smoke or allow a spark or flame in vicinity of vehicle battery, engine or power station
• Remove personal metal items such as rings, bracelets, necklaces and watches when working with a
lead acid battery. A lead acid battery can produce a short circuit current high enough to weld a ring,
or similar metal object, to skin, causing a severe burn.
• Do not wear vinyl clothing when jump-starting a vehicle when jump-starting a vehicle, friction can
cause dangerous static-electrical sparks.
• Jump-start procedures should only be performed in a safe, dry, well-ventilated area.
• Always store battery clamps when not in use. Never touch battery clamps together. This can cause
dangerous sparks, power arcing and/or explosion.
• When using this unit close to the vehicle’s battery and engine, stand the unit on a flat, stable surface,
and be sure to keep all clamps, cords, clothing and body parts away from moving vehicle parts.
• Never allow red and black clamps to touch each other or another common metal conductor — this
could cause damage to the unit and/or create a sparking/explosion hazard.
a) For negative-grounded systems, connect the POSITIVE (RED) clamp to the POSITIVE ungrounded
b a t t e ry post and the NEGATIVE (BLACK) clamp to the vehicle chassis or engine block away from
the battery. Do not connect the clamp to the carburetor, fuel lines or sheet-metal body parts.
Connect to a heavy gauge metal part of the frame or engine block.
b) For positive-grounded systems, connect the NEGATIVE (BLACK) clamp to the NEGATIVE
ungrounded battery post and the POSITIVE (RED) clamp to the vehicle chassis or engine block
away from the battery. Do not connect the clamp to the carburetor, fuel lines or sheet-metal body
parts. Connect to a heavy gauge metal part of the frame or engine block.
• If the connections to the battery’s POSITIVE and NEGATIVE terminals are incorrect, the Reverse
Polarity Indicator will light (red) and the unit will sound a beep. Disconnect clamps and reconnect to
b a t t e ry with correct polarity.
• Always disconnect the negative (Black) jumper cable first, followed by the positive (Red) jumper
cable, except for positive grounded systems.
• Do not expose battery to fire or intense heat since it may explode. Before disposing of the battery,
protect exposed terminals with heavy-duty electrical tape to prevent shorting (shorting can result in
i n j u ry or fire).
• Place this unit as far away from the battery as DC cables permit.
• Never allow battery acid to come in contact with this unit.
• Do not operate this unit in a closed area or restrict ventilation in any way.
• FIRST AID – SKIN: If battery acid comes in contact with skin, rinse immediately with water, then
wash thoroughly with soap and water. If redness, pain, or irritation occurs, seek immediate medical
attention.
EYES: If battery acid comes in contact with eyes, flush eyes immediately, for a minimum of 15
minutes and seek immediate medical attention.
• IMPORTANT: This unit is delivered in a partially charged state. Fully charge unit with a household
extension cord (not supplied) for a full 24 hours before using for the first time. You cannot
overcharge the unit using the AC charging method.
• All ON/OFF switches should be in the OFF position when the unit is charging or not in use. Make sure
all switches are in the OFF position before connection to a power source or load.
• Never insert anything other than the supplied recommended appliance power/recharging cords into
the 12 volt DC power outlet on this unit. Do not use any accessory that is not recommended or
provided by the manufacturer.
• Do not use this unit to operate appliances that need more than 5 amps to operate from the 12 volt
DC accessory outlet.
3
JS450CP ManualEN 062807.qxp
9/26/08
12:42 PM
Page 4
• This system is designed to be used only on vehicles with a 12 volt DC battery system. Do not
connect to a 6 volt or 24 volt battery system.
• This system is not designed to be used as a replacement for a vehicular battery. Do not attempt to
operate a vehicle that does not have a battery installed.
• Excessive engine cranking can damage a vehicle’s starter motor. If the engine fails to start after the
recommended number of attempts, discontinue jump-start procedures and look for other problems
that may need to be corrected.
• Do not use this jump-starter on a watercraft. It is not qualified for marine applications.
• Although this unit contains a non-spillable battery, it is recommended that unit be kept upright
during storage, use and recharging. To avoid possible damage that may shorten the unit’s working
life, protect it from direct sunlight, direct heat and/or moisture.
• Read And Understand This Instruction Manual Before Using This Unit.
SAVE THESE INSTRUCTIONS
WARNING: TO REDUCE THE RISK OF INJURY:
Follow these instructions and those published by the battery manufacturer and manufacturer of any equipment you
intend to use with this unit. Review cautionary markings on these products and on engine.
INTRODUCTION
Thank you for choosing the Power on Board® Jump-Starter With Inflator. This compact jump-starter is
unique in the amount of energy it can supply for its size. The internal battery is a high density sealed, lead-acid
battery that stores and delivers energy comparable to full sized ordinary jump-starters. Please read this guide
carefully before use to ensure optimum performance and avoid damage to the unit or items that you are using it
with.
The Power on Board® Jump-Starter With Inflator is a compact, durable, portable jump-start system for
vehicles that have a standard 12 volt battery system. This self-contained, rechargeable system will start most
vehicles without the need for a host vehicle or 12 volt DC power supply. It can also be used as a portable
source of 12 volt DC electric power in remote locations and/or emergency situations. It is ideal for use with 12
volt DC cordless, portable, rechargeable products and DC/AC power inverters.
FEATURES
•
•
•
•
•
•
•
•
•
•
•
Keyless ON/OFF Power Switch
Cordless/rechargeable
Built-in non-spillable, maintenance-free, heavy duty, sealed, lead-acid battery
Requires no maintenance (other than recharging) for optimum operation
Heavy duty cables and clamps
12 Volt DC Outlet for powering/recharging 12 volt DC appliances
Reverse polarity connection warning indicator
Exclusive cable storage channels keep jumper cables out of the way until needed
Built-in 120 Volt AC Charger (uses a standard extension cord, not included)
Easy-to-read LED battery charge status indicators
Built-in portable inflator for vehicle tires, trailer tires and recreational inflatables
4
JS450CP ManualEN 062807.qxp
9/26/08
12:42 PM
Page 5
Controls and Indicators
4
5
8
6
9
3
2
7
10
1
11
12
13
1.
2.
3.
4.
5.
6.
7.
Front View
Built-in LED Emergency Area Light
Reverse Polarity Indicator
12 Volt DC Outlet
Battery Charge Level Pushbutton
LED Battery Status Indicators
Jump-Starter Power Switch
Area Light Power Switch
8.
9.
10.
11.
12.
13.
14.
14
Back View
Built-in 120 Volt AC Charger
Pressure Gauge
Inflator Power Switch
Negative (–) Black Clamp
Positive (+) Red Clamp
Air Hose
Connector (Chuck)
NOZZLES
Applications
• Jump-start most vehicle batteries with a standard 12 volt DC system: small truck, car, RV, tractor, etc.
• Operate (using 5 amp rated 12 volt DC accessory outlet): 12 volt DC fans, fluorescent worklights, air
compressors, spotlights, TVs, portable radios, cassette or CD players, and more. The unit can quick-charge a
cellular phone by using the phone’s 12 volt DC adapter cord.
• Illuminate areas under the hood, inside tents and work areas.
• Inflate (using inflator) tires, air mattresses, basketballs, volleyballs, and more.
JUMP-STARTER
This Jump-Starter is equipped with an ON/OFF Power Switch. Once the connections are properly made, turn the
switch ON to jump-start the vehicle.
1. Turn OFF vehicle ignition and all accessories (radio, A/C, lights, connected cell phone chargers, etc.). Place
vehicle in “park” and set the emergency brake.
2. Make sure the Jump-Starter Power Switch is turned to OFF.
3. Remove jumper clamps from clamp tabs. Connect the red clamp first, then the black clamp.
5
JS450CP ManualEN 062807.qxp
9/26/08
12:42 PM
Page 6
4. Procedure for jump-starting a NEGATIVE GROUNDED SYSTEM (negative battery terminal is connected to
chassis) (MOST COMMON)
4a. Connect positive (+) red clamp to vehicle battery’s positive terminal.
4b. Connect negative (–) black clamp to chassis or a solid, non-moving, metal vehicle component or body
part. Never clamp directly to negative battery terminal or moving part.
5. Procedure for jump-starting POSITIVE GROUND SYSTEMS
Note: In the rare event that the vehicle to be started has a Positive Grounded System (positive battery terminal
is connected to chassis), replace steps 4a and 4b above with steps 5a and 5b, then proceed to step 6.
5a. Connect negative (–) black clamp to vehicle battery’s negative terminal.
5b. Connect positive (+) red clamp to vehicle chassis or a solid, non-moving, metal vehicle component or body
part. Never clamp directly to Positive battery terminal or moving part.
6. When clamps are connected properly, turn the Jump-Starter Power Switch to ON.
7. Turn ON the ignition and crank the engine in 5-6 second bursts until engine starts.
8. Turn the Jump-Starter Power Switch back to the OFF position.
9. Disconnect the negative (–) engine or chassis clamp first, then disconnect the positive (+) battery clamp.
FOLLOW ALL SAFETY INSTRUCTIONS FOUND IN THIS MANUAL.
CAUTIONS: RISK OF PROPERTY DAMAGE
• If the connections to the battery ’s POSITIVE and NEGATIVE terminals are incorrect, the Reverse Polarity
Indicator will light (red) and the unit will sound a beep. Disconnect clamps and reconnect to battery with
correct polarity.
• If vehicle fails to start, turn OFF the ignition, turn OFF the Jump-Starter Power Switch, disconnect the jump-start
system’s leads and contact a qualified technician to investigate why the engine did not start.
• Recharge this unit fully after each use.
WARNINGS
• Jump-Starter Power Switch should be off prior to jump-starting.
• This power system is to be used ONLY on vehicles with 12 volt DC battery systems.
• Never touch red and black clamps together — this can cause dangerous sparks, power arcing, and/or explosion.
• Vehicles that have on-board computerized systems may be damaged if vehicle battery is jump-started. Before
jump-starting this type of vehicle, read the vehicle manual to confirm that external-starting assistance is advised.
• Excessive engine cranking can damage the vehicle‘s starter motor. If the engine fails to start after the recommended
number of attempts, discontinue jump-start procedure and look for other problems that need to be corrected.
• After use, turn the Jump-Starter Power Switch OFF.
• Replace worn or defective parts immediately — contact the Customer Service Department toll free (800)
544-6986.
12 VOLT DC PORTABLE POWER SUPPLY
This portable power source is also for use with all 12 volt DC accessories equipped with a male accessory
outlet plug and are rated up to 5 amps.
1. Lift up the cover of the unit ‘s 12 volt DC outlet.
2. Insert the 12 volt DC plug from the appliance into the 12 volt accessory outlet on the unit. DO NOT EXCEED
A 5 AMP LOAD.
3. Switch on the appliance and operate as usual.
4. Periodically press the battery charge level pushbutton to check battery status.
EMERGENCY AREA LIGHT
The area light is controlled by the Area Light Power Switch on the front panel of the unit. Make sure the lamp is
turned OFF when the unit is being recharged or stored.
PORTABLE INFLATOR
The built-in 12 volt DC inflator is the ultimate inflator for all vehicle tires, trailer tires and recreational inflatables.
Three different sized nozzles are supplied. Each nozzle will clip on the end of the standard tire valve connector
located at the free end of the inflator hose. The inflator nozzles are stored inside the hose hatch. The inflator
hose with tire fitting is stored in a retaining channel between the jumper cable channels on the rear of the unit.
The ON/OFF Switch is located on the back of the Main Unit. The inflator can operate long enough to fill up to 3
average sized tires before the battery must be recharged.
6
JS450CP ManualEN 062807.qxp
9/26/08
12:42 PM
Page 7
The inflator may be used by removing the air hose from the storage hatch and if required, fitting an appropriate
nozzle to the air hose. An On/Off switch located on the back of the unit controls the power to the inflator and
the gauge light. Refer to the “Controls and Indicators” section on page 5 for locations of inflator hose and
nozzle storage hatch. Return hose to the storage compartment after use.
WARNING: BURST HAZARD
• The inflator is capable of inflating up to 120 pounds per square inch (psi) pressure. To avoid over-inflation,
carefully follow instructions on articles to be inflated. Never exceed recommended pressures. Bursting articles
can cause serious injury.
• Always check pressure with the pressure gauge.
• Never leave the inflator unattended while in use.
CAUTION: RISK OF PROPERTY DAMAGE
Do not operate inflator continuously for extended periods of time (approximately 10 minutes, depending on
ambient temperatures), as it may overheat. In such event, inflator will automatically shut down. Immediately
turn OFF the Inflator Power Switch. Restart after a cooling down period of approximately 10 minutes.
Inflating Tires or Products With Valve Stems
1.
2.
3.
4.
5.
6.
7.
8.
9.
Place connector (chuck) on valve stem.
Ensure connector is pushed on to valve stem as far as possible before closing thumb latch.
Make sure latch is secure.
Turn ON the Inflator Power Switch.
Check pressure with the pressure gauge.
When desired pressure is reached, open thumb latch and remove connector from valve stem.
Turn OFF Inflator Power Switch.
Allow unit to cool before storing away.
Store inflator hose and tire fitting in storage compartment.
Inflating Other Inflatables Without Valve Stems
Inflation of other items requires use of one of the adapters (nozzles).
1. Select the appropriate nozzle, located on the inside back cover.
2. Insert appropriate adapter (i.e. needle) into connector (chuck) and close thumb latch.
3. Small items such as volleyballs, footballs, etc. inflate very rapidly.
4. Insert adapter (i.e., needle) into item to inflate to appropriate pressure.
5. Turn ON the Inflator Power Switch — inflate to desired pressure or fullness.
6. Remove adapter.
7. Switch the Inflator Power Switch OFF.
8. Recharge the unit before storing away.
CARE AND MAINTENANCE
This product has a sealed lead acid battery that should be kept fully charged. Recharge before first use, immediately
after each use, and once a month if not used. Failure to do this may reduce the battery life dramatically.
Note: This unit is delivered in a partially charged state – you must fully charge it before using it for the first time.
Initial AC charge should be for 24 hours.
Charging/Recharging
For maximum battery life, we recommend the Jump-Starter be kept fully charged at all times. If the battery is
allowed to remain in a discharged state, battery life will be shortened.
Note: Recharging battery after each use will prolong battery life; frequent heavy discharges between recharges
and/or overcharging will reduce battery life.
Charging/Recharging Using the 120 Volt AC Charger and
a Standard Household Extension Cord (not included)
1. Lift the AC adapter cover located on the back of the unit and connect an extension cord to the unit. Plug the
other end of the cord into a standard 120 volt AC wall outlet.
2. Charge until three Red and one Green LED Battery Status Indicators light.
7
JS450CP ManualEN 062807.qxp
9/26/08
12:42 PM
Page 8
3. Once fully charged, disconnect the extension cord.
Note: The unit cannot be overcharged using the AC method.
Accessories
Recommended accessories for use with your tool are available from your local dealer or authorized
service center. If you need assistance regarding accessories, please call: 1-800-544-6986.
WARNING: The use of any accessory not recommended for use with this tool could be hazardous.
PostScript Picture
(Warning tirangle)
Service Information
All Black & Decker Service Centers are staffed with trained personnel to provide customers with efficient and
reliable power tool service. Whether you need technical advice, repair, or genuine factory replacement parts,
contact the Black & Decker location nearest you. To find your local service location, refer to the yellow page
directory under "Tools—Electric" or call: 1-800-544-6986 or visit www.blackanddecker.com.
Battery Replacement/Disposal
It is recommended that the unit be returned to manufacturer for battery replacement. Contact Customer
Service, toll-free, at (800) 618-5178.
Battery Disposal
Contains a maintenance-free, sealed, non-spillable, lead acid battery, which must be
disposed of properly. Recycling is required — contact your local authority for
information. Failure to comply with local, state and federal regulations can result in fines
or imprisonment. For more information on recycling this battery, call toll-free (800) 822-8837.
WARNINGS
Do not dispose of the battery in fire, as this may result in an explosion.
Before disposing of the battery, protect exposed terminals with heavy-duty electrical tape to
prevent shorting (shorting can result in injury or fire).
Do not expose battery to fire or intense heat, as it may explode.
FULL TWO-YEAR HOME USE WARRANTY
Black & Decker (U.S.) Inc. warrants this product for two years against any defects in material or
workmanship. The defective product will be replaced or repaired at no charge in either of two ways.
The first, which will result in exchanges only, is to return the product to the retailer from whom it
was purchased (provided that the store is a participating retailer). Returns should be made within
the time period of the retailer’s policy for exchanges (usually 30 to 90 days after the sale). Proof of
purchase may be required. Please check with the retailer for their specific return policy regarding
returns that are beyond the time set for exchanges.
The second option is to take or send the product (prepaid) to a Black & Decker owned or authorized
Service Center for repair or replacement at our option. Proof of purchase may be required. Black &
Decker owned and authorized Service Centers are listed under "Tools-Electric" in the yellow pages of
the phone directory and on our website www.blackanddecker.com.
This warranty does not apply to accessories. This warranty gives you specific legal rights and you
may have other rights which vary from state to state or province to province. Should you have any
questions, contact the manager of your nearest Black & Decker Service Center. This product is not
intended for commercial use.
FREE WARNING LABEL REPLACEMENT: If your warning labels become illegible or are missing, call
1-800-544-6986 for a free replacement.
8
JS450CP ManualEN 062807.qxp
9/26/08
12:42 PM
Page 9
SPECIFICATIONS
Boost Ampere:
Battery Type:
Area Light:
Booster Cables:
A c c e s s o ry Outlet:
450 instantaneous cranking amps
Sealed, high energy density, AGM, lead-acid, rechargeable, maintenance-free,
12 volt DC
Light Emitting Diode (LED)
6 AWG cables with 450 Amps heavy duty clamps
Self-resetting breaker 5 amps
This device complies with part 15 of the FCC rules. Operation is subject to the following two conditions:
(1) This device may not cause harmful interference, and (2) This device must accept any interference
received, including interference that may cause undesired operation.
This equipment has been tested and found to comply with the limits for a Class B digital device, pursuant
to part 15 of the FCC Rules, These limits are designed to provide reasonable protection against harmful
interference to radio communications. However, there is not guarantee that interference to radio or
television reception, with can be determined by turning the equipment off and on, user is encouraged to
try to connect the interference by one or more of the following measures:
• Reorient or relocate the receiving antenna.
• Increase the separation between equipment and receiver.
• Connect equipment into an outlet on a circuit different from that to which the receiver is connected.
• Consult the dealer or an experienced radio/TV technician for help.
Imported by
Black & Decker (U.S.) Inc.,
701 E. Joppa Rd.
Towson, MD 21286 U.S.A.
BD062807
9