1
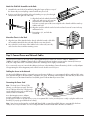
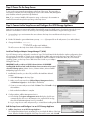
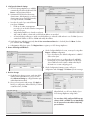
Quick Start Guide and User CD
Kurzanleitung und Benutzer-CD
rápida y
Guía de iniciación
CD del usuario
Guide de mise en route rapide et CD de l’utilisateur
Guida rapida all’uso e CD utente
700i
Series Quick Start Guide
Руководство по быстрой установке и компакт-диск User CD
and User CD
Kurzanleitung und Benutzer-CD
Guía de iniciación rápida y CD del usuario
Guide de mise en route rapide et CD de l’utilisateur
Guida rapida all’uso e CD utente
Руководство по быстрой установке и
компакт-диск User CD
About This Guide
This guide shows you how to install your Snap Server 700i Series in a rack, connect the server to your network, and set up your
iSCSI configuration. The instructions consist of 5 steps:
•
Step 1: Verify the contents of your shipping package and ensure that you are using a supported iSCSI Initiator.
•
Step 2: Install the server in the rack.
•
Step 3: Connect power and network cables.
•
Step 4: Power on the Snap Server.
•
Step 5: Connect to the Snap Server and configure it as an iSCSI Storage Appliance.
Step 1: Verify Contents of the Shipping Package and System Requirements
Before you begin installation, check to make sure you have all the hardware and software components required for your system.
•
Check the contents of your Ship Kit to ensure you have all the components described in Hardware Features.
•
Gather any optional components that you need to complete your system (described below in the Optional Hardware
Components table).
•
Verify that supported operating system(s) and Initiator(s) are installed on your network (see the Snap Server 700i Series
User’s Guide for a complete list).
Optional Hardware Components
Component
Description
Power Supply Upgrade
The Snap Server 720i can be upgraded to a second power supply. The Snap Server 730i
and 750i come with dual power supplies.
APC-brand UPS devices
Snap Servers are designed to work with a USB- or network-based APC-brand UPS. Visit the
APC Web site for a list of APC models to use with your Snap Server.
Memory Upgrades
The Snap Server 720i memory can be upgraded to 2 GB. Memory upgrades are available
in 1GB DIMMs.
Step 2: Install the Server in a Rack
Note The Snap Server 700i Series models can only be mounted in a four-post, 32-inch depth, EIA-compliant rack. A two-post
telco-style rack or a rack less than 32-inches in depth will not support the server.
As shown in the Hardware Features illustration, the Snap Server ships with two slide rail assemblies consisting of inner rails to
attach to the chassis, outer rails to attach to the rack, and a packet of screws for mounting the rails to the chassis and to the rack.
The rails are not universal. They are stamped Left and Right and must be mounted correctly (stamped designation refers to left
and right as you are facing the front of the unit). You will need a Phillips screwdriver to mount the rails and a second person to
help position the Snap Server into the rack.
Attach the Sliders to the Chassis
1 Take the left inner slider and position it on the left side toward the rear of the chassis.
The tongues on the chassis should fit through the rectangular holes on the rail, and the
release mechanism should be facing out.
2 Slide the rail forward, and continue to slide until you can feel that it is attached
securely (see illustration).
3 Fasten with the rail attachment Phillips screw.
4 Repeat Steps 1 through 3 for the right inner slider.
Hardware Features
2 1
9
3 4
5
8 7 6
5
11
eth0
12
MGMT
eth0
17
10
16
13
14 15
19
18
20
21
e
Guid
Start er CD
Quick and Us Benutzer-CD
Guía
e de
Guid
22
rio
g und
del usua
anleitun
ur
Kurz
a y CD
rápid
l’utilisate
ación
te
CD de
de inici
e et
CD uten
so e
e rapid
и
a all’u
en rout
новкеr CD
a rapid
уста
Guid
трой диск Use
быс
о по компакт�
дств
Руково
mise
1 Power button
9 Hot-swappable disk drives (4)
17 Ethernet cables (4) *
2 Reset button
10 Power supply modules (2) *
18 Power cables (2 US, 2 UK, 2 EU)*
3 System status lights
11 eth0 and eth1 Ethernet ports
19 Inner slide rails (2)
4 Disk drive status lights
12 eth2 and eth3 Ethernet ports *
20 Outer slide rails (4)
5 Bezel release mechanisms
13 USB 2.0 ports (2)
21 Rack mount screws
6 Unit ID (UID) light and button
14 Service connector
22 Quick Start Guide and User CD
7 Not active (for future use)
15 Unit ID (UID) light and button
8 LCD (Liquid Crystal Display)
16 SAS connector
* The Snap Server 720i has a single power supply with one power cable (1US, 1UK, 1EU). It also has 3 Ethernet ports with 3 Ethernet cables.
Attach the Slide Rail Assemblies to the Rack
1 Assemble the outer slide rail assemblies by fitting the longer rail piece on top of
the shorter rail piece and pulling outward until the two pieces lock.
2 Position one of the rail assemblies in the rack (making sure you place the rightstamped rail on the right side of the rack).
3 Align the front holes with the front holes
in the rack, and screw a rail screw into
the bottom hole. Note that the rack
holes are not evenly spaced. Be sure to align the rail so that the rail holes match up
with the rack holes.
4 Align the rear holes with the rear holes in the rack and screw rail screws in the top
and bottom holes.
5 Repeat Steps 2, 3, and 4 for the
second rail.
Mount the Chassis in the Rack
1 Align the inner sliders (attached to the chassis) with the front ends of the slide
rail assemblies (attached to the rack) and slide the server into the rack.
2 Line up the holes on the inner sliders with the holes on the rack/outer rails,
and secure the chassis with the remaining screws.
Step 3: Connect Power and Network Cables
The server has four (three on the Snap Server 720i) Gigabit Ethernet ports that can connect to 10BaseT, 100BaseTx, or
1000BaseT networks (a 1000BaseT network will provide best performance). At least one port must be connected; however, a
multi-port configuration offers considerable performance advantages and is highly recommended.
If you connect only one port, it must be the eth0 port (as shown in the Hardware Features illustration), which is used by Adaptec
Storage Manager as the management port but which can also double as an iSCSI port.
Cabling the Server to the Network
Use the provided Ethernet cables to connect the server to the network. When you connect network cables to eth0 and eth1 active
ports, the network lights on the bezel (LAN 1 and LAN 2) are green. The Activity network lights for eth2 and eth3 (located on the
rear of the server on the Network Interface Card) blink green to indicate that the ports are active.
Connecting the Power Cord
Note The Snap Server 730i and 750i
(shown) use a dual power supply. The Snap
Server 720i (not shown) has a single power
supply and will require only one UPS and/or
electrical outlet for installation.
As a data integrity measure, Adaptec
strongly recommends you connect each
power supply module to a separate power source via a separate UPS. Use the provided power cord(s) to plug the modules into
the UPS(s) or properly grounded electrical outlet(s).
Note Snap Servers are designed to work with APC-brand, USB- or network-based UPS devices to automatically shut down
cleanly in case of a power failure. You must configure the APC unit both in ASM and in the APC user interface.
Step 4: Power On the Snap Server
To turn on the server, press the power button on the front of the server. The server takes a
few minutes to initialize. The LCD will display the server’s name and the eth0 (Management
port) IP address when the system has fully initialized.
Power
Note If you connect a SANbloc S50 expansion array, use the array’s documentation to
install and connect the array before powering on the Snap Server.
Step 5: Connect to the Snap Server and Configure the iSCSI Storage Appliance
Snap Servers are preset to acquire an IP address from a DHCP server. If no DHCP server is found on the network, the server
defaults to an IP address of 10.10.10.10 and you should assign a different IP address using the following procedure:
1 Set a machine in your environment to the same subnet as the Snap Server and telnet to the Snap Server: telnet
10.10.10.10
2 Exit the CLI Wizard to get an Administrator prompt: *abort (If prompted for an ID and password, use admin/admin.)
3 Change the IP Address: interface
manage eth0
ip xxx.xxx.xxx.xxx (the new IP Address)
The LCD screen on the Snap Server bezel will show the new IP Address.
Install and Configure Adaptec Storage Manager™ (ASM)
Your iSCSI Storage can be configured in a number of ways. This Quick Start Guide describes the simplest configuration, where
all components are installed on a single server running Windows 2003 and connected to the Snap Server 700i Series iSCSI
Storage Appliance. For more complex network configurations and for installations on Windows Vista, XP, or Linux-based
operating systems, see the Snap Server 700i Series User’s Guide on your Adaptec
OnTarget™ User CD.
IMPORTANT! Install your Microsoft iSCSI Software Initiator v2.05 BEFORE
installing ASM. Download and install the Initiator from www.microsoft.com and
select the following options: Initiator Service, Software Initiator, Microsoft MPIO
Multipathing Support for iSCSI.
1 Install ASM (located on your User CD), and follow the Installation Wizard
prompts:
a. Select iSCSI Storage as the Setup Type.
b. Make sure all component boxes (GUI and Agent, Management Service,
and Windows Support) are checked (this is the default).
d. Create a user name and password and click Next. Then click Install to begin
the installation.
e. Reboot after the installation is complete.
2 Configure ASM to add the Management Service.
a. Launch ASM. The Login to management service dialog box should open
automatically. If it does not, in the Enterprise view, expand iSCSI Storage,
then click the ASM Management Service just installed.
b. Log in, using the user name and password you created when installing ASM.
Add the Snap Server and Configure it as an iSCSI Storage Appliance
1 Add the Snap Server as an iSCSI Storage Appliance.
The Configuration Wizard opens, prompting you to provide the IP address of the Snap
Server. Enter the IP address displayed on the Snap Server LCD screen, and click Add.
2 Configure the Network Settings
a The iSCSI Storage Appliance you added is
automatically selected in the Wizard. Click
Next to configure Network Values.
b Set Network and CLI Values (host name,
domain name, default gateway, up to three
domain name servers, and CLI passwords)
or accept the defaults. Click Next.
c Set values for each of your active Ethernet
ports, then click Next.
•
ETH0 can be either a management
port only or it can double as both a management
and an iSCSI port.
•
Verify that the DHCP box is cleared on each port
and a static IP address, subnet mask, and broadcast address are provided.
•
A Caution displays asking you to make sure the IP address you entered is valid and not in use. Click Yes if you are
certain the IP address is valid or click No and modify the address.
d Set the date, time, and time zone (verify that the Use current date and time box is checked), then click Next. Confirm
your selections and click Apply.
e A Registration dialog box opens. Click Register Now to register your iSCSI Storage Appliance.
2 Create and Configure RAID Pools
a On the Configure RAID Pools screen, create pools using either
Express or Custom configuration.
• If you select Express, the default configuration is a RAID 5
with one hot spare.
• If you select Custom, you configure the pools and RAID
levels based on your system requirements. See the Snap
Server 700i Series User’s Guide or ASM online help for
information on custom-configuring pools.
b On the Configuration Summary screen, verify your
configuration and click Apply. Click Next to provision storage.
3 Provision Storage
a On the Provision Storage screen, set the size, label,
and drive letter information for your pools. Then
select Advanced Settings to configure Partition style
and Authentication method.
b Once you have provisioned storage, click Apply to
finish your configuration. When asked if you want to
create the volume, click Yes.
When finished, you will see a display of your
iSCSI Storage Appliance configuration.
You now have a fully configured iSCSI storage
volume, which is available for use immediately.
You do not need to wait until the build/verify
process finishes.
Copyright © 2007 Adaptec, Inc. All rights reserved worldwide. All
other product names or company names are the property of their
respective owners.
Copyright © 2007 Adaptec, Inc. Alle Rechte weltweit vorbehalten. Alle
anderen Produktnamen und Firmennamen sind Eigentum der jeweiligen
Unternehmen.
Copyright © 2007 Adaptec, Inc. Reservados todos los derechos en
el ámbito internacional. Todos los otros nombres de productos o de
compañías son propiedad de susrespectivos priopietarios.
Copyright © 2007 Adaptec, Inc. Tous droits réservés dans le monde
entier. Tous les autres noms de produit ou de société appartiennent à
leurs détenteurs respectifs.
Copyright © 2007 Adaptec, Inc. Tutti i diritti riservati in tutti i paesi del
mondo. Tutti i nomi di prodotti e società sono di proprietà dei rispettivi
proprietari.
© Adaptec, Inc., 2007. Все права защищены во всех странах.
Прочие названия изделий и компаний являются собственностью
соответствующих владельцев.
70990908-002 Rev A
www.snapserver.com
408-957-2550